
SCD39 - Cd player/recorder LENCO - Free user manual and instructions
Find the device manual for free SCD39 LENCO in PDF.

| Product type | Portable CD player/recorder with FM radio and USB port |
| Brand | Lenco |
| Model | SCD39 |
| Dimensions (W x D x H) | 232 x 227 x 112.5 mm |
| Power supply | AC mains adapter 100-240 V, 50/60 Hz (output 9 V DC 1 A) or 6 C size batteries (UM-2, not included) |
| Power consumption | 9 W |
| FM reception band | 87.5 - 108 MHz |
| Output power | 1.2 W x 2 (at 10% THD) |
| Speaker impedance | 8 Ohms |
| USB port | USB 2.0 |
| Playback formats | Audio CD, MP3 CD, USB flash drive (MP3) |
| Main functions | CD/MP3/USB playback, FM radio with 20 presets, auxiliary input, headphone jack, programmable playback, repeat, shuffle |
| Care and cleaning | Clean with a soft, dry cloth; do not use solvents. For discs, wipe from the center outward. |
| Safety | Do not open the device, do not expose to water or heat, unplug during storms, keep out of reach of children. |
| Spare parts and repairability | No user-serviceable parts. Contact an authorized service center or retailer for repairs. |
| General information | Warranty according to European legislation. Support: www.lenco.com. Manufactured by STL Group BV. |
Frequently Asked Questions - SCD39 LENCO
User questions about SCD39 LENCO
0 question about this device. Answer the ones you know or ask your own.
Ask a new question about this device
Download the instructions for your Cd player/recorder in PDF format for free! Find your manual SCD39 - LENCO and take your electronic device back in hand. On this page are published all the documents necessary for the use of your device. SCD39 by LENCO.
USER MANUAL SCD39 LENCO
Please read and follow these instructions before using your unit.
For information and support, www.lenco.com
Dear customer,
Thank you for buying this Lenco product. Quality and usability is our top priority. In order to let you fully enjoy this product, we have manufactured this product using high quality standards, materials, components and care.
SAFETY INSTRUCTIONS
Read carefully before use.

CAUTION - RISK OF ELECTRICAL SHOCK - DO NOT OPEN

CAUTION: TO PREVENT AN ELECTRICAL SHOCK, DO NOT REMOVE ANY COVER SCREWS. THERE ARE NO USER SERVICEABLE PARTS INSIDE. REQUEST A QUALIFIED SERVICE PERSON TO PERFORM SERVICING.
Keep these instructions in mind:
- Although this device is manufactured with the utmost care and checked several times before leaving the factory, it is still possible that problems may occur, as with all electrical appliances. If you notice smoke, an excessive build-up of heat or any other unexpected phenomena, you should disconnect the plug from the main power socket immediately.
- Do not use this device near water.
- Clean only with a slightly damp cloth.
- Do not cover or block any ventilation opening. When placing the device on a shelf, leave 5cm (2") free space around the whole device.
Install in accordance with the supplied user manual. - Don't step on or pinch the power cord. Be very careful, particularly near the plugs and the cable's exit point. Do not place heavy items on the power cord, which may damage it. Keep the entire device out of children's reach! When playing with the power cable, they can seriously injure themselves.
- Unplug this device during lightning storms or when unused for a long period.
- Keep the device away from heat sources such as radiators, heaters, stoves, candles and other heat-generating products.
- Avoid using the device near strong magnetic fields.
- ESD can disturb normal usage of this device. If so, simply reset and restart the device following the instruction manual. During file transmission, please handle with care and operate in a static-free environment.
- Never insert an object into the product through the vents or openings. High voltage flows thru the product and inserting an object can cause electric shock and/or short circuit internal parts. For the same reason, do not spill water or liquid on the product.
- Do NOT use in wet or moist areas such as bathrooms, steamy kitchens or near swimming pools.
-
Do not use this device when condensation may occur.
-
This device must operate on a power source as specified on the specification label. If you are not sure of the type of power supply used in your home, consult your dealer or local power company.
- The socket outlet must be installed near the equipment and must be easily accessible.
- Do not overload AC outlets or extension cords. Overloading can cause fire or electric shock.
Devices with Class 1 construction should be connected to a main socket outlet with a protective earthed connection.
Devices with Class 2 construction do not require a earthed connection. - Keep away from rodents. Rodents enjoy biting on power cords.
- Always hold the plug when pulling it out of the main supply socket. Do not pull the power cord. This can cause a short circuit.
- Avoid placing the device on any surfaces that may be subject to vibrations or shocks.
- When the device is not in use for long periods, unplug the AC power cable for safety reasons.
- To clean the device, use a soft dry cloth. Do NOT use solvents or petrol based fluids. To remove severe stains, you may use a damp cloth with dilute detergent.
- The supplier is not responsible for damage or lost data caused by malfunction, misuse, modification of the device or battery replacement.
- The marking plate is located at the bottom of the apparatus.
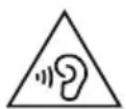
WARNING: Prolonged exposure to loud sounds from personal music players may lead to temporary or permanent hearing loss.

The USB memory stick should be plugged into the unit directly. Don't use an USB extension cable because it can cause interference resulting in failing of data.
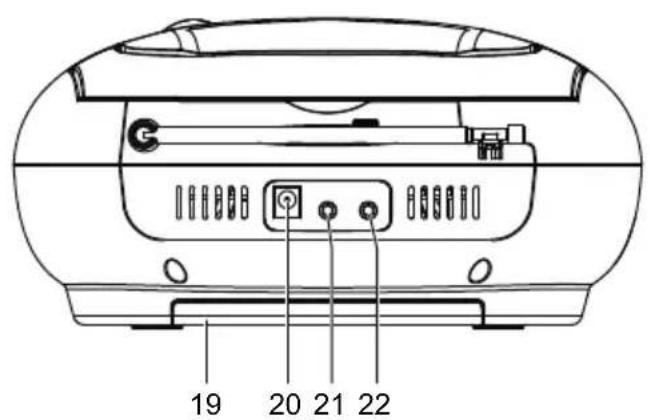
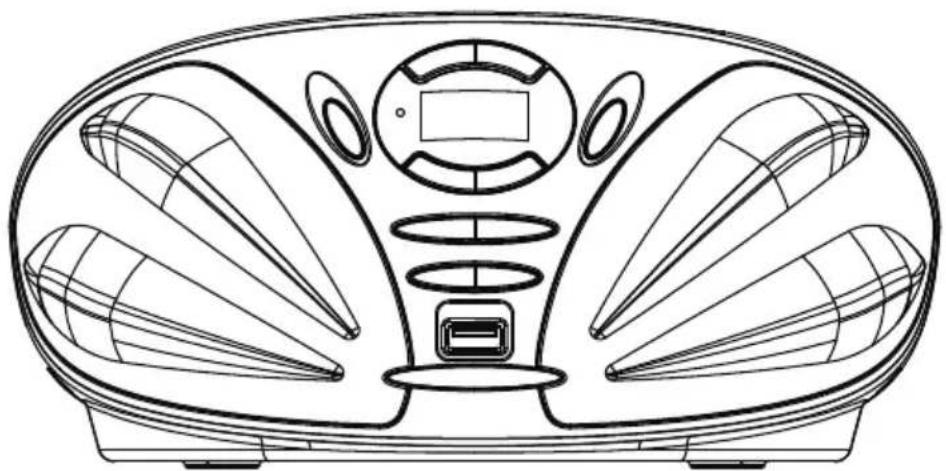
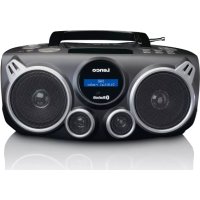
OVERVIEW OF THE PLAYER

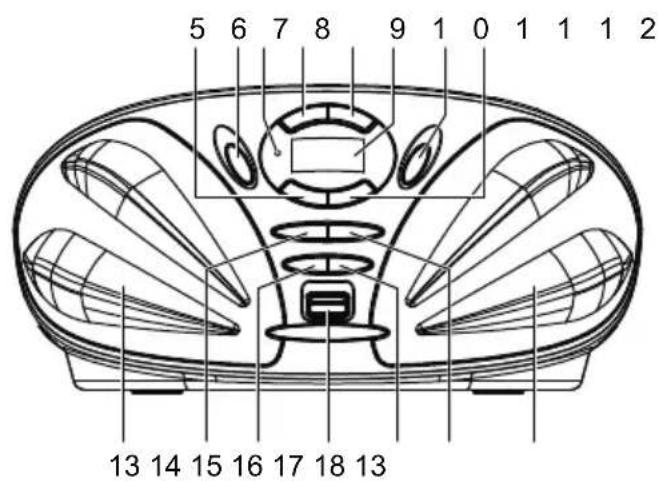
- FOLDING HANDLE
- FM TELESCOPIC ANTENNA
- CD DOOR
- CD DOOR OPEN AREA
- SKIP/SEARCH DOWN BUTTON
- SOURCE BUTTON
- STANDBY INDICATOR
- STOP/CH-B BUTTON
- PLAY/PAUSE/CH+ BUTTON
- LCD DISPLAY
- ON/STANDBY BUTTON
- SKIP/SEARCH UP BUTTON
- SPEAKERS
- MEM/MODE/PROG BUTTON
- VOLUME - BUTTON
- USB PORT
- VOLUME + BUTTON
- FOLDER/10+ BUTTON
- BATTERY COMPARTMENT
- DC IN JACK
- PHONE JACK
- AUX IN JACK
POWER SUPPLY
BATTERY OPERATION
- Remove the battery compartment cover gently.
- Install 6 x 'C' size batteries (UM-2 or equivalent) while observing the correct polarities.
- Replace the battery compartment cover.
NOTE:
- The AC/DC adapter must be detached from the DC IN jack of the player for battery operation.
- Leaking batteries may damage the battery cabinet and the player as a whole, so they should be removed from the cabinet when becoming flat or when the player is not to be played on batteries for some time.
DC INPUT OPERATION
Plug the supplied adapter to the DC IN jack on the unit and the main power.
NOTE:
If not any audio signal inputs to the unit in about one hour, the unit will enter to standby mode automatically (except at FM radio mode).
FM RADIO
TUNING THE FM RADIO
- The standby indicator will light once connect the main unit to the main power. Press the ON/STANDBY button to turn the unit on (the standby indicator will be off).
- Press the SOURCE button repeatedly to switch the unit to radio mode if necessary.
- To launch the auto-searching, press and hold the SKIP/SEARCH DOWN button or SKIP/SEARCH UP button several seconds and then release it.
- Press the SKIP/SEARCH DOWN button or SKIP/SEARCH UP button to tune the radio stations manually.
- Adjust the volume level to a comfortable listening level via pressing the VOLUME +/- buttons.
- Press the ON/STANDBY button to turn off the unit.
NOTE:
- The FM telescopic antenna is directional. When you are receiving an FM broadcast, fully extend the telescopic antenna and rotate it for the best reception.
STORING YOUR FAVORITE RADIO STATION
- Tune to your favorite station first; press the MEM/MODE/PROG button for storing the current station until memory cell number flashes on the screen.
- Use the STOP/CH- button or the PLAY/PAUSE/CH+ button to select the corresponding memory cell among P01-P20.
- Confirm your selection by pressing the MEM/MODE/PROG button.
- During radio playback, press the STOP/CH- button or the PLAY/PAUSE/CH+ button repeatedly to recall the preset stations.
HANDLING AND MAINTENANCE OF A DISC
Follow the instructions below to handle and maintain your disc in order that long time and trouble free performance can possibly be obtained:
- Ensure not to caress the rain bow side of the disc; handle the disc by the edge.
- Long time exposure to sunshine, high temperatures and humidity will damage the disc. And keep storage area clean.
- Avoid sticking labels on both sides of a disc. Writing with pointed articles on the disc should be strictly avoided.
- Clean the disc wiping the centre and then working out to the edge with a dry & soft cloth or a disc brush. Avoid any cleansing lotion or chemical eradicator.
- Store them in their cases when they are not to be used.

- Open the CD door by the Door open area.
- Load a disc on the disc tray with the label side facing up.
- Close the CD door.
PLAY A DISC (CD/MP3)
- Press the ON/STANDBY button to turn the unit on (the standby indicator will be off).
- Press the SOURCE button repeatedly to switch to CD mode.
- Follow the steps above to load a disc.
- The player begins reading disc immediately.
- When the disc is successfully read, the playback will start from the first track automatically.
- Press the PLAY/PAUSE/CH+ button once to halt music playback, press the button again to resume the normal playback; press the STOP/CH- button to cease music playback.
EXTERNAL MEMORY MEDIA OPERATION (USB)
- Press the ON/STANDBY button to turn the unit on (the standby indicator will be off).
- Insert an USB to the USB port.
- Press the SOURCE button repeatedly to switch to USB mode.
- When the inserted USB is detected and read, the first track will be played automatically.
- Press the PLAY/PAUSE/CH+ button to pause or resume the playback.
- Press the STOP/CH- button to cease the playback.
SKIP TRACKS AND SEARCH FOR A SPECIFIC POINT TO PLAY (CD/MP3/USB)
- Press once the SKIP/SEARCH UP button in music play to skip to the next track; press once the SKIP/SEARCH DOWN button in music play to go back to beginning of the current track, press the button twice continuously to skip to the previous track.
-
Press and hold the SKIP/SEARCH UP button or the SKIP/SEARCH DOWN button in music play to search at quick rate for a specific point to play.
-
Press the FOLDER/10+ button once in play to skip to the track 10 tracks ahead, twice to skip to the track 20 tracks ahead. You can reach the last track of the disc using this button.
SKIP TO THE PREVIOUS/NEXT FOLDER (MP3/USB)
- During playback, press and hold the FOLDER/10+ button until the folder number flashes on the screen.
- Press the SKIP/SEARCH DOWN button or SKIP/SEARCH UP button to select the folder you want.
- Wait several seconds or press the FOLDER/10+ button to confirm, the playback starts from the selected folder.
REPEAT PLAYBACK (CD/MP3/USB)
During playback, press the MEM/MODE/PROG button to repeat play a single track; press the button twice to repeat play all tracks; press the button three times to enter the introduction play mode; press the button four times to enter the random play mode; press the button five times to exit.
PROGRAMMED PLAY (CD/MP3 DISC/USB)
- In stop mode, press the MEM/MODE/PROG button once, the program's icon shows with a program sequence indication "P01" first, then a track number flickers on the LCD with the program's icon.
- Select the first track to be programmed using the SKIP/SEARCH UP button or the SKIP/SEARCH DOWN button, and then press the MEM/MODE/PROG button again to store and advance to the next programming step (If there are several folders on the MP3 disc or USB, it is necessary to program folders first and then the tracks. The method of the folders programming is the same as the tracks programming.).
- Repeat the above steps to program more tracks. A maximum of 20 tracks for CD and 99 tracks for MP3 disc/USB can be programmed in memory in a preferred order. If the memory is full, the screen will show "FUL" for indicating.
- Press the PLAY/PAUSE/CH+ button to begin programmed play in the preferred order after you are done with programming. The player stops automatically after all programmed tracks are played.
- You may press the STOP/CH- button to terminate programmed playback. In program stop mode, press the PLAY/PAUSE/CH+ button to begin the programmed playback with the programming order identical with the previous one done; press the STOP/CH- button again to clear the programming.
AUX IN
- Connect the AUX IN jack on the unit to an audio source, for example, MP3 player with an audio cable.
- Power on the unit following the corresponding instructions.
-
Press the SOURCE button repeatedly to switch to AUX mode.
-
Use the native controls on the connected audio device to begin playing music through the connected unit.
STEREOPHONE JACK
A stereo phone jack has been provided on the back side of the player so that you can listen without disturbing others. To use this jack, plug in the headphones/earphones (NOT INCLUDED) and adjust the volume level to a preferred level.
NOTE: When external headphones/earphones are connected, the speakers will be muted.
CAUTION: Listening at high power for a long moment could damage users' ears.
SPECIFICATION
Power requirement .AC power adaptor:
Input: AC 100-240V, 50/60Hz
Output: DC 9V, 1A
DC 9V UM-2/"C" x 6pcs (batteries) - not included
Power consumption 9W
Dimensions Approx. 232(L) X 227(W) X 112.5(H) mm
Operation temperature +5^ +35^
Receiving band FM
Tuning range FM87.5-108MHz
Playback system Compact Disc Digital Audio System
Output power 1.2W x 2 @10% THD
Speaker impedance 8 ohms
USB USB2.0 version
Specifications are subject to change without notice.
SERVICE AND SUPPORT
For information: www.lenco.com
For support: http://lencosupport.zendesk.com
Lenco helpdesk:
Germany 0900-1520530 (Local charges)
The Netherlands 0900-23553626 (Local charges + 1ct p/min)
Belgium 02-6200115 (Local charges)
France 03-81484280 (Local charges)
The helpdesk is accessible from Monday till Friday from 9 AM till 6 PM.
When contacting Lenco, you will always be asked for the model and serial number of your product. The serial number can be found on the back of the device. Please write down the serial number below:
Model: SCD-39 USB
Serial number:
Lenco offers service and warranty in accordance to European law, which means that in case of repairs (both during and after the warranty period) you should contact your local dealer.
Important note: It is not possible to send products that need repairs to Lenco directly.
Important note: If this unit is opened or accessed by a non-official service center in any way, the warranty expires.
This device is not suitable for professional use. In case of professional use, all warranty obligations of the manufacturer will be voided.
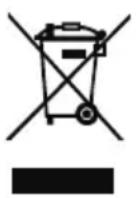
This symbol indicates that the relevant electrical product or battery should not be disposed of as general household waste in Europe. To ensure the correct waste treatment of the product and battery, please dispose them in accordance to any applicable local laws of requirement for disposal of electrical equipment or batteries. In so doing, you will help to conserve natural resources and improve standards of environmental protection in treatment and disposal of electrical waste (Waste Electrical and Electronic Equipment Directive).

Products with the CE marking comply with the EMC Directive (2004/108/EC) and the Low Voltage Directive (2006/95/EC) issued by the Commission of the European Community.
©All rights reserved
www.lenco.com
Lenco
REPRODUCTOR DE CD/MP3 CON RADIO FM PLL FM Y LECTOR DE USB
SCD-39 USB
Guía del usuario

- Dear customer,
- SAFETY INSTRUCTIONS
- Keep these instructions in mind:
- OVERVIEW OF THE PLAYER
- POWER SUPPLY
- BATTERY OPERATION
- NOTE:
- DC INPUT OPERATION
- FM RADIO
- TUNING THE FM RADIO
- STORING YOUR FAVORITE RADIO STATION
- HANDLING AND MAINTENANCE OF A DISC
- PLAY A DISC (CD/MP3)
- EXTERNAL MEMORY MEDIA OPERATION (USB)
- SKIP TRACKS AND SEARCH FOR A SPECIFIC POINT TO PLAY (CD/MP3/USB)
- SKIP TO THE PREVIOUS/NEXT FOLDER (MP3/USB)
- REPEAT PLAYBACK (CD/MP3/USB)
- PROGRAMMED PLAY (CD/MP3 DISC/USB)
- AUX IN
- STEREOPHONE JACK
- SPECIFICATION
- SERVICE AND SUPPORT
- Lenco helpdesk:
- Lenco
- REPRODUCTOR DE CD/MP3 CON RADIO FM PLL FM Y LECTOR DE USB
- Guía del usuario
Brand : LENCO
Model : SCD39
Category : Cd player/recorder