Allure 2 Slice - Toaster RUSSELL HOBBS - Free user manual and instructions
Find the device manual for free Allure 2 Slice RUSSELL HOBBS in PDF.
User questions about Allure 2 Slice RUSSELL HOBBS
0 question about this device. Answer the ones you know or ask your own.
Ask a new question about this device
Download the instructions for your Toaster in PDF format for free! Find your manual Allure 2 Slice - RUSSELL HOBBS and take your electronic device back in hand. On this page are published all the documents necessary for the use of your device. Allure 2 Slice by RUSSELL HOBBS.
USER MANUAL Allure 2 Slice RUSSELL HOBBS
HHCTpyKcnn (bblrapcn)
instructions
50
54
58
62
66
70
74
78
82
86
BaXHbIe Mepbl npeOCTOpOXHOCTn
CneNyTe OCHOBbIM HNcTpyKcIyM No 6e3oNaChOCTn, BKNIOUaY CneDyUOJIne:
1 DeTAM pa3peSeHO NOIb3OBAtbcra yCTPOINCTBOM TOIbKO IOd INPNCMTpOM B3POCNbIX. NcnoJIb3yIte I XpaHInTe np6Op B MeCTax HeIOCTynHbIX DnA DeTei.
2 He norpykaTe np6op B kakyio-n6o KndKocTb; He nCnoIb3yIte erO B BaHHoKOMHaTe, OKOIO BOdbI NII INBHe NOMEueHn.
3Пи Использовани OДНОР pa3bema ДЯTOCTOB,СLEДNTe,чTOбы BO BTOPOI pa3bem HnueRo He nonaLo,Tak KaK o6a pa3bema 6ydyT pa6OuHmN, KOrda pyKoRTka dny cyllnopta onyuSha.
4 YCTaHOBNTe TOCTe BepTKaJIbH0 Ha TBepdYIO, ROpN3OHTaJIbHyIO, TepMOCToKyIO NOBepxHOCTb.
5 He yctaHaBnBaIte npnbop Ha nIIN PAnOM c npeMaTAMN, KOToPbE MOrY TNoIyUHTb NOBpeKdEHNA DaKe BCJeCTBVe BO3DeiCTBua YMepeHHORo TEIIa.
6 Xne6 moKet noDropeb. He nCnoJIb3yIte yCTpOJCTBO pAOM IIN IOI NOI 3aHaBeCKAMN IIN dpyrIMM rOpUChmMaTePnAlamN i CneIITe 3a np6Opom, KOrda OH rOpAyn.
7 06laactb BOKpyr pa3beMOB dny TOCTOB HArpeBaetc OueH b CnIbHO - He TporaTe ee!
8 CneiTe, uTo6bI uHyp He cBewuBaIcra co cTol a HHe haxoIncra Ha npoxoe, rKe o6 Hero MOxHO CNOTKHyTbCra nll 3auePiNTbCra 3a Hero.
9 He hakpbBaIte np6op n He pa3MeaIte Hnueero Ha ero nobepxHocTn.
10 Ecnxne6 cdaBnBaetc, OTKnIOHTe TocTe, daTte emy OCTbITb N OCTOPOXHO BbHbTe Xle6. He nCnoB3yIte octpbl, Bbl MoKeTe NOBpeDNTb 3JeMeHTbl.
11 He noxdapnbaiTe cma3aHHbIe MacnOM n3denn, OHN MOryT 3aRopeTbcra.
12 He nCnoIb3yIe pa3OpBaHHbI, 3aKpyeHHbI nn DeΦopMnPoBaHHbI xIe6, Bbl MoKeTe 3aKlnHHTb TocTeP.
13 OTKIouaIte np6op ot cetn, KOrda He nCNoIb3yTe ee, nepeI nepeHocKo nnu chTko. DaIte emy nonHOCTbIO OCTbITb nepeI quCTKO u xpaHeHem.
14 Yacto ouuau Te TocTep OT KpoWeK, UTo6bl N36eKaTb HaKOpIeHnK pOweK. 3To HeRnRHeHnUHO I MOKeT PpNBecTNI K BO3HNKHOBeHnIO NOJapa.
15 He nCnoB3yIe TocTepe, ecn noDOnH Ira KpoWeK He yCTaHOBJeH n He 3aKpbIt.
16 XpaHnte npnbop n Ka6eIb BdaII NT eKtpnuecknx PnITOK, KOHΦOpOK I rOpEnok.
17 IcnoIb3yIe npu6Op TOnbKO nO Ha3NaYeHnIO.
18 Пибор He может pa60taTb OT BHeшero TaMepa nIN dNCTaHcNOHHOcCnCTeMbI ynpabLeHn.
19 He nCloNoB3yIe np6Op, ecn OH noBpeKdEn nn pa6oTaet c nepe6oAm.
20 Ecn Ka6enb nobpejdeH, OH donxhen 6bItb 3ameHn npOn3BODHTeHem, cepBnchblm areHTOM nn dpyrHM KBaHnOuropoBaHHbIM nIcOM IJIpEDoTbpaueHn ONaCHOCTN.
TOIbKO Ia 6bITOBORIO NcNoJIb3OBAHnA
peepnepBbIM nCnoJb3OBAHHeM npn6opa
1 YcTaHOBInTe yPoBeHb noJxapKn Ha MaKcImMym (6).
2BknHnTe np6Op nnpBeHnB npApOK 3neMeHTOB.
3 MoXeT NOABtbcr He6oBbWOn 3aNaX, HO BONHOBaTbcr He cToNT. OBeCneYbTe xopoSyu BOHTnlaIcNIO KOMHaTbl.
noJkaHnneXle6a
4 YcTaHOBnTe TocTep BepTuKaJIbHo Ha TBepDyIO, Ropu3OHTaJIbHyIO, TepMOCToKyIO NOBepXHOCTb.
5 He yctaHaBnBaIe np6op Ha nIIN PAnOM C ppeMeTAMN, KOToPbIe MOryT NOUyHTb IOBpeJdeHNa DaKe BCNeIDCTBne BO3DeIcTBnY UmepeHHoro TeIIa.
6 Xne6 moKet noIropeTb. He nCnoJIb3yIte yCTpoIcTBo pIOM nII nOJ 3aHaBeckamn IIN dpyrIMN rOpUChmMaTePnaIamn i CneIte 3a np6Opom, KOrda OH rOpAyn.
7 BkIIOUHTe BnIKy Bpo3ETKy.
8 YctaHOBNTe Heo6xOdmyIO CTeneHb 6xapNBaHnC nOMOu bOperyIaTopa (1 = cBeTna, 6 = TEMHa).
9 PonoJxIe6 B pa3bem IJIa TOcTOB (MaKcImaJIbHa TaOnUHa KycKa 25 MM).
10 Haxmnte Ha pbyar Bn3 do ero nonHoro onyueHna.
Oh He 6ydeT 3anept, Noka TocTeP He NoDcoeINHeN K JneKtpueckomy nCTOuHnky.
11 Korda 3TO npOn3oJdeT, TOCT NOckOuyt, n JIeMeHTbI BvIKIOUaTcR.
I3BleueHne
12 UTo6bl OCTaHOBbTb NODKApKy, HaxMMte KnaBnUy ▲. TocNODCKOHT, IN 3JIeMeHtbl BbIKIIOuYaTcR.
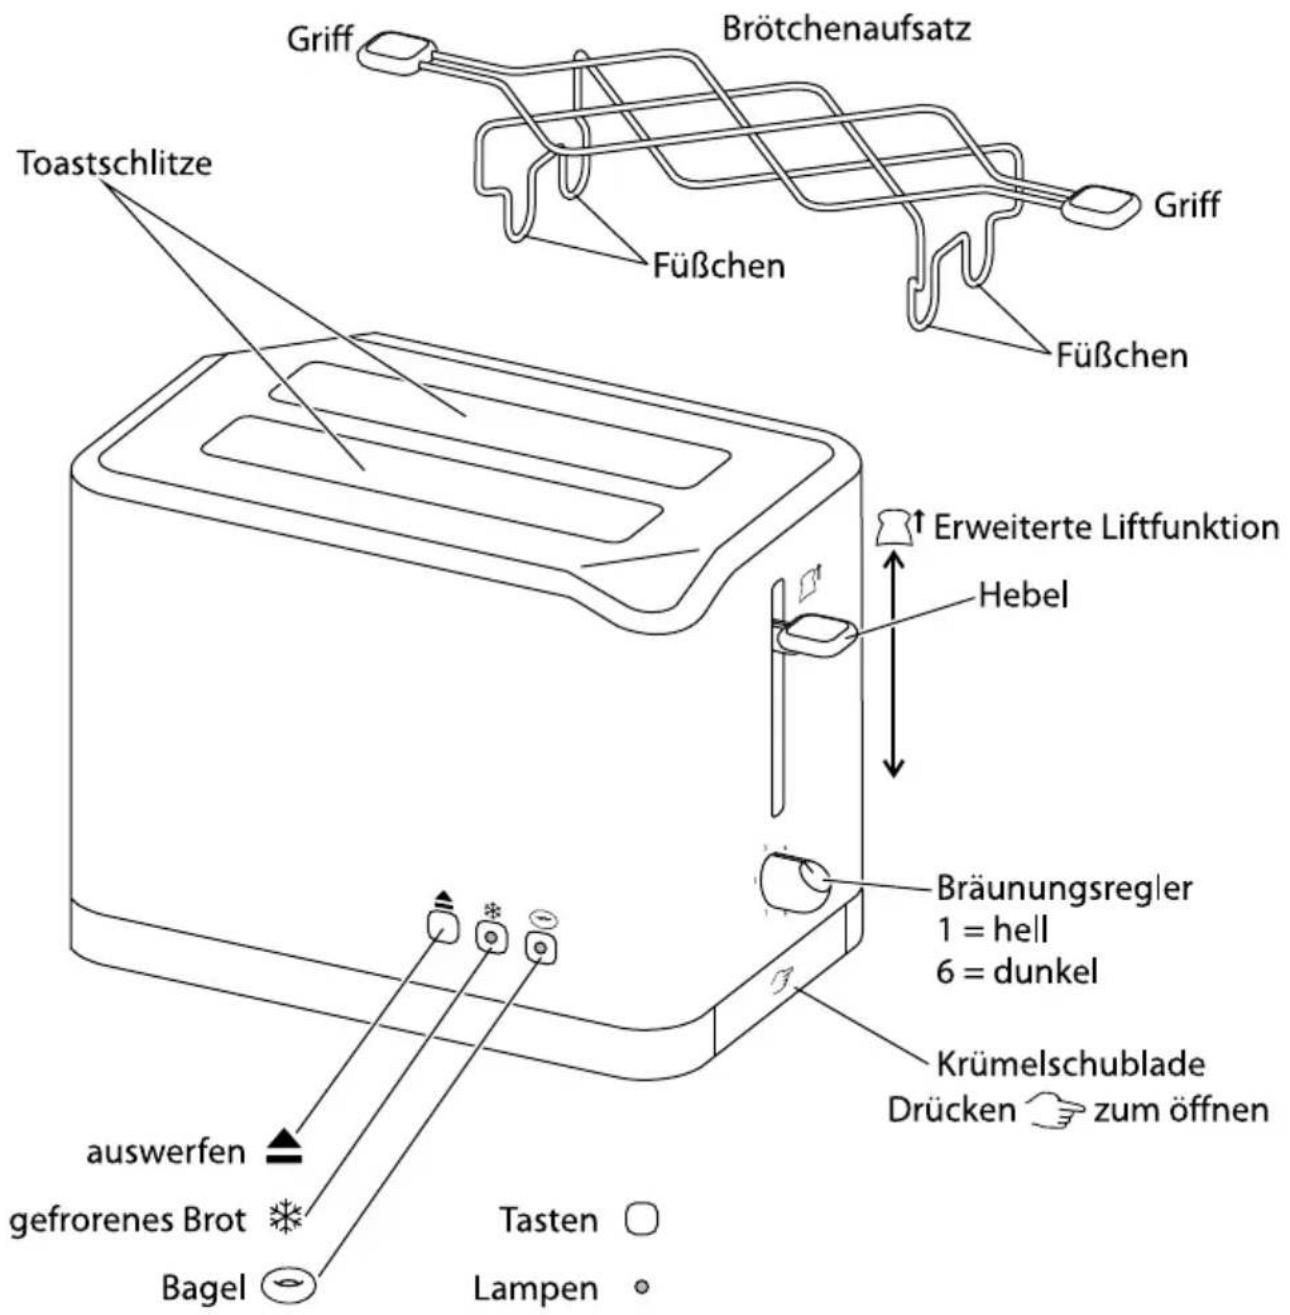
DOnOJIHnteIbHbI NOpBeM
13 Nocne noJxapnBaHnHe6oIbIuX n3eIiN (6y6NIKOB, cO6hIX nbIweK n T,I.) pbUarM OryT 6bITb NOHrTbI, YTO6bl IerKO INX BblHyTb.
3amopoxeHHbI Xne6
14 3To cBoiCTBO pa3pyuMaET npeIIOLOXeHnO nOJaKapuBaHn 3aMOpoxeHHoro Xne6a.
15 OctaBbTe peRyIaTOp noJXapKn Ha npEiNoHTaEMOM Bamn 3HaueHIn, BCTaBbTe 3amOpOKeHHbI XIe6, onyCTnte pbUar, 3aTeM HaxMMte KlaBnUy
16 BkIouHTcBcTOBOHnHnKaTOp, INBpemrnoJXapNBaHnA bTOMaTnueCKn N3MeHnTcN IJI pOnyuHnToJx CeCTeHn noJXapNBaHn, YTO n dJa He3aMOPoKeHHoro Xle6a.
6y6nK
17 Cnedyet noJxapNBaTb TOnbKO BHeuHne KopuHBeBie NOBepXHOCTN 6y6NIKOB, a MrgKne BHyTpEHHne NOBepXHOCTN He dONKbI noJxapNBaTbCra.
18 Pa3peKbTe 6y6nK nONoIam I NOMeCTnTE DBe NIOBnHKn B pa3beMbI JIra TOcTOB KOpUHeBbIMN BHeuHmN CTOpOHaMn B HAnpaBLeHm NcHTpaJIbHbIX 3JIeMeHToB.
19 OctabBe peRyJIaTOp CTeHEn NODJXapINBaHnHa NpeINoUHTaEMOM Bamn 3NaueHn, onyCTnte pbIur, 3aTeM HaxMnte KnaBnUy .Pnp HaxKaTnN 3Toi KnaBnUHn HaRpeBaOTcra TOnbKO ceHTpaJIbHbIe 3JIeMeHTbl
20 3aopntcBcetoboiHndkaTOp 念 ,KOpuHHeBbIe BHeuHne CTOpOHbl 6y6nka nOxaparTcra, a CTOpOHbl pa3pe3a noDorpeIoTcra.
NOBTOPbI NOpOrpeB TOCTa
3aToPnIHe Ha Beue npeneuHn 0nn
21 I3noI3BaIe HaI-HnCKaTa CTepeH. MoXeTe Da 3aToPJIaTe cAmO YnCTn, T.e. 6e3 MaCNo npeneuHn Fnnn.
CTOka 3a 3aTOnPJIHe Ha KInΦJIuYKn
22 CtoiKaTa 3a 3aToIJIHe Ha KnΦJIuKn TpI6Ba Da ce I3NoJ3Ba cMo CbC CTeEN Ha npenNuHa 1.
23 He n3non3BaIte cToiKaTa 3a KnΦlNUcKn 3a 3aTOIIHe Ha 3aMPa3eHn KnΦlNUcKn IIN TaKINBa C rna3ypa, CbC 3axap, HAmazAHN C MaCNO INN C PbNHExK.
24 NocTaBeTe cToiKaTa 3a 3aToIJIHe Ha KnΦJIuKb B rOpHaTa YacT Ha TocTepa, KaTO KpaYeTaTbIa3aT B IpoUeNITe.
25 NocTaBeTe KnΦnUcKInTe BbPxy cToiKaTa 3a 3aToIJaHe.
26 3aaiTe ctenen Ha npennuhe 1, cnei Koeto cnucHe pTuKaTa.
27 Korato pBcKaTa n3ckOuHarope,OTCTpaHeTe 3aToPJIeHnTe KfJInuKn.
28 He JOKOCBaIe XnIe Ha CToIkaTa 3a 3aTOnIaHe - Te ca Iopeu.
29 Празда празимпете Кьм Нормална уnotpe6а на ТOTера, OTCTpaHETe CTOKaTа 3aTOПЯне Ha KIФПИЧК.
CbBETN npenopbKn
30 Ako npenuatae noBuee ot eHa nIa, nIIOJ3BaIte nIaNc eHaKbB pa3Mep, de6eHnHa n npecHOta.
31 CtapnT (BuepaWeH) xIa6 e c no-MaIKo BnaRa, 3aTOBa npi npenuHaHe Toi CTaBA no-xpyknBa.
32 CtapnayxIy6 nnn TbHKnte fnnnn ce npennuat no-6bp3o, OTKoJKOto npecnnyT xIa6 nn ne6eHnte fnnnn.
33 Пюдуктinte OT садко ТсTo (keKcYeTa, плodOBи пITКИ np.се прпчaT MHorO NO-6bp30, OTKOKOTO obNKHOBEHnЯ xIЯ6. 3aTOBa рп Тра6Ba Да ce nI3NoJ3Ba NO-HNCKa CTepeH.
TPOXn
34ПочистваiteТрохITEВTOCTepa peoOBHO,3aДаИЗБERHeTe HaTpynBaHTo IM,Koeto e HexiRnEHNuHOn MoKeДa NOPOIN PnCK OT NOxap.
35 N3KIIIOUeTe TOCTepa OKTaKaTn FO OCTaBeTe Da ce OxnaI.
36 HaTnCHete n OcBO6OJeTe 6yToHa Ha TaBnUkTa 3a TpOxN 3a Da a OTKnIOuHTe.
37 ɪnʒaɪdæteɪ nɪnʒpɑaɪsTe Taɪbɪqkʌtə 3a Tpɔxɪ.
38 NocTeTcBbJxHa Kbpna, NOcCyWeTe I OTHOBa NOCTaBeT BTOCTepa.
39 He n3non3BaIte TocTepe, npeIN TabNcKaTa 3a TPOXn da e npaBnHNO NOCTabeHa n 3aTBOpeHa.
rpxn n noaepbXka
40 N3KJIIOUeTe TOCTepa OT KOHTaKaTaNTO OCTaBeTe da Ce OXnaI.
41ПочирTe BьншиTe NOBbpxHoctn C BlaЖHa Kbpna.Ак e Heo6xOДmo,прложeTe MaNKo KOJIИЧECTBO TeUHOCT 3a MIneHe Ha CbДОВe.
42 He donyckaite haBn3aHe Ha KaKBoto n da 6nlo B npoceHte - TOBa MoKe da nobpei HarpeBaTeIte.
43 He noctabrayte ypea BbB BOda nll B npyra TeuhoCT.
44 He n3noJ3BaITe cInHn nn a6pa3NBn NOcNCTBaUIN npenapaTn nn pa3TBOpuTeJI.
CIMBOJ,3auepkHaTO KoUe 3a 6OkIyK"
3a da ce n36eHaT ekOJOrnUHn n 3dpaBn npo6IeMn nopadn HauNue Ha onaChn cy6ctaHcnn B eJeKTPnueCKnTe n eJeKTPoHN cToKN, ypeDnTe, o6o3NaueHn c To3n CmBOJ, He Tp86Ba Da ce n3XBbPnT 3aeDnC HecOpTnPaHn O6uHnCKn OTnaDbu, a CneBDa da ce BbPHaT 6bpaTHO, Da ce n3NON3BaT OTHOBO nnn peuNKInpaT.
Read the instructions and keep them safe. Pass them on if you pass the appliance on. Remove all packaging, but keep it till you're satisfied that the appliance is working.
important safeguards
Follow basic safety precautions, including:
1 The appliance must only be used by or under the supervision of a responsible adult. Use and store the appliance out of reach of children.
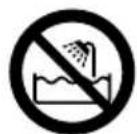
2 Don't put the appliance in liquid, don't use it in a bathroom, near water, or outdoors.
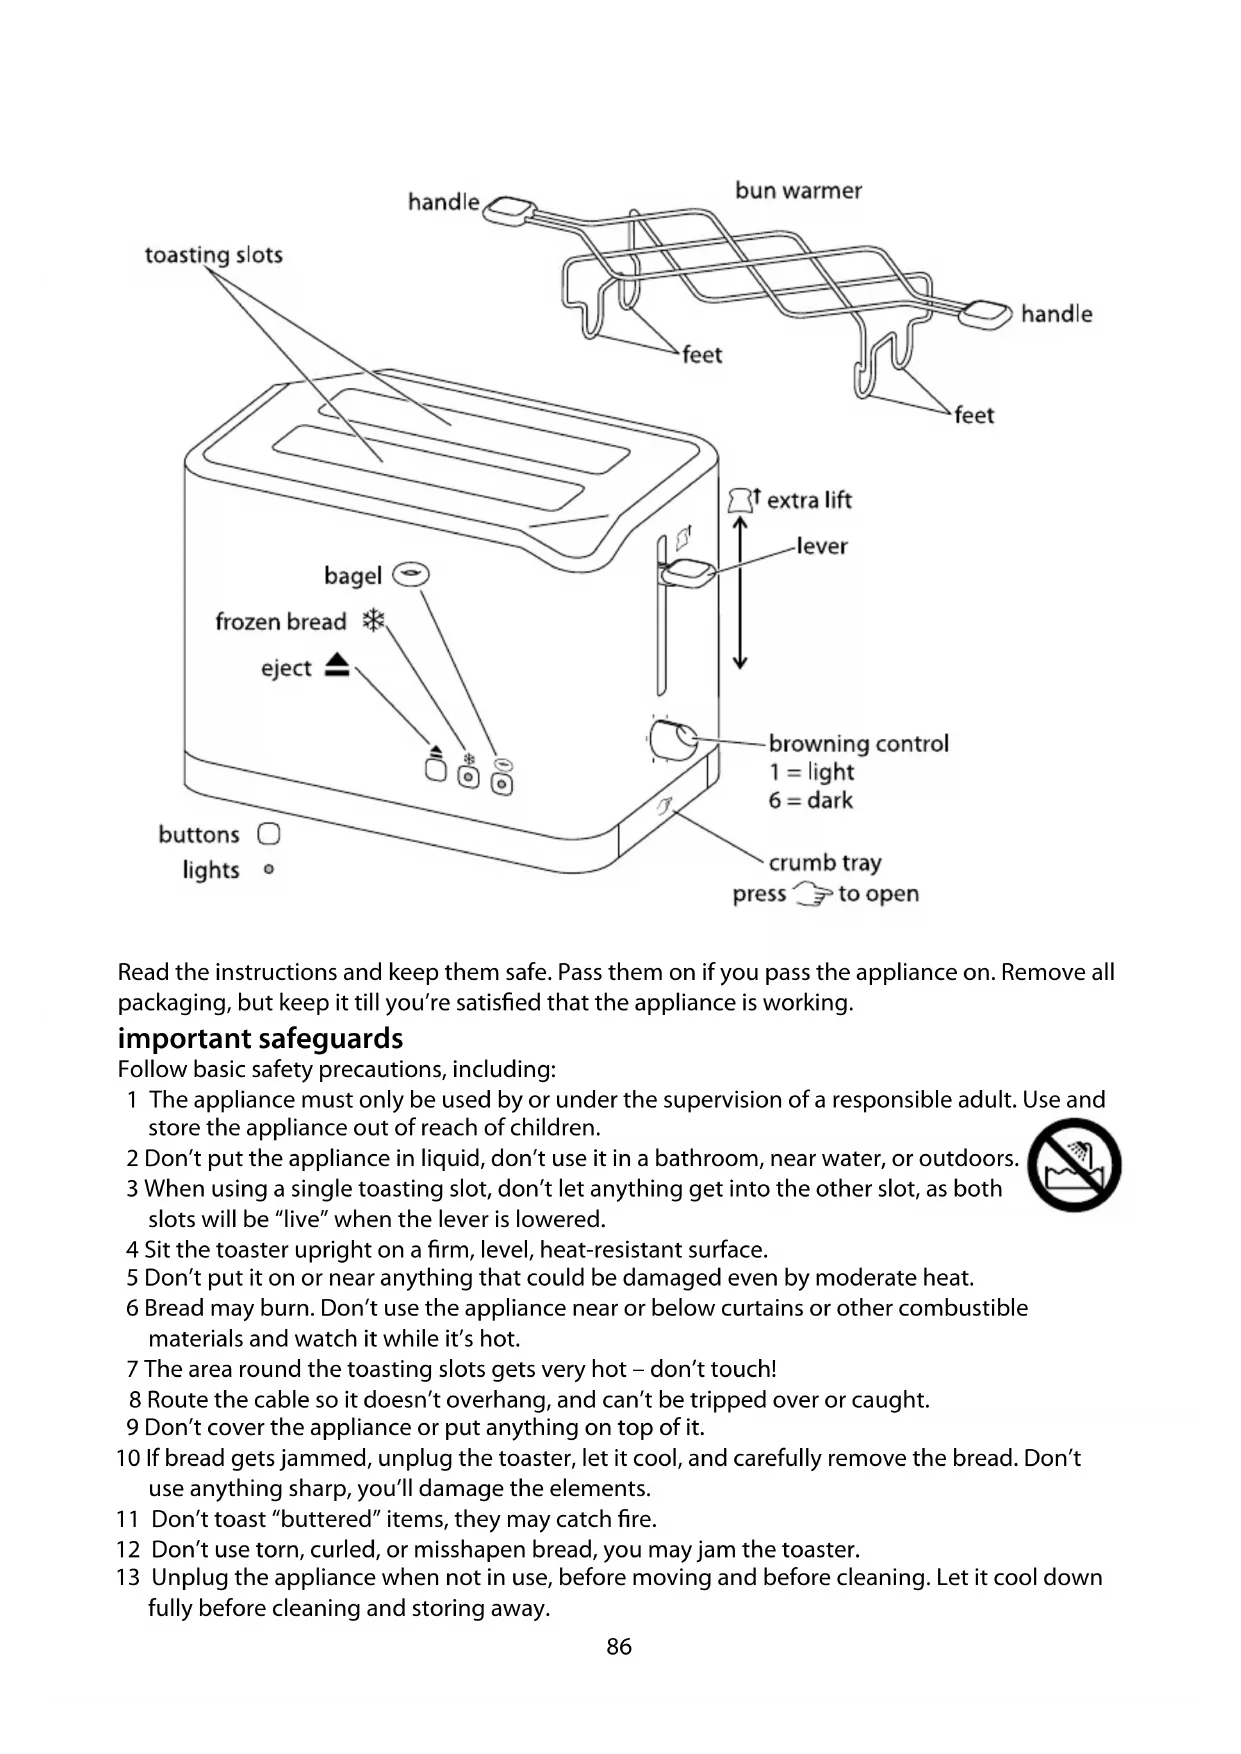
3 When using a single toasting slot, don't let anything get into the other slot, as both slots will be "live" when the lever is lowered.
4 Sit the toaster upright on a firm, level, heat-resistant surface.
5 Don't put it on or near anything that could be damaged even by moderate heat.
6 Bread may burn. Don't use the appliance near or below curtains or other combustible materials and watch it while it's hot.
7 The area round the toasting slots gets very hot – don't touch!
8 Route the cable so it doesn't overhang, and can't be tripped over or caught.
9 Don't cover the appliance or put anything on top of it.
10 If bread gets jammed, unplug the toaster, let it cool, and carefully remove the bread. Don't use anything sharp, you'll damage the elements.
11 Don't toast "buttered" items, they may catch fire.
12 Don't use torn, curled, or misshapen bread, you may jam the toaster.
13 Unplug the appliance when not in use, before moving and before cleaning. Let it cool down fully before cleaning and storing away.
14 Clean the crumbs out of your toaster frequently, to avoid a build up of crumbs. This is unhygienic and could cause a fire hazard.
15 Don't use the toaster unless the crumb tray is fitted and closed.
16 Keep the appliance and the cable away from hotplates, hobs or burners.
17 Don't use the appliance for any purpose other than those described in these instructions.
18 This appliance must not be operated by an external timer or remote control system.
19 Don't operate the appliance if it's damaged or malfunctions.
20 If the cable is damaged, it must be replaced by the manufacturer, its service agent, or someone similarly qualified, in order to avoid hazard.
household use only
before using for the first time
1 Set the browning level to maximum (6).
2. Operate the appliance empty, to cure the new elements.
3 This may smell a bit, but it's nothing to worry about. Ensure the room is well ventilated.
toasting bread
4 Sit the toaster upright on a firm, level, heat-resistant surface.
5 Don't put it on or near anything that could be damaged even by moderate heat.
6 Bread may burn. Don't use the appliance near or below curtains or other combustible materials and watch it while it's hot.
7 Put the plug into the power socket.
8 Turn the browning control to the required setting (1 = light, 6 = dark).
9 Put bread into the toasting slots (maximum thickness 28mm).
10 Press the lever down fully.
It won't lock down unless the toaster is connected to the electricity supply.
11 When it's done, the toast will pop up and the elements will turn off.
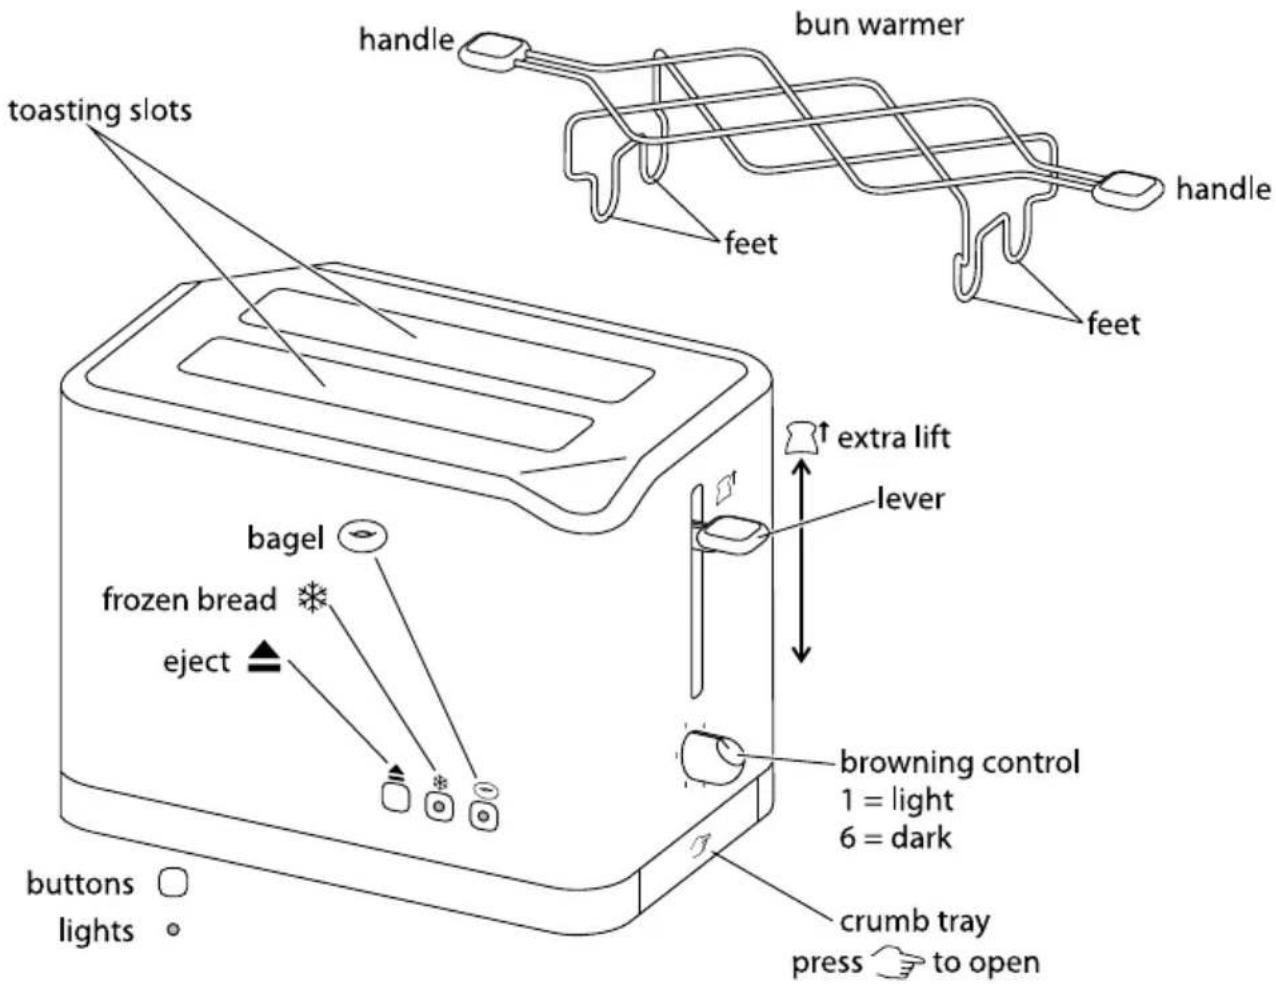
eject
12 To stop toasting, press the button. The toast will pop up, and the elements will turn off.
extra lift
13 After toasting small items (bagels, crumpets, etc.) the lever may be raised further, to allow them to be removed more easily.
frozen bread
14 This feature takes the guesswork out of toasting frozen bread.
15 Leave the browning control at your favoured setting, insert the frozen bread, lower the lever, then press the ※ button.
16 The light will come on, and the toasting time will be altered automatically to give the same degree of browning you get with unfrozen bread.
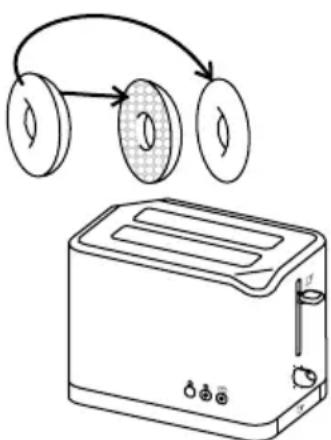
bagel
17 Only the brown outside surfaces of bagels should be toasted, the soft inner surfaces shouldn't be browned.
18 Split your bagel, and put the two halves into the slots with the brown outsides facing the centre elements.
19 Leave the browning control at your favoured setting, lower the lever, then press the button. This heats only the centre elements
20 The light will glow, the brown outsides of the bagel will be toasted, and the cut sides will be warmed.
Reheating toast
21 Use the lowest setting. Only reheat plain, "unbuttered" toast.

bun warmer
22 Use the bun warmer only on browning level 1.
23 Don't use the bun warmer to warm frozen, buttered, coated, iced, or filled buns.
24 Sit the bun warmer on top of the toaster, with the feet inside the slots.
25 Sit the buns on top of the bun warmer.
26 Set the browning level to 1, then lower the lever.
27 When the lever pops up,remove the warmed buns.
28 Don't touch the bun warmer wires - they'll be hot.
29 Remove the bun warmer before using the toaster normally.
Hints and tips
30 If toasting more than one slice, use slices of similar size, thickness and freshness.
31 Old (yesterday's) bread contains less moisture, so makes crispier toast
32 Old or thin bread cooks faster than fresh or thick bread. Use a lower setting
33 Sweet bread products (tea cakes, fruit loaf, etc.) brown much more quickly than ordinary bread, so should be toasted on a lighter setting
crumbs
34 Clean the crumbs out of your toaster frequently, to avoid a build up of crumbs. This is unhygienic and could cause a fire hazard.
35 Unplug the toaster and let it cool down.
36 Press and release the crumb tray to unlock it.
37 Remove and empty the crumb tray.
38 Wipe with a damp cloth, dry, then replace it in the toaster.
39 Don't use the toaster unless the crumb tray is fitted and closed.
care and maintenance
40 Unplug the toaster and let it cool down.
41 Wipe outer surfaces with a damp cloth. If necessary, use a little washing-up liquid.
42 Don't let anything enter the slots, you might damage the elements.
43 Don't put the appliance in water or any other liquid.
44 Don't use harsh or abrasive cleaning agents or solvents.
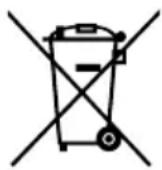
wheelie bin symbol
To avoid environmental and health problems due to hazardous substances in electrical and electronic goods, appliances marked with this symbol mustn't be disposed of with unsorted municipal waste, but recovered, reused, or recycled.