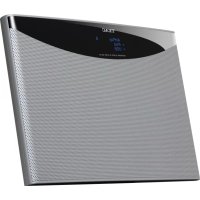
NSX1 - Radio TEAC - Free user manual and instructions
Find the device manual for free NSX1 TEAC in PDF.


| Product Type | AM/FM Radio |
| Brand | Teac |
| Model | NSX1 |
| Dimensions (W x H x D) | 20 x 12 x 15 cm |
| Weight | 0.6 kg |
| Power Supply | Mains 230 V or 4 LR14 batteries (not included) |
| Power Consumption | 8 W |
| Frequency Ranges | FM 87.5-108 MHz, AM 520-1710 kHz |
| Number of Presets | 20 stations (10 FM, 10 AM) |
| Antenna | Telescopic FM antenna, built-in AM ferrite antenna |
| Speaker | 10 cm full-range speaker, 3 W |
| Main Functions | Auto search, manual tuning, clock, alarm, sleep timer, headphone jack |
| Display | Backlit LCD screen |
| Auxiliary Input | 3.5 mm jack socket |
| Headphone Output | 3.5 mm stereo jack socket |
| Care and Cleaning | Disconnect before cleaning. Use a soft, dry cloth. Do not use abrasive products. |
| Safety | Do not expose to moisture, rain or extreme temperatures. Use only the supplied mains adapter. |
| Spare Parts and Repairability | Contact Teac customer service for spare parts. Repair must be carried out by a professional. |
| Included Accessories | Mains cable, instruction manual |
Frequently Asked Questions - NSX1 TEAC
User questions about NSX1 TEAC
0 question about this device. Answer the ones you know or ask your own.
Ask a new question about this device
Download the instructions for your Radio in PDF format for free! Find your manual NSX1 - TEAC and take your electronic device back in hand. On this page are published all the documents necessary for the use of your device. NSX1 by TEAC.
USER MANUAL NSX1 TEAC
IMPORTANT SAFETY INSTRUCTIONS
1) Read these instructions.
2) Keep these instructions.
3) Heed all warnings.
4) Follow all instructions.
5) Do not use this apparatus near water.
6) Clean only with dry cloth.
7) Do not block any ventilation openings. Install in accordance with the manufacturer's instructions.
8) Do not install near any heat sources such as radiators, heat registers, stoves, or other apparatus (including amplifiers) that produce heat.
9) Do not defeat the safety purpose of the polarized or grounding-type plug. A polarized plug has two blades with one wider than the other. A grounding type plug has two blades and a third grounding prong. The wide blade or the third prong are provided for your safety. If the provided plug does not fit into your outlet, consult an electrician for replacement of the obsolete outlet.
10) Protect the power cord from being walked on or pinched particularly at plugs, convenience receptacles, and the point where they exit from the apparatus.
11) Only use attachments/accessories specified by the manufacturer.
12) Use only with the cart, stand, tripod, bracket, or table specified by the manufacturer, or sold with the apparatus. When a cart is used, use caution when moving the cart/apparatus combination to avoid injury from it tipping over.

13) Unplug this apparatus during lightning storms or when unused for long periods of time.
14) Refer all servicing to qualified service personnel. Servicing is required when the apparatus has been damaged in any way, such as if the power-supply cord or plug is damaged, liquid has been spilled on or objects have fallen into the apparatus, the apparatus has been exposed to rain or moisture, it does not operate normally, or it has been dropped.
Caution regarding installation

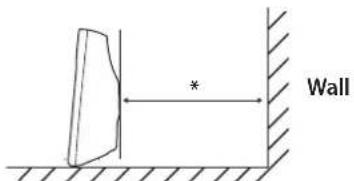
Do not block ventilation openings or stack other equipment on the top.
* Note : For heat dispersal, do not install this unit in a confined space such as a bookcase or similar enclosure.
- Do not expose this apparatus to drips or splashes.
- Do not place any objects filled with liquids, such as vases, on the apparatus.
- Do not install this apparatus in a confined space such as a bookcase or similar unit.
- The apparatus draws nominal non-operating power from the AC outlet with its STANDBY/ON in the standby position.
- The apparatus should be located close enough to the AC outlet so that you can easily reach the power cord plug at any time.
- The mains plug is used as the disconnect device, the disconnect device shall remain readily operable.
- Products with Class I construction are equipped with a power supply cord that has a grounding plug. The cord of such a product must be plugged into an AC outlet that has a protective grounding connection.
- If the product uses batteries (including a battery pack or installed batteries), they should not be exposed to sunshine, fire or excessive heat.
- WARNING for products that use replaceable lithium batteries: there is danger of explosion if a battery is replaced with an incorrect type of battery. Replace only with the same or equivalent type.
- Caution should be taken when using earphones or headphones with the product because excessive sound pressure (volume) from earphones or headphones can cause hearing loss.
WARNING: TO PREVENT FIRE OR SHOCK HAZARD, DO NOT EXPOSE THIS APPLIANCE TO RAIN OR MOISTURE.
CAUTION
- DO NOT REMOVE THE EXTERNAL CASES OR CABINETS TO EXPOSE THE ELECTRONICS. NO USER SERVICEABLE PARTS ARE INSIDE.
- IF YOU ARE EXPERIENCING PROBLEMS WITH THIS PRODUCT, CONTACT TEAC FOR A SERVICE REFERRAL. DO NOT USE THE PRODUCT UNTIL IT HAS BEEN REPAIRED.
- USE OF CONTROLS OR ADJUSTMENTS OR PERFORMANCE OF PROCEDURES OTHER THAN THOSE SPECIFIED HEREIN MAY RESULT IN HAZARDOUS RADIATION EXPOSURE.
For U.S.A.
This equipment has been tested and found to comply with the limits for a Class B digital device, pursuant to Part 15 of the FCC Rules. These limits are designed to provide reasonable protection against harmful interference in a residential installation. This equipment generates, uses, and can radiate radio frequency energy and, if not installed and used in accordance with the instructions, may cause harmful interference to radio communications. However, there is no guarantee that interference will not occur in a particular installation. If this equipment does cause harmful interference to radio or television reception, which can be determined by turning the equipment off and on, the user is encouraged to try to correct the interference by one or more of the following measures:
- Reorient or relocate the equipment and/or the receiving antenna.
- Increase the separation between the equipment and receiver.
- Connect the equipment into an outlet on a circuit different from that to which the receiver is connected.
- Consult the dealer or an experienced radio/TV technician for help.
CAUTION
Changes or modifications to this equipment not expressly approved by TEAC CORPORATION for compliance will void the user's warranty.
For Canada
Industry Canada's Compliance Statement: This Class B digital apparatus complies with Canadian ICES-003. Cet appareil numérique de la classe B est conforme à la norme NMB-003 du Canada.
FOR YOUR SAFETY
| U.S.ACANADA | 120 V |
Units shipped to the U.S.A and CANADA are designed for operation on 120 V AC only. Safety precaution with use of a polarized AC plug. However, some products may be supplied with a nonpolarized plug.
MPEG Layer-3 audio coding technology licensed from Fraunhofer IIS and Thomson.
Wi-Fi ^® is a registered mark of the Wi-Fi Alliance.
The Wi-Fi CERTIFIED Logo is a certification mark of the Wi-Fi Alliance.
This product is protected by certain intellectual property rights of Microsoft. Use or distribution of such technology outside of this product is prohibited without a license from Microsoft.
Windows Media is either a registered trademark or trademark of Microsoft Corporation in the United States and/or other countries.
"Made for iPod" and "Made for iPhone" mean that an electronic accessory has been designed to connect specifically to iPod or iPhone, respectively, and has been certified by the developer to meet Apple performance standards.
Apple is not responsible for the operation of this device or its compliance with safety and regulatory standards. Please note that the use of this accessory with iPod or iPhone may affect wireless performance.
Apple, AirPlay, the AirPlay logo, iPad, iPhone, iPod, iPod classic, iPod nano, and iPod Touch are trademarks of Apple Inc., registered in the U.S. and other countries.
Other company names, product names and logos in this document are the trademarks or registered trademarks of their respective owners.
- Do not expose this apparatus to drips or splashes.
- Do not place any objects filled with liquids, such as vases, on the apparatus.
- Do not install this apparatus in a confined space such as a bookcase or similar unit.
- The apparatus draws nominal non-operating power from the AC outlet with its STANDBY/ON in the standby position.
- The apparatus should be located close enough to the AC outlet so that you can easily reach the power cord plug at any time.
- The mains plug is used as the disconnect device, the disconnect device shall remain readily operable.
- Products with Class I construction are equipped with a power supply cord that has a grounding plug. The cord of such a product must be plugged into an AC outlet that has a protective grounding connection.
- If the product uses batteries (including a battery pack or installed batteries), they should not be exposed to sunshine, fire or excessive heat.
- WARNING for products that use replaceable lithium batteries: there is danger of explosion if a battery is replaced with an incorrect type of battery. Replace only with the same or equivalent type.
- Caution should be taken when using earphones or headphones with the product because excessive sound pressure (volume) from earphones or headphones can cause hearing loss.
For European customers
Disposal of electrical and electronic equipment
(a) All electrical and electronic equipment should be disposed of separately from the municipal waste stream via collection facilities designated by the government or local authorities.
(b) By disposing of electrical and electronic equipment correctly, you will help save valuable resources and prevent any potential negative effects on human health and the environment.
(c) Improper disposal of waste electrical and electronic equipment can have serious effects on the environment and human health because of the presence of hazardous substances in the equipment.
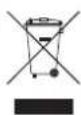
(d) The Waste Electrical and Electronic Equipment (WEEE) symbol, which shows a wheeled bin that has been crossed out, indicates that electrical and electronic equipment must be collected and disposed of separately from household waste.
(e) Return and collection systems are available to end users. For more detailed information about the disposal of old electrical and electronic equipment, please contact your city office, waste disposal service or the shop where you purchased the equipment.
Disposal of batteries and/or accumulators
(a) Waste batteries and/or accumulators should be disposed of separately from the municipal waste stream via collection facilities designated by the government or local authorities.
(b) By disposing of waste batteries and/or accumulators correctly, you will help save valuable resources and prevent any potential negative effects on human health and the environment.
(c) Improper disposal of waste batteries and/or accumulators can have serious effects on the environment and human health because of the presence of hazardous substances in them.
(d) The WEEE symbol, which shows a wheeled bin that has been crossed out, indicates that batteries and/or accumulators must be collected and disposed of separately from household waste.
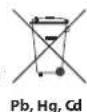
If a battery or accumulator contains more than the specified values of lead (Pb), mercury (Hg), and/or cadmium (Cd) as defined in the Battery Directive (2006/66/EC), then the chemical symbols for those elements will be indicated beneath the WEEE symbol.
(e) Return and collection systems are available to end users. For more detailed information about the disposal of waste batteries and/or accumulators, please contact your city office, waste disposal service or the shop where you purchased them.
Contents Before Using
Thank you for choosing this TEAC product. Read this manual carefully to get the best performance from this unit.
Before Using the Unit 5
Remote Control Unit 6
Identifying the Parts (Main Unit)....7
Identifying the Parts (Remote Control Unit) 8
Connections 9
Music Setting 12
iPod/iPhone 14
Internet Radio 15
Using Music Streaming 17
AirPlay....18
FM 19
AUX 21
Settings 22
Troubleshooting 29
Specifications 31
e Unit (1)
What's in the box
Confirm that the standard accessories are included.
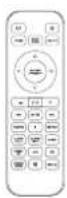
Remote control RC-1287 x 1
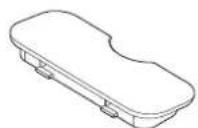
Battery CR-2025 x 1

Cover x 1
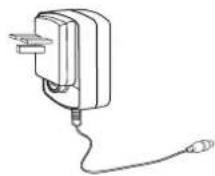
Power adapter x 1
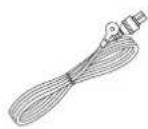
FM wire antenna x 1
Owner's manual (this document) x 1
Keep this manual in a safe place for future reference ●
Warranty card x 1
Before Using the Unit (2)
Placement of the unit
Choose the installation location of your unit carefully. Avoid placing it in direct sunlight or close to a source of heat. You should also avoid locations that are subject to vibration, excessive dust, heat, cold or moisture.
As the unit may become warm during operation, always leave sufficient space around it for ventilation.
Do not place the unit on a amplifier, a receiver or any other device that generates heat.
When the unit is turned on, if a TV is turned on nearby lines might appear on the TV screen depending on the frequency of the TV broadcast. This is not a malfunction of the unit or the TV. If you see such lines, move the unit and the TV further apart.
Installing the unit on a wall
You can mount the product on the wall using two grooves on the back.
1 Connect the power cable.
2 Measure the distance between the 2 grooves and transfer it to the wall. Drill two holes at the marked points, and then insert two wall plugs and screws in the wall.
3 Mount the unit.
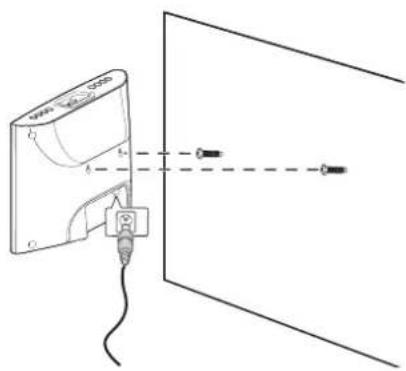
When choosing the anchors and screws, be sure that the head of the screws fit into the grooves on the rear of the unit.
Remote Control Unit
Inserting the battery
1 Open the battery tray.
2 Insert the included CR2025 battery into the battery tray.
3 Close the battery tray.
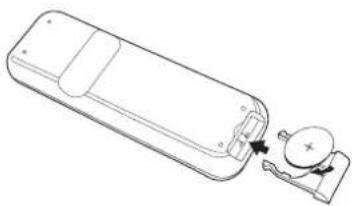
natural_image
Line drawing of a remote control device with a connector inserted (no text or symbols)Make sure that the "+" on the battery faces up when you insert the battery with the rear side of the remote control facing up as shown in the above image.
Caution
Remove the battery when it is not used for a long time.
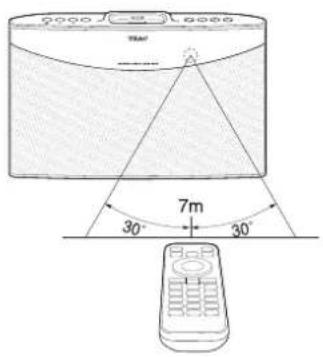
Operating range of the remote control
Use the remote control within a range of about 7 m (23 feet) and angles of up to 30° aiming at the remote control sensor.
Front and rear parts
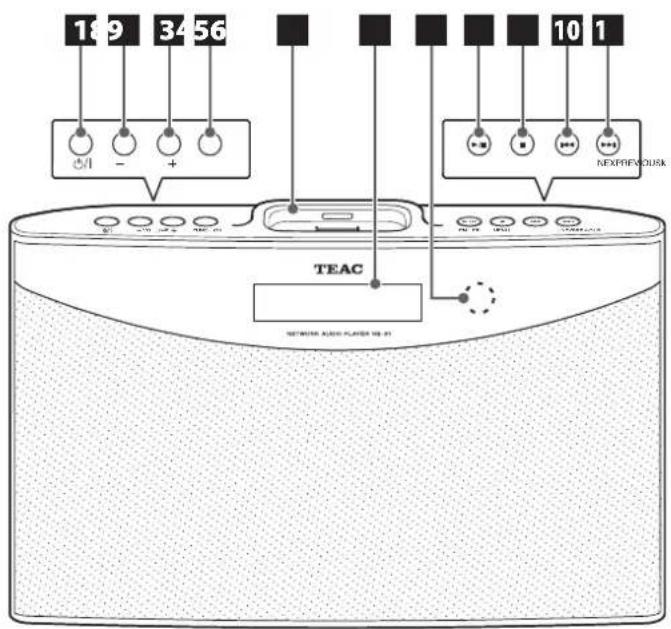
1 STANDBY/ON (⏻/l) button
Press this button to turn the unit on or put it into standby.
2 VOLUME - button
Press this button to turn down the volume.
3 VOLUME + button
Press this button to turn up the volume.
4 FUNCTION button
Press this button to select an input source.
5 iPod/iPhone dock
6 Display
7 Remote control sensor
8 ▶/II (ENTER) button
Press this button to play or pause music.
Use this button as well to enter or select a menu.
9 ■ (HOME MENU) button
Press and hold this button to go to the Home menu.
10 (PREVIOUS) button
Press this button to play the current song from the beginning. Use this button as well to move up the menu.
11 ▶▶▶ (NEXT) button
Press this button to skip to the next music
Use this button as well to move down the menu.
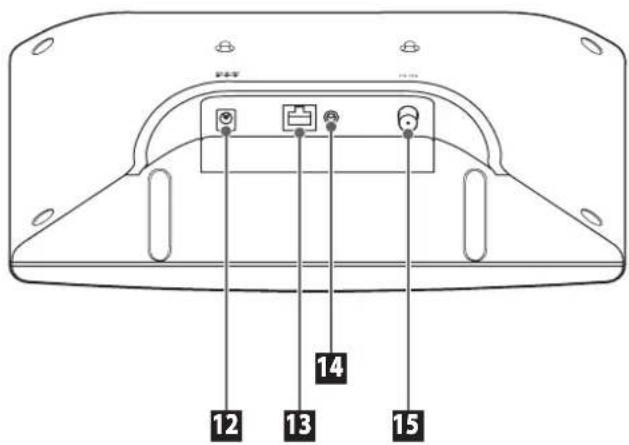
12 DC IN port
13 ETHERNET port
14 AUX IN jack
15 FM antenna terminal
flowchart
graph TD
    A["STANDBY/ON"] --> B["HOME"]
    B --> C["BOOK MARK"]
    C --> D["ENTER (PRESET)"]
    D --> E["FUNCTION"]
    E --> F["CLOCK (ADJ)"]
    F --> G["ALARM (SET)"]
    G --> H["SLEEP"]
    H --> I["PRESET EQ"]
    I --> J["STEREO/MONO"]
    J --> K["DISPLAY"]
    style A fill:#f9f,stroke:#333
    style K fill:#f9f,stroke:#333
    style D fill:#ccf,stroke:#333
    style E fill:#cfc,stroke:#333
    style F fill:#fcc,stroke:#333
    style G fill:#cff,stroke:#333
    style H fill:#ffc,stroke:#333
    style I fill:#fcf,stroke:#333
    style J fill:#cff,stroke:#333
    style K fill:#ffc,stroke:#333
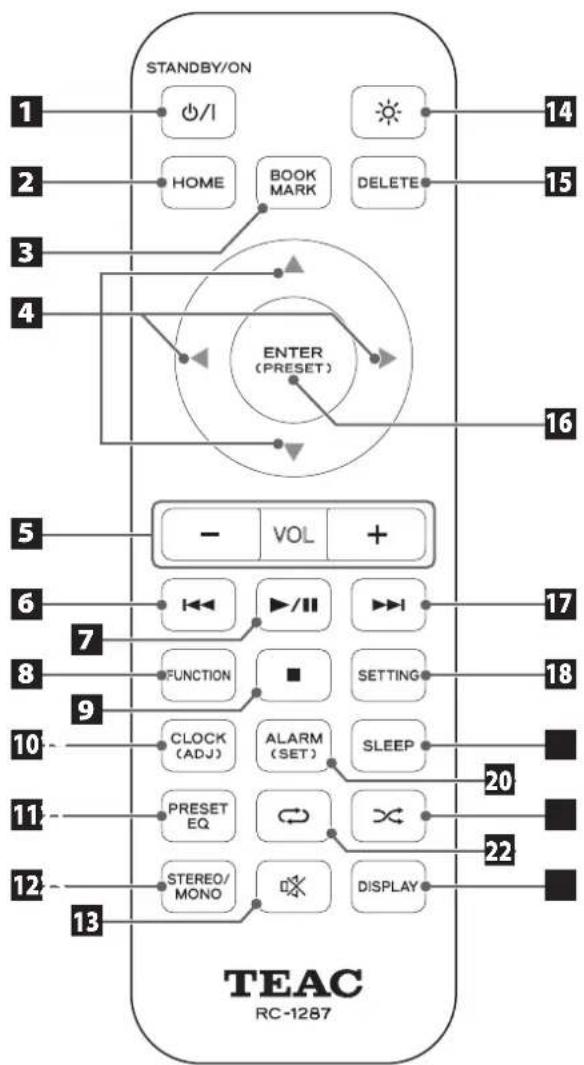
1 STANDBY/ON ( ⏻/l ) button
Press this button to turn the unit on or put it into standby.
2 HOME button
Press this button to go to the Home menu.
3 BOOKMARK
Press this button to add a bookmark to your Internet radio stations list.
Use this button as well to go to the Bookmark list (in Home menu).
4 UP(▲), DOWN(▼), LEFT(◀), RIGHT(▶)
To move up, down, left or right on the menu, press the corresponding arrow button.
5 VOL -/+
Press this button to turn the volume down or up.
6 PREVIOUS (1)
Press this button to search a frequency (in FM tune or preset) Use this button as well to play the current song from the beginning (in music)
7 PLAY/PAUSE (▶ /II)
Press this button to play or pause music.
8 FUNCTION
Press this button to select an input source (iPod / Net Radio / MUSIC SERVER / FM / AUX).
9 STOP (■)
Press this button to stop playback of the music. Use this button as well to select an FM tuning mode (Auto/Manual/Preset).
10 CLOCK (ADJ)
Press this button to check the time. To set the clock, press and hold this button.
To set the clock, you must have your unit connected to the Internet.
11 PRESET EQ
Press this button to change the preset EQ setting (Flat/Rock/Pop/Classic/Jazz/Talk).
12 STEREO/MONO
Select Stereo / Mono (in FM)
Connections (1)
13 MUTE (※)
Press this button to mute the sound.
14 DIMMER (☀️)
Press this button to adjust the brightness of the display (Normal / Dark / Very dark).
15 DELETE
Press this button to delete a bookmark from your bookmark list.
16 ENTER (PRESET)
Press this button to select or save (menu / setting). To start auto preset, press and hold this button in FM mode.
17 NEXT (▶▶▶)
Press this button to search frequency (in FM tune or preset). Use this button as well to select the next song (in music).
18 SETTING
Press this button to go to the setting menu.
19 SLEEP
Press this button to set the sleep timer (OFF / 120 / 90 / 60 / 45 / 30 / 15).
20 ALARM (SET)
Press this button to check the alarm setting. To set the alarm timer, press and hold this button.
21 SHUFFLE (∞)
Press this button to set the Shuffle (Random play) mode.
22 REPEAT ( ⇌ )
Press this button to set the repeat option (All / 1 / Off).
23 DISPLAY
Press this button to check the information about the music.
Connecting the iPod/iPhone
1 Attach the dock adapter (supplied with the iPod/iPhone) to the unit.
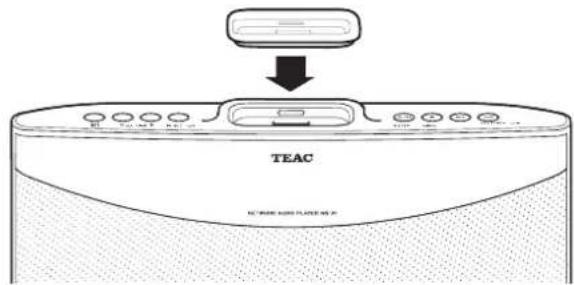
- Your dock adapter may look different from the above illustration depending on the model.
2 Connect the iPod/iPhone to the unit.
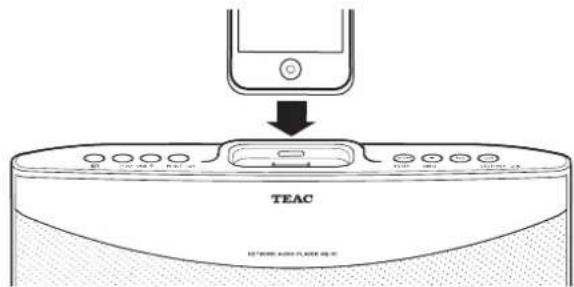
The following iPod/iPhone models are compatible with this unit: iPod classic.
●Pod nano (1st, 2nd, 3rd, 4th, 5th, and 6th generation)
Pod touch (1st, 2nd, 3rd, and 4th generation)
●Phone 4, iPhone 3GS, iPhone 3G, iPhone
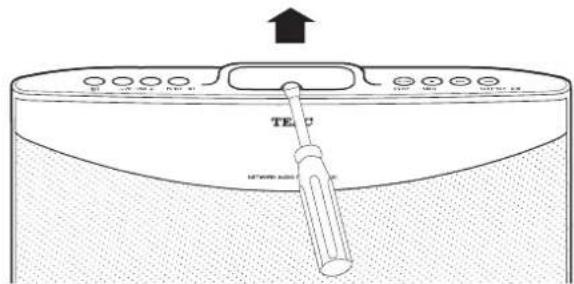
Disconnecting the dock adapter
Insert a flat screwdriver into the slit on the dock adapter and lift it.
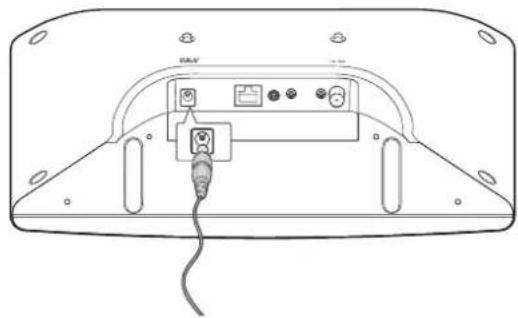
Connecting the power
1 Connect one end of the power adapter to DC IN 12V.
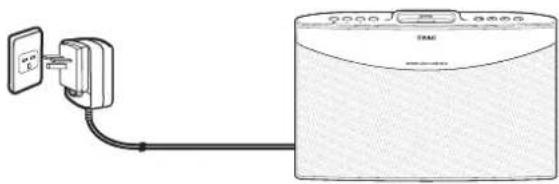
natural_image
Back view of a device rear panel with cable and connector (no text or symbols visible)2 Connect the power plug to the AC wall socket.
natural_image
Diagram of a connected device with a power outlet and cable, no text or symbols presentNote
Use the supplied power adapter and plug only. Do not use any AC ● adapter other than the one included with this unit.
Be sure to connect the power adapter to an AC outlet which ● supplies the correct voltage.
If you do not use the unit for a certain amount of time, disconnect ● the AC adaptor from the wall socket.
Connecting the LAN/ETHERNET cable
To connect this unit to a broadband home network to listen to Internet radio broadcast, connect the LAN/ETHERNET cable to the ETHERNET port.
For detailed information on wired network setting, see "Setting up a wired network connection" on page 23.
![[Wired LAN] Router To LAN port To WAN side LAN port/Ethernet connector To LAN port Modem Internet](/content/2026/02/362832/images/193b109da6364d9bc9d24ff31f838d9352563bb88dac8ad9341d409b94e270e2.jpg)
Connecting an external device
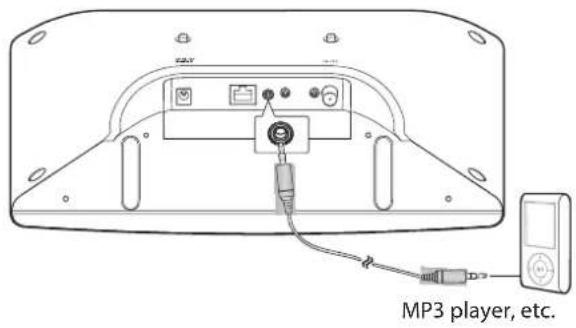
You can connect an additional audio player to the AUX IN jack and use the NS-X1 unit as a speaker.
Connect one end of the AUX cable to the unit and the other end to the external device you want to connect. (AUX cable is not provided. It should be purchased separately.)
Connecting the FM antenna
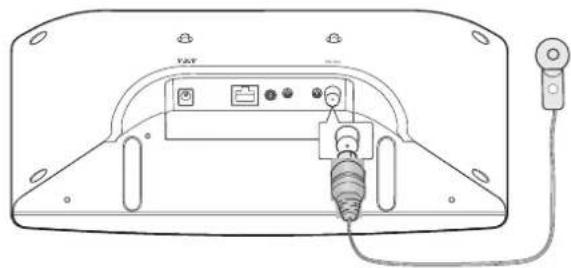
1 Connect the provided FM antenna to the FM antenna terminal on the unit.
2 Change the position of the antenna until you get the best reception of your favorite FM stations.
natural_image
Line drawing of a back panel with labeled ports and cable (no text or symbols)Turning on the unit
Press the STANDBY/ON (☐/I) button on the unit or on the remote control to turn the unit on.
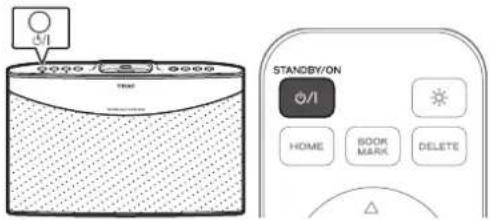
The unit turns on with the input source that was last selected.
It takes about 30 seconds to turn the unit on.
Note
Make sure power is connected to the unit. (See "Connecting the power" on page 10 for detailed information.)
Selecting an input source
Press the FUNCTION button on the unit or on the remote control.
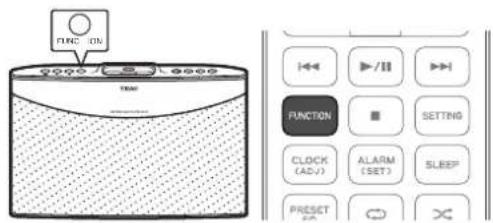
Each time the FUNCTION button is pressed, the input source ● changes as follows:
iPod → Net Radio → MUSIC SERVER → FM → AUX
If you press the FUNCTION button to change the input source, the currently selected input source will stop playing.
Selecting an input source from the Home menu
1 Press and hold the MENU (■) button on the unit or press the Home button on the remote control to go to the Home menu.
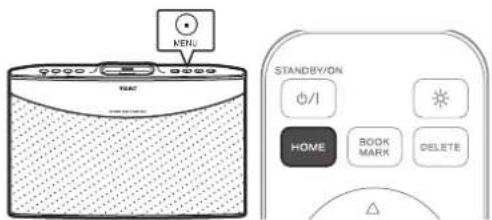
2 Press the PREVIOUS (|◀◀) or NEXT (▶▶|) button on the unit or UP (▲) or DOWN (▼) button on the remote control to move ">" on the display to the input source you want to use.
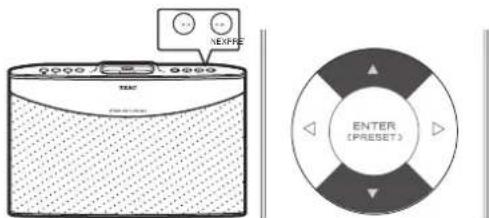
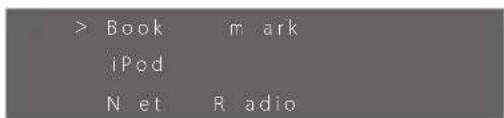
"Bookmark", "iPod", "Net Radio", "MUSIC SERVER", "FM", "AUX", and "Settings" will be listed on the top menu screen.
3 To select the input source next to ">", press the ENTER (▶/II) button on the unit or ENTER button on the remote control.
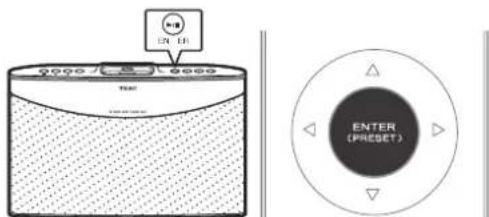
As the input source, select "iPod", "Net Radio", "MUSIC SERVER", "FM" or "AUX".
Adjusting the volume
Press the VOLUME - or + button on the unit or on the remote control to adjust the volume.
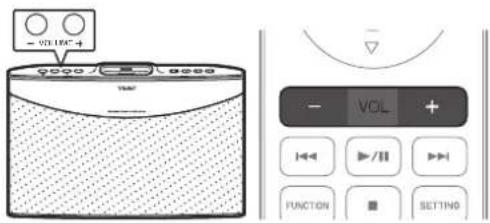
The current volume level setting will be displayed for about 3 seconds.
The volume level setting can be adjusted from 0 to 50. ●
"MIN" represents volume 0 and "MAX" represents 50.
Muting the sound temporarily
Press the MUTE (OK) button on the remote control.
The volume level setting on the display will blink when the mute ● function is on. (Example: When the volume is set to 12.)

- To turn off the mute setting, press the MUTE(OK) button again or press the VOLUME - or + button on the remote control or unit.
Note
You can turn the mute setting on only by using the remote control.
Selecting a preset EQ
Press the PRESET EQ button on the remote control to change the current setting.
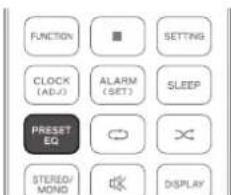
●Each time you press the PRESET EQ button, the unit cycles through the following settings: FLAT, ROCK, POP, CLASSIC, JAZZ and TALK.
Adjusting the brightness
Press the DIMMER (※) button on the remote control.
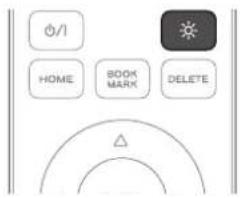
●The brightness level setting will change as follows:
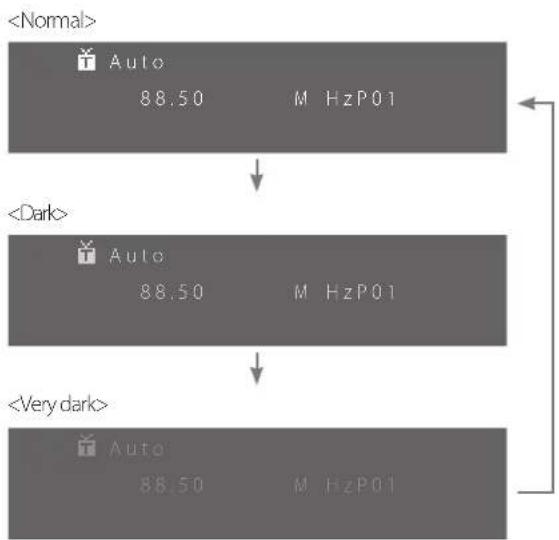
flowchart
graph TD
    A["<Normal>"] --> B["Auto 88.50 M HzP01"]
    B --> C["<Dark>"]
    C --> D["Auto 88.50 M HzP01"]
    D --> E["<Very dark>"]
    E --> F["Auto 88.50 M HzP01"]
Checking the information
Press the DISPLAY button on the remote control to check the playback information.
It is available only when Net Radio or MUSIC SERVER is selected as the input source or AirPlay is activated.
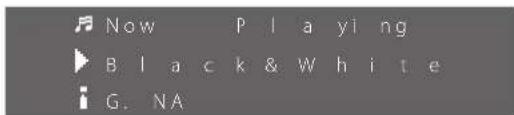
The following information is shown on the third line of the display.
♪: Current state of the unit
▶ : Current file name or ID3 information
i : Elapsed playback time → File type → Album title
→ File size → Artist name
Each time you press the DISPLAY button, the display cycles through ● the above information.
Playing music from iPod/iPhone
1 Connect your iPod/iPhone to the unit.
For detailed information on connecting the iPod/iPhone, see "Connecting the iPod/iPhone" on page 9.
If you connect an iPod/iPhone that is playing a song, the song is automatically output from the NS-X1.
2 Press the FUNCTION button on the unit or the remote control repeatedly until "iPod" appears on the display.
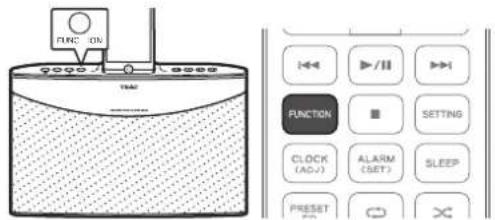
You can also select iPod as the input source from the menu. For detailed information, see "Selecting an input source from the Home menu" on page 12.
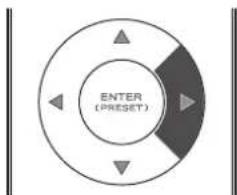
3 Press the RIGHT (▶) button.
Playback starts.
flowchart
graph TD
    A["ENTER (Preset)"] --> B["Arrow 1"]
    A --> C["Arrow 2"]
    A --> D["Arrow 3"]
You can control playback from your iPod/iPhone.
Selecting an iPod/iPhone menu item
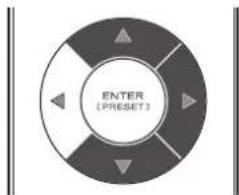
Press the UP and DOWN (▲ and ▼) buttons to select the desired menu item, and then press the RIGHT (▶) button.
flowchart
graph TD
    A["ENTER (PRESET)"] --> B["Arrow 1"]
    A --> C["Arrow 2"]
    A --> D["Arrow 3"]
    A --> E["Arrow 4"]
Button operation during iPod/iPhone playback
| Button Description | |
| VOL - or + Adjust volume | |
| Play the current song from the beginning | |
| Play or pause the currently selected music | |
| Play the next song | |
| Stop playbackMove to the previous menu on the iPod/iPhone while stopped | |
| Select a repeat option: Repeat all songs: Repeat 1 song | |
| Set the shuffle mode | |
- if you connect the iPod/iPhone while a function is selected, a list of files that is one folder up from the file being played appears automatically on the iPod/iPhone display. However, the iPod/iPhone may behave differently depending on the operating state of the NS-X1.
Listening to the Internet radio
1 Check your network environment, making sure that the network connection has been established, and then turn on the unit.
- If you use the net radio for the first time and a network connection has yet to be established, you will need to go through wired or wireless Internet connection setup first. For detailed information, see "Network Setup" on pages 23 to 25.
2 Press the FUNCTION button on the unit or the remote control repeatedly until "Net Radio" appears on the display.
Net Radio is selected as the input source.
You can also select Net Radio as the input source from the menu. For detailed information, see "Selecting an input source from the Home menu" on page 12.
3 Press the UP and DOWN (▲ and ▼) buttons on the remote control to move “>” next to the desired category, and then press the ENTER or RIGHT (▶) button.
| Category Description | |
| Favorites | List of stations/Podcast you stored as favorite is displayed. Select a station/Podcast you want to listen to. |
| Added Stations | Even though the station list contains thousands of stations, you may want to listen to stations not listed. You can add your own stations via the vTuner website. (For detail information on adding a station, see "Adding an Internet radio station from TEAC vTuner website" on the next page.) |
| Location Lists of Internet stations sorted by location | |
| Genre | Search by the genre of music played on the station/Podcast. |
| Podcasts By Location | Search by the Podcast's location. |
| Podcasts By Genre Search by the Podcast's genre. | |
| New Stations | Select from a list of recently added stations. |
| Most Popular Stations | Select from a list of popular stations. |
| Recently Played | You can select the station/Podcast from the ones you listened to recently. |
4 By using the UP and DOWN (▲ and ▼) buttons on the remote control and then the ENTER or RIGHT (▶) button, move down the list of stations until the desired station appears, and then press the ENTER or RIGHT (▶) button on the remote control to listen to the selected station.
- if you want to stop listening to the current Internet station and go back to the previous menu with lists of stations, press the STOP (■) button.
Adding an Internet radio station to your bookmark list
1 Follow the steps 1 to 4 shown on "Listening to the Internet radio" to display the Internet radio station you want to add to your bookmark list.
2 Press the BOOKMARK button on the remote control.
The selected Internet radio station is added to your bookmark list.
- After the bookmark process is completed, you can select the added station from the Bookmark menu. (Home menu >> Bookmark)
Deleting an Internet radio station from your bookmark list
1 Press the HOME button on the remote control to go to the Home menu.
If the Home menu is shown on the display, skip to step 2.
2 Press the UP and DOWN (▲ and ▼) buttons on the remote control to move ">" to "Bookmark", and then press the ENTER button.

3 Press the UP and DOWN (▲ and ▼) buttons on the remote control to move “>” next to the radio station you want to delete.
4 Press the DELETE button on the remote control.
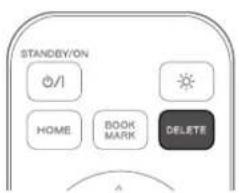
Adding an Internet radio station from TEAC vTuner website
You can add desired Internet radio stations from your computer and listen to the stations from the unit.
1 Check the MAC address of the unit.
From the "Home" menu, select "Settings" → "Network", → "Network Information" → "MAC Address".
Press the UP and DOWN (▲ and ▼) buttons to move up and down the menu screen, and then press the ENTER button to select the desired menu.
2 From your computer, access TEAC vTuner website (http://teac.vtuner.com/).
You can change the language by clicking each nation's flag icon on the top.
3 On the website, register your e-mail address and password.
4 Enter the MAC address of the unit.
Enter the MAC address without colons between alphanumeric characters. (For example if the MAC address displayed on your unit is 01:23:45:67:89:00, enter 012345678900 on the vTuner website.)
Once the registration has been completed, you will not need to enter the MAC address of your unit.
5 Select a genre from the list of genres such as Music.
6 Select the station you want to add to your favourite list.
Click the ♥+button to add the station, and then a dialog box appears.
7 Enter a group name in the dialog box to make a group, and then click the Go button.
The group name is added to "My Favourite Groups". You can access the group from "Favourites" in the Internet Radio menu. Add the Internet radio station(s) you want to listen to.
- To listen to the Internet radio station(s) added from the vTuner website, you must have your unit connected to the Internet.
Playing music through music server
You can listen to music files stored on a computer (music server) connected to this unit via wired/wireless network.
1 Start your computer (music server). Check your network environment, making sure that the network connection has been established, and then turn on the unit.
- for detailed information, see "Network Setup" on pages 23 to 25.
2 Press the FUNCTION button on the unit or the remote control to select "MUSIC SERVER" as the input source.
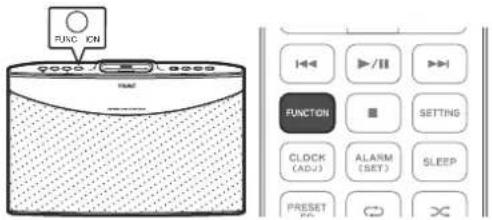
- The list of devices connected to the same network is displayed.
3 Press the UP and DOWN (▲ and ▼) buttons on the remote control to select your computer as a music server, and then press the ENTER button.
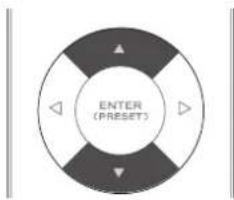
4 Press the UP and DOWN (▲ and ▼) buttons on the remote control to move “>” next to the desired category, such as Music, for example, and then press the ENTER button.
5 Go down the folder tree by performing the operations similar to those in step 4 above until “>” is moved next to the file you want to play.
6 Press the ENTER button to start playback.
Configuring the Windows Media® Player 11 to play music files stored on your computer
1 Run the Windows Media Player 11 on your computer.
2 Select the "Library" tab on the menu bar, and then select "Media Sharing".
3 In the "Media Sharing" dialog box, select the "Share my media" check box, and then click "OK".
4 Select this unit from the list of devices, and then click "Allow".
5 Click "OK" to close the dialog box.
The Windows Media Player 11 configuration is completed. You can play the music files stored on your computer by using the Windows Media Player 11 library through this unit.
Using Music Streaming (2)
Configuring the Windows Media® Player 12 to play music files stored on your computer
1 Run the Windows Media Player 12 on your computer.
2 Click the Stream arrow near the top of the Windows Media Player window, and then select "Turn on media streaming..."
If the administrator password or confirmation is required, enter the password or provide confirmation.
3 In the Choose media streaming options for computers and devices window, click "Turn on media streaming", and then click "OK".
4 Select your NS-X1 from the list of devices shown, and then select "Allowed" from the drop-down list for the unit selected. Then, click "OK".
5 Click the Stream arrow near the top of the Windows Media Player window, and then select "Automatically allow devices to play my media..."
The Windows Media Player 12 configuration is completed. You can play the music files stored on your computer by using the Windows Media Player 12 library through this unit.
AirPlay
AirPlay connection
Using AirPlay streaming technology, this unit is capable of playing audio from the following iPod/iPhone/iPad models with iOS 4.3 or later through wireless connection.
iPod touch (3rd and 4th generation) ●
iPhone 4S, iPhone4, iPhone 3GS ●
iPad 2, iPad ●
1 Check your network environment, making sure that the network connection has been established, and then turn on the unit.
For detailed information, see "Network Setup" on pages 23 to ● 25.
- Make sure that the unit and the iPod/iPhone/iPad are connected to the same network.
2 Start playback on your iPod/iPhone/iPad.
If the unit and the iPod/iPhone/iPad are connected to the same network, the AirPlay) icon will appear on the right side of the volume bar on your iPod/iPhone/iPad.
Be sure to select the same server on your iPod/iPhone/iPad as ● the one selected on this unit.
3 Press the (AirPlay) icon, and then select the unit as the output source.
When the unit and the iPod/iPhone/iPad are connected properly within the wireless range, music that is playing on your iPod/iPhone/iPad will come from the unit.
Auto tuning
1 Press the FUNCTION button on the unit or the remote control repeatedly until "FM" appears on the display.
FM is selected as the input source.
- You can also select FM as the input source from the menu. For detailed information, see "Selecting an input source from the Home menu" on page 12.
2 Press the STOP (■) button repeatedly until "Auto" appears.
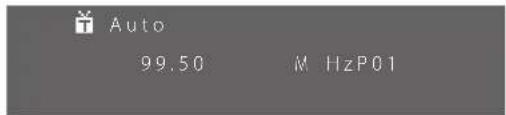
Each time you press the button, the mode changes as follows:

3 Press the PREVIOUS (1◄◄) or NEXT (►►1) button to start searching a station of sufficient strength.
When the unit detects a station of sufficient strength, the display shows the tuned frequency and icon.
If the station detected is not the desired one, simply repeat this operation.
●Stations of insufficient signal strength are skipped during the auto tuning process.
Manual tuning
1 Press the FUNCTION button on the unit or the remote control repeatedly until "FM" appears on the display.
FM is selected as the input source.
- You can also select FM as the input source from the menu. For detailed information, see "Selecting an input source from the Home menu" on page 12.
2 Press the STOP (■) button repeatedly until "Manual" appears.

3 Press the PREVIOUS (◀◀) or NEXT (▶▶) button repeatedly until the desired frequency has been reached.
Tuning in a preset station
1 Press the FUNCTION button on the unit or the remote control repeatedly until "FM" appears on the display.
FM is selected as the input source.
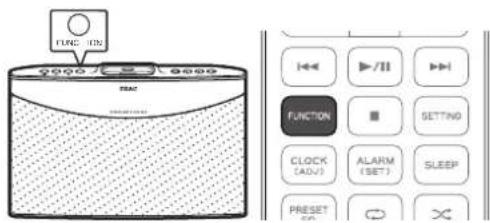
You can also select FM as the input source from the menu. For detailed information, see "Selecting an input source from the Home menu" on page 12.
2 Press the STOP (■) button repeatedly until "Preset" appears.

3 Press the PREVIOUS (|◀◀) or NEXT (▶▶|) button repeatedly until the desired preset station appears.
RDS (Radio Data System)
Radio Data System (RDS) is a broadcasting service that allows stations to send additional information along with the regular radio program signal.
●RDS works on the FM waveband in Europe.
Tune in to an FM RDS station.
The RDS mode is shown on the third line of the display.
For detailed information about how to tune in an FM RDS station, see the previous page.
If no RDS mode is displayed, try an external antenna to increase the sensitivity.
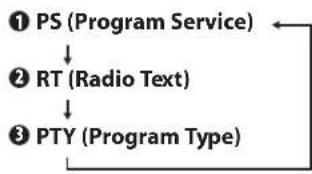
Every time you press the DISPLAY button on the remote control, ● the unit cycles through RDS mode settings in the following order.
flowchart
graph TD
    A["PS (Program Service)"] --> B["RT (Radio Text)"]
    B --> C["PTY (Program Type)"]
① PS (Program Service)
When you select PS, the station name is displayed. If there is no PS data, no message is displayed.
② RT (Radio Text)
When you select RT, the news of the station with up to 64 characters is displayed. If there is no RT data, no message is displayed.
③ PTY (Program Type)
When you select PTY, the description of the type of music broadcast by the radio station such as pop, rock or classical music is displayed. If there is no PTY data, no message is displayed.
Auto presetting
1 Press the FUNCTION button on the unit or the remote control repeatedly until "FM" appears on the display.
FM is selected as the input source.
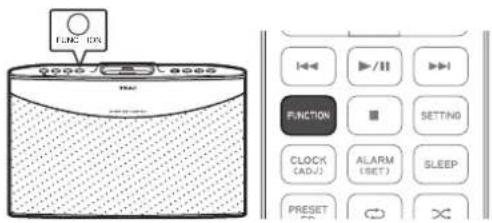
2 Press and hold the ENTER button for more than 2 seconds.
The message "Auto Preset OK?" will appear.

3 Press the ENTER button again.
Up to 30 FM stations will be stored.
- To stop auto presetting, press the PREVIOUS (I◄◄) or NEXT (►►I) button.
Switching stereo/mono mode
You can select stereo or mono mode while listening to an FM radio station. To do so, simply press the STEREO/MONO button on the remote control.
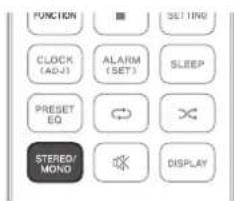
When stereo mode is selected, Sicon will appear on the display.

- if severe noise is heard, select mono mode.
- If no station is received, the sound is automatically muted.
AUX
Saving preset stations
1 Press the FUNCTION button on the unit or the remote control repeatedly until "FM" appears on the display.
FM is selected as the input source.
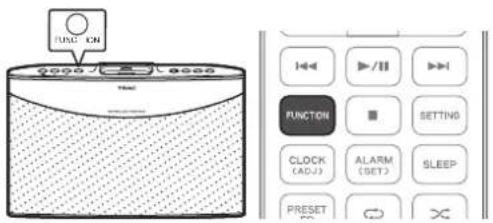
2 Select a station automatically or manually.
See "Auto tuning" on page 19 to select a station automatically.
- See "Manual tuning" on page 19 to select a station manually.
- See "Tuning in a preset station" on page 19 to select a station manually.
- When the station selected is already stored, a number will be shown on the right side of the display. When the station is not stored, "P--" will be displayed.
3 Press the ENTER button on the remote control.

4 Press the PREVIOUS (|◀◀) or NEXT (▶▶|) button to select the number you want to use as a preset number.
5 Press the ENTER button to save the station with the selected preset number.
Playing music from external devices
1 Connect your external device to the unit.
For detailed information on connecting the external device, see "Connecting an external device" on page 11.
2 Press the FUNCTION button on the unit or the remote control repeatedly until "AUX" appears on the display.
AUX is selected as the input source.
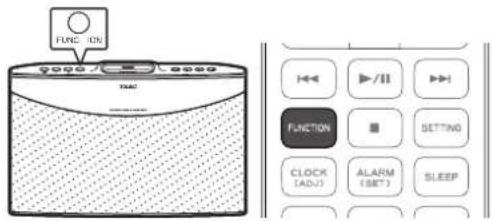
3 Start playback.
You cannot control the external device from the unit or by using the remote control. You can control the playback option from the external device only.
You can adjust the volume level setting from the unit or by using the remote control.
Settings menu flow
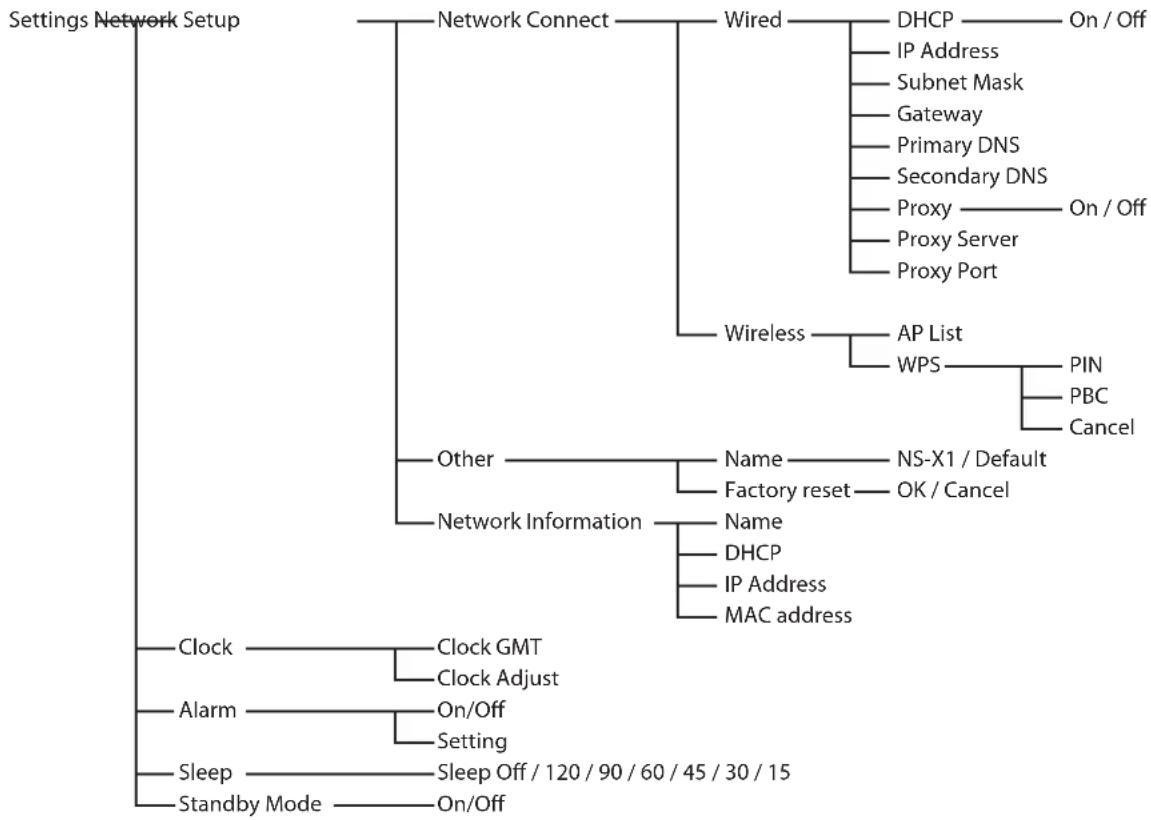
flowchart
graph TD
    A["Settings Network Setup"] --> B["Network Connect"]
    A --> C["Wireless"]
    A --> D["Other"]
    A --> E["Network Information"]
    B --> F["Wired"]
    F --> G["DHCP — On / Off"]
    F --> H["IP Address"]
    F --> I["Subnet Mask"]
    F --> J["Gateway"]
    F --> K["Primary DNS"]
    F --> L["Secondary DNS"]
    F --> M["Proxy — On / Off"]
    F --> N["Proxy Server"]
    F --> O["Proxy Port"]
    C --> P["AP List"]
    C --> Q["WPS — PIN"]
    C --> R["PBC — Cancel"]
    C --> S["Factory reset — OK / Cancel"]
    C --> T["DHCP"]
    C --> U["IP Address"]
    C --> V["MAC address"]
    E --> W["Clock GMT"]
    E --> X["Clock Adjust"]
    E --> Y["Alarm — On/Off"]
    E --> Z["Setting — Sleep Off / 120 / 90 / 60 / 45 / 30 / 15"]
    E --> AA["Standby Mode — On/Off"]
Using the setting menu
You can access the setting menu from the main unit or by using the remote control.
Using the setting menu from the main unit
1 Press and hold the MENU (■) button on the unit.
2 Press the PREVIOUS (|◀◀) or NEXT (▶▶|) button to select "Settings".
3 Press the ENTER (▶/II) button.
4 Press the PREVIOUS (I◄◄) and NEXT (►►|) buttons to move “>” next to the menu you want to select, and then press the ENTER (►/II) button.
Depending on the menu selected, you can change settings on Network, Clock, Alarm, Sleep or Standby Mode.
Note
There is no button on the unit to move to the previous menu. If you want to move to the previous menu, use the LEFT (◀) button on the remote control.
Using the setting menu from the remote control
1 Press the SETTING button on the remote control.
Menus right under "Settings" appear.
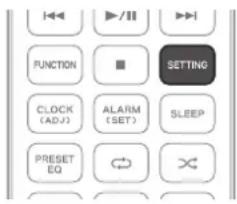
The above menus also appear when you press the HOME ● button, and press the UP or DOWN (▲ or ▼) button to move “>” next to “Settings”, and then press the ENTER button. Depending on the menu selected, you can change settings ● on Network Setup, Clock, Alarm, Sleep or Standby Mode.
2 Press the UP or DOWN (▲ or ▼) button to select the desired menu, and then press the ENTER button.
Network Setup
To listen to Internet radio stations or music files stored on your computer via a wired/wireless network, you need to configure network settings first.
Network connection
Setting up a wired network connection by using DHCP
Before you set up a network connection, make sure that a LAN/ETHERNET cable is connected to the ETHERNET port properly and securely. For details, see "Connecting the LAN/ETHERNET cable" on page 10.
1 From the "Settings" menu, select "Network" → "Network Connect" → "Wired".

After you switch between Wired and Wireless, be sure to ● put the unit into standby and then turn it on by pressing the STANDBY/ON (☐/I) button on the unit.
2 Change the following settings if necessary.
| Menu item Description | |
| DHCP | Turn the DHCP function On/Off. |
| IP Address | Enter an IP Address. |
| Subnet Mask | Enter a subnet mask when the DHCP function is turned off. |
| Gateway | Enter a gateway when the DHCP function is turned off. |
| Primary DNS | Enter a primary DNS when the DHCP function is turned off. |
| Secondary DNS | Enter a secondary DNS when the DHCP is turned off. |
| Proxy | Turn the Proxy function On/Off |
| Proxy Server | Enter a proxy server when the Proxy function is turned on. |
| Proxy Port | Enter a proxy port when the Proxy function is turned on. |
Note
When you set the DHCP to "ON", you do not need to enter an IP address, subnet mask, gateway, DNS, etc.
When you set the DHCP to "OFF", you must establish the network connection manually by entering an IP address, etc. In this case, some knowledge of networks is required. If you are unfamiliar with Internet connection settings, contact your Internet service provider for assistance.
Setting up a wired network connection manually
1 From the "Settings" menu, select "Network" → "Network Connect" → "Wired".
After you switch between Wired and Wireless, be sure to ● put the unit into standby and then turn it on by pressing the STANDBY/ON (☐/I) button on the unit.
2 Select "DHCP", and then select "Off".
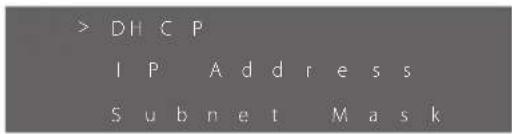
3 Press the LEFT (◀) button to return to the previous screen, and then select "IP Address".
4 Select the desired number by pressing the UP or DOWN (▲ or ▼) button.
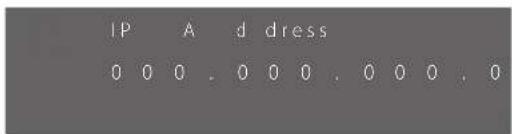
- You can move to the previous or next digit by pressing the LEFT or RIGHT (◀ or ▶) button.
5 Press the LEFT (◀) button to return to the previous menu, and then enter the Subnet Mask, Gateway, Primary DNS, and Secondary DNS in the same way as instructed in steps 1 to 4 above.
When the wired network connection is established properly, the .■icon will be displayed.
Setting the wireless network connection
If your wireless router with access point supports WPS function, you can select "WPS". If not, select "AP List".
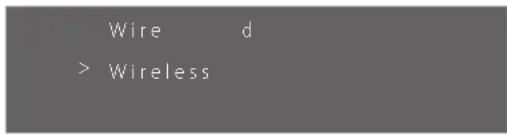
1 From the "Settings" menu, select "Network" → "Network Connect" → "Wireless".
Wire d
> Wireless
After you switch between Wired and Wireless, be sure to ● put the unit into standby and then turn it on by pressing the STANDBY/ON (☐/I) button on the unit.
2 Change the following settings if necessary.
| Menu item Description | ||
| AP List Select Access Point. | ||
| WPS | PIN | Check the PIN code to setup WPS. |
| PBC | Set WPS using PBC. | |
| Cancel | Cancel the WPS process. | |
Note
Because DHCP is fixed to "On" for wireless network connection, you cannot set a static IP address when using wireless network connection.
Setting up a wireless network via AP
1 From the "Settings" menu, select "Network" → "Network Connect" → "Wireless".
After you switch between Wired and Wireless, be sure to ● put the unit into standby and then turn it on by pressing the STANDBY/ON (☐/I) button on the unit.
2 Select "AP List".

3 Select one of the APs on the list.
4 Enter the key if you are prompted to do so.
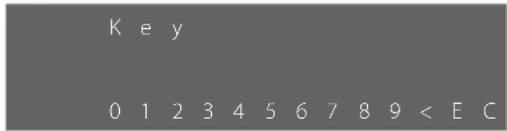
- Press the UP or DOWN (▲ or ▼) button to see different sets of numbers, letters or characters.
Move the cursor to the desired number, letter or character by ● pressing the LEFT and RIGHT (◀ and ▶) buttons, and then press the ENTER button to enter the selected number.
To delete the selection, select "<".
To confirm your entry, select "E".
To cancel and return to the previous menu, select "C".
5 Press the ENTER button to confirm your selection.
- The Network setup will restart automatically and the icon will be displayed.
Other network settings
1 From the "Settings" menu, select "Network" and then "Other".
Netw o rkConn
> Other
NetworkInfo
2 Change the following settings if necessary.
| Menu item Description | |
| Name | Change the name of the unit that appears on the network. |
| Factory Reset | Reset all the settings to the factory default. |
Changing the name of the unit
1 From the "Settings" menu, select "Network" → "Other" → "Name".
> Name
Fac tory Rese
> NS - X 1 22138F
De f aul t
- You can select the current name of your unit or "Default".
- If you select the current name, you can change it to any name you like. If you select "Default", the name of the unit will be changed automatically to the default setting.
- The default setting is "NS-X1".
2 To change the name of the unit, select the current name, and then press the ENTER button

Note
- Be sure to change the time zone while the unit is connected to the Internet. - GMT stands for Greenwich Mean Time. You should find out if your local time zone is past or ahead of the Greenwich Mean Time and then enter the time.Setting the clock
Note
- Because the unit updates the time through the Internet, it needs to be connected to the network before you start setting the time. To see detailed information on setting wired/wireless network, see "Network Setup" on pages 23 to 25. - You can also set the clock by pressing and holding the CLOCK (ADJ) button on the remote control for 2 seconds. From the "Settings" menu, select "Clock" and then "Clock Adjust".  \- The unit will show the "Clock Adjust" message on the display and adjust the time automatically according to the time zone. Checking the time
After setting the time, you can check the time. Simply press the CLOCK (ADJ) button on the remote control. Alarm
You can set the alarm timer to turn on the unit at the set time. The alarm function can be used only when the clock time setting is completed. For detailed information, see "Clock" on the previous page.Setting the alarm timer for the first time
1 From the "Settings" menu, select "Alarm".
2 Set the time you want the unit to turn on.
 \- Press the UP or DOWN (▲ or ▼) button to change the hour (01 to 24) and minutes (00 to 59), and then press the ENTER button after selecting each item.3 Select an input source to be turned on.
You can select iPod or FM by pressing the UP or DOWN (▲ or ▼) button. ●Make sure that the selected input source is playable.4 Set the volume to a value from 00 to MAX (50), and then press the ENTER button.
\- Press the UP or DOWN (▲ or ▼) button to change the volume setting. ●After setting the volume, the display changes as follows: Time → Input source → Volume. \- You can also check the alarm setting by pressing the ALARM button on the remote control. \- After the alarm setting has been turned on, you cannot change it by pressing and holding the ALARM button on the remote control.5 The following menu screen will appear.
 - The Ⓐ icon will appear, showing that the alarm is set. - Press the UP or DOWN (▲ or ▼) button to move up or down the menu, and then press the ENTER button to select a menu. ●You can select "On/Off" to turn the alarm on or off. - You can select "Setting" to reset the alarm settings as instructed in steps 1 to 4. - Press the HOME button to exit the menu. - You can access the above menu by pressing and holding the ALARM button except when the alarm setting is turned on.Sleep
You can set the sleep timer to automatically put the unit into standby after the set time.Setting the sleep timer
Simply press the SLEEP button on the remote control. Each time you press the SLEEP button, the message changes as follows:   After setting the sleep timer, you can check or change the remaining time from the "Settings" menu. While the sleep timer setting is turned on, the 📣icon is shown on the display.Checking the sleep timer setting
You can check the remaining time of the sleep timer. From the "Settings" menu, select "Sleep".Alarm
> Sleep
StandbyMode
Adjusting the sleep function
1 From the "Settings" menu, select "Sleep". The remaining time will be displayed. Sleep 13 2 Press the UP or DOWN (▲ or ▼) button to adjust the time. - Press the UP (▲) button to increase the remaining time. (Example: If you press the button when the remaining time is 13, the remaining time is changed to 15.) - Press the DOWN (▼) button to decrease the remaining time. (Example: If you press the button when the remaining time is 33, the remaining time is changed to 30.)Standby Mode
You can set the network to stay on/off during standby mode.Setting the standby mode
1 From the "Settings" menu, select "Standby Mode".Alarm
Sleep
> StandbyMode
Troubleshooting (1)
If you experience any problems with this unit, please take the time to read through these pages and see if you can solve the problem yourself before you call your dealer or a TEAC service center. Moreover, the problem might be caused by something other than this unit. Confirm that connected devices are also being used properly.Erratic behavior of the unit during video/audio playback
- Make sure that the file being played uses one of the formats shown on page 31 "Specifications". Install the latest operating system version on the iPod/iPhone. - If the problem continues to occur, put the unit into standby and then on by pressing the STANDBY/ON (☐/I) button. Then, make sure that the above two conditions are met.No sound output via dock connection during video playback
Play video via AirPlay.| Symptom Possible cause Remedy | ||
| No power | The AC input cord is disconnected. Connect the cord securely. | |
| Poor connection at AC wall outlet or the outlet is dead or off. | Check the outlet using a lamp or another appliance. | |
| No sound | The master volume is adjusted too low. | Adjust the master volume. |
| The MUTE button is pressed to "ON". | Press the MUTE button to cancel the muting effect. | |
| Incorrect selection of input source. Select the desired input source correctly. | ||
| Incorrect connections between the components. | Make connections correctly. | |
| Remote control does not operate | No battery is inserted or the battery is exhausted. | Insert or replace the battery. |
| The remote sensor is obstructed. | Remove the obstacle. | |
| Stations cannot be received | No antenna is connected. | Connect an antenna. |
| The desired station frequency is not tuned in. | Tune in the desired station frequency. | |
| Antenna is in wrong position. | Move antenna and retry tuning. | |
| Preset stations cannot be received | An incorrect station frequency has been memorized. | Memorize the correct station frequency. |
| The memorized stations are cleared. | Memorize the stations again. | |
| Poor FM reception | No antenna is connected. | Connect an antenna. |
| The antenna is not positioned for the best reception. | Change the position of the antenna. | |
| Cannot connect to network | No LAN/ETHERNET cable is connected. | Connect a LAN/ETHERNET cable. |
| No available wireless connection. | Check for available wireless connection. | |
| Network down. | Check that network is working. | |
| Insufficient signal strength (wireless connection). | Shorten the distance from the wireless LAN's access point or remove any obstacles. | |
| Internet radio broadcast cannot be played | Network is disconnected. | Check the connection status. |
| Program is broadcasting in non-compatible format. | Only Internet radio programs in MP3, WMA, WAV and AAC formats can be played in this receiver. | |
| Internet radio station is not currently broadcasting. | Tune in a radio station that is currently broadcasting. | |
Troubleshooting (2)
| Symptom Possible cause Remedy | ||
| Unstable AirPlay | Communication problem with the access point may be present | AirPlay may be unstable depending on the performance or operating conditions of the router. In that case, check the state of the network, and then optimize the operating environment of the NS-X1. |
| The shuffle or repeat icon does not disappear from the display. | In the Home menu (top menu screen), select “Bookmark” and then start playing a file from the Bookmark list. Then, press the shuffle (✗) or repeat (⇨) button on the remote control to cancel the shuffle or repeat setting, or press the stop (■) button on the remote control. |
Specifications
AMPLIFIER SECTION
Rated output 10 W + 10 W (1 kHz, 6 Ω, THD 10 %) Singal-to-Noise ratio ..... 78 dB (IHF-A weighted, 20 kHz LPF)Input sensitivity
AUX 1 VrmsSPEAKER SECTION
Enclosure....Bass Reflex Type Speakers 80 mm cone type Impedance 6ΩFM TUNER SECTION
Receiving range 87.5 MHz - 108.0 MHz step 50 kHz S/N (Mono/Stereo) 75 dB or higher / 70 dB or higherNETWORK SECTION
Ethernet 10 BASE-T/100 BASE-TX Wi-Fi IEEE 802.11 b/g Transmission speed..... 802.11b mode (DS-SS: 11/5.5/1 Mbps) 802.11g mode (OFDM: 54/48/36/24/18/12/9/6 Mbps) Used frequency range ..... 2.412 - 2.472 GHz (2.4 GHz ISM Band)GENERAL
Power supply ...... AC 100 - 240 V, 50 / 60Hz (DC 12 V) Power consumption .... AC 20 W (DC 15 W) Standby power consumption 1 W or less Max Dimensions (W x H x D) 320 x 212.2 x 95.5mm Weight 1.95 kg (Net)Included accessories
Remote control RC-1287 x 1 Battery CR-2025 x 1 Cover x 1 Power adapter x 1 FM wire antenna x 1 Owner's manual (this document) x 1 Warranty card x 1 Design and specifications are subject to change without notice. ● Weight and dimensions are approximate. ● Illustrations may differ slightly from production models. Supported audio format| Format | File extension | Stream | Parameters | Value |
| MP3 | mp3 | MPEG-1/2 Layer-III | Sampling Frequency | 8 - 48KHz |
| Audio word size | 16bits | |||
| Channel count | 2Ch | |||
| Bit-rate | 8 - 320Kbps | |||
| VBR/CBR | Supported | |||
| WAV | wav | LPCM | Sampling Frequency | 8 - 192KHz |
| Audio word size | 16, 20, 24bits | |||
| Channel Count | 2Ch | |||
| WMA | as' wma | WMA2/7/6/9/10 | Sampling Frequency | 8 - 48KHz |
| Audio word size | 16bits | |||
| Channel Count | 2Ch | |||
| Bit Rate | 5 - 320kbps | |||
| VBR/CBR | Supported | |||
| WMA Pro WMA Lossless | Sampling Frequency | 8 - 48KHz | ||
| Audio word size | 16bits | |||
| Channel Count | 2Ch | |||
| Bit Rate | 5 - 320kbps | |||
| VBR/CBR | Supported | |||
| AAC | m4a | MPEG-4 AAC | Sampling Frequency | 32 - 96Khz |
| aac | MPEG-4 HE AAC | Audio word size | 16bits | |
| 3gp | (AAC Plus v1/2) | Channel Count | 2Ch | |
| 3g2 | Bit Rate | 16 - 320Kbps | ||
| VBR/CBR | Supported |
Pour les consommateurs européens
Mise au rebut des équipements électriques et électroniques
(a) Tout équipement électrique et électronique doit être traité séparément de la collecte municipale d'ordures ménagères dans des points de collecte désignés par le gouvernement ou les autorités locales. (b) En vous débarrassant correctement des équipements électriques et électroniques, vous contribuerez à la sauvegarde de précieuses ressources et à la prévention de potentiels effets négatifs sur la santé humaine et l'environnement. (c) Le traitement incorrect des déchets d'équipements électriques et électroniques peut avoir des effets graves sur l'environnement et la santé humaine en raison de la présence de substances dangereuses dans les équipements. (d) Le symbole de déchets d'équipements électriques et électroniques (DEEE), qui représente une poubelle à roulettes barrée d'une croix, indique que les équipements électriques et électroniques doivent être collectés et traités séparément des déchets ménagers. (e) Des systèmes de retour et de collecte sont disponibles pour l'utilisateur final. Pour des informations plus détaillées sur la mise au rebut des vieux équipements électriques et électroniques, veuillez contacter votre mairie, le service d'ordures ménagères ou le magasin dans lequel vous avez acquis l'équipement. Mise au rebut des batteries et/ou accumulateurs
(a) Les batteries et/ou accumulateurs hors d'usage doivent être traités séparément de la collecte municipale d'ordures ménagères dans des points de collecte désignés par le gouvernement ou les autorités locales. (b) En vous débarrassant correctement des batteries et/ou accumulateurs hors d'usage, vous contribuerez à la sauvegarde de précieuses ressources et à la prévention de potentiels effets négatifs sur la santé humaine et l'environnement. (c) Le traitement incorrect des batteries et/ou accumulateurs hors d'usage peut avoir des effets graves sur l'environnement et la santé humaine car ils contiennent des substances dangereuses. (d) Le symbole de déchets d'équipements électriques et électroniques (DEEE), qui représente une poubelle à roulettes barrée d'une croix, indique que les batteries et/ou accumulateurs doivent être collectés et traités séparément des déchets ménagers. Si une batterie ou un accumulateur contient plus que les valeurs spécifiées de plomb (Pb), mercure (Hg) et/ou cadmium (Cd) telles que définies dans la directive sur les batteries (2006/66/EC), alors les symboles chimiques de ces éléments seront indiqués sous le symbole DEEE. (e) Des systèmes de retour et de collecte sont disponibles pour l'utilisateur final. Pour des informations plus détaillées sur la mise au rebut des batteries et/ou accumulateurs, veuillez contacter votre mairie, le service d'ordures ménagères ou le magasin dans lequel vous les avez achetés. Sommaire Avant d'utilis
Nous vous remercions d'avoir choisi ce produit TEAC. Lisez ce manuel avec attention pour tirer les meilleures performances de cette unité. Avant d'utiliser l'unité 33 Télécommande 34 Identification des parties (unité principale) 35 Identification des parties (télécommande) 36 Raccordements 37 Réglage de la musique 40 iPod/iPhone 42 Radio internet 43 Diffusion de musique par streaming 45 AirPlay....46 FM 47 AUX 49 Réglages 50 Guide de dépannag 57 Caractéristiques techniques 59l'unité (1)
Contenu de l'emballage
Vérifiez que les accessoires livrés en standard sont inclus. Télécommande RC-1287 x 1  Pile CR-2025 x 1  Cache x 1  Adaptateur secteur x 1  Antenne filaire FM x 1  Mode d'emploi (ce document) x 1 Conservez ce mode d'emploi dans un endroit sûr pour référence • ultérieure. Carte de garantie x 1Avant d'utiliser l'unité (2)
Emplacement de l'unité
Choisissez soigneusement l'emplacement de votre unité. Évitez de l'exposer directement aux rayons solaires ou à une source de chaleur. Évitez aussi les endroits sujets aux vibrations, à une poussière excessive, à la chaleur, au froid et à l'humidité. Il est possible que l'unité chauffe durant l'utilisation, laissez donc • toujours un espace suffisant autour de lui pour la ventilation. Ne placez pas l'unité sur un amplificateur, un récepteur ou tout • autre dispositif générant de la chaleur. Quand cette unité est en service, allumer un téléviseur à proximité peut entraîner l'apparition de lignes sur l'écran de celui-ci, en fonction de la fréquence de la télédiffusion. Ce n'est pas un mauvais fonctionnement de l'unité ni du téléviseur. Si vous voyez de telles lignes, éloignez l'unité du téléviseur.Installation murale de l'unité
Vous pouvez monter le produit au mur grâce aux deux encoches qu'il possède à l'arrière. 1 Branchez le câble d'alimentation. 2 Mesurez la distance entre les deux encoches et transférez-la sur le mur. Percez deux trous aux endroits marqués puis insérez deux chevilles dans le mur puis des vis. 3 Montez l'unité. natural_image
Diagram showing a device with a cable inserted into a panel, connected to a wall-mounted sensor or connector (no text or symbols present)Télécommande
Insertion de la pile
1 Ouvrez le tiroir de pile. 2 Insérez la pile CR2025 fournie dans le tiroir de pile. 3 Fermez le tiroir de pile. natural_image
Line drawing of a remote control device with a connector inserted (no text or symbols)Attention
Retirez la pile en cas de non utilisation prolongée.Portée de fonctionnement de la télécommande
Utilisez la télécommande dans un rayon d'environ 7 m avec un angle maximal de 30° en la pointant vers le capteur de télécommande. Faces avant et arrière
 1 Touche STANDBY/ON (⏻/ı)
Appuyez sur cette touche pour mettre l'unité en service (On) ou en veille (Standby).2 Touche VOLUME –
Appuyez sur cette touche pour baisser le volume.3 Touche VOLUME +
Appuyez sur cette touche pour monter le volume.4 Touche FUNCTION
Appuyez sur cette touche pour choisir une source d'entrée.5 Dock pour iPod/iPhone
6 Écran
7 Capteur de télécommande
8 Touche ▶/II(ENTER)
Appuyez sur cette touche pour lire ou mettre en pause de la musique. Utilisez-la aussi pour ouvrir ou sélectionner un menu.9 Touche ■(MENU HOME)
Maintenez cette touche pressée pour accéder au menu d'accueil (Home).10 Touche ◀◀◀ (PREVIOUS)
Appuyez sur cette touche pour reprendre la lecture du morceau en cours à son début. Utilisez aussi cette touche pour monter dans le menu.11 Touche ▶▶I(NEXT)
Appuyez sur cette touche pour sauter au morceau suivant. Utilisez aussi cette touche pour descendre dans le menu.12 Port d'entrée d'alimentation CC (DC IN)
13 Port ETHERNET
14 Prise d'entrée auxiliaire AUX IN
15 Prise pour antenne FM
flowchart
graph TD
A["STANDBY/ON"] --> B["1"]
A --> C["2"]
A --> D["3"]
A --> E["4"]
A --> F["5"]
A --> G["6"]
A --> H["7"]
A --> I["8"]
A --> J["9"]
A --> K["10"]
A --> L["11"]
A --> M["12"]
A --> N["13"]
A --> O["ENTER (PRESET)"]
O --> P["14"]
O --> Q["15"]
O --> R["16"]
O --> S["17"]
O --> T["18"]
O --> U["20"]
O --> V["22"]
O --> W["TEAC RC-1287"]
1 Touche STANDBY/ON ( ⏻/I)
Appuyez sur cette touche pour mettre l'unité en service (On) ou en veille (Standby).2 Touche HOME
Appuyez sur cette touche pour accéder au menu d'accueil (Home).3 BOOKMARK
Appuyez sur cette touche pour ajouter un signet à votre liste de stations de radio internet favorites. Utilisez aussi cette touche pour accéder à la liste des favoris (Bookmark, dans le menu d'accueil Home).4 HAUT (▲), BAS (▼), GAUCHE (◀), DROITE (▶)
Pour vous déplacer en haut, en bas, à gauche ou à droite dans le menu, appuyez sur la touche flèche correspondante.5 VOL - /+
Appuyez sur cette touche pour monter ou baisser le volume.6 PREVIOUS (◀◀)
Appuyez sur cette touche pour rechercher une fréquence (en syntonisation FM ou préréglée (preset)) Utilisez aussi cette touche pour reprendre la lecture du morceau en cours à son début (en musique).7 LECTURE/PAUSE (▶/II)
Appuyez sur cette touche pour lire ou mettre en pause de la musique.8 FUNCTION
Appuyez sur cette touche pour sélectionner une source d'entrée (iPod / Net Radio / MUSIC SERVER / FM / AUX).9 STOP (■)
Appuyez sur cette touche pour arrêter la lecture de la musique. Utilisez aussi cette touche pour sélectionner un mode de syntonisation FM (Auto/Manual/Preset).10 CLOCK (ADJ)
Appuyez sur cette touche pour vérifier l'heure. Pour régler l'horloge, maintenez cette touche pressée. Pour régler l'horloge, votre unité doit être connectée à • internet.11 PRESET EQ
Appuyez sur cette touche pour changer la correction tonale préréglée (Flat/Rock/Pop/Classic/Jazz/Talk).Raccordements (1)
12 STEREO/MONO
Sélectionnez Stéréo / Mono (en FM)13 MUTE (呎)
Appuyez sur cette touche pour couper le son.14 DIMMER (☀️)
Appuyez sur cette touche pour régler la luminosité de l'écran (Normal / Sombre / Très sombre).15 DELETE
Appuyez sur cette touche pour supprimer un signet (favori) de votre liste de signets.16 ENTER (PRESET)
Appuyez sur cette touche pour sélectionner ou sauvegarder (menu / réglage). Pour lancer le préréglage automatique, maintenez cette touche pressée en mode FM.17 NEXT (▶▶▶)
Appuyez sur cette touche pour rechercher une fréquence (en syntonisation FM ou préréglée (preset)) Utilisez aussi cette touche pour sélectionner le morceau suivant (en musique).18 SETTING
Appuyez sur cette touche pour accéder au menu des réglages.19 SLEEP
Appuyez sur cette touche pour régler la minuterie d'extinction (OFF / 120 / 90 / 60 / 45 / 30 / 15).20 ALARM (SET)
Appuyez sur cette touche pour vérifier le réglage du rêveil. Pour régler le réveil, maintenez cette touche pressée.21 LECTURE ALÉATOIRE (∞)
Appuyez sur cette touche pour régler le mode de lecture aléatoire.22 LECTURE EN BOUCLE ( ⇌ )
Appuyez sur cette touche pour régler l'option de lecture en boucle (All / 1 / Off).23 DISPLAY
Appuyez sur cette touche pour afficher des informations sur la musique.Branchement de l'iPod/iPhone
1 Montez l'adaptateur de dock (fourni avec l'iPod/iPhone) sur l'unité.
 Votre adaptateur de dock peut avoir un aspect différent de • l'illustration ci-dessus selon le modèle.2 Connectez l'iPod/iPhone à l'unité.
 Les modèles d'iPod/iPhone suivants sont compatibles avec cette unité : iPod classic ● Pod nano (1ère, 2e, 3e, 4e, 5e et 6e génération) Pod touch (1ère, 2e, 3e et 4e génération) ●Phone 4, iPhone 3GS, iPhone 3G, iPhoneDémontage de l'adaptateur de dock
Insérez un tournevis plat dans la fente de l'adaptateur de dock et soulevez ce dernier. Branchement électrique
1 Branchez le cordon de l'adaptateur secteur à l'entrée CC 12 V (DC IN). natural_image
Back view diagram of a device rear panel with connectors and a cable inserted (no text or symbols)natural_image
Simple line drawing of a wall-mounted device connected to a container with a cable (no text or symbols)Note
\- N'utilisez que l'adaptateur secteur fourni. N'utilisez aucun adaptateur secteur autre que celui fourni avec cette unité. Veillez à brancher l'adaptateur secteur dans une prise secteur ● fournissant la tension correcte. Si vous n'utilisez pas l'unité durant un certain temps, débranchez • l'adaptateur secteur de la prise secteur.Connexion du câble de réseau local (LAN)/
ETHERNET
Pour raccorder cette unité à un réseau domestique à haut débit afin d'écouter une émission de radio internet, connectez le câble de réseau local (LAN)/ETHERNET au port ETHERNET. Pour des informations détaillées sur les réglages de réseau filaire, voir "Établissement d'une connexion réseau filaire" en page 51. Connexion d'un appareil externe
Vous pouvez brancher un lecteur audio supplémentaire à la prise d'entrée AUX IN et utiliser le N5-X1 comme une enceinte. Branchez une extrémité du câble AUX à l'unité et l'autre extrémité à l'appareil externe que vous souhaitez raccorder (le câble AUX n'est pas fourni. Il doit être acheté séparément). Branchement de l'antenne FM.
1 Branchez l'antenne FM fournie à la prise pour antenne FM de l'unité. 2 Changez la position de l'antenne jusqu'à l'obtention de la meilleure réception de vos stations FM favorites. natural_image
Line drawing of a back panel with labeled ports and cable (no text or symbols)Mise sous tension de l'unité
Appuyez sur la touche STANDBY/ON (∅/I) de l'unité ou de la télécommande pour allumer l'unité.  L'unité s'allume sur la dernière source d'entrée ayant été sélectionnée. Il faut environ 30 secondes à l'unité pour démarrer.Note
Assurez-vous que l'unité est raccordée à l'adaptateur secteur (voir "Branchement électrique" en page 38 pour des informations détaillées).Sélection d'une source d'entrée
Appuyez sur la touche FUNCTION de l'unité ou de la télécommande.  Chaque fois que vous appuyez sur la touche FUNCTION, la source • d'entrée change comme suit : iPod → Net Radio → MUSIC SERVER → FM → AUX Si vous appuyez sur la touche FUNCTION pour changer de source d'entrée, la source d'entrée actuellement sélectionnée cesse d'être produite. Sélection d'une source d'entrée depuis le menu d'accueil (Home) 1 Maintenez la touche MENU (■) pressée sur l'unité ou appuyez sur la touche Home de la télécommande pour accéder au menu d'accueil (Home).  2 Appuyez sur la touche PREVIOUS (◀◀) ou NEXT (▶▶) de l'unité ou sur la touche HAUT (▲) ou BAS (▼) de la télécommande pour déplacer le curseur ">” de l'écran sur la source d'entrée que vous souhaitez utiliser.  "Bookmark", "iPod", "Net Radio", "MUSIC SERVER", "FM", "AUX" et • "Settings" s'afficheront dans l'écran de menu principal.  3 Pour sélectionner la source d'entrée pointée par le ">", appuyez sur la touche ENTER (▶/II) de l'unité ou la touche ENTER de la télécommande.  Comme source d'entrée, sélectionnez "iPod", "Net Radio", • "MUSIC SERVER", "FM" ou "AUX".Réglage du volume
Appuyez sur la touche VOLUME - ou + de l'unité ou de la télécommande pour régler le volume.  Le réglage actuel du niveau de volume s'affichera pendant ● environ 3 secondes. Le niveau de volume peut être réglé de 0 à 50. "MIN" représente le volume 0 et "MAX" le volume 50.Coupure temporaire du son
Appuyez sur la touche MUTE (OK) de la télécommande.  Le réglage du niveau de volume clignote à l'écran quand le son est • ainsi coupé (exemple : quand le volume est réglé sur 12).  \- Pour rétablir le son, appuyez à nouveau sur la touche MUTE (噁) ou sur la touche VOLUME – ou + de la télécommande ou de l'unité.Note
Vous ne pouvez couper le son qu'à partir de la télécommande.Sélection d'une correction tonale préréglée (preset EQ)
Appuyez sur la touche PRESET EQ de la télécommande pour changer le réglage actuel.  Chaque fois que vous appuyez sur la touche PRESET EQ, l'unité • passe en revue les réglages suivants : FLAT (neutre), ROCK, POP, CLASSIC (classique), JAZZ et TALK (paroles).Réglage de la luminosité
Appuyez sur la touche DIMMER (※) de la télécommande.  \- Le réglage du niveau de luminosité changera comme suit : flowchart
graph TD
A["<Normal>"] --> B["Auto\n88 . 50 MHz P01"]
B --> C["<Sombre>"]
C --> D["Auto\n88 . 50 MHz P01"]
D --> E["<Très sombre>"]
E --> F["Auto\n88 . 50 MHz P01"]
Vérification des informations
Appuyez sur la touche DISPLAY de la télécommande pour vérifier les informations de lecture. Cela n'est possible que si la source d'entrée est réglée sur Net Radio ou MUSIC SERVER, ou si AirPlay est activé.  Les informations suivantes sont affichées sur la troisième ligne de l'écran. : statut actuel de l'unité : nom du fichier actuel ou informations ID3 i : Temps de lecture écoulé → Type de fichier → Titre de l'album →Taille de fichier→Nom de l'artiste Chaque fois que vous appuyez sur la touche DISPLAY, l'unité passe • en revue les informations ci-dessus.Lecture de musique à partir d'un iPod/iPhone
1 Connectez votre iPod/iPhone à l'unité.
Pour des informations détaillées sur le branchement de l'iPod/iPhone, voir "Branchement de l'iPod/iPhone" en page 37. Si vous branchez un iPod/iPhone en cours de lecture de ● morceau, le morceau est automatiquement produit par le NS-X1.2 Appuyez plusieurs fois sur la touche FUNCTION de l'unité ou de la télécommande jusqu'à ce que "iPod" s'affiche à l'écran.
 Vous pouvez aussi sélectionner l'iPod comme source d'entrée ● depuis le menu. Pour des informations détaillées, voir "Sélection d'une source d'entrée depuis le menu d'accueil (Home)" en page 40.3 Appuyez sur la touche DROITE (▶).
La lecture démarre. flowchart
graph TD
A["ENTER (PROPOSENT)"] --> B["Process Step 1"]
A --> C["Process Step 2"]
A --> D["Process Step 3"]
Sélection d'une option de menu d'iPod/iPhone
Appuyez sur les touches HAUT ou BAS (▲ ou ▼) pour sélectionner l'article de menu désiré, puis appuyez sur la touche DROITE (▶). flowchart
graph TD
A["ENTER (PRESET)"] --> B["Arrow 1"]
A --> C["Arrow 2"]
A --> D["Arrow 3"]
A --> E["Arrow 4"]
| Touche Description | |
| VOL - ou + Règlent le volume | |
| Lit le morceau actuel depuis son début | |
| Lit ou met en pause la musiqueactuellement sélectionnée | |
| Lit le morceau suivant | |
| Arrête la lectureÀ l'arrêt, amène au menu précédent del'iPod/iPhone | |
| Sélectionne une option de lecture enboucle (répétition)1 : répétition de tous les morceaux1 : répétition d'un morceau | |
| Règle le mode de lecture aléatoire | |
Écoute de la radio internet
1 Contrôlez votre environnement réseau pour vous assurer que la connexion réseau a bien été établie, puis allumez l'unité.
\- Si vous utilisez la radio par internet pour la première fois et si une connexion réseau doit encore être établie, vous devrez d'abord passer par la configuration d'une connexion internet, avec ou sans fil. Pour des informations détaillées, voir "Configuration du réseau" en pages 51 et 53.2 Appuyez plusieurs fois sur la touche FUNCTION de l'unité ou de la télécommande jusqu'à ce que "Net Radio" s'affiche à l'écran.
Net Radio est sélectionnée comme source d'entrée.  Vous pouvez aussi sélectionner Net Radio comme source • d'entrée depuis le menu. Pour des informations détaillées, voir "Sélection d'une source d'entrée depuis le menu d'accueil (Home)" en page 40.3 Appuyez sur les touches HAUT ou BAS (▲ ou ▼) de la télécommande pour déplacer le curseur “>” sur la catégorie désirée, puis appuyez sur la touche ENTER ou DROITE (▶).
| Catégorie Description | |
| Favorites | La liste des stations/Podcasts que vous avez mémorisés comme favoris est affichée. Sélectionnez la station/le Podcast que vous souhaitez écouter. |
| Added Stations | Même si la liste des stations contient des milliers de stations, vous pouvez vouloir écouter des stations non listées. Vous pouvez ajouter vos propres stations via le site web vTuner (pour des informations détaillées sur l'ajout d'une station, voir "Ajout d'une station radio internet depuis le site web TEAC vTuner" en page suivante). |
| Location | Listes des stations internet triées par lieu |
| Genre | Recherche par genre de musique diffusée sur la station/le Podcast. |
| Podcasts By Location | Recherche par lieu de Podcast. |
| Podcasts By Genre | Recherche par genre de Podcast. |
| New stations | Choisissez dans une liste des stations ajoutées récemment. |
| Most Popular Stations | Choisissez dans une liste de stations populaires. |
| Recently Played | Vous pouvez sélectionner une station/un Podcast parmi ceux que vous avez écoutés récemment |
4 En utilisant les touches HAUT et BAS (▲ et ▼) de la télécommande puis la touche ENTER ou DROITE (▶), descendez dans la liste des stations jusqu'à ce que la station désirée apparaisse, puis appuyez sur la touche ENTER ou DROITE (▶) de la télécommande pour écouter la station sélectionnée.
\- «i vous voulez arrêter l'écoute de la station internet actuelle et revenir au menu précédent avec les listes de stations, appuyez sur la touche STOP (■).Ajout d'une station de radio internet à votre liste de favoris
1 Suivez les étapes 1 à 4 indiquées dans "Écoute de la radio internet" pour afficher la station de radio internet que vous voulez ajouter à votre liste de favoris.
2 Appuyez sur la touche BOOKMARK de la télécommande.
 La station de radio internet sélectionnée est ajoutée à votre • liste de favoris. Une fois le processus de marquage comme favori terminé, vous pouvez sélectionner la station ajoutée dans le menu Bookmark (menu Home >> Bookmark) Suppression d'une station de radio internet de votre liste de favoris 1 Appuyez sur la touche HOME de la télécommande pour accéder au menu d'accueil (Home).  Si le menu d'accueil Home est déjà affiché, sautez à l'étape 2. 2 Appuyez sur les touches HAUT ou BAS (▲ ou ▼) de la télécommande pour déplacer le curseur “>” sur "Bookmark", puis appuyez sur la touche ENTER.  3 Appuyez sur les touches HAUT ou BAS (▲ ou ▼) de la télécommande pour déplacer le curseur “>” jusqu'à la station de radio que vous souhaitez supprimer.  4 Appuyez sur la touche DELETE de la télécommande.  Ajout d'une station radio internet depuis le site web TEAC vTuner Vous pouvez ajouter des stations de radio internet depuis votre ordinateur et écouter ces stations depuis l'unité. 1 Vérifiez l'adresse MAC de l'unité. Depuis le menu "Home", sélectionnez "Settings" (réglages) → "Network" (réseau) → "Network Information" (informations réseau) → "MAC Address" (adresse MAC). Appuyez sur les touches HAUT et BAS (▲ et ▼) pour faire défiler vers le haut et le bas l'écran de menu, puis appuyez sur la touche ENTER pour sélectionner le menu désiré. 2 Depuis votre ordinateur, accédez au site web TEAC vTuner (http://teac.vtuner.com/). Vous pouvez changer la langue en cliquant sur l'icône de drapeau correspondant à chaque nation dans le bandeau du haut. 3 Sur le site web, enregistrez votre adresse e-mail et votre mot de passe. 4 Saisissez l'adresse MAC de l'unité. Saisissez l'adresse MAC sans les deux points entre caractères alphanumériques (par exemple, si votre unité affiche l'adresse MAC 01 : 23 : 45 : 67 : 89 : 00, saisissez 012345678900 sur le site web vTuner). Une fois l'enregistrement terminé, vous n'aurez plus à saisir l'adresse MAC de votre unité. 5 Sélectionnez un genre dans la liste des genres, comme par exemple Musique. 6 Sélectionnez la station que vous souhaitez ajouter à votre liste de favoris. Cliquez sur le bouton ♥+pour ajouter la station, et une fenêtre de dialogue s'ouvre. 7 Saisissez un nom de groupe dans la fenêtre de dialogue pour constituer un groupe, puis cliquez sur le bouton Aller. Le nom du groupe est ajouté à "Mes groupes préférés". Vous pouvez accéder au groupe depuis "Favourites" dans le menu Radio Internet. Ajoutez la ou les stations de radio internet que vous souhaitez écouter. \- Pour écouter la ou les stations de radio internet ajoutées depuis le site web vTuner, votre unité doit être connectée à internet.Lecture de musique au travers d'un serveur musical
Vous pouvez écouter les fichiers musicaux stockés sur un ordinateur (serveur musical) connecté à cette unité via un réseau avec ou sans fil. 1 Faites démarrer votre ordinateur (serveur musical). Contrôlez votre environnement réseau pour vous assurer que la connexion réseau a bien été établie, puis allumez l'unité. \- Pour des informations détaillées, voir "Configuration du réseau" en pages 51 et 53. 2 Appuyez sur la touche FUNCTION de l'unité ou de la télécommande pour sélectionner "MUSIC SERVER" (serveur musical) comme source d'entrée.  La liste des appareils connectés au même réseau est affichée. 3 Appuyez sur les touches HAUT ou BAS (▲ ou ▼) de la télécommande pour sélectionner votre ordinateur comme serveur musical, puis appuyez sur la touche ENTER.  4 Appuyez sur les touches HAUT ou BAS (▲ ou ▼) de la télécommande pour déplacer le curseur “>” sur la catégorie désirée, telle que Music par exemple, puis appuyez sur la touche ENTER. 5 Descendez dans l'arborescence des dossiers à l'aide d'opérations similaires à celles de l'étape 4 ci-dessus jusqu'à ce que le curseur ">" pointe sur le fichier que vous souhaitez lire. 6 Appuyez sur la touche ENTER pour lancer la lecture. Configuration du lecteur Windows Media® 11 pour lire des fichiers musicaux conservés sur votre ordinateur 1 Lancez le lecteur Windows Media 11 sur votre ordinateur. 2 Sélectionnez l'onglet "Bibliothèque" dans la barre des menus, puis sélectionnez "Partage des fichiers multimédias". 3 Dans la fenêtre de dialogue "Partage des fichiers multimédias", cochez la case "Partager mes fichiers multimédias" puis cliquez sur "OK". 4 Sélectionnez cette unité dans la liste des appareils, puis cliquez sur "Autoriser". 5 Cliquez sur "OK" pour fermer la fenêtre de dialogue. La configuration du lecteur Windows Media 11 est terminée. Vous pouvez faire produire par cette unité les fichiers musicaux conservés sur votre ordinateur en utilisant la bibliothèque du lecteur Windows Media 11.Diffusion de musique par streaming (2)
Configuration du lecteur Windows Media® 12 pour lire des fichiers musicaux conservés sur votre ordinateur 1 Lancez le lecteur Windows Media 12 sur votre ordinateur. 2 Cliquez sur la flèche Diffuser en continu vers le haut de la fenêtre du lecteur Windows Media, et sélectionnez "Activer la diffusion multimédia en continu..." Si le mot de passe de l'administrateur ou une confirmation vous sont demandés, saisissez le mot de passe ou fournissez la confirmation. 3 Dans la fenêtre Sélectionnez les options de diffusion multimédia en continu pour les ordinateurs et les périphériques, cliquez sur "Activer la diffusion multimédia en continu" puis sur "OK". 4 Sélectionnez votre NS-X1 dans la liste des appareils affichée, puis sélectionnez "Autorisé" dans le menu déroulant correspondant à l'unité sélectionnée. Puis cliquez sur "OK". 5 Cliquez sur la flèche Diffuser en continu vers le haut de la fenêtre du lecteur Windows Media, et sélectionnez "Autoriser un accès internet aux médias personnels..." La configuration du lecteur Windows Media 12 est terminée. Vous pouvez faire produire par cette unité les fichiers musicaux conservés sur votre ordinateur en utilisant la bibliothèque du lecteur Windows Media 12.AirPlay
Connexion AirPlay
Grâce à la technologie de streaming (diffusion en continu) AirPlay, cette unité peut lire l'audio des modèles d'iPod/iPhone/iPad suivants avec iOS 4.3 ou ultérieur au travers d'une connexion sans fil. iPod touch (3e et 4e génération) ● iPhone 4S, iPhone4, iPhone 3GS ● iPad 2, iPad ● 1 Contrôlez votre environnement réseau pour vous assurer que la connexion réseau a bien été établie, puis allumez l'unité. Pour des informations détaillées, voir "Configuration du ● réseau" en pages 51 et 53. Vérifiez que l'unité et l'iPod/iPhone/iPad sont connectés au • même réseau. 2 Lancez la lecture sur votre iPod/iPhone/iPad. Si l'unité et l'iPod/iPhone/iPad sont connectés au même réseau, l'icône (AirPlay) apparaîtra sur le côté droit de la barre de volume sur votre iPod/iPhone/iPad. Veillez à bien sélectionner sur votre iPod/iPhone/iPad le • même serveur que celui sélectionné sur cette unité. 3 Appuyez sur l'icône (AirPlay), puis sélectionnez l'unité comme source de sortie. Si l'unité et l'iPod/iPhone/iPad sont correctement connectés et à portée de l'émission sans fil, la musique lue par votre iPod/iPhone/iPad est produite par l'unité.Syntonisation automatique
1 Appuyez plusieurs fois sur la touche FUNCTION de l'unité ou de la télécommande jusqu'à l'affichage de "FM".
La FM est sélectionnée comme source d'entrée. \- Nous pouvez aussi sélectionner la FM comme source d'entrée depuis le menu. Pour des informations détaillées, voir "Sélection d'une source d'entrée depuis le menu d'accueil (Home)" en page 40.2 Appuyez plusieurs fois sur la touche STOP (■) jusqu'à ce que "Auto" apparaisse.
 À chaque pression de la touche, le mode change comme suit : 3 Appuyez sur la touche PREVIOUS (1◄◄) ou NEXT (►►1) pour lancer la recherche d'une station reçue avec suffisamment de puissance.
- Quand l'unité détecte une station de puissance suffisante, l'écran affiche la fréquence syntonisée et l'icône - Si la station détectée n'est pas celle désirée, répétez simplement cette opération. - Les stations dont la force de signal est insuffisante sont sautées durant le processus de syntonisation automatique.Syntonisation manuelle
1 Appuyez plusieurs fois sur la touche FUNCTION de l'unité ou de la télécommande jusqu'à l'affichage de "FM".
La FM est sélectionnée comme source d'entrée. \- vous pouvez aussi sélectionner la FM comme source d'entrée depuis le menu. Pour des informations détaillées, voir "Sélection d'une source d'entrée depuis le menu d'accueil (Home)" en page 40.2 Appuyez plusieurs fois sur la touche STOP (■) jusqu'à ce que "Manual" apparaisse.
3 Appuyez plusieurs fois sur la touche PREVIOUS (.) ou NEXT (/) jusqu'à l'obtention de la fréquence désirée.
Réception d'une station préréglée (preset)
1 Appuyez plusieurs fois sur la touche FUNCTION de l'unité ou de la télécommande jusqu'à l'affichage de "FM".
La FM est sélectionnée comme source d'entrée.  Vous pouvez aussi sélectionner la FM comme source d'entrée ● depuis le menu. Pour des informations détaillées, voir "Sélection d'une source d'entrée depuis le menu d'accueil (Home)" en page 40.2 Appuyez plusieurs fois sur la touche STOP (■) jusqu'à ce que "Preset" apparaisse.
3 Appuyez plusieurs fois sur la touche PREVIOUS (|◀◀) ou NEXT (▶▶!) jusqu'à l'affichage de la station préréglée (preset) désirée.
RDS (Radio Data System)
Le système RDS (Radio Data System) est un service de diffusion qui permet aux stations d'envoyer des informations supplémentaires en même temps que le programme radio normal. •e RDS fonctionne sur la bande FM en Europe.Réglez la réception sur une station FM RDS.
Le mode RDS est affiché sur la troisième ligne de l'écran. Pour des informations détaillées sur la façon de recevoir une ● station FM RDS, voir la page précédente. Si aucun mode RDS n'est affiché, essayez une antenne externe • pour accroître la sensibilité de réception. Chaque fois que vous appuyez sur la touche DISPLAY de la ● télécommande, l'unité passe au réglage de mode RDS suivant, selon l'ordre ci-dessous. ① PS (Affichage du nom de la station)
Si vous sélectionnez PS, le nom de la station s'affiche. S'il n'y a pas de données PS, aucun message n'est affiché.② RT (Texte radio)
Si vous sélectionnez RT, les informations de la station, composées au maximum de 64 caractères, s'affichent. S'il n'y a pas de données RT, aucun message n'est affiché.③ PTY (Type de programme)
Si vous sélectionnez PTY, la description du type de musique diffusé par la station de radio, par exemple pop, rock ou musique classique, est affichée. S'il n'y a pas de données PTY, aucun message n'est affiché.Préréglage automatique
1 Appuyez plusieurs fois sur la touche FUNCTION de l'unité ou de la télécommande jusqu'à ce que "FM" s'affiche à l'écran.
La FM est sélectionnée comme source d'entrée. 2 Maintenez pressée la touche ENTER pendant plus de 2 secondes.
Le message "Auto Preset OK?" (préréglage automatique, OK?) apparaîtra. 3 Appuyez à nouveau sur la touche ENTER.
Cela mémorisera jusqu'à 30 stations FM. -our arrêter le préréglage automatique, appuyez sur la touche PREVIOUS (I◀◀) ou NEXT (▶▶▶).Commutation en mode stéréo/mono
Vous pouvez sélectionner le mode stéréo ou mono tout en écoutant une station de radio FM. Pour cela, appuyez simplement sur la touche STEREO/MONO de la télécommande.  Quand le mode stéréo est sélectionné, l'icône 5oparaît dans l'écran.  Si vous entendez beaucoup de parasites, sélectionnez le mode ● mono. Si aucune station n'est reçue, le son est automatiquement coupé.Sauvegarde des stations préréglées
1 Appuyez plusieurs fois sur la touche FUNCTION de l'unité ou de la télécommande jusqu'à ce que "FM" s'affiche à l'écran.
La FM est sélectionnée comme source d'entrée. 2 Sélectionnez une station, automatiquement ou manuellement.
- Voir "Syntonisation automatique" en page 47 pour sélectionner automatiquement une station. - Oir "Syntonisation manuelle" en page 47 pour sélectionner manuellement une station. - Voir "Réception d'une station préréglée (preset)" en page 47 pour sélectionner manuellement une station. - Si la station sélectionnée est déjà mémorisée, un numéro s'affiche sur le côté droit de l'écran. Si la station n'est pas mémorisée, "P--" s'affiche.3 Appuyez sur la touche ENTER de la télécommande.
4 Appuyez sur la touche PREVIOUS (1◄◄) ou NEXT (►►) pour sélectionner le numéro de preset dans lequel faire la mémorisation.
5 Appuyez sur la touche ENTER pour sauvegarder la station dans le numéro de preset sélectionné.
Lecture de musique à partir d'appareils externes
1 Connectez votre appareil externe à l'unité.
Pour des informations détaillées sur le branchement de l'appareil externe, voir "Connexion d'un appareil externe" en page 39.2 Appuyez plusieurs fois sur la touche FUNCTION de l'unité ou de la télécommande jusqu'à ce que "AUX" s'affiche à l'écran.
AUX est sélectionné comme source d'entrée. 3 Lancez la lecture.
- Vous ne pouvez pas contrôler l'appareil externe depuis l'unité ni à l'aide de la télécommande. Vous ne pouvez contrôler la lecture que depuis l'appareil externe. - Vous pouvez régler le niveau de volume depuis l'unité ou à l'aide de la télécommande.Arborescence du menu des réglages
flowchart
graph TD
A["Settings Network Setup"] --> B["Network Connect"]
A --> C["Wireless"]
A --> D["Other"]
A --> E["Network Information"]
B --> F["Wired"]
F --> G["DHCP"]
G --> H["On / Off"]
F --> I["IP Address"]
F --> J["Subnet Mask"]
F --> K["Gateway"]
F --> L["Primary DNS"]
F --> M["Secondary DNS"]
F --> N["Proxy"]
N --> O["On / Off"]
F --> P["Proxy Server"]
F --> Q["Proxy Port"]
C --> R["AP List"]
C --> S["WPS"]
S --> T["PIN"]
S --> U["PBC"]
S --> V["Cancel"]
D --> W["Name"]
D --> X["Factory reset"]
D --> Y["NS-X1 / Default"]
D --> Z["OK / Cancel"]
E --> AA["Name"]
E --> AB["DHCP"]
E --> AC["IP Address"]
E --> AD["MAC address"]
E --> AE["Clock GMT"]
E --> AF["Clock Adjust"]
E --> AG["Alarm"]
E --> AH["On/Off"]
E --> AI["Setting"]
E --> AJ["Sleep"]
E --> AK["Sleep Off / 120 / 90 / 60 / 45 / 30 / 15"]
E --> AL["Standby Mode"]
Emploi du menu des réglages
Vous pouvez accéder au menu des réglages depuis l'unité ou à l'aide de la télécommande. Emploi du menu des réglages depuis l'unité 1 Maintenez pressée la touche MENU (■) de l'unité. 2 Appuyez sur la touche PREVIOUS (◀◀) ou NEXT (▶▶) pour sélectionner "Settings" (réglages). 3 Appuyez sur la touche ENTER (▶/III). 4 Appuyez sur la touche PREVIOUS (1◄◄) ou NEXT (►►1) pour déplacer le curseur “>” sur la rubrique de menu que vous voulez sélectionner, puis appuyez sur la touche ENTER (►/II). Selon le menu sélectionné, vous pouvez changer les réglages de réseau (Network), horloge (Clock), réveil (Alarm), minuterie d'extinction (Sleep) ou mode de veille (Standby Mode).Note
L'unité n'a pas de touche pour revenir au menu précédent. Pour revenir au menu précédent, utilisez la touche GAUCHE (◀) de la télécommande. Emploi du menu des réglages depuis la télécommande 1 Appuyez sur la touche SETTING de la télécommande. Les menus situés juste sous "Settings" (réglages) apparaissent.  Les menus ci-dessus apparaissent aussi quand vous appuyez sur la touche HOME puis utilisez les touches HAUT ou BAS (▲ ou ▼) pour amener ">" sur "Settings" puis appuyez sur la touche ENTER. Selon la rubrique sélectionnée, vous pouvez changer les réglages de configuration réseau (Network Setup), horloge (Clock), réveil (Alarm), minuterie d'extinction (Sleep) ou mode de veille (Standby Mode). 2 Appuyez sur les touches HAUT ou BAS (▲ ou ▼) pour sélectionner l'article de menu désiré, puis appuyez sur la touche ENTER.Configuration du réseau (Network Setup)
Pour écouter par réseau (avec ou sans fil) des stations de radio sur internet ou des fichiers musicaux conservés sur votre ordinateur, vous devez d'abord faire les réglages de réseau.Connexion réseau
Établissement d'une connexion réseau filaire avec DHCP
Avant d'établir une connexion réseau, assurez-vous qu'un câble de réseau local (LAN)/ETHERNET est correctement et sûrement connecté au port ETHERNET. Pour des détails, voir "Connexion du câble de réseau local (LAN)/ETHERNET" en page 38. 1 Dans le menu "Settings", sélectionnez "Network" (réseau) → "Network Connect" (connexion réseau) → "Wired" (filaire).  Après avoir alterné entre Wired (filaire) et Wireless (sans fil), veillez bien à mettre l'unité en veille puis à la rallumer en appuyant sur sa touche STANDBY/ON (☑/I). 2 Changez les réglages suivants si nécessaire.| Élément de menu | Description |
| DHCP Commutation de la fonction DHCP. | |
| IP Address Saisie d'une adresse IP. | |
| Subnet Mask | Saisie d'un masque de sous-réseau quand la fonction DHCP est désactivée. |
| Gateway | Saisie d'une passerelle quand la fonction DHCP est désactivée. |
| Primary DNS | Saisie d'une adresse DNS primaire quand la fonction DHCP est désactivée. |
| Secondary DNS | Saisie d'une adresse DNS secondaire quand la fonction DHCP est désactivée. |
| Proxy | Commutation de la fonction Proxy. |
| Proxy Server | Saisie d'un serveur Proxy quand la fonction Proxy est activée. |
| Proxy Port | Saisie d'un port Proxy quand la fonction Proxy est activée. |
Note
Quand vous réglez DHCP sur "ON", vous n'avez pas à saisir d'adresse IP, masque de sous-réseau, passerelle, DNS, etc. Quand vous réglez DHCP sur "OFF", vous devez établir manuellement la connexion réseau en saisissant adresse IP, etc. Dans ce cas, une certaine connaissance des réseaux est nécessaire. Si vous n'êtes pas familiarisé avec les réglages de connexion internet, contactez votre fournisseur d'accès internet pour obtenir de l'assistance.Établissement d'une connexion réseau filaire manuelle
1 Dans le menu "Settings", sélectionnez "Network" (réseau) → "Network Connect" (connexion réseau) → "Wired" (filaire). Après avoir alterné entre Wired (filaire) et Wireless (sans fil), veillez bien à mettre l'unité en veille puis à la rallumer en appuyant sur sa touche STANDBY/ON ( ⏻/I). 2 Sélectionnez "DHCP", puis sélectionnez "Off".  3 Appuyez sur la touche GAUCHE (◀) pour revenir à l'écran précédent, puis sélectionnez "IP Address". 4 Sélectionnez le numéro désiré en appuyant sur la touche HAUT ou BAS (▲ ou ▼).  \- Vous pouvez passer au chiffre précédent ou suivant en appuyant sur la touche GAUCHE ou DROITE (◀ ou ▶). 5 Appuyez sur la touche GAUCHE (◀) pour revenir au menu précédent puis saisissez Subnet Mask (masque de sous-réseau), Gateway (passerelle), Primary DNS (adresse DNS primaire), et Secondary DNS (adresse DNS secondaire) comme indiqué dans les étapes 1 à 4 ci-dessus. Une fois la connexion réseau filaire correctement établie, l'icône sera affichée.Réglage de la connexion réseau sans fil
Si votre routeur sans fil avec point d'accès prend en charge la fonction WPS, vous pouvez sélectionner "WPS". Sinon, sélectionnez "AP List". 1 Dans le menu "Settings", sélectionnez "Network" (réseau) → "Network Connect" (connexion réseau) → "Wireless" (sans fil).  Après avoir alterné entre Wired (filaire) et Wireless (sans fil), veillez bien à mettre l'unité en veille puis à la rallumer en appuyant sur sa touche STANDBY/ON (☑/I). 2 Changez les réglages suivants si nécessaire.| Élément de menu Description | ||
| AP List Sélection du point d'accès. | ||
| WPS | PIN | Vérification du code PIN pour configurer le WPS. |
| PBC | Réglage du WPS par PBC. | |
| Cancel | Annulation du processus WPS. | |
Note
Comme le DHCP est figé sur "On" pour la connexion réseau sans fil, vous ne pouvez pas saisir d'adresse IP statique quand vous utilisez une connexion réseau sans fil.Établissement d'un réseau sans fil via un point d'accès (AP)
1 Dans le menu "Settings", sélectionnez "Network" (réseau) → "Network Connect" (connexion réseau) → "Wireless" (sans fil).  Après avoir alterné entre Wired (filaire) et Wireless (sans fil), veillez bien à mettre l'unité en veille puis à la rallumer en appuyant sur sa touche STANDBY/ON (⚡/1). 2 Sélectionnez "AP list" (liste des points d'accès).  3 Sélectionnez un des points d'accès de la liste. 4 Saisissez la clé si cela vous est demandé.  - Appuyez sur la touche HAUT ou BAS (▲ ou ▼) pour voir différents jeux de chiffres, lettres ou caractères. - Amenez le curseur sur le chiffre, la lettre ou le caractère désiré à l'aide des touches GAUCHE et DROITE (◀ et ▶), puis appuyez sur la touche ENTER pour valider la sélection faite. Pour supprimer la sélection, sélectionnez "<". Pour confirmer votre choix, sélectionnez "E". Pour annuler et revenir au menu précédent, sélectionnez "C". 5 Appuyez sur la touche ENTER pour confirmer votre sélection. \- La configuration réseau redémarrera automatiquement et l'icône s'affichera.Autres réglages réseau
1 Dans le menu "Settings", sélectionnez "Network" (réseau), puis "Other" (autre).  2 Changez les réglages suivants si nécessaire.| Élément de menu | Description |
| Name | Changement du nom de l'unité tel qu'il apparaît sur le réseau. |
| Factory Reset | Réinitialisation de tous les réglages tels qu'à la sortie d'usine. |
Changement du nom de l'unité
1 Dans le menu "Settings", sélectionnez "Network" (réseau) → "Other" (autre) → "Name" (nom).  - Vous pouvez sélectionner le nom actuel de votre unité ou "Default" (par défaut). - Si vous sélectionnez le nom actuel, vous pouvez opter pour le nom de votre choix. Si vous sélectionnez "Default", l'unité prendra automatiquement le nom par défaut. - Ce nom par défaut est "NS-X1". 2 Pour changer le nom de l'unité, sélectionnez le nom actuel puis appuyez sur la touche ENTER.  2 Vérifiez les informations suivantes si nécessaire.| Élément de menu | Description |
| Name | Affiche le nom de l'unité tel qu'il apparaît sur le réseau. |
| DHCP | Affiche le statut de DHCP (On/Off). |
| IP Address | Affiche l'adresse IP de l'unité. |
| MAC Address | Affiche l'adresse MAC de l'unité. |
Horloge (Clock)
Réglage du fuseau horaire
1 Dans le menu "Settings", sélectionnez "Clock" (horloge), puis "Clock GMT" (fuseau GMT).  2 Appuyez sur la touche HAUT ou BAS (▲ ou ▼) pour changer le fuseau horaire.  Le réglage par défaut est 00 (GMT) \- Vous pouvez sélectionner le fuseau horaire de -12 à +12. 3 Appuyez sur la touche ENTER quand le réglage est fait.Note
- Veillez à changer le fuseau horaire quand l'unité est connectée à internet. - GMT signifie Greenwich Mean Time (heure moyenne de Greenwich). Vous devez savoir si votre fuseau horaire est en avance ou en retard par rapport à l'heure GMT et donc saisir le décalage.Réglage de l'horloge
Note
- Comme l'unité actualise son horloge via internet, elle doit être connectée au réseau avant que vous ne commenciez à régler son horloge. Pour des informations détaillées sur le réglage de réseau avec ou sans fil, voir "Configuration du réseau (Network Setup)" en pages 51 et 53. - Vous pouvez aussi régler l'horloge en maintenant pressée la touche CLOCK (ADJ) de la télécommande durant 2 secondes. Dans le menu "Settings", sélectionnez "Clock" (horloge), puis "Clock Adjust" (régler l'horloge).  \- L'unité affichera le message "Clock Adjust" (régler l'horloge) à l'écran et réglera automatiquement l'heure en fonction du fuseau horaire. Vérification de l'heure
Après avoir réglé l'heure, vous pouvez la vérifier. Appuyez simplement sur la touche CLOCK (ADJ) de la télécommande. Réveil (Alarm)
Vous pouvez régler le réveil pour allumer l'unité à l'heure voulue. Le réveil ne peut être utilisé qu'une fois l'heure de l'horloge réglée. Pour des informations détaillées, voir "Horloge (Clock)" en page précédente.Premier réglage du réveil
1 Dans le menu "Settings", sélectionnez "Alarm" (réveil).  2 Réglez l'heure à laquelle l'unité doit s'allumer.  \- Appuyez sur la touche HAUT ou BAS (▲ ou ▼) pour changer les heures (01 à 24) et les minutes (00 à 59), puis appuyez sur la touche ENTER après avoir sélectionné chaque valeur. 3 Sélectionnez la source d'entrée qui doit être mise en service. \- Vous pouvez choisir iPod ou FM en appuyant sur la touche HAUT ou BAS (▲ ou ▼). \- Veillez bien à ce que la source d'entrée sélectionnée soit utilisable. 4 Réglez le volume sur une valeur comprise entre 00 et MAX (50), puis appuyez sur la touche ENTER. \- Appuyez sur la touche HAUT ou BAS (▲ ou ▼) pour changer le réglage de volume. \- Après réglage du volume, l'affichage change comme suit : Heure → Source d'entrée → Volume. \- Vous pouvez aussi vérifier le réglage du réveil en appuyant sur la touche ALARM de la télécommande. \- Une fois le réveil en service, vous ne pouvez plus le changer en maintenant pressée la touche ALARM de la télécommande.5 L'écran de menu suivant apparaîtra.
 - L'icône apparaîtra, indiquant que le réveil est réglé. - Appuyez sur la touche HAUT ou BAS (▲ ou ▼) pour faire défiler vers le haut ou le bas le menu, puis appuyez sur la touche ENTER pour sélectionner un menu. - Vous pouvez sélectionner "On/Off" pour activer/désactiver le réveil. - Vous pouvez sélectionner "Setting" pour refaire les réglages de réveil comme indiqué dans les étapes 1 à 4. - Appuyez sur la touche HOME pour sortir du menu. - Vous pouvez accéder au menu ci-dessus en maintenant pressée la touche ALARM sauf si le réveil est en service.Minuterie d'extinction (Sleep)
Vous pouvez régler la minuterie d'extinction pour mettre automatiquement l'unité en veille après la période de temps réglée.Réglage de la minuterie d'extinction
Appuyez simplement sur la touche SLEEP de la télécommande. Chaque fois que vous appuyez sur la touche SLEEP, le message change comme suit :   Après réglage de la minuterie d'extinction, vous pouvez vérifier ou changer le temps restant depuis le menu "Settings". Quand la minuterie d'extinction est en service, l'icône suffiche à l'écran.Vérification du réglage de minuterie d'extinction
Vous pouvez vérifier le temps restant pour la minuterie d'extinction. Dans le menu "Settings", sélectionnez "Sleep" (minuterie d'extinction).Alarm
> Sleep
StandbyMode
Réglage de la fonction de minuterie d'extinction
1 Dans le menu "Settings", sélectionnez "Sleep" (minuterie d'extinction). Le temps restant s'affichera.Sleep 13
Mode de veille (Standby Mode)
Vous pouvez régler le réseau pour rester en/hors service pendant le mode de veille.Réglage du mode de veille (Standby Mode)
1 Dans le menu "Settings", sélectionnez "Standby Mode" (mode de veille).Alarm
Sleep
> StandbyMode
Guide de dépannage (1)
Si vous rencontrez des problèmes quelconques avec cette unité, veuillez prendre le temps de lire ces pages et de voir si vous pouvez résoudre le problème vous-même avant de faire appel à votre revendeur ou au service après-vente TEAC. Par ailleurs, cette unité n'est peut-être pas la cause du problème. Vérifiez que les appareils qui lui sont connectés sont aussi employés correctement.Comportement erratique de l'unité durant la lecture audio/vidéo
- Assurez-vous que le fichier lu est à un des formats indiqués en page 59 dans "Caractéristiques techniques", Installez la dernière version du système d'exploitation sur l'iPod/iPhone. - Si le problème persiste, mettez l'unité en veille et rallumez-la en appuyant sur la touche STANDBY/ON (∅/I). Ensuite, assurez-vous que les deux conditions ci-dessus sont satisfaites.Aucun son ne sort via la connexion au dock durant la lecture vidéo
Lisez la vidéo via AirPlay.| Symptôme Cause possible Remède | ||
| Pas d'alimentation. | Le cordon d'alimentation secteur est débranché. | Branchez bien le cordon. |
| Mauvais branchement à la prise secteur, ou prise défaillante ou coupée. | Vérifiez la prise à l'aide d'un luminaire ou autre appareil. | |
| Pas de son | Le volume général est réglé trop bas. | Réglez le volume général. |
| La touche MUTE est enclenchée ("ON"). | Appuyez sur la touche MUTE pour rétablir le son. | |
| Mauvaise sélection de la source d'entrée. | Sélectionnez correctement la source d'entrée désirée. | |
| Connexions incorrectes entre composants. | Faites correctement les connexions. | |
| La télécommande ne fonctionne pas | Pas de pile ou pile épuisée. | Remplacez la pile. |
| Le capteur de télécommande est masqué. | Retirez l'obstacle. | |
| Les stations ne peuvent pas être captées | Aucune antenne n'est connectée. | Branchez une antenne. |
| La fréquence de la station désirée n'est pas sélectionnée. | Réglez la fréquence de la station désirée. | |
| L'antenne est dans une position incorrecte. | Déplacez l'antenne et ressayez la syntonisation. | |
| Les stations préréglées ne peuvent pas être captées | Une fréquence de station incorrecte a été mémorisée. | Mémorisez correctement la fréquence de la station. |
| Les mémoires de stations sont effacées. | Remémorisez les stations. | |
| Mauvaise réception FM | Aucune antenne n'est connectée. | Branchez une antenne. |
| L'antenne n'est pas positionnée pour la meilleure réception. | Changez la position de l'antenne. | |
| Impossible de se connecter au réseau | Aucun câble de réseau local (LAN)/ETHERNET n'est connecté. | Branchez un câble de réseau local (LAN)/ETHERNET. |
| Aucune connexion sans fil de disponible. | Vérifiez les connexions sans fil disponibles. | |
| Réseau en panne. | Vérifiez que le réseau fonctionne. | |
| Force de signal insuffisante (connexion sans fil). | Rapprochez l'unité du point d'accès sans fil au réseau local (LAN) ou supprimez tous les obstacles. | |
| Impossible d'écouter une radio par internet | Le réseau est débranché. Vérifiez le statut de la connexion. | |
| Le programme diffuse dans un format non compatible. | Seuls les programmes de radio internet aux formats MP3, WMA, WAV et AAC peuvent être produits par ce récepteur. | |
| La station de radio internet ne diffuse rien actuellement. | Cherchez une station de radio qui diffuse en ce moment. | |
| Airplay instable | Il peut y avoir un problème de communication avec le point d'accès. | AirPlay peut être instable en fonction des performances ou des conditions de fonctionnement du routeur. Dans ce cas, vérifiez l'état du réseau puis optimisez l'environnement de fonctionnement du NS-X1. |
| L'icône de lecture aléatoire ou en boucle ne disparaît pas de l'écran. | Dans le menu Home (menu d'accueil ou écran de menu supérieur), sélectionnez "Bookmark" et lancez la lecture d'un fichier depuis la liste des favoris. Puis appuyez sur la touche de lecture aléatoire (✗) ou en boucle (☐) de la télécommande pour annuler le réglage correspondant ou appuyez sur la touche Stop (■) de la télécommande. | |
Caractéristiques techniques
SECTION AMPLIFICATEUR
Puissance nominale de sortie .... 10W + 10W (1 kHz, 6 Ω, DHT 10 %) Rapport signal/bruit 78 dB (pondération IHF-A, filtre passe-bas 20 kHz)Sensibilité d'entrée
AUX 1 VrmsSECTION ENCEINTE
Enceinte .... Type Bass Reflex Haut-parleurs....Type cône de 80 mm Impédance 6 ΩSECTION TUNER FM
Plage de réception 87.5 MHz - 108.0 MHz paliers de 50 kHz Rapport S/B (mono/stéréo) ..... 75 dB ou plus / 70 dB ou plusSECTION RÉSEAU
Ethernet 10 BASE-T/100 BASE-TX Wi-Fi IEEE 802.11 b/g Vitesse de transmission ..... Mode 802.11b (DS-SS: 11/5,5/1 Mb/s) Mode 802.11g (OFDM: 54/48/36/24/18/12/9/6 Mb/s) Plage de fréquences utilisée .2,412 - 2,472 GHz (bande ISM 2,4 GHz)GÉNÉRALES
Alimentation électrique .... CA 100 - 240 V, 50 / 60 Hz (CC 12 V) Consommation électrique .... CA 20 W (CC 15 W) Consommation en veille .... 1 W ou moins Dimensions (L x H x P) 320 x 212,2 x 95,5 mm Poids 1,95 kg (net)Accessoires fournis
Télécommande RC-1287 x 1 Pile CR-2025 x 1 Cache x 1 Adaptateur secteur x 1 Antenne filaire FM x 1 Mode d'emploi (ce document) x 1 Carte de garantie x 1 - Conception et caractéristiques techniques sont sujettes à changements sans préavis. - Le poids et les dimensions sont des valeurs approchées. - Les illustrations peuvent légèrement différer des modèles de production. Formats audio pris en charge| Format | Extension de fichier | Flux | Paramètres | Valeur |
| MP3 | mp3 | MPEG 1/2 Layer II | Fréquence d'échantillonnage | 8 - 48 kHz |
| Résolution (taille du mot audio) | 16 bits | |||
| Nombre de canaux | 2 canaux | |||
| Débit binaire | 8 - 320 kb/s | |||
| VBR/CBR (débit variable/constant) | Pris en charge | |||
| WAV | wav | LPCM | Fréquence d'échantillonnage | 8 - 192 kHz |
| Résolution (taille du mot audio) | 16, 20, 24 bits | |||
| Nombre de canaux | 2 canaux | |||
| WMA | asf wma | WMA2/7/8/9/10 | Fréquence d'échantillonnage | 8 - 48 kHz |
| Résolution (taille du mot audio) | 16 bits | |||
| Nombre de canaux | 2 canaux | |||
| Débit binaire | 5 - 320 kb/s | |||
| VBR/CBR (débit variable/constant) | Pris en charge | |||
| WMA Pro WMA Lossless | Fréquence d'échantillonnage | 8 - 48 kHz | ||
| Résolution (taille du mot audio) | 16 bits | |||
| Nombre de canaux | 2 canaux | |||
| Débit binaire | 5 - 320 kb/s | |||
| VBR/CBR (débit variable/constant) | Pris en charge | |||
| AAC | m4a aac 3gp 3g2 | MPEG 4 AAC MPEG-1 HE AAC (AAC Plus v1/2) | Fréquence d'échantillonnage | 32 - 36 kHz |
| Résolution (taille du mot audio) | 16 bits | |||
| Nombre de canaux | 2 canaux | |||
| Débit binaire | 16 - 320 kb/s | |||
| VBR/CBR (débit variable/constant) | Pris en charge |
Para consumidores europeos
Deshacerse de aparatos eléctricos y electrónicos
(a) Todos los aparatos eléctricos y electrónicos deben ser eliminados separados del resto de basura común y únicamente en los "puntos limpios" o bajo los procedimientos especificados por el gobierno o autoridades municipales locales. (b) Con la eliminación correcta de los equipos eléctricos y electrónicos estará ayudando a conservar recursos muy valiosos y a evitar los posibles efectos negativos en la salud humana y en el medio ambiente. (c) La eliminación incorrecta de los equipos eléctricos y electrónicos puede producir efectos muy dañinos en el medio ambiente y en la salud humana a causa de las sustancias peligrosas que pueden encontrarse en estos equipos. (d) El símbolo de Eliminación de Aparatos Eléctricos y Electrónicos (WEEE en inglés), identificado por un cubo de basura tachado, indica que los equipos eléctricos y electrónicos deben ser eliminados de forma totalmente independiente con respecto a la basura doméstica. (e) Existen sistemas para la eliminación y recogida de este tipo de aparatos a disposición del usuario final. Si necesita más información acerca de la forma de deshacerse de aparatos eléctricos y electrónicos antiguos, póngase en contacto con su Ayuntamiento, con la correspondiente empresa del servicio de recogida de residuos o con el comercio en el que adquirió ese aparato. Deshacerse de pilas y/o acumuladores
(a) Las pilas y/o acumuladores gastados deben ser eliminados separados del resto de basura común y únicamente en los "puntos de recogida" o bajo los procedimientos especificados por el gobierno o autoridades municipales locales. (b) Con la eliminación correcta de las pilas y/o acumuladores gastados estará ayudando a conservar recursos muy valiosos y a evitar los posibles efectos negativos en la salud humana y en el medio ambiente. (c) La eliminación incorrecta de las pilas y/o acumuladores gastados puede producir efectos muy dañinos en el medio ambiente y en la salud humana con motivo de las sustancias peligrosas que pueden encontrarse en estos equipos. (d) El símbolo WEEE, identificado por un cubo de basura tachado, indica que las pilas y/o acumuladores gastados deben ser eliminados de forma totalmente independiente con respecto a la basura doméstica.  Si una pila o un acumulador contienen más cantidad de los valores especificados de plomo (Pb), mercurio (Hg), y/o cadmio (Cd) según está definido en la Directiva relativa a las pilas (2006/66/EC), entonces los símbolos químicos correspondientes a estos elementos estarán indicados debajo del símbolo WEEE. (e) Existen sistemas para la eliminación y recogida a disposición del usuario final. Si necesita más información acerca de la forma de eliminar pilas y/o acumuladores gastados, póngase en contacto con su Ayuntamiento, con la correspondiente empresa del servicio de recogida de residuos o con el comercio donde se adquirieron.Índice Antes de utiliza
Gracias por elegir este producto TEAC. Lea este manual con atención para obtener el mejor rendimiento de esta unidad.
Antes de utilizar la unidad 61 Mando a distancia 62 Identificación de las partes (unidad principal) 63 Identificación de las partes (mando a distancia) 64 Conexiones 65 Ajustes para la reproducción de música 68 iPod/iPhone 70 Radio por Internet 71 Utilización de música en "streaming" 73 AirPlay....74 FM 75 AUX 77 Ajustes de configuración ....78 Solución de posibles fallos 85 Especificaciones 87a unidad (1)
Qué hay en la caja
Confirme que los accesorios de serie están incluidos. Mando a distancia RC-1287 x 1  Pila CR-2025 x 1  Tapa x 1  Adaptador de corriente x 1  Antena de FM de cable x 1  Manual del usuario (este documento) x 1 Conserve este manual en un lugar seguro para futuras consultas ● Tarjeta de garantía x 1Antes de utilizar la unidad (2)
Emplazamiento de la unidad
Elija con cuidado el emplazamiento para la instalación de la unidad. Evite colocarla donde le de la luz solar directa o cerca de una fuente de calor. Deberá evitar también lugares sujetos a vibraciones y a polvo, calor, frío o humedad excesivos. Como la unidad puede calentarse durante el funcionamiento, deje • siempre suficiente espacio a su alrededor para la ventilación. No sitúe la unidad sobre un amplificador o receptor ni sobre • cualquier otro aparato que genere calor. Cuando la unidad está encendida, al encender una televisión cercana pueden aparecer líneas en la pantalla de la televisión, dependiendo de la frecuencia de la emisión de televisión. Esto no significa un mal funcionamiento de la unidad ni de la televisión. Si se ven tales líneas, aleje la unidad lo más posible del aparato de televisión.Instalación del producto sobre una pared
Se puede instalar el producto sobre una pared utilizando dos ranuras que hay en la parte posterior. 1 Conecte el cable de corriente. 2 Mida la distancia entre las 2 ranuras y traslade la medición a la pared. Taladre dos agujeros en los puntos marcados y a continuación inserte dos tacos de anclaje y dos tornillos en la pared. 3 Monte la unidad. natural_image
Diagram of a device with a probe inserted into a panel, showing wiring and alignment lines (no text or symbols)Mando a distancia
Introducción de la pila
1 Abra la bandeja de la pila. 2 Inserte la pila CR2025 suministrada en la bandeja de la pila. 3 Cierre la bandeja de la pila. natural_image
Line drawing of a remote control device with a battery and connector (no text or symbols)Precaución
Quite la pila cuando no se vaya a utilizar durante un largo periodo de tiempo.Margen operativo del mando a distancia
Use el mando a distancia dentro de un margen de unos 7 m y un ángulo de 30° apuntándolo hacia el sensor de control remoto. Partes de los paneles frontal y posterior
1 Botón de reposo/encendido (STANDBY/ON) (⏻/I)
Pulse este botón para encender la unidad (ON) o ponerla en reposo (STANDBY).2 Botón VOLUME –
Pulse este botón para bajar el volumen.3 Botón VOLUME +
Pulse este botón para subir el volumen.4 Botón FUNCTION
Pulse este botón para seleccionar una fuente de entrada.5 Base Dock para iPod/iPhone
6 Pantalla
7 Sensor de control remoto
8 Botón ▶/II(ENTER)
Pulse este botón para reproducir o poner en pausa la música. Use este botón tanto para seleccionar un menú como para entrar en él.9 Botón ■(MENU)
Pulse y mantenga pulsado este botón para ir al menú principal. 10 Botón ◀◀◀ (PREVIOUS)
Pulse este botón para reproducir la canción en curso desde el principio. Use este botón también para desplazarse hacia arriba por el menú.11 Botón ▶▶▶(NEXT)
Pulse este botón para saltar a la siguiente canción. Use este botón también para desplazarse hacia abajo por el menú.12 Entrada de corriente DC IN
13 Puerto ETHERNET
14 Terminal de entrada auxiliar AUX IN
15 Terminal de antena de FM
flowchart
graph TD
A["STANDBY/ON"] --> B["HOME"]
B --> C["BOOK MARK"]
C --> D["ENTER (PRESET)"]
D --> E["FUNCTION"]
E --> F["CLOCK (ADJ)"]
F --> G["ALARM (SET)"]
G --> H["SLEEP"]
H --> I["PRESET EQ"]
I --> J["STEREO/MONO"]
J --> K["DISPLAY"]
style A fill:#f9f,stroke:#333
style K fill:#f9f,stroke:#333
style D fill:#ccf,stroke:#333
style E fill:#cfc,stroke:#333
style F fill:#fcc,stroke:#333
style G fill:#cff,stroke:#333
style H fill:#ffc,stroke:#333
style I fill:#fcf,stroke:#333
style J fill:#cff,stroke:#333
style K fill:#ffc,stroke:#333
1 Botón de reposo/encendido STANDBY/ON ( ⏻/I)
Pulse este botón para encender (ON) la unidad o ponerla en reposo (STANDBY).2 Botón HOME
Pulse este botón para ir al menú principal.3 BOOKMARK
Pulse este botón para añadir un marcador a su lista de emisoras de radio por Internet. Use este botón también para ir a la lista de marcadores (en el menú principal).4 ARRIBA(▲), ABAJO(▼), IZQUIERDA(◀), DERECHA(▶)
Para desplazarse hacia arriba, hacia abajo, a la izquierda o a la derecha por el menú, pulse el correspondiente botón de flecha.5 VOL - /+
Pulse este botón para bajar o subir el volumen.6 ANTERIOR (◀◀)
Pulse este botón para buscar una frecuencia (en sintonización o presintonización de FM). Use este botón también para reproducir la canción en curso desde el principio (en música).7 REPRODUCCIÓN/PAUSA (▶/II)
Pulse este botón para reproducir o poner en pausa la música.8 FUNCTION
Pulse este botón para seleccionar una fuente de entrada (iPod / Net Radio [radio por Internet] / MUSIC SERVER [servidor de música] / FM / AUX).9 PARADA (■)
Pulse este botón para detener la reproducción de la música. Use este botón también para seleccionar un modo de sintonización de FM (Auto /Manual /Preset [presintonías]).10 CLOCK (ADJ)
Pulse este botón para comprobar la hora. Para ajustar la hora, pulse y mantenga pulsado este botón. Para ajustar el reloj, la unidad debe estar conectada a Internet.11 PRESET EQ
Pulse este botón para cambiar el ajuste de ecualización prefijada (Flat [plana] /Rock/ Pop /Classic [clásica] /Jazz /Talk [conversación]).12 STEREO/MONO
Selecciona estéreo/mono (en FM).Conexiones (1)
13 SILENCIAMIENTO (※)
Pulse este botón para silenciar el sonido.14 ATENUADOR DE PANTALLA (☀️)
Pulse este botón para ajustar el brillo de la pantalla (Normal/Oscuro / Muy oscuro).15 DELETE
Pulse este botón para borrar un marcador de la lista de marcadores.16 ENTER (PRESET)
Pulse este botón para seleccionar o salvar (menú / ajuste). Para comenzar la presintonización automática, pulse y mantenga pulsado este botón en el modo de FM.17 SIGUIENTE (▶▶)
Pulse este botón para buscar una frecuencia (en sintonización o presintonización de FM). Use este botón también para seleccionar la canción siguiente (en música).18 SETTING
Pulse este botón para ir al menú de ajustes de configuración.19 SLEEP
Pulse este botón para ajustar el temporizador de apagado (OFF [desactivado] / 120 / 90 / 60 / 45 / 30 / 15).20 ALARM (SET)
Pulse este botón para comprobar el ajuste de la alarma. Para ajustar la alarma, pulse y mantenga pulsado este botón.21 REPRODUCCIÓN ALEATORIA (×)
Pulse este botón para ajustar el modo de Reproducción Aleatoria (reproducción al azar).22 REPETICIÓN (↔)
Pulse este botón para ajustar la opción de repetición (All [todas] / 1 / Off [desactivado]).23 DISPLAY
Pulse este botón para comprobar la información acerca de la música.Conexión del iPod/iPhone
1 Coloque el adaptador de base Dock (suministrado con el iPod/iPhone) en la unidad.
 Su adaptador de base Dock puede tener un aspecto diferente del que aparece en la ilustración superior dependiendo del modelo.2 Conecte el iPod/iPhone a la unidad.
 Los modelos de iPod/iPhone compatibles con esta unidad son los siguientes: Pod classic. Pod nano (1 ^a , 2 ^a , 3 ^a , 4 ^a , 5 ^a , y 6 ^a generación) Pod touch (1 ^a , 2 ^a , 3 ^a y 4 ^a generación) ●Phone 4, iPhone 3GS, iPhone 3G, iPhoneDesconexión del adaptador de base Dock
Use un destornillador plano para introducirlo en la hendidura del adaptador de base Dock y levantarlo. Conexión a la corriente
1 Conecte un extremo del adaptador de corriente a la entrada de corriente DC IN 12V. natural_image
Back view diagram of a device rear panel with connectors and a cable inserted (no text or symbols)natural_image
Diagram of a connected electrical outlet with a container labeled 'TEC' and cable, no readable text or symbols present.Nota
\- Utilice solamente el adaptador de corriente y el enchufe suministrados. No utilice ningún otro adaptador de corriente que no sea el incluido con esta unidad. Asegúrese de conectar el cable de corriente a una toma de electricidad que suministre el voltaje correcto. Si no va a utilizar la unidad durante algún tiempo, desconecte el cable de corriente de la toma de electricidad.Conexión con cable LAN/ETHERNET
Para conectar esta unidad a una red doméstica de banda ancha para escuchar emisiones de radio por Internet, conecte el cable LAN/ETHERNET al puerto ETHERNET. Para instrucciones detalladas sobre la configuración de una red cableada, ver "Configuración de la conexión a una red cableada" en la página 79. Conexión de un dispositivo externo
Puede conectar un reproductor de audio adicional al terminal AUX IN y utilizar la unidad NS-X1 como un altavoz. Conecte un extremo del cable "auxiliar" al terminal AUX de la unidad y el otro extremo al dispositivo externo que desee conectar (el cable "auxiliar" no se suministra con esta unidad, deberá comprarlo aparte). Conexión de la antena de FM
1 Conecte la antena de FM suministrada al terminal "Antenna FM" de la unidad. 2 Cambie la posición de la antena hasta que consiga la mejor recepción de sus emisoras de FM favoritas. natural_image
Line drawing of a back panel with labeled ports and cable (no text or symbols)Encendido de la unidad
Pulse el botón de reposo/encendido STANDBY/ON (☐/I) en la unidad o en el mando a distancia para encender la unidad.  La unidad se enciende con la última fuente de entrada que estuviese seleccionada. La unidad tarda unos 30 segundos en encenderse.Nota
Asegúrese de que la unidad está enchufada a la corriente eléctrica (ver "Conexión a la corriente" en la página 66 para instrucciones detalladas).Selección de una fuente de entrada
Pulse el botón FUNCTION en la unidad o en el mando a distancia.  Cada vez que se pulsa el botón FUNCTION, la fuente de entrada • cambia como sigue: iPod → Net Radio → MUSIC SERVER → FM → AUX Si pulsa el botón FUNCTION para cambiar la fuente de entrada, la fuente de entrada seleccionada en ese momento dejará de sonar. Selección de una fuente de entrada desde el menú principal 1 Pulse y mantenga pulsado el botón MENU (■) en la unidad o pulse el botón "Home" en el mando a distancia para ir al menú principal.  2 Pulse los botones PREVIOUS (1◀◀) (anterior) o NEXT (▶▶1) (siguiente) en la unidad o los botones ARRIBA (▲) o ABAJO (▼) en el mando a distancia para desplazar ">" por la pantalla hasta la fuente de entrada que desee utilizar.  "Bookmark" (marcador), "iPod", "Net Radio" (radio por Internet), "MUSIC SERVER" (servidor de música), "FM", "AUX" y "Settings" (ajustes de configuración) aparecerán listados en la pantalla del menú superior.  3 Para seleccionar la fuente de entrada situada junto a ">", pulse el botón ENTER (▶/II) en la unidad o el botón ENTER en el mando a distancia.  Como fuente de entrada, seleccione "iPod", "Net Radio" (radio por Internet), "MUSIC SERVER" (servidor de música), "FM" o "AUX".Ajuste del volumen
Pulse el botón VOLUME - o + en la unidad o en el mando a distancia para ajustar el volumen.  El nivel de volumen actual aparecerá en la pantalla durante 3 • segundos. El nivel de volumen se puede ajustar de 0 a 50. "MIN" representa volumen 0 y "MAX" representa 50.Silenciamiento del sonido temporalmente
Pulse el botón MUTE (呎) en el mando a distancia.  El nivel de volumen parpadeará en la pantalla cuando la función de silenciamiento esté activada. Ejemplo cuando el volumen está puesto en 12:  \- Para cancelar el silenciamiento, pulse otra vez el botón MUTE(噁) o pulse uno de los botones de volumen VOLUME - o + en el mando a distancia o en la unidad.Nota
Solamente se puede silenciar el sonido desde el mando a distancia.Selección de una ecualización prefijada
Pulse el botón PRESET EQ en el mando a distancia para cambiar el ajuste actual.  \- Cada vez que pulse el botón PRESET EQ, la unidad recorrerá cíclicamente los siguientes ajustes: FLAT (plana), ROCK, POP, CLASSIC (clásica), JAZZ y TALK (conversación).Ajuste del brillo de la pantalla
Pulse el botón ATENUADOR DE PANTALLA (※) en el mando a distancia.  El nivel de brillo cambiará como sigue: flowchart
graph TD
A["<Normal>"] --> B["Auto 88.50 M HzP01"]
B --> C["<Oscuro>"]
C --> D["Auto 88.50 M HzP01"]
D --> E["<Muy oscuro>"]
E --> F["Auto 88.50 M HzP01"]
Comprobación de la información
Pulse el botón DISPLAY en el mando a distancia para comprobar la información de reproducción. Esta función solamente está disponible cuando Net Radio (radio por Internet) o MUSIC SERVER (servidor de música) están seleccionados como fuente de entrada o AirPlay está activado.  La siguiente información se mostrará en la tercera línea de la pantalla: ♪: Estado actual de la unidad : Nombre del archivo actual o información ID3 : Tiempo de reproducción transcurrido → tipo de archivo → título del álbum → tamaño del archivo → nombre del artista \- Cada vez que pulse el botón DISPLAY, la pantalla recorrerá cíclicamente la información arriba mencionada.Reproducción de música desde un iPod/iPhone
1 Conecte el iPod/iPhone a la unidad.
Para instrucciones detalladas sobre la conexión del iPod/iPhone, ver "Conexión del iPod/iPhone" en la página 65. Si conecta un iPod/iPhone que esté reproduciendo una canción, la canción automáticamente se escuchará por el NS-X1.2 Pulse el botón FUNCTION en la unidad o en el mando a distancia repetidamente hasta que en la pantalla aparezca "iPod".
 También puede seleccionar iPod como fuente de entrada desde el menú. Para instrucciones detalladas, ver "Selección de una fuente de entrada desde el menú principal" en la página 68.3 Pulse el botón DERECHA (▶).
Comenzará la reproducción. flowchart
graph TD
A["ENTER (PROPOSENT)"] --> B["Process Step 1"]
A --> C["Process Step 2"]
B --> D["End"]
Selección de un apartado del menú del iPod/iPhone
Pulse los botones ARRIBA y ABAJO (▲ y ▼) para seleccionar el apartado del menú deseado y a continuación pulse el botón DERECHA (▶). flowchart
graph TD
A["ENTER (PRESSET)"] --> B
B --> C
C --> D
D --> E
E --> F
F --> G
G --> H
H --> I
I --> J
J --> K
K --> L
L --> M
M --> N
N --> O
O --> P
P --> Q
Q --> R
R --> S
S --> T
T --> U
U --> V
V --> W
W --> X
X --> Y
Y --> Z
| Botón Descripción | |
| VOL - o + Ajustan el volumen | |
| Reproduce la canción en curso desde el principio | |
| Reproduce o pone en pausa la música seleccionada en ese momento | |
| Reproduce la siguiente canción | |
| Detiene la reproducciónDesplaza al menú anterior en el iPod/iPhone durante el modo de parada | |
| Selecciona una opción de repetición: Repetir todas las canciones: Repetir una canción | |
| Establece el modo de repetición aleatoria | |
Escuchar la radio por Internet
1 Compruebe el entorno de red, asegúrese de que se ha hecho la conexión de red y a continuación encienda la unidad.
\- Si utiliza la radio por Internet por primera vez y la conexión de red aún no se ha establecido, necesitará primeramente configurar dicha conexión de red a través de una conexión a Internet cableada o inalámbrica. Para instrucciones detalladas, ver "Conexión a una red" en las páginas 79 a 81.2 Pulse repetidamente el botón FUNCTION en la unidad o en el mando a distancia hasta que "Net Radio" aparezca en la pantalla.
Net Radio está ahora seleccionada como fuente de entrada.  \- También puede seleccionar Net Radio como fuente de entrada desde el menú. Para instrucciones detalladas, ver "Selección de una fuente de entrada desde el menú principal" en la página 68.3 Pulse los botones ARRIBA y ABAJO (▲ y ▼) en el mando a distancia para desplazar “>” junto a la categoría deseada y a continuación pulse el botón ENTER o DERECHA (▶).
| Categoría Descripción | |
| Favorites | Lista de emisoras/Podcasts que usted haya almacenado como favorita aparece en la pantalla. Seleccione la emisora/Podcast que desee escuchar. |
| Added Stations | Incluso aunque la lista de emisoras contenga miles de emisoras, puede ser que usted quiera escuchar emisoras que no estén en la lista. Usted puede añadir sus propias emisoras a través de la web vTuner (para información detallada sobre cómo añadir una emisora, ver "Añadir una emisora de radio por Internet desde la web vTuner de TEAC" en la página siguiente). |
| Location | Listas de emisoras de Internet ordenad por localización |
| Genre | Búsqueda por el género de la música emitida en la emisora/Podcast. |
| Podcasts By Location | Búsqueda por la localización de los Podcasts. |
| Podcasts By Genre | Búsqueda por el género de los Podcasts. |
| New Stations | Selección a partir de una lista de emisoras añadidas recientemente. |
| Most Popular Stations | Selección a partir de una lista de emisoras populares. |
| Recently Played | Puede seleccionar la emisora/Podcast entre las escuchadas recientemente. |
4 Usando los botones ARRIBA y ABAJO (▲ y ▼) en el mando a distancia y a continuación el botón ENTER o DERECHA (▶), desplácese por la lista de emisoras hasta que aparezca la emisora deseada y a continuación pulse el botón ENTER o DERECHA (▶) en el mando a distancia para escuchar la emisora seleccionada.
-í desea dejar de escuchar la emisora de Internet que esté escuchando en ese momento y volver al menú anterior con la lista de emisoras, pulse el botón de PARADA (■). Añadir una emisora de radio por Internet a su lista de marcadores1 Siga los pasos 1 a 4 del apartado anterior "Escuchar la radio por Internet" para que aparezca en pantalla la emisora de radio por Internet que desee añadir a su lista de marcadores.
2 Pulse el botón BOOKMARK en el mando a distancia.
 La emisora de radio por Internet seleccionada será añadida a • su lista de marcadores. Una vez que el proceso de añadir la emisora a la lista de marcadores se haya completado, puede seleccionar la emisora añadida desde el menú de marcadores ("bookmark"): menú principal >> Bookmark. Borrar una emisora de radio por Internet de su lista de marcadores 1 Pulse el botón HOME en el mando a distancia para ir al menú principal.  Si ya está viendo el menú principal, salte este paso y vaya al paso 2. 2 Pulse los botones ARRIBA y ABAJO (▲ y ▼) en el mando a distancia para desplazar ">" hasta "Bookmark" y a continuación pulse el botón ENTER.  3 Pulse los botones ARRIBA y ABAJO (▲ y ▼) en el mando a distancia para desplazar ">" junto a la emisora de radio que desee borrar.  4 Pulse el botón DELETE en el mando a distancia.  Añadir una emisora de radio por Internet desde la web vTuner de TEAC Usted puede añadir emisoras de radio por Internet desde su ordenador y escuchar dichas emisoras desde esta unidad. 1 Compruebe la dirección MAC del producto. Desde el menú principal, seleccione "Settings" (ajustes de configuración) → "Network" (red), → "Network Information" (información de red) → "MAC Address" (dirección MAC). Pulse los botones ARRIBA y ABAJO (▲ y ▼) para desplazarse por la pantalla del menú y a continuación pulse el botón ENTER para seleccionar el menú deseado. 2 Desde su ordenador, acceda a la web vTuner de TEAC (http://teac.vtuner.com/). Puede cambiar el idioma haciendo clic en el icono de la bandera de cada nación en la parte superior. En la página web, registre su dirección de email y su contraseña. 4 Introduzca la dirección MAC de la unidad. Introduzca la dirección MAC sin comas entre los caracteres alfanuméricos (por ejemplo si la dirección MAC que aparece en su unidad es 01:23:45:67:89:00, introduzca 012345678900 en la web vTuner). Una vez que haya completado el registro, no necesitará introducir la dirección MAC de la unidad. 5 Seleccione un género de la lista de géneros, como puede ser por ejemplo Música. 6 Seleccione la emisora que desee añadir a su lista de favoritos. Haga clic en el botón ¿para añadir la emisora y a continuación aparecerá un cuadro de diálogo. 7 Introduzca un nombre de grupo en el cuadro de diálogo para hacer un grupo y a continuación haga clic en el botón Ejecutar. El nombre del grupo se añadirá a "Mis grupos de favoritas". Usted puede acceder al grupo desde el apartado "Favourites" en el menú de Radio por Internet. Añada la(s) emisora(s) de radio por Internet que desee escuchar. \- Para escuchar la(s) emisora(s) de radio por Internet añadida(s) desde la web vTuner, su unidad debe estar conectada a Internet.Reproducción de música a través de un servidor de música
Puede escuchar archivos de música almacenados en un ordenador (servidor de música) conectado a esta unidad mediante una red cableada/inalárnbrica. 1 Arranque el ordenador (servidor de música). Compruebe el entorno de red, asegúrese de que se ha hecho la conexión de red y a continuación encienda la unidad. Para instrucciones detalladas, ver "Conexión a una red" en las páginas 79 a 80. 2 Pulse el botón FUNCTION en la unidad o en el mando a distancia para seleccionar "MUSIC SERVER" (servidor de música) como fuente de entrada.  Aparecerá en pantalla la lista de dispositivos conectados a la misma red. 3 Pulse los botones ARRIBA y ABAJO (▲ y ▼) en el mando a distancia para seleccionar su ordenador como servidor de música y a continuación pulse el botón ENTER.  4 Pulse los botones ARRIBA y ABAJO (▲ y ▼) en el mando a distancia para desplazar “>” junto a la categoría deseada, como por ejemplo Música y a continuación pulse el botón ENTER. 5 Descienda por el árbol de carpetas ejecutando las operaciones similares a las mencionadas en el paso anterior 4 hasta que “>” se desplace junto al archivo que quiera reproducir. 6 Pulse el botón ENTER para comenzar la reproducción. Configuración del reproductor Windows Media® Player 11 para reproducir archivos de música almacenados en su ordenador 1 Arranque Windows Media Player 11 en su ordenador. 2 Seleccione la pestaña "Biblioteca" en la barra de menú y a cont inuación se leccione "Us o comp artido de multimedia". 3 En el cuadro de diálogo de "Uso compartido de multimedia", seleccione la caja de verificación "Compartir mi multimedia" y a continuación haga clic en "Aceptar". 4 Seleccione esta unidad en la lista de dispositivos y a continuación haga clic en "Permitir". 5 Haga clic en "Aceptar" para cerrar el cuadro de diálogo. Ha completado la configuración del reproductor Windows Media Player 11. Ya puede reproducir los archivos de música almacenados en su ordenador usando la biblioteca del reproductor Windows Media Player 11 a través de esta unidad.Utilización de música en "streaming" (2)
Configuración del reproductor Windows Media® Player 12 para reproducir archivos de música almacenados en su ordenador 1 Arranque Windows Media Player 12 en su ordenador. 2 Haga clic en la flecha "Transmitir" cerca de la parte superior de la ventana del Windows Media Player y a continuación seleccione "Activar transmisión por secuencia de multimedia..." Si le requiere la confirmación o contraseña de administrador, introduzca la contraseña o proporcione la confirmación. En la ventana "Elegir opciones de transmisión por secuencia de multimedia para equipos y dispositivos", haga clic en "Activar transmisión por secuencia de multimedia" y a continuación haga clic "Aceptar". 4 Seleccione su NS-X1 en la lista de dispositivos mostrados y a continuación seleccione "Permitido" en la lista desplegada para la unidad seleccionada. Después, haga clic en "Aceptar". 5 Haga clic en la flecha "Transmitir" cerca de la parte superior de la ventana del Windows Media Player y a continuación seleccione "Permitir automáticamente que los dispositivos puedan reproducir mis elementos multimedia..." Ha completado la configuración del reproductor Windows Media Player 12. Ya puede reproducir los archivos de música almacenados en su ordenador usando la biblioteca del reproductor Windows Media Player 12 a través de esta unidad.AirPlay
Conexión "AirPlay"
Usando la tecnología de flujo de datos en "streaming" denominada AirPlay, esta unidad puede reproducir audio desde los siguientes modelos de iPod/iPhone/iPad con sistema operativo iOS 4.3 o posterior a través de una conexión inalámbrica. iPod touch (3ª y 4ª generación) ● iPhone 4S, iPhone4, iPhone 3GS ● iPad 2, iPad ● 1 Compruebe el entorno de red, asegúrese de que se ha hecho la conexión de red y a continuación encienda la unidad. Para instrucciones detalladas, ver "Conexión a una red" en las páginas 79 a 81. Asegúrese de que la unidad y el iPod/iPhone/iPad están • conectados a la misma red. 2 Inicie la reproducción en el iPod/iPhone/iPad. Si la unidad y el iPod/iPhone/iPad están conectados a la misma red, el icono (XiPlay) aparecerá en el lado derecho de la barra de volumen del iPod/iPhone/iPad. \- Asegúrese de seleccionar el mismo servidor en el iPod/iPhone/iPad que el seleccionado en esta unidad. 3 Pulse el icono (AirPlay) y a continuación seleccione la unidad como fuente de salida. Cuando la unidad y el iPod/iPhone/iPad estén correctamente conectados dentro del alcance de la red inalámbrica, la reproducción de música del iPod/iPhone/iPad saldrá desde esta unidad.Sintonización automática
1 Pulse repetidamente el botón FUNCTION en la unidad o en el mando a distancia hasta que "FM" aparezca en la pantalla.
FM está ahora seleccionada como fuente de entrada. \- también puede seleccionar FM como fuente de entrada desde el menú. Para instrucciones detalladas, ver "Selección de una fuente de entrada desde el menú principal" en la página 68.2 Pulse el botón de PARADA (■) repetidamente hasta que "Auto" aparezca en la pantalla.
 Cada vez que pulse el botón, el modo cambiará como sigue: 3 Pulse el botón PREVIOUS (|◀◀) (anterior) o NEXT (▶▶) (siguiente) para empezar a buscar una emisora con fuerza suficiente.
- Cuando la unidad detecta una emisora con la suficiente fuerza, la pantalla muestra la frecuencia sintonizada y aparece el icono - Si la emisora encontrada no es la deseada, simplemente repita esta operación. Las emisoras con una fuerza de señal insuficiente son saltadas durante el proceso de sintonización automática.Sintonización manual
1 Pulse repetidamente el botón FUNCTION en la unidad o en el mando a distancia hasta que "FM" aparezca en la pantalla.
FM está ahora seleccionada como fuente de entrada. También puede seleccionar FM como fuente de entrada desde el menú. Para instrucciones detalladas, ver "Selección de una fuente de entrada desde el menú principal" en la página 68.2 Pulse el botón de PARADA (■) repetidamente hasta que "Manual" aparezca en la pantalla.
 3 Pulse repetidamente el botón PREVIOUS (1◀◀) (anterior) o NEXT (▶▶1) (siguiente) hasta alcanzar la frecuencia deseada.Sintonización de una emisora presintonizada
1 Pulse repetidamente el botón FUNCTION en la unidad o en el mando a distancia hasta que "FM" aparezca en la pantalla.
FM está ahora seleccionada como fuente de entrada.  \- También puede seleccionar FM como fuente de entrada desde el menú. Para instrucciones detalladas, ver "Selección de una fuente de entrada desde el menú principal" en la página 68.2 Pulse el botón de PARADA (■) repetidamente hasta que "Preset" aparezca en la pantalla.
3 Pulse repetidamente el botón PREVIOUS (|◀◀) (anterior) o NEXT (▶▶) (siguiente) hasta que la emisora presintonizada deseada aparezca en la pantalla.
RDS (Sistema de Datos por Radio)
El Sistema de Datos por Radio (RDS) es un servicio de radiodifusión que permite a las emisoras enviar información adicional junto con la señal de los programas de radio normales. El sistema RDS funciona en la banda de FM en Europa.Sintonice una emisora de FM RDS.
El modo RDS se muestra en la tercera línea de la pantalla. Para información detallada sobre como sintonizar una emisora FM ● RDS, ver página anterior. Si en la pantalla no aparece el modo RDS, inténtelo con una antena externa para aumentar la sensibilidad. Cada vez que pulse el botón DISPLAY en el mando a distancia, la unidad recorrerá cíclicamente los ajustes del modo RDS en el siguiente orden: flowchart
graph TD
A["PS (Servicio de programa)"] --> B["RT (Texto por radio)"]
B --> C["PTY (Tipo de programa)"]
① PS (Servicio de programa)
Cuando se selecciona PS, en la pantalla aparece el nombre de la emisora. Si no hay datos PS, no aparece ningún mensaje en la pantalla.② RT (Texto por radio)
Cuando se selecciona RT, en la pantalla aparecen las noticias de la emisora hasta un máximo de 64 caracteres. Si no hay datos RT, no aparece ningún mensaje en la pantalla.③ PTY (Tipo de programa)
Cuando se selecciona PTY, en la pantalla aparece la descripción del tipo de música emitido por la emisora de radio, por ejemplo música pop, rock o clásica. Si no hay datos PTY, no aparece ningún mensaje en la pantalla.Presintonización automática
1 Pulse repetidamente el botón FUNCTION en la unidad o en el mando a distancia hasta que "FM" aparezca en la pantalla.
FM está ahora seleccionada como fuente de entrada. 2 Pulse y mantenga pulsado el botón ENTER durante más de 2 segundos.
Aparecerá el mensaje "Auto Preset OK?" (¿Aceptar presintonización automática? 3 Vuelva a pulsar otra vez el botón ENTER.
Se almacenarán hasta un total de 30 emisoras de FM. Para detener la presintonización automática, pulse el botón PREVIOUS (I◀◀) (anterior) o NEXT (▶▶I) (siguiente).Cambiar a modo estéreo/mono
Se puede seleccionar modo estéreo o mono mientras se escucha una emisora de radio de FM. Para hacerlo, simplemente pulse el botón STEREO/MONO en el mando a distancia.  Cuando está seleccionado el modo estéreo, el icono ■ parece en la pantalla.  \- Si se oye mucho ruido, seleccione el modo mono. \- Si no se recibe ninguna emisora, el sonido se silencia automáticamente.Guardar presintonías
1 Pulse repetidamente el botón FUNCTION en la unidad o en el mando a distancia hasta que "FM" aparezca en la pantalla. FM está ahora seleccionada como fuente de entrada.  2 Seleccione una emisora automáticamente o manualmente. - "er "Sintonización automática" en la página 75 para seleccionar una emisora automáticamente. -Ver "Sintonización manual" en la página 75 para seleccionar una emisora manualmente. -Ver "Sintonización de una emisora presintonizada" en la página 75 para seleccionar una emisora manualmente. - Cuando la emisora seleccionada ya esté almacenada, en el lado derecho de la pantalla aparecerá un número. Cuando la emisora no esté almacenada, en la pantalla aparecerá "P--". 3 Pulse el botón ENTER en el mando a distancia.  4 Pulse el botón PREVIOUS (1◀◀) (anterior) o NEXT (▶▶1) (siguiente) para seleccionar el número que desee utilizar como número de presintonía. 5 Pulse el botón ENTER para guardar la emisora con el número de presintonía seleccionado.Reproducción de música desde dispositivos externos
1 Conecte el dispositivo externo a la unidad. Para instrucciones detalladas sobre la conexión de dispositivos externos, ver "Conexión de un dispositivo externo" en la página 67. 2 Pulse repetidamente el botón FUNCTION en la unidad o en el mando a distancia hasta que "AUX" aparezca en la pantalla. AUX está ahora seleccionada como fuente de entrada.  3 Comience la reproducción. No se puede controlar el dispositivo externo desde la unidad ni utilizando el mando a distancia. Solamente puede controlar la opción de reproducción desde el dispositivo externo. \- ¿e puede controlar el nivel del volumen desde la unidad o utilizando el mando a distancia. Diagrama de flujo del menú de ajustes de configuración flowchart
graph TD
A["Settings Network Setup"] --> B["Network Connect"]
A --> C["Wireless"]
A --> D["Other"]
A --> E["Network Information"]
B --> F["Wired"]
F --> G["DHCP — On / Off"]
F --> H["IP Address"]
F --> I["Subnet Mask"]
F --> J["Gateway"]
F --> K["Primary DNS"]
F --> L["Secondary DNS"]
F --> M["Proxy — On / Off"]
F --> N["Proxy Server"]
F --> O["Proxy Port"]
C --> P["AP List"]
C --> Q["WPS — PIN"]
C --> R["PBC"]
C --> S["Cancel"]
E --> T["Name — NS-X1 / Default"]
E --> U["Factory reset — OK / Cancel"]
E --> V["Name"]
V --> W["DHCP"]
V --> X["IP Address"]
V --> Y["MAC address"]
E --> Z["Clock GMT"]
E --> AA["Clock Adjust"]
E --> AB["Alarm"]
E --> AC["On/Off"]
E --> AD["Setting"]
E --> AE["Sleep — Sleep Off / 120 / 90 / 60 / 45 / 30 / 15"]
E --> AF["Standby Mode — On/Off"]
Utilización del menú de ajustes de configuración
Se puede acceder al menú de ajustes de configuración desde la unidad principal o desde el mando a distancia. Utilización del menú de ajustes de configuración desde la unidad principal 1 Pulse y mantenga pulsado el botón MENU (■) en la unidad. 2 Pulse el botón PREVIOUS (1◀◀) (anterior) o NEXT (▶▶1) (siguiente) para seleccionar "Settings" (ajustes de configuración). 3 Pulse el botón ENTER (▶/II). 4 Pulse los botones PREVIOUS (1◀◀) (anterior) y NEXT (▶▶1) (siguiente) para desplazar “>” junto al menú que desee seleccionar y luego pulse el botón ENTER (▶/III). Dependiendo del menú seleccionado, se pueden cambiar los ajustes de la red (Network), del reloj (Clock), de la alarma (Alarm), del temporizador de apagado (Sleep) o del modo de reposo (Standby).Nota
No hay ningún botón en la unidad para desplazarse al menú anterior. Si desea desplazarse al menú anterior, use el botón IZQUIERDA (◀) en el mando a distancia. Utilización del menú de ajustes de configuración desde el mando a distancia 1 Pulse el botón SETTING en el mando a distancia. Aparecerán los menús justo debajo de "Settings".  Los menús arriba mencionados también aparecerán cuando ● pulse el botón HOME y pulse el botón ARRIBA o ABAJO (▲ o ▼) para desplazar ">" junto a "Settings" y a continuación pulse el botón ENTER. Dependiendo del menú seleccionado, se pueden cambiar los ● ajustes de configuración de la red (Network Setup), del reloj (Clock), de la alarma (Alarm), del temporizador de apagado (Sleep) o del modo de reposo (Standby). 2 Pulse los botones ARRIBA o ABAJO (▲ o ▼) para seleccionar el menú deseado y a continuación pulse el botón ENTER.Ajustes de configuración de red
Para escuchar emisoras de radio de Internet o archivos de música almacenados en su ordenador mediante una red cableada/inalámbrica, primero deberá configurar los ajustes de red.Conexión a una red
Configuración de la conexión a una red cableada
Antes de configurar la conexión, compruebe que hay un cable LAN/ETHERNET correctamente conectado al puerto ETHERNET. Para más detalles, ver "Conexión con cable LAN/ETHERNET" en la página 66. 1 Desde el menú de ajustes de configuración "Settings", seleccione "Network" (red) → "Network Connect" (conexión de red) → "Wired" (cableada).  Después de cambiar entre cableada (Wired) e inalámbrica ● (Wireless), asegúrese de poner la unidad en reposo (Standby) y después encenderla pulsando el botón STANDBY/ON (☐/I) en la unidad principal. 2 Cambie los siguientes ajustes si es necesario:| Apartado del menú | Descripción |
| DHCP | Activar (on)/desactivar (off) la función DHCP (protocolo de configuración de "host" dinámico). |
| IP Address Introducir una dirección IP. | |
| Subnet Mask | Introducir una submáscara de red cuando la función DHCP está desactivada (off). |
| Gateway | Introducir una puerta de enlace cuando la función DHCP está desactivada (off). |
| Primary DNS | Introducir una DNS primaria cuando la función DHCP está desactivada (off). |
| Secondary DNS | Introducir una DNS secundaria cuando la función DHCP está desactivada (off). |
| Proxy | Activar (on)/desactivar (off) la función Proxy |
| Proxy Server | Introducir un Servidor Proxy cuando la función Proxy está activada (on). |
| Proxy Port | Introducir un Puerto Proxy cuando la función Proxy está activada (on). |
Nota
Cuando DHCP está puesto en "ON" (activado), no se necesita establecer una dirección IP (IP Address), una submáscara de red (Subnet Mask), una puerta de enlace (Gateway), DNS, etc. Cuando DHCP esté puesto en "OFF" (desactivado), deberá configurar la conexión de red manualmente introduciendo la dirección IP (IP Address,) etc. En ese caso, se requiere un cierto conocimiento sobre redes. Si usted no entiende de conexiones a Internet, contacte con su proveedor de servicios de Internet.Configuración manual de una conexión de red cableada
1 Desde el menú de ajustes de configuración "Settings", seleccione "Network" (red) → "Network Connect" (conexión a una red) → "Wired" (cableada). ●Después de cambiar entre cableada (Wired) e inalámbrica (Wireless), asegúrese de poner la unidad en reposo (Standby) y después encenderla pulsando el botón STANDBY/ON (☐/I) en la unidad principal. 2 Seleccione "DHCP" y ajústelo en "Off" (desactivado).  3 Pulse el botón IZQUIERDA (◀) para regresar a la pantalla anterior y a continuación seleccione "IP Address". (dirección IP). 4 Seleccione el número deseado pulsado el botón ARRIBA o ABAJO ( ▲ o ▼ ).  Puede desplazarse al número anterior o siguiente pulsando el botón IZQUIERDA o DERECHA (◀ o ▶). 5 Pulse el botón IZQUIERDA (◀) para regresar al menú anterior y a continuación introduzca la submáscara de red (Subnet Mask), la puerta de enlace (Gateway), la DNS primaria (Primary DNS) y la DNS secundaria (Secondary DNS) de la misma manera que se ha indicado más arriba en los pasos 1 a 4. Cuando la conexión a una red cableada esté correctamente hecha, en la pantalla aparecerá el icono .Configuración de la conexión a una red inalámbrica
Si su router inalámbrico con punto de acceso soporta la función WPS, puede seleccionar "WPS". Si no, seleccione "AP List" (lista de puntos de acceso). 1 Desde el menú de ajustes de configuración "Settings", seleccione "Network" (red) → "Network Connect" (conexión a una red) → "Wired" (cableada).Wire d
> Wireless
| Apartado del menú | Descripción | |
| AP List Seleccionar | punto de acceso. | |
| WPS | PIN | Verificar el código PIN para configurar WPS. |
| PBC | Configurar WPS usando PBC. | |
| Cancel | Cancelar el proceso WPS. | |
Nota
Puesto que la función DHCP (protocolo de configuración de "host" dinámico) está fija en "On" (activada) para la conexión de red inalámbrica, no se puede establecer una dirección IP (IP Address) estática cuando se utilice una conexión de red inalámbrica. Configuración de una red inalámbrica mediante AP (punto de acceso) 1 Desde el menú de ajustes de configuración "Settings", seleccione "Network" (red) → "Network Connect" (conexión a una red) → "Wired" (cableada).  Después de cambiar entre cableada (Wired) e inalámbrica ● (Wireless), asegúrese de poner la unidad en reposo (Standby) y después encenderla pulsando el botón STANDBY/ON ( ⭕/I) en la unidad principal. 2 Seleccione "AP List".  3 Seleccione uno de los puntos de acceso ("APs") de la lista. 4 Introduzca la clave si se le requiere que lo haga.  - Pulse el botón ARRIBA o ABAJO (▲ o ▼) para ver los diferentes grupos de números, letras o caracteres. - Desplace el cursor al número, letra o carácter deseado pulsando los botones IZQUIERDA y DERECHA (◀ y ▶) y pulse el botón ENTER para introducir el carácter seleccionado. Para borrar la selección, seleccione "<". Para confirmar la entrada, seleccione "E". Para cancelar y regresar al menú anterior, seleccione "C". 5 Pulse el botón ENTER para confirmar la selección. \- La configuración de red se reiniciará automáticamente y en la pantalla aparecerá el icono 📄Otros ajustes de configuración de red
1 Desde el menú de ajustes de configuración "Settings", seleccione "Network" (red) y a continuación "Other" (otros).Netw o rkConn
> Other
NetworkInfo
| Apartado del menú | Descripción |
| Name | Cambiar el nombre de la unidad que aparece en la red. |
| Factory Reset | Restablecer todos los ajustes a los valores de fábrica por defecto. |
Cambiar el nombre de la unidad
1 Desde el menú de ajustes de configuración "Settings", seleccione "Network" (red) → "Other" (otros) → "Name" (nombre).> Name
Fac tory Rese
> N5 - X 1 22138F
De f aul t
Nota
- Asegúrese de cambiar la zona horaria mientras la unidad está conectada a Internet. - GMT significa "Greenwich Mean Time" (horario del Meridiano de Greenwich). Deberá averiguar si su horario local está por delante o por detrás del horario del Meridiano de Greenwich e introducir el horario.Ajustar el reloj
Nota
- Dado que la unidad actualiza la hora a través de Internet, es necesario que esté conectada a la red antes de empezar a realizar los ajustes horarios. Para información más detallada sobre la configuración de una red cableada/inalámbrica, ver "Configuración de red" en las páginas 79 a 80. - También puede ajustar el reloj pulsando y manteniendo pulsado el botón CLOCK (ADJ) en el mando a distancia durante 2 segundos. Desde el menú de ajustes de configuración "Settings", seleccione "Clock" (reloj) y a continuación "Clock Adjust" (ajustar reloj).  \- La unidad mostrará el mensaje "Clock Adjust" en la pantalla y ajustará la hora automáticamente de acuerdo a la zona horaria. Verificación de la hora
Después de ajustar la hora, puede comprobarla. Simplemente pulse el botón CLOCK (ADJ) en el mando a distancia. Alarma
Se puede ajustar la alarma para encender la unidad a la hora establecida. La función de alarma solamente puede usarse una vez que ya se ha ajustado la hora en el reloj. Para información detallada, ver "Reloj" en la página anterior.Ajuste del temporizador de la alarma por primera vez
1 Desde el menú de ajustes de configuración "Settings", seleccione "Alarm" (alarma).Netw o r k
Clock
> Alarm
00:00
5 Aparecerá el siguiente menú en pantalla:
 - Aparecerá el icono 🔒 mostrando que la alarma está puesta. - Pulse los botones ARRIBA o ABAJO (▲ o ▼) para desplazarse hacia arriba o hacia abajo por el menú y a continuación pulse el botón ENTER para seleccionar un menú. - Puede seleccionar "On/Off" para encender o apagar la alarma respectivamente. - Puede seleccionar "Settings" para volver a realizar los ajustes de la alarma como se ha descrito en los pasos 1 a 4 ●Pulse el botón HOME para salir del menú. - Puede acceder al menú superior pulsando y manteniendo pulsado el botón ALARM excepto cuando el ajuste de la alarma está activado.Temporizador de apagado (Sleep)
Se puede configurar el temporizador de apagado (función Sleep) para poner en reposo (Standby) la unidad automáticamente después de la hora establecida.Configuración del temporizador de apagado
Simplemente pulse el botón SLEEP en el mando a distancia. Cada vez que pulse el botón SLEEP, el mensaje cambiará como sigue:   Después de ajustar el temporizador de apagado, puede comprobar o ajustar el tiempo que queda desde el menú de ajustes de configuración "Settings". Mientras el ajuste de temporizador de apagado está activado, en la pantalla se muestra el icono 🚫.Comprobación del temporizador de apagado
Se puede comprobar el tiempo que queda del temporizador de apagado. Desde el menú de ajustes de configuración "Settings", seleccione "Sleep".Alarm
> Sleep
StandbyMode
Ajuste del temporizador de apagado (función Sleep)
1 Desde el menú de ajustes de configuración "Settings", seleccione "Sleep". En la pantalla aparecerá el tiempo que queda.Sleep 13
Modo de reposo (standby)
Se puede configurar la red para permanecer activada (on) o desactivada (off) durante el modo de reposo (standby).Ajuste del modo de reposo
1 Desde el menú de ajustes de configuración "Settings", seleccione "Standby Mode" (modo de reposo).Alarm
Sleep
> StandbyMode
Solución de posibles fallos (1)
Si experimenta algún problema con esta unidad, por favor tómese unos momentos para leer estas páginas y ver si puede resolver el problema por usted mismo antes de llamar a su distribuidor o a un servicio técnico de TEAC. Es más, el problema podría estar causado por algo ajeno a esta unidad. Confirme que los demás dispositivos conectados también están siendo utilizados correctamente.Comportamiento errático de la unidad durante la reproducción de vídeo/audio
- Asegúrese de que el archivo que está siendo reproducido utiliza uno de los formatos que aparecen en las "Especificaciones" de la página 87. Instale la última versión del sistema operativo en el iPod/iPhone. - Si el problema continúa sucediendo, ponga la unidad en reposo (Standby) y después enciéndala pulsando el botón STANDBY/ON (Ó/I). A continuación, asegúrese de que se cumplen las dos condiciones anteriores.No sale sonido alguno por la conexión de la base Dock durante la reproducción de vídeo
Reproduzca el vídeo mediante AirPlay.| Síntoma Posible causa Solución | ||
| No hay corriente | El cable de corriente está desconectado. Conecte bien el cable. | |
| Hay una mala conexión en la toma de electricidad o el enchufe está averiado o apagado. | Compruebe el enchufe usando una lámpara u otro aparato. | |
| No hay sonido | El volumen general está demasiado bajo | Ajuste el volumen general. |
| El botón de silenciamiento (MUTE) está activado. | Pulse el botón MUTE para cancelar el efecto de silenciamiento. | |
| Selección incorrecta de la fuente de entrada. | Seleccione correctamente la fuente de entrada seleccionada. | |
| Conexiones incorrectas entre los componentes. | Haga las conexiones correctamente. | |
| El mando a distancia no funciona | No hay pila puesta o está gastada. | Sustituya la pila. |
| Hay un impedimento que obstaculiza el sensor de control remoto. | Quite el obstáculo. | |
| No se pueden recibir las emisoras | No hay antena conectada. | Conecte una antena. |
| La frecuencia de la emisora deseada no está sintonizada. | Sintonice la frecuencia de la emisora deseada. | |
| La antena está en mala posición. | Mueva la antena y vuelva a intentar la sintonización. | |
| No se pueden recibir las emisoras presintonizadas | Se ha memorizado una frecuencia de emisora incorrecta. | Memorice la frecuencia de emisora correcta. |
| Las emisoras memorizadas se han borrado. | Memorice las emisoras otra vez. | |
| La recepción de FM es pobre | No hay antena conectada. | Conecte una antena. |
| La antena no está posicionada para obtener la mejor recepción. | Cambie la posición de la antena. | |
Solución de posibles fallos (2)
| Síntoma Posible causa Solución | ||
| No se puede conectar a la red | No hay cable LAN/ETHERNET conectado. Conecte | un cable LAN/ETHERNET. |
| No hay conexión inalámbrica disponible. Verifique | si hay una conexión inalámbrica disponible. | |
| La red se ha caído. Compruebe que la red está funcionando. | ||
| Insuficiente fuerza de la señal (conexión inalámbrica). | Acorte la distancia desde el punto de acceso de LAN inalámbrico o elimine cualquier posible obstáculo. | |
| No se pueden reproducir las emisiones de radio por Internet | La red está desconectada. Compruebe el estado de la conexión. | |
| El programa se está emitiendo en un formato no compatible. | En este receptor solamente se pueden reproducir los formatos MP3, WMA, WAV y AAC. | |
| La emisora de radio por Internet no está emitiendo en ese momento. | Sintonice una emisora de radio que esté emitiendo en ese momento. | |
| AirPlay inestable | Puede existir un problema de comunicación con el punto de acceso. | AirPlay puede comportarse inestablemente según el rendimiento o las condiciones de funcionamiento del router. En ese caso, compruebe el estado de la red y a continuación optimice el entorno de funcionamiento del NS-X1. |
| Elicono de reproducción aleatoria o repetida no desaparece de la pantalla. | En el menú principal (pantalla del menú superior), seleccione "Bookmark" (marcador) y a continuación empiece a reproducir un archivo desde la lista de marcadores. Después, pulse el botón de reproducción aleatoria (✗) o repetida (☐) en el mando a distancia para cancelar el ajuste de reproducción aleatoria o repetida o pulse el botón de Parada (■) en el mando a distancia. | |
Especificaciones
SECCIÓN DE AMPLIFICADOR
Salida nominal 10W + 10W (1kHz, 6 Ω, THD 10%) Relación señal/ruido .....78dB (IHF-ponderada A 20 kHz LPF)Sensibilidad de entrada
AUX 1 VrmsSECCIÓN DE ALTAVOCES
Recintos acústicos....Tipo "reflex" de graves Altavoces....Tipo cono de 80 mm Impedancia 6ΩSECCIÓN DE SINTONIZADOR DE FM
Rango de recepción 87.5 MHz - 108.0 MHz pasos de 50 kHz Señal/Ruido (Mono/Estéreo) .... 75 dB o superior / 70 dB o superiorrSECCIÓN DE RED
Ethernet 10 BASE-T/100 BASE-TX Wi-Fi IEEE 802.11 b/g Velocidad de transmisión ..... modo 802.11b (D5-SS: 11/5.5/1 Mbps) modo 802.11g (OFDM: 54/48/36/24/18/12/9/6 Mbps) Rango de frecuencias usado 2.412 - 2.472 GHz (2.4 GHz Banda ISM)GENERAL
Alimentación ....CA 100 - 240 V, 50 / 60Hz (DC 12 V) Consumo de corriente CA 20 W (DC 15 W) Consumo de corriente en reposo 1 W o menor Dimensiones máximas (an. x al. x pro.) ..... 320 x 212.2 x 95.5mm Peso 1.95 kg (Neto)Accesorios incluidos
Mando a distancia RC-1287 x 1 Pila CR-2025 x 1 Tapa x 1 Adaptador de corriente x 1 Antena de cable de FM x 1 Manual del usuario (este documento) x 1 Tarjeta de garantía x 1 El diseño y las especificaciones están sujetos a cambios sin previo aviso. El peso y las dimensiones son aproximados. Las ilustraciones pueden diferir ligeramente de los modelos de ● producción. Formatos de audio soportados| Formato | Extensión de archivo | Flujo de transmisión ("stream") | Parámetros | Valor |
| MF3 | mp3 | MPEG-1/2 Layer-I | Frecuencia de muestreo | 8 - 48KHz |
| Tamaño de palabras de audio | 16bits | |||
| Número de canales | 2Ch | |||
| Velocidad de bits | 8 - 320Kops | |||
| VBR/CBR | Soportado | |||
| WAV | wav | LFCM | Frecuencia de muestreo | 8 - 192KHz |
| Tamaño de palabras de audio | 16, 20, 24bits | |||
| Número de canales | 2Ch | |||
| WMA | así wma | WMA2/ 7/6/ 9/10 | Frecuencia de muestreo | 8 - 48KHz |
| Tamaño de palabras de audio | 16bits | |||
| Número de canales | 2Ch | |||
| Velocidad de bits | 5 - 320Kops | |||
| VBR/CBR | Soportado | |||
| WMA Pro WMA Lossless | Frecuencia de muestreo | 8 - 48KHz | ||
| Tamaño de palabras de audio | 16bits | |||
| Número de canales | 2Ch | |||
| Velocidad de bits | 5 - 320Kops | |||
| VBR/CBR | Soportado | |||
| AAC | m4a | MPEG-4 AAC | Frecuencia de muestreo | 32 - 96KHz |
| aac | MPEG-4 HE AAC | Tamaño de palabras de audio | 16bits | |
| 3gp | (AAC Plus v1/2) | Número de canales | 2Ch | |
| 3g2 | Velocidad de bits | 16 - 320Kops | ||
| VBR/CBR | Soportado |
Für Kunden in Europa
Entsorgung von elektrischen Altgeräten und Batterien
(a) Wenn das Symbol einer durchgestrichenen Abfallton ne auf einem Produkt, der Verpackung und/oder der begleitenden Dokumentation angebracht ist, unterliegt dieses Produkt den europäischen Richtlinien 2002/96/EC und/oder 2006/66/EC sowie nationalen Gesetzen zur Umsetzung dieser Richtlinien.  (b) Diese Richtlinien und Gesetze schreiben vor, dass Elektro-/Elektronik-Altgeräte sowie Batterien und Akkus nicht in den Hausmüll (Rest müll) gelangen dürfen. Um die fachgerechte Entsorgung, Aufbereitung und Wiederverwertung sicherzustellen, sind Sie verpflichtet, Altgeräte und entladene Batterien/Akkus über staatlich dafür vorgesehene Stellen zu entsorgen. (c) Durch die ordnungsgemäße Entsorgung solcher Geräte, Batte rien und Akkus leisten Sie einen Beitrag zur Einsparung wertvoller Rohstoffe und verhindern potenziell schädliche Auswirkung gen auf die Gesundheit der Allgemeinheit und die Umwelt, die durch falsche Abfallentsorgung entstehen können. Die Entsorgung ist für Sie kostenlos. (d) Falls der Gehalt an Blei (Pb), Quecksilber (Hg) und/oder Cadmium (Cd) in Batterien/Akkus die in der Richtlinie zur Batte rie entsorgung (2006/66/EC) angegebenen, zulässigen Höchst werte übersteigen, wird die Bezeichnung des entsprechen den chemischen Elements oder der Elemente unterhalb der durchgestrichenen Abfall tonne angegeben.  (e) Weitere Informationen zur Wertstoffsammlung und Wieder ver wertung von Altgeräten, Batterien und Akkus erhalten Sie bei Ihrer Stadt verwaltung, dem für Sie zuständigen Abfall entsorgungsunternehmen oder der Verkaufsstelle, bei der Sie das Produkt erworben haben.Inhalt Vor der ersten
Danke, dass Sie sich für TEAC entschieden haben. Lesen Sie diese Bedienungsanleitung bitte aufmerksam durch, um die Leistung des NS-X1 in vollem Umfang nutzen zu können. Vor der ersten Inbetriebnahme 89 Die Fernbedienung....90 Bedienelemente und Anschlüsse (NS-X1) 91 Tasten und deren Funktion (Fernbedienung) 92 Anschließen 93 Grundlegende Bedienung 96 iPod/iPhone 98 Internetradio....99 Streaming von Audiodateien 101 AirPlay....102 UKW (FM) Radiobetrieb 103 AUX 105 Einstellungen 106 Hilfe bei Funktionsstörungen....113 Technische Daten 115etriebnahme (1)
Lieferumfang
Überprüfen Sie das mitgelieferte Zubehör auf Vollständigkeit. Fernbedienung RC-1287 x 1  Batterie CR-2025 x 1  Abdeckung x 1  Netzadapter x 1  UKW (FM) Wurfantene x 1  Bedienungsanleitung (dieses Dokument) x 1 Bewahren Sie die Bedienungsanleitung an einem sicheren Ort auf, ● um jederzeit Etwas darin nachschlagen zu können. Garantiekarte x 1Vor der ersten Inbetriebnahme (2)
Wahl des Aufstellungsortes
Wählen Sie einen Aufstellungsort, an dem der NS-X1 nicht direk tem Sonnenlicht oder anderen Wärmequellen ausgesetzt ist. Vermeiden Sie ebenfalls Betriebsorte mit erhöhtem Staubauf kommen oder solche, die Erschütterungen, Hitze, Kälte sowie Feuchtigkeit ausgesetzt sind. Achten Sie auf ausreichenden Belüftungsabstand, da sich der • NS-X1 während des Betriebs erwärmen kann. Stellen Sie den NS-X1 nicht auf Verstärker, Endstufen, Receiver oder andere Geräte, die Wärme erzeugen. Bei eingeschaltetem NS-X1 können, nach Einschalten eines Fernsehgeräts, Linien im Fernsehbild erscheinen. Hierbei handelt es sich nicht um Fehlfunktionen, sondern um Interferenzen, die unter bestimmten Umständen auftreten können. Falls dieser Effekt auftritt, vergrößern Sie den Abstand zwischen dem Network Audio Player und dem TV-Gerät.Wandmontage
Der NS-X1 kann mittels der beiden Aufhängungsmontageöffnungen auf der Geräte rückseite an einer Wand befestigt werden. 1 Schließen Sie das Netzkabel an. 2 Übertragen Sie den genauen Abstand zwischen den beiden Montageöffnungen auf die Wand, bohren Sie entsprechende Löcher und versehen Sie diese mit Dübeln und Schrauben. 3 Hängen Sie den NS-X1 an den vorbereiteten Schrauben auf.  Achten Sie beim Auswählen der Schrauben darauf, dass der Schraubenkopf möglichst präzise in die Montageöffnungen passt.Die Fernbedienung
Einsetzen der Batterien
1 Ziehen Sie die Batteriehalterung heraus. 2 Setzen Sie die mitgelieferte CR2025 Batterie in die Halterung ein. 3 Schieben Sie die Batteriehalterung wieder in die Fernbedienung. natural_image
Line drawing of a remote control device with a connector inserted (no text or symbols)Achtung
Nehmen Sie die Batterie aus der Fernbedienung, wenn Sie diese über einen längeren Zeitraum nicht verwenden.Betriebsradius der Fernbedienung
Der effektive Betriebsradius der Fernbedienung beträgt ungefähr sieben Meter und der Richtwinkel beträgt ungefähr 30 Grad. Richten Sie die Fernbedienung zur Übermittlung von Steuerungssignalen auf den Sensor am NS-X1. Front- und Rückansicht
1 STANDBY/ON-Taste (⏻/ı)
Mittels dieser Taste schalten Sie den NS-X1 ein oder versetzen ihn in den Bereitschaftsmodus (STANDBY).2 „VOLUME –“ Taste
Diese Taste dient zum Vermindern der Wiedergabelautstärke.3 „VOLUME +“ Taste
Diese Taste dient zum Erhöhen der Wiedergabelautstärke.4 FUNCTION-Taste
Mittels dieser Taste wählen Sie eine Signalquelle5 iPod/iPhone Dock
6 Display
7 Fernbedienungssensor
8 ▶/II(ENTER) Taste
Wiedergabe/Pause bei Musikwiedergabe. Bestätigen/Auswählen von Menüs.9 ■(HOME MENU) Taste
Betätigen Sie diese Taste anhaltend, um das „Home“-Menü aufzurufen. 10 (PREVIOUS) Taste
Mittels dieser Taste gelangen Sie erneut an den Anfang des aktuellen Titels. Mittels dieser Taste können Sie in Menüs nach oben blättern.11 ▶▶(NEXT) Taste
Mittels dieser Taste gelangen Sie an den Anfang des folgenden Titels. Mittels dieser Taste können Sie in Menüs nach unten blättern.12 Netzadapteranschluss (DC IN)
13 ETHERNET-Port
14 AUX IN-Buchse
15 UKW (FM) Antennenanschluss
Tasten und deren Funktion (Fernbedienung)
flowchart
graph TD
A["STANDBY/ON"] --> B["HOME"]
B --> C["BOOK MARK"]
C --> D["DELETE"]
D --> E["ENTER (PRESET)"]
E --> F["FUNCTION"]
F --> G["CLOCK (ADJ)"]
G --> H["ALARM (SET)"]
H --> I["SLEEP"]
I --> J["PRESET EQ"]
J --> K["STEREO/MONO"]
K --> L["DISPLAY"]
style A fill:#f9f,stroke:#333
style E fill:#ccf,stroke:#333
style F fill:#cfc,stroke:#333
style G fill:#fcc,stroke:#333
style H fill:#cff,stroke:#333
style I fill:#ffc,stroke:#333
style J fill:#fcf,stroke:#333
style K fill:#cff,stroke:#333
style L fill:#ffc,stroke:#333
1 STANDBY/ON-Taste ( ⏻/I)
Mittels dieser Taste schalten Sie den NS-X1 ein oder versetzen ihn in den Bereitschaftsmodus (STANDBY).2 HOME-Taste
Mittels dieser Taste rufen Sie das „Home“-Menü auf.3 BOOKMARK-Taste (Lesezeichen)
Diese Taste fügt der Internetradio-Senderliste ein Lesezeichen hinzu. Mittels dieser Taste rufen Sie die Lesezeichenliste (im „Home“-Menü) auf.4 Cursortasten AUFWÄRTS (▲), ABWÄRTS (▼), LINKS (◀), RECHTS (▶)
Hiermit bewegen Sie das Auswahlfeld innerhalb von Menüs.5 VOL -/+
Mittels dieser Tasten können Sie die Wiedergabelautstärke vermindern oder erhöhen.6 PREVIOUS-Taste (◀◀)
Mittels dieser Taste können Sie bei UKW (FM) Betrieb sowie der Preset-Wahl eine Frequenz suchen. Bei Musikwiedergabe gelagen Sie mittels dieser Taste an den Anfang des aktuellen Titels.7 Wiedergabe-/Paustaste (▶/II)
Diese Taste dient zum Starten oder vorübergehenden Unterbrechen der Wiedergabe.8 FUNCTION-Taste
Mittels dieser Taste wählen Sie eine Signalquelle (iPod / Net Radio / MUSIC SERVER / FM / AUX).9 Stopptaste (■)
Diese Taste beendet die Wiedergabe. Im UKW (FM) Betrieb wählen Sie mittels dieser Taste den Sendersuchmodus (Auto / Manual / Preset).10 CLOCK (ADJ)-Taste
Mittels dieser Taste können Sie die aktuelle Uhrzeit anzeigen. Zum Einstellen der Uhrzeit betätigen Sie diese Taste anhaltend. Zum Einstellen der Uhr muss der NS-X1 Verbindung zum Internet haben.11 PRESET EQ-Taste
Mittels dieser Taste wählen Sie eine vorprogrammierte Equalizer-Einstellung (Flat / Rock / Pop/ Classic / Jazz / Talk).12 STEREO/MONO-Taste
Bei UKW-Betrieb dient diese Taste zum Umschalten zwischen Stereo- und Monowiedergabe.13 MUTE-Taste (※) (Stummschaltung)
Mittels dieser Taste kann die Wiedergabe vorübergehend stumm geschaltet werden.14 DIMMER-Taste (☀️)
Diese Taste dient zum Einstellen der Display-Helligkeit (Normal / Dunkel / Sehr dunkel).15 DELETE-Taste
Mittels dieser Taste löschen Sie ein Lesezeichen in der Lesezeichenliste.16 ENTER (PRESET)-Taste
Betätigen Sie diese Taste zum Auswählen oder Sichern (in Menüs oder von Einstellungen). Im UKW (FM) Betrieb starten Sie durch anhaltendes Betätigen die automatische (Preset-) Senderspeicherplatzbelegung.17 NEXT-Taste (▶▶)
Mittels dieser Taste können Sie bei UKW (FM) Betrieb sowie der Preset-Wahl eine Frequenz suchen. Bei Musikwiedergabe gelangen Sie mittels dieser Taste an den Anfang des folgenden Titels.18 SETTING-Taste
Mittels dieser Taste rufen Sie das Einstellungsmenü auf.19 SLEEP-Taste
Diese Taste dient zum Programmieren der Einschlaftimerfunktion in Minutenintervallen: (120 / 90 / 60 / 45 / 30 / 15).20 ALARM (SET)-Taste
Mittels dieser Taste überprüfen Sie die eingestellte Alarmzeit. Zum Einstellen der Alarmzeit betätigen Sie diese Taste anhaltend.21 SHUFFLE-Taste ( ) (Titelauswahl nach dem Zufallprinzip)
Mittels dieser Taste aktivieren/deaktivieren Sie die Shuffle-Wiedergabefunktion (Titelwahl nach dem Zufallprinzip).22 Wiederholfunktionstaste (↔)
Diese Taste dient zum Auswählen der Wiederholfunktion: (All / 1 / Off).23 DISPLAY
Betätigen Sie diese Taste, um Informationen zum aktuellen Titel anzuzeigen.Anschließen eines iPod/iPhone
1 Installieren Sie den Dockadapter, den Sie zusammen mit Ihrem iPod-/iPhone-Modell erhalten haben, im Dock des NS-X1.
 Abhängig vom jeweiligen Modell unterscheidet sich Ihr Dock-adapter möglicherweise von der Darstellung in der Abbildung.2 Stellen Sie den iPod/das iPhone ins Dock des NS-X1.
 Folgende iPod-/iPhone-Modelle können mit dem NS-X1 verwendet werden: Pod classic. Pod nano (1., 2., 3., 4., 5. und 6. Generation) Pod touch (1., 2., 3. und 4. Generation) ●Phone 4, iPhone 3GS, iPhone 3G, iPhoneEntfernen des Dockadapters
Stecken Sie einen flachen Schraubendreher vorsichtig in die seitliche Aussparung des Dockadapters und heben Sie ihn behutsam an. Anschließen des Netzadapters
1 Verbinden Sie das Kabel des Netzadapters mit dem DC IN 12V-Anschluss.
natural_image
Back view diagram of a device rear panel with connectors and a cable inserted (no text or symbols)2 Schließen Sie den Netzadapter an einer Wandsteckdose an.
natural_image
Diagram of a wall-mounted power outlet connected to a rectangular device with labeled ports (no text or symbols on the device itself)Hinweise:
Verwenden Sie ausschließlich den mitgelieferten Netzadapter. ● Verwenden Sie keine anderen Netzadapter, als den zum Lieferumfang des NS-X1 gehörenden. Stellen Sie sicher, dass Sie den Netzadapter an einer Wandsteckdose anschließen, die die angegebene Spannung liefert. Trennen Sie den Netzadapter vom Spannungsnetz, falls Sie den NS-X1 über einen längeren Zeitraum nicht verwenden.Anschließen der LAN-Kabel
Der NS-X1 kann mit einem Breitband-Heimnetzwerk verbunden werden, um Internetradio wiederzugeben. Schließen Sie hierzu ein LAN/ETHERNET-Kabel am ETHERNET-Port des NS-X1 an. Nähere Informationen zu den Kabelnetzeinstellungen finden Sie im Abschnitt „Einrichten einer LAN-Verbindung (Wired) mittels DHCP“ auf Seite 107. Anschließen einer externen Signalquelle
Der AUX IN-Anschluss des NS-X1 bietet die Möglichkeit zum An- schließen eines externen Audio-Players. Verwenden Sie zum Herstellen der Verbindung zwischen dem Aus- gang des externen Players und dem AUX IN des NS-X1 ein optional e hältliches, handelsübliches Kabel mit entsprechenden Steckern. Anschließen der UKW (FM) Antenne
1 Schließen Sie die UKW (FM) Antenne am UKW (FM) Antennenanschluss des NS-X1 an. 2 Richten Sie die Antenne so aus, dass Ihre bevorzugten UKW-Sender in bestmöglicher Qualität empfangen werden. natural_image
Line drawing of a back panel with attached electronic components and cable (no text or symbols)Einschalten des Netzwerk Audio Players
Betätigen Sie zum Einschalten die STANDBY/ON-Taste (Ø/I) am NS-X1 oder auf der Fernbedienung.  Nach dem Einschalten wird das Audiosignal der Signalquelle wiedergegeben, die als letzte aktiv war, bevor der NS-X1 zuletzt in den Bereitschaftsmodus (STANDBY) versetzt wurde. Der Einschaltvorgang kann bis zu 30 Sekunden dauern.Hinweis
Stellen Sie sicher, dass der NS-X1 mit dem Spannungsnetz verbunden ist (Einzelheiten hierzu finden Sie im Abschnitt „Anschließen des Netzadapters“ auf Seite 94).Auswählen einer Signalquelle/eines Eingangs
Betätigen Sie die FUNCTION-Taste am NS-X1 oder auf der Fernbedienung.  Bei jedem Betätigen der FUNCTION-Taste wird die Signalquelle wie folgt gewechselt: flowchart
graph LR
A["iPod"] --> B["Net Radio"]
B --> C["MUSIC SERVER"]
C --> D["FM"]
D --> E["AUX"]
Auswählen einer Signalquelle im „Home“-Menü
1 Betätigen Sie zum Aufrufen des „Home“-Menüs anhaltend die MENU-Taste (■) am NS-X1 oder verwenden Sie die „Home“-Taste auf der Fern bedienung.  2 Verwenden Sie zum Navigieren innerhalb des Menüs die PREVIOUS- (◀◀) sowie NEXT-Taste (▶▶) am NS-X1 oder die AUFWÄRTS- (▲) sowie ABWÄRTS-Taste (▼) auf der Fern be dienung, und positionieren Sie die Auswahlmarke „>“ im Display vor der gewünschten Signalquelle/dem Eingang.  „Bookmark“ (Lesezeichen), „iPod“, „Net Radio“ (Internetradio), • „MUSIC SERVER“, „FM“ (UKW), „AUX“ (zusätzliche externe Signalquelle) und „Settings“ (Einstellungen) sind die Einträge der obersten Menüebene.  3 Betätigen Sie zum Auswählen der mittels „>“ markierten Signalquelle/des Eingangs die ENTER-Taste (▶/II) am NS-X1 oder die ENTER (PRESET)-Taste auf der Fernbedienung.  \- Wählen Sie als Signalquelle/Eingang „iPod“, „Net Radio“, „MUSIC SERVER“, „FM“ oder „AUX“.Einstellen der Wiedergabelautstärke
Verwenden Sie zum Einstellen der Wiedergabelautstärke die VOLUME-Tasten (- oder +) am NS-X1 oder auf der Fernbedienung.  Der Lautstärkewert wird jeweils ungefähr drei Sekunden lang • im Display angezeigt. Die Wiedergabelautstärke kann im Bereich von 0 - 50 einge- ● stellt werden. „MIN“ repräsentiert den Minimalwert „0“ und „MAX“ die ● Maximallautstärke „50“.Zeitweises Stummschalten der Wiedergabe
Betätigen Sie die MUTE-Taste (☒) auf der Fernbedienung.  Bei aktivierter Stummschaltung blinkt der im Display angezeigte ● Lautstärkewert. (Beispiel: bei Lautstärkewert „12“)  \- Die Stummschaltung kann durch erneutes Betätigen der MUTE-Taste (※) oder durch Ändern der Wiedergabelautstärke mittels VOLUME-Tasten (- oder +) auf der Fernbedienung oder am NS-X1 aufgehoben werden.Hinweis:
Die Stummschaltfunktion (Muting) kann nur mittels Fernbedienung aktiviert und aufgehoben werden.Auswählen eines EQ-Presets
Betätigen Sie zum Ändern der aktuellen Einstellung die „PRESET EQ“-Taste auf der Fernbedienung.  \- Bei jedem Betätigen der „PRESET EQ“-Taste wird zwischen den folgenden Equalizer-Einstellung umgeschaltet: FLAT, ROCK, POP, CLASSIC, JAZZ sowie TALK.Einstellen der Display-Helligkeit
Betätigen Sie die DIMMER-Taste (※) auf der Fernbedienung.  ●Die Helligkeitsstufe wechselt jeweils, wie folgt: flowchart
graph TD
A["<Nomal>"] --> B["Auto 88.50 MHz P01"]
B --> C["<Dunkel>"]
C --> D["Auto 88.50 MHz P01"]
D --> E["<Sehrdunkel>"]
E --> F["Auto 88.50 MHz P01"]
Anzeigen von Titelinformationen
Betätigen Sie die DISPLAY-Taste auf der Fernbedienung, um Titelinformationen im Display anzuzeigen. Diese Funktion steht nur dann zu Verfügung, wenn „Net Radio“ oder „MUSIC SERVER“ als Signalquelle gewählt sind oder AirPlay aktiviert ist.  Folgende Informationen werden in der dritten Displayzeile angezeigt: ♪: derzeitiger Betriebsmodus des N5-X1 : Name der aktuellen Datei oder ID3-Tag Informationen : verstrichene Wiedergabedauer → Dateityp → Albumname → Dateigröße → Künstlername Bei jedem Betätigen der DISPLAY-Taste wechselt die Displayanzeige • zwischen den genannten Informationen.Audiodateien eines iPod/iPhone wiedergeben
1 Schließen Sie einen iPod/ein iPhone am NS-X1 an.
Informationen zum Anschließen eines iPod/iPhone finden Sie im Abschnitt „Anschließen eines iPod/iPhone“ auf Seite 93. Wird ein iPod/iPhone während der Wiedergabe einer Audio- datei ins Dock gestellt, wird die Wiedergabe automatisch über die Lautsprechersysteme des NS-X1 fortgesetzt.2 Betätigen Sie wiederholt die FUNCTION-Taste am NS-X1 oder auf der Fernbedienung, bis als Signalquelle „iPod“ im Display angezeigt wird.
 „iPod“ kann auch über das Menü als Signalquelle ausgewählt werden. Nähere Informationen hierzu finden Sie im Abschnitt „Auswählen einer Signalquelle im „Home“-Menü auf Seite 96.3 Betätigen Sie die RECHTS-Taste (▶).
Die Wiedergabe beginnt.  Die Wiedergabe kann am iPod/iPhone gesteuert werden.Auswählen eines iPod-/iPhone-Menüpunkts
Verwenden Sie zum Auswählen des gewünschten Menüpunkts die AUFWÄRTS- (▲) sowie ABWÄRTS-Taste (▼) auf der Fernbedienung und betätigen Sie anschließend die RECHTS-Taste (▶). flowchart
graph TD
A["ENTER (PRESENT)"] --> B["Arrow 1"]
A --> C["Arrow 2"]
A --> D["Arrow 3"]
A --> E["Arrow 4"]
| Taste Beschreibung | |
| VOL - oder + | Einstellen der Wiedergabelautstärke |
| Erneute Wiedergabe des aktuellen Titels ab Titelanfang | |
| Starten oder kurzzeitiges Unterbrechen der Wiedergabe (Pause) | |
| Wiedergabe des folgenden Titels ab Titel-anfang | |
| Stoppen der WiedergabeBei gestoppter Wiedergabe, Rückkehr zum zuvor aufgerufenen iPod-/iPhone-Menü | |
| Auswählen der gewünschten Wiederhol-funktion: : alle Titel wiederholen : einen Titel wiederholen | |
| Aktivieren der Shuffle-Funktion(Titelauswahl nach dem Zufallprinzip) | |
Internetradiowiedergabe
1 Überprüfen Sie Ihr Heimnetzwerk. Vergewissern Sie sich, dass eine aktive Verbindung zum Internet besteht, und schalten Sie den NS-X1 anschließend ein. \- Falls Sie Intemetradio zum ersten Mal verwenden und noch keine Verbindung zum Netzwerk besteht, muss zuerst eine Kabel-gestützte oder drahtlose Internetverbindung eingerichtet werden. Nähere Informationen hierzu finden Sie im Abschnitt „Netzwerkeinstellungen“ auf den Seiten 107 - 109. 2 Betätigen Sie zum Auswählen von „Net Radio“ wiederholt die FUNCTION-Taste am NS-X1 oder auf der Fernbedienung. „Net Radio“ als Signalquelle auswählen.  „Net Radio“ kann auch über das Menü ausgewählt werden. Nähere Informationen hierzu finden Sie im Abschnitt „Auswählen einer Signalquelle im „Home“-Menü auf Seite 96. 3 Positionieren Sie die Auswahlmarke „>“ mittels AUFWÄRTS- (▲) sowie ABWÄRTS-Taste (▼) auf der Fern bedienung vor der gewünschten Kategorie, und betätigen Sie zum Auswählen anschließend die ENTER- oder RECHTS-Taste (▶).| Kategorie Beschreibung | |
| Favorites(Favoriten) | Liste der als Favoriten gespeicherten Sender/Podcasts. Wählen Sie den Sender/Podcast, den Sie hören möchten. |
| Added Stations(Hinzugefügte Sender) | Um nicht gelistete Sender wiederzugeben, können Sie eigene Internetradiosender über die vTuner-Website hinzufügen. (Nähere Informa tionen finden Sie im Abschnitt „Internetradio sender von der TEAC vTuner Internet seite hinzufügen“ auf der folgenden Seite.) |
| Location (Ort) Internetradiosenderliste sortiert nach Ort | |
| Genre | Sender/Podcasts gefiltert nach Musikgen suchen. |
| Podcasts By Location(Podcasts nach Ort) | Podcasts gefiltert nach Ursprungsland suchen. |
| Podcasts By Genre(Podcasts nach Genre) | Podcasts nach Genres gefiltert suchen. |
| New Stations(Neue Sender) | Wählen Sie einen Sender aus der Liste de zuletzt hinzugefügten Sender. |
| Most Popular Stations(Populärste Sender) | Wählen Sie einen Sender aus der Liste de meist gehörten Sender. |
| Recently Played(zuletzt wiedergegeben) | Wählen Sie das Gewünschte aus der Liste der Sender/Podcasts, die Sie zuletzt wiedergegeben haben. |
> Book m ark
iPod
NetRadio
Audiodateien mittels Music Server wiedergeben
Sie können Audiodateien eines Computers (Music Server) wiedergeben, der drahtlos oder via Ethernet mit dem Netzwerk verbunden ist. 1 Starten Sie den Computer (Music Server). Überprüfen Sie Ihr Heimnetzwerk. Vergewissern Sie sich hierbei, dass eine aktive Verbindung zum Internet besteht, und schalten Sie anschließend den NS-X1 ein. \- Weiterführende Informationen hierzu finden Sie im Abschnitt „Netzwerkeinstellungen“ auf den Seiten 107 - 109. 2 Wählen Sie mittels FUNCTION-Taste am NS-X1 oder auf der Fernbedienung „MUSIC SERVER“ als Signalquelle aus.  Eine Liste aller Geräte, die sich im selben Netzwerk wie der NS-X1 befinden, wird angezeigt. 3 Wählen Sie mittels AUFWÄRTS- (▲) oder ABWÄRTS-Taste (▼) auf der Fernbedienung den Computer als Music Server aus, und betätigen Sie anschließend die ENTER-Taste.  4 Verwenden Sie zum Positionieren der Auswahlmarke „>“ vor der gewünschten Kategorie – vorzugsweise „Musik“ – die AUFWÄRTS- (▲) sowie ABWÄRTS-Taste (▼) auf der Fernbedienung und betätigen Sie anschließend die ENTER-Taste. 5 Navigieren Sie auf die gleiche Weise, wie in Bedienschritt 4 beschrieben, durch die Ordnerstruktur, um mittels Auswahlmarke „>“ die wiederzugebende Audiodatei auszuwählen. 6 Betätigen Sie zum Starten der Wiedergabe die ENTER-Taste. Konfigurieren des Windows Media® Player 11 für die Wiedergabe von Audiodateien Ihres Computers 1 Starten Sie „Windows Media Player 11“ auf dem Computer. 2 Wählen Sie in der Menüzeile den „Medienbibliothek“-Reiter und anschließend „Medienfreigabe“. 3 Wählen Sie im „Medienfreigabe“-Dialog „Meine Medien freigeben“ aus und klicken Sie anschließend auf „OK“. 4 Wählen Sie den NS-X1 in der Geräteliste aus und klicken Sie anschließend auf „Erlauben“. 5 Klicken Sie zum Schließen des Dialogs auf „OK“. Die Konfiguration des „Windows Media Player 11“ ist damit abgeschlossen. Zur Wiedergabe von auf dem Computer gespeicherter Audiodateien kann nun vom NS-X1 auf die „Windows Media Player 11“-Bibliothek zugegriffen werden.Streaming von Audiodateien (2)
Konfigurieren des Windows Media® Player 12 für die Wiederga be von Audiodateien Ihres Computers 1 Starten Sie „Windows Media Player 12“ auf dem Computer 2 Klicken Sie auf „Streamen“ im oberen Bereich des „Windows Media Player“-Fensters und wählen Sie anschließend „Heimmedienstreaming aktivieren“ Falls Sie zur Eingabe des Administratorkennworts oder einer Bestätigung aufgefordert werden, geben Sie das Passwort oder die Bestätigung ein. 3 Klicken Sie im Fenster „Wählen Sie Medienstreamingoptionen für Computer und Geräte aus“ auf "Medienstreaming aktivieren", und klicken Sie anschließend auf „OK“. 4 Wählen Sie in der angezeigten Geräteliste Ihren NS-X1 aus und wählen Sie anschließend für das gewählte Gerät in der Drop-Down-Liste die Option „Zulassen“ aus. Klicken Sie danach auf „OK“. 5 Klicken Sie auf „Streamen“ im oberen Bereich des „Windows Media Player“-Fensters und wählen Sie anschließend „Automatische Wiedergabe der Medien durch Geräte zulassen...“. Die Konfiguration des „Windows Media Player 12“ ist damit abgeschlossen. Zur Wiedergabe von auf dem Computer gespeicherten Audiodateien kann nun vom NS-X1 auf die „Windows Media Player 12“-Bibliothek zugegriffen werden.AirPlay
Audiodateien via AirPlay wiedergeben
Mittels AirPlay Streaming kann der NS-X1 drahtlos übertragene Audio-dateien von folgenden, unter iOS 4.3 betriebenen iPod-, iPhone- sowie iPad-Modellen wiedergeben. iPod touch (3. und 4. Generation) ● iPhone 4S, iPhone4, iPhone 3GS ● iPad 2, iPad ● 1 Überprüfen Sie Ihr Heimnetzwerk. Vergewissern Sie sich, dass ei ne aktive Verbindung zum Internet besteht, und schalten Sie anschließend den NS-X1 ein. Weiterführende Informationen hierzu finden Sie im Abschnitt • „Netzwerkeinstellungen“ auf den Seiten 107 – 109. Vergewissem Sie sich, dass der NS-X1 sowie der iPod touch, das iPhone oder iPad mit dem selben Netzwerk verbunden sind. 2 Starten Sie die Wiedergabe am iPod touch/iPhone/iPad. Sofern NS-X1, iPod touch, iPhone oder iPad im selben Netzwerk angemeldet sind, wird rechts über dem Lautstärkeschieberegler des iPod touch/iPhone/iPad das (AirPlay) Symbol angezeigt. \- Achten Sie darauf, am iPod touch, iPhone oder iPad den selben Server zu wählen, wie am NS-X1. 3 Berühren Sie das (AirPlay) Symbol und wählen Sie den NS-X1 als Wiedergabegerät aus. Sofern NS-X1, iPod touch, iPhone oder iPad korrekt im Drahtlosnetzwerk angemeldet sind und sich in dessen Reichweite befinden, werden Audiodateien des iPod touch, iPhone oder iPad über die Lautsprechersysteme des NS-X1 wiedergegeben.Automatische Sendersuche
1 Betätigen Sie wiederholt die FUNCTION-Taste am NS-X1 oder auf der Fernbedienung, um „FM“ als Signalquelle auszuwählen. „FM“ (UKW) wird als Signalquelle ausgewählt. ●FM" kann auch über das Menü als Signalquelle ausgewählt werden. Nähere Informationen hierzu finden Sie im Abschnitt „Auswählen einer Signalquelle im „Home“-Menü auf Seite 96. 2 Betätigen Sie wiederholt die Stopptaste (■), bis „Auto“ im Display angezeigt wird.  Bei jedem Betätigen der Taste wechselt der Suchmodus, wie folgt:  3 Betätigen Sie die PREVIOUS- (◄◄◄) oder NEXT-Taste (►►◄), um die Suche nach Radiostationen mit ausreichender Sendeleistung zu starten. Sobald ein Sender mit entsprechender Sende leistung gefunden ist, erscheinen im Display dessen Empfangs frequenz und das Symbol. - Wiederholen Sie diesen Bedienschritt, um einen anderen Sender zu suchen. - Sender mit schwacher Sendeleistung werden bei der automatischen Sendersuche übersprungen.Manuelle Sendersuche
1 Betätigen Sie wiederholt die FUNCTION-Taste am NS-X1 oder auf der Fernbedienung, um „FM“ als Signalquelle auszuwählen. „FM“ (UKW) wird als Signalquelle ausgewählt. ●FM" kann auch über das Menü als Signalquelle ausgewählt werden. Nähere Informationen hierzu finden Sie im Abschnitt „Auswählen einer Signalquelle im „Home“-Menü auf Seite 96. 2 Betätigen Sie wiederholt die Stopptaste (■), bis „Manual“ im Display angezeigt wird.  3 Betätigen Sie wiederholt die PREVIOUS- (1◀◀) oder NEXT-Taste (▶▶1), bis die gewünschte Frequenz angezeigt wird.Aufrufen von Senderspeicherplätzen (Presets)
1 Betätigen Sie wiederholt die FUNCTION-Taste am NS-X1 oder auf der Fernbedienung, um „FM“ als Signalquelle auszuwählen. „FM“ (UKW) wird als Signalquelle ausgewählt.  \- „FM“ kann auch über das Menü als Signalquelle ausgewählt werden. Nähere Informationen hierzu finden Sie im Abschnitt „Auswählen einer Signalquelle im „Home“-Menü auf Seite 96. 2 Betätigen Sie wiederholt die Stopptaste (■), bis „Preset“ im Display angezeigt wird.  3 Betätigen Sie wiederholt die PREVIOUS- (◀◀) oder NEXT-Taste (▶▶), bis der gewünschte Senderspeicherplatz (Preset) im Display angezeigt wird.RDS (Radio Data System)
RDS (Radio Data System) ist ein Service, der es Rundfunkanstalten erlaubt, zusätzliche Informationen zusammen mit dem Radioprogramm auszustrahlen. RDS wird ausschließlich in Europa und nur im UKW-Frequenzbereich angeboten.Wählen Sie einen UKW (FM) Sender, der den RDS-Datendienst unterstützt.
Der jeweilige RDS-Modus wird in der dritten Displayzeile angezeigt. ●Detaillierte Informationen zur UKW (FM) RDS-Senderwahl finden Sie auf der vorherigen Seite. Falls kein RDS-Modus angezeigt wird, verwenden Sie eine externe • Antenne, um die Empfangsleistung zu verbessern. Bei jedem Betätigen der DISPLAY-Taste auf der Fernbedienung, • wechselt der RDS-Modus, wie folgt: flowchart
graph TD
A["PS (Programmservice)"] --> B["RT (Radiotext)"]
B --> C["PTY (Programmtyp)"]
① PS (Programmservice)
Bei Auswahl von „PS“ wird der Sendername angezeigt. Falls keine PS-Daten verfügbar sind, wird kein Name angezeigt.② RT (Radiotext)
Bei Auswahl von „RT“ wird ein bis zu 64 Zeichen langer Text, der beispielsweise die neuesten Meldungen enthält, in Laufschrift im Display angezeigt. Falls keine RT-Daten verfügbar sind, wird kein Text angezeigt.③ PTY (Programmtyp)
Bei Auswahl von „PTY“ wird eine Beschreibung des derzeit empfangenen Pro grammtyps, wie beispielsweise Pop, Rock oder Klassik, im Display angezeigt. Falls keine PTY-Daten verfügbar sind, wird der Programmtyp nicht angezeigt.Automatische Preset-Speicherung
1 Betätigen Sie wiederholt die FUNCTION-Taste am NS-X1 oder auf der Fernbedienung, um „FM“ als Signalquelle auszuwählen.
„FM“ (UKW) wird als Signalquelle ausgewählt. 2 Betätigen Sie die ENTER-Taste länger als zwei Sekunden.
Die Meldung „Auto Preset OK?“ erscheint im Display. 3 Betätigen Sie erneut die ENTER-Taste.
● Bis zu 30 UKW (FM) Sender werden gespeichert. \- Durch ein Betätigen der PREVIOUS- (◀◀) oder NEXT-Taste (▶▶1) wird die automatische Sendersuche abgebrochen.Umschalten zwischen Stereo-/Monowiedergabe
Bei Wiedergabe eines UKW-Senders kann zwischen Stereo- oder Monoqualität umgeschaltet werden. Betätigen Sie hierzu die STEREO/MONO-Taste auf der Fernbedienung.  Bei Stereowiedergabe wird das Symbol im Display angezeigt.  Wählen Sie „Mono“, falls bei der UKW-Wiedergabe starkes Rauschen • auftritt. ●Die Wiedergabe wird automatisch stummgeschaltet, wenn kein Sender empfangen wird.Manuelle Preset-Speicherung
1 Betätigen Sie wiederholt die FUNCTION-Taste am NS-X1 oder auf der Fernbedienung, um „FM“ als Signalquelle auszuwählen. „FM“ (UKW) wird als Signalquelle ausgewählt.  2 Wählen Sie einen Sender mittels automatischer oder manueller Sendersuche aus. Informationen zur automatischen Sendersuche finden Sie auf Seite 103. Informationen zur manuellen Sendersuche finden Sie auf Seite 103. Informationen zum Aufrufen von Senderspeicherplätzen (Presets) finden Sie auf Seite 103. Wurde ein Sender bereits in einem Preset gespeichert, wird rechts im Display die Presetnummer angezeigt. Wurde der Sender noch nicht gespeichert, erscheint „P--”. 3 Betätigen Sie die ENTER-Taste auf der Fernbedienung.  4 Wählen Sie mittels PREVIOUS- (1◄◄) oder NEXT-Taste (►►1) die Nummer des Presets, in dem Sie die ausgewählte Frequenz (den Sender) speichern möchten. 5 Betätigen Sie die ENTER-Taste, um den Sender im ausgewählten Preset zu speichern.Audiosignale externer Quellen wiedergeben
1 Schließen Sie eine externe Signalquelle am NS-X1 an. Nähere Informationen zum Anschließen externer Geräte finden Sie im Abschnitt „Anschließen einer externen Signalquelle“ auf Seite 95. 2 Betätigen Sie wiederholt die FUNCTION-Taste am NS-X1 oder auf der Fernbedienung, um „AUX“ als Signalquelle auszuwählen. „AUX“ wird als Signalquelle ausgewählt.  3 Starten Sie die Wiedergabe der externen Signalquelle. Das Starten der Wiedergabe sowie andere Steuerungen der externen Signalquelle können nicht vom NS-X1 oder dessen Fernbedienung aus vorgenommen werden. Starten Sie daher die Wiedergabe an der externen Komponente. - Die Wiedergabelautstärke kann am NS-X1 oder mittels Fernbedienung geregelt werden. Einstellungsmenüchart flowchart
graph TD
A["Settings Network Setup"] --> B["Network Connect"]
A --> C["Wireless"]
A --> D["Other"]
A --> E["Network Information"]
A --> F["Clock"]
A --> G["Alarm"]
A --> H["Sleep"]
A --> I["Standby Mode"]
B --> J["Wired"]
J --> K["DHCP — On / Off"]
J --> L["IP Address"]
J --> M["Subnet Mask"]
J --> N["Gateway"]
J --> O["Primary DNS"]
J --> P["Secondary DNS"]
J --> Q["Proxy — On / Off"]
J --> R["Proxy Server"]
J --> S["Proxy Port"]
C --> T["AP List"]
T --> U["WPS — PIN"]
U --> V["PBC"]
U --> W["Cancel"]
E --> X["Name — NS-X1 / Default"]
E --> Y["Factory reset — OK / Cancel"]
E --> Z["Name"]
Z --> AA["DHCP"]
Z --> AB["IP Address"]
Z --> AC["MAC address"]
F --> AD["Clock GMT"]
F --> AE["Clock Adjust"]
G --> AF["On/Off"]
G --> AG["Setting"]
H --> AH["Sleep / 120 / 90 / 60 / 45 / 30 / 15"]
I --> AI["On/Off"]
Verwenden des Einstellungsmenüs
Das Einstellungsmenü kann am NS-X1 oder mittels Fernbedienung aufgerufen werden. Das Einstellungsmenü am NS-X1 aufrufen 1 Betätigen Sie anhaltend die MENU-Taste (■) am NS-X1. 2 Betätigen Sie zum Auswählen von „Settings“ die PREVIOUS- (|◀◀) oder NEXT-Taste (▶▶). 3 Betätigen Sie die ENTER-Taste (▶/III). 4 Verwenden Sie zum Positionieren der Auswahlmarke „>“ vor dem gewünschten Untermenü die PREVIOUS- (1◀◀) sowie NEXT-Taste (▶▶1) und betätigen Sie anschließend die ENTER-Taste (▶/II). Abhängig vom gewählten Menü können die Netzwerk-, Uhr-, Alarm-, Einschlaftimer- und Standby-Einstellungen geändert werden.Hinweis:
Am NS-X1 besteht keine Möglichkeit zum vorherigen Menü zurückzukehren. Betätigen Sie daher die LINKS-Taste (◀) auf der Fernbedienung, um zum vorherigen Menü zurückzukehren. Das Einstellungsmenü mittels Fernbedienung aufrufen 1 Betätigen Sie die SETTING-Taste auf der Fernbedienung. Die Menüs unter „Settings“ werden angezeigt.  Zum Aufrufen des „Settings“-Menüs kann auch die HOME-Taste betätigt, die Auswahl marke „>“ mittels AUFWÄRTS- (▲) sowie ABWÄRTS-Taste (▼) vor „Settings“ positioniert und anschließend die ENTER-Taste betätigt werden. Abhängig vom gewählten Menü können die Netzwerk-, Uhr-, Alarm-, Einschlaftimer- und Standby-Einstellungen geändert werden. 2 Wählen Sie mittels AUFWÄRTS- (▲) sowie ABWÄRTS-Taste (▼) das gewünschte Menü aus, und betätigen Sie anschließend die ENTER-Taste.Netzwerkeinstellungen
Bevor Internetradiosendungen oder Audiodateien eines Computers mittels Ethernet- oder Drahtlosverbindung übertragen und wiedergege ben werden können, muss das Netzwerk entsprechend konfiguriert werden.Netzwerkverbindung
Einrichten einer Ethernet-Verbindung mittels DHCP
Überprüfen Sie vor dem Konfigurieren der Netzwerkverbindung, ob das LAN/ETHERNET-Kabel korrekt mit dem LAN/ETHERNET-Anschluss verbunden ist (siehe auch „Anschließen der LAN-Kabel“ auf Seite 94. 1 Wählen Sie: „Settings“-Menü → „Network“ → „Network Connect“ → „Wired“.  Nach jedem Umschalten zwischen Ethernet- und Drahtlosverbindung muss der NS-X1 mittels STANDBY/ON-Taste (Ø/I) in den Standby-Modus versetzt und kurz darauf wieder eingeschaltet werden. 2 Falls erforderlich, können Sie folgende Einstellungen ändern:| Menüpunkt Beschreibung | |
| DHCP | DHCP aktivieren/deaktivieren |
| IP Address | Eingeben der IP-Adresse |
| Subnet Mask | Eingeben der Teilnetzmaske, wenn DHCP deaktiviert ist |
| Gateway | Eingeben der Gateway IP-Adresse, wenn DHCP deaktiviert ist |
| Primary DNS | Eingeben des primären DNS, wenn DHCP deaktiviert ist |
| Secondary DNS | Eingeben des sekundären DNS, wenn DHCP deaktiviert ist |
| Proxy | Aktivieren/deaktivieren der Proxy-Funktion |
| Proxy Server | Eingeben des Proxy Servers, wenn die Proxy-Funktion aktiviert ist |
| Proxy Port | Eingeben des Proxy-Ports, wenn die Proxy-Funktion aktiviert ist |
Hinweis:
Bei Verwendung von DHCP ("ON") müssen für IP-Adresse, Subnet Mask, Gateway, DNS, usw. keine Eingaben vorgenommen werden. Wenn Sie DHCP nicht verwenden („OFF“) muss die IP-Adresse, usw. manuell eingeben werden. Hierfür sind einige grundlegende Kenntnisse der Netzwerktechnologie erforderlich. Falls Sie Fragen zur Internetverbindung haben, kontaktieren Sie Ihren Internetanbieter (Internet Service Provider).Manuelle Konfiguration des LAN/ETHERNET-Netzwerks
1 Wählen Sie: „Settings“-Menu → „Network“ → „Network Connect“ → „Wired“. Nach jedem Umschalten zwischen Ethernet- und Drahtlosverbindung muss der NS-X1 mittels STANDBY/ON-Taste (☐/I) in den Standby-Modus versetzt und kurz darauf wieder eingeschaltet werden. 2 Wählen Sie „DHCP“ aus und deaktivieren Sie es („Off“).  3 Betätigen Sie die LINKS-Taste (◀), um zum vorherigen Menü zurückzukehren und wählen Sie anschließend „IP Address“ aus. 4 Wählen Sie mittels AUFWÄRTS- ( ▲) oder ABWÄRTS-Taste ( ▼) die gewünschte Zifferngruppe aus.  \- Verwenden Sie zum Auswählen jeweils benachbarter Ziffern die LINKS- (◀) oder RECHTS-Taste (▶). 5 Betätigen Sie die LINKS-Taste (◀), um zum vorherigen Menü zurückzukehren und geben Sie anschließend die Adressen für Teilnetzmaske, Gateway sowie primären und sekundären DNS ein. Die Vorgehensweise hierbei entspricht den Bedienschritten 1 bis 4. Wenn das Netzwerk korrekt konfiguriert wurde, erscheint das -Symbol im Display.Einrichten einer Drahtlosverbindung (WLAN-Netzwerk)
Sofern Ihre Drahtlosstation „WPS“ unterstützt, können Sie „WPS“ auswählen. Andernfalls wählen Sie bitte „AP List“. 1 Wählen Sie: „Settings“-Menü → „Network“ → „Network Connect“ → „Wireless“.Wire d
> Wireless
| Menüpunkt Beschreibung | ||
| AP List Auswählen eines Access Point | ||
| WPS | PIN | PIN-Code für WPS-Setup überprüfen |
| PBC | WPS-Setup unter Verwendung von PBC | |
| Cancel | Abbrechen der WPS-Konfiguration | |
Hinweis:
Für Drahtlosnetzwerkverbindungen ist DHCP grundsätzlich aktiviert („ON“). Die Möglichkeit zum Einstellen einer festen IP-Adresse besteht daher nicht.Einrichten einer Drahtlosverbindung (WLAN-Netzwerk) via AP
1 Wählen Sie: „Settings“-Menü → „Network“ → „Network Connect“ → „Wireless“.  Nach jedem Umschalten zwischen Ethernet- und Drahtlosverbindung muss der NS-X1 mittels STANDBY/ON-Taste (Ø/I) in den Standby-Modus versetzt und kurz darauf wieder eingeschaltet werden. 2 Wählen Sie „AP List“ aus.  3 Wählen Sie einen der „APs“ aus der Liste. 4 Geben Sie den Schlüssel (Key) ein, falls Sie dazu aufgefordert werden.  Verwenden Sie zur Anzeige unterschiedlicher Ziffern-, Buch-● staben- oder Zeichensätze die AUFWÄRTS- (▲) sowie die ABWÄRTS-Taste (▼). \- Positionieren Sie den Cursor mittels LINKS- (◀) oder RECHTS-Taste (▶) auf der gewünschten Zahl, dem Buchstaben oder Zeichen, und betätigen Sie zur Eingabe des gewählten Zeichens anschließend die ENTER-Taste. Zum Löschen der Auswahl wählen Sie „<“. Zum Bestätigen einer Eingabe wählen Sie „E“. Zum Abbrechen und Rückkehren zum vorherigen Menü wählen Sie „C“. 5 Betätigen Sie zum Bestätigen der gewählten Aktion die ENTER-Taste. \- Die Netzwerkkonfiguration startet automatisch und das Symbol erscheint im Display.Andere Netzwerkeinstellungen
1 Wählen Sie: „Settings“-Menü → „Network“ → „Other“.Netw o rkConn
> Other
NetworkInfo
| Menüpunkt Beschreibung | |
| Name | Ändern des Namens, mit dem der N5-X1 im Netzwerk gelistet wird |
| Factory Reset | Alle Einstellungen auf die werkseitigen Werte zurücksetzen |
> Name
Fac tory Rese
> NS - X 1 22138F
De f aul t
Hinweise:
- Vergewissern Sie sich vor dem Einstellen oder Ändern der internen Uhr des NS-X1, dass eine aktive Verbindung zum Internet besteht. - „GMT“ bedeutet „Greenwich Mean Time“. Finden Sie den Zeitunterschied zwischen der Zeitzone, in der Sie sich befinden und „GMT“ heraus, und geben Sie den Unterschiedswert ein.Einstellen der Uhrzeit
Hinweise:
- Der NS-X1 bezieht seine Zeitinformationen via Internet. Daher muss er mit einem Netzwerk, das Internetverbindung hat, verbunden sein. Nähere Informationen zur Konfiguration eines LAN- oder WLAN-Netzwerks finden Sie im Abschnitt „Netzwerkeinstellungen“ auf den Seiten 107 - 109. - Die Uhrzeit des NS-X1 kann auch eingestellt werden, indem Sie die CLOCK (ADJ)-Taste auf der Fernbedienung länger als zwei Sekunden betätigen. Wählen Sie: „Settings“-Menü → „Clock“ → „Clock Adjust“.  \- Im Display des NS-X1 erscheint die Meldung „Clock Adjust“ und die aktuelle Uhrzeit wird automatisch, korrespondierend zur gewählten Zeitzone, eingestellt. Überprüfen der Uhrzeit
Nachdem die Uhr eingestellt wurde, kann die aktuelle Uhrzeit durch Betätigen der CLOCK-Taste auf der Fernbedienung überprüft werden. Alarm
Sie können den Alarmtimer so programmieren, dass sich der NS-X1 automatisch zum programmierten Zeitpunkt einschaltet. Die Alarmtimerfunktion kann erst verwendet werden, nachdem die interne Uhr eingestellt wurde. Nähere Informationen hierzu finden Sie im Abschnitt „Uhr“ auf der vorherigen Seite.Erstmaliges Einstellen des Alarm-Timers
1 Wählen Sie: „Settings“-Menü → „Alarm“.Netw o r k
Clock
> Alarm
00:00
5 Folgende Menüanzeige erscheint im Display.
 - Das 📊-Symbol signalisiert, dass der Alarm programmiert ist. - Navigieren Sie innerhalb des Menüs mittels AUFWÄRTS- (▲) oder ABWÄRTS-Taste (▼) und betätigen Sie zum Auswählen eines Menüpunkts die ENTER-Taste. Wählen Sie zum Ein-/Ausschalten der Alarmfunktion „On“ oder • „Off“. Wählen Sie „Setting“, um die Alarm-Timer-Einstellung gemäß • der Bedienschritte 1 bis 4 zurückzusetzen. - Mittels HOME-Taste kann das Menü verlassen werden. Sofern die Alarmtimerfunktion nicht aktiviert wurde, kann - das oben dargestellte Menü durch anhaltendes Betätigen der ALARM-Taste aufgerufen werden.Einschlaftimer (Sleep)
Mittels Einschlaftimerfunktion kann der NS-X1 nach einem zu programmierenden Zeitintervall in den Standby-Modus versetzt werden.Programmieren des Einschlaftimers
Betätigen Sie die SLEEP-Taste auf der Fernbedienung. Bei jedem Betätigen der SLEEP-Taste wechselt die Einstellung, wie folgt:   Nach dem Programmieren des Einschlaftimers kann im „Settings“-Menü die bis zum Ausschalten des NS-X1 verbleibende Zeitspanne überprüft oder geändert werden. Bei aktivierter Einschlaftimerfunktion (Setting „On“) wird das 🚙-Symbol im Display angezeigt.Überprüfen der Einschlaftimerfunktion
Die bis zur Aktivierung des Standby-Modus verbleibende Zeitspanne kann angezeigt werden. Wählen Sie: „Settings“-Menü → „Sleep“.Alarm
> Sleep
StandbyMode
Einstellen des Einschlaftimers
1 Wählen Sie: „Settings“-Menü → „Sleep“. Die verbleibende Zeitspanne wird angezeigt.Sleep 13
Standby-Modus
Sie können einstellen, ob das Netzwerk während des Bereitschaftsmodus (Standby) eingeschaltet bleiben soll oder ausgeschaltet wird.Standby-Einstellung
1 Wählen Sie: „Settings“-Menü → „Standby Mode“.Alarm
Sleep
> StandbyMode
Hilfe bei Funktionsstörungen (1)
Falls beim NS-X1 Funktionsstörungen auftreten sollten, versuchen Sie diese bitte, anhand der folgenden Hinweise selbst zu beheben, bevor Sie Ihren Fachhändler oder ein TEAC Servicecenter kontaktieren. Da die Ursache einer Funktionsstörung auch bei Geräten, die in Verbindung mit dem NS-X1 betrieben werden, liegen kann, stellen Sie bitte auch deren ordungsgemäße Funktion sicher.Fehlerhaftes Verhalten des NS-X1 während der Video-/Audiowiedergabe
- Stellen Sie sicher, dass das Format der wiederzugebenden Datei einem in den „Technische Daten“ (Seite 115) genannten Format entspricht. Installieren Sie jeweils die aktuellste Version der iPod-/iPhone-Betriebssystemsoftware. - Sollte das Problem weiterhin auftreten, versetzen Sie den NS-X1 mittels STANDBY/ON-Taste (∅/I) in den Standby-Modus und schalten Sie ihn nach ungefähr einer Minute wieder ein. Überprüfen Sie anschließend nochmals, ob die vorgenannten Bedingungen erfüllt sind.Bei der Videowiedergabe von einem im Dock des NS-X1 befindlichen iPod oder eines iPhone wird kein Audiosignal über tragen.
Geben Sie die Videodatei mittels AirPlay-Verbindung wieder.| Symptom Mögliche Ursache Mögliche Lösung | ||
| Kein Strom | Das Netzadapterkabel ist nicht angeschlossen. Schließen Sie das Kabel korrekt an. | |
| Der Netzadapter ist nicht mit der Wandsteck-dose verbunden. Die Steckdose ist defekt oder ausgeschaltet. | Überprüfen Sie die verwendete Steckdose, indem Sie eine Lampe oder einen anderen Verbraucher anschließen. | |
| Keine Wiedergabe | Zu geringe Wiedergabelautstärke. | Erhöhen Sie die Wiedergabelautstärke. |
| Die Stummschaltung ist aktiviert. | Betätigen Sie die MUTE-Taste, um die Stumm-schaltung aufzuheben. | |
| Eine inaktive Signalquelle ist ausgewählt. | Wählen Sie die gewünschte Signalquelle. | |
| Komponenten sind nicht korrekt angeschlossen. | Schließen Sie die Komponenten korrekt an. | |
| Die Fernbedienung funktioniert nicht | Es befindet sich keine oder eine verbrauchte Batterie in der Fernbedienung. | Tauschen Sie die Batterie aus. |
| Zwischen Fernbedienung und Empfangssensor am NS-X1 befindet sich ein Hindernis oder der Sensor ist verschmutzt. | Wechseln Sie Ihre Position, entfernen Sie die Hindernisse oder reinigen Sie die Fernbedie-nung sowie den Sensor. | |
| Kein Radioempfang | Es ist keine Antenne angeschlossen. | Schließen Sie eine Antenne an. |
| Für den gewünschten Sender ist eine falsche Empfangsfrequenz eingestellt. | Stellen Sie die Empfangsfrequenz des ge-wünschten Senders ein. | |
| Die Antenne wurde nicht optimal ausgerichtet. | Richten Sie die Antenne erneut aus, und ver-suchen Sie den Sender zu empfangen. | |
| Kein Empfang von in UKW (FM) Sender spei-cher plätzen (Presets) abgelegten Sendeern | Der gespeicherten Empfangsfrequenz ist kein Sender zugeordnet. | Speichern Sie die korrekte Empfangsfre-quenz des gewünschten Senders. |
| Die Presets wurden gelöscht. | Belegen Sie die Senderspeicherplätze neu. | |
| Schwaches UKW (FM) Empfangssignal | Es ist keine Antenne angeschlossen. | Schließen Sie eine Antenne an. |
| Die Antenne wurde nicht optimal ausgerichtet. | Richten Sie die Antenne erneut aus. | |
| Symptom Mögliche Ursache | Mögliche Lösung | |
| Keine Verbindung zum Netzwerk | Die LAN/ETHERNET-Kabel sind nicht ange- schlossen. | Schließen Sie die LAN/ETHERNET-Kabel kor- rekt an. |
| Es besteht keine Verbindung zum WLAN- Netzwerk. | Überprüfen Sie die WLAN-Verbindung. | |
| Das (drahtlose) Netzwerk ist ausgefallen. | Überprüfen Sie, ob das Netzwerk funktioniert und starten Sie es gegebenenfalls neu. | |
| Die WLAN-Signalstärke ist zu gering (außerhalb der Reichweite). | Verringern Sie den Abstand zur Drahtlos- station und entfernen Sie mögliche Hinder- nisse, die die Sende-/Empfangsleistung be- einträchtigen könnten. | |
| Internetradio sendun- gen werden nicht wiedergegeben. | Es besteht keine Verbindung zum Netzwerk. Überprüfen Sie den Verbindungsstatus. | |
| Das Programm wird in einem inkompatiblen Format übertragen. | Der NS-X1 kann nur Internetradioprogram- me, die im MP3-, WMA-, WAV- sowie AAC- Format übertragen werden, wiedergeben. | |
| Der Internetradiosender überträgt momentan kein Programm. | Wählen Sie einen Internetradiosender, der derzeit Programme überträgt. | |
| Instabile AirPlay-Verbin- dung/-Wiedergabe | Abhängig von der Leistung sowie den Betriebs- bedingungen des verwendeten Routers können bei der AirPlay-Verbindung Störungen auftreten. | Überprüfen Sie Ihre Netzwerkkonfiguration und optimieren Sie die Netzwerkkommu- nikation zwischen Router und NS-X1. |
| Die Symbole für Shuffle- (zufällige Titel auswahl) oder Wiederholfunktion erlöschen nicht im Display. | Wählen Sie im „Home“-Menü (oberste Menü ebene) den Eintrag „Bookmark“ und starten Sie die Wiedergabe einer Datei aus der Liste der Lesezeichen. Betätigen Sie anschließend zum Beenden der zufälli- gen Titelauswahl oder Wiederholfunktion die Shuffle- (✗) beziehungsweise die Wiederholfunktionstaste (⇨) oder die Stopptaste (■) auf der Fernbedienung. | |
Technische Daten
VERSTÄRKERTEIL
Nennleistung 10 W + 10 W (1 kHz, 6 Ω, THD 10 %) Rauschabstand (S/N) ..... 78 dB (IHF-A bewertet, 20 kHz LPF)Eingangsempfindlichkeit
AUX 1 VrmsLAUTSPRECHERSYSTEME
Gehäuse Bass Reflex-Gehäuse Wandler 80 mm Konus Impedanz....6ΩUKW (FM) TUNERTEIL
Empfangsbereich 87.5 MHz - 108.0 MHz in Schritten von 50 kHz Rauschabstand (S/N) .....(Mono) 75 dB oder höher (Stereo) 70 dB oder höherNETZWERK
Ethernet 10 BASE-T/100 BASE-TX Wi-Fi IEEE 802.11b/g Übertragungsgeschwindigkeit 802.11b Modus (DS-SS: 11/5.5/1 Mbps) 802.11g Modus (OFDM: 54/48/36/24/18/12/9/6 Mbps) Unterstützter Frequenzbereich 2.412 - 2.472 GHz (2.4 GHz ISM Band)ALLGEMEIN
Spannungsversorgung ..... AC 100 - 240 V, 50 / 60 Hz (DC 12 V) Leistungsaufnahme AC 20W (DC 15 W) Standby-Leistungsaufnahme .... 1 W oder weniger Abmessungen (B x H x T) 320 x 212,2 x 95,5 mm Nettogewicht 1,95 kgMitgeliefertes Zubehör
Fernbedienung RC-1287 x 1 Batterie CR-2025 x 1 Abdeckung x 1 Netzadapter x 1 UKW (FM) Wurfantenne x 1 Bedienungsanleitung (dieses Dokument) x 1 Garantiekarte x 1 Änderungen in Design und technischer Ausstattung vorbehalten. ● Gewichtsangaben und Abmessungen sind Näherungswerte. ● Illustrationen können geringfügig vom Serienmodell abweichen. ● Unterstützte Audioformate| Format | Dateierweiterung | Stream | Parameter | Wert |
| MP3 | mp3 | MPEG 1/2 Layer III | (Abust-) Sampling-Frequenz | 8 - 48 kHz |
| Audio-Wortlänge | 16 Bit | |||
| Anzahl der Kanäle | 2 | |||
| Bitrate | 8 - 320 kbps | |||
| VBR/CBR | unterstützt | |||
| WAV | wav | LPCM | (Abust-) Sampling-Frequenz | 8 - 192 kHz |
| Audio-Wortlänge | 16, 20, 24 Bit | |||
| Anzahl der Kanäle | 2 | |||
| WMA | asf wma | WMA2/7/8/9/10 | (Abust-) Sampling-Frequenz | 8 - 48 kHz |
| Audio-Wortlänge | 16 Bit | |||
| Anzahl der Kanäle | 2 | |||
| Bitrate | 5 - 320 kbps | |||
| VBR/CBR | unterstützt | |||
| WMA Pro WMA Lossless | (Abust-) Sampling-Frequenz | 8 - 48 kHz | ||
| Audio-Wortlänge | 16 Bit | |||
| Anzahl der Kanäle | 2 | |||
| Bitrate | 5 - 320 kbps | |||
| VBR/CBR | unterstützt | |||
| AAC | m4a aac 3gp 3g2 | MPEG 4 AAC MPEG 4 HE AAC (AAC Plus v1/2) | (Abust-) Sampling-Frequenz | 32 - 96 kHz |
| Audio-Wortlänge | 16 Bit | |||
| Anzahl der Kanäle | 2 | |||
| Bitrate | 16 - 320 kbps | |||
| VBR/CBR | unterstützt |
Per gli utenti europei
Smaltimento delle apparecchiature elettriche ed elettroniche
(a) Tutte le apparecchiature elettriche ed elettroniche devono essere smaltite separatamente dai rifiuti urbani mediante impianti di raccolta designati dal governo o dalle autorità locali. (b) Con lo smaltimento corretto di apparecchiature elettriche ed elettroniche, si contribuisce a risparmiare preziose risorse ed evitare potenziali effetti negativi sulla salute umana e l'ambiente. (c) Gli impianti di smaltimento improprio di rifiuti elettrici ed elettronici possono avere gravi conseguenze sull'ambiente e sulla salute umana a causa della presenza di sostanze pericolose nelle apparecchiature. (d) Il simbolo RAEE (Rifiuti Apparecchiature Elettriche ed Elettroniche), che mostra un bidone con ruote barrato, indica che le apparecchiature elettriche ed elettroniche devono essere raccolte e smaltite separatamente dai rifiuti domestici. (e) I centri di raccolta sono disponibili per gli utenti finali. Per informazioni più dettagliate circa lo smaltimento delle vecchie apparecchiature elettriche ed elettroniche, contattare il negozio dove è stato acquistato l'apparecchio o l'autorità locale. Smaltimento delle pile e/o accumulatori
(a) I rifiuti di pile e/o accumulatori devono essere smaltiti separatamente dai rifiuti urbani mediante impianti di raccolta designati dal governo o dalle autorità locali. (b) Lo smaltimento corretto dei rifiuti di pile e/o accumulatori contribuisce a risparmiare preziose risorse ed evitare potenziali effetti negativi sulla salute umana e l'ambiente. (c) Lo smaltimento non corretto dei rifiuti di pile e/o accumulatori possono avere gravi conseguenze sull'ambiente e sulla salute umana a causa della presenza di sostanze pericolose in essi. (d) Il simbolo RAEE, che mostra un contenitore con ruote barrato, indica che le pile e/o accumulatori devono essere raccolti e smaltiti separatamente dai rifiuti domestici.  Se una pila o accumulatore contiene più dei valori specificati Pb, Hg, C di piombo (Pb), mercurio (Hg) e/o di cadmio (Cd) come definito nella direttiva 2006/66/CE, i simboli chimici di questi elementi verranno indicati sotto il simbolo RAEE. (e) I centri di raccolta sono disponibili per gli utenti finali. Per informazioni più dettagliate circa lo smaltimento dei rifiuti di pile e/o accumulatori, contattare il negozio dove è stato acquistato l'apparecchio o l'autorità locale.Indice dei contenuti Prima di
Grazie per aver scelto TEAC. Leggere attentamente questo manuale per ottenere le migliori prestazioni con questa unità.
Prima di utilizzare l'unità....117 Telecomando 118 Identificazione delle parti (unità principale)....119 Identificazione delle parti (telecomando)....120 Collegamenti....121 Impostazione musica 124 iPod/iPhone 126 Internet Radio 127 Musica in streaming 129 AirPlay....130 FM 131 AUX 133 Impostazioni 134 Risoluzione dei problemi 141 Specifiche 143tilizzare l'unità (1)
Contenuto della confezione
Verificare che siano inclusi gli accessori di serie. Telecomando RC-1287 x 1  Batteria CR-2025 x 1  Custodia x 1  Alimentatore x 1  Cavo dell'antenna FM x 1  Manuale di istruzioni (questo documento) x 1 \- Conservare questo manuale in un luogo sicuro per future consultazioni Cartolina di garanzia x 1Prima di utilizzare l'unità (2)
Posizionamento dell'unità
Scegliere con attenzione il luogo di installazione dell'unità. Evitare il posizionamento alla luce solare diretta o vicino a una fonte di calore. Si dovrebbero evitare luoghi soggetti a vibrazioni, polvere eccessiva, calore, freddo o umidità. Poiché l'unità si riscalda durante il funzionamento, lasciare sempre - uno spazio sufficiente attorno ad essa per la ventilazione. Non posizionare l'unità su un amplificatore, un ricevitore o qualsiasi altro dispositivo che genera calore. Quando l'unità è accesa, se un televisore è acceso nelle vicinanze potrebbero apparire linee sullo schermo del televisore a seconda della frequenza della trasmissione televisiva. Questo non è un malfunzionamento dell'apparecchio o della TV. Se si vedono queste linee, tenere lontani l'unità e il televisore.Installazione a muro dell'unità
È possibile montare il prodotto a muro usando le due scanalature sulla parte posteriore. 1 Collegare il cavo di alimentazione. 2 Misurare la distanza tra le 2 scanalature e avvitare le 2 viti sul muro. Praticare due fori nei punti segnati e poi inserire due tasselli e viti nel muro. 3 Montare l'unità. natural_image
Diagram of a device with a cable inserted into a panel, showing wiring and a dashed line indicating direction (no text or symbols)Telecomando
Inserimento delle batterie
1 Aprire il vano della batteria. 2 Inserire nel vassoio la batteria CR2025 inclusa. 3 Chiudere il vano. natural_image
Line drawing of a remote control device with a battery and plug inserted (no text or symbols)Cautela
Togliere la batteria quando non viene utilizzata per lungo tempo.Raggio d'azione del telecomando
Usare il telecomando entro un raggio di circa 7 metri e un angolo fino a 30° puntandolo verso il sensore del telecomando. Parte anteriore e posteriore
1 Pulsante STANDBY/ON (⏻/I)
Premere questo pulsante per accendere l'unità o metterla in standby.2 Pulsante VOLUME –
Premere questo pulsante per diminuire il volume.3 Pulsante VOLUME +
Premere questo pulsante per alzare il volume.4 Pulsante FUNCTION
Premere questo pulsante per selezionare una sorgente di ingresso.5 Dock per iPod/iPhone
6 Display
7 Sensore del telecomando
8 Pulsante ▶/II(ENTER)
Premere questo pulsante per riprodurre o mettere in pausa la musica. Usare questo pulsante anche per immettere o selezionare un menu.9 Pulsante ■ (HOME MENU)
Tenere premuto questo pulsante per passare al menu principale. 10 Pulsante ◀◀(PRECEDENTE)
Premere questo pulsante per riprodurre il brano corrente dall'inizio. Usare questo pulsante anche per salire di un livello nel menu.11 Pulsante ▶▶I(SUCCESSIVO)
Premere questo pulsante per passare al brano successivo Usare questo pulsante anche per scendere di un livello nel menu.12 Porta DC IN
13 Porta ETHERNET
14 Presa AUX IN
15 Terminale antenna FM
flowchart
graph TD
A["STANDBY/ON"] --> B["1"]
A --> C["2"]
A --> D["3"]
A --> E["4"]
A --> F["5"]
A --> G["6"]
A --> H["7"]
A --> I["8"]
A --> J["9"]
A --> K["10"]
A --> L["11"]
A --> M["12"]
A --> N["13"]
A --> O["ENTER (PRESET)"]
O --> P["14"]
O --> Q["15"]
O --> R["16"]
O --> S["17"]
O --> T["18"]
O --> U["20"]
O --> V["22"]
O --> W["TEAC RC-1287"]
1 Pulsante STANDBY/ON ( ⏻/I)
Premere questo pulsante per accendere l'unità o metterla in standby.2 Pulsante HOME
Premere questo pulsante per andare al menu principale.3 BOOKMARK
Premere questo pulsante per aggiungere un segnalibro alla lista di stazioni radio Internet. Usare questo pulsante anche per andare alla lista dei preferiti (nel menu Home).4 SU(▲), GIÙ(▼), SINISTRA(◀), DESTRA(▶)
Premere il corrispondente pulsante freccia per spostarsi su, giù, sinistra o destra nel menu.5 VOL-/+
Premere questo pulsante per alzare o abbassare il volume.6 PRECEDENTE (◄◄).
Premere questo pulsante per la ricerca di una frequenza (in sintonia FM o Preset) Usare questo pulsante anche per riprodurre il brano corrente dall'inizio (in musica)7 PLAY/PAUSE (▶ /II)
Premere questo pulsante per riprodurre o mettere in pausa la musica.8 FUNCTION
Premere questo pulsante per selezionare una sorgente di ingresso (iPod / Net Radio / MUSIC SERVER / FM / AUX).9 STOP (■)
Premere questo pulsante per fermare la riproduzione della musica. Usare questo pulsante anche per selezionare una modalità di sintonizzazione FM (Auto/Manual/Preset).10 CLOCK (ADJ)
Premere questo pulsante per controllare l'ora. Per impostare l'orologio, tenere premuto questo pulsante. Per impostare l'orologio, è necessario che l'unità sia connessa a Internet.11 PRESET EQ
Premere questo pulsante per modificare l'impostazione predefinita dell'equalizzatore (Flat/Rock/Pop/Classic/Jazz/Talk).12 STEREO/MONO
Seleziona Stereo / Mono (in FM)13 MUTE (※)
Premere questo pulsante per disattivare l'audio.14 DIMMER (☀️)
Premere questo pulsante per regolare la luminosità del display (Normale/ Scuro/ Molto scuro).15 DELETE
Premere questo pulsante per cancellare un segnalibro dalla lista dei segnalibri.16 ENTER (PRESET)
Premere questo pulsante per selezionare o salvare (menù / impostazioni). Per avviare la preselezione automatica, tenere premuto questo pulsante in modalità FM.17 SUCCESSIVO (▶▶I)
Premere questo pulsante per la ricerca della frequenza (in sintonia FM o Preset). Usare questo pulsante anche per selezionare il brano successivo (in musica).18 SETTING
Premere questo pulsante per andare al menu di impostazione.19 SLEEP
Premere questo pulsante per impostare il timer di spegnimento (OFF / 120 / 90 / 60 / 45 / 30 / 15).20 ALARM (SET)
Premere questo pulsante per controllare l'impostazione dell'allarme. Per impostare la sveglia, tenere premuto questo pulsante.21 SHUFFLE (∞)
Premere questo pulsante per impostare la modalità di riproduzione casuale.22 REPEAT ( ⇌ )
Premere questo pulsante per impostare l'opzione di ripetizione (All / 1 / Off).23 DISPLAY
Premere questo pulsante per controllare le informazioni sulla musica.Collegare un iPhone/iPod
1 Collegare all'unità l'adattatore dock (in dotazione con l'iPhone/iPod).
 L'adattatore dock potrebbe essere diverso dalla figura qui sopra a seconda del modello.2 Collegare l'iPhone/iPod all'unità.
 I seguenti modelli di iPod / iPhone sono compatibili con questa unità: Pod classic. Pod nano (1a, 2a, 3a, 4a, 5a e 6a generazione) Pod touch (1a, 2a, 3a 4a generazione) ●Phone 4, iPhone 3GS, iPhone 3G, iPhoneScollegare l'adattatore dock
Inserire un cacciavite piatto nella fessura dell'adattatore dock e sollevarlo. Collegamento dell'alimentazione
1 Collegare un'estremità dell'alimentatore alla presa DC IN 12V.
natural_image
Back view of a computer monitor with ports and cable (no text or symbols visible)2 Collegare la spina di alimentazione alla presa a muro.
natural_image
Diagram of a power outlet connected to a device labeled 'Laser' (no text or symbols on the device itself)Nota
Utilizzare l'alimentatore e spina in dotazione. Non usare alcun • alimentatore AC diverso da quello incluso con questa unità. Assicurarsi di collegare l'alimentatore ad una presa AC che fornisca la corretta tensione. Se non si utilizza l'unità per un certo periodo di tempo, scollegare • l'alimentatore AC dalla presa a muro.Collegamento del cavo LAN/ETHERNET
Per collegare l'unità ad una rete domestica a banda larga per ascoltare trasmissioni radio via Internet, collegare il cavo LAN/ETHERNET alla porta ETHERNET. Per informazioni dettagliate sulla configurazione della rete cablata, vedere "Impostazioni di connessione a una rete cablata" a pagina 135. Collegamento di un dispositivo esterno
È possibile collegare un lettore audio aggiuntivo alla presa AUX IN e utilizzare l'unità NS-X1 come altoparlante. Collegare un'estremità del cavo AUX all'unità e l'altra estremità al dispositivo esterno che si desidera collegare (il cavo AUX non è fornito e dovrebbe essere acquistato separatamente). Collegamento dell'antenna FM
1 Collegare l'antenna FM in dotazione al terminale dell'antenna FM dell'unità. 2 Cambiare la posizione dell'antenna fino a ottenere la migliore ricezione delle stazioni FM preferite. natural_image
Diagram of a device rear panel with cable and connector, no text or symbols presentAccendere l'unità
Premere il pulsante STANDBY/ON (☐/I) dell'unità o del telecomando per accendere l'unità.  L'unità si accende con la sorgente di ingresso che è stata selezionata per ultima. \- Ci vogliono circa 30 secondi per accendere l'unità.Nota
Assicurarsi che il cavo di alimentazione sia collegato all'unità (vedere "Collegamento dell'alimentazione" a pagina 122 per informazioni dettagliate).Selezione di una sorgente di ingresso
Premere il pulsante FUNCTION sull'unità o sul telecomando.  Ogni volta che si preme il pulsante FUNCTION, la sorgente di ingresso cambia nel modo seguente: iPod → Net Radio → MUSIC SERVER → FM → AUX Se si preme il pulsante FUNCTION per modificare la sorgente di ingresso, si interrompe la riproduzione della sorgente di ingresso attualmente selezionata.Selezione di una sorgente di ingresso dal menu Home
1 Tenere premuto il pulsante MENU (■) dell'unità o premere il pulsante Home del telecomando per passare al menu principale.  2 Premere i pulsanti PRECEDENTE (1◀◀) o SUCCESSIVO (▶▶▶) dell'unità o il pulsante SU (▲) o GIÙ (▼) del telecomando per muovere la freccia ">" sul display per la sorgente di ingresso che si desidera utilizzare.  Le impostazioni "Bookmark", "iPod", "Net Radio", "MUSIC SERVER", "FM", "AUX" e "Settings" saranno elencate nel menu in alto.  3 Per selezionare la sorgente di ingresso accanto al simbolo ">", premere il pulsante ENTER (►/III) dell'unità o il pulsante ENTER del telecomando.  \- Come sorgente di ingresso, selezionare "iPod", "Net Radio", "MUSIC SERVER", "FM" o "AUX".Regolazione del volume
Premere il pulsante VOLUME - o + dell'unità o del telecomando per regolare il volume.  L'attuale impostazione del livello del volume viene visualizzata per circa 3 secondi. Il livello del volume può essere regolata da 0 a 50. "MIN" rappresenta il volume a 0 e "MAX" rappresenta 50.Disattivare l'audio temporaneamente
Premere il pulsante MUTE (呎) del telecomando.  Il livello del volume sul display lampeggia quando la funzione Mute è attiva (nell'esempio: quando il volume è impostato a 12).  \- Per disattivare l'impostazione Mute, premere il pulsante MUTE (噁) di nuovo o premere il pulsante VOLUME - o + del telecomando o dell'unità.Nota
È possibile attivare l'impostazione Mute solo dal telecomando.Selezione dei Preset EQ
Premere il pulsante PRESET EQ del telecomando per modificare l'impostazione corrente.  \- Ogni volta che si preme il pulsante PRESET EQ, l'unità cambia le seguenti impostazioni: FLAT, ROCK, POP, CLASSIC, JAZZ e TALK.Regolazione della luminosità
Premere il pulsante DIMMER (※) del telecomando.  \- livello della luminosità cambierà come segue: flowchart
graph TD
A["<Nomale>"] --> B["Auto 88.50 M HzP01"]
B --> C["<Scuro>"]
C --> D["Auto 88.50 M HzP01"]
D --> E["<Molto scuro>"]
E --> F["Auto 88.50 M HzP01"]
Controllo delle informazioni
Premere il pulsante DISPLAY del telecomando per controllare le informazioni di riproduzione. È disponibile solo quando è selezionato Net Radio o MUSIC SERVER come sorgente di ingresso o è attivato AirPlay.  Le informazioni seguenti vengono visualizzato nella terza riga del display. ♪: Stato corrente dell'unità : Nome del file corrente o informazioni ID3 : Tempo di riproduzione trascorso → Tipo di file → Titolo dell'album → Dimensione del file → Nome dell'artista \- Ogni volta che si preme il pulsante DISPLAY, il display visualizza le informazioni di cui sopra.Riproduzione di musica da iPod/iPhone
1 Collegare l'iPod/iPhone all'unità.
Per informazioni dettagliate su come collegare l'iPod/iPhone, vedere "Collegare un iPhone/iPod" a pagina 121. Se si collega un iPod/iPhone in riproduzione di un brano, il • brano è mandato uscita automaticamente dall'NS-X1.2 Premere ripetutamente il pulsante FUNCTION dell'unità o del telecomando fino a quando appare "iPod" sul display.
 È possibile selezionare iPod come sorgente di ingresso dal menu. Per istruzioni dettagliate, vedere "Selezione di una sorgente di ingresso dal menu Home" a pagina 124.3 Premere il pulsante DESTRA (▶).
La riproduzione inizia.  È possibile controllare la riproduzione dall'iPod/iPhone.Selezione di una voce di menu iPod/iPhone
Premere i pulsanti SU e GIÙ (▲ e ▼) per selezionare la voce di menu desiderata e quindi premere il pulsante DESTRA (▶). flowchart
graph TD
A["ENTER (PRESET)"] --> B["Arrow 1"]
A --> C["Arrow 2"]
A --> D["Arrow 3"]
A --> E["Arrow 4"]
| Pulsante Descrizione | |
| VOL - o + Regola il volume | |
| Riproduce il brano corrente fin dall'inizio | |
| Riproduce o mette in pausa il brano selezionato | |
| Riproduce il brano successivo | |
| Ferma la riproduzionePassa al menu precedente su iPod/iPhone fermo | |
| Seleziona un'opzione di ripetizione: Ripete tutti i brani: Ripete 1 brano | |
| Impostare la modalità Shuffle | |
Ascoltare la radio via Internet
1 Controllare la rete, facendo in modo che la connessione di rete sia stata stabilita e poi accendere l'unità.
Se si utilizza la Net Radio per la prima volta e deve essere ancora stabilita una connessione di rete, sarà necessario installare prima una connessione Internet cablata o senza fili. Per informazioni dettagliate, consultare la sezione "Installazione della rete" alle pagine 135-137.2 Premere ripetutamente il pulsante FUNCTION dell'unità o del telecomando fino a quando "Net Radio" appare sul display.
Net Radio è selezionata come sorgente di ingresso.  È possibile selezionare Net Radio come sorgente di ingresso dal menu. Per istruzioni dettagliate, vedere "Selezione di una sorgente di ingresso dal menu Home" a pagina 124.3 Premere i pulsanti SU e GIÙ (▲ e ▼) del telecomando per muovere ">" accanto alla categoria desiderata e poi premere il pulsante ENTER o DESTRA (▶).
| Categoria Descrizione | |
| Favorites | Viene visualizzata la lista delle stazioni/Podcast memorizzate come preferite. Selezionare una stazione/ Podcast da ascoltare. |
| Added Stations | Anche se la lista delle stazioni contiene migliaia di stazioni, si potrebbero ascoltare le stazioni non elencate. È possibile aggiungere le proprie stazioni tramite il sito web vTuner (per informazioni dettagliate su come aggiungere una stazione, vedere "Aggiunta di una stazione radio su Internet dal sito vTuner TEAC" a pagina seguente). |
| Location | Liste di stazioni internet ordinate per posizione |
| Genre | Ricerca per genere di musica suonata sulla stazione/Podcast. |
| Podcasts By Location | Ricerca del Podcast per posizione. |
| Podcasts By Genre Ricerca del Podcast per genere. | |
| New Stations | Selezione da una lista di stazioni aggiunte di recente. |
| Most Popular Stations | Selezione da una lista di stazioni popolari. |
| Recently Played | È possibile selezionare la stazione/ Podcast da quelle ascoltate di recente. |
4 Usando i pulsanti SU e GIÙ (▲ e ▼) del telecomando e poi il pulsante ENTER o DESTRA (▶), ci si sposta verso il basso nella lista delle stazioni fino alla stazione desiderata poi premere il pulsante ENTER o DESTRA (▶) del telecomando per ascoltare la stazione selezionata.
Se si desidera interrompere l'ascolto della stazione Internet corrente e tornare al menu precedente, con le liste di stazioni, premere il pulsante STOP (■). Aggiunta di una stazione radio Internet al segnalibro1 Seguire i passi da 1 a 4 descritti su "Ascoltare la radio via Internet" per visualizzare la stazione radio Internet che si desidera aggiungere alla lista dei segnalibri.
2 Premere il pulsante BOOKMARK del telecomando.
 La stazione radio Internet selezionato viene aggiunta alla lista • dei segnalibri. Al termine dell'aggiunta del segnalibro, è possibile selezionare • la stazione aggiunta dal menu Bookmark (menu Home >> Bookmark). Eliminazione di una stazione radio Internet dai Bookmark 1 Premere il pulsante HOME del telecomando per andare al menu Home.  Se si è già nel menu Home, passare direttamente al passo 2. 2 Premere i pulsanti SU e GIÙ (▲ e ▼) del telecomando per spostare ">” su "Bookmark" e poi premere il pulsante ENTER.> Book m ark
iPod
NetRadio
Riproduzione di musica da un server di musica
È possibile ascoltare i file musicali memorizzati su un computer (server musicale) collegato a questa unità tramite una rete cablata/wireless. 1 Avviare il computer (server musicale). Controllare la rete, facendo in modo che la connessione di rete sia stata stabilita e poi accendere l'unità. Per informazioni dettagliate, consultare la sezione "Configurazione della rete" alle pagine 135-137. 2 Premere il pulsante FUNCTION dell'unità o del telecomando per selezionare "MUSIC SERVER" come sorgente di ingresso.  Viene visualizzato la lista dei dispositivi collegati alla stessa • rete. 3 Premere i pulsanti SU e GIÙ (▲ e ▼) del telecomando per selezionare il computer come server musicale e poi premere il pulsante ENTER.  4 Premere i pulsanti SU e GIÙ (▲ e ▼) del telecomando per muovere ">" accanto alla categoria desiderata, come musica, per esempio e poi premere il pulsante ENTER. 5 Scendere la struttura di cartelle eseguendo le operazioni simili a quelle del passo 4 sopra fino a posizionare “>” vicino al file che si desidera riprodurre. 6 Premere il pulsante ENTER per avviare la riproduzione. Configurazione di Windows Media® Player 11 per riprodurre file musicali archiviati sul computer 1 Eseguire Windows Media Player 11 sul computer. 2 Selezionare "Catalogo multimediale" nella barra dei pulsanti, quindi selezionare "Condividi". 3 Nella finestra di dialogo "Condivisione file multimediali", mettere il segno di spunta su "Consenti condivisione file multimediali" e poi cliccare su "OK". 4 Selezionare questa unità nella lista dei dispositivi e quindi cliccare su "Consenti". 5 Cliccare su "OK" per chiudere la finestra di dialogo. La configurazione di Windows Media Player 11 è completa. È possibile riprodurre i file musicali della libreria di Windows Media Player 11 attraverso questa unità.Musica in streaming (2)
Configurazione di Windows Media® Player 12 per riprodurre file musicali archiviati sul computer 1 Eseguire Windows Media Player 12 sul computer. 2 Cliccare sulla freccia Condividi vicino alla parte superiore della finestra Windows Media Player e poi selezionare "Attiva flusso di file multimediali..." Se è richiesta la password di amministratore o una conferma, digitare la password o fornire la conferma. 3 Nella casella Scegliere le opzioni di flusso multimediale per i computer e dispositivi, cliccare su "Consenti" e quindi cliccare su "OK". 4 Selezionare NS-X1 dall'elenco dei dispositivi mostrati e quindi selezionare "Consentito" dal menu a tendina per l'unità selezionata. Quindi, cliccare su "OK". 5 Cliccare sulla freccia Condividi vicino alla parte superiore della finestra Windows Media Player e poi selezionare "Consenti controllo remoto del lettore..." La configurazione di Windows Media Player 12 è completa. È possibile riprodurre i file musicali della libreria di Windows Media Player 12 attraverso questa unità.AirPlay
Connessione AirPlay
Grazie alla tecnologia di streaming AirPlay, questa unità è in grado di riprodurre audio da seguenti modelli iPod/iPhone/iPad con iOS 4.3 o successivo, attraverso una connessione wireless. iPod touch (3a e 4a generazione) ● iPhone 4S, iPhone4, iPhone 3GS ● iPad 2, iPad ● 1 Controllare la rete, facendo in modo che la connessione di rete sia stata stabilita e poi accendere l'unità. Per informazioni dettagliate, consultare la sezione ● "Configurazione della rete" alle pagine 135-137. Assicurarsi che l'unità e l'iPod/iPhone/iPad siano connessi alla • stessa rete. 2 Avviare la riproduzione sul proprio iPod/iPhone/iPad. Se l'unità e l'iPod/iPhone/iPad sono collegati alla stessa rete, apparirà l'icona (A)Play) sul lato destro della barra del volume dell'iPod/iPhone/iPad. \- Assicurarsi di selezionare lo stesso server dell' iPod/iPhone/ iPad come quello selezionata per questa unità. 3 Premere l'icona (AirPlay) e quindi selezionare l'unità come sorgente di uscita. Quando l'unità e l'iPod/iPhone/iPad sono collegati in modo corretto all'interno del raggio wireless, verrà riprodotta attraverso l'unità la musica in riproduzione nell'iPod/iPhone/iPad.Sintonizzazione automatica
1 Premere ripetutamente il pulsante FUNCTION dell'unità o del telecomando finché "FM" appare sul display.
FM è selezionata come sorgente di ingresso. \- altresì possibile selezionare FM come sorgente di ingresso dal menu. Per istruzioni dettagliate, vedere "Selezione di una sorgente di ingresso dal menu Home" a pagina 124.2 Premere ripetutamente il pulsante STOP (■) fino a quando appare "Auto".
 Ogni volta che si preme il pulsante, la modalità cambia come segue: 3 Premere i pulsanti PRECEDENTE (1◄◄) o SUCCESSIVO (►►1) per avviare la ricerca di una stazione con sufficiente segnale.
\- Quando l'unità rileva una stazione di forza sufficiente, il display mostra la frequenza sintonizzata e l'icona 📋. Se la stazione rilevata non è quella desiderata, è sufficiente - ripetere l'operazione. \- e stazioni con segnale insufficiente vengono saltate durante il processo di sintonizzazione automatica.Sintonizzazione manuale
1 Premere ripetutamente il pulsante FUNCTION dell'unità o del telecomando finché "FM" appare sul display.
FM è selezionata come sorgente di ingresso. \- altresì possibile selezionare FM come sorgente di ingresso dal menu. Per istruzioni dettagliate, vedere "Selezione di una sorgente di ingresso dal menu Home" a pagina 124.2 Premere ripetutamente il pulsante STOP (■) fino a quando appare "Manual".
3 Premere ripetutamente il pulsante PRECEDENTE (1◄◄) o SUCCESSIVO (►►) fino a quando si raggiunge la frequenza desiderata.
Sintonizzazione di una stazione Preset
1 Premere ripetutamente il pulsante FUNCTION dell'unità o del telecomando finché "FM" appare sul display.
FM è selezionata come sorgente di ingresso.  È altresì possibile selezionare FM come sorgente di ingresso • dal menu. Per istruzioni dettagliate, vedere "Selezione di una sorgente di ingresso dal menu Home" a pagina 124.2 Premere ripetutamente il pulsante STOP (■) fino a quando appare "Preset".
3 Premere ripetutamente il pulsante PRECEDENTE (1◄◄) o SUCCESSIVO (►►) fino a che appare la stazione Preset desiderata.
RDS (Radio Data System)
Radio Data System (RDS) è un servizio di radiodiffusione che consente alle stazioni di inviare informazioni aggiuntive assieme al segnale normale del programma radiofonico. ●RDS lavora sulla banda FM in Europa.Sintonizzarsi su una stazione FM RDS.
La modalità RDS viene visualizzata nella terza riga del display. Per informazioni dettagliate su come sintonizzare una stazione FM ● RDS, vedere la pagina precedente. Se nessuna modalità RDS viene visualizzata, provare un'antenna • esterna per aumentare la sensibilità. Ogni volta che si preme il pulsante DISPLAY del telecomando, • l'unità scorre le impostazioni della modalità RDS nel seguente ordine: flowchart
graph TD
A["PS (Program Service)"] --> B["RT (Radio Text)"]
B --> C["PTY (Program Type)"]
① PS (Program Service)
Quando si seleziona PS, viene visualizzato il nome della stazione. Se non ci sono dati PS, non viene visualizzato alcun messaggio.② RT (Radio Text)
Quando si seleziona RT, appaiono le notizie della stazione con un massimo di 64 caratteri. Se non ci sono dati RT, non viene visualizzato alcun messaggio.③ PTY (Program Type)
Quando si seleziona PTY, viene visualizzata la descrizione del tipo di musica trasmessa dalla stazione radio come musica pop, rock o classica. Se non ci sono dati PTY, non viene visualizzato alcun messaggio.Preselezione automatica
1 Premere ripetutamente il pulsante FUNCTION dell'unità o del telecomando finché "FM" appare sul display.
FM è selezionata come sorgente di ingresso. 2 Tenere premuto il pulsante ENTER per più di 2 secondi.
Apparirà Il messaggio "Auto Preset OK?". 3 Premere il pulsante ENTER di nuovo.
Verranno memorizzate fino a 30 stazioni FM. • Per bloccare la preimpostazione automatica, premere il pulsante PRECEDENTE (I◀◀) o SUCCESSIVO (▶▶).Cambiare modalità stereo/mono
Si può selezionare la modalità stereo o mono mentre si ascolta una stazione radio FM. Basta premere il pulsante STEREO/MONO del telecomando.  Quando è selezionata la modalità stereo, apparirà sul display l'icona  Se si riceve un rumore forte, selezionare la modalità mono. Se non viene ricevuta alcuna stazione, il suono viene automaticamente disattivato.AUX
Salvataggio delle stazioni Preset
1 Premere ripetutamente il pulsante FUNCTION dell'unità o del telecomando finché "FM" appare sul display.
FM è selezionata come sorgente di ingresso. 2 Selezionare la stazione in modo automatico o manuale.
- Vedere "Sintonizzazione automatica" a pagina 131 per selezionare la stazione automaticamente. - "Vedere "Sintonizzazione manuale" a pagina 131 per selezionare la stazione manualmente. - "vedere "Sintonizzazione di una stazione Preset" a pagina 131 per selezionare la stazione manualmente. - Quando la stazione è già memorizzata, il numero verrà visualizzato sul lato destro del display e quando non viene memorizzata, verrà visualizzato "P--".3 Premere il pulsante ENTER del telecomando.
4 Premere i pulsanti PRECEDENTE (I◄◄) o SUCCESSIVO (►►I) per selezionare il numero che si desidera utilizzare come numero Preset.
5 Premere il pulsante ENTER per salvare la stazione con il numero di Preset selezionato.
Riproduzione di musica da dispositivi esterni
1 Collegare il dispositivo esterno all'unità.
Per le istruzioni dettagliate su come collegare il dispositivo esterno, vedere "Collegamento di un dispositivo esterno" a pagina 123.2 Premere ripetutamente il pulsante FUNCTION dell'unità o del telecomando fino a che appare "AUX" sul display.
AUX è selezionata come sorgente di ingresso. 3 Avviare la riproduzione.
Non è possibile controllare il dispositivo esterno dall'unità o dal telecomando. È possibile controllare le opzioni di riproduzione solo dal dispositivo esterno. \- Si può controllare il livello del volume dall'unità o con il telecomando. Flusso del menu impostazioni flowchart
graph TD
A["Settings Network Setup"] --> B["Network Connect"]
A --> C["Wireless"]
A --> D["Other"]
A --> E["Network Information"]
B --> F["Wired"]
F --> G["DHCP — On / Off"]
F --> H["IP Address"]
F --> I["Subnet Mask"]
F --> J["Gateway"]
F --> K["Primary DNS"]
F --> L["Secondary DNS"]
F --> M["Proxy — On / Off"]
F --> N["Proxy Server"]
F --> O["Proxy Port"]
C --> P["AP List"]
C --> Q["WPS — PIN"]
C --> R["PBC — Cancel"]
C --> S["Factory reset — OK / Cancel"]
C --> T["DHCP"]
C --> U["IP Address"]
C --> V["MAC address"]
E --> W["Clock GMT"]
E --> X["Clock Adjust"]
E --> Y["Alarm — On/Off"]
E --> Z["Setting — Sleep Off / 120 / 90 / 60 / 45 / 30 / 15"]
E --> AA["Standby Mode — On/Off"]
Utilizzare il menu impostazioni
È possibile accedere al menu di impostazione dall'unità principale o utilizzando il telecomando. Utilizzare il menu impostazioni dall'unità principale 1 Tenere premuto il pulsante MENU (■) dell'unità. 2 Premere i pulsanti PRECEDENTE (I◄◄) o SUCCESSIVO (►►) per selezionare"Settings". 3 Premere il pulsante ENTER (▶/II). 4 Premere i pulsanti PRECEDENTE (|◀◀) e SUCCESSIVO (▶▶▶) per spostare ">” accanto al menu che si desidera selezionare e poi premere il pulsante ENTER (▶/II). A seconda del menu selezionato, è possibile modificare le impostazioni di Network, Clock, Alarm, Sleep o Standby Mode.Nota
Non esiste un pulsante dell'unità per spostarsi al menu precedente. Se si desidera spostarsi al menu precedente, utilizzare il pulsante SINISTRA (◀) del telecomando. Utilizzare il m menu impostazioni dal telecomando 1 Premere il pulsante SETTING del telecomando. Apparirà il menu proprio sotto "Settings".  I suddetti menu appaiono anche quando si preme il pulsante • HOME e si premono i pulsanti SU o GIÙ (▲ o ▼) per spostare ">" accanto a "Settings" e poi premere il pulsante ENTER. A seconda del menu selezionato, è possibile modificare le • impostazioni di Network Setup, Clock, Alarm, Sleep o Standby Mode. 2 Premere il pulsante SU o GIÙ (▲ o ▼) per selezionare il menu desiderato e poi premere il pulsante ENTER.Configurazione della rete
Per ascoltare le stazioni radio Internet o file musicali memorizzati nel computer tramite una rete cablata/wireless, è necessario prima configurare le impostazioni di rete.Connessione di rete
Impostazioni di connessione a una rete cablata usando DHCP
Prima di impostare una connessione di rete, assicurarsi che sia collegato un cavo LAN/ETHERNET alla porta ETHERNET in modo adeguato e sicuro. Per dettagli, vedere "Collegamento del cavo LAN/ETHERNET" a pagina 122. 1 Dal menu "Settings", selezionare "Network" → "Network Connect" → "Wired".  Dopo aver commutato da Wired a Wireless, assicurarsi di mettere l'unità in standby e poi accenderla premendo il pulsante STANDBY/ON ( Ⓗ/I) dell'unità. 2 Modificare le impostazioni seguenti se necessario.| Voce di menu Descrizione | |
| DHCP | Imposta la funzione DHCP On/Off |
| IP Address | Inserimento dell'indirizzo IP |
| Subnet Mask | Inserimento Subnet Mask quando la funzione DHCP è Off |
| Gateway | Inserimento del Gateway quando la funzione DHCP è Off |
| Primary DNS | Inserimento DNS primario quando la funzione DHCP è Off |
| Secondary DNS | Inserimento DNS secondario quando la funzione DHCP è Off |
| Proxy | Imposta la funzione Proxy On/Off |
| Proxy Server | Inserimento di un Server Proxy quando la funzione Proxy è On |
| Proxy Port | Inserimento di una porta Proxy quando la funzione Proxy è On |
Nota
Quando si imposta DHCP su "ON", non è necessario impostare l'indirizzo IP, Subnet Mask, Gateway, DNS ecc. Quando si imposta DHCP su "OFF", è necessario impostare la connessione di rete manualmente inserendo l'indirizzo IP ecc. In questo caso, è necessaria una certa conoscenza delle reti. Se non si conosce la materia, contattare il proprio Internet Service Provider per l'assistenza.Impostazioni di connessione manuale a una rete cablata
1 Dal menu "Settings" selezionare "Network" → "Network Connect" → "Wired". Dopo aver commutato da Wired a Wireless, assicurarsi di mettere l'unità in standby e poi accenderla premendo il pulsante STANDBY/ON (O/I) dell'unità. 2 Selezionare "DHCP" e poi selezionare "Off".  3 Premere il pulsante SINISTRA (◀) per tornare al precedente menu e quindi selezionare "IP Address". 4 Selezionare il numero desiderato premendo il pulsante SU o GIÙ ( ▲ o ▼).  Si può passare alla cifra successiva/precedente premendo il • pulsante SINISTRA o DESTRA (◀ o ▶). 5 Premere il pulsante SINISTRA (◀) per tornare al menu precedente, e quindi inserire Subnet Mask, Gateway, Primary DNS e Secondary DNS allo stesso modo come indicato ai precedenti passi da 1 a 4. Quando la connessione di rete cablata viene stabilita correttamente, sarà visualizzata l'iconaImpostazione della connessione di rete wireless
Se il router wireless con Access Point (punto di accesso) supporta la funzione WPS, si può selezionare "WPS". In caso contrario, selezionare "AP List". 1 Dal menu "Settings", selezionare "Network" → "Network Connect" → "Wireless".  Dopo aver commutato da Wired a Wireless, assicurarsi di mettere l'unità in standby e poi accenderla premendo il pulsante STANDBY/ON (O/I) dell'unità. 2 Modificare le impostazioni seguenti se necessario.| Voce di menu Descrizione | ||
| AP List | Seleziona un Access Point | |
| WPS | PIN | Controllo del codice PIN per l'impostazione WPS |
| PBC | Impostazione WPS tramite PBC | |
| Cancel | Annulla il processo WPS | |
Nota
Dato che DHCP è fisso su "On" per la connessione di rete wireless, non è possibile impostare un indirizzo IP statico quando si usa una connessione di rete wireless.Impostazione di una rete wireless tramite AP
1 Dal menu "Settings", selezionare "Network" → "Network Connect" → "Wireless".  Dopo aver commutato da Wired a Wireless, assicurarsi di mettere l'unità in standby e poi accenderla premendo il pulsante STANDBY/ON (O/I) dell'unità. 2 Selezionare "AP List".  3 Selezionare uno dei punti di accesso in lista. 4 Inserire la chiave, se richiesto.  \- Premere il pulsante SU o GIÙ (▲ o ▼) per vedere diverse serie di numeri, lettere o caratteri. Spostare il cursore sul numero desiderato, lettera o carattere • premendo i pulsanti SINISTRA e DESTRA (◀ e ▶) e poi premere il pulsante ENTER per inserire il numero selezionato. Per eliminare la selezione, selezionare "<". Per confermare la voce, selezionare "E". Per annullare e tornare al menu precedente, selezionare "C". 5 Premere il pulsante ENTER per confermare la selezione. La configurazione di rete si riavvia automaticamente e verrà visualizzata l'iconaAltre impostazioni di rete
1 Dal menu "Settings", selezionare "Network" e poi "Other".Netw o rkConn
> Other
NetworkInfo
| Voce di menu Descrizione | |
| Name | Cambia il nome dell'unità che compare in rete. |
| Factory Reset | Ripristina tutte le impostazioni ai valori di fabbrica. |
Modifica del nome dell'unità
1 Dal menu "Settings", selezionare "Network" → "Other" → "Name".> Name
Fac tory Rese
> NS - X 1 22138F
De f aul t
Nota
- Assicurarsi di modificare il fuso orario mentre l'unità è connessa a Internet. - GMT sta per Greenwich Mean Time. Si dovrebbe conoscere il fuso orario locale rispetto al Greenwich Mean Time e inserire l'orario in modo adeguato.Impostazione dell'ora
Nota
- Visto che l'unità aggiorna l'orario attraverso Internet, bisogna essere connessi alla rete prima di iniziare a impostare l'ora. Per visualizzare le informazioni dettagliate sulla configurazione della rete cablata/wireless, consultare la sezione "Configurazione della rete" alle pagine 135-137. - È anche possibile impostare l'orologio tenendo premuto il pulsante CLOCK (ADJ) del telecomando per 2 secondi. Dal menu "Settings", selezionare "Clock" e poi "Clock Adjust".  \- L'unità visualizzerà "Clock Adjust" sul display e regolerà l'ora automaticamente in base al fuso orario. Controllo dell'ora
Dopo aver impostato l'ora, è possibile effettuare un controllo. È sufficiente premere il pulsante CLOCK (ADJ) del telecomando. Sveglia
È possibile impostare la sveglia per accendere l'unità all'orario stabilito. La funzione di sveglia può essere utilizzata solo quando è stato impostato l'orologio. Per informazioni dettagliate, vedere "Orologio" nella pagina precedente.Impostare la sveglia per la prima volta
1 Dal menu "Settings", selezionare "Alarm".Netw o r k
Clock
> Alarm
00:00
Spegnimento
È possibile impostare il timer per mettere automaticamente l'unità in modalità standby dopo un tempo stabilito.Impostazione del timer di spegnimento
È sufficiente premere il pulsante SLEEP del telecomando. Ogni volta che si preme il pulsante SLEEP, il messaggio cambia come segue:   Una volta impostata la funzione Sleep, è possibile controllare o regolare il tempo rimanente dal menu "Settings". Durante il funzionamento del timer di spegnimento, viene visualizzata sul display l'icona.Verificare l'impostazione del timer di spegnimento
È possibile controllare il tempo rimanente del timer di spegnimento. Dal menu "Settings", selezionare "Sleep".Alarm
> Sleep
StandbyMode
Regolazione della funzione di spegnimento
1 Dal menu 'Settings', selezionare "Sleep".
Verrà visualizzato il tempo rimanente. Sleep 132 Premere il pulsante SU o GIÙ (▲ o ▼) per regolare il tempo.
- Premere il pulsante SU (▲) per aumentare il tempo rimanente. (Esempio: se si preme il pulsante quando il tempo rimanente è 13, il tempo rimanente viene cambiato a 15). - Premere il pulsante GIÙ (▼) per diminuire il tempo rimanente. (Esempio: se si preme il pulsante quando il tempo rimanente è 33, il tempo rimanente viene cambiato a 30).Modalità Standby
È possibile impostare la rete in modo che rimanga accesa/spenta in modalità standby. Impostazione della modalità standby1 Dal menu "Settings" selezionare "Standby Mode".
Alarm
Sleep
> StandbyMode
2 Selezionare "On" o "Off".
On: la connessione di rete rimarrà attiva in modalità standby. Off: la connessione di rete verrà disattivata in modalità standby.Risoluzione dei problemi (1)
Se si verificano problemi con questa unità, si prega di leggere queste pagine per vedere se è possibile risolvere il problema da soli prima di rivolgersi al rivenditore o a un centro di assistenza TEAC. Inoltre, il problema potrebbe essere causato da qualcosa di estraneo. Verificare che anche i dispositivi collegati siano utilizzati correttamente.Comportamento irregolare dell'unità durante la riproduzione video/audio
- Assicurarsi che il file in riproduzione sia in uno dei formati descritti a pagina 143 "Specifiche". Installare l'ultima versione del sistema operativo sull'iPod/iPhone. - Se il problema persiste, mettere l'unità in standby e poi riaccenderla premendo il pulsante STANDBY/ON (☑/I). Poi, fare in modo che le precedenti due condizioni siano soddisfatte.Nessuna uscita audio tramite connessione Dock durante la riproduzione video
Riprodurre il video via AirPlay.| Sintomo Possibile causa Rimedio | ||
| Nessuna alimentazione | Il cavo di rete AC è scollegato. Collegare il cavo in modo sicuro. | |
| Cattivo collegamento alla presa a muro o la presa non porta corrente. | Controllare la presa di corrente utilizzando una lampada o un altro apparecchio. | |
| Nessun suono | Il volume principale è regolato troppo basso. | Regolare il volume principale. |
| Il pulsante MUTE è premuto su "ON". | Premere il pulsante MUTE per annullare il silenziamento dell'audio. | |
| Scelta errata della sorgente in ingresso. | Selezionare la sorgente di ingresso desiderata correttamente. | |
| Collegamenti errati tra i componenti. | Effettuare i collegamenti in modo corretto. | |
| Il telecomando non funziona | La batteria non è inserita o è esaurita. | Inserire o sostituire la batteria. |
| Il sensore del telecomando è ostruito. | Rimuovere l'ostacolo. | |
| Non si ricevono stazioni | Nessuna antenna collegata. | Collegare un'antenna. |
| La frequenza della stazione desiderata non è sintonizzata | Sintonizzarsi sulla frequenza della stazione desiderata. | |
| L'antenna è in posizione errata. | Spostare l'antenna e riprovare a sintonizzare. | |
| Non si ricevono stazioni Preset | È stata memorizzata una frequenza non corretta di una stazione. | Memorizzare la frequenza corretta della stazione. |
| Le stazioni memorizzate sono state cancellate. | Memorizzare le stazioni di nuovo. | |
| Scarsa ricezione FM | Nessuna antenna collegata. | Collegare un'antenna. |
| L'antenna non è posizionata per la ricezione migliore. | Cambiare la posizione dell'antenna. | |
| Impossibile connettersi alla rete | Nessun cavo LAN/ETHERNET è collegato. | Collegare un cavo LAN/ETHERNET. |
| Nessuna connessione wireless è disponibile. | Verificare la presenza di una connessione wireless disponibile. | |
| La rete non è attiva. | Controllare che la rete funzioni. | |
| Potenza del segnale insufficiente (connessione wireless). | Diminuire la distanza dal punto di accesso LAN wireless o rimuovere eventuali ostacoli. | |
Risoluzione dei problemi (2)
| Sintomo Possibile causa Rimedio | ||
| La trasmissione radio su Internet non può essere riprodotta | La rete è scollegata. Controllare lo stato della connessione. | |
| Il programma sta trasmettendo in formato non compatibile. | Solo i programmi radio Internet in formato MP3, WMA, WAV e AAC possono essere riprodotti in questo ricevitore. | |
| La stazione radio Internet non sta trasmettendo. Sintonizzarsi su una stazione radio che sta trasmettendo. | ||
| AirPlay instabile | Può essere presente un problema di comunicazione con il punto di accesso | AirPlay può essere instabile a seconda delle condizioni di performance operativa o del router. In tal caso, controllare lo stato della rete e quindi ottimizzare l'ambiente operativo dell'unità NS-X1. |
| L'icona di riproduzione casuale o ripetuta non scompare dal display. | Nel menu Home (schermata del menu in alto), selezionare "Bookmark" e avviare la riproduzione di un file dalla lista dei segnalibri. Poi, premere il Pulsante Shuffle (✗) Repeat o (✗) del telecomando per annullare l'impostazione di riproduzione casuale o ripetuta o premere il pulsante di stop (■) del telecomando. | |
Specifiche
SEZIONE AMPLIFICATORE
Potenza nominale .... 10 W + 10 W (1 kHz, 6 Ω, THD 10 %) Rapporto segnale/rumore .....78 dB (IHF pesato-A, 20 kHz LPF)Sensibilità di ingresso
AUX 1 VrmsSEZIONE ALTOPARLANTI
Cassa Tipo Bass Reflex Altoparlanti Tipo a cono 80 mm Impedenza 6 ΩSEZIONE SINTONIZZATORE FM
Intervallo di ricezione 87.5 MHz - 108.0 MHz step 50 kHz Rapporto S/N (mono/stereo) .....75 dB o più / 70 dB o piùSEZIONE RETE
Ethernet 10 BASE-T/100 BASE-TX Wi-Fi IEEE 802.11 b/g Velocità di trasmissione ..... modalità 802.11b (DS-SS: 11/5.5/1 Mbps) modalità 802.11g (OFDM: 54/48/36/24/18/12/9/6 Mbps) Gamma di frequenze usata ... 2.412 - 2.472 GHz (banda 2.4 GHz ISM)GENERALI
Alimentazione ...... AC 100 - 240 V, 50 / 60Hz (DC 12 V) Consumo AC 20 W (DC 15 W) Consumo in standby ....1 W o meno Dimensioni massime (L x A x P) 320 x 212,2 x 95,5 mm Peso 1,95 kg (netto)Accessori inclusi
Telecomando RC-1287 x 1 Batteria CR-2025 x 1 Custodia x 1 Alimentatore x 1 Cavo antenna FM x 1 Manuale di istruzioni (questo documento) x 1 Cartolina di garanzia x 1 Design e specifiche sono soggetti a modifiche senza preavviso. Peso e dimensioni sono approssimativi. \- Le illustrazioni possono differire leggermente dai modelli di produzione. Formati audio supportati| Formato | Estensione del file | Stream | Parametri | Valore |
| MP3 | mp3 | MPEG 1/2 Layer III | Frequenza di campionamento | 8 - 48 kHz |
| Dimensione parola audio | 16 bit | |||
| Numero canali | 2 Ch | |||
| Bit rate | 8 - 320 Kbps | |||
| VBR/CBR | Supportato | |||
| WAV | wav | LPCM | Frequenza di campionamento | 8 - 192 kHz |
| Dimensione parola audio | 16, 20, 24 bit | |||
| Numero canali | 2 Ch | |||
| WMA | así wma | WMA2/7/8/9/10 | Frequenza di campionamento | 8 - 48 kHz |
| Dimensione parola audio | 16 bit | |||
| Numero canali | 2 Ch | |||
| Bit Rate | 5 - 320 Kbps | |||
| VBR/CBR | Supportato | |||
| WMA Pro WMA Lossless | Frequenza di campionamento | 8 - 48 kHz | ||
| Dimensione parola audio | 16 bit | |||
| Numero canali | 2 Ch | |||
| Bit Rate | 5 - 320 Kbps | |||
| VBR/CBR | Supportato | |||
| AAC | m4a aac 3gp 3g2 | MPEG 4 AAC MPEG 4 HE AAC (AAC Plus v1/2) | Frequenza di campionamento | 32 - 96 kHz |
| Dimensione parola audio | 16 bit | |||
| Numero canali | 2 Ch | |||
| Bit Rate | 16 - 320 Kbps | |||
| VBR/CBR | Supportato |
TEAC
| TEAC CORPORATION | 1-47 Ochiai, Tama-shi, Tokyo 206-8530 Japan | Phone: (042) 356-9156 |
| TEAC AMERICA, INC. 7733 Telegraph Road, Montebello, California 90640 U.S.A. | Phone: (323) 726-0303 | |
| TEAC CANADA LTD. 5939 Wallace Street, Mississauga, Ontario L4Z 1Z8, Canada | Phone: (905) 890-8008 | |
| TEAC MEXICO, S.A. DE C.V. | Río Churubusco 364, Colonia Del Carmen, Delegación Coyoacàn, CP 04100, México DF, México | Phone: (5255) 5010-6000 |
| TEAC UK Ltd. | Suites 19 & 20, Building 6, Croxley Green Business Park, Hatters Lane, Watford, Hertfordshire, WD18 8TE, U.K. | Phone: (0845) 130-2511 |
| TEAC EUROPE GmbH Bahnstraße 12, D-65205 Wiesbaden-Erbenheim, Deutschland | Phone: 0611-71580 | |

- IMPORTANT SAFETY INSTRUCTIONS
- Do not block ventilation openings or stack other equipment on the top.
- CAUTION
- For U.S.A.
- For Canada
- FOR YOUR SAFETY
- For European customers
- Disposal of electrical and electronic equipment
- Disposal of batteries and/or accumulators
- Contents Before Using
- Thank you for choosing this TEAC product. Read this manual carefully to get the best performance from this unit.
- e Unit (1)
- What's in the box
- Before Using the Unit (2)
- Placement of the unit
- Installing the unit on a wall
- Remote Control Unit
- Inserting the battery
- Operating range of the remote control
- Front and rear parts
- STANDBY/ON ( ⏻/l ) button
- HOME button
- BOOKMARK
- UP(▲), DOWN(▼), LEFT(◀), RIGHT(▶)
- VOL -/+
- PREVIOUS (1)
- PLAY/PAUSE (▶ /II)
- FUNCTION
- STOP (■)
- CLOCK (ADJ)
- PRESET EQ
- STEREO/MONO
- Connections (1)
- MUTE (※)
- DIMMER (☀️)
- DELETE
- ENTER (PRESET)
- NEXT (▶▶▶)
- SETTING
- SLEEP
- ALARM (SET)
- SHUFFLE (∞)
- REPEAT ( ⇌ )
- DISPLAY
- Connecting the iPod/iPhone
- Attach the dock adapter (supplied with the iPod/iPhone) to the unit.
- Connect the iPod/iPhone to the unit.
- Disconnecting the dock adapter
- Connecting the power
- Note
- Connecting the LAN/ETHERNET cable
- Connecting an external device
- Connecting the FM antenna
- Turning on the unit
- Selecting an input source
- Selecting an input source from the Home menu
- Adjusting the volume
- Muting the sound temporarily
- Selecting a preset EQ
- Adjusting the brightness
- Checking the information
- Playing music from iPod/iPhone
- Connect your iPod/iPhone to the unit.
- Press the FUNCTION button on the unit or the remote control repeatedly until "iPod" appears on the display.
- Press the RIGHT (▶) button.
- Selecting an iPod/iPhone menu item
- Listening to the Internet radio
- Check your network environment, making sure that the network connection has been established, and then turn on the unit.
- Press the FUNCTION button on the unit or the remote control repeatedly until "Net Radio" appears on the display.
- Press the UP and DOWN (▲ and ▼) buttons on the remote control to move “>” next to the desired category, and then press the ENTER or RIGHT (▶) button.
- Adding an Internet radio station from TEAC vTuner website
- Playing music through music server
- Using Music Streaming (2)
- AirPlay
- AirPlay connection
- Auto tuning
- Manual tuning
- Tuning in a preset station
- RDS (Radio Data System)
- Tune in to an FM RDS station.
- ① PS (Program Service)
- ② RT (Radio Text)
- ③ PTY (Program Type)
- Auto presetting
- Press the FUNCTION button on the unit or the remote control repeatedly until "FM" appears on the display.
- Press and hold the ENTER button for more than 2 seconds.
- Press the ENTER button again.
- Switching stereo/mono mode
- AUX
- Saving preset stations
- Select a station automatically or manually.
- Press the ENTER button on the remote control.
- Press the PREVIOUS (|◀◀) or NEXT (▶▶|) button to select the number you want to use as a preset number.
- Press the ENTER button to save the station with the selected preset number.
- Playing music from external devices
- Connect your external device to the unit.
- Press the FUNCTION button on the unit or the remote control repeatedly until "AUX" appears on the display.
- Start playback.
- Settings menu flow
- Using the setting menu
- Using the setting menu from the main unit
- Using the setting menu from the remote control
- Network Setup
- Network connection
- Setting up a wired network connection by using DHCP
- Setting up a wired network connection manually
- Setting the wireless network connection
- Setting up a wireless network via AP
- Other network settings
- Changing the name of the unit
- Network information
- Clock
- Setting the time zone
- Setting the clock
- Checking the time
- Alarm
- Setting the alarm timer for the first time
- From the "Settings" menu, select "Alarm".
- Set the time you want the unit to turn on.
- Select an input source to be turned on.
- Set the volume to a value from 00 to MAX (50), and then press the ENTER button.
- The following menu screen will appear.
- Sleep
- Setting the sleep timer
- Checking the sleep timer setting
- Adjusting the sleep function
- Standby Mode
- Setting the standby mode
- Troubleshooting (1)
- Erratic behavior of the unit during video/audio playback
- No sound output via dock connection during video playback
- Troubleshooting (2)
- Specifications
- AMPLIFIER SECTION
- Input sensitivity
- SPEAKER SECTION
- FM TUNER SECTION
- NETWORK SECTION
- GENERAL
- Included accessories
- Pour les consommateurs européens
- Mise au rebut des équipements électriques et électroniques
- Mise au rebut des batteries et/ou accumulateurs
- Sommaire Avant d'utilis
- l'unité (1)
- Contenu de l'emballage
- Avant d'utiliser l'unité (2)
- Emplacement de l'unité
- Installation murale de l'unité
- Télécommande
- Insertion de la pile
- Attention
- Portée de fonctionnement de la télécommande
- Faces avant et arrière
- Touche STANDBY/ON (⏻/ı)
- Touche VOLUME –
- Touche VOLUME +
- Touche FUNCTION
- Dock pour iPod/iPhone
- Écran
- Capteur de télécommande
- Touche ▶/II(ENTER)
- Touche ■(MENU HOME)
- Touche ◀◀◀ (PREVIOUS)
- Touche ▶▶I(NEXT)
- Port d'entrée d'alimentation CC (DC IN)
- Port ETHERNET
- Prise d'entrée auxiliaire AUX IN
- Prise pour antenne FM
- Touche STANDBY/ON ( ⏻/I)
- Touche HOME
- HAUT (▲), BAS (▼), GAUCHE (◀), DROITE (▶)
- VOL - /+
- PREVIOUS (◀◀)
- LECTURE/PAUSE (▶/II)
- Raccordements (1)
- MUTE (呎)
- LECTURE ALÉATOIRE (∞)
- LECTURE EN BOUCLE ( ⇌ )
- Branchement de l'iPod/iPhone
- Montez l'adaptateur de dock (fourni avec l'iPod/iPhone) sur l'unité.
- Connectez l'iPod/iPhone à l'unité.
- Démontage de l'adaptateur de dock
- Branchement électrique
- Connexion du câble de réseau local (LAN)/
- ETHERNET
- Connexion d'un appareil externe
- Branchement de l'antenne FM.
- Mise sous tension de l'unité
- Sélection d'une source d'entrée
- Réglage du volume
- Coupure temporaire du son
- Sélection d'une correction tonale préréglée (preset EQ)
- Réglage de la luminosité
- Vérification des informations
- Lecture de musique à partir d'un iPod/iPhone
- Connectez votre iPod/iPhone à l'unité.
- Appuyez plusieurs fois sur la touche FUNCTION de l'unité ou de la télécommande jusqu'à ce que "iPod" s'affiche à l'écran.
- Appuyez sur la touche DROITE (▶).
- Sélection d'une option de menu d'iPod/iPhone
- Écoute de la radio internet
- Contrôlez votre environnement réseau pour vous assurer que la connexion réseau a bien été établie, puis allumez l'unité.
- Appuyez plusieurs fois sur la touche FUNCTION de l'unité ou de la télécommande jusqu'à ce que "Net Radio" s'affiche à l'écran.
- Appuyez sur les touches HAUT ou BAS (▲ ou ▼) de la télécommande pour déplacer le curseur “>” sur la catégorie désirée, puis appuyez sur la touche ENTER ou DROITE (▶).
- En utilisant les touches HAUT et BAS (▲ et ▼) de la télécommande puis la touche ENTER ou DROITE (▶), descendez dans la liste des stations jusqu'à ce que la station désirée apparaisse, puis appuyez sur la touche ENTER ou DROITE (▶) de la télécommande pour écouter la station sélectionnée.
- Ajout d'une station de radio internet à votre liste de favoris
- Suivez les étapes 1 à 4 indiquées dans "Écoute de la radio internet" pour afficher la station de radio internet que vous voulez ajouter à votre liste de favoris.
- Appuyez sur la touche BOOKMARK de la télécommande.
- Lecture de musique au travers d'un serveur musical
- Diffusion de musique par streaming (2)
- Connexion AirPlay
- Syntonisation automatique
- Appuyez plusieurs fois sur la touche FUNCTION de l'unité ou de la télécommande jusqu'à l'affichage de "FM".
- Appuyez plusieurs fois sur la touche STOP (■) jusqu'à ce que "Auto" apparaisse.
- Appuyez sur la touche PREVIOUS (1◄◄) ou NEXT (►►1) pour lancer la recherche d'une station reçue avec suffisamment de puissance.
- Syntonisation manuelle
- Appuyez plusieurs fois sur la touche STOP (■) jusqu'à ce que "Manual" apparaisse.
- Appuyez plusieurs fois sur la touche PREVIOUS (.) ou NEXT (/) jusqu'à l'obtention de la fréquence désirée.
- Réception d'une station préréglée (preset)
- Appuyez plusieurs fois sur la touche STOP (■) jusqu'à ce que "Preset" apparaisse.
- Appuyez plusieurs fois sur la touche PREVIOUS (|◀◀) ou NEXT (▶▶!) jusqu'à l'affichage de la station préréglée (preset) désirée.
- Réglez la réception sur une station FM RDS.
- ① PS (Affichage du nom de la station)
- ② RT (Texte radio)
- ③ PTY (Type de programme)
- Préréglage automatique
- Appuyez plusieurs fois sur la touche FUNCTION de l'unité ou de la télécommande jusqu'à ce que "FM" s'affiche à l'écran.
- Maintenez pressée la touche ENTER pendant plus de 2 secondes.
- Appuyez à nouveau sur la touche ENTER.
- Commutation en mode stéréo/mono
- Sauvegarde des stations préréglées
- Sélectionnez une station, automatiquement ou manuellement.
- Appuyez sur la touche ENTER de la télécommande.
- Appuyez sur la touche PREVIOUS (1◄◄) ou NEXT (►►) pour sélectionner le numéro de preset dans lequel faire la mémorisation.
- Appuyez sur la touche ENTER pour sauvegarder la station dans le numéro de preset sélectionné.
- Lecture de musique à partir d'appareils externes
- Connectez votre appareil externe à l'unité.
- Appuyez plusieurs fois sur la touche FUNCTION de l'unité ou de la télécommande jusqu'à ce que "AUX" s'affiche à l'écran.
- Lancez la lecture.
- Arborescence du menu des réglages
- Emploi du menu des réglages
- Configuration du réseau (Network Setup)
- Connexion réseau
- Établissement d'une connexion réseau filaire avec DHCP
- Établissement d'une connexion réseau filaire manuelle
- Réglage de la connexion réseau sans fil
- Établissement d'un réseau sans fil via un point d'accès (AP)
- Autres réglages réseau
- Changement du nom de l'unité
- Informations réseau (Network information)
- Horloge (Clock)
- Réglage du fuseau horaire
- Réglage de l'horloge
- Vérification de l'heure
- Réveil (Alarm)
- Premier réglage du réveil
- L'écran de menu suivant apparaîtra.
- Minuterie d'extinction (Sleep)
- Réglage de la minuterie d'extinction
- Vérification du réglage de minuterie d'extinction
- Réglage de la fonction de minuterie d'extinction
- Mode de veille (Standby Mode)
- Réglage du mode de veille (Standby Mode)
- Guide de dépannage (1)
- Comportement erratique de l'unité durant la lecture audio/vidéo
- Aucun son ne sort via la connexion au dock durant la lecture vidéo
- Caractéristiques techniques
- SECTION AMPLIFICATEUR
- Sensibilité d'entrée
- SECTION ENCEINTE
- SECTION TUNER FM
- SECTION RÉSEAU
- GÉNÉRALES
- Accessoires fournis
- Para consumidores europeos
- Deshacerse de aparatos eléctricos y electrónicos
- Deshacerse de pilas y/o acumuladores
- Índice Antes de utiliza
- Gracias por elegir este producto TEAC. Lea este manual con atención para obtener el mejor rendimiento de esta unidad.
- a unidad (1)
- Qué hay en la caja
- Antes de utilizar la unidad (2)
- Emplazamiento de la unidad
- Instalación del producto sobre una pared
- Mando a distancia
- Introducción de la pila
- Precaución
- Margen operativo del mando a distancia
- Partes de los paneles frontal y posterior
- Botón de reposo/encendido (STANDBY/ON) (⏻/I)
- Botón VOLUME –
- Botón VOLUME +
- Botón FUNCTION
- Base Dock para iPod/iPhone
- Pantalla
- Sensor de control remoto
- Botón ▶/II(ENTER)
- Botón ■(MENU)
- Botón ◀◀◀ (PREVIOUS)
- Botón ▶▶▶(NEXT)
- Entrada de corriente DC IN
- Puerto ETHERNET
- Terminal de entrada auxiliar AUX IN
- Terminal de antena de FM
- Botón de reposo/encendido STANDBY/ON ( ⏻/I)
- Botón HOME
- ARRIBA(▲), ABAJO(▼), IZQUIERDA(◀), DERECHA(▶)
- ANTERIOR (◀◀)
- REPRODUCCIÓN/PAUSA (▶/II)
- PARADA (■)
- Conexiones (1)
- SILENCIAMIENTO (※)
- ATENUADOR DE PANTALLA (☀️)
- SIGUIENTE (▶▶)
- REPRODUCCIÓN ALEATORIA (×)
- REPETICIÓN (↔)
- Conexión del iPod/iPhone
- Coloque el adaptador de base Dock (suministrado con el iPod/iPhone) en la unidad.
- Conecte el iPod/iPhone a la unidad.
- Desconexión del adaptador de base Dock
- Conexión a la corriente
- Nota
- Conexión con cable LAN/ETHERNET
- Conexión de un dispositivo externo
- Conexión de la antena de FM
- Encendido de la unidad
- Selección de una fuente de entrada
- Ajuste del volumen
- Silenciamiento del sonido temporalmente
- Selección de una ecualización prefijada
- Ajuste del brillo de la pantalla
- Comprobación de la información
- Reproducción de música desde un iPod/iPhone
- Conecte el iPod/iPhone a la unidad.
- Pulse el botón FUNCTION en la unidad o en el mando a distancia repetidamente hasta que en la pantalla aparezca "iPod".
- Pulse el botón DERECHA (▶).
- Selección de un apartado del menú del iPod/iPhone
- Escuchar la radio por Internet
- Compruebe el entorno de red, asegúrese de que se ha hecho la conexión de red y a continuación encienda la unidad.
- Pulse repetidamente el botón FUNCTION en la unidad o en el mando a distancia hasta que "Net Radio" aparezca en la pantalla.
- Pulse los botones ARRIBA y ABAJO (▲ y ▼) en el mando a distancia para desplazar “>” junto a la categoría deseada y a continuación pulse el botón ENTER o DERECHA (▶).
- Usando los botones ARRIBA y ABAJO (▲ y ▼) en el mando a distancia y a continuación el botón ENTER o DERECHA (▶), desplácese por la lista de emisoras hasta que aparezca la emisora deseada y a continuación pulse el botón ENTER o DERECHA (▶) en el mando a distancia para escuchar la emisora seleccionada.
- Siga los pasos 1 a 4 del apartado anterior "Escuchar la radio por Internet" para que aparezca en pantalla la emisora de radio por Internet que desee añadir a su lista de marcadores.
- Pulse el botón BOOKMARK en el mando a distancia.
- Reproducción de música a través de un servidor de música
- Utilización de música en "streaming" (2)
- Conexión "AirPlay"
- Sintonización automática
- Pulse repetidamente el botón FUNCTION en la unidad o en el mando a distancia hasta que "FM" aparezca en la pantalla.
- Pulse el botón de PARADA (■) repetidamente hasta que "Auto" aparezca en la pantalla.
- Pulse el botón PREVIOUS (|◀◀) (anterior) o NEXT (▶▶) (siguiente) para empezar a buscar una emisora con fuerza suficiente.
- Sintonización manual
- Pulse el botón de PARADA (■) repetidamente hasta que "Manual" aparezca en la pantalla.
- Sintonización de una emisora presintonizada
- Pulse el botón de PARADA (■) repetidamente hasta que "Preset" aparezca en la pantalla.
- Pulse repetidamente el botón PREVIOUS (|◀◀) (anterior) o NEXT (▶▶) (siguiente) hasta que la emisora presintonizada deseada aparezca en la pantalla.
- RDS (Sistema de Datos por Radio)
- Sintonice una emisora de FM RDS.
- ① PS (Servicio de programa)
- ② RT (Texto por radio)
- ③ PTY (Tipo de programa)
- Presintonización automática
- Pulse y mantenga pulsado el botón ENTER durante más de 2 segundos.
- Vuelva a pulsar otra vez el botón ENTER.
- Cambiar a modo estéreo/mono
- Guardar presintonías
- Reproducción de música desde dispositivos externos
- Utilización del menú de ajustes de configuración
- Ajustes de configuración de red
- Conexión a una red
- Configuración de la conexión a una red cableada
- Configuración manual de una conexión de red cableada
- Configuración de la conexión a una red inalámbrica
- Otros ajustes de configuración de red
- Cambiar el nombre de la unidad
- Información de red
- Reloj
- Configuración de la zona horaria
- Ajustar el reloj
- Verificación de la hora
- Alarma
- Ajuste del temporizador de la alarma por primera vez
- Aparecerá el siguiente menú en pantalla:
- Temporizador de apagado (Sleep)
- Configuración del temporizador de apagado
- Comprobación del temporizador de apagado
- Ajuste del temporizador de apagado (función Sleep)
- Modo de reposo (standby)
- Ajuste del modo de reposo
- Solución de posibles fallos (1)
- Comportamiento errático de la unidad durante la reproducción de vídeo/audio
- No sale sonido alguno por la conexión de la base Dock durante la reproducción de vídeo
- Solución de posibles fallos (2)
- Especificaciones
- SECCIÓN DE AMPLIFICADOR
- Sensibilidad de entrada
- SECCIÓN DE ALTAVOCES
- SECCIÓN DE SINTONIZADOR DE FM
- SECCIÓN DE RED
- Accesorios incluidos
- Für Kunden in Europa
- Entsorgung von elektrischen Altgeräten und Batterien
- Inhalt Vor der ersten
- etriebnahme (1)
- Lieferumfang
- Vor der ersten Inbetriebnahme (2)
- Wahl des Aufstellungsortes
- Wandmontage
- Die Fernbedienung
- Einsetzen der Batterien
- Achtung
- Betriebsradius der Fernbedienung
- Front- und Rückansicht
- STANDBY/ON-Taste (⏻/ı)
- „VOLUME –“ Taste
- „VOLUME +“ Taste
- FUNCTION-Taste
- iPod/iPhone Dock
- Display
- Fernbedienungssensor
- ▶/II(ENTER) Taste
- ■(HOME MENU) Taste
- (PREVIOUS) Taste
- ▶▶(NEXT) Taste
- Netzadapteranschluss (DC IN)
- ETHERNET-Port
- AUX IN-Buchse
- UKW (FM) Antennenanschluss
- Tasten und deren Funktion (Fernbedienung)
- STANDBY/ON-Taste ( ⏻/I)
- HOME-Taste
- BOOKMARK-Taste (Lesezeichen)
- Cursortasten AUFWÄRTS (▲), ABWÄRTS (▼), LINKS (◀), RECHTS (▶)
- PREVIOUS-Taste (◀◀)
- Wiedergabe-/Paustaste (▶/II)
- FUNCTION-Taste
- Stopptaste (■)
- CLOCK (ADJ)-Taste
- PRESET EQ-Taste
- STEREO/MONO-Taste
- MUTE-Taste (※) (Stummschaltung)
- DIMMER-Taste (☀️)
- DELETE-Taste
- ENTER (PRESET)-Taste
- NEXT-Taste (▶▶)
- SETTING-Taste
- SLEEP-Taste
- ALARM (SET)-Taste
- SHUFFLE-Taste ( ) (Titelauswahl nach dem Zufallprinzip)
- Wiederholfunktionstaste (↔)
- Anschließen eines iPod/iPhone
- Installieren Sie den Dockadapter, den Sie zusammen mit Ihrem iPod-/iPhone-Modell erhalten haben, im Dock des NS-X1.
- Stellen Sie den iPod/das iPhone ins Dock des NS-X1.
- Entfernen des Dockadapters
- Anschließen des Netzadapters
- Verbinden Sie das Kabel des Netzadapters mit dem DC IN 12V-Anschluss.
- Schließen Sie den Netzadapter an einer Wandsteckdose an.
- Hinweise:
- Anschließen der LAN-Kabel
- Anschließen einer externen Signalquelle
- Anschließen der UKW (FM) Antenne
- Einschalten des Netzwerk Audio Players
- Hinweis
- Auswählen einer Signalquelle/eines Eingangs
- Auswählen einer Signalquelle im „Home“-Menü
- Einstellen der Wiedergabelautstärke
- Zeitweises Stummschalten der Wiedergabe
- Hinweis:
- Auswählen eines EQ-Presets
- Einstellen der Display-Helligkeit
- Anzeigen von Titelinformationen
- Audiodateien eines iPod/iPhone wiedergeben
- Schließen Sie einen iPod/ein iPhone am NS-X1 an.
- Betätigen Sie wiederholt die FUNCTION-Taste am NS-X1 oder auf der Fernbedienung, bis als Signalquelle „iPod“ im Display angezeigt wird.
- Betätigen Sie die RECHTS-Taste (▶).
- Auswählen eines iPod-/iPhone-Menüpunkts
- Internetradiowiedergabe
- Audiodateien mittels Music Server wiedergeben
- Streaming von Audiodateien (2)
- Audiodateien via AirPlay wiedergeben
- Automatische Sendersuche
- Manuelle Sendersuche
- Aufrufen von Senderspeicherplätzen (Presets)
- Wählen Sie einen UKW (FM) Sender, der den RDS-Datendienst unterstützt.
- ① PS (Programmservice)
- ② RT (Radiotext)
- ③ PTY (Programmtyp)
- Automatische Preset-Speicherung
- Betätigen Sie wiederholt die FUNCTION-Taste am NS-X1 oder auf der Fernbedienung, um „FM“ als Signalquelle auszuwählen.
- Betätigen Sie die ENTER-Taste länger als zwei Sekunden.
- Betätigen Sie erneut die ENTER-Taste.
- Umschalten zwischen Stereo-/Monowiedergabe
- Manuelle Preset-Speicherung
- Audiosignale externer Quellen wiedergeben
- Verwenden des Einstellungsmenüs
- Netzwerkeinstellungen
- Netzwerkverbindung
- Einrichten einer Ethernet-Verbindung mittels DHCP
- Manuelle Konfiguration des LAN/ETHERNET-Netzwerks
- Einrichten einer Drahtlosverbindung (WLAN-Netzwerk)
- Einrichten einer Drahtlosverbindung (WLAN-Netzwerk) via AP
- Andere Netzwerkeinstellungen
- Netzwerkinformationen
- Uhr
- Einstellen der Zeitzone
- Einstellen der Uhrzeit
- Überprüfen der Uhrzeit
- Erstmaliges Einstellen des Alarm-Timers
- Folgende Menüanzeige erscheint im Display.
- Einschlaftimer (Sleep)
- Programmieren des Einschlaftimers
- Überprüfen der Einschlaftimerfunktion
- Einstellen des Einschlaftimers
- Standby-Modus
- Standby-Einstellung
- Hilfe bei Funktionsstörungen (1)
- Fehlerhaftes Verhalten des NS-X1 während der Video-/Audiowiedergabe
- Bei der Videowiedergabe von einem im Dock des NS-X1 befindlichen iPod oder eines iPhone wird kein Audiosignal über tragen.
- Technische Daten
- VERSTÄRKERTEIL
- Eingangsempfindlichkeit
- LAUTSPRECHERSYSTEME
- UKW (FM) TUNERTEIL
- NETZWERK
- ALLGEMEIN
- Mitgeliefertes Zubehör
- Per gli utenti europei
- Smaltimento delle apparecchiature elettriche ed elettroniche
- Smaltimento delle pile e/o accumulatori
- Indice dei contenuti Prima di
- Grazie per aver scelto TEAC. Leggere attentamente questo manuale per ottenere le migliori prestazioni con questa unità.
- tilizzare l'unità (1)
- Contenuto della confezione
- Prima di utilizzare l'unità (2)
- Posizionamento dell'unità
- Installazione a muro dell'unità
- Telecomando
- Inserimento delle batterie
- Cautela
- Raggio d'azione del telecomando
- Parte anteriore e posteriore
- Pulsante STANDBY/ON (⏻/I)
- Pulsante VOLUME –
- Pulsante VOLUME +
- Pulsante FUNCTION
- Dock per iPod/iPhone
- Sensore del telecomando
- Pulsante ▶/II(ENTER)
- Pulsante ■ (HOME MENU)
- Pulsante ◀◀(PRECEDENTE)
- Pulsante ▶▶I(SUCCESSIVO)
- Porta DC IN
- Porta ETHERNET
- Presa AUX IN
- Terminale antenna FM
- Pulsante STANDBY/ON ( ⏻/I)
- Pulsante HOME
- SU(▲), GIÙ(▼), SINISTRA(◀), DESTRA(▶)
- VOL-/+
- PRECEDENTE (◄◄).
- SUCCESSIVO (▶▶I)
- Collegare un iPhone/iPod
- Collegare all'unità l'adattatore dock (in dotazione con l'iPhone/iPod).
- Collegare l'iPhone/iPod all'unità.
- Scollegare l'adattatore dock
- Collegamento dell'alimentazione
- Collegare un'estremità dell'alimentatore alla presa DC IN 12V.
- Collegare la spina di alimentazione alla presa a muro.
- Collegamento del cavo LAN/ETHERNET
- Collegamento di un dispositivo esterno
- Collegamento dell'antenna FM
- Accendere l'unità
- Selezione di una sorgente di ingresso
- Selezione di una sorgente di ingresso dal menu Home
- Regolazione del volume
- Disattivare l'audio temporaneamente
- Selezione dei Preset EQ
- Regolazione della luminosità
- Controllo delle informazioni
- Riproduzione di musica da iPod/iPhone
- Collegare l'iPod/iPhone all'unità.
- Premere ripetutamente il pulsante FUNCTION dell'unità o del telecomando fino a quando appare "iPod" sul display.
- Premere il pulsante DESTRA (▶).
- Selezione di una voce di menu iPod/iPhone
- Ascoltare la radio via Internet
- Controllare la rete, facendo in modo che la connessione di rete sia stata stabilita e poi accendere l'unità.
- Premere ripetutamente il pulsante FUNCTION dell'unità o del telecomando fino a quando "Net Radio" appare sul display.
- Premere i pulsanti SU e GIÙ (▲ e ▼) del telecomando per muovere ">" accanto alla categoria desiderata e poi premere il pulsante ENTER o DESTRA (▶).
- Usando i pulsanti SU e GIÙ (▲ e ▼) del telecomando e poi il pulsante ENTER o DESTRA (▶), ci si sposta verso il basso nella lista delle stazioni fino alla stazione desiderata poi premere il pulsante ENTER o DESTRA (▶) del telecomando per ascoltare la stazione selezionata.
- Seguire i passi da 1 a 4 descritti su "Ascoltare la radio via Internet" per visualizzare la stazione radio Internet che si desidera aggiungere alla lista dei segnalibri.
- Premere il pulsante BOOKMARK del telecomando.
- Riproduzione di musica da un server di musica
- Musica in streaming (2)
- Connessione AirPlay
- Sintonizzazione automatica
- Premere ripetutamente il pulsante FUNCTION dell'unità o del telecomando finché "FM" appare sul display.
- Premere ripetutamente il pulsante STOP (■) fino a quando appare "Auto".
- Premere i pulsanti PRECEDENTE (1◄◄) o SUCCESSIVO (►►1) per avviare la ricerca di una stazione con sufficiente segnale.
- Sintonizzazione manuale
- Premere ripetutamente il pulsante STOP (■) fino a quando appare "Manual".
- Premere ripetutamente il pulsante PRECEDENTE (1◄◄) o SUCCESSIVO (►►) fino a quando si raggiunge la frequenza desiderata.
- Sintonizzazione di una stazione Preset
- Premere ripetutamente il pulsante STOP (■) fino a quando appare "Preset".
- Premere ripetutamente il pulsante PRECEDENTE (1◄◄) o SUCCESSIVO (►►) fino a che appare la stazione Preset desiderata.
- Sintonizzarsi su una stazione FM RDS.
- Preselezione automatica
- Tenere premuto il pulsante ENTER per più di 2 secondi.
- Premere il pulsante ENTER di nuovo.
- Cambiare modalità stereo/mono
- Salvataggio delle stazioni Preset
- Selezionare la stazione in modo automatico o manuale.
- Premere il pulsante ENTER del telecomando.
- Premere i pulsanti PRECEDENTE (I◄◄) o SUCCESSIVO (►►I) per selezionare il numero che si desidera utilizzare come numero Preset.
- Premere il pulsante ENTER per salvare la stazione con il numero di Preset selezionato.
- Riproduzione di musica da dispositivi esterni
- Collegare il dispositivo esterno all'unità.
- Premere ripetutamente il pulsante FUNCTION dell'unità o del telecomando fino a che appare "AUX" sul display.
- Avviare la riproduzione.
- Utilizzare il menu impostazioni
- Configurazione della rete
- Connessione di rete
- Impostazioni di connessione a una rete cablata usando DHCP
- Impostazioni di connessione manuale a una rete cablata
- Impostazione della connessione di rete wireless
- Impostazione di una rete wireless tramite AP
- Altre impostazioni di rete
- Modifica del nome dell'unità
- Informazioni della rete
- Orologio
- Impostazione dell'ora
- Controllo dell'ora
- Sveglia
- Impostare la sveglia per la prima volta
- Spegnimento
- Impostazione del timer di spegnimento
- Verificare l'impostazione del timer di spegnimento
- Regolazione della funzione di spegnimento
- Dal menu 'Settings', selezionare "Sleep".
- Premere il pulsante SU o GIÙ (▲ o ▼) per regolare il tempo.
- Modalità Standby
- Dal menu "Settings" selezionare "Standby Mode".
- Selezionare "On" o "Off".
- Risoluzione dei problemi (1)
- Comportamento irregolare dell'unità durante la riproduzione video/audio
- Nessuna uscita audio tramite connessione Dock durante la riproduzione video
- Risoluzione dei problemi (2)
- Specifiche
- SEZIONE AMPLIFICATORE
- Sensibilità di ingresso
- SEZIONE ALTOPARLANTI
- SEZIONE SINTONIZZATORE FM
- SEZIONE RETE
- GENERALI
- Accessori inclusi
- TEAC
Brand : TEAC
Model : NSX1
Category : Radio