CR 105K - Radio SEG - Free user manual and instructions
Find the device manual for free CR 105K SEG in PDF.

| Product type | Digital alarm clock radio with RDS |
| Brand | SEG |
| Model | CR 105K |
| Power supply | AC 230 V ~ 50 Hz mains |
| Frequency range | FM 87.5 - 108 MHz |
| Main functions | FM RDS radio, dual alarms, kitchen timer, SDA (Special Date Alert), time/date display, backlight, key lock, electronic volume control, 60 radio presets, AMS (Auto Memory), auto scan, AOT (Auto Off Timer) |
| Display | Backlit LCD screen |
| Spare parts and repairability | No spare parts provided; repair by authorized service only |
| Dimensions (approx.) | 250 x 150 x 100 mm |
| Weight (approx.) | 1 kg |
| Warranty | 2 years |
| Maintenance | Clean with a soft, dry cloth; do not use chemical products |
| Safety | Do not open the device, risk of electric shock |
Frequently Asked Questions - CR 105K SEG
User questions about CR 105K SEG
0 question about this device. Answer the ones you know or ask your own.
Ask a new question about this device
Download the instructions for your Radio in PDF format for free! Find your manual CR 105K - SEG and take your electronic device back in hand. On this page are published all the documents necessary for the use of your device. CR 105K by SEG.
USER MANUAL CR 105K SEG
Operating Instructions
FM UKW Band 105.28 frequenz
AL1 Alarm 1 AL2 Alarm 2
natural_image
Technical line drawing of a mechanical device with mounting holes and internal components (no text or symbols)5. Technische Daten
text_image
Symbolic image showing a recycling bin with cross and minus signs next to the letters CEnatural_image
Symbol of a trash bin crossed with two crossed lines, no text or numbers presentSelect the alarm output format is Beep
sounds

Select the alarm output format is Radio
Table of Contents
Overview....1
Key List....2
Display....3
Table of Contents......5
1. Safety Instructions ....7
1.1 Intended Use....7
1.2 User manual....7
1.3 Connecting to the Power Supply....7
1.4 WARNING......8
1.5 Objects inside the device....8
1.6 Installation....8
1.7 Condensation....9
1.8 Children....9
1.9 Batteries....9
1.10 Cleaning....9
1.11 Servicing....10
1.12 Repairs....10
1.13 WARNING....10
2. General Description.....11
3. How to used....12
3.1 Auto-run Mode (Radio OFF)....12
3.2 Set the clock (manually)....13
3.3 Set the date....13
3.4 Set the SDA....14
3.5 Switching automatic update ON/OFF....14
3.6 Switching dimmer ON/OFF....15
3.7 Select 12/24 hour....15
3.8 The Cooking Timer....16
3.9 Timer Value Preset....16
3.10 ALARM1/ALARM2 setting(Radio OFF)....17
3.11 When SDA is active....18
3.12 When alarm is active....18
3.13 Radio reception....19
3.14 Recall radio preset memory....19
3.15 Store into memory....19
3.16 Search up/Down....20
3.17 Memory review....20
3.18 AMS Using....21
3.19 AOT function....21
3.20 Electronic Volume Control....21
3.21 Key-lock....21
4. Disposal....22
4.1 Packing....22
4.2 Device....22
4.3 Batteries....22
4.4 Assembly....23
5. Technical Date....24
1. Safety Instructions
Please read the following instructions and safety notes thoroughly before starting to use your product!
1.1 Intended Use
- this device has been designed for receiving and playing back radio broadcasts. If the product is not used according to the instructions, the user's and other persons' safety is not guaranteed and the warranty will be void.
1.2 User manual
- please read this User Manual thoroughly and keep it for any future reference in a safe place. For your own safety and in order to familiarize yourself with the different functions of the product, please follow the instructions in this manual carefully. When passing this product to other persons, please also hand over this User Manual.
Please also read the user manuals of all devices that you are going to connect to this device.
1.3 Connecting to the Power Supply
- do not use the device if the device or its cables present visible damage. Connect the device only to the voltage indicated on the corresponding label on the product. Never connect the device to a different voltage. Connect the device to grounded power outlets that comply with the corresponding safety standards only. Do not bend or squeeze the cables.
1.4 WARNING
- Inside the device there is dangerous voltage. Never open the housing of the device: there is risk of personal injury by electric shock. In order to completely disconnect the device from the mains, the power plug must be pulled out from the wall outlet. Always pull the power cord from the plug and never from the cable itself. Electric storms may damage any electric equipment; therefore disconnect the power plug from the wall outlet during a thunderstorm. It is also recommended to disconnect the device from the mains and to remove any batteries when you are intending not to use the device for a longer time.
1.5 Objects inside the device
- Make sure that no foreign objects or liquids enter the device via the ventilation holes or other openings. There is risk of electric shock, damage to the device and short-circuit. In case of any emergency, immediately pull the power plug and contact a qualified service technician.
1.6 Installation
- place the device onto a flat and even surface. Never cover the ventilation holes of the device and make sure that the air can easily flow around the device (keep at least 10 ~cm / 4 inch space on the back and sides). The device has anti-skid rubber feet. Over the long-term, these feet can dissolve due to chemical substances. It is recommended that you place the device on an anti-skid surface. WARNING: do not use this device outdoors!
1.7 Condensation
- When bringing this device from a cold to a warm environment (e.g. after transportation) moisture can condensate inside the device. In order to protect the device from damage and failure wait at least 2 hours prior to using the device.
1.8 Children
- Do not allow children to play with electrical devices. Children may not be able to comprehend the presence of potential risks.
1.9 Batteries
- Keep batteries away from children. Always replace all the batteries at the same time (never mix old and new batteries). Do not short-circuit any batteries. There is risk of explosion when misusing the batteries.
- Do not place any objects on the device and never apply any pressure onto the housing or the display. Do not place any recipients containing liquids (beverages, vases, etc.) onto or next to the device. Do not place any fire sources (such as candles) onto the device. This could damage the product.
- Environmental effects: Keep the device away from any heat sources (heating equipment, ovens, cooking places, candlelight, etc.), direct sun radiation, dirt, dust, vibrations, strong magnetic fields, moisture and rain.
1.10 Cleaning
- Clean the device with a soft, slightly moistened cloth. Do not use any chemicals, alcohol or solvents for cleaning. The finish of the device can be damaged by using these substances.
Always make sure that no moisture enters the device.
1.11 Servicing
- When using the device according to the operating instructions, no special service or maintenance is required. In case of any loss of performance or other malfunction, contact a qualified service technician.
1.12 Repairs
- Never open the device! Any repairs must be performed by authorized technicians or service personnel. Any unauthorised opening or modification will void the warranty and also the safety of the product may be altered.
1.13 WARNING
- Inside the device there is dangerous voltage. Never open the housing of the device: there is risk of personal injury by electric shock.
2. General Description
- RDS Function
• An electronic module for digital tuning radio
• Power supply: AC power - Precise crystal is used for system operation
- Interactive LCD display provides user friendly operation
• Real time clock display with day-flag
• 12/24 Hour clock display - Ascending Alarm—The Buzzer sounds progressively faster in 4 levels
• Built in calendar with auto leap year handling within 2000-2099
• 4 mode dual alarms can be set to daily, weekday, week-end and daily independently - Alarm output can be set to radio or Buzzer sound.
• 6 User setting SDA (Special Date Alert) - 6+1 preset able cooking Timer (1 minute to 23:59)
• AMS function (Automatic Memory System)
• 60 memories pre-set radio station
• Automatic/Manual search Up/Down features are provided
• Memory scan feature is provided
• Electronic Volume Control
• LED back light with smooth dimmer work in 2 mode
• Key lock function to prevent accidental keying
• A.O.T (Auto Off Timer) function
• Radio frequency range:
| Band Freq. range Freq./step | |
| FM 87.5 - 108.0MHz 100 KHz |
3. How to used
As the unit is powered up, the date and clock are defaulted to Friday, 1st Jan 2010, and “PLEASE WAIT FOR SETTING THANKS” appears on the display, and then updates the time automatically.
• The two alarms are defaulted to 0:00, daily type but disabled
• The radio is switched off
- It then switches to auto-run mode
3.1 Auto-run Mode (Radio OFF)
- Press

natural_image
Two vertical arrows, one upward and one downward, on a plain white background (no text or symbols)select 12/24 hour ← Dimmer ON/OFF ← Automatic update ON/OFF
- In radio mode, If RDS information is transmitted by the station, the station name appears in place of the frequency; the frequency is displayed when there is no RDS information had been received.
- Press
- Press
- When the radio is ON, press
- When the radio is ON, press
- When the radio is ON, press
- When the radio is ON, press
- At every minute boundary, the real time clock is compared with the alarm setting if it has been enabled. For details, please refer to the section of ‘When alarm is active’
3.2 Set the clock (manually)
- Press
• The clock goes flashing the LCD with day-flag cleared
• The second keeps counting up once per second
- Press
- Press
- Press and hold
- Press
- Press other key to start its corresponding function.
- When no key has been pressed for 10 seconds, the current setting is confirmed and it switches to auto-run mode
3.3 Set the date
- Press
- The current date goes flashing in the format of dd.mm.yyyy in the LCD
- Press
per step. Press and hold
- Press
- Press other key to start its corresponding function.
- When no key has been pressed for 10 seconds, the current setting is confirmed and it switches to auto-run mode automatically.
3.4 Set the SDA
- Press
• The date & 'SDA' goes flashing alternative
- Press
- Press < TIMER/ALARM MODE > to ignore the year
- Press
- Press < A - F> to select the number of SDA
- Press other key to start its corresponding function.
- When no key has been pressed for 10 seconds, the current setting is confirmed and it switches to auto-run mode automatically.
In case of ignore the year the SDA will be active ever year at same date
3.5 Switching automatic update ON/OFF
- Press
- The display show 'UPDATE' press
- The indicator “ ⏻ ” disappears, the update function is switch OFF.
- The indicator “ ” flashes. The time will be updated the next RDS time signal is received.
- Press
- Press other key to start its corresponding function.
- When no key has been pressed for 10 seconds, the current setting is confirmed and it switches to auto-run mode automatically.
3.6 Switching dimmer ON/OFF
- Press
• The display show 'DIM ON' or 'DIM OFF'
- Press
- Display show 'DIM ON' the display is illuminated for 10 seconds, when any key had been pressed.
- Display show 'DIM OFF' the display is illuminated for all time
- Press
- Press other key to start its corresponding function.
- When no key has been pressed for 10 seconds, the current setting is confirmed and it switches to auto-run mode automatically.
3.7 Select 12/24 hour
- Press
• The display show '12 HOUR' or '24 HOUR'
- Press
- Press
- Press other key to start its corresponding function.
- When no key has been pressed for 10 seconds, the current setting is confirmed and it switches to auto-run mode automatically.
3.8 The Cooking Timer
- Press
- Press
- When the timer is running press
- When the timer remain 30 seconds, the remind tone “be” will sound, (it also sound at 25s, 20s, 16s, 12s, 9s, 6s, 4s, 2s) the time reach to 00.00, the voice “be...be...be...be...be” will be heard for ever. Press
- Press and hold
3.9 Timer Value Preset
- Press
- Press
| Output format | LCD display |
| Beep sounds ‘Alarm’ symbol goes solid | |
| Radio output ‘Radio’ symbol goes solid | |
| Disable All the ‘Alarm’ and ‘Radio’ are cleared | |
- Press
once, the 'T' goes flash. Press
• Similar to - Press the
to start the timer, press and hold for 2 seconds to exit the timer mode.
3.10 ALARM1 and ALARM2 setting(Radio OFF)
- Press
or once, 'ALARM1' or 'ALARM2' goes solid in the alphanumeric section. - The current setting of HH:MM and the type of alarm go flashing by the corresponding day-flags.
- Press
to advance the setting by 1 minute - Press
to move the setting back by 1 minute - Press and hold
or to change the setting in fast mode of 10 minutes per step - Press
to change the type of alarm between daily, weekday, weekend and daily independently, which are reflected by the 7 day-flags. -
Press and hold
to enter daily independently mode. Press again to select the day and it will reflect by the day-flags. Press and hold to leave the daily independently mode and return select daily, weekday and weekend. -
Press same alarm key, which is
or , once to select the output format of the alarm - Press other key to start its corresponding function
- When no key has been pressed for 10 seconds, the system goes back to auto-run mode
3.11 When SDA is active
- When the date/month/(year) matches with the SDA which has been enable, alert becomes active at 8:00AM
- As the SDA active, Sound of beep toggles at the Speaker for 10 minutes, Muted Radio even radio ON & The “SDA” goes flash on LCD display
• The beep will sound ever hour for 10 minutes until 23:00 - Press any key to terminate the SDA when SDA is sounding.
3.12 When alarm is active
- When the real time clock matches with the alarm which has been enabled, alarm becomes active
• As the alarm becomes active, the Cooking timer, if exists, is terminated immediately
• If beep sounds alarm is selected,
a) Sound of beep toggles at the Speaker
b) Muted Radio even radio ON
c) The duration of alarm is 10 minutes
• If Radio alarm is selected,
a) RADIO ON
b) the duration of the alarm is 60 minutes
- To terminate the currently active alarm, press the corresponding key
3.13 Radio reception
- Press
- If RDS information is transmitted by the station current set, “” appears in the display and after short time the station name appears in place of the frequency.
3.14 Recall radio preset memory
• There are 60 preset memory stations for the radio
- When the radio is ON, press
• Similar to
- When new preset memory key is pressed, MUTE is active. When keying the preset memory has been released for 1 second, the selection of preset memory is considered as valid and the radio will be tuned to that frequency immediately with MUTE idle.
- At any time, press other key to start its corresponding function.
3.15 Store into memory
- To store the tuning frequency of radio station being received into any of the preset memory, press < MEMORY SETTING > once. The ‘MEM’ goes flashing
- Select the desired memory station by pressing the corresponding key until its number goes solid above ‘MEM’
- Press < MEMORY SETTING > again to confirm the process of storing. Then, 'MEM' goes solid.
- When ‘MEM’ is flashing, pressing
, or will search up, search down and memory scan with the ‘MEM’ cleared - Press other key to start its corresponding function.
3.16 Search Up/Down
- When the radio is ON, press
once to change the receiving frequency up by 1 step (100KHz). - Press
once to change the receiving frequency down by 1 step (100KHz). - Press and hold
to search the next radio station by moving the receiving frequency up. - Press and hold
to search the next radio station by moving the receiving frequency down.
3.17 Memory review
- When the radio is ON, press
once to scan the 10 preset memory stations in folder A. Select folder B-F to review corresponding preset memory stations.
• The review starts from the next memory station or A-0 if no memory station is being selected.
• Review will stop at each station for 5 seconds.
• During review, press other key will start its corresponding function and the review process will be terminated.
3.18 AMS Using
- When radio is On, press and hold < MEMORY REVIEW/A.M.S > 2 seconds to active AMS mode. In this mode, the radio will automatically store the station that had been scanned.
3.19 AOT function
- When radio is on, press the
key once, the LCD displays "AOT 90". If radio is off, press will turn on the radio. - Press
once to change the time down by 5 minutes, press and hold to change the setting in fast mode. - When radio is on, and set the AOT time, press
once to change the time to the multiple of 5. For example, the preset ATO time is 10, press once to change time to 5, press again to OFF 90,85,80,...10,5,OFF... - When the time is reach to preset, it will turn off the radio automatically.
3.20 Electronic Volume Control
- When radio is on,
- Press
once, to increase speaker volume by one step. Hold for continually. - Press
once, to decrease speaker volume by one step. Hold for continually.
3.21 Key-lock
- Press and hold the
for 2 seconds, key-lock has been switched ON; the "KEY" goes solid. - Press and hold the < MEMORY SETTING > again for 2 seconds to release the key-lock; the "KEY" will disappear.
4. Disposal
4.1 Packing
- Your RDS Kitchen Radio is packgaed to protect it from transport damage. Packages are raw materials and thus can be when returned to the raw materials.
4.2 Device
- At the end of its life cycle, never dispose off your RDS Kitchen Radio in the normal household garbage. Ask your shire council for options on disposing of the appliance and in an environmentally friendly way.
4.3 Batteries
- Do not dispose off used batteries with normal household waste. Batteries should be disposed off at special collection points as they contain harmful substance.
4.4 Assembly
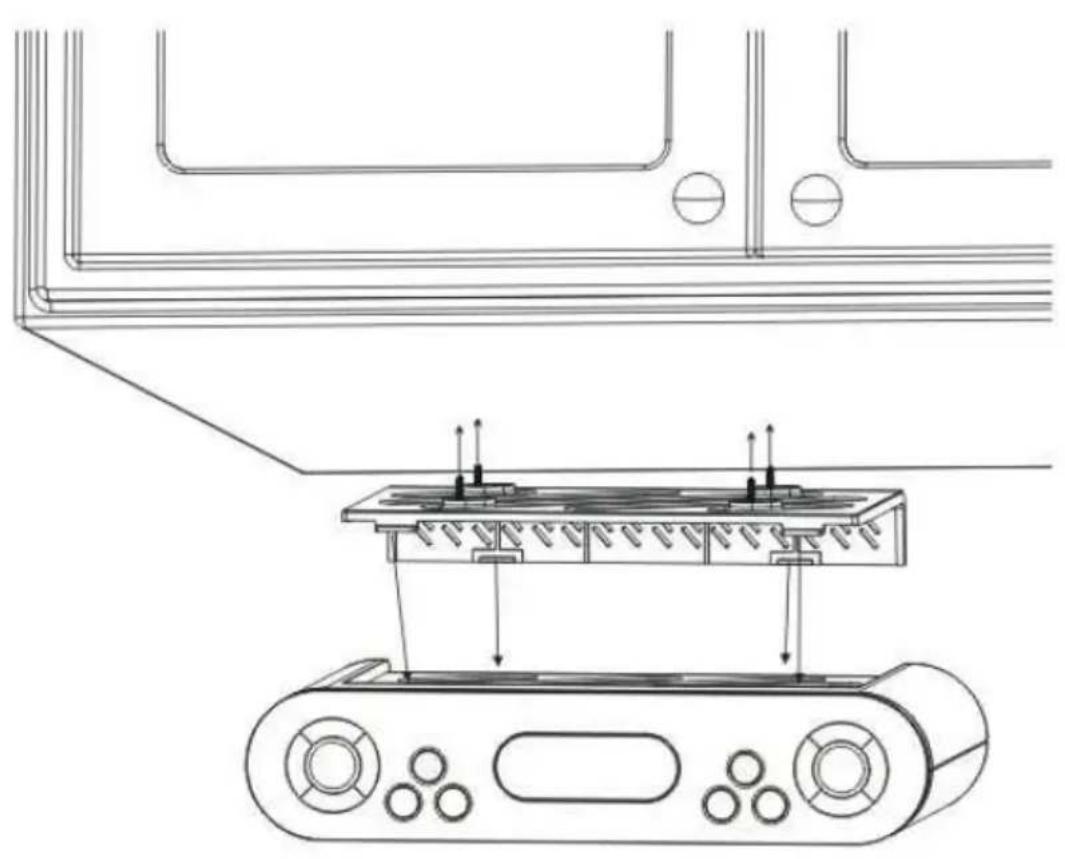
natural_image
Technical line drawing of a mechanical assembly with no visible text or symbols5. Technical Date
- UKW-FM Frequency
- Rated Voltage
- Backup Battery
- Output
• Operation temperature
87.5-108MHz
AC 230V 50Hz
3V (2×1.5V UM-4/AAA)
500mW
5^ C - 35^ C
Product of :
Select the alarm output format is Beep
sounds

Select the alarm output format is Radio
Table of Contents
Liste des clés....1
Liste des clés....2
Display....3
Table of Contents......5
1.7 Condensation :....8
1.8 Enfants :....9
- Assembly......23
- Technical Date....24
natural_image
Technical line drawing of a mechanical device with labeled components and assembly lines (no text or symbols)5. Technical Date
- UKW-FM Frequency
- Rated Voltage
- Backup Battery
- Output
• Operation temperature
87.5-108MHz
AC 230V 50Hz
3V (2×1.5V UM-4/AAA)
500mW
5^ C - 35^ C
Product of :
Select the alarm output format is Beep
sounds

Select the alarm output format is Radio
Table of Contents
Overview....1
Key List....2
Display....3
Table of Contents......5
-
Assembly......23
-
Technical Date....24
| Banda Freq. gamma Freq. / step | |
| FM 87.5 - 108.0MHz 100 KHz |
3. Come usato
natural_image
Technical line drawing of a mechanical device with mounting holes and internal components (no text or symbols)5. Technical Date
- UKW-FM Frequency
- Rated Voltage
- Backup Battery
- Output
• Operation temperature
87.5-108MHz
AC 230V 50Hz
3V (2×1.5V UM-4/AAA)
500mW
5^ C-35^ C
Product of :
service@schmid-electronics.de
service@schmid-electronics.de