BA 3286 - Iron SEVERIN - Free user manual and instructions
Find the device manual for free BA 3286 SEVERIN in PDF.
Download the instructions for your Iron in PDF format for free! Find your manual BA 3286 - SEVERIN and take your electronic device back in hand. On this page are published all the documents necessary for the use of your device. BA 3286 by SEVERIN.
USER MANUAL BA 3286 SEVERIN
Instructions for use
Before using the appliance, please read the
following instructions carefully and keep this
manual for future reference. e appliance
must only be used by persons familiar with
Connection to the mains supply
e appliance should only be connected to
an earthed socket installed in accordance
with the regulations. Make sure that the
supply voltage corresponds with the voltage
marked on the rating label of the appliance.
is product complies with all binding CE
labelling directives.
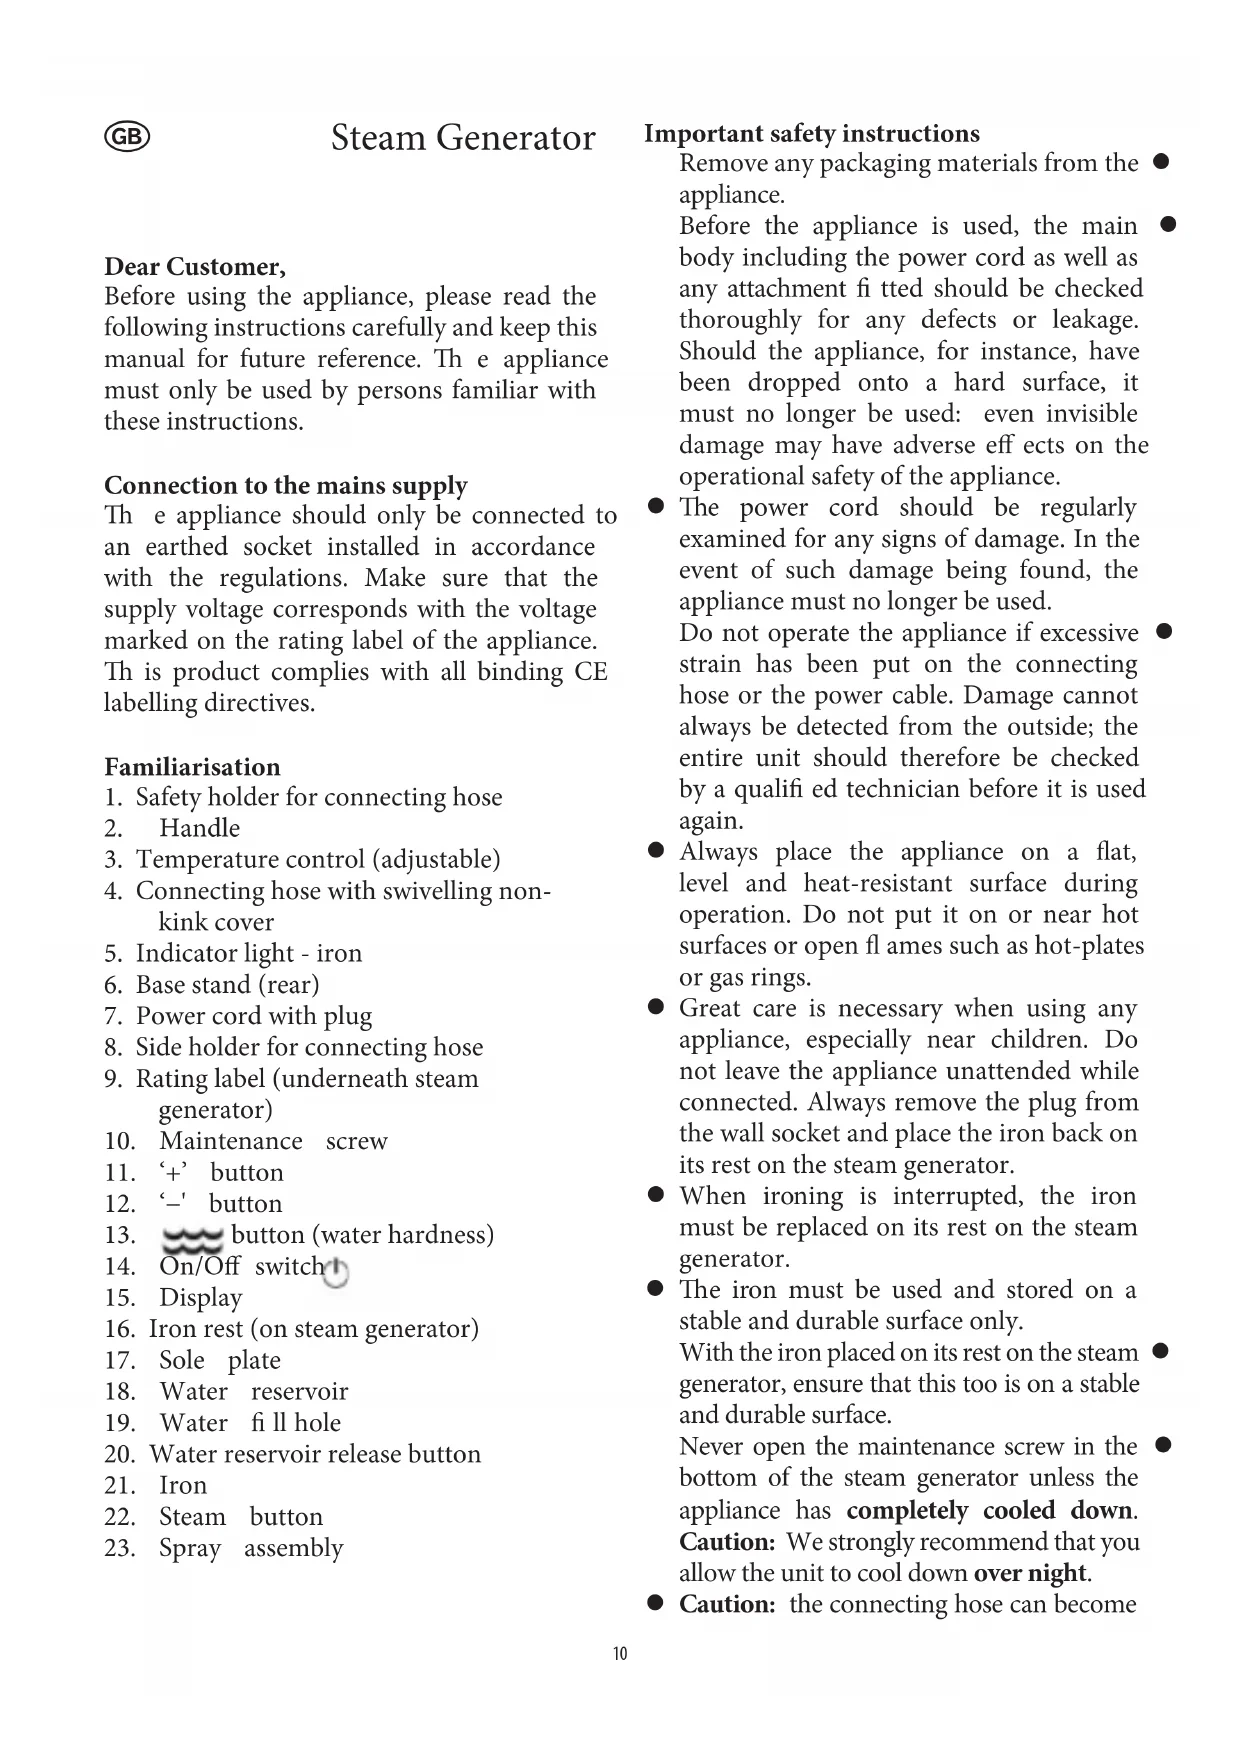
1. Safety holder for connecting hose
3. Temperature control (adjustable)
4. Connecting hose with swivelling non-
5. Indicator light - iron
6. Base stand (rear)
7. Power cord with plug
8. Side holder for connecting hose
9. Rating label (underneath steam
10. Maintenance screw
16. Iron rest (on steam generator)
Important safety instructions
Remove any packaging materials from the z
Before the appliance is used, the main z
body including the power cord as well as
any attachment tted should be checked
thoroughly for any defects or leakage.
Should the appliance, for instance, have
been dropped onto a hard surface, it
must no longer be used: even invisible
damage may have adverse e ects on the
operational safety of the appliance.
e power cord should be regularly z
examined for any signs of damage. In the
event of such damage being found, the
appliance must no longer be used.
Do not operate the appliance if excessive z
strain has been put on the connecting
hose or the power cable. Damage cannot
always be detected from the outside; the
entire unit should therefore be checked
by a quali ed technician before it is used
Always place the appliance on a at, z
level and heat-resistant surface during
operation. Do not put it on or near hot
surfaces or open ames such as hot-plates
Great care is necessary when using any z
appliance, especially near children. Do
not leave the appliance unattended while
connected. Always remove the plug from
the wall socket and place the iron back on
its rest on the steam generator.
When ironing is interrupted, the iron z
must be replaced on its rest on the steam
e iron must be used and stored on a z
stable and durable surface only.
With the iron placed on its rest on the steam z
generator, ensure that this too is on a stable
and durable surface.
Never open the maintenance screw in the z
bottom of the steam generator unless the
appliance has completely cooled down.
Caution: We strongly recommend that you
allow the unit to cool down over night.
Caution: z the connecting hose can become
10very hot during ironing.
e appliance operates at very high z
temperatures. Do not touch any part of
the appliance except the handle. Burns
can occur from touching the hot parts
of the housing or the sole plate and from
hot water or steam. Do not allow steam to
escape in the direction of anyone nearby.
When operating the appliance, hold only z
Do not attempt to iron or to smooth out z
wrinkles or creases from clothes by using
the steam jet function while wearing
Do not ll the reservoir with any liquid z
Always switch the appliance o and z
remove the plug from the wall socket
before the water reservoir is removed;
this will prevent the appliance from being
Do not allow the power cord to touch z
hot surfaces, and do not coil it round the
Always remove the plug from the wall z
in case of any malfunction, -
while re lling, when the reservoir is -
When removing the plug from the wall z
socket, never pull on the power cord;
always grip the plug itself.
is appliance is not intended for use by z
any persons (including children) with
reduced physical, sensory or mental
capabilities, or lacking experience and
knowledge, unless they have been given
supervision or instruction concerning
the use of the appliance by a person
responsible for their safety.
Children should be supervised to ensure z
that they do not play with the appliance.
Caution: z Keep any packaging materials
well away from children: there is a risk of
No responsibility will be accepted if z
damage results from improper use, or if
these instructions are not complied with.
is appliance is intended for domestic use z
only and not for commercial applications.
In order to comply with safety regulations z
and to avoid hazards, repairs of electrical
appliances must be carried out by quali ed
personnel, including the replacement
of the power cord. If repairs are needed,
please send the appliance to one of our
customer service departments. e
address can be found in the appendix to
reservoir must be lled with water in the
switch o the generator and remove the -
plug from the wall outlet;
press the reservoir release button and take -
o the reservoir to the rear;
ll the reservoir with clean tap water, -
observing the ‘Max’ marking;
replace the reservoir in the generator, -
ensuring it locks into place.
Adjusting the level of water hardness
Before the appliance is used for the rst time,
or when it is used in a new location with a
di erent degree of water hardness, the iron
should be adjusted to the appropriate hardness
button to enter the water-
hardness adjustment mode.
Use the + and – buttons to select the –
Should you be unsure about the hardness of
the water in your area, please enquire of the
relevant local authority department.
button again to con rm the
11selected setting and save it for future ironing.
Re- lling with water
As soon as the water in the reservoir needs to
be replenished, the symbol
display and a beep signal is heard. Proceed as
described in the section Filling with water.
To facilitate ironing, t the cable guide
(provided) into the rear opening and run
the connecting hose through the loop on the
upper part of the cable guide.
Before being used for the rst time, the iron
should be heated up and cleaned as follows:
Fill the reservoir with clean tap water. –
Place the iron on its rest and insert the –
plug into a suitable wall socket.
Use the On/O switch to turn on the –
A beep signal is heard and the display –
shows the medium setting for the water
, as well as the medium
setting for the steam output selection
starts ashing to indicate
that the boiler is heating up.
Set the temperature control to its –
As the iron is heating up, the temperature –
indicator lamp on the iron will be on.
It goes out once the required ironing
temperature is reached.
button and the + / − buttons
to set the appropriate hardness level as
described in the section Adjusting the level
While the appliance is heating up, the –
display shows the symbol for the steam
pressure already available for steam
e symbol disappears once the water –
in the boiler has reached the required
As soon as the steam output indicator z
appears in the display, pass the
sole plate over a clean cotton cloth, while
repeatedly using the steam button in short
bursts to clean the sole plate.
Now clean the appliance according to z
the instructions given in the paragraph
General Care and Cleaning.
is will remove possible dust particles z
from the sole plate and subsequently
lessen the smell typically encountered
when rst switching on. Ensure su cient
General information about ironing
Always check rst whether a label with
ironing instructions is attached to the article
e meaning of the ironing symbols is as –
ese markings can also be found on the –
temperature control knob of the iron in
the form of dot symbols.
Laundry to be ironed should be z
sorted according to the fabric ironing
temperature. Follow the ironing symbols
and start with the lowest temperature.
When ironing highly sensitive fabrics, z
or if you are not sure about the fabric,
carefully test-iron on a non-visible point,
e.g. inside a seam. Always start with the
If the laundry is put into a dryer before z
ironing, the temperature should be
adjusted to ‚iron dry‘. Very dry fabrics are
Steam ironing requires high temperatures. z
e appropriate level for steam ironing
is indicated on the temperature control
12Fill the water reservoir with clean tap –
Place the iron on its rest and insert the –
plug into a suitable wall socket.
Use the On/O switch –
symbol starts ashing to indicate
that the boiler is heating up.
Set the temperature control knob to the –
required ironing temperature according
to the ironing symbols.
As the iron is heating up, the temperature –
indicator lamp on the iron will be on.
It goes out once the required ironing
temperature is reached.
Use the + and – buttons to select the –
desired steam output:
While the appliance is heating up, the –
display shows the symbol for the steam
pressure already available for steam
the water in the boiler has reached the
required temperature.
As soon as the steam output indicator ‘ – 4’
appears in the display, the water in the
boiler is su ciently hot for steam ironing.
Before starting to iron, the sole plate –
should be cleaned by passing it over a
clean cotton cloth, while using the steam
jet function; this helps to ush out any dirt
residues or lint particles trapped inside the
openings in the sole plate.
You can now start ironing; press the steam –
e steam function may also be used with –
the iron held vertically, to remove creases
or wrinkles from fabrics.
If, during ironing, the water reservoir z
becomes empty, simply re- ll it as
described in the section ‘Filling with
water’. Always replenish the water in
good time, whenever the symbol
Turn the appliance o a er use. Replace z
the iron on its rest on the steam generator
and remove the plug from the wall socket.
Once the appliance has cooled down z
su ciently, the power cord and
connecting hose may be carefully wound
up and stored in the side holder.
For dry-ironing (i.e. ironing without steam),
proceed as described in the section Steam
ironing and use the + and – buttons to select
the ‘no steam’-symbol
e spray function can be used at any time.
To ll the water tank for the spray function,
pull o the entire spray assembly and take
o the tank. Fill the tank with clean water,
observing the ‘Max’ marking and replace
it. Ensure that the two arrow markings are
properly aligned, i.e. facing each other.
Replace the spray assembly.
If the appliance is not used for more than
10 minutes, it will automatically switch into
‘Pause’ mode. is is indicated by a beep
pause symbol in the display.
To continue ironing, re-activate the appliance
by pressing the On/O switch
button and allow it to re-heat for around two
General care and cleaning
Before cleaning the appliance, ensure it is z
disconnected from the power supply and
has completely cooled down.
To avoid the risk of electric shock, do not z
clean the appliance with water and do not
immerse it in water.
Do not use abrasives or harsh cleaning z
If necessary, the appliance may be wiped z
with a dry lint-free cloth.
Starch, fat and other deposits on the sole –
plate may be removed with a woollen
13cloth soaked in a vinegar/water solution.
To empty any water remaining in the reservoir
A er use, any remaining water must be
removed from the reservoir.
Remove the reservoir. –
Pour out any remaining water through the –
Replace the reservoir in the generator. –
To prevent a build-up of lime deposits on the
heating element and to extend the lifespan of
your appliance, the boiler should be cleaned
as soon as the ‘Clean boiler’-signal
appears in the display.
Remove the plug from the wall socket –
a er use and allow the appliance to cool
down completely. Caution: We strongly
recommend that you allow the unit to cool
down over night before cleaning the boiler
Place the iron on the rest on its rear onto a –
stable and durable surface.
Remove the empty water reservoir. –
Turn the steam generator upside down. –
Use a coin to turn the maintenance screw –
turning anti-clockwise and remove it.
Hold the steam generator over a suitable –
Let the residual water inside the boiler drain –
Fill the boiler with one cup of clean tap –
Shake the appliance repeatedly to and fro, –
and then pour out the water again.
Repeat this procedure until the water is clear –
and no longer shows any impurities.
Fill the boiler with 400 ml of clean tap –
water. Caution: Do not forget to re-plenish
the water; operating the boiler empty is
likely to cause serious damage.
Replace the maintenance screw and ensure –
that it is properly tted.
Caution: – Never pour vinegar or descaling
liquid into the boiler.
Caution: – danger of scalding from
escaping steam. Never open the boiler
during use; allow the appliance to cool
Do not dispose of old or defective
appliances in domestic garbage;
this should only be done through
public collection points.
is product is guaranteed against defects
in materials and workmanship for a period
of three years from the date of purchase.
Under this guarantee the manufacturer
undertakes to repair or replace any parts
found to be defective, providing the product
is returned to one of our authorised service
centres. is guarantee is only valid if the
appliance has been used in accordance with
the instructions, and provided that it has not
been modi ed, repaired or interfered with
by any unauthorised person, or damaged
is guarantee naturally does not cover wear
and tear, nor breakables such as glass and
ceramic items, bulbs etc. is guarantee does
not a ect your statutory rights, nor any legal
rights you may have as a consumer under
applicable national legislation governing the
purchase of goods. If the product fails to
operate and needs to be returned, pack it 8
carefully, enclosing your name and address
and the reason for return. If within the
guarantee period, please also provide the
guarantee card and proof of purchase.
begynder at blinke for at
begynder at blinke for at vise
Service Post of Thermi
7th Floor, Cité Dora 3 Building, Dora
E Sc. 2 Et.1, Ap. 27, Sector 1
Serbia and Montenegro