
DVP 7027 DVBT - DVD player SALORA - Free user manual and instructions
Find the device manual for free DVP 7027 DVBT SALORA in PDF.

| Brand | Salora |
| Model | DVP 7027 DVBT |
| Product type | Portable DVD player with LCD screen and DVB-T receiver |
| Screen | 7-inch LCD, 16:9 format |
| Dimensions (W x D x H) | 215 x 168 x 43 mm |
| Weight | 0.861 kg |
| Power supply | DC 9-12 V via mains adapter or cigarette lighter |
| Rechargeable battery | Li-Polymer, battery life ~2 h, charge ~6 h |
| Supported disc formats | DVD, CD, MP3, JPEG, Kodak Picture CD |
| DVB-T tuner | Yes, DTT reception with automatic search |
| Connectors | AV input, AV output, 3.5 mm headphone jack, antenna, USB, SD card reader, DC IN |
| Special features | Repeat, zoom, subtitles, camera angles, on-screen menu |
| Security | Parental control (password 8888), password lock |
| Included accessories | Remote control, headphones, mains adapter, cigarette lighter adapter, antenna, audio/video cable |
| Maintenance and cleaning | Unplug before cleaning, use a soft slightly damp cloth |
| Repairability | Do not open, consult a specialist in case of malfunction |
| Manual languages | FR, DE, EN, NL (available for download) |
Frequently Asked Questions - DVP 7027 DVBT SALORA
User questions about DVP 7027 DVBT SALORA
0 question about this device. Answer the ones you know or ask your own.
Ask a new question about this device
Download the instructions for your DVD player in PDF format for free! Find your manual DVP 7027 DVBT - SALORA and take your electronic device back in hand. On this page are published all the documents necessary for the use of your device. DVP 7027 DVBT by SALORA.
USER MANUAL DVP 7027 DVBT SALORA
Note: Please do not disconnect USB devices or plug out SD/MMC cards while they are working with the unit. Functional failure may occur in case of wrong operations.
Safety Precautions 1
Introduction 3
Quick start Guide 5
Connecting 6
Playing back a Disc 7
Playing back a KODAK Picture CD/JPEG/SONG 9
Locating a Specific Title, Chapter or Track 10
1
Subtitlon 13
Selecting the camera Angle 13
DVD 14
14
Custom Setup 15
Using the Repeat Feature 16
Playing Mp3 Disc 16
Playing JPEG files 18
Rechargeable Battery use 17
AVIN 17
VIO
DVB 18
BvBme 19
Program Search 21
Parental Control 22
USB&SD Setting 25
Custom setup 26
system setting 27
Strengg Coots 37
Preference 28
Specifications 30
Troubleshooting 30
Safety Precautions
Please read the Manual carefully before using this player, and keep the manual well for turn-back consultation.
Important instruction for safety
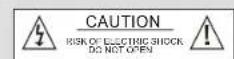
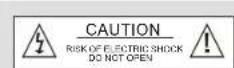
A Warning To alert the user to dangerous voltage on the spot.
Caution:To remind the user of important operating and maintenance instructions attached
Warning: In order to prevent the risk of fire or electric shock, do not expose the machine in the rain or wet place. And do not open the case of the machine because of the high-voltage of interior accessories. Repairing work must be done by specialized personnel.
Caution: Please use wide pin plug and the matching socket and insert the plug to the bottom to avoid the risk of electric shock.
Caution:This DVD player has laser system.
Please read through this manual in order to use this machine properly.
Please keep it for turn-back consultation after finishing reading. Please note that hazardous radiation leakage may be caused if the control buttons, adjust buttons or operation process other than being designated used.
Do not open the case of the player to avoid direct laser radiation. The visible laser light will come out when the case is open or the binding mechanism is removed. Do not stare at the laser beam.
Warning:Many inconveniences may occur when this machine being modified or refitted without authorization.
Safety Information
Introduction
Thank you for choosing our DVB-T. The main features include a 7" Wide Screen (16:9 Aspect Ratio) Liquid Crystal Display (LCD) monitor and a DVB-T. The unit applies the latest state of art electronics and is designed for use at home in hotels, offices. The unit is constructed to provide years of reliable, trouble-free service, and is compact so that you can take it with you anywhere and is designed for quick and easy installation. Please read the entire instruction manual supplied with this product prior to using. Please save this manual for later use.
Cautions andWarnings
- Placement To prevent fire or electric shock, do not expose this appliance to rain or moisture. Do not place the set on an unstable cart, stand, tripod, bracket or table to prevent it from falling. Keep the unit away from strong magnets, heat sources, direct sunlight, excessive dust. If the unit is brought directly from a cold to a warm location, moisture may condense inside the unit, wait for about one hour before operating the unit, or remove the disc and leave the unit turned on until the moisture evaporates.
2. Installation
Ensure that the 7 DVB-T is installed in accordance with the instructions and illustrations provided in this manual.
3. Caution
Do not push objects of any kind into the unit through openings; do not spill or spray liquid of any kind on or in the system (this may result in a fire or electric shock). Do not place anything heavy on the unit. To ensure proper ventilation and proper operation, never cover or block the slots and openings with a cloth or other material. Keep the unit away from an open flame such as fire, candle etc. It is hazardous to replace the battery incorrectly. Replace the battery only with the same or equivalent type, in order to protect the environment, please dispose the battery properly. Do not use the unit in temperatures higher than 95 degrees Fahr- enheit or 35 degrees Celsius.
4.Disassemble
Do not attempt to disassemble the cabinet. There is a risk of electric shock and/or exposure to Laser Radiation. Contact qualified service personnel if your system needs repair.
5. Cleaning Unit
When cleaning, make sure the system is unplugged from the power source. Do not use liquid cleaners or aerosol cleaners. Use a cloth lightly dampened with water for cleaning the exterior of the system only.
6. Support SD Card and USB
Introduction
UNPACKING
First check the contents of your Portable DVD player package:

1x7LCD Monitor & DVD PlayerCombo with built-in Polymer batter
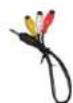
Audio/Video Cable
Remote Control
DC Adapter
If any item should be damaged or missing, please contact your dealer without delay.
Keep the packaging materials, you may need them to transport your player in the future.
WARNING: Changes or modifications made to this equipment, not expressly approved by us or parties authorized by us will avoid all manufacture warranties.
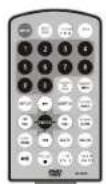
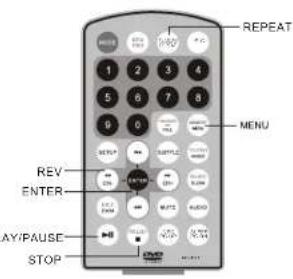
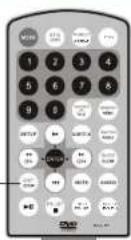
Location of Controls
Controls, Indicators, and Connectors
2.Controls
1.ANT 2.USB
3. POWER ON/OFF SWITCH
4.MODE 5.MENU
6. Setup 7.STOP
8.▲▼BUTTON
9. BUTTON
0. OPEN 11.HEADPHONE
12. VOLUME 13.AV IN/OUT
14. ON/OFF 15.SD
16.DC IN 9V 17. OK (play/pause)
1OSD/EPG
2.Mode
3.Number buttons 0-9
4. 1
5. Setup
6.Enter (To confirm)
7、CH-CH+ buttons
8Zoom/Exit
9 Play/Pause
0.PRList
1.TV/Music/Repeat
2.PIC
3.Favorite PR/Title
4. Memory/Menu
5.Subtitle 16 Teletext/Angle
7.Guide/Slow 18 Mute
9 Audio 20 Sleep/PG DN
21info/PGUP
Quick Start Guide
- Powering the system indoors
Plug one end of the AC to DC adapter into the DC input jack on the side of the main unit, then plug the other end into the AC power receptacle.
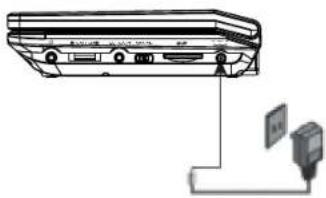
2.Powering the system in a car
Plug one end of the cigarette
lighteradapterintotheDC
input jack on the
unit, then plug the other end into
the cigarette lighter socket

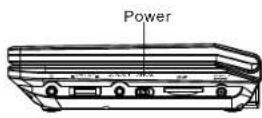
- Press the power button
on the right of the panel
to turn on the player.
Connecting
Connecting headphones
- Connect the headphones.
Headphones with a 3.5 mm stereo plug can be connected.
- Adjust the volume by turning the volume control on the side of the screen.


- Avoid listening to sound at levels which may be harmful to your ears.

Connecting to TV
Playing Back a Disc
How to start playback from the menu screen
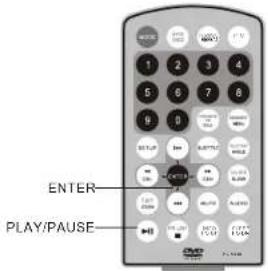
- Press TITLE/MENU to access the menu screen.
- Press / < > (cursor keys) or the numerical keys (will only work on certain discs) to select the desired title.
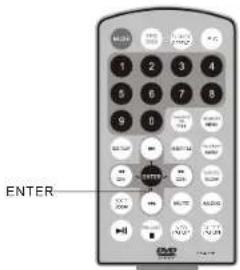
- Press the ENTER or PLAY button.
The DVD video player will start playback from the selected title
Title 1 Title 2

Title 3

Title 4

How to pause playback
When paused, press the PLAY button to resume normal playback.
Playing Back a Disc
STOP PLAYBACK
Press the STOP button.
Playback will stop.
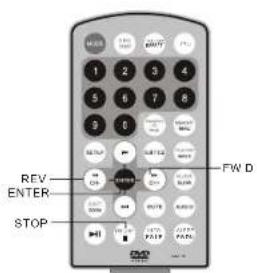
FAST FORWARD & REWIND
You can playback a disc at 2x, 4x, 8x, 16x or 32x the normal speed for fast forward or rewind.

Press the REV or FWD button during playback. The playback speed changes, each time you press the REV or Forward button(as shown above).
TO RESUME NORMAL PLAY BACK Press PLAY.
Note: This function is not possible on some DVD discs or during certain sections of playback.
Playing Back a KODAK Picture CD/JPEG/SONG
- Load your KODAK Picture CD or JPEG disc. When a KODAK Picture CD is loaded, playback will start automatically.
- Select a folder or a picture/track contained on the JPEG, a menu will appear on the screen.
Press UP or DOWN to select a folder and press ENTER to view folder contents.
- Select playback mode. You can use the button REPEAT to select one playback mode, repeat one (continually repeat the current picture/track) or all (repeat all pictures).
Press UP or DOWN to choose the picture or song you want to enjoy.
4.Start playback
Press PLAY to playback the pictures or songs.
- Use the STOP or MENU button to view the contents When JPEG CD is played, the STOP or MENU is used to display JPEG folders and the corresponding files.
Locating a Specific Title, Chapter or Track
DVD DISCS ARE NORMALLY DIVIDED INTO TITLES WHICH ARE SUB-DIVIDED INTO CHAPTERS, CDS ARE DIVIDED INTO TRACKS.

LOCATING A TITLE USING THE TITLE MENU
You can locate a specific title using the title menu function, if a DVD video disc contains a title menu.
-
Press the TITLE button The title menu will be shown
-
Press the cursor keys to select the title you want. You can also directly locate a specific title by pressing its assigned number with the numerical keys (this may only function on certain discs)
-
Press the ENTER button
This will cause the DVD video player to start playback from chapter 1 of the title selected. You also can use skip buttons to select a chapter or track desired:
Press or button repeatedly till the required Chapter/ Title/Track is shown.
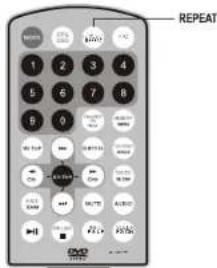
Playing Repeatedly
THIS DVD VIDEO PLAYER ALLOWS YOU TO PLAY BACK A SPECIFIC TITLE, CHAPTER,TRACK REPEATEDLY. (TITLE REPEAT,CHAPTER/TRACK REPEAT)
REPEAT A TITLE, CHAPTER OR DISC
During normal playback, press the REPEAT button. The repeat mode changes, each time you press the REPEAT button (as shown below).
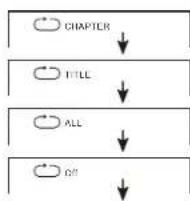
Repeat the current chapter.
Repeat the current title.
Repeat the whole disc
Resume normal playback.
ZOOM
This DVD video player allows you to zoom into a picture as well as the zoom point.
Press ZOOM during normal playback or slow - motion.
The player magnifies in the center of the picture. Press cursor keys during zoom mode to pan

Press the ZOOM button repeatedly to cycle through the available magnification levels (as shown below).

Subtitles
DISPLAY SUBTITLES
This player can display subtitles that have been recorded on the DVD. To cycle through the available subtitle languages press the SUBTITLE button repeatedly.
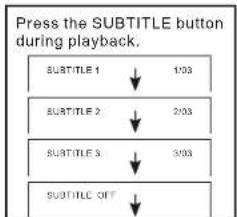
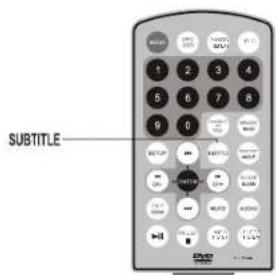
To TURNOFF the subtitles.
Press the SUBTITLE button repeatedly during playback until SUBTITLE OFF is shown and the subtitles are no longer shown.

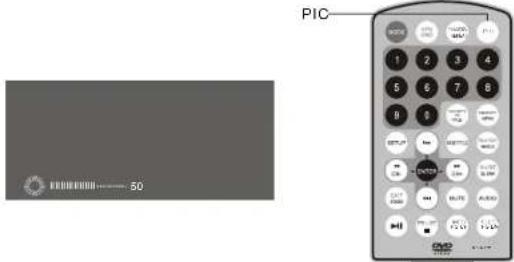
Press PIC button on the machine, to enter below menus in consequence:
Selecting the Camera Angle
THIS DVD VIDEO PLAYER ALLOWS YOU TO SELECT FROM SEVERAL DIFFERENT ANGLES disc dependant).
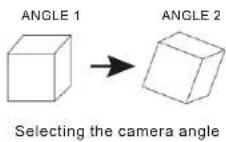
HOW TO CHANGE THE CAMERA ANGLE
If the DVD video disc was recorded with multiple angles, you have the option to change the camera angle for the scene you are watching.
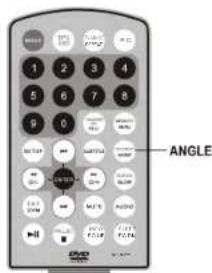
Press the ANGLE button repeatedly during playback of a scene recorded with multiple angles (when available).
- You may only press the ANGLE button when the angle icon is flashing on the DVD display.
Each time you press the ANGLE button, the angle will change.

- The angle function will not work on DVD video discs that do not contain scenes recorded with multiple angles.
DVD
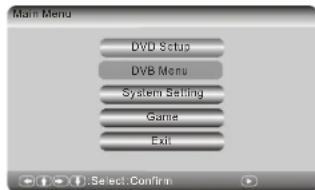
When DVD-ROM Drive option is chosen, the unit will enter into DVD Mode. Putting a disc in it, the unit will identify automatically the format of disc and play it. Press SETUP button, the screen will display Main Menu. In this mode the DVB menu is unavailable to operate. Select DVD Setup by DVD Setup Page will be shown on the screen.

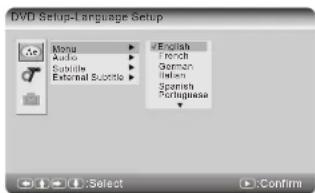
DVD Setup
The following shows the initial image of the DVD Setup page: Basic operation measures of the unit in DVD Setup mode will be introduced in the following content.
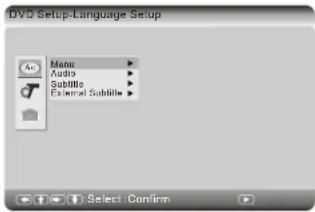
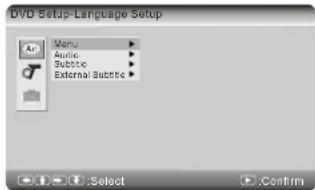
Language Setup
Menu
Select Menu by using A button, then enter into the submenu to preset the default Menu Language. When DVD disc does not support it, the first language on the disc will be automatically chosen to display.
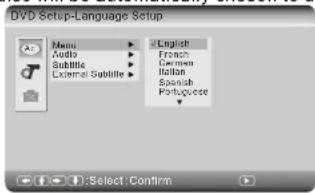
Audio
Select Audio by then enter into the submenu to set up the default audio language of DVD. When DVD disc does not support it, the first language on the disc will be chosen automatically to display.
DVD
Subtitle
Select Subtitle by. Then enter into the submenu to set default subtitle language.When DVD disc does not support it, the first language on the disc will be chosen automatically to display.
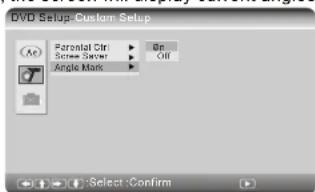
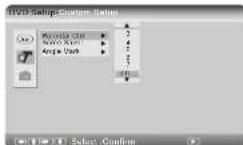
Custom Setup
Turn back from Language Setting, user can enter into Custom Setup by
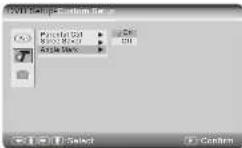
Parental Ctrl
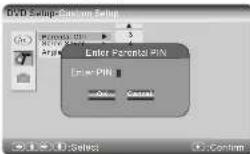
Press to select Parental Ctrl. To select the parental level by These are listed from the lowest level (1 kid) to the highest level (8 Adult). To cancel this function, select off option.
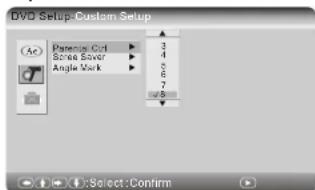
When the level needs to be changed, user has to enter the correct password.

Remark: To remind you again, the default pin for the unit is8888.
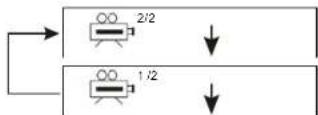
Angle Mark
Select Angel Mark by ▲, it is set as on, when playing DVD disc containing multi-angles, the screen will display current angles marked total number of angles. DVD Suaq Custom Selup
Exit
Press Exit button to return to the Main Menu
DVD
USING THE REPEAT FEATURE
The default mode for the Repeat feature is OFF. Pressing REPEAT
Consecutively changes the repeat options:
o Track-repeat the track that is playing.
o All-repeat the disc that is playing.
。 Off
As you toggle through the options, the repeat option changes. The selected repeat option loops repeatedly until you turn it off.
Playing MP3 Discs
MP3 is a format for storing digital audio. An audio CD-quality song is compressed into the MP3 format with very little loss of audio quality while taking up much less disc space. CD-R /RW discs that have been encoded in MP3 format are compatible with this system.
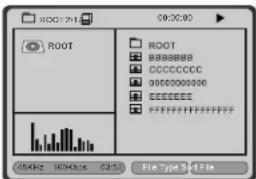
When a MP3 disc is inserted into the unit, the menu screen appears automatically. You can use the menu screen to select your desired folders and songs or the system plays the songs in the order they were burned into the disc.
- Press the or button to choose a folder from the folder list on the left side of the screen.
- Press ENTER to select the highlighted folder. The songs available under the folder will be listed.
- Use or button to choose a song from the list. Press ENTER to select and begin playback of the highlighted song. NOTICE:
"icon in front of a file name indicates that this is a folder, not an MP3 file. - "MP3" icon in front of a file name indicates that this is a MP3 file.
Playing JPG files
1) Load the JPG Disc into tray.
2) Select.JPG file by pressing" 一 /一 "or ENTER button through menus or submenus. To go back previous menu page, use button.
(3) You can preview the JPG file which you selected by pressing "PLAY"or "OK".
4) Pressing the " "Key will rotate the picture 90 degrees counterclockwise. Pressing the " "Key will rotate the picture clockwise.
5) When previewing the file, pressing "TITLE", "SUBTITLE", "AUDIO", "SLOW" a hand icon will appear on the display meaning that these options are not available.
DVD
6) Press "STOP" to browse the JPG file, "SLIDE SHOW" "MENU" will display on the screen.
7) Press ANGLE button to select different display mode. Eg: from top to bottom; from left side to right side; from right top to left bottom, etc. There are 15 display modes for user to select.
8) When browsing the picture, press "STOP" and thumbnail size picture will be displayed. You can select the picture you desire by using the ENTER key.
Rechargeable Battery Use
The player utilizes long-life Li polymer battery, built inside the unit, for portable power supply. Li battery features high storage capacity and low level of degradation. This means the battery doesn't have "Memory Effect" and thus can be recharged safely regardless of whether the battery is fully or partially discharged. It's enough to recharge no longer than 6H each time, Fully recharged battery can last about 2 hours.
Precautions related to Battery Recharge
- The battery can be only recharged when turning power to OFF state, and keep continuous power supply, the red light will be on, indicating the unit is under recharging. When it's fully charged, the light will turn green.
Using and Maintaining Rechargeable Battery
- The normal working temperature is: 0^ - 45^
- Always unplug AC/DC power supply for the unit whenever not playing, unless recharging the battery;
- Heat will create during playing, it's normal, while avoid long time playing and unattended;
- Avoid the unit collide with other objects, and place it away from possible heat sources, or damp areas;
AVIN
AV IN: Go to below main menu by pressing MODE button on the left top of the remote control or machine. Move up/down button to select AV IN. Make sure antenna or cable connected well.
Note: This machine has memory function. It'll auto save last mode. i.e.: If last mode was set AV IN, it'll enter AV IN mode when start again.
Press PIC button on the machine, to enter below menus in consequence:

DVB
DVB
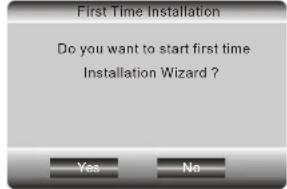
At the first time operation, the screen will display First Time Installation page. It will guide user to finish the initial setup of the DVB system. Firstly, choose YES, then press ENTER button. The system will operate the initial setup. First Time Installation
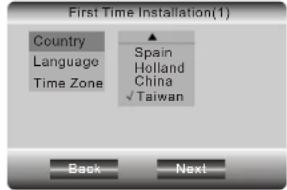
Secondly, input regional information of user, including the country, OSD language and Time zone. DVB will automatically scan channels through the information.
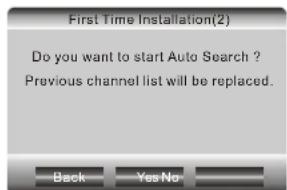
Thirdly, choose 'Yes', the system will automatically scan the channels.
Fourthly, the system will directly enter into DVB mode and play the last channel it finds.
DVB
In playing mode, press SETUP button, the unit will enter into to the Main menu. At this moment DVD Setup is unavailable to operate. To enter into DVB Setup page, select DVB Menu.
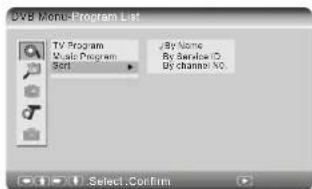
DVB Menu
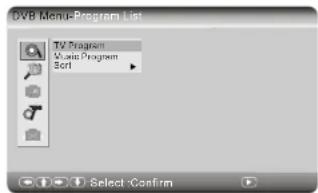
Program List
TV Program
This option allows user to edit the program list and set programs into three types, including Favorite program, Move the program and Delete. All programs available to watch are on the list. The three items (Favor, Move& Del) are used to set programs.
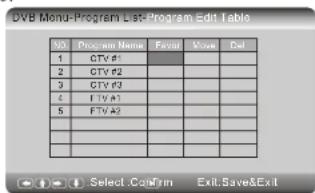
Favor
You can edit one more programs as favorite programs by this option. Once a program is chosen, a mark will appear in its favor blank. To remove the program from the favor list, press ENTER button in the favor blank of that program.
DVB
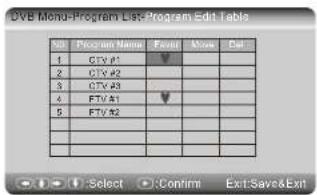
Move
This option allows user to change the order of programs on the list. When user choose the Move item of one program will appear on the screen, Then use to modify the order of programs. Then Press ENTER button to confirm the setting.

Del
User can use this option to delete programs. To delete one program, Press ENTER bottom on the Delete blank of that program (a sign will appear there). Once the setting is reserved, the deleted programs will not appear on the list next time.
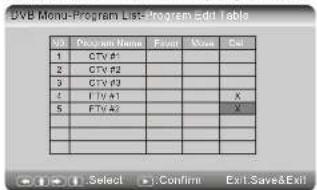
Notes: User can use Program Search option to recover the deleted programs.
The operation setting of Music program is the same as that of TV Program.
Sort
You can sort channels on the list according to channel name, service ID or channel number.
DVB
Program Search
Automatic Search
By operating of this option, the unit can automatically search channels according to the information in Country and Time Zone setting. Before searching, the system will indicate whether reserved channels in the program list are supposed to be deleted.
Choose Yes, new channels will replace the previous channels on the list. Choose NO to add these new channels to the list.
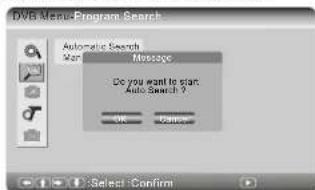
When the automatic search is over, DVB mode will return to play the last channel it searched. If pressing EXIT to suspend the search, new channels will be added to the list, and the unit will play the last one it found.

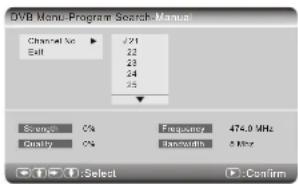
Music Prog#nual Search
To find particular channels, select this option searching manually.
User must provide the numbers of target channels to enable the system to search.
The channels from manual search will be added to the list, but the unit will not return directly to the playing status at this moment.
DVB
Parental control

Channel Lock
Select Channel Lock to setup whetherlocks the blocked channels in Parental Setting.When its set as YES, user has to enter password before watching these locked channels. When the option is changed to YES from No, No need entering the password. But when it is changed from YES to NO, user must enter the password.
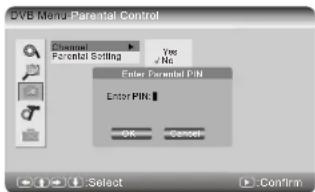
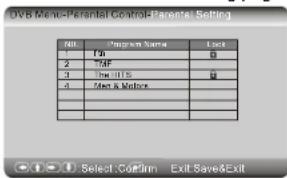
Parental Setting
Parental Setting canwork together with Channellock to lock channels. Before enter into Parental Setting page. The system will require you to enter the password.
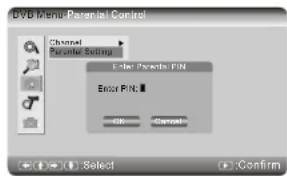
DVB
Enter correct PIN, user will enter into Parental Setting page.
When switch to the locked channel, user must enter correct PIN before watching. Notes: the default PIN is 8888. To change it, return to Main Menu and select System Setting, then enter into System Setting Menu-Preference page, select Change PIN option.
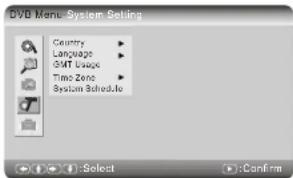
System Setting
Country
Select this option to set the country where user receives the DVB signal.
Language
Entire this submenu; there will be 3 options for user to operate: 2 Audio and Subtitle.
172 Audio
User can choose the audio language from audio 1 or audio 2. This option only works when the channel provides multi-language. Otherwise, the preset language of that channel will be automatically chosen.
Subtitle
Select this option to choose subtitle language. This option only works when the channel provides multi-language. Otherwise, the preset subtitle language of that channel will be automatically chosen.
GMT Usage
Select this option to set the usage of GMT Time. When it is set with Off, Time Zone option will not work, users can set the time by themselves. When it is set with on, user can select Time Zone option to choose the time zone where the DVB system locates.
Time Zone
Select this option to set the time zone where the DVB system locates.
System Schedule
- Select this option to preset the time for changing channel. User can preset 10 channels to watch at most.
DVB
Exit
To return to the Main Menu from DVB Setup page, press Exit button
Basic Operation
Adjust Channel
- Press CH-/CH+ to turn to previous /nextchannels or press the number buttons on the remote control.
- In playing mode, press ENTER button again, the program list will be shown on the screen. Then choose channels by button, press PLAY button to play.
- During the playing, Press GUIDE button, the GUIDE MENU will be displayed. Under this mode, the icons of all channels will be displayed with smaller size. User can choose channel by pattdn then press play button to play.
Switching to the mute
Press Mute button to switch to mute mode, then the mute sign will appear on the screen. Press it again, the unit will return to normal playing.
Program Information
In DVB playing status, Press INFO button, the detail information of the program will be displayed on the screen.
Sleeping Mode
Press sleep button to set a time to turn the unit off.
The time can be set with 15 min., 30 min., 60 min. and 120 min.
At the first time of selecting Sleep, the preset time will appear, Press it repeatedly, the time will be prolonged.
To cancel the function, press the button repeatedly until Sleep Off appears.
Audio
Press audio button to choose audio output port (Audio 1 or Audio 2). There are three audio modes: LL, RR and LR.
Choosing Subtitle
Press subtitle button to choose subtitle language. The number of languages user can choose depends on subtitle languages programs provide. If no other language to choose, only off option appears there.
EPG Page
Press EPG button to enter into EPG mode. Then user can use a button to choose channel and check the program list in the next two sessions. To return to playing mode, Press PLAY button.
To check the Complete program list of a day, press button (The screen will display it).
Press button to learn the detail information of one channel, those information will be shown on the right blank of program list. When one program is chosen, user can press Play button to setup the preset time for changing channel.
USB&SD
DVD Setting
When USB&SD Drive option is chosen, the unit will enter into DVD Mode. Press SETUP button, the screen will display Main Menu. In this mode the DVB menu is unavailable to operate. Select DVD Setup by DVD Setup Page will be shown on the screen.

DVD Setup
The following shows the initial image of the DVD Setup page: Basic operation measures of the unit in DVD Setup mode will be introduced in the following content.
Language Setup
Menu
Select Menu by using A button, then enter into the submenu to preset the default Menu Language. When files does not support it, the first language on the files will be automatically chosen to display.
Audio
Select Audio by. Then enter into the submenu to set up the default audio language of Audio. When Audio files does not support it, the first language on the files will be chosen automatically to display.
USB&SD
Subtitle
Select Subtitle by, Then enter into the submenu to set default subtitle language. When Video files does not support it, the first language on the files will be chosen automatically to display.
Custom Setup
Turn back from Language Setting, user can enter into Custom Setup by/Parental Ctrl
Press to select Parental Ctrl. To select the parental level by these are listed from the lowest level (1 kid) to the highest level (8 Adult). To cancel this function, select off option.
When the level needs to be changed, user has to enter the correct password.
Remark: To remind you again, the default pin for the unit is 8888.
Angle Mark
Select Angel Mark by ▲, it is set as on, when playing Video files containing multi-angles, the screen will display current angles marked total number of angles.
Exit
Press Exit button to return to the Main Menu
Note: Please do not disconnect USB devices or plug out SD/MMC cards while they are working with the unit. Functional failure may occur in case of wrong operations.
System Setting
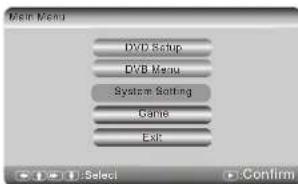
System Setting
Select this option to set up some setting not related to DVD and DVB, the System Setting Menu will appear on the screen.
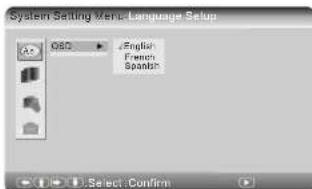
OSD
To set up the language on screen display, select this option to enter into the submenu. Then select OSD language by
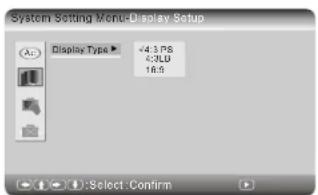
Display Setup
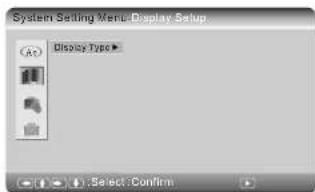
System Setting
Display Type
This option is used to choose the display ratio. If the video of channel is transmitted with 16:9 ratio, it can be switched to 4:3PS or 4:3LB. But if the video is transmitted with 4:3 ratio, it doesn't work.
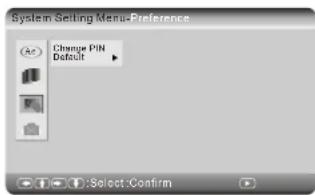
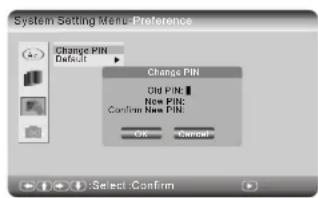
Preference
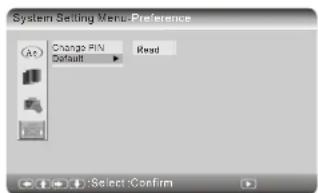
Change PIN
Select this option to change the PIN (it is made up of 4 numbers).you must enter the previous PIN, then enter your new PIN twice, press Enter to confirm.
System Setting
Default
Select this option to return to original setting. For example, if user operates this option in DVB Mode, all the setting in DVB mode will return to original setting.
Exit
Press Exit button to turn back to the Main Menu.
Specifications
Specifications
Panel size: 7 inch
Frequency response: 20Hz to 20kHz
Video output: 1 Vp-p/75 Ohm, unbalanced
Audio output: 1.4Vrms/10kOhm
Audio S/N: Better than 80 dB
Dynamic range: Better than 85 dB
Laser: Semiconductor Laser, Wave Length: 650 nm/795 nm
Power source: DC 9-12V
Power consumption: 10 W
Operating temperature: 5 40^
Weight: 0.861kg
Dimensions (W x D x H): 215 x 168 x 43mm
Battery Type: Li Polymer
Troubleshooting
| PROBLEM | SOLUTION |
| No sound or distorted sound | Make sure your DVB-T is connected properly. Make sure all cables are securely inserted into the appropriate jacks. |
| Can't advance through a movie | You can't advance through the opening credits and warning information that appears at the beginning of movies because the disc is programmed to prohibit that action. |
| The icon ( ) appears on screen | The feature or action cannot be completed at this time because:1. The softwares of SD Card/USB restricts it.2. The softwaresof SD Card/USB doesn't support the feature(e.g., angles)3. The feature is not available at the moment.4. You've requested a title or chapter number that is out of range. |
| Picture is distorted | •The SD Card/USB might be damaged. Try another SD Card/USB •It is normal for some distortion to appear during forward or reverse scan. |
| No forward or reverse scan | •Some SD Cards/USB has sections that prohibit rapid scanning or title and chapter skip.If you try to skip through the warning information and credits at the beginning of a movie, you won't be able to. This part of the movie is often programmed to prohibit skipping through it. |
DESIGN AND SPECIFICATIONS ARE SUBJECT TO CHANGE WITHOUT NOTICE
INHALT
Zifferntasten drucken (dies


- Safety Precautions
- Safety Information
- Introduction
- Cautions andWarnings
- Installation
- Caution
- 4.Disassemble
- Cleaning Unit
- Support SD Card and USB
- UNPACKING
- Location of Controls
- Quick Start Guide
- Connecting
- Connecting headphones
- Playing Back a Disc
- How to start playback from the menu screen
- How to pause playback
- STOP PLAYBACK
- FAST FORWARD & REWIND
- Playing Back a KODAK Picture CD/JPEG/SONG
- Locating a Specific Title, Chapter or Track
- LOCATING A TITLE USING THE TITLE MENU
- Playing Repeatedly
- REPEAT A TITLE, CHAPTER OR DISC
- ZOOM
- Subtitles
- DISPLAY SUBTITLES
- Selecting the Camera Angle
- HOW TO CHANGE THE CAMERA ANGLE
- DVD
- DVD Setup
- Language Setup
- Menu
- Audio
- Subtitle
- Parental Ctrl
- Angle Mark
- Exit
- USING THE REPEAT FEATURE
- Playing MP3 Discs
- Rechargeable Battery Use
- AVIN
- DVB
- Program List
- TV Program
- Favor
- Move
- Del
- Sort
- Program Search
- Automatic Search
- Music Prog#nual Search
- Channel Lock
- Parental Setting
- Country
- Language
- Audio
- GMT Usage
- Time Zone
- System Schedule
- Basic Operation
- Adjust Channel
- Switching to the mute
- Program Information
- Sleeping Mode
- Choosing Subtitle
- EPG Page
- USB&SD
- DVD Setting
- System Setting
- OSD
- Display Type
- Change PIN
- Default
- Specifications
- INHALT
Brand : SALORA
Model : DVP 7027 DVBT
Category : DVD player