
EasyOne SHD 4U - Digital decoder SetOne - Free user manual and instructions
Find the device manual for free EasyOne SHD 4U SetOne in PDF.

| Brand | SetOne |
| Model | EasyOne SHD 4U |
| Product type | Digital satellite decoder |
| Dimensions (W x D x H) | 310 x 190 x 40 mm |
| Input frequency | 950 MHz ~ 2150 MHz |
| Symbol rate | 2 – 45 MS/s |
| FEC | 1/2, 2/3, 3/4, 5/6, 7/8, auto |
| Supported TV formats | 720 x 576 (PAL), 720 x 480 (NTSC), 1280 x 720, 1920 x 1080 |
| Aspect Ratio | 4:3 letterbox, 4:3 PanScan, 16:9 |
| Audio mode | Left, Right, Stereo, AC3 |
| Connectivity | LNB input (F), SCART (output), RCA Audio L/R, Coaxial digital audio output, HDMI, YPbPr, USB 2.0, Ethernet RJ45 |
| LNB control | 22 kHz ±2 kHz, DiSEqC 1.0 |
| Power supply | 100-240 V ~ 50/60 Hz, consumption ~25 W (with LNB), ~3 W in standby |
| Operating temperature | 0°C to +40°C |
| Storage temperature | -40°C to +60°C (estimate) |
| PVR recording | Yes, via USB (hard drive or USB stick) |
| EPG guide | Yes, with timer programming |
| Integrated applications | Weather, U-Tube, Games (Othello, Sudoku) |
| Software update | Via OTA (satellite) or USB |
| Menu languages | English, French, German, Russian, Arabic, Portuguese, Turkish, Spanish, Polish, Italian |
| Parental lock | Yes, PIN code (default 0000) |
| Cleaning | Unplug, use a soft cloth slightly moistened with a mild detergent |
| Safety | Do not open the casing (presence of dangerous voltages), avoid humidity, protect the power cord |
| Spare parts and repairability | Use exclusively parts specified by the manufacturer; entrust any repair to qualified personnel |
| Warranty | Compliant with legal regulations at the time of purchase |
Frequently Asked Questions - EasyOne SHD 4U SetOne
User questions about EasyOne SHD 4U SetOne
0 question about this device. Answer the ones you know or ask your own.
Ask a new question about this device
Download the instructions for your Digital decoder in PDF format for free! Find your manual EasyOne SHD 4U - SetOne and take your electronic device back in hand. On this page are published all the documents necessary for the use of your device. EasyOne SHD 4U by SetOne.
USER MANUAL EasyOne SHD 4U SetOne
HDTV Satellite Receiver
S-HD 4U
EASYONE
S-HD 4U
Article1Nr.:10-01-000-055
www.setone.eu
3.2.1 TV Channel List 20
3.2.2 Radio Channel List 25
3.2.3 Edit Favorites 25
3.2.4 Delete 25
3.3 System Setup 27
3.3.1 Language 27
3.3.2 Local Time Setting 28
3.3.3 TV-Format 29
3.3.4 OSD Settings 30
3.3.5 Timer 31
3.3.6 Firmware Information 32
3.3.7 Parental Lock 32
3.3.8 Factory Setting 33
3.3.9 Software update by OTA 33
3.3.10 Software update via USB 34
3.3.11 Network Local Setting 35
3.4 DVR Options 37
3.4.1 Record Manager 38
3.4.2 HDD Format 39
3.4.3 DVR-Settings 39
3.4.4 Diashow-Settings 40
3.4.5 Media Player 40
3.4.6 Remove USB Device 42
3.5 Tools 43
3.5.1 Othello 43
3.5.2 Soduko 44
3.5.3 Weather 44
3.5.4 U-Tube 45
TECHNICAL DATA: 49
DECLARATION OF CONFORMITY 50
Disposal

Ask your city or local authorities about ways to properly dispose e-waste in keeping with current environmental standards and regulations. Return spent batteries to a designated collection point. Never dispose of batteries along with your normal household waste. Batteries probably could contain toxic substances. Therefore, always dispose of batteries in accordance with current laws governing mandatory return schemes for e-waste.
The Symbol on the Product, User's manual or packing refer to disposal.
European Directive 2002/96/EC on Waste Electrical and Electronic Equipment (WEEE). Never dispose of your receiver along with normal household waste. Ask your city or local authorities about ways to properly dispose of equipment in keeping with good environmental stewardship practices.
SAFETY PRECAUTION

The lightning flash with arrowhead symbol, within an equilateral triangle, is intended to alert the user to "dangerous voltage" and to prevent from a risk of electric shock.

Warning:
To reduce the risk of electric shock, don't open the cabinet. Refer servicing to qualified personnel only

The exclamation point within an equilateral triangle is intended to alert the user to important operating and maintenance (servicing).
WARNING: Do not use this STB where contact with or immersion in water is a possibility. Do not use near flower vase, washbowls, kitchen sinks, laundry tubs, swimming pools, etc.
WARNING: Do not put the candle or lamp stand on the cabinet; otherwise, there is the danger of fire.
WARNING: The unit should be connected to a power supply only of the type described in the operating instructions or as marked on the unit. If you are not sure of the type of power supply (for example, 120 or 230V ) to your home, consult your local dealer or local power company.
WARNING: This product installs diodes. Do not open the cabinet or touch any parts in the inner mechanism. Consult your local dealer for technical service if the opening is required
Note: To ensure proper use of this product, please read this User manual carefully and retain for further reference.
WARNING: Plug is the disconnect device, and the disconnect device shall remain readily operable.
Unit Cleaning: After the unit power is turned off, you can clean the cabinet, panel and remote control with a soft cloth lightly moistened with a mild detergent solution.
Attachments: Never add any attachments and/or equipment without the manufacturer consent; as such additions may result in the risk of fire, electric shock, or other personal injury.
Locating: Slots and openings in the cabinet are provided for ventilation to protect it from overheating. Do not block these openings or allow them to be blocked by placing the STB on a bed, sofa, or other similar surface, nor should it be placed over a radiator or heat register.
Power-Cord Protection: Place the power-supply cord out of the way, where it will not be walked on. Please take special attentions to cords at plugs, convenience receptacles, and the point where they exit from the unit.
Object and Liquid Entry: Never put objects of any kind into this STB through openings, as they may touch dangerous voltage points or short-out parts that could result in a fire or electric shock. Never spill any liquid on the STB.
Note: Moisture may be formed on the lens In the following conditions:
when the unit is suddenly moved from a cold environment or an air-condition room to a warm place.
immediately after a heater has been turned on.
in a steamy or very humid room.
If the moisture forms inside the unit, it may not operate properly. To correct this problem, turn on the power and wait about two hours for the moisture to evaporate.
Parts Replacement: When the unit parts need to be replaced, user should make sure the service technician use the replacement parts specified by the manufacturer or having the same characteristics as the original part. Unauthorized replacement may put the unit in the risk of fire, electric shock or other hazards.
Safety Check: After all the maintenances and repairs are done, user is required to request the service technician to conduct the overall safety check to ensure the machine is in the proper condition
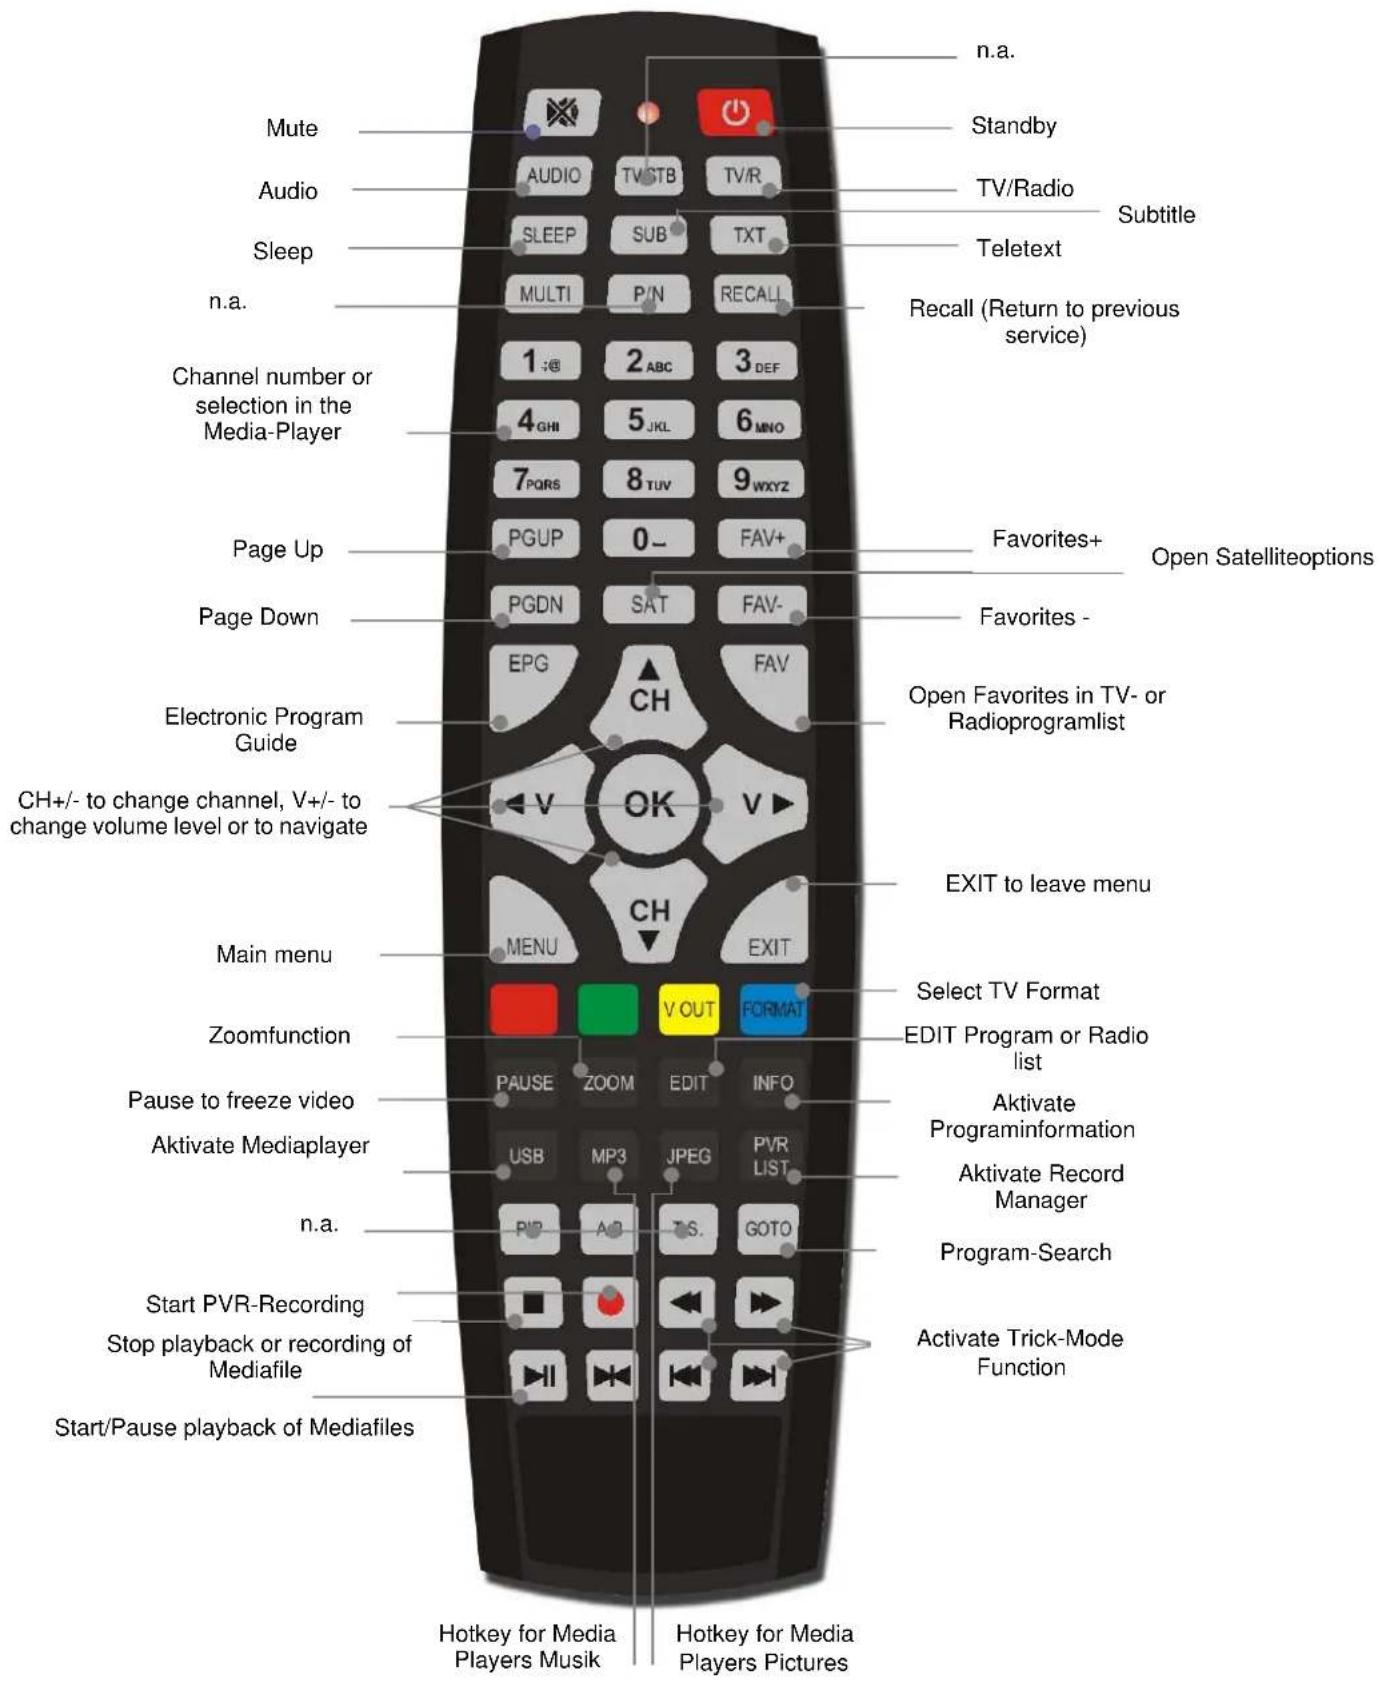
1. Remote Control & Frontpanel
1.1 Frontpanel
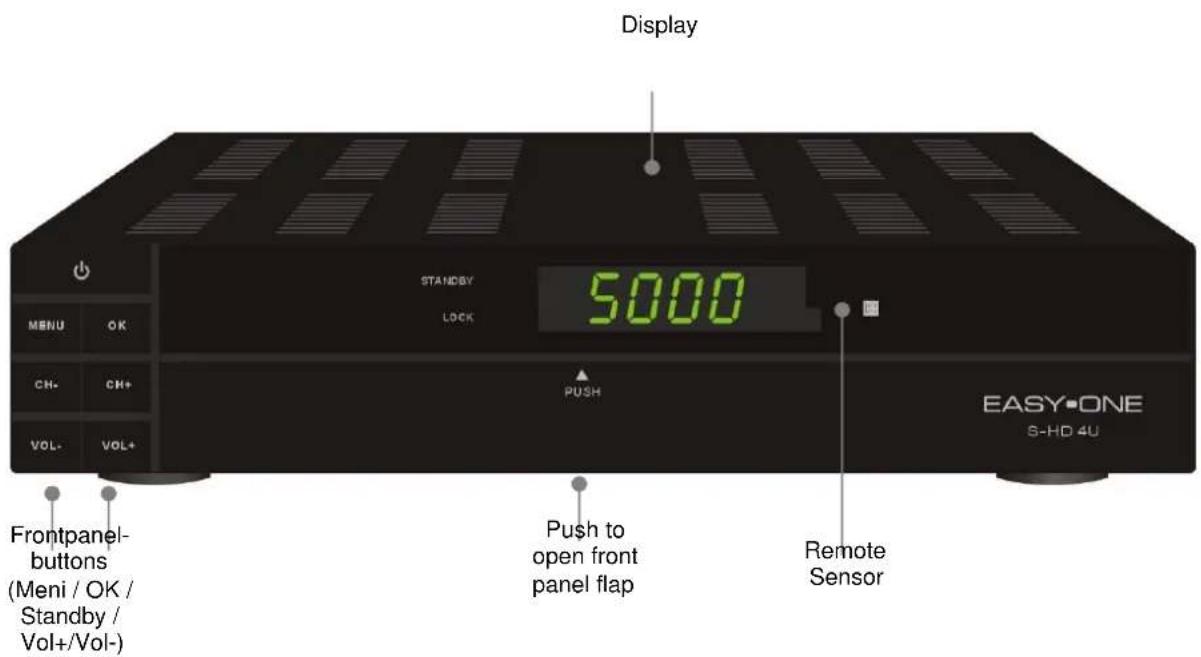
- Standby: Switch to power on or Stand-by-Mode
- Display (4-Digit/7-Segment): Show power and lock status as well the related channel number. In standby mode you will see current time.
- Remote Sensor: Receipt of Infrared Signals.
- VOL+:/: Change volume level in TV Mode and to navigate in menu mode.
- MENU: to open or Exit main menu.
- OK: to open sub menu or to open channel list.
- CH + / - : change of services or to navigate in menu.
1.2 Rearpanel
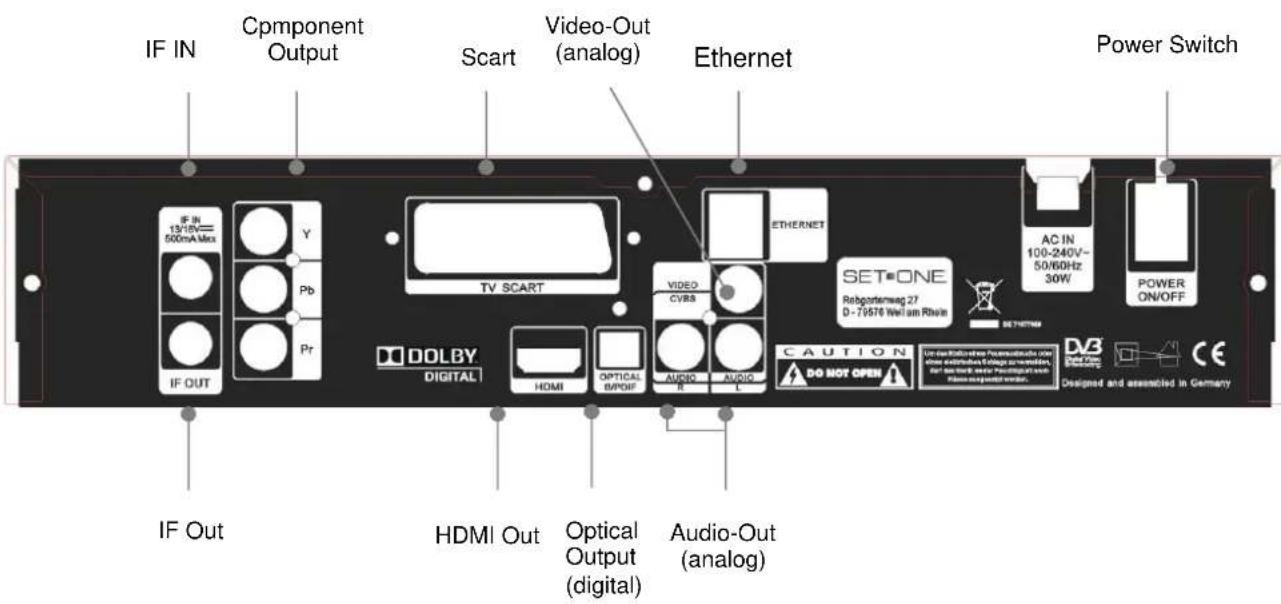
- IF OUT: Satellite tuner output
Note: the operation of another receivers in loop mode will limit the number of services.
- IF IN Satellite input
- Optical Digital Out (AC3)
- AC IN Power cord
- Power ON/OFF
- VIDEO / AUDIO hi-fi-Out for your Hi-fi System of Monitor
- TV SCART SCART-Out to connect the TV Set
- YpbPr: Component Out
- HDMI: Digital Out for the transmission of Audio- and Video Data.
- Ethernet: Access to Ethernet.
2. Basic Operations
2.1 Turn on STB
First, press the [Device's Main Power] to turn on the unit. When the STB is first used, there will play the first channel from the default Channel List. If the STB is not first used, STB will play the same channel as last time before turning off.
2.2 Power
- Press [Power] Key can enter the Standby state.
- In Standby state, press [Power] Key again can call back the unit and go on play the previous channel.
- User can also disconnect the device's main power to end the Standby state
2.3 CH ▲
In full screen, press [CH▲▼], to change channel
2.4 VOL
In full screen, press [VOL ], to adjust volume.
2.5 Channel Number
In full screen, use number key and press [OK] on the Remote Control Unit to change channel.
2.6 Mute
- Press [Mute ] key to mute the sound and the screen will show up mute OSD.
- Press mute [Mute ] again to restore sound.
2.7 Pause
- In playing mode, press [Pause] key, the picture will be paused, but the sound of the channel will still continue.
- Press [PAUSE] key again, the screen's picture will skip over to the current playing picture, and the sound of the channel will corresponding playing.
2.8 Recall
Press [Recall] key will directly switch to the previous channel that you played before current channel.
2.9 FAV
- In TV-Mod press [FAV]. In the window of "Favorite", you can move highlight by press [Channel Up/Channel Down] key and press [OK] key to select favorite group. To create a Favorite please press [EDIT] key.
- In the "Fav-Group-window" please navigate with [CH▲▼] and press [OK] key to select favorite channels. Pressing [Page Up/Page Down] keys can implement the "Page up/Page down" function. You also can press [Volume Up/Volume Down] keys to select different "Favorite Group".
- Press [VOL] to select different "Favorite Group".
2.10 FAV +/-
- In TV-Modus please press [FAV +/-] key, to switch between Favorites and actual Favorite Groups
- The ordering of the favorites is in accordance to the "Favorite Group - List"
- Press [Exit], to leave "Favorite Group window.
2.11 Audio
- In full screen, press [AUDIO] key can open the "Audio" window on the screen.
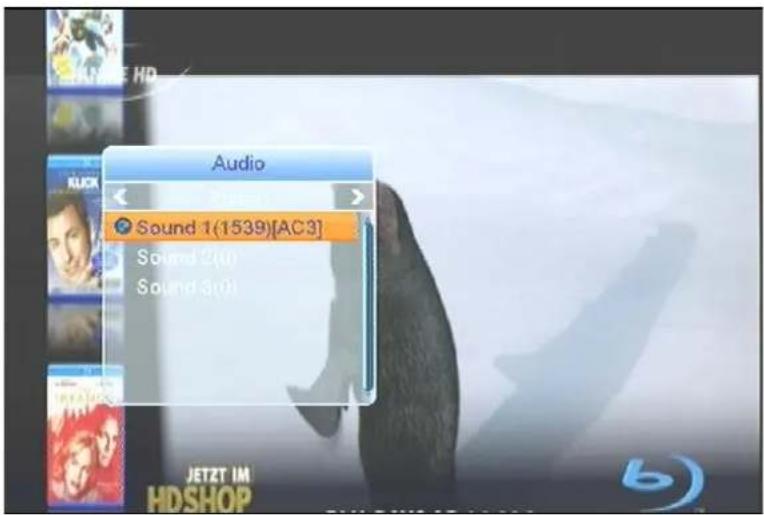
Select "Audio Track" with [CH▲▼], to change the "Audio Modes" press [VOL←▶] for Stereo, Mono, Right/Left.
2.12 INFO
In full screen, press [INFO] key can open information screen, in the window shows the parameters of current channel.
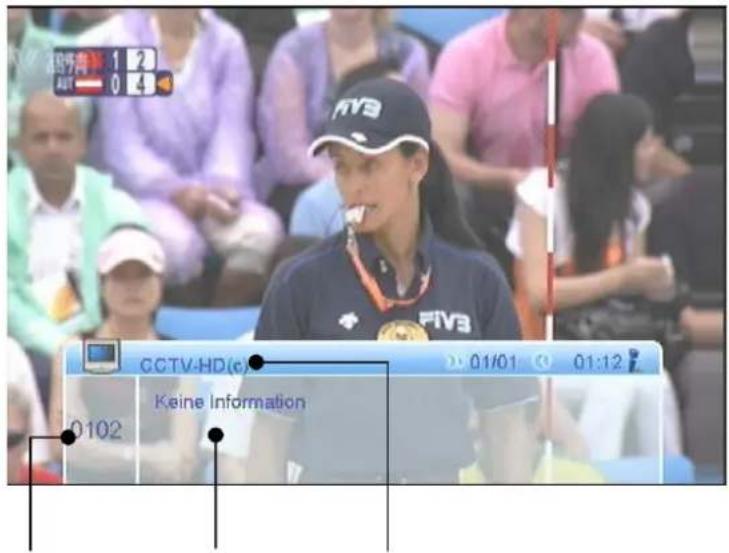
Channelnumber
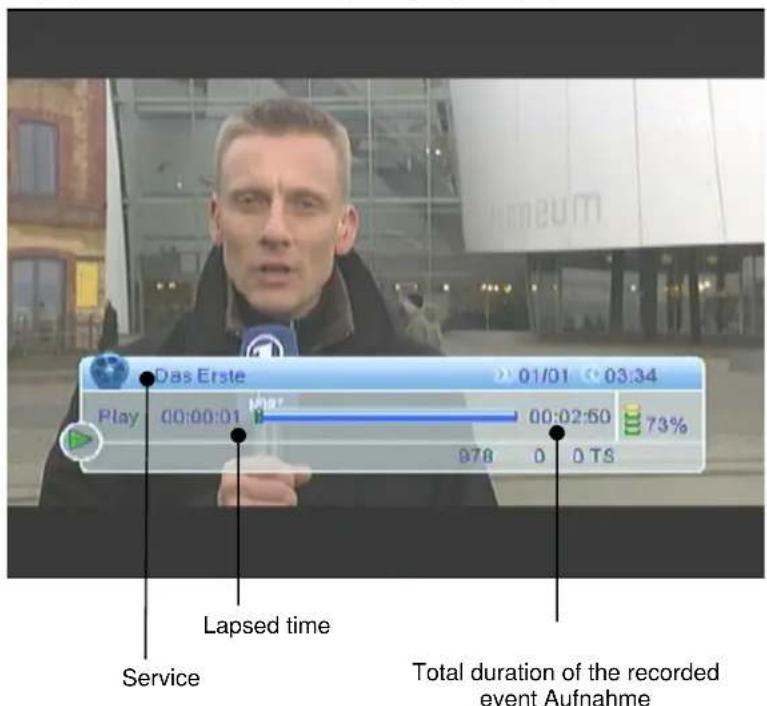
Service
Information
Channelname
2.13 EPG (Electronic Program Guide)
The STB has an Electronic Program Guide (EPG) to help you navigate channels through all the possible viewing options.
The EPG supplies information such as channel listings and starting and ending times for all available channels.
Press [EPG] key to display EPG screen.
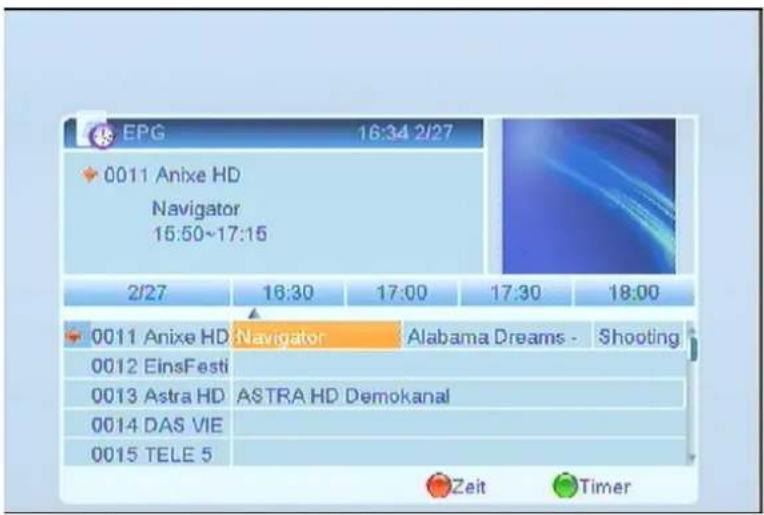
- Press red [Time] key to enter into following screen.
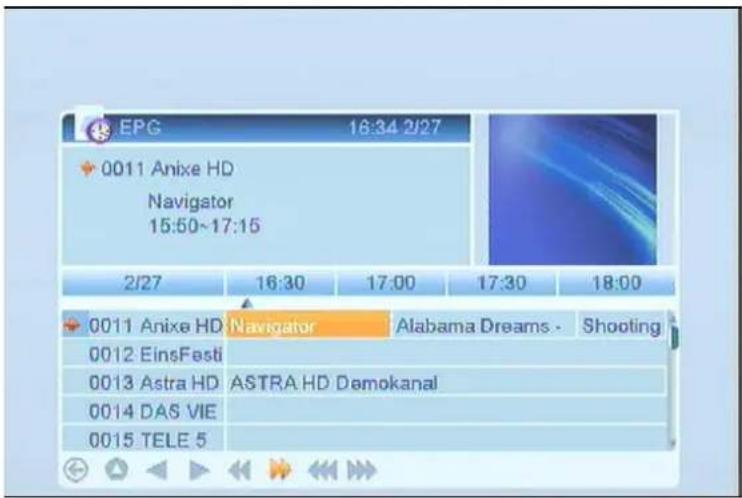
I cons to navigate in the EPG
- Press [OK] key in each item can see more detail information and press [Red] key to cancel.

Back to previous Manu

Back to actual time

Navigate in a,30 minutes interval

Navigate in a ,2 hour interval

Navigate in a "daily interval"
- Press [GREEN] (Timer), to open the Timer Sub Menu.
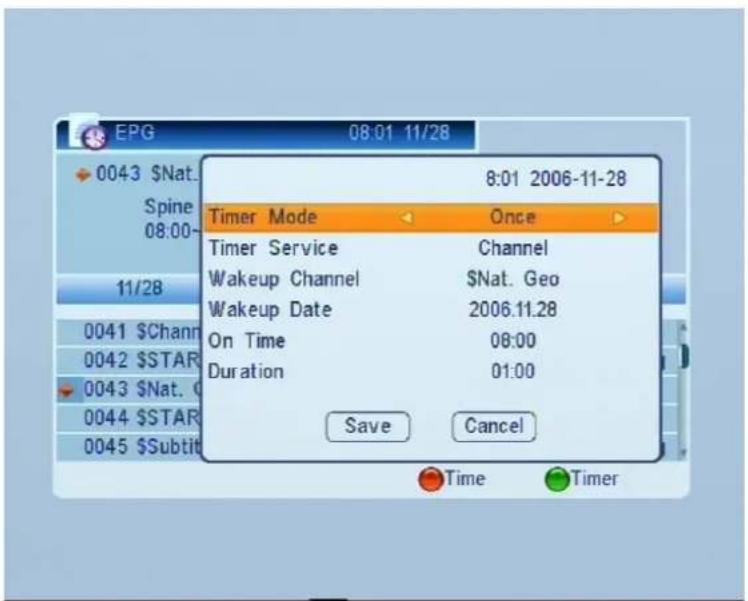
To navigate, press [CH VOL ] and set related date, as well start and stop time. Save your settings.
2.14 TV/Radio
In TV mode, pressing [TV/RADIO] key can switch to Radio mode. In Radio mode, press [TV/RADIO] key to switch to TV mode.
2.15 OK
- In full screen, press [OK] key to enter "Channel List".
2.16 SAT
- In TV-Mode press [VOL] keys to switch between the satellites.
- In TV -Mode press [SAT] key, to open satellite list.
2.17 MULTI
TV -Mode press [MULTI] key, to enter the Multi-Picture-Mode.
- In the Multi-Picture-Mode you show nine pictures on the screen.
2.18 LNB short circuit
In case of LNB short circuit you see "LNB shortcut!" on the screen. Please check your cable connections carefully. If LNB short circuit has been resolved, the message to disappear.
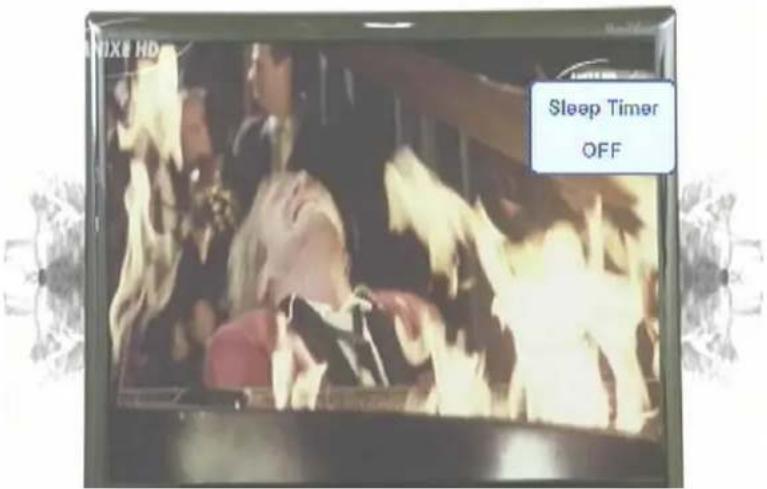
2.19 Sleep
- This function can set sleep timer. When you set a sleep timer and the time arrive, the system will enter to standby automatically. You can select between "Sleep Timer OFF / Sleep Timer 10 / Sleep Timer 30 / Sleep Timer 60 / Sleep Timer 90 / Sleep Timer 120".
- If you select required Sleep time, your receiver went into Stand-by-Mode.
2.20 TXT
- Press [TEXT] key in full screen, you can open teletext page on the channel which has teletext information.
- If the Service do not provide teletext, you will se a message "No teletext-data" on the screen.
2.21 Subtitle
- Press [SUBTITLE] key in full screen, you can switch subtitle on or off. Availability of Subtitle depends on the service provider.
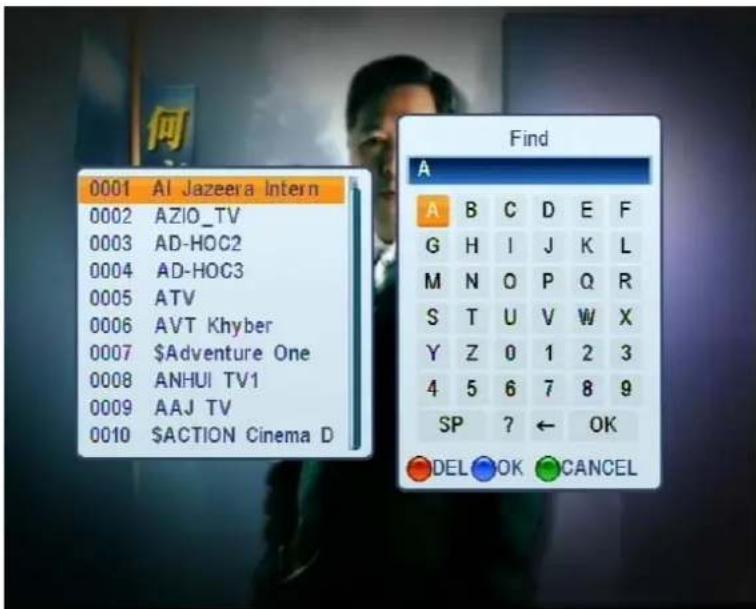
2.22 GOTO (Search function)
Press [GOTO] key in TV-Mode or [YELLOW] key in the channel list, to activate program search function. The keys [CH▲▼VOL<▶] allow to navigate, [BLUE] to confirm, [RED] to delete.
2.23 Zoom
- The [ZOOM] key allows you to focus and enlarge a certain area on the images.
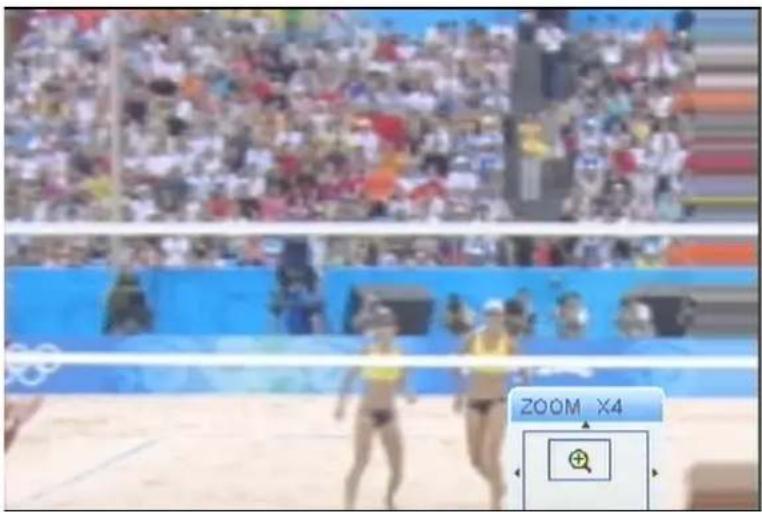
- Press [ZOOM] key again, the image will enlarge rotate as x1, x2, x4, x6, x8, x12, x16.
- In "x2 ~ x16" image, using [Up/ Down/ Up/ Down] keys to move the image center area you want to see.
2.24 TV/STB
Press [TV/STB] to switch between TV mode and STB mode.
2.25 Menu
Press [MENU] key to open the menu, exit the current menu to previous menu or to close the window.
2.26 Format
Press [Format] / [BLUE] key in full screen mode to select different TV-Formats: 576i -> 480i -> 576P -> 480P -> 720P_50 -> 720P_60 -> 1080i_25 -> 1080i_30.

2.27 Exit
Press [EXIT] to leave the actual menu.
3. Menu
3.1 Installation
Press [MENU] key to enter into the main menu:
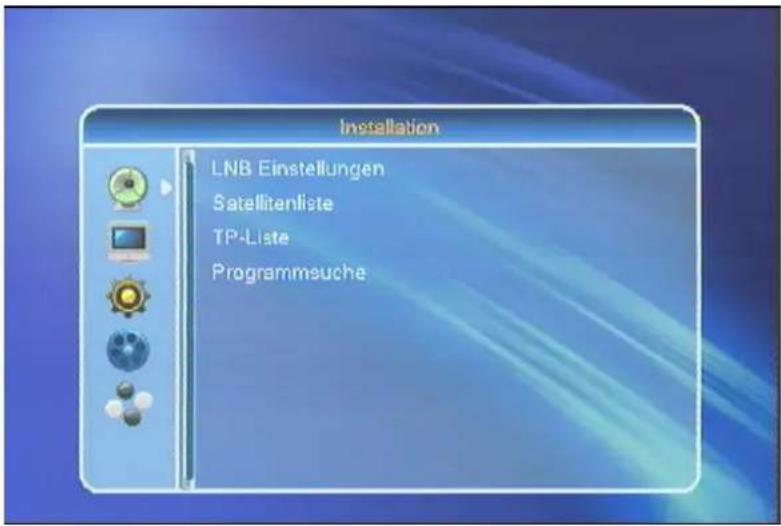
- Press [CH VOL], to select between LNB Settings, Satellite list, TP-Lists and Program search.
- Press [OK], to enter.
3.1.1 LNB Settings
Press [VOL ], to enter into "LNB Settings":
- LNB Frequency: Press [VOL▶], to switch between "Universal", "Twin", "User" or C-Band.
For example: If you use a Single LNB, select "Universal".
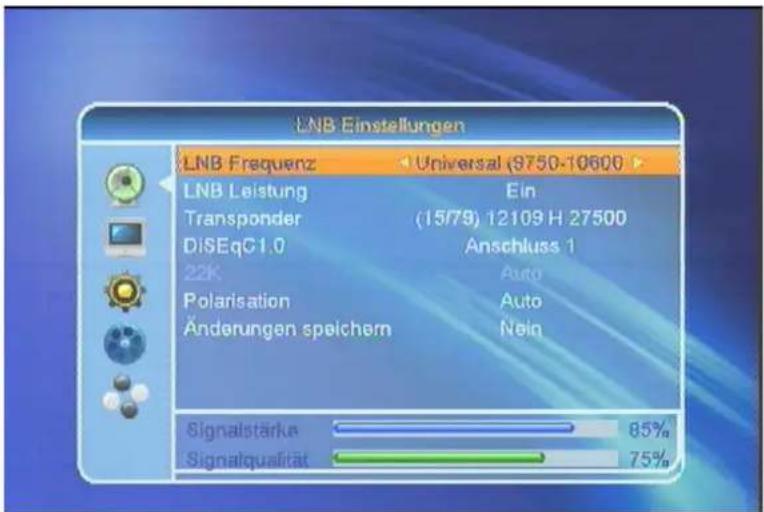
22K: Use [VOL ] , to select "ON" or "OFF". The 22kHz Signal to be used for KU Universal LNB, to switch between
low- and highland.
! Note: If you select LNB Type „Universal", you cannot change 22K.
DiSEcC1.0: Press [VOL ], to select the disc Options between ,deactivated / LNB1 / LNB2 / LNB3 / LNB4".
- Polarization: Press [VOL▶], to select between "Auto / H / V / OFF".
- Transponder: Press [VOL ], to select the transponder.
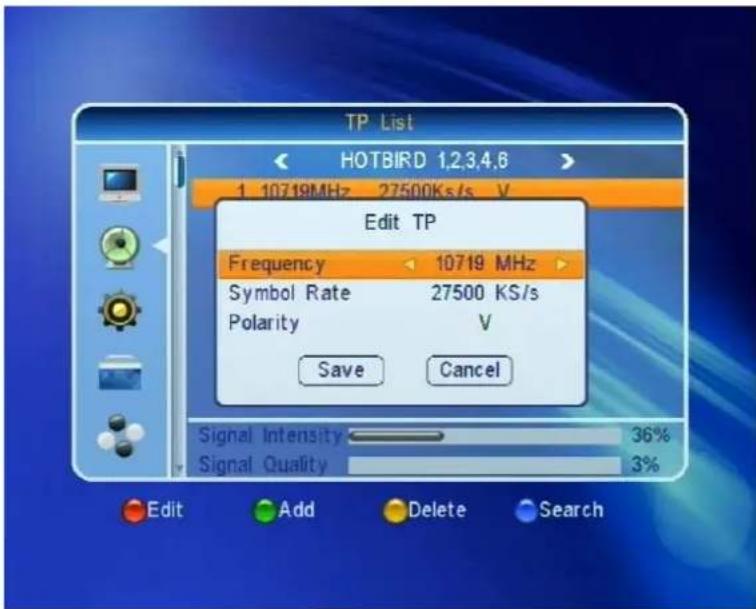
With signal- and quality indicator you can check if the LNB settings are correct.
Any changes please confirm with [YES].
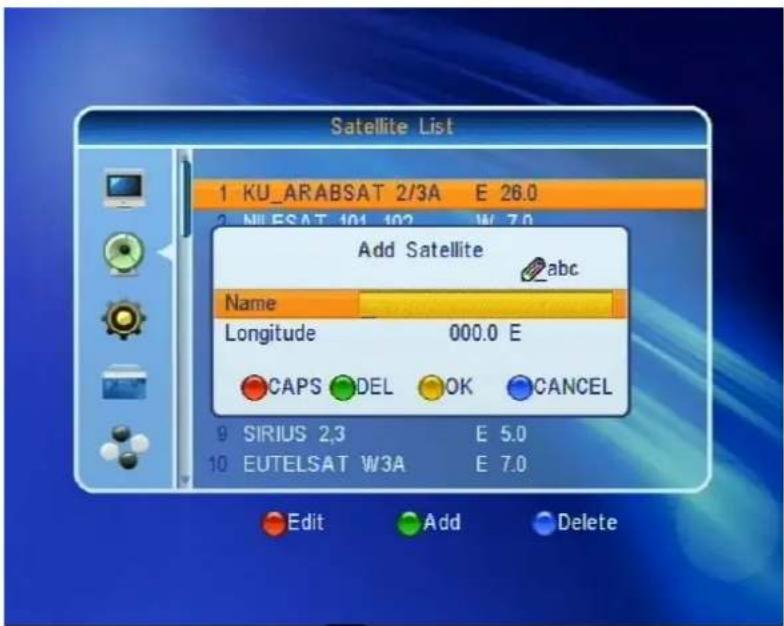
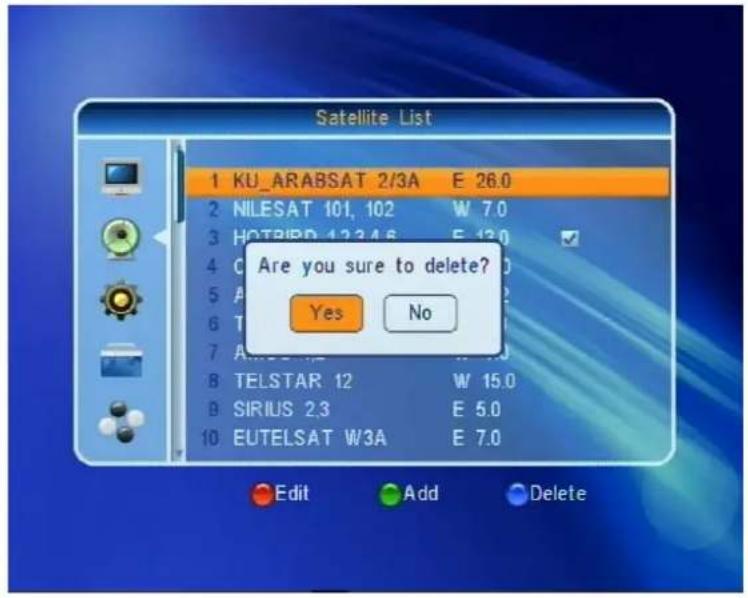
3.1.2 Satellite list
When you enter to "Satellite List" menu, the screen appears as follows:
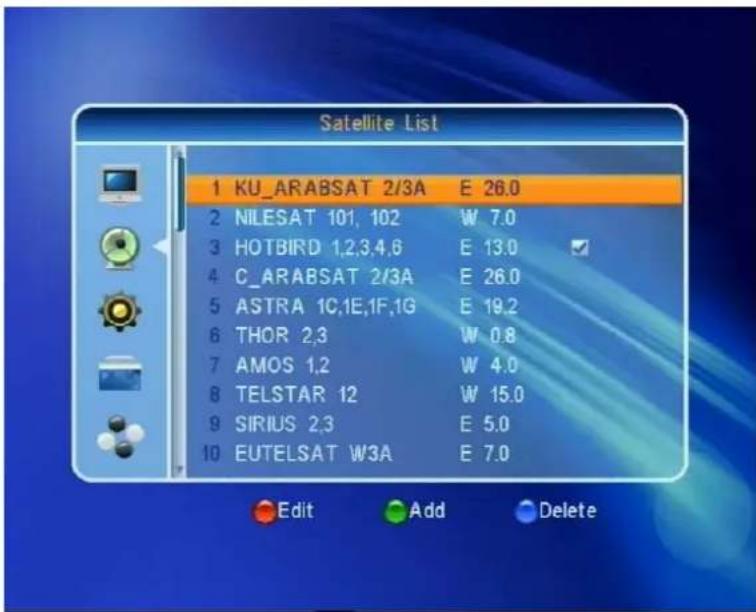
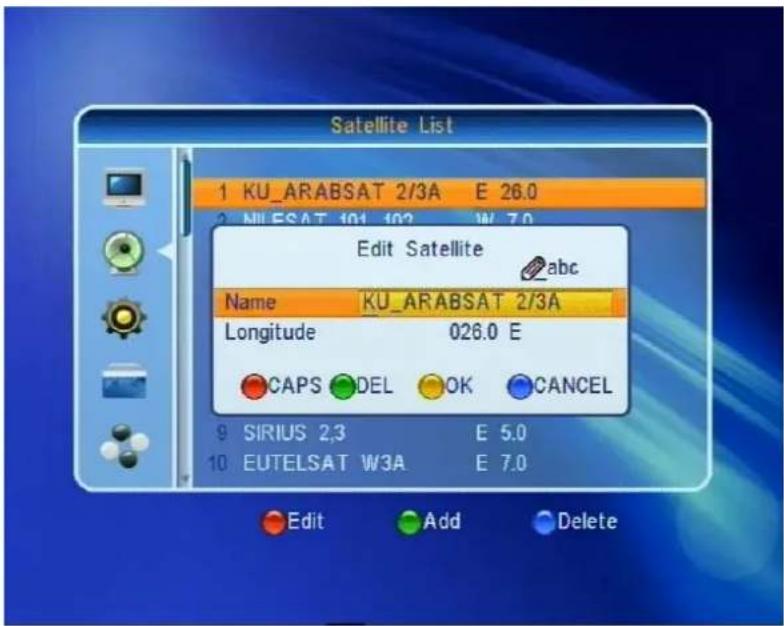
- Press [RED] key, to edit the satellite menu. You can edit Satellite name and satellite longitude, use [CH▲▼/VOL▶] keys to navigate and edit.
- Use the [RED] key for CAPS, [GEEN] to delete, [YELLOW] to confirm and [BLUE] to leave the menu.
- Press the [GREEN] key, to open "add Satellite".
- Press the [BLUE] button to delete. The pop up will ask "YES" to delete the selected satellite or "NO" to exit the operation.
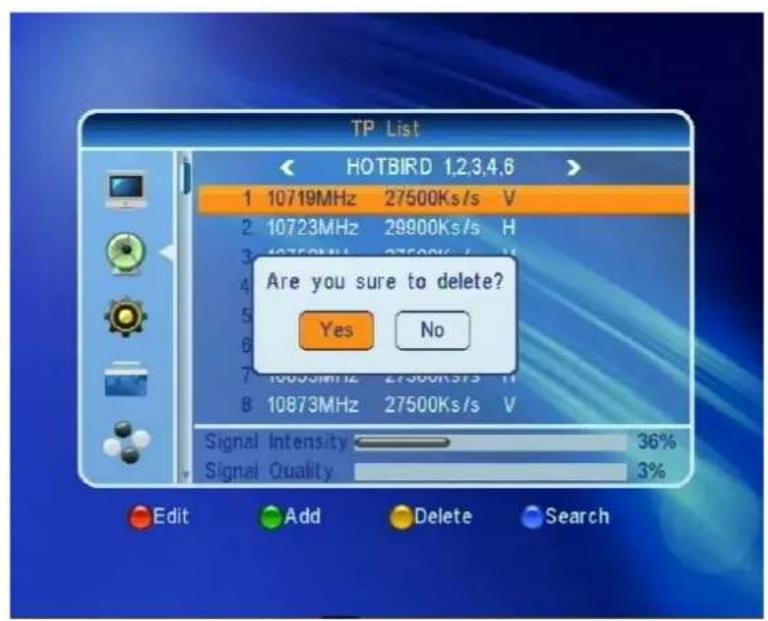
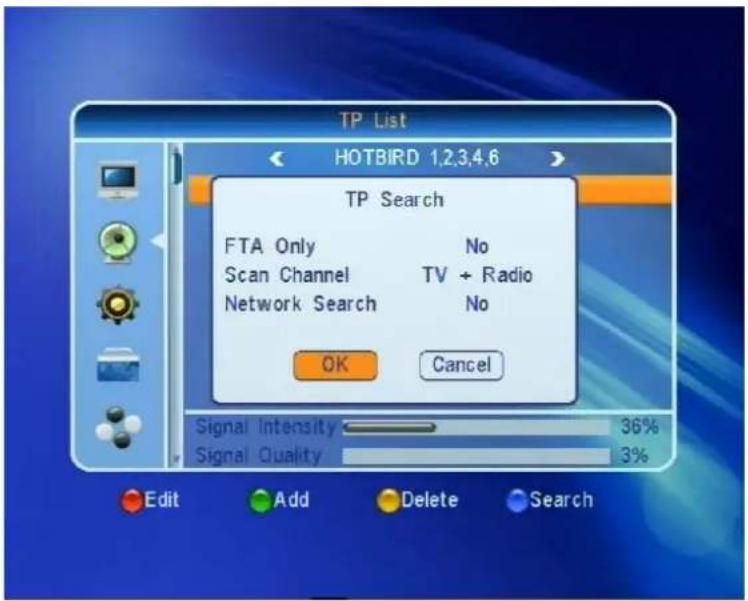
3.1.3 TP-List
In this sub-menu, you can edit the enabled transponders in the „Satellite List“ sub-menu.
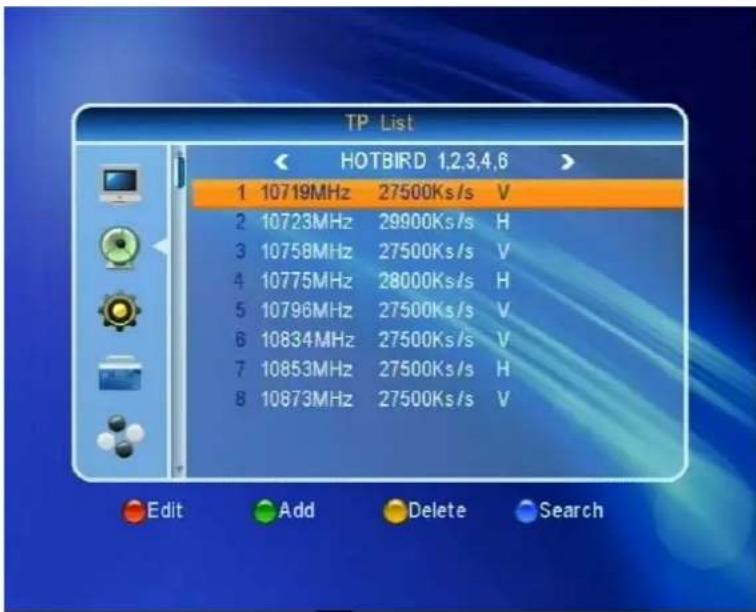
- Press [VOL] to change the satellite.
- Press [RED] to change the parameters of the selected transponder. Be aware that this will affect the channels of the transponder you have changed.
- Press [GREEN] to create a new transponder.
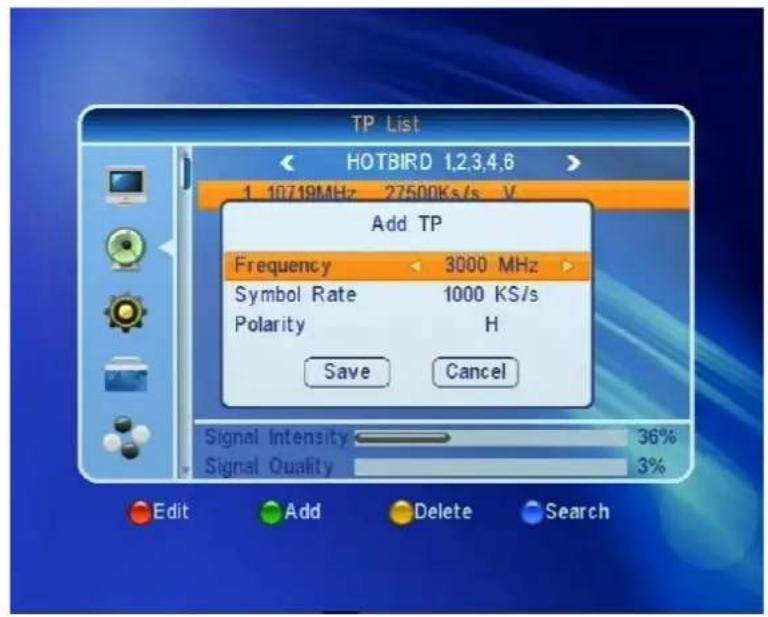
- Press [YELLOW] to delete a selected transponders.
- Press (BLUE) to search services on the selected transponder.
3.1.4 Channel Search
Here you start a channel search on the selected satellite:

- "Satellite": to select with [VOL ].
- "Only FTA": to select with [VOL ], between free to air or all services.
- "Program search": press [VOL▶], to select between TV+Radio, TV only or Radio only Services.
-
"Search mode" allows to select between "automatic search" or "manual search".
-
"Network search" allows a pre-defined channel search.
- "Delete" You can delete the existing channel search or keep during channel search.
- Navigate to „Search" with [CH▼] and press [OK].
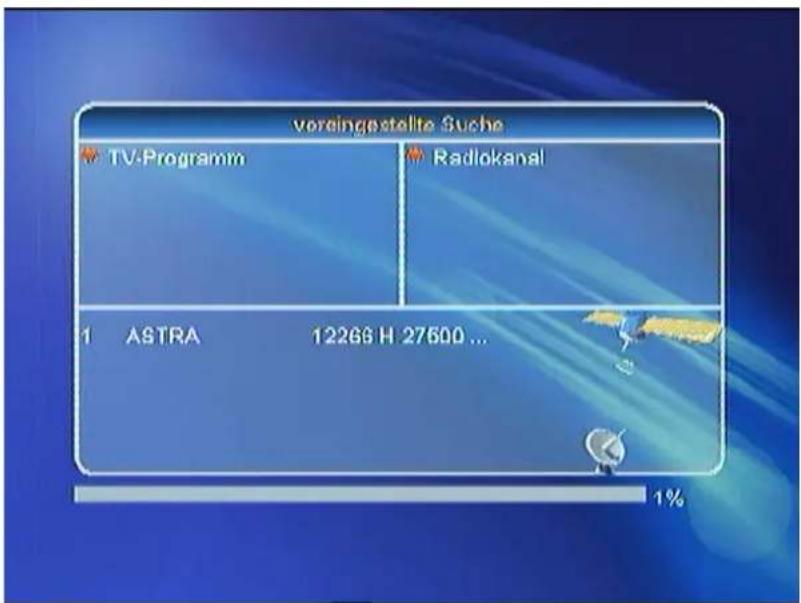
- During channel search you can press [Exit] to stop current operation, new channels will be kept.
3.2 Edit Channel
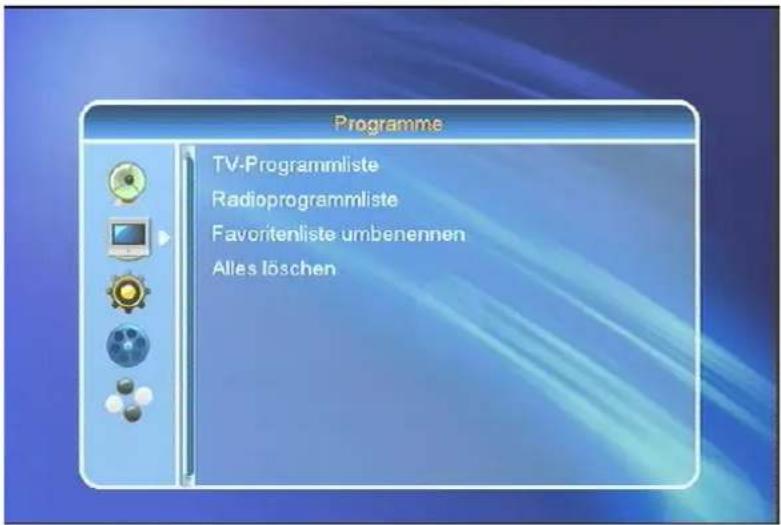
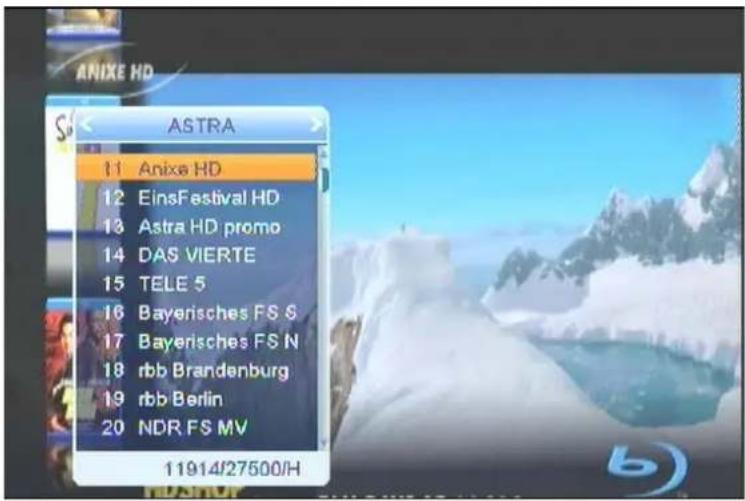
3.2.1 TV Channel List
The TV Channel List allows to edit your services.
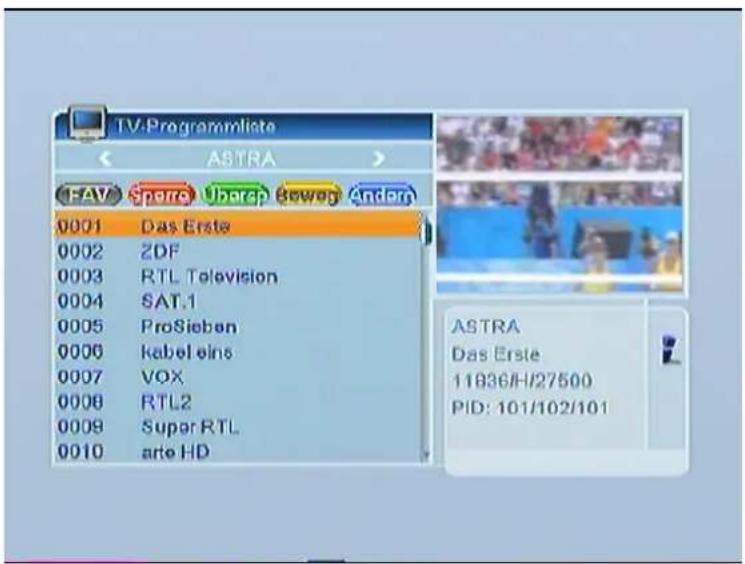
You can move the "highlighted" services by pressing [CH▲] key and press [OK] key to preview the current highlighted program in the right scaled video.
3.2.1.1 Favorites
If you want to add services to your favorite list, press[FAV] and confirm with [OK]. A small icon will be visible behind the selected service.

- You can move between 8 favorite groups by pressing [CH ] key and press [OK] key to mark a favorite.
2 Press [EXIT], to close the Favorites.
3.2.1.2 Lock
Press [RED] to enable the lock mode, select a service a confirm with [OK]. Enter the PIN code and a small icon will be visible behind the selected service.
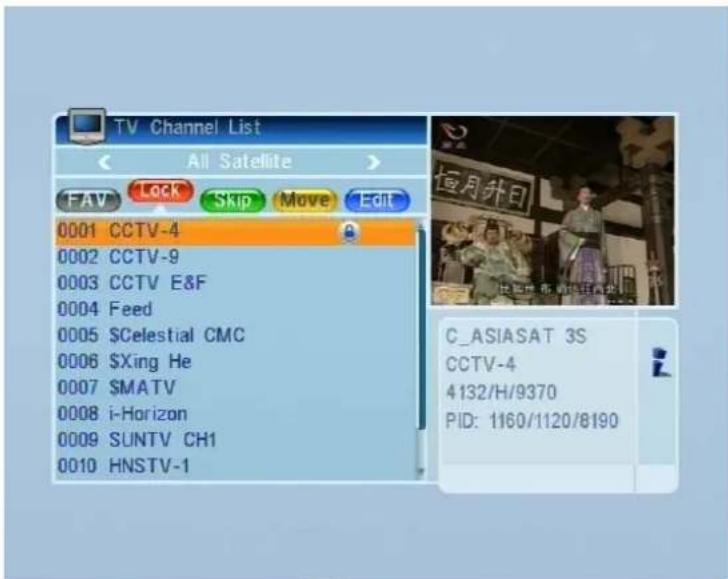
3.2.1.3 Skip
Press [GREEN] key to enter into skip mode:
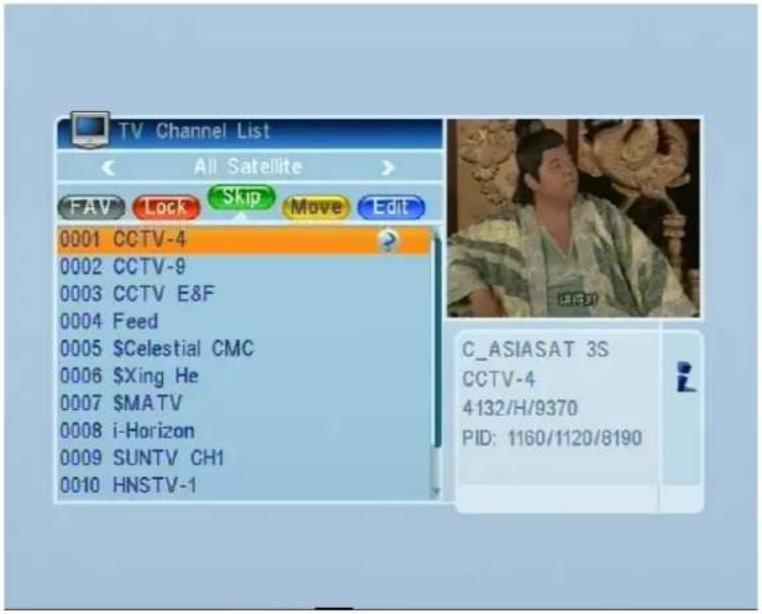
Press [CH-] key to move the highlighted service and press [OK] to add a "skip mark".
3.2.1.4 Move
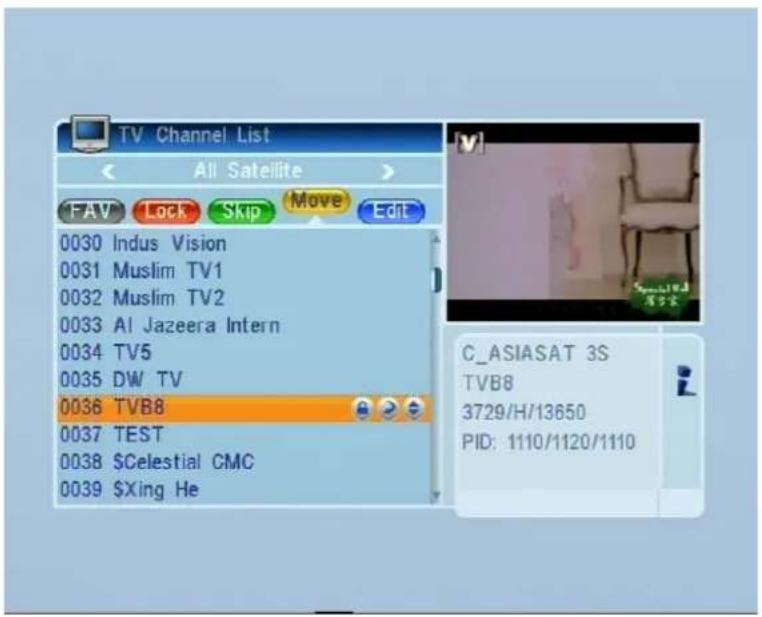
- Press [YELLOW] key, then press [CH ] key to move the highlighted service and press [OK] key to mark.
- A small Icon will be visible behind the selected service.
3.2.1.5 Edit
Press [BLUE] to "Edit". You can select between "Sort", "Edit" and "Delete".
3.2.1.5.1 Sort
Press [RED] key to "Sort". There are four types to sort. Press [CH ] key to move the highlighted service and press [OK] key to confirm.
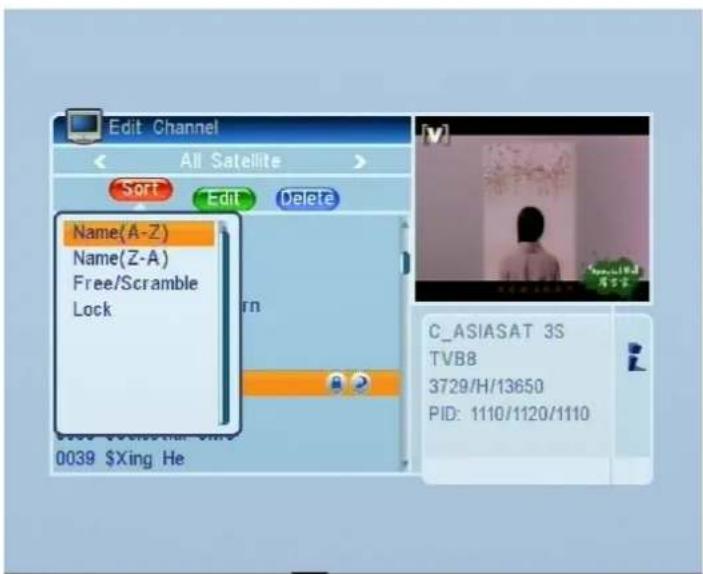
Please select different options.
- Name (A-Z): Sorting in Alphabetical order, ignore "$" symbol.
- Name (Z-A): Sorting in Alphabetical order, ignore "$" symbol.
FTA: Sort channel through free and scramble sequence. Free channel will in the front of channel list and scramble channel will at the rear of channel list - Lock: All locked channels.
3.2.1.5.2 Edit
In "Edit Channel" menu, press [GREEN], then press [CH ] key to move the highlighted service and press [OK] key to open the "Rename" window as follows:
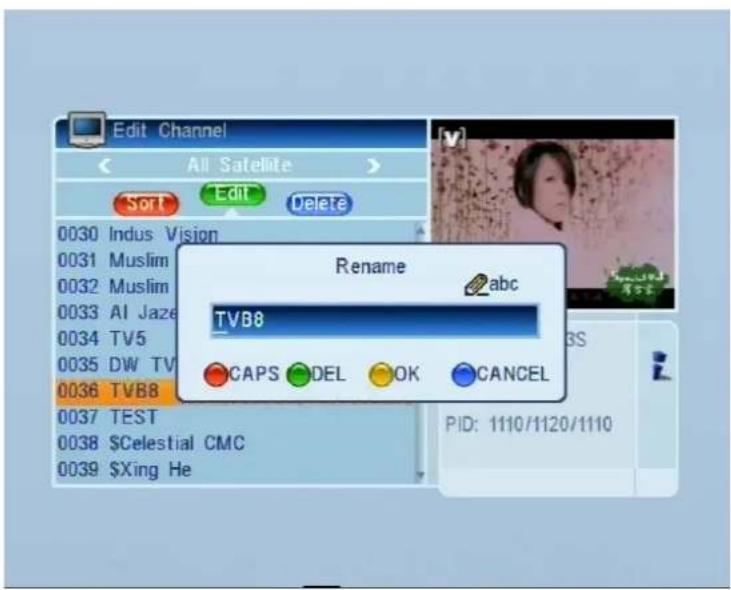
- Press [RED] key to select "CAPS".
- Press [GREEN] key to delete the char on the cursor.
- Press [YELLOW] key to save the modification
- Press [BLUE] key to cancel the operation
3.2.1.5.1 Delete
- Press [BLUE] key, then press [CH ] key to move the highlighted service and press [OK] key to mark as deleted.
- Exit the menu to delete the services.
3.2.2 Radio Channel List
Operation is identical to the TV Channel List.
3.2.3 Edit Favorites
Select a Favorite list to rename with [VOL].
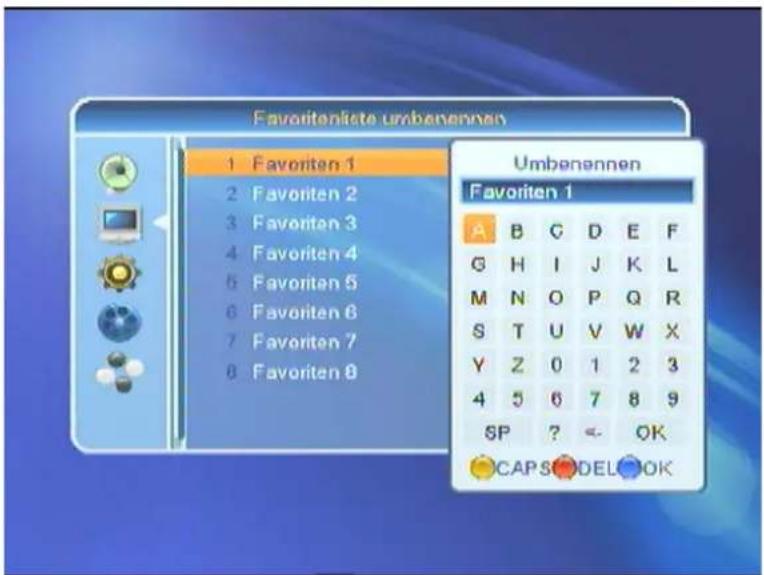
Press [RED] "DEL" to delete, with [YELLOW] "CAPS" you select between capital and non capital letters, [BLUE] "OK" to confirm.
Note:
Please make sure that you need to highlight [OK] before you press [OK] on your remote control

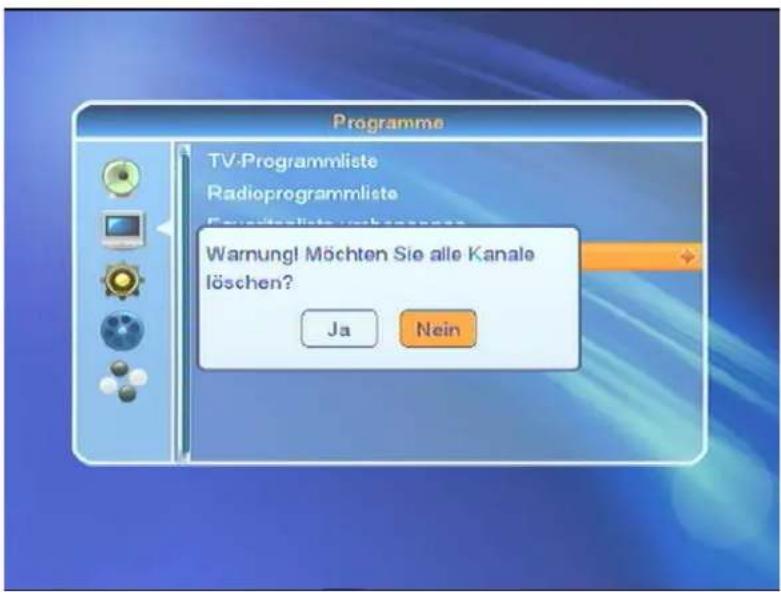
3.2.4 Delete
If you want to delete all services select [VOL ]
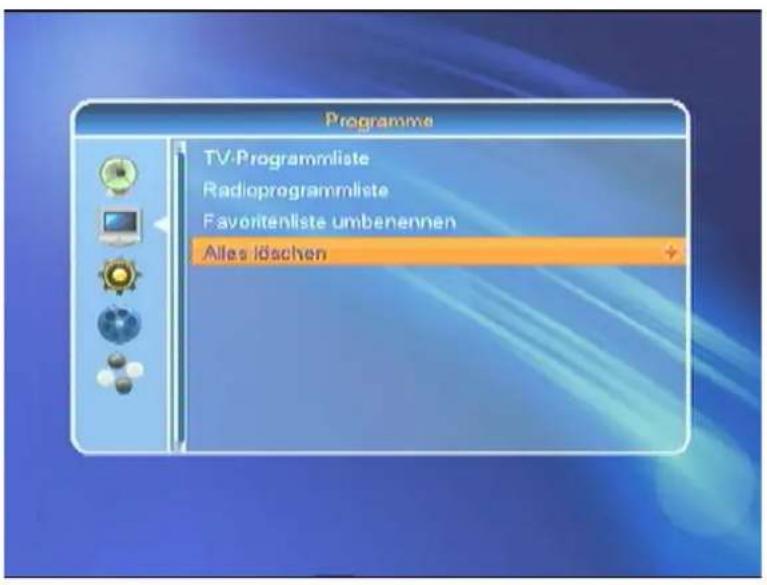
Confirm with "YES" or "NO" to exit the operation as follows:
3.3 System Setup
3.3.1 Language
Please select the language menu as follows:
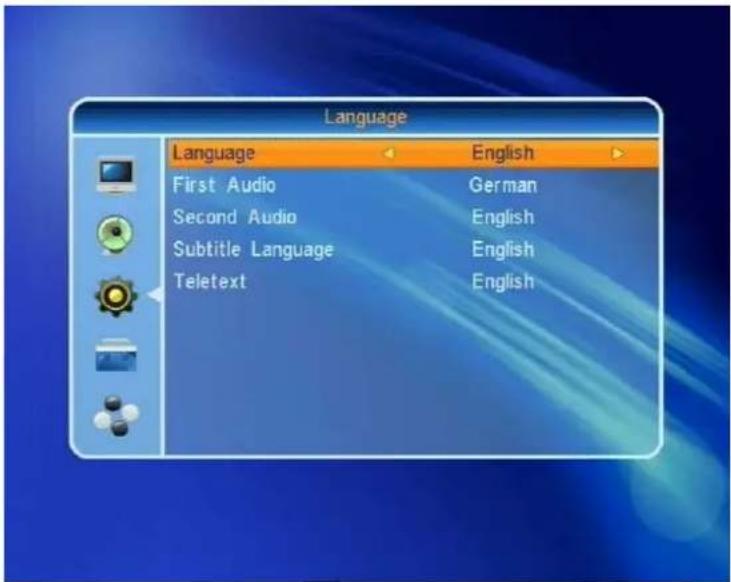
- Language: press [VOL ] key to select menu languages, the selections of languages include: English, French, German, Russian, Arabic, Portuguese, Turkish, Spanish, Polish and Italian.
- First Audio: Some channels have more than one audio language for choosing; by this function you can set the first audio for this channel. If the playing channel has the same audio as the "First Audio" you set, system will play this audio language as default. If the channel hasn't the suited audio language, then the system will compare automatically with second audio language. The selections of audio languages include: English, French, German, Russian, Arabic, Portuguese, Turkish, Spanish, Polish and Italian.
- Second Audio: If the channel has no correspond audio with "First Audio" but have corresponded audio with "Second Audio", system will play the second audio language as default. If no audio language corresponds with the "Second Audio", then the default language of current channel will be played automatically. The selections of audio languages include: English, French, German, Russian, Arabic, Portuguese, Turkish, Spanish, Polish and Italian.
- Teletext: You can set the teletext language if the operator provides such service otherwise a pop up message show: "No Teletext".
- [Exit] to leave the menu.
3.3.2 Local Time Setting
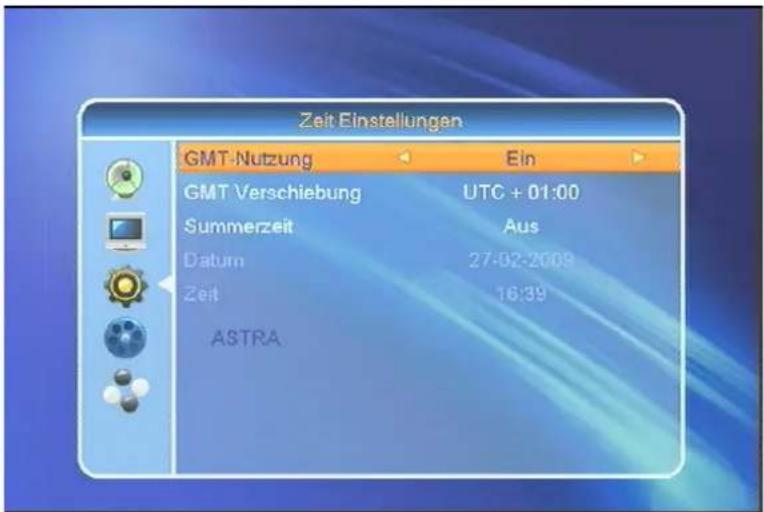
- GMT-Usage: Refers to the time provided by satellite stream. Press [VOL ] to change the settings.
- GMT-Offset: This option is available if you set GMT-Offset to ON". Press [VOL ], to set "GMT Offset". Every selection increase/decrease the GMT Offset for 30 minutes.
- Summertime: You can set the summertime.
- Date and Time: These options are only available if you set GMT-Offset to „OFF“. Press [VOL← ], to navigate and use the number buttons to set the date and time.
NOTE: In case the selected service do not provide date and time information, please set these data manually. But the most of the satellite services do provide date and time information.
- Press [Exit], to leave the menu.
3.3.3 TV-Format
In the Sub menu TV-Format you have the following screen:

- You have the option between various modes dependent on your TV Set: Auto -> PAL -> PAL-N -> PAL-M ->PAL-BG -> NTSC -> 576i -> 480i -> 576P -> 480P -> 720P_50 -> 720P_60 -> 1080i_25 -> 1080i_30. Press [VOL< ], to select the required TV Mode.
- Aspect Ratio allows to switch between 4:3 PS / 4:3 LB / 16:9. Press [VOL▶], to select the required mode.
- RF Channel (optional: only for TV Sets with RF Modulator): As long as your TV Set do not support CVBS/YpbPr, Scart or HDMI, it should have a RF Modulator. Set the Receiver to the related UHF/VHF channel and connect the Receiver with the Antenna cable to the TV Set (Antenna IN).
- HMDI Video Out is for setting the HDMI video output mode. It has option: RGB-Normal, RGB-Expand, YCbCr4:4:4 and YCbYr4:2:2. You can press [VOL ] key to select each mode circularly.
- Digital Audio Out is for setting the both SPDIF and HDMI digital audio output mode, it has options LPCM Out, BS Out and Auto, You can press [VOL ] Key to select each mode circularity. LPCM Out means system will decode no matter AC3 or PCM audio track data to be LPCM, digital audio decoder or HDMI TV will get LPCM digital audio data. BS Out means system won't do AC3 decode just output AC3 RAW data to SPDIF and HDMI. Auto means system will detect which the connected HDMI TV can decode and then output that data. If HDMI TV can decode AC3, system just output RAW data, if HDMI TV can decode LPCM only, system will just decode AC3 or LPCM to be LPCM and then output.
3.3.4 OSD Settings

- OSD Timeout: When you switch channels in full screen, there will show up some information about current channel on the lower of the screen. And regarding to the duration of these information show up on the screen, you can press [VOL] key to set the time. The range of the duration is "1 second ~ 10 seconds".
- OSD Transparency: You can press [VOL ] key to select the values. There are 5 levels of transparency, 10% , 20% , 30% , and 40% and "NO" (means no transparency function).
- OSD Screensaver: You can select start time for Screensaver.
3.3.5 Timer
The Timer menu looks as follows:
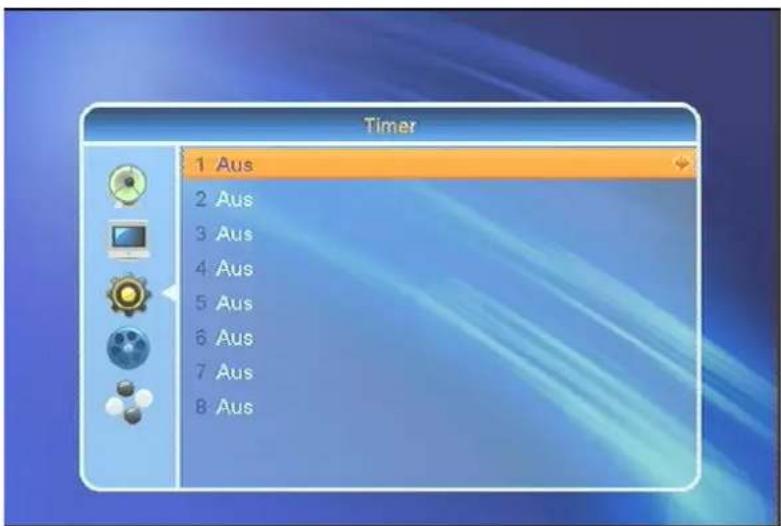
- Timer Setting: Select "Timer" and "Timer" and choose up to 8 Timer. Press [VOL] to enter into the following menu:
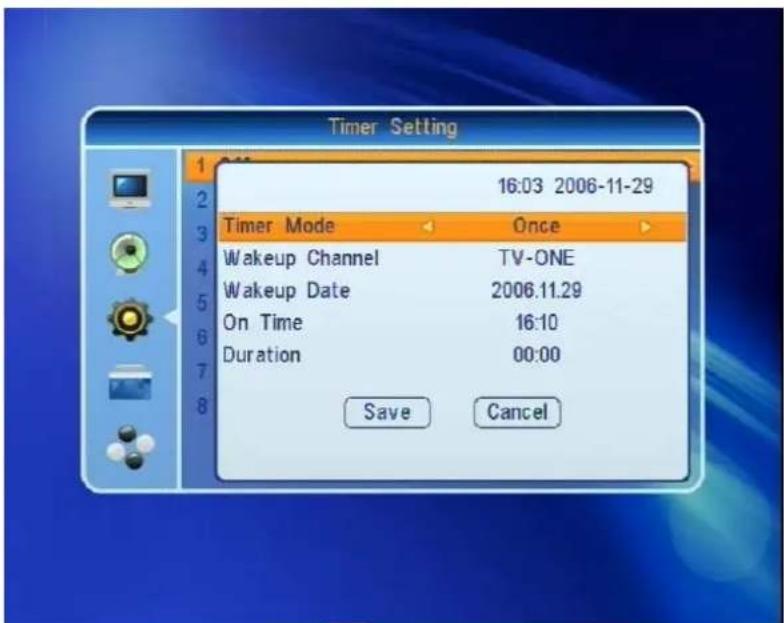
- Select the required Timer mode with [VOL]. Select between "OFF", "once" or "daily".
- Wakeup Channel: press [OK] key to enter channel list and select the related channel you want to set.
- Wakeup Date: use the number keys to input your wakeup date.
- On Time: use number keys to set the wakeup time.
- Duration: Please set the duration (start - and end time) of the selected service.
3.3.6 Firmware Information
If you select "Firmware Information" you will have the following screen:
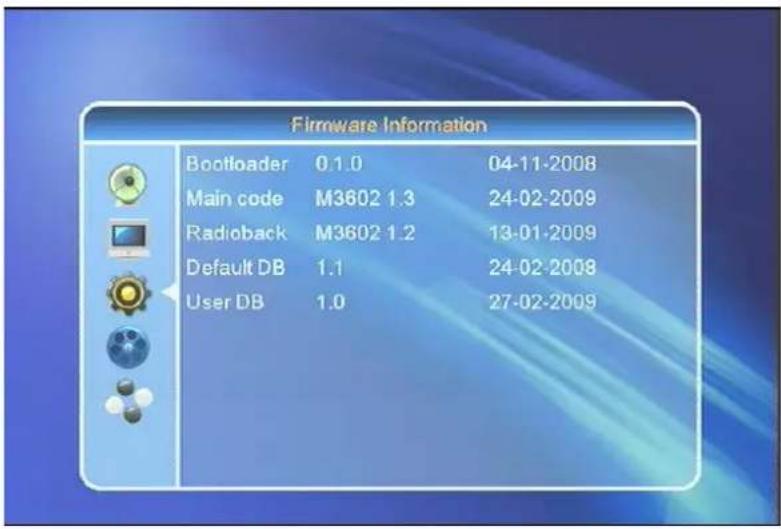
This is for service issues only.
3.3.7 Parental Lock
"Parental Lock" allows to protect the main menu and the channels (which are previously marked as "lock" in the Edit menu) with a PIN code. The default password is "0000":
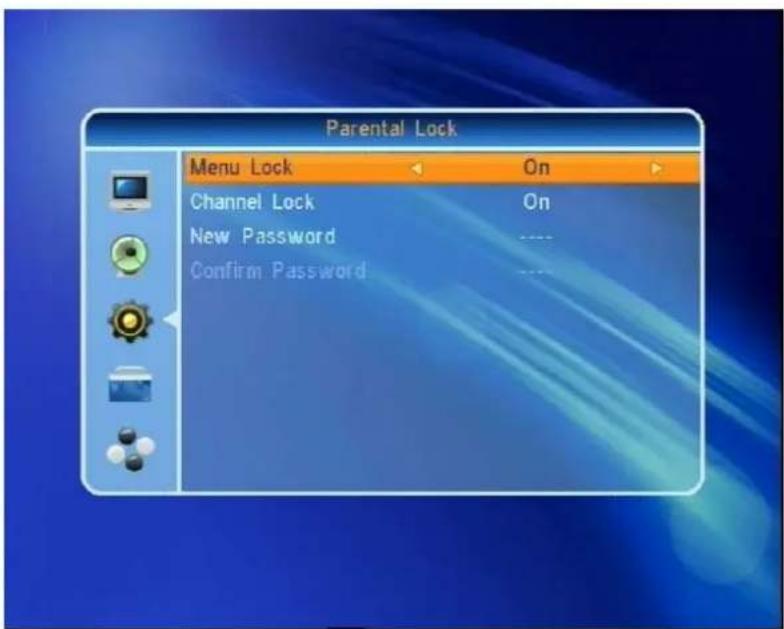
- "Parental Lock" please press [VOL] to set ON to force a password entry for every menu you like to enter. If you set OFF no password is required.
- Channel Lock" please press [VOL ] to set "ON" to protect the channels which are previously marked as "lock" in
the Edit menu with a PIN code. The default password is "0000".
- New Password: You can change the default password from 0000 to any individual. Please note, that once you lost your password the Receiver becomes a service issue.
4 Press [EXIT] to leave the menu.
3.3.8 Factory Setting
If you enter into Factory Settings :
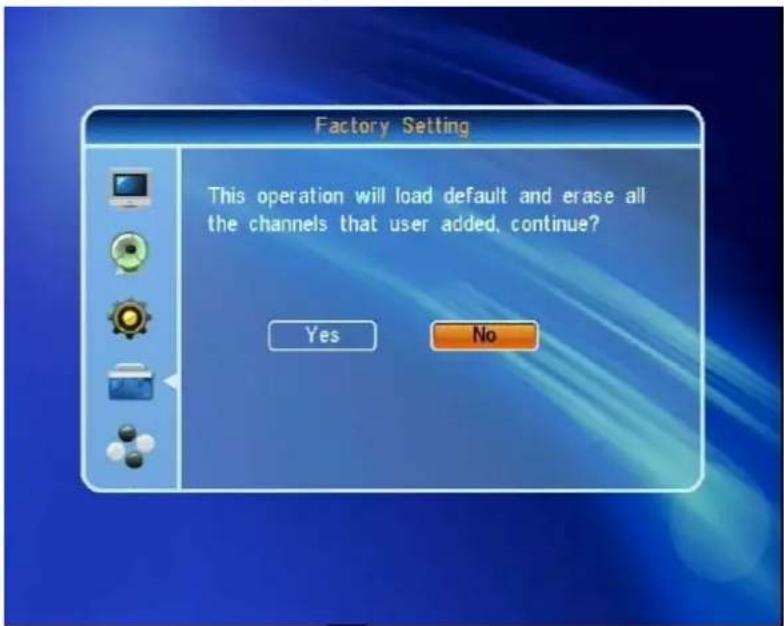
- If you select "YES" the Receiver will be set to standard value as originally delivered.
- Press [EXIT] to leave the menu or select "NO".
3.3.9 Software update by OTA
The receiver is fitted with Software update by OTA. The screen looks as follows:

You must point your satellite system towards ASTRA1 19.2°East to carry out the software update. This operation is only to update the operating software on the receiver.
3.3.10 Software update via USB
Another option to update the operating software on the receiver is to "Upgrade via USB".
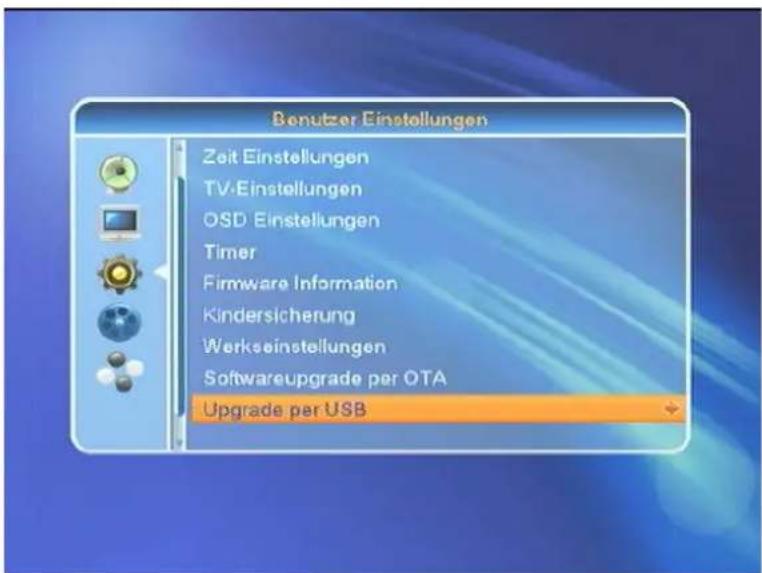
If you want to update the receiver by using a USB 2.0 compatible Stick or such USB Hard Drive Disk, please press [VOL]. Select the Upgrade-file and start by press the [VOL] key.
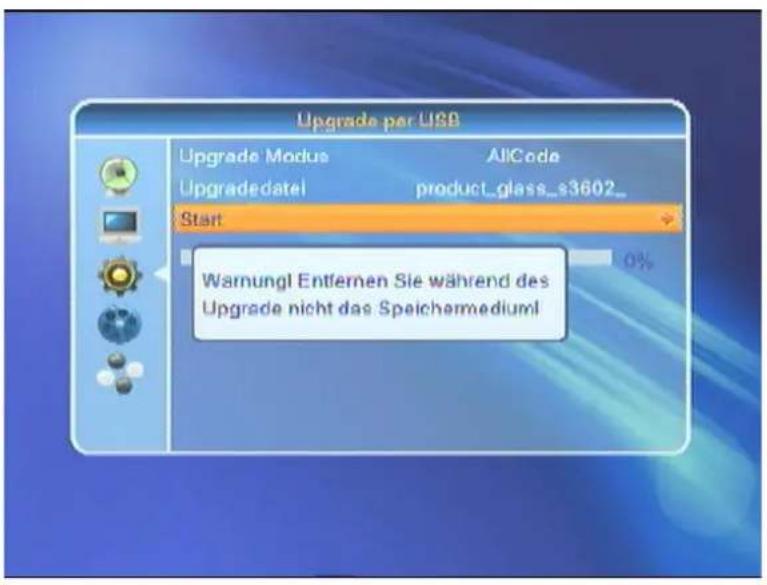
Note: Do not remove the USB stick or power off during operation, otherwise you may cause a service issue!
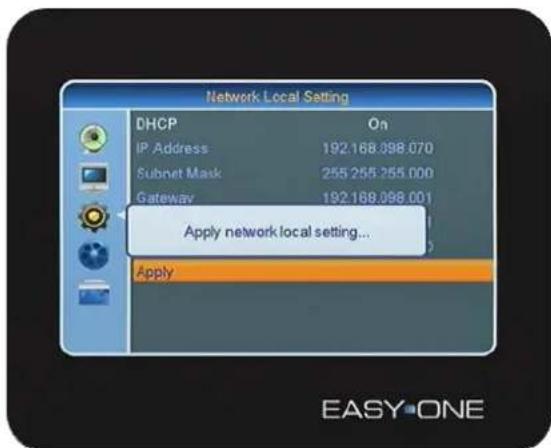
3.3.11 Network Local Setting
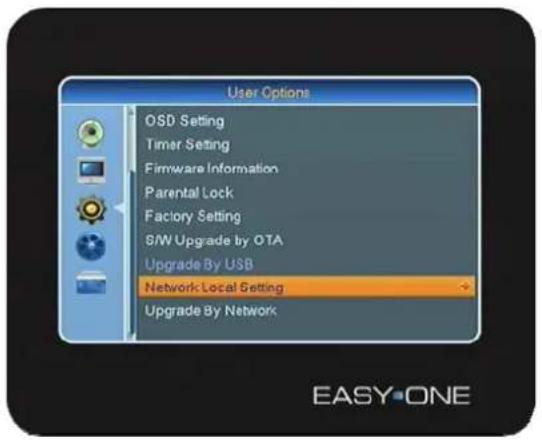
- The STB must be switched off. Please connect your STB with the Internet-Router via the Ethernet Cable (RJ45) (not part of the delivery).
- Switch STB power on.
- Enter into the main menu and User Options, also Select ,Network Local Setting"and confirm with [OK].
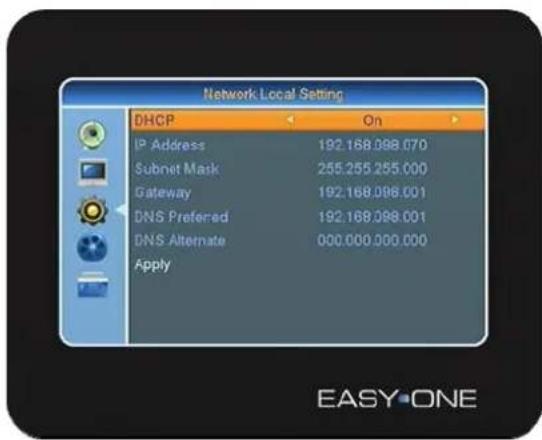
- To navigate in this menu please use CH▲, CH▼, V▲, V▼ and [OK].
- Enable (DHCP) and move to [Apply] to confirm with [OK].
- In case you want to setup your Network manually, please disable DHCP [OFF] and set the required parameter by using the number buttons on your remote control, move to [Apply] to confirm with [OK].
Upgrade by Network
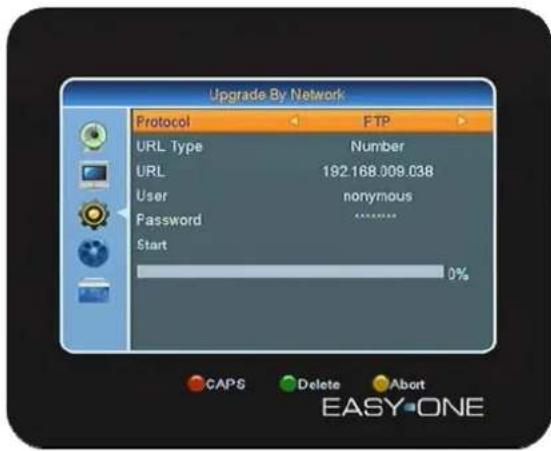
- Your STB allows via Ethernet Port Upgrade via Ethernet.
- Please select [FTP or http] and set the correct URL Type by using the number buttons on your remote control in case is not preconfigured.
- Use the [Red] button, for capital letters in [URL], [Green] to delete.
- In addition please set User and Password and confirm with [OK]. During the Software update you can press [Yellow] to abort.
3.4 DVR Options
If you select DVR Options please find the following menu:

1. DVR/PVR (Digital/Personal Video Recorder)
Your PVR-Ready Receiver (PVR = Personal Video Recorder) is prepared with a USB 2.0 slot to fit external Hard Drive Disk. This would allow that you do not need any longer an analog Video Recorder. The maximal recording time
depends on the capacity of the USB device and bandwidth of the selected service.
Note!
Because of technical reason, you can only record and watch the one service at the same time.
3.4.1 Record Manager
The Record Manager show all recorded Video Services, the menu looks as follows:
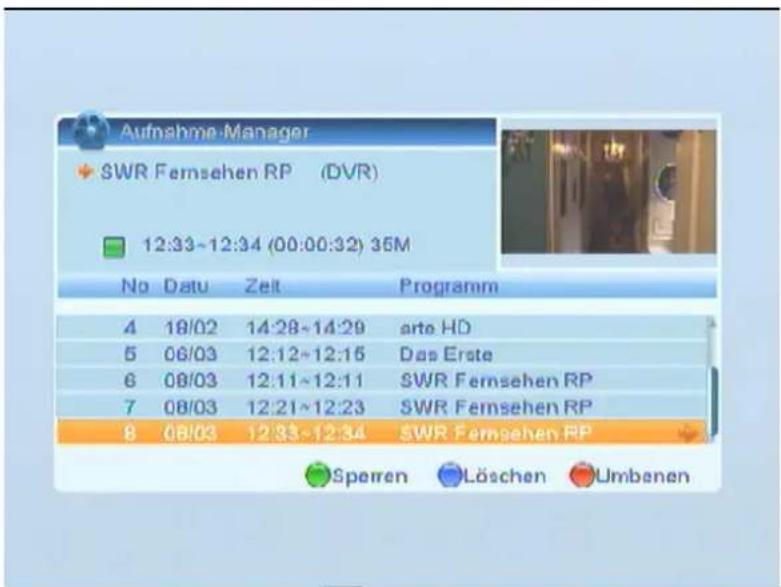
- You can lock the recorded services individually with the [GREEN] key lowif by the PIN code.
- You also can delete recorded services with [BLUE]. The services will be marked with
To playback a recorded service, press [OK]. The playback screen looks as follows:
3.4.2 HDD Format
In case you want to format your USB device please enter into HDD Format:
Note!
In case you format your USB Devices, please be aware that all Multimedia-Files (also MP3s) will be deleted.
3.4.3 DVR-Settings
Entering the DVR-Settings you have the following options:
- With time shift you can playback and record one service at the same time.
- Set „Timesheet" with [VOL] to "ON" to enable Timeshiftfunction in general.
- If you set "Timeshiftrecording" with [VOL ] to "ON", any service will be recorded during watching.
3.4.4 Diashow-Settings
Please enter with [VOL] into the "Diashow-Settings".
- Size (Screen): You can select between full screen mode o
real size. - Diashow time set the display duration for every image.
- Repeat: Set "On" or "OFF".
3.4.5 Media Player
Enter into the Media Player menu with [VOL]:
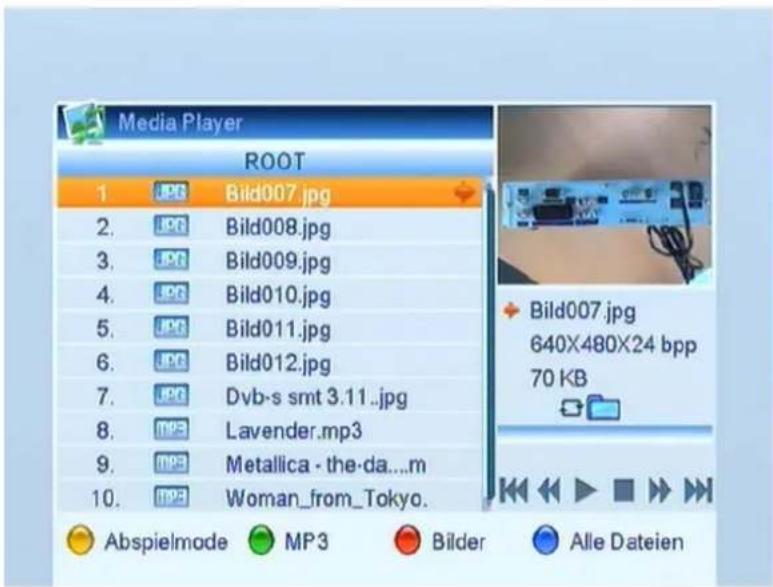
3.4.5.1 Pictures
can playback.JPG- and BMP-Formats. To playback the media files connect the USB device with With your receiv
the receiver. The Hotkey for JPG or BMP-files, press [JPEG] on the Remote control.
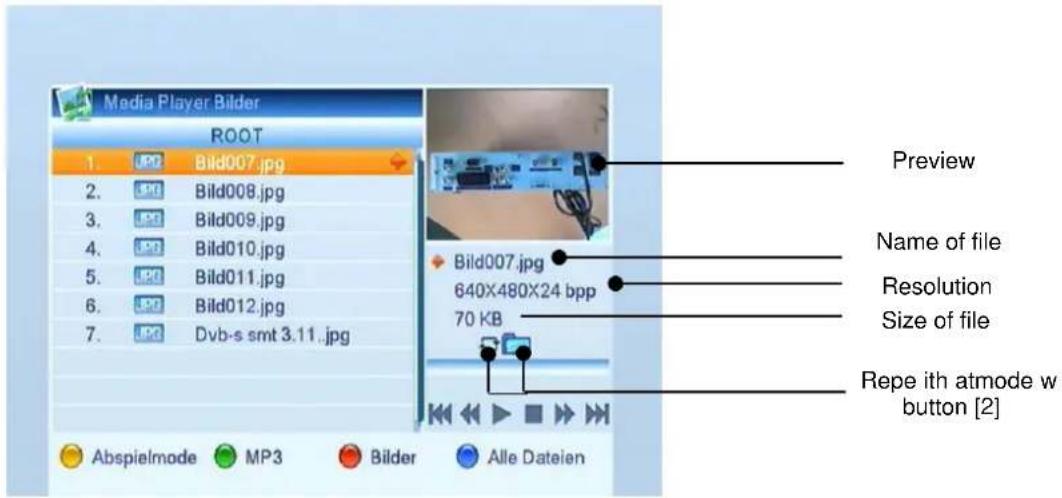
Select the picture with [CH ] to see the preview.
1. Playback mode (YELLOW)
Repeat mode:

Only the selected picture will be displayed.

All pictures in the activated folder will be displayed.

All pictures in the activated folder will be displayed endless.
2. MP3 (GREEN) key
Create list with all MP3 files.
3. Pictures (RED)
Create list with all jpeg / bmp files
4. All Data [BLUE]
Create list with all files
3.4.5.2 Music
With your receiver you can playback MP3-Formats. To playback the media files connect the USB device with the receiver. The Hotkey for MP3-files, press [MPEG] on the Remote control
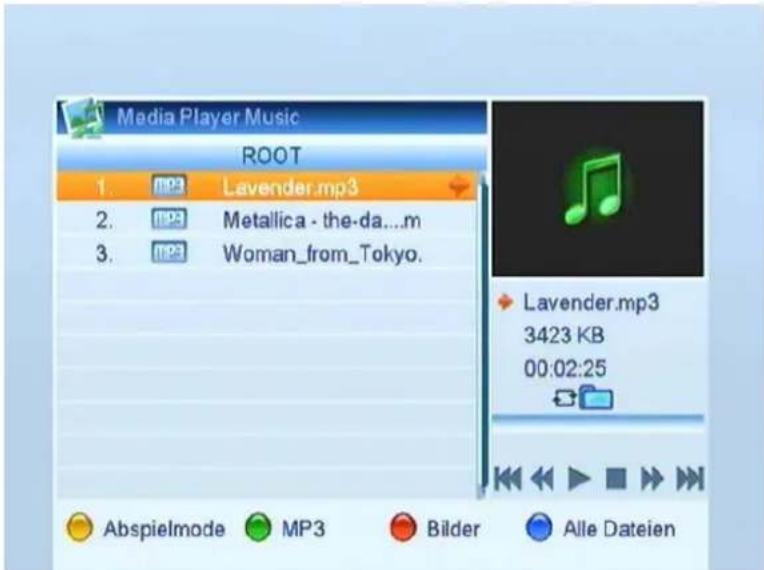
Select the required MP3 File with [CH▲▼]. Press [OK] to playback.

Select the MP3-File with [CH▲▼] to see the preview.
1. Playback mode (YELLOW)
Repeat mode:

Only the selected MP3-File will be displayed.

All pictures in the activated folder will be displayed.

All pictures in the activated folder will be displayed endless.
2. MP3 (GREEN) key
Create list with all MP3-File files.
5. Pictures (RED)
Create list with all MP3-File files
6. All Data [BLUE]
Create list with all files
3.4.6 Remove USB Device
In casenewtantusBedevicepleasealwaysdothisas follows:
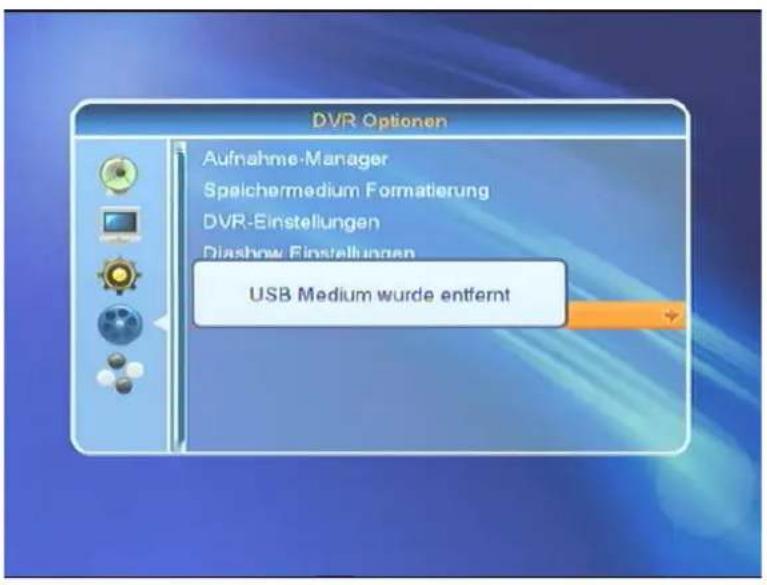
Press [VOL] to disable/remove USB Medium safely. This avoids any potential data loss in case of unauthorized remove of the USB device.
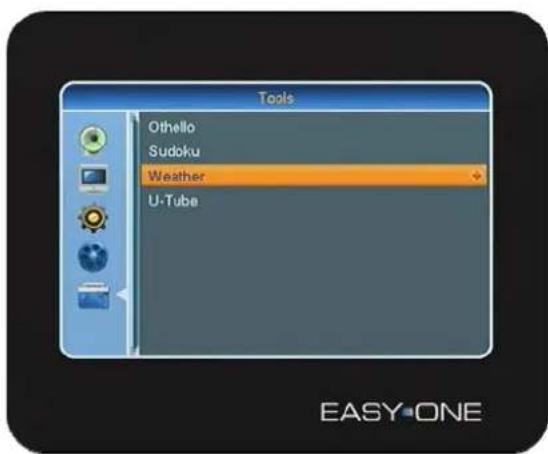
3.5 Tools
3.5.1 Othello
Select the game with [VOL] to enter into the following dialog:
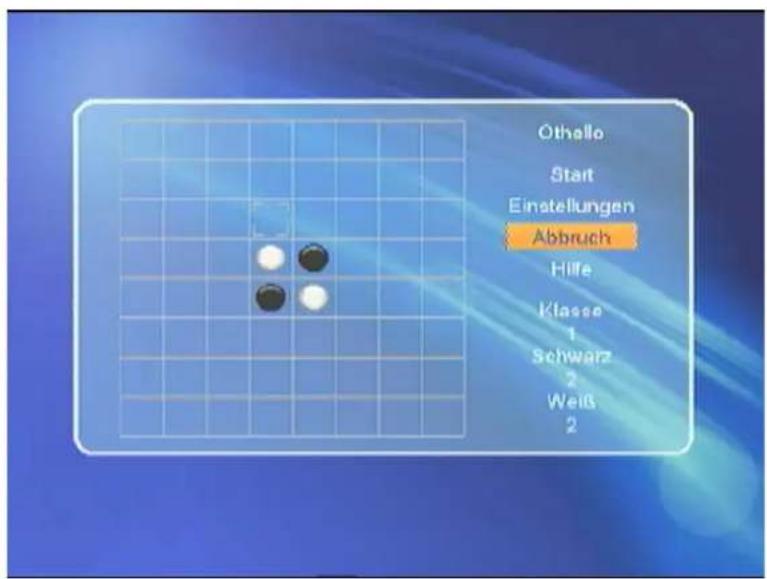
To set level of difficulty please press [VOL ]. Press "Help" and [OK] for further information of [EXIT] to leave.
3.5.2 Soduko
Select the game with [VOL] to enter into the following dialog:
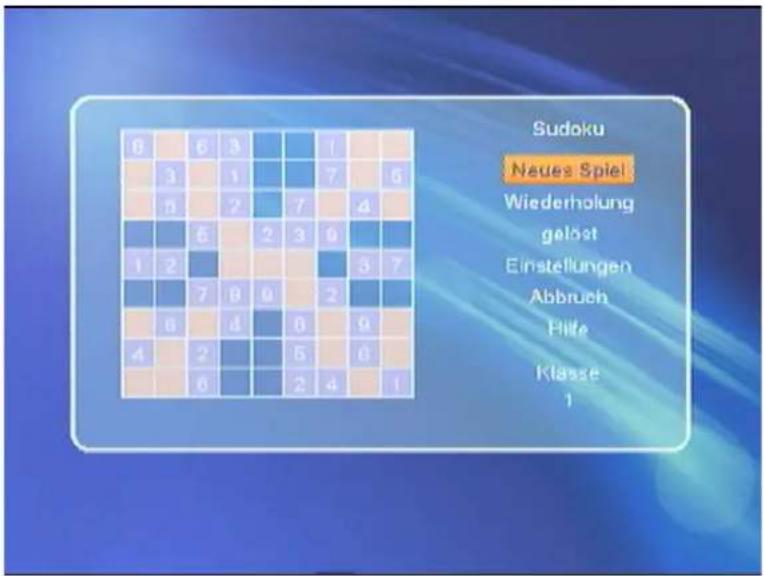
To set level of difficulty please press [VOL ]. Press "Help" and [OK] for further information of [EXIT] to leave.
3.5.3 Weather
The correct network configuration allows receiving actual Weather data.
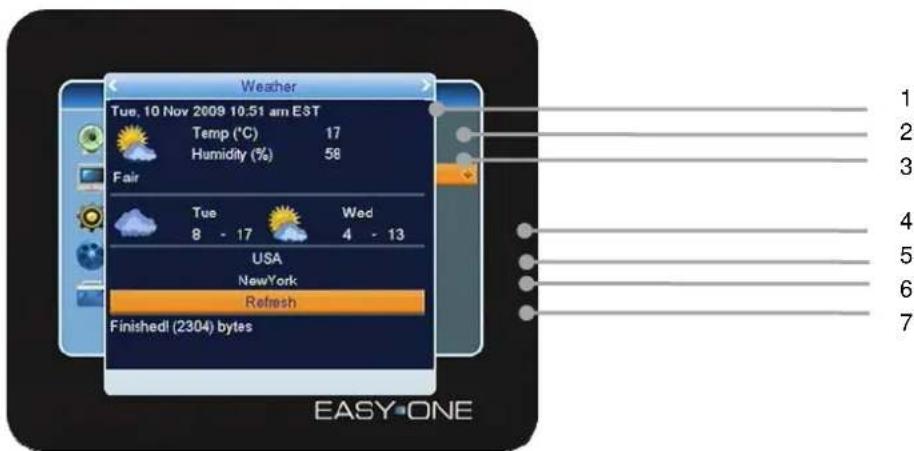
- Display of the current time and date.
- Display of the current temperature.
- Display of the humidity.
- Display of the lowest and highest temperature of the day and next day's preview.
- Selection of the country, to navigate with V▲, V>.
- Selection of the City, to navigate with V<, V>.
- Actualization of the data with [OK].
3.5.4 U-Tube

Another application you will find under [U-Tube]. This Internet-Video portal allows watching Video-Clips at no cost.
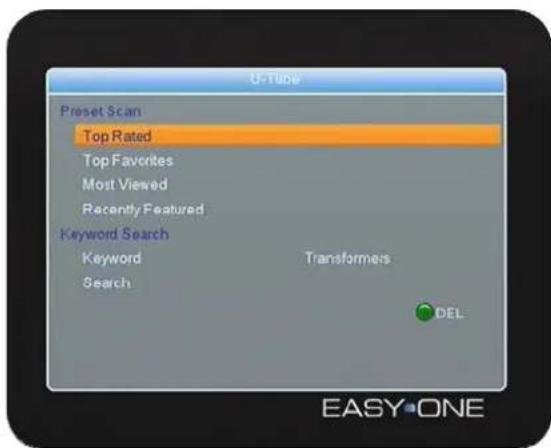
This U-Tube application allows selecting:
a. Top Rated
b. Top Favorites
c. Most Viewed
d. Recently Featured
e. Keyword Search with the number buttons of the remote control. To delete please press [Green] DEL.
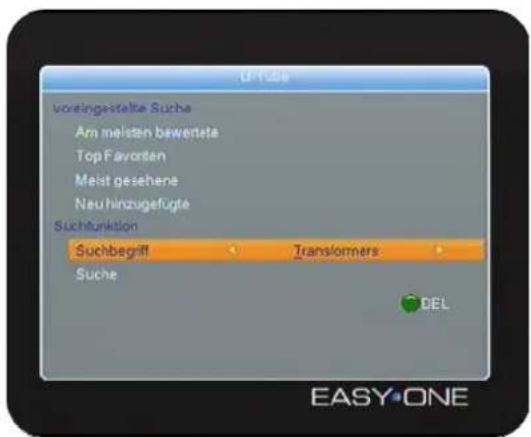
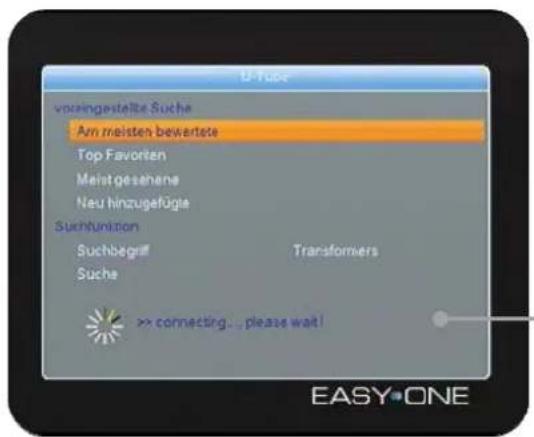
Navigate to Search and press [OK]
!
! Note: According to network capacity the connection time may varies.
In case the search was successful, you will find a preview of 8 Video-Clips.
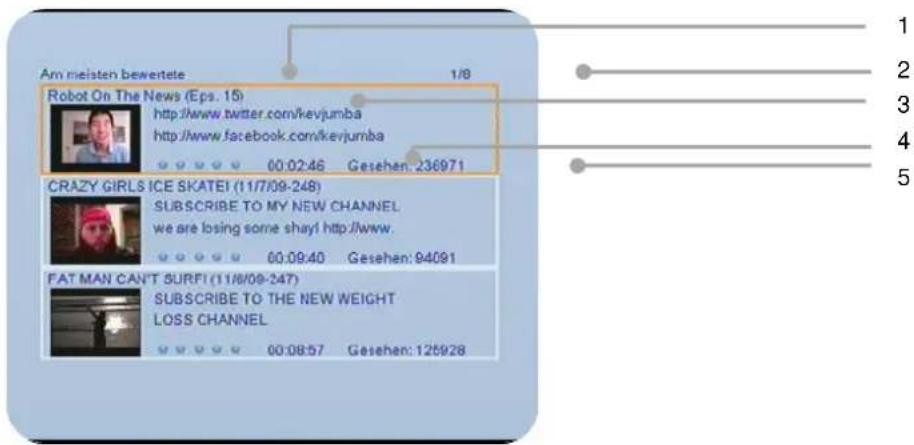
For example the" Top Rated" shows a follows:
- Page 1 of 8, total 24 titles
- Title of the Video-Clip
- Duration oft he Video-Clip
- Viewed in total
Please navigate within the preview with CH▲,CH▼ and press [OK] to start

! Note: According to network capacity the loading time may varies.

Once the Video-Clips has been successfully loaded the banner shows the following information.
- Title of the Video-Clip
- Duration of the Video-Clip
- Lapsed time of the Video-Clips
To stop the Video-Clip, please press [Stop] or [Pause] II.
Technical Data:
Receiver
| Size in mm (W × D × H) 310 × 190 × 40 | ||||||
| IF Bandwidth 950 MHz ~ 2150 MHz | ||||||
| LNB controller 22 kHz ± 2 kHz, 0,6 V pp ± 0,2 V | ||||||
| DiSEqC controller Version 1.0 | ||||||
| Symbol rate 2 ~ 45 MS/s | ||||||
| D a t a r a t e M a x | ||||||
| Forward Error Correction (FEC) 1/2, 2/3, 3/4, 5/6, 7/8, auto | ||||||
| Aspect Ratio 4:3 letterbox, 4:3 PanScan, | ||||||
| TV Format 720 x 576 (Pal), | ||||||
| Audio mode 1280 x 720, 1920 x 1080 | ||||||
| Left, Right, Stereo, AC3 di | ||||||
Connection
| LNB IF Input | Type | F, IEC | 169-24 | |||||
| TV-SCART (output only) | Video CVBS, Audio L, R | |||||||
| RCA (CINCH) | Audio L,R | |||||||
| COAXIAL | Digital Audio Output | |||||||
| HDMI Output | Connection for digital transmission of Audio and Video Signals. | |||||||
| YPbPr | Component U S B 2 . | |||||||
| U S B | ||||||||
| Power supply | ||||||||
| Input voltage | 100-240 V ~, 50/60 Hz | |||||||
| Power consumption | ca. 25 W (with Single | |||||||
| c a . 3 W (S | ||||||||
| Operating Temperature | 0° C ~ +40° C | |||||||
| Storing Temperature | - 40° C ~ + 65° C | |||||||
Guarantee:
The guarantee for this digital satellite receiver is in accordance to the legal regulation start at time of purchase.
Any modification of this digital satellite receiver will terminate any warranty claim.
Declaration of Conformity
The supplier herewith confirm the following regularities and norms:
low voltage directive 73/23/EWG
EN 60065:202 +A1:2006
Norm for electromagnetic compatibility 89/336/EWG
EN 55013:2001
+A1:2003
+A2:2006
EN 55020:2007
EN 61000-3-2:2006
EN 61000-3-3:1995 +A1:2001 +A2:2005
Type: Digital Satellite-Receiver


Your digital satellite receiver contains CE.
DiSEqC is a registered trademark of EUTELSAT.
DVB is a registered trademark of DVB Digital Video Broadcasting Project.
Setone GmbH
Rebgartenweg 27
D-79576 Weil am Rhein
DISPOSAL / RECYCLAGE
CONSIGNES DE SECURITE II
1 TELECOMMANDENDE & FACE AVANT & FACE ARRIERE 4
2 OPERATIONS DE BASE 7
- IF OUT: Sortie Tuner satellite
HDTV Satellite Receiver
S-HD 4U
EASYONE
S-HD 4U
Article1Nr.:10-01-000-055
www.setone.eu