TX-2250 USB PVR - Digital decoder SetOne - Free user manual and instructions
Find the device manual for free TX-2250 USB PVR SetOne in PDF.

| Product Type | Digital Decoder |
| Brand | SetOne |
| Model | TX-2250 USB PVR |
| Dimensions (W x D x H) | 180 x 120 x 40 mm |
| Weight | 0.5 kg |
| Power Supply | 12V DC, 1A |
| Power Consumption | ≤ 10 W (operating) |
| Display | LED indicator |
| Tuner Type | DVB-T/T2 |
| Video Output | HDMI, composite |
| Audio Output | HDMI, optical |
| USB Ports | 1x USB 2.0 for PVR |
| Recording | USB storage (not included) |
| Timeshift | Supported |
| Electronic Program Guide (EPG) | Up to 7 days |
| Supported Video Formats | MPEG-2, MPEG-4, H.264 |
| Supported Audio Formats | MPEG-1, MPEG-2, AAC |
| Remote Control | Included (batteries required) |
| Care and Cleaning | Wipe with dry cloth; avoid liquids |
| Safety | Use only supplied adapter; keep ventilated |
| Spare Parts / Repairability | Contact SetOne support for service |
Frequently Asked Questions - TX-2250 USB PVR SetOne
User questions about TX-2250 USB PVR SetOne
0 question about this device. Answer the ones you know or ask your own.
Ask a new question about this device
Download the instructions for your Digital decoder in PDF format for free! Find your manual TX-2250 USB PVR - SetOne and take your electronic device back in hand. On this page are published all the documents necessary for the use of your device. TX-2250 USB PVR by SetOne.
USER MANUAL TX-2250 USB PVR SetOne
Vorwort
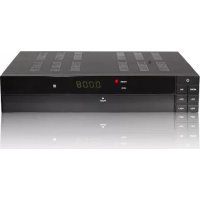
Receiver Frontansicht 8
Receiver Frontansicht
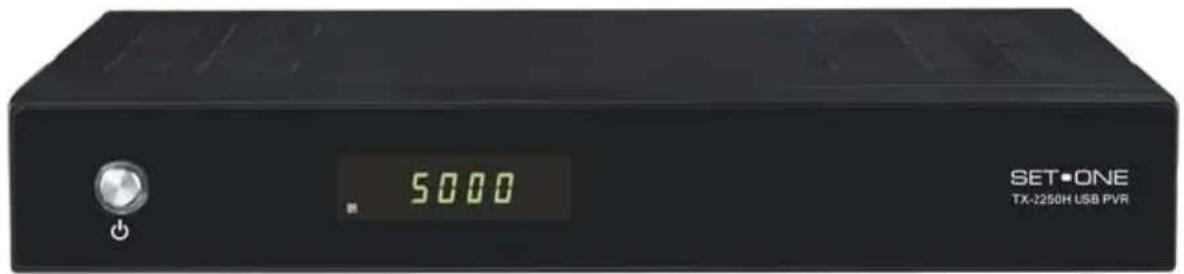

(Abb. ähnlich)
6.4 Software Upgrade
Table of contents....2
Safety Instructions ....4
General Introductions....6
Front Panel/ Rear Panel....7
Remote Control Unit 8
S.T.B Connection ....10
- Operations ...... 11
1.1 Switching on the Receivers 11
1.2 Standby mode:....11
1.3 Channel changing....11
1.4 Volume adjusting 11
1.5 Channel number....11
1.6 Mute (audio muting)....11
1.7 SUBTL (Subtitle, German: Sub-title) 11
1.8 INFO 12
1.9 AUDIO 12
1.10 M-P (multi-program preview) 12
1.11 TXT 12
1,12 EPG Electronics Program Guide (EPG)......12
1,13 Program list (red key)....12
1.14 TV/RADIO ....13
1,16 Recall....13
1.17 REC and STOP....13
- User Settings....14
2,1 OSD setting....14
2,2 A/V output setting....14
2,3 Local time setting....15
2,5 Parental Control In this menu you can assign, which menu options to be password-protected and only after input of the pin number to be used. (Pin number in factory setting is: "0000 ")....16
- Installation....17
3.1 Scan ....17
3.2 Antenna setting....17
3.3 Satellite list....18
3.4 Transponder list....18
3.5 Setup Motor and USALSetup ....18
4. Channel Manager....19
4.1 Edit Channels....19
4.2 Delete channel ....19
4.3 Move channel....19
4.4 Skip channel ....19
4.5 Lock channel....19
4.6 Set Favorite....19
5. System Setting....20
5.1 System Information ....20
5.2 Factory Default ....20
5.3 OTA Update 20
5.4 RCU code (optional) 20
5.5 Hotel Mode ....20
5.6 Standby Display....20
6. USB ......21
Cleaning....24
Troubleshooting....25
Glossary 26
Safety Instructions
This STB has been manufactured to satisfy the international safety standards. Please read the following safety precautions carefully.
MAIN SUPPLY
:AC 100/240V, 50/60Hz, 30W.
OVERLOADING
:Do not overload a wall outlet, extension cord or adapter as this may result in fire or electric shock.
Ensure that the power source (socket) is easily accessible.
LIQUIDS
:This STB shall not be exposed to dripping or splashing and that no objects filled with liquids, such as vases, shall be placed on the STB.
CLEANING
:Disconnect the STB from the main supply before cleaning. Do not use any kind of solvents to clean the STB, only use a soft-dry cloth.
VENTILATION
:The slots on top of the STB must be left uncovered to allow proper airflow to the unit.
Ensure a minimum distance of 5cm around the apparatus for sufficient ventilation.
Ensure that the ventilation is not impeded by covering the ventilation openings with items such as newspapers, table-cloths, curtains, etc.
Do not stand the STB on soft furnishings or carpets.
Do not expose the STB to direct sunlight or do not place it near a heater.
Do not stack electronic equipments on top of the STB.
Do not place naked flame sources, such as lighted candles on the apparatus.
ATTACHMENTS
:Do not use any unrecommended attachments as these may cause hazard or damage to the STB.
CONNECTION TO THE SATELLITE DISH LNB
:Disconnect the STB from the main supply before connecting or disconnecting the cable from the satellite dish. FAILURE TO DO SO CAN DAMAGE THE LNB.
CONNECTION TO THE TV
:Disconnect the STB from the main supply before connecting or disconnecting the cable from TV. FAILURE TO DO SO CAN DAMAGE THE TV.
EARTHING
:The LNB cable MUST BE EARTHED to the system earth for the satellite dish.
LOCATION
:Place the STB indoor in order not to expose to lightening, rain or Sunlight. Use the apparatus only in moderate climates (not in tropical climates).
Battery handling
:Batteries may contain toxic agents that are hazardous to the environment. Therefore, dispose of the batteries immediately according to the prevailing statutory regulations. Never throw the batteries in normal household waste.
General Introductions
INTRODUCTION
This manual will help you learn basic functions such as installation, selecting channels and many other functions of the STB. All functions can be operated by the remote control. You can easily install it by selecting "Installation" function and upgrade its software through communication cable.
The remote control is designed for easy access to all the functions at once and for comfortable grab for your hand. It is programmed to control all functions and to easily watch TV and Radio programs via the STB.
WARNING!!!
Any problems can be caused by the use of unofficial software. The use of software versions other than dealers or distributors official software will void the manufacturer's warranty. It is advised that only the formal software released from dealers or distributors should be used.
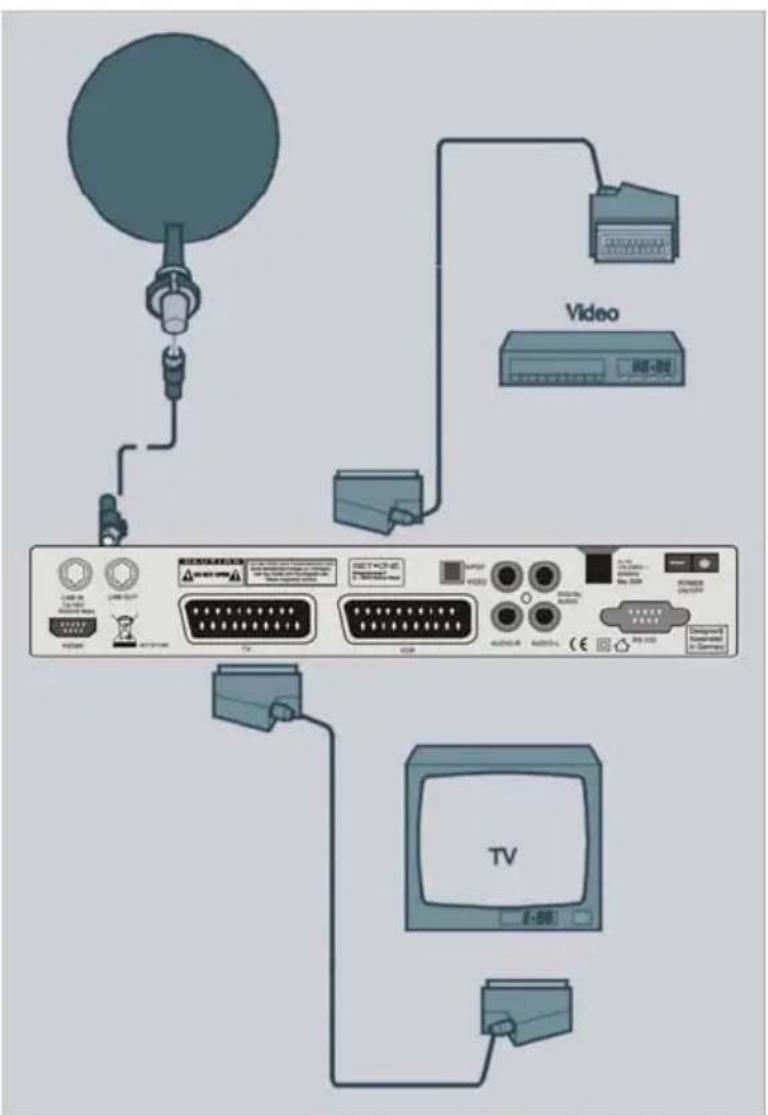
Front Panel/ Rear Panel
Front Panel
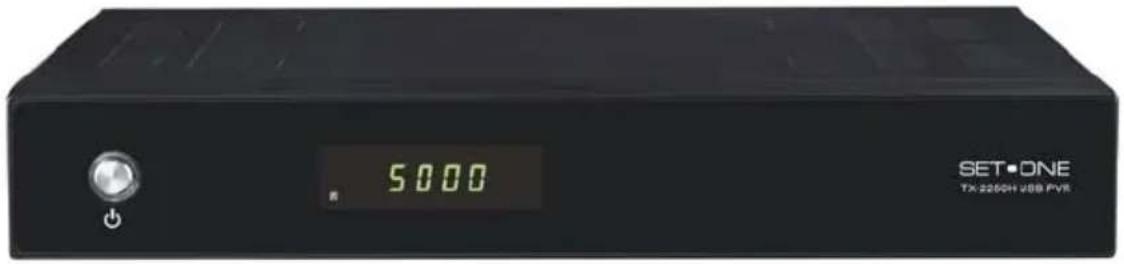
Press to switch between operation and standby modes Rear Panel
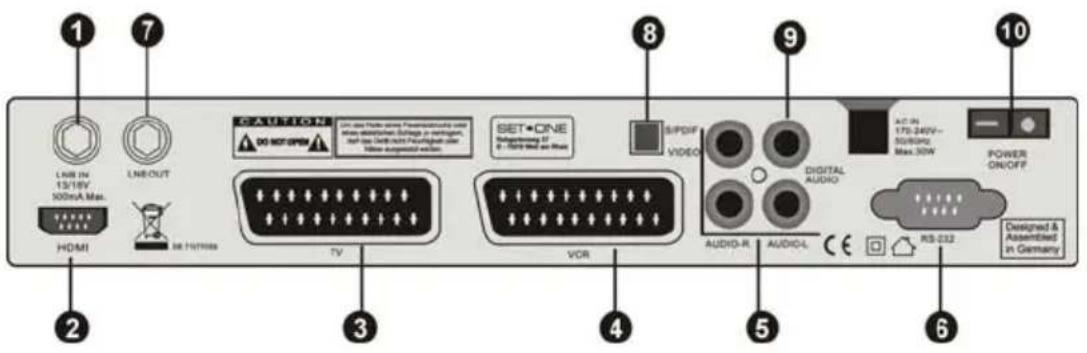
| No. | Symbol Function | |
| 1 | LNB INPUT | Use to connect an antenna. |
| 2 | HDMI | To connect the high definition media interface output to HDTV. |
| 3 | TV SCART | For the video/audio input of the TV. |
| 4 | VCR SCART | For the video/audio input of VCR. |
| 5 | A/V RCA: | To connect the Audio/Video RCA output to TV. |
| 6 | RS-232 | Use it when connecting to your PC. |
| 7 | LNB OUTPUT | Use it when connecting to another STB. |
| 8 | SPDIF SPDIF audio format output system. | |
| 9 | Digital Audio SPDIF format sound by coaxial and optical output | |
| 10 | POWER Power ON/OFF switch. | |
Remote Control Unit
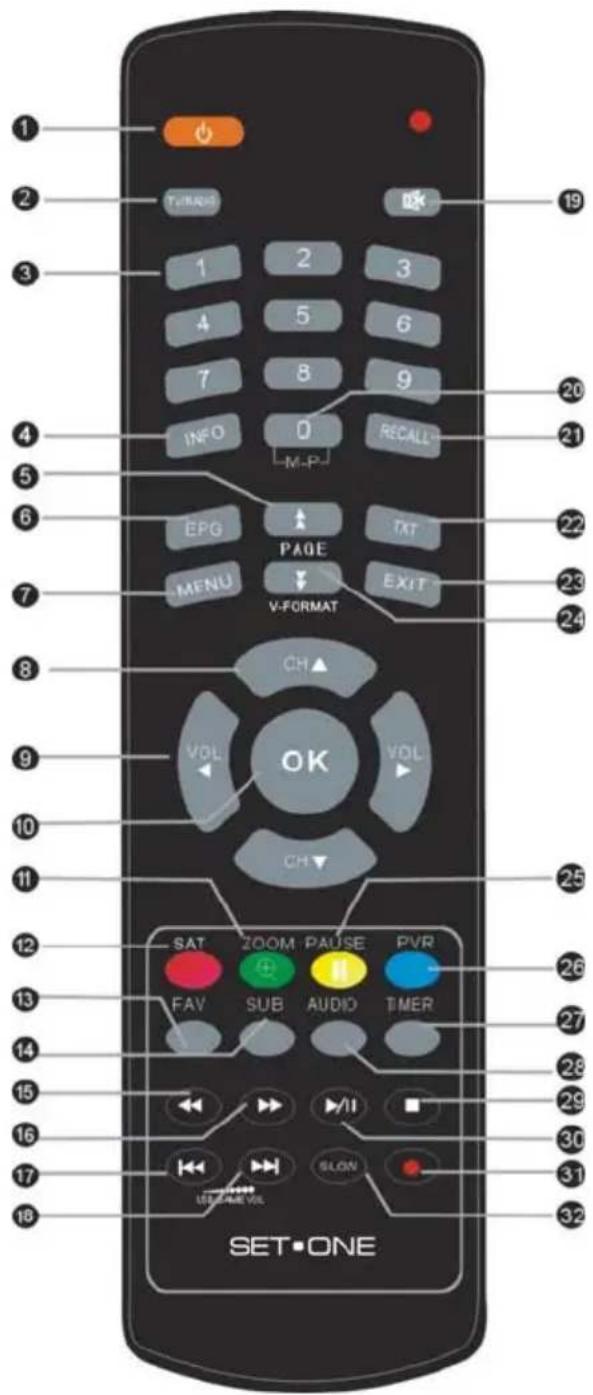
| No. | Symbol | Function |
| 1 Switches between Operation and Standby modes. | ||
| 2 TV/RADIO Switches between TV and Radio modes. | ||
| 3 0~9 Changes channels or selects the menu options. | ||
| 4 INFO Displays the program information box on the screen. | ||
| 5 Pg UP Press to jump one page up | ||
| 6 INFO Displays the program information box on the screen. | ||
| 7 MENU Moves to main menu during TV viewing. | ||
| 8 | CH ▲ /▼ | Changes channels or items from top to bottom on the menu. |
| 9 | VOL ◀/▶ | Turns up/down volume.Changes the page of channel list. |
| 10 OK Displays the channel list and selects the item on the menu. | ||
| 11 ZOOM Press to Zoom-in and Zoom out picture. | ||
| 12 SAT To display SAT list. | ||
| 13 | FAV | Selects favorite channel list or current channel list in the view mode In Edit Channel mode“Add favorite”menu it changes the right window channel list. |
| 14 | SUBTL | Subtile functions |
| 15 BACKWARD Speed back while USB Media playing | ||
| 16 FORWARD Speed up while USB Media playing | ||
| 17 FORMER Turn to the former file while USB Media playing | ||
| 18 FORWARD Speed up while USB Media playing | ||
| 19 MUTE Turn off volume | ||
| 20 MULTI PICTURES MULTI -PICTURE | ||
| 21 RECALL Press to jump to previous channel. | ||
| 22 TXT Displays TXT information broadcasting from satellite. | ||
| 23 NEXT Press to skip the playing file to play the next file | ||
| 24 PAGE DOWN Press to jump one page down or change EPG program list down. | ||
| 25 PAUSE Pauses to freeze the screen | ||
| 26 | PVR LIST | Press to show recorded file list |
| 27 | TIMER | Enter into Wake-up timer menu |
| 28 | AUDIO | Changes audio mode to left right and stereo. |
| 29 | STOP | Press to stop file playing, and back to menu |
| 30 | PLAY/Pause | Press to play USB Media, such as Movie; Music; Photo |
| 31 | REC | Start recording |
| 32 | SLOW | Slow down playing speed to be 1/2, 1/4 of normal. |
S.T.B Connection
Various equipment and TV/VCR can be connected to STB.
This manual will explain common ways to connect to the equipment.
If you experience any problem, please contact your sales agency.
1. Operations
In the menus you navigate with the keys ▲, ▼, ▶, ◀. Selected menu options are marked. With the OK key to selec. With the EXIT key you can back into the previous menu, and/or leave you the main menu. Changes must be confirmed additionally. Beyond that in further submenus the number keys are needed.
In each menu bottom, a help info is indicated to you, which offers also all possible options.
Example: Receiver to summer time setting.
Key „MENU“, „User settings“ Select „Local time setting “select with key OK, in the point „summer time“ to switch from OFF to ON position. Press EXIT key to save and exit.
1.1 Switching on the Receivers
Switch the equipment on by the power switch on the real panel.
1.2 Standby mode:
Press „Power“ keys on front panel or remote control unit, to make the receiver in the „Standyby“ mode.
With renewed manipulation of the “power” key the Receiver becomes again to working mode.
In order to switch the Receiver off completely, pls power off it at the real panel power switch.
1.3 Channel changing
In the TV or radio mode, you can change the channels with the CH▲, CH▼ - keys
1.4 Volume adjusting
In the TV or radio mode, you can adjust the volume high or low with VOL◀, VOL▶ - keys
1.5 Channel number
In the TV or radio mode, you can select the channels with 0\~9 keys and confirm with „OK“-key. To get a channel directly which you want.
1.6 Mute (audio muting)
By pressures “Mute” key one or two times, it can make the audio on or off.
1.7 SUBTL (Subtitle, German: Sub-title)
In and fade out from sub-titles (if offered by the transmitter)..
1.8 INFO
By pressures of the “info” – key, to open an information window in that shows the current channel information. By repeated pressing of the „info “key you receive further information to straight related program (if offered by the transmitter)
1.9 AUDIO
By pressures of the :audio" key you can select with ◀/▶ keys the desired language or the desired mode (Stereo/left/right/mono).
1.10 M-P (multi-program preview)
With the key „MP “can call you a multiple TV channels preview with several transmitters. On picture of the current channel is live. From the other transmitters only „a snapshot “are represented.
You can change marked program with the keys ▲, ▼, ◀ and ▶, in order to then see the picture running in each case. With the ok key you will retrun at full image mode of the selected channel.
1.11 TXT
Teletext is an information system, which indicates pages on your television set. For the Teletext receipt the selected transmitter must support this function. With the program change the TXT information is provided to you, if Teletext is supported by the transmitter. To switch on Teletext, please press „TXT“- key. If you liked to again switch the Teletext off, press „EXIT“- key.
1,12 EPG
Electronics Program Guide (EPG)
By press the EPG key to open 7 days program guide if the program supports the EPG.
1,13 Program list (red key)
With the ok key you can call the program list in the normal operation.
With the red key you can enter into the advance program list.
With the direction keys you can navigate in the list.
By renewed the red key, you can sort the program according to satellites list.
With the Green key, you can sort the channels with the channel name A\~Z.
Through the yellow key, you can sort the channels by transponders list.
Through the blue key, you sort the channels according to different coding embedded systems list.
1.14 TV/RADIO
In order to change to the radio channel, pleas press “TV/Radio” key. By repeated press this key again back to the TV channels.
1,15 Favorite list
By press „FAV“ –key, the preset groups of favorites will be opened. With ▼/▲ keys you can select a favorite list and with the “OK” - key to play it.
1,16 Recall
Through press „RECALL “- key, you change back to the previous channel you watched.
1.17 REC and STOP
By pressing the "REC"-key, you can start to record the program you are watching. And pressing "STOP"-key, the recording will be finished.
1.18 PVR
Pressing "PVR"-key, you can select recorded file and press "OK"-key to preview. In order to be able to use the following settings possibilities, please press „MENU “key at your remote control unit.
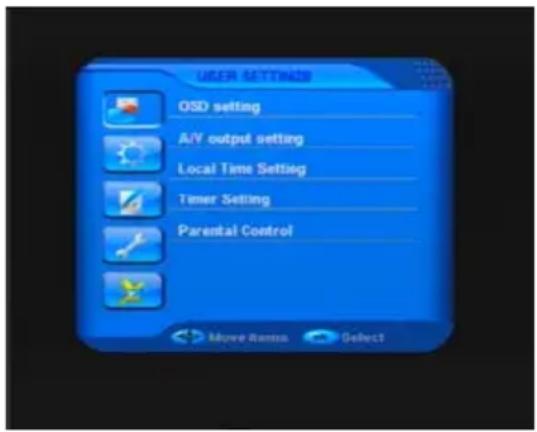
2. User Settings
In this menu option you can make different settings as for example video output
format, Local time setting or Timers.
The following submenus are available thereby:
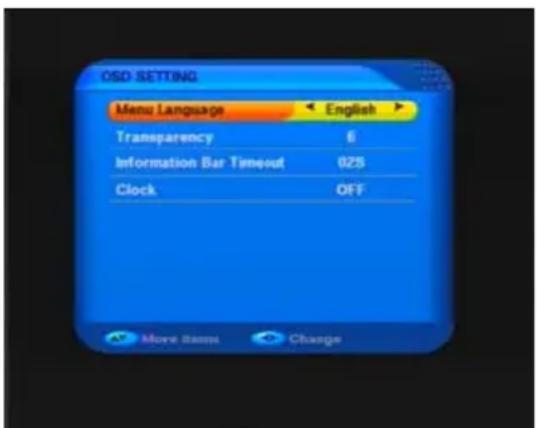
2,1 OSD setting
In this menu option you can edit the OSD menu of the Receivers
Menu language
Select here from the available menu language.
Transparency
Select the transparency degree of the OSD menu here
Information Bar Timeout
Select the display time of the program info bar here.
2,2 A/V output setting
In this menu option you can co-ordinate the representation of the television picture with your TV-equipment.
TV-type: Select it here the output format that your color television set supports. To select from PAL, NTSC, SECAM or AUTOMATIC.
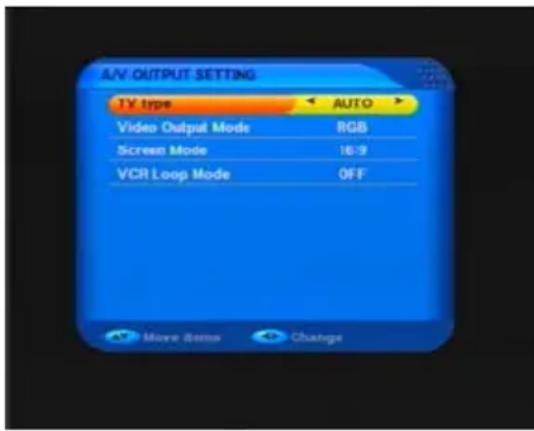
Video output mode: Select the video
output mode of your Receivers here. To select between RGB and CVBS.
Screen mode: Select here for your Receiver's with screen mode in 4:3 or 16:9. Over the key „16: 9 “on your remote control unit, it also can switch the screen mode in the current program
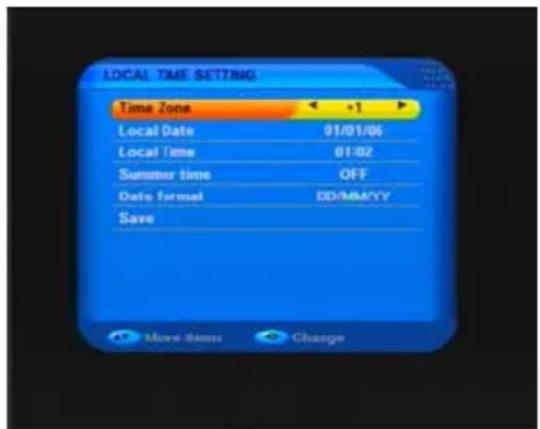
2,3 Local time setting
In this menu option you can set the time of your Receivers to your location
GMT time Zone
Set the receiver time in your location here at the world time (set for Germany, Austria or Switzerland is the position „+1“).
Enter now the date and the time via of the number keys at your remote control unit.
Summer time
Switch here depending upon summer time on or off.
2,4 Tmer setting
They can program the Receiver in such a way that he switches at the desired
time to a certain channel. Up to ten timer functions are possible. You can use this function, in order to take up e.g. by video recorders a transmission.
Timer number
They can program independent timers up to 8, select with the direction keys VOL◀ and VOL▶ the timers number, which you would like to program.

Timer control
There are total 3 types of Timer type: Start time only; Stop time only; Both on; or Off.
Repeat mode
Select yourselves here whether the timer uniquely, daily or is to repeat weekly.
Start time
Input Start date and Start time by pressing numeric keys on RCU, when the time begin, if the STB is working, and it will change automatically to the preset channel, if STB is power off, it will automatically power on and change to preset channel too
Stop time
Input Stop date and Stop time by pressing numeric keys on RCU, when the time finish, the STB will automatically power off.
Channel
To set the channel which you would like Timer to be execute for.
TV/radio
Select here whether the Receiver on a TV, or on radio channel.
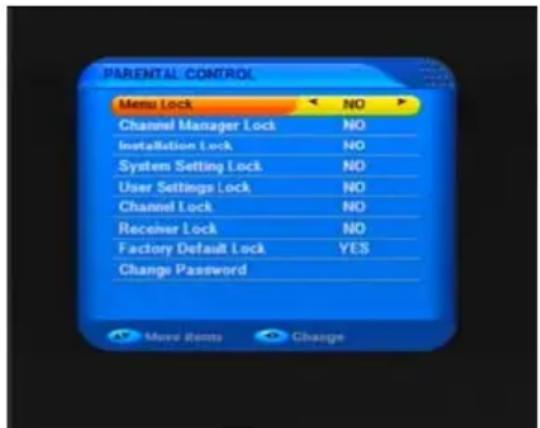
2,5 Parental Control
In this menu you can assign, which menu options to be password-protected and only after input of the pin number to be used. (Pin number in factory setting is: "0000")
2,6 Local Games
Here the STB provide you games etertainment with TETRIS and SNSAKE. Enjoy it with your RCU.
3. Installation
Please select the menu option "installation" (pin code: 0000 if requested). In this menu you can work on your antenna setting and make further settings to your satellite reception.
With the direction keys CH ▲ and CH▼ you can navigate them in the menu, with the key "OK" you can select a menu option, and you can use the "EXIT" or "MENU" key to return to the menu.

The transitter data are presetted. Adjust these settings only, if you know the exact values and know well with satellite transmission technology.
3.1 Scan
In this menu option you can make simply scan by Satellite Scan, TP Scan, and Blind Scan
3.2 Antenna setting
In this menu option you can simply set your Receiver to the satellite as you wished. The following parameters can be edited: LNB type; Frequency; DiSEqC; LNB power.
With the keys VOL◀ and VOL▶ you can enter your desired values, then to confirm with "OK" key thereby the values to be saved.

Satellite
In the right column you can select a satellite from the pre-programmed ones (There is only the receptable satellites, to which your satellite is aligned)
LNB Type
Here you can select the LNB type which can be used by your receiver (standard: Universal).
The usual standard settings for the respective used LNB type are deposited for all further menu options.
Scan
To select "scan" (red key) to start the searching. In the following submenu of it you should first select what kind of the search function for the selected satellite: FTA (Free To Air)/ FTA + NIT / ALL / FTA + NIT
3.3 Satellite list
The following menu options are for you to deal with the satellites:
Satellite add
Select this menu option you can add a new satellite into your list. Pressing the
yellow key, and then you are given a new satellite list which are ranked alphabetically. With the key VOL▶ you can reach and choose the appropriate degree of longitude as well as the east/west. And press the key "OK", the new satellite is added.
Satellite edit
In this menu, you can view the satellite information, and edit the satellite by Rename and Modify Using the "Vol" or numeric buttons.
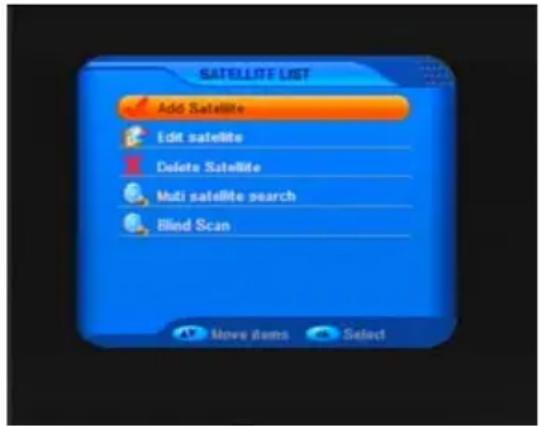
Satellite delete
Select this menu option and choose the satellite which you want to delete in your satellite list. Press the yellow key and confirm in the following menu, the satellite is deleted.
3.4 Transponder list
In this menu option you can scan, edit, add or delete the individual transponders of a satellite. With the keys CH▲, CH▼, you can navigate the transponders in the transponder list. Through pressing the red key, you can deal with the selected transponder in all sub-menu options after transmitters search.
Transponder add
Press the yellow key to add a new transponder. Enter the following menu and select the correct frequency, symbol rate and polarization of the new transponder. Press "memory" to add the new transponder to the transponder list.
Transponder edit
Press the yellow key before you edit the selected transponder. Enter the following menu and choose the correct frequency, symbol rate and polarization of the transponder. Select "memory" to save the new transponder data.
Delete
Press the yellow key to remove the selected transponder from the list.
3.5 Setup Motor and USALSetup
If your dish hardware supported, you can make the appropriate setting here. These settings should be made only by the specialist with appropriate expertise.
4. Channel Manager
You can easily access to any TV and Radio programs by the variable functions available from this STB, and enjoy your digital entertainment TV fun.
4.1 Edit Channels
Press Red button, to Rename
4.2 Delete channel
Select the channel you want to delete, and you press the red key to mark it as
delete. Then please press yellow key to delete finally all marked channles here.

4.3 Move channel
In order to move a channel, you mark the channel with the red key, which can be moved. Press afterwards the yellow key and it appear an inquiry on which program place the selected channel to be moved. Enter the program number and press OK to move the channel.
4.4 Skip channel
In order to skip a channel, you mark the channel with the red key, which can be skipped. Press afterwards the yellow key and the channel will be skipped.
4.5 Lock channel
Select the channel you would like to lock. Press the red key and afterwards yellow key to lock it.
4.6 Set Favorite
The easy to use function of Set Favorite enhance the flexibility of operating huge amount of TV and Radio Channels in your STB. Personalize it with your own way of interests can increase the joy of Digital Entertainment.
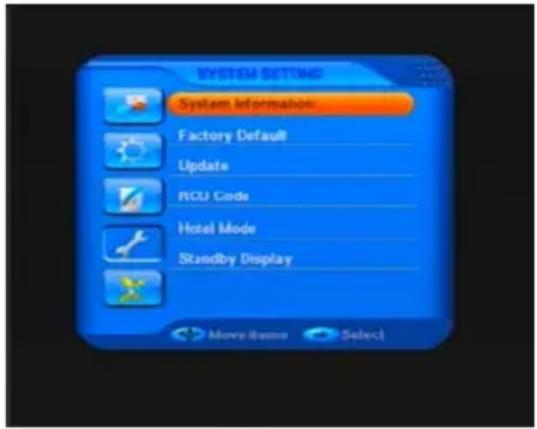
5. System Setting
5.1 System Information
Here you can see which software up-to-date on your Receiver are.
5.2 Factory Default
In this menu you can put the Receiver back into the ex-factory status. All by you made settings and stored data are deleted (e.g. program list, favorite list etc.),
5.3 OTA Update
In this menu you can upgrade your receiver with available newest software to keep you receiver up to date. It options for OTA(=Over the air) directly from satellite download
OTA: In this menu option you can get the newest software on your Receiver. The software is downloaded over the satellite Astra 1E.
Don't change anything in the preset parameters.
Select the point „update“, which looks for Receiver now whether there is an updated software-Version for your Receiver. If the message comes „OK“ you has already the newest software on your Receiver, terminate the Download with „exit“ - key.
5.4 RCU code (optional)
If you want to operate several Receiver of this type with a remote control unit, you can specify in this menu option, to which switch position to your remote control unit of the Receiver is to react. You find the change over switch in your remote control unit underneath the batteries (covers open). This function is available only optionally.
5.5 Hotel Mode
If you place this mode „on“, according to standard all menu options are password-protected.
5.6 Standby Display
Here you can set whether your Receiver indicates the current time to mode in the display during the Standby, or whether nothing the display is to indicate.
6. USB
This function and MENU only available when you plug your USB device to your STB.
With the USB2.0 interface, you will have a wonderful media life with your receivers.
Supported Device:
1) Most of popular USB2.0 Hard Drive Disk can be supported by our STB, however due to there are too many types of HDD available in the market, if you find one particular HDD can not work with our STB, please kindly provide it to us, and we will be happy to solve it for you in shortest time.
2) System required: FAT32
3) Speed required: 5400rpm
Instructions to TV program
1) Any SD TV program (Standard Definition) with a bit rate lower then 6Mbps can be recorded by this STB.
2) During recording, EPG; TXT; Multi AUDIO functions can not be operated.
3) Recorded TV program will not support EPG: TXT: Multi AUDIO.
Recording Capacity
1) Our STB can support up to 4 partition of one HDD, and theoretically each partition can allow up to 2TByte (2,000Gb), however, we suggest to use one HDD with each partition not bigger than 120Gb
2) Each recorded video file will not bigger than 3.8Gb (Approx 4 hours), the STB will automatically create new video file to continue recording your TV program if the recorded video file is bigger than 3.8Gb.
WARNING
USB1.1 or USB2.0 Key or Stick (Including MP3 player)
1) We strongly suggest not to record any TV program by USB Key or Stick, because a huge of different USB Key or Stick are indeed available in the market with different quality level, we do not guarantee any damage of your USB Key or Stick from the attempting recording.
2) Do not remove your USB device from STB while it is in use of any USB multimedia function.
6.1 PVR Preview
In PVR preview menu, select recorded file, and press "OK" to preview. Press Yellow button turn to delete all the programs you recorded. Press BLUE button to rename the program.
6.2 PVR Partition Select
Usually there are several partition available in HDD, and our STB can allow you to choose different partition for recording purpose, choose from PVR partition select menu, menu of Device List will pop-up, it lists all partitions your HDD has, choose the one you want, and press OK button to save. Then the recorded video file will be stored into this partition.
6.3 USB Media
Music
Go to USB music menu, choose path to music files, select one and press "USB Play" or "OK" button to start play. Press "Exit" or "USB Stop" to stop and back to music menu.
Picture
Go to USB pictures menu, choose path to photo files, for the picture selected, there is preview in right side, and use "OK" button to full screen display. Press "Exit" or "USB Stop" to stop and back to picture menu.
Movie
Go to USB movie menu, choose path to video files, select one and press "USB Play" or "OK" button to start full screen play. Press "Exit" or "USB Stop" to stop and back to movie menu.
6.4 USB Game
Go to USB game menu, choose path to Native32 game files, select one and press “OK” to play. Press “Exit” or “USB Stop” to stop and back to USB Game menu.
USB Game become Black and White?
Solution: Make sure the STB TV type set to the same system (PAL; NTSC; AUTO, etc..) of TV Color system.
6.5 Software upgrade
Choose path to new software file, or channel data bin file which is saved in USB
device, select and press "OK" to proceed
6.6 Database backup
To use this function, you can backup your data setting/FAV/Channels to the USB devices. And then you can edit the data by S+ ChannelEditor.exe on the PC. And to download to your receiver by USB devices or RS232 cable.
Cleaning
Do not make any liquid into the Receiver. Never clean it with a wet cloth. Pull out the power supply plug from the outlet box before cleaning.
Note!
Do not use cleaning liquid such as gasoline or dilution. These means can damage the surface of the housing.
Clean the housing of the Receivers with a dry cloth.
Troubleshooting
When you found some problems about this STB, please check the table in below. Because these may not be any serious problems:
| Fault Phenomenon probably reasons Resolve | ||
| Power on, but no display on screen | Please carefully check the power plug, to see it is in socket of wall or not? Is power interrupted? | Put firmly the power plug to the socket on the wall. |
| Power on this STB, then that screen displays"No signal" | Is the aerial install correct? Reinstall the aerial and calibrate it | |
| LNB input is not connect Connect the LNB | ||
| The transmit station turns off | Attempt until the signal coming again | |
| The sky wave disturbs the device | Attempt again later | |
| The program setups are incorrect | Set the proper parameters of received program in the system settings menu | |
| STB plays a strange sound | Due to the channel contain more audio tracks or audio languages | User can use the “Audio” button on the RCU to select the correct audio track or audio languages |
Tips: If you refer to this troubleshooting, but no resolve that problem you encountered. Please contact the local dealer or technical support instantly, do not open the machine, because that is very dangerous to you or to the machine in that cases.
Glossary
(1) 22KHz switch
A tone that can be sent via the LNB coax, this tone can control the LNB or switches on the coax cable. Do not interfere with the DC or 22KHz tone that the receiver sends to the dish.
(2) Antenna
A device that collects and radiates electromagnetic waves includes a satellite dish and a broadband antenna.
(3) CVBS
Composite Video Baseband Signal, Standard single-wire video, mixing lum and chroma signals together.
(4) DiSEqC
Digital Satellite Equipment Control, a protocol established by EUTELSAT organization www.eutelsat.com, the most popular standard are DiSEqC 1.0 for Switching solution, DiSEqC 1.2 for Dish actuator solution, and DiSEqC 2.0 for Satellite Receiver solution.
(5) Forward Error Correction (FEC)
A system of error control for data transmission
(6) Frequency
The number of cycles or events per one second, which is expressed in the unit of Hertz(Hz)
(7) Intermediate Frequency (IF)
A frequency to which a carrier frequency is shifted as an intermediate step in transmission or reception
(8) Low Noise Block (LNB) Downconverter
A low noise microwave amplifier and converter which downconverts a range of frequencies to IF range
(9) NTSC
National Television Standards Committee, a video standard established by the United States (RCA/NBC) and adopted by numerous other countries.
(10) PAL
Phase Alternate Line, a video standard used in Europe and other parts of the world for composite color encoding.
(11) Packet Identifier (PID)
A set of numbers that identifies transport stream packets containing data from a single data stream
(12) Polarization
Satellite waves are polarized. They can be linear or circular. Linear polarity is Vertical or Horizontal, circular polarity is Right-hand and Left-hand circular polarity.
(13) Quaternary Phase Shift Keying (QPSK)
Phase-shift keying in which four different phase angles are used.
(14) RF
A frequency that is useful for radio transmission, usually between 10KHz and 300,000Mhz.
(15) RGB
Video information in the form of Red, Green and Blue tristimulus values, The combination of three values that representing the intensity of each of the three colors can represent the entire range of visible light.
(16) STB
Set Top Box, another common name of Digital Satellite Receiver, because it usually be put on top of TV in household. This word is used now worldwide.
(17) Symbol Rate
The amount of data transmitted every second.
(18) Transponder (TP)
Equipment in a satellite which receives a single uplink channel from a satellite earth station, amplifies it, converts the frequency and changes the polarization, then broadcasts it back to earth.
(19) Transport Stream
The bit stream formed prior to transmission of signals by combining the video, audio and data streams of one service. It consists of fixed length packets of 188 bytes of data.
Dear Customer!
We offer you our telephone HOT LINE with professional help. This will give you expert tips council and fast to locate a possible source of error. If talking out that it is indeed a defective device, you will be asked to return the device for repair with a precise description of the error. Please note that unjustified claims for you are not free of charge!
Thank you very much.
HOT-LINE:
Tel.: 01805 - 342 000 (€ 0,14/Min.)
Service-Time: 8.00 a.m. to 11.00 p.m.
SetOne GmbH
Rebgartenweg 27
D-79576 Weil am Rhein
Internet: www.setone.eu
E-Mail: service@setone.eu
Thank you for choosing one of our products.
This product complies with the legal standards and is manufactured under constant quality control.
The technical specifications are up-to-date at the time of printing.
Subject to changes without prior notice.
V1.00