
IC3116W - Surveillance Camera Edimax - Free user manual and instructions
Find the device manual for free IC3116W Edimax in PDF.
| Product Type | Wireless IP Surveillance Camera |
| Brand and Model | Edimax IC3116W |
| Maximum Video Resolution | 640 x 480 pixels (VGA) |
| Supported Video Formats | H.264 and MJPEG |
| Network Connection | Wi-Fi 802.11 b/g/n and Ethernet 10/100 |
| Configuration Method | EdiLife App (iOS/Android), EdiView Finder (Windows/Mac), WPS |
| Night Vision | IR LED with auto switching |
| Motion Detection | Yes, with customizable zones and scheduling |
| Event Notifications | By email (SMTP), FTP, push to smartphone (EdiLife), HTTP |
| Local Storage | On NAS server (via network) |
| Digital Zoom Function | Yes |
| Image Rotation | 180° |
| Remote Viewing | Via Edimax Plug & View Cloud or Cloud ID |
| Power Supply | AC adapter (voltage not specified) |
| Power Consumption | Not specified |
| LED Indicators | LED indicators: Power, LAN, Internet |
| Reset | Press and hold WPS/Reset button for 10 seconds |
| Cleaning and Maintenance | Wipe with a soft dry cloth, avoid liquids |
| Security | Password authentication, anonymous connection possible, WPS |
| Spare Parts and Repairability | Not applicable (electronic device not user-repairable) |
Frequently Asked Questions - IC3116W Edimax
User questions about IC3116W Edimax
0 question about this device. Answer the ones you know or ask your own.
Ask a new question about this device
Download the instructions for your Surveillance Camera in PDF format for free! Find your manual IC3116W - Edimax and take your electronic device back in hand. On this page are published all the documents necessary for the use of your device. IC3116W by Edimax.
USER MANUAL IC3116W Edimax
No. 278, Xinhu 1st Rd., Neihu Dist., Taipei City, Taiwan
Email: support@edimax.com.tw
Edimax Technology Europe B.V.
Fijenhof 2, 5652 AE Eindhoven, The Netherlands
Email: support@edimax.nl
Edimax Computer Company
3350 Scott Blvd., Bldg.15 Santa Clara, CA 95054, USA
Live Tech Support: 1(800) 652-6776
Email: support@edimax.com
Copyright @ Edimax Technology Co., Ltd. all rights reserved. No part of this publicaon may be reproduced, transmied, transcribed, stored in a retrieval system, or translated into any language or computer language, in any form or by any means, electronic, mechanical, magnec, opcal, chemical, manual or otherwise, without the prior written permission from Edimax Technology Co., Ltd.
Edimax Technology Co., Ltd. makes no representaons or warranes, either expressed or implied, with respect to the contents hereof and specifically disclaims any warranes, merchantability, or tness for any parcular purpose. Any soware described in this manual is sold or licensed as is. Should the programs prove defective following their purchase, the buyer (and not this company, its distributor, or its dealer) assumes the enre cost of all necessary servicing, repair, and any incidental or consequential damages resulting from any defect in the soware. Edimax Technology Co., Ltd. reserves the right to revise this publicaon and to make changes from me to me in the contents hereof without the obligaon to nofy any person of such revision or changes.
The product you have purchased and the setup screen may appear slightly dierent from those shown in this QIG. For more informaon about this product, please refer to the user manual on the CD-ROM. The soware and specicaons are subject to change without noce. Please visit our website www.edimax.com for updates. All brand and product names menoned in this manual are trademarks and/or registered trademarks of their respective holders.
Edimax Technology Co., Ltd.
Add: No. 278, Xinhu 1st Rd., Neihu Dist., Taipei City, Taiwan
Noce According to GNU General Public License Version 2
Certain Edimax products include soware code developed by third pares, soware code is subject to the GNU General Public License ("GPL") or GNU Lesser General Public License ("LGPL"). Please see the GNU (www.gnu.org) and LPGL (www.gnu.org) Websites to view the terms of each license.
The GPL Code and LGPL Code used in Edimax products are distributed without any warranty and are subject to the copyrights of their authors. For details, see the GPL Code and LGPL Code licenses. You can download the rmware-les at http://www.edimax.com under "Download" page.
V-3-1-3. Audio....84
natural_image
Simple line drawing of a circular mechanical component with six holes, labeled 'KOIMAX' at the bottom (no other text or symbols)IC-3116W

text_image
EXIMAX Quick Installation GuideGIR

natural_image
Simple illustration of a CD or DVD disc (no text or symbols)CD-ROM
natural_image
Line drawing of a medical or scientific device with coiled cable and connector (no text or symbols)Adaptateur secteur

natural_image
Line drawing of a coiled hose with two connectors (no text or symbols)Câble Ethernet
natural_image
Simple circular diagram with four evenly spaced circles at the center (no text or symbols)Kit de montage

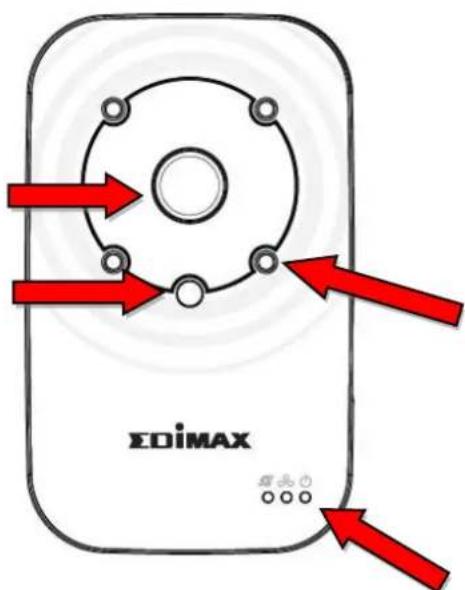
I-2. Panneau avant
Objecf
Capteur de
text_image
EDiMAXLED infrarouges
Voyants
text_image
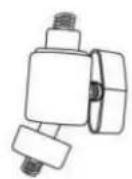
Technical diagram showing assembly of a device with labeled ports and components, including a connector and mechanical assembly.natural_image
Line drawing of a hand inserting a USB into a device casing with ports and connectors (no text or symbols)
text_image
ANDROID APP ON Google play Download on the App Store EDIMAXtext_image
EditLife Add New Device Available wireless device list Available device list TEST-3210W TEST5220 TEST5230 Add new device with QR code generatedtext_image
Add New Device Choose a device... Available wireless Device list Get Wifi list need permission and GPS on OK Test Show Add new device with QR code generated
text_image
Add New Device Choose a device... Available wireless device list Allow EdiLife to access this device's location? Don't ask again DENY ALLOW Add new device with QR code generatedtext_image
To continue, turn on device location, which uses Google's location service Your device will need to: Use GPS, Wi-Fi, cell networks, and sensors Use Google's location service; as part of this service, Google may collect location data periodically and use this data in an anonymous way to improve location accuracy and location-based services. This may change the location mode you've selected for your device. For details, go to the location settings. NO THANKS OKtext_image
Add New Device Choose a device... Available wireless device list EdiView Setup 37 EdiView Setup E7 Available device list test6220 test6230 TEST-3210W Add new device with QR code generatedtext_image
Wi-Fi Setup Due to Security, please change default configuration below New Device Name Name New password Password Confirm password Password Show password Done
text_image
Wi-Fi Setup Due to Security, please change default configuration below New Device Name Fisheye Cam New password .... Confirm password .... Show password Donetext_image
Wi-Fi Setup Wi-Fi Password SSID:chichi Please enter your Wi-Fi password ****** Show password Cancel OK JackwAP JackchenPlease wait a moment.
text_image
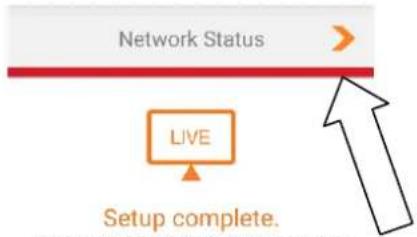
Network Status LIVE Setup complete.Your device has been installed successfully and will now disconnect from your phone.


text_image
EdiLife Fisheye Cam
text_image
Fisheye Cam

text_image
Mobile app interface screenshot showing navigation icons and a large upward arrow pointing to the right.
text_image
App info EdiLife Installed DISABLE FORCE STOP UNINSTALL App notifications Permissions Camera, Location, Microphone, and Storage Storage 20.08 MB used in internal storage Data usage 5.71 MB used since Sep 25 Battery 6% use since last full charge Open by default
text_image
Add New Device Choose a device... Available wireless device list Allow EdiLife to access this device's location? Don't ask again DENY ALLOW Add new device with QR code generatedIII-2. EdiView Finder

text_image
Setup Utility Multi-Language QIG Multi-Language User Manual 16-Channel Viewer Include Adidas Reader Exit EDIMAX Network Cameras www.edimax.com Contact Ustext_image
Setup - EdiView Finder Utility Welcome to the EdiView Finder Utility Setup Wizard This will install EdiView Finder v1.0.18 on your computer. It is recommended that you close all other applications before continuing. Click Next to continue, or Cancel to exit Setup. Next > Cancel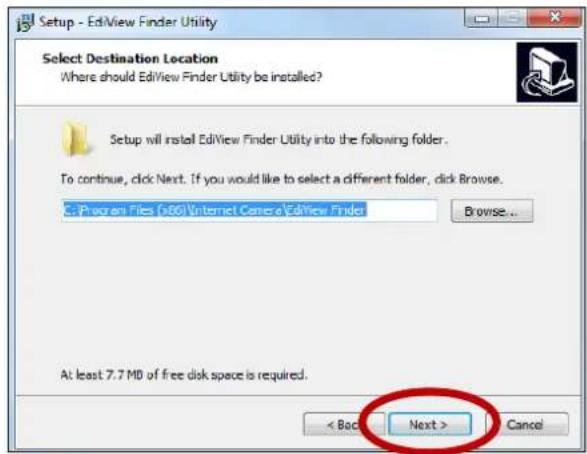
text_image
Setup - EdView Finder Utility Select Destination Location Where should EdView Finder Utility be installed? Setup will install EdView Finder Utility into the following folder. To continue, click Next. If you would like to select a different folder, click Browse. C:\Program Files\info\Internet\Cancel\EdView Finder Browse... At least 7.7 MD of free disk space is required. < Back Next > Cancel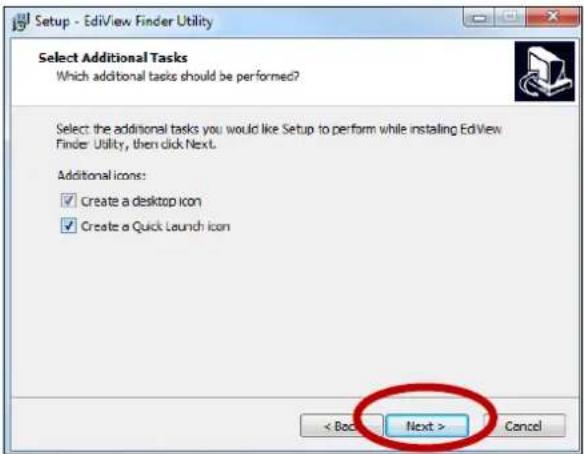
text_image
Setup - EdView Finder Utility Select Additional Tasks Which additional tasks should be performed? Select the additional tasks you would like Setup to perform while installing EdView Finder: Utility, then click Next. Additional icons: ✓ Create a desktop icon ✓ Create a Quick Launch icon < Back Next > Cancel
text_image
Setup - EdView Finder Utility Ready to Install Setup is now ready to begin installing EdView Finder Utility on your computer. Click Install to continue with the installation, or click Back if you want to review or change any settings. Destination location: C:\Program Files (x86)\Internet Camera\EdView Finder Additional tasks: Additional icons: Create a desktop icon < Back Install Canceltext_image
Setup - EdiView Finder Utility Completing the EdiView Finder Utility Setup Wizard Setup has finished installing EdiView Finder Utility on your computer. The application may be launched by selecting the installed icons. Click Finish to exit Setup. ✓ Launch EdiView Finder Utility Finish
text_image
EdView Finder Utilitytext_image
IDIMAX Camera Name: IC-010204 Model: IP Address: 192.168. 2.101 MAC Address: 00:11:09:01:02:04 English
text_image
Your camera is connected to the cloud. This is a wireless network camera. Do you want to set up a wireless connection? No Yestext_image
Please unplug your network camera's Ethernet cable. Click "Next" and wait 30 seconds for the program to detect the wireless connection. 1 Waitingtext_image
Please unplug your network camera's Ethernet cable. Click "Next" and wait 30 seconds for the program to detect the wireless connection. Connection detected Click "Next" to set the network camera's name and password. Nexttext_image
IC-010204 The network camera's setup is complete. You can access this network camera at the following. http://001109010204.myedimax.com OKIII-2-2. Mac

natural_image
Icon of a blue folder inside a red circle labeled 'Mac' (no additional text or symbols)text_image
EDIMAX Name: IC-010204 Model: IP Address: 192.168.2.101 MAC Address: 00:11:09:01:02:04 English
text_image
Obtaining IP address from DHCP server, please wait for a second... Success
text_image
Testing the cloud connection, please wait for a second... Successtext_image
EditView Finder Set up the camera name and password. Camera Name: IC-010204 Password: ...... Confirm Password: ...... Nexttext_image
EdiView Finder IC-010204 This camera has set up successfully. To access this network camera, you can use web browser with following URL: http://001109010204.myedimax.com Finishtext_image
EDiMAX Name: IC-010204 Model: IP Address: 192.168.2.101 MAC Address: 00:11:09:01:02:04 English Admin DHCP Static IP IP Address 192.168.77.198 Subnet Mask 255.255.248.0 Gateway 192.168.2.1 DNS 192.168.2.1 Cancel OK Advanced
text_image
WPS Routertext_image
EDIMAX Camera Name: IC-010204 Model: IP Address: 192.168.10.154 MAC Address: 00:11:09:01:02:04 http://192.168.10.154 Englishtext_image
. If you trust the website and the add-on and want to allow it to run, click here... Run Add-on Run Add-on on All Websites What's the Risk? Information Bar Help
text_image
Internet Explorer - Security Warning Do you want to run this ActiveX control? Name: Java(TM) SE Runtime Environment 5 Update 18 Publisher: Sun Microsystems, Inc. Run Don't Run This ActiveX control was previously added to your computer when you installed another program, or when Windows was installed. You should only run it if you trust the publisher and the website requesting it. What's the risk?text_image
Connect to 192.168.2.103 The server 192.168.2.103 at Network Camera requires a username and password. Warning: This server is requesting that your username and password be sent in an insecure manner (basic authentication without a secure connection) User name: admin Password: ****** Remember my password OK Canceltext_image
EDIMAX NETWORKING PEOPLE TOGETHER Live View Setup English Basic Network Wireless Dynamic DNS RTSP Date & Time Users UPnP Bonjour Video Events Storage Settings System Status Basic Select a category from the menu on the left side.text_image
Save settingsIV-1. Basique
| Basic |
| Network |
| Wireless |
| Dynamic DNS |
| RTSP |
| Date & Time |
| Users |
| UPnP |
| Bonjour |
text_image
192.168.2.101/m/index.asp EDIMAX NETWORKING PEOPLE TOGETHER English Live Basic Video Events Storage Settings System Status
text_image
192.168.2.101/m/basicmenu.as EDIMAX NETWORKING PEOPLE TOGETHER Basic Network Wireless Dynamic DNS RTSP Date & Time Users UPnP Bonjourtext_image
192.168.2.101/m/wireless.asp EDIMAX NETWORKING PEOPLE TOGETHER Wireless Wireless Connection: Enable Disable Available Network: Refresh Click "Refresh" to see available networks SSID: Authentication: None Encryption Type: None WPA Pre Shared Key:C

text_image
Available Network Refresh Click "Refresh" to see available networks Matt OBM_68U IBR-6208AC_2.4_high power OBM to LAN EdimaxHQ Edimax IP CAM_2.4G Edimax_Home EdiView.SetupEE OBM-SMB-2.4G OBM_WAP1750_G EdiView23D
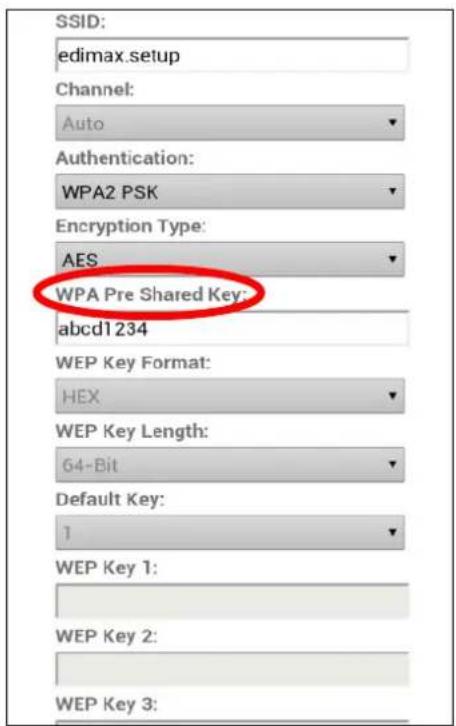
text_image
SSID: edimax.setup Channel: Auto Authentication: WPA2 PSK Encryption Type: AES WPA Pre Shared Key: abcd1234 WEP Key Format: HEX WEP Key Length: 64-Bit Default Key: 1 WEP Key 1: WEP Key 2: WEP Key 3: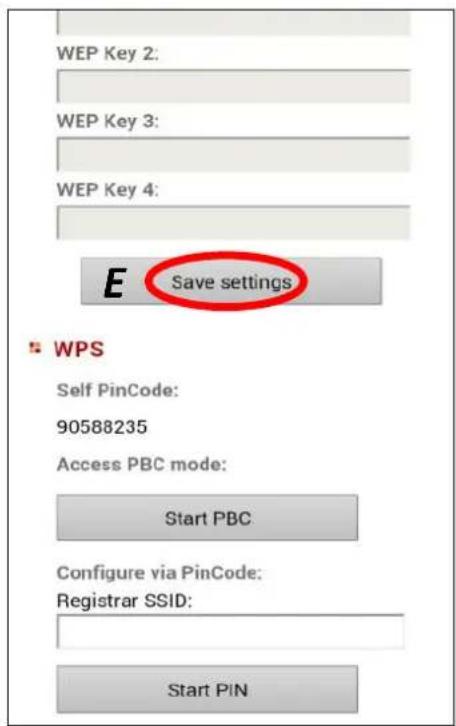
text_image
WEP Key 2: WEP Key 3: WEP Key 4: E Save settings WPS Self PinCode: 90588235 Access PBC mode: Start PBC Configure via PinCode: Registrar SSID: Start PINtext_image
Wireless A B Wireless Connection Available Network Enable Disable Refresh Click "Refresh" to see available networks Connected SSID BSSID Signal Channel Encryption Network Type edimax setup 00:E0:4C:81:96:C1 2 WPA2PSK(AES) Infrastructure EdimaxHQ 10:6F:3F:47:04:00 9 None Infrastructure EDIMAX IP Cam-2.4G 80:1F:02:2E:FE:81 5 WPAPSK(TKIP) Infrastructure OBM_AE 10:9A:DD:87:47:CF 11 WPA2PSK(AES) Infrastructure edimax SDINS 80:1F:02:00:00:09 - 1 WPASPSK(AES) Infrastructure SSID: edimax setup Authentication: WPA2 PSK Encryption Type: AES WPA Pre Shared Key WEP Key Format: ASCII - WEP Key Length: 64-Bit - Default Key: 1 - WEP Key 1: WEP Key 2: WEP Key 3: WEP Key 4: Save settingsSelf PinCode: 90588235
Access PBC mode: Start PBC
Configure via PinCode: Registrar SSID:
Start PIN
text_image
Mode: NTP Manual Setting Set Time & Date Manually: / / : : Synchronize to PC time NTP Server: pool.ntp.org Time Zone: (GMT) England Daylight Saving: Enable Disabletext_image
Edimax : Operator User List: User Name: Password: Confirm Password: Authority: Operator Guest Add Modify Remove Anonymous Login: Enable DisableIGD (UPnP Port Forward)
IGD Enable (UPnP Port Forward):
Enable Disable
IGD Configuration (External Port):
IGD Fully Automation (Auto) IGD Semi Automation (Manually)
External HTTP Port :
10000
External RTSP Port :
20000
text_image
• Video Video Settings Image Appearance Night Visiontext_image
Events Motion Detection NotificationUpload Event File to FTP :

Enable

Disable
Send Event File to Email :

Enable

Disable
Video Recording Time :
10 second

Save Video To Local Storage
Save Event Files to NAS or SD :

Enable

Disable
Video Recording Time :
5 Minute

Save settings
text_image
Detection Region Region 1 Region 2 Region 3 Sensitivity 90 90 90 Threshold 3 3 3 Savetext_image
Email Service Provider: SMTP Server: SMTP Port: Recipient Email Address: Sender Email Address: SSL/TLS: None SMTP Authentication: Enable Disable Account: Password: Save settings Send test emailtext_image
FTP Server: Username: Password: Port: 21 Path: Passive mode: Enable Disable Save settings SendVideo/Human motion alert:
Reconnected to Internet alert:

Enable

Disable

On

Off

On

Off
Save settings
text_image
List: MotionDetection Please select an item from the list below: MotionDetection Notification: Enable Disable URL: http:// : 80 / Method: GET POST Authentication: Enable Disable Username: Password: Timeout: 0 second Modifytext_image
Storage Settings Storage Directory Schedule Settings NAS SettingsPlease select storage directory:


Network Camera Name:
IC-010204
Administrator Password:

Confirm Password:

LED Indicators:

On

Off
Keep Network Settings
Default Settings
Reset to Default
MAC Address : 80:1F:02:ED:20:0F
HTTP Port : 80
Wireless LAN
Link Status : Connected
SSID : chichi
Channel : 1
Encryption : WPA2 PSKAES
Access Point MAC Address : 74:DA:38:03:61:50
IGD (UPnP Port Forward)
Link Status : UPNP port forward successful
External IP Address : 118.161.29.45
External HTTP Port : 13018
External RTSP Port : 18525
text_image
Log Level: 4 (Detail) Remote Log: Enable Disable Remote Log Server: Save settings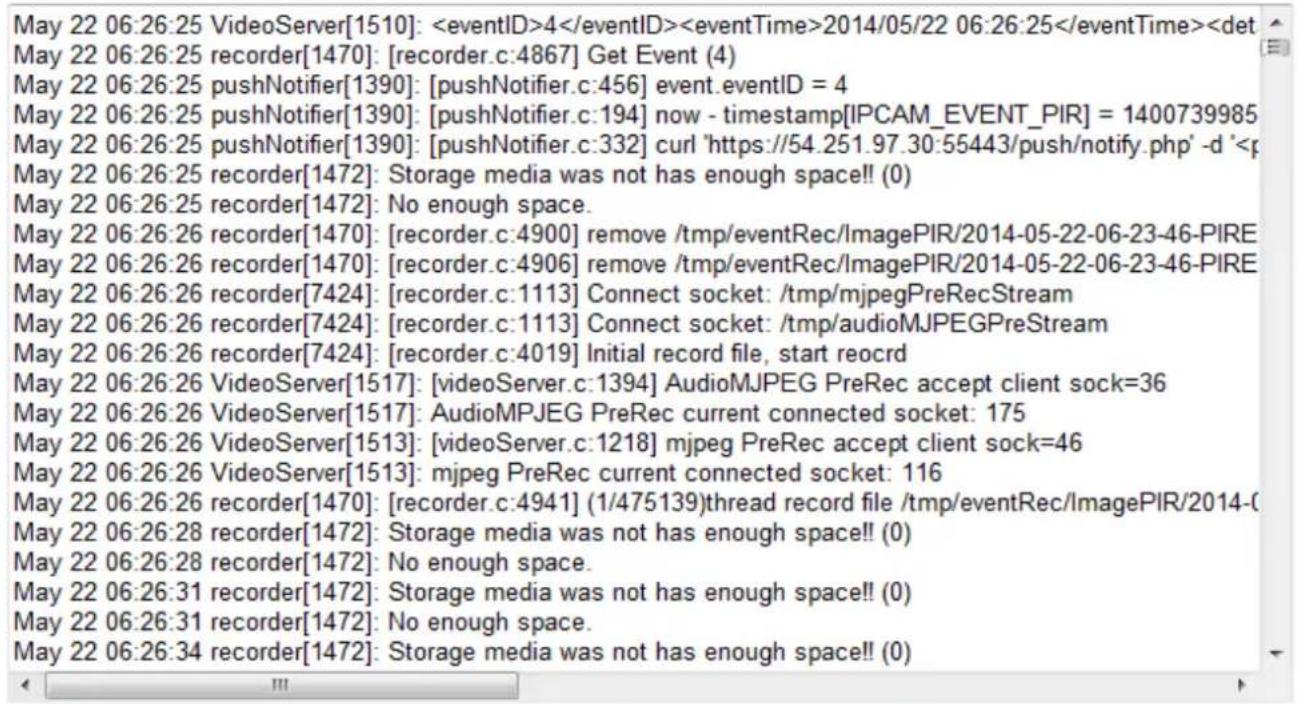
text_image
May 22 06:26:25 VideoServer[1510]:| Niveau journal | Séleconnez un niveau de détails pour le journal, allant de 0 à 4, à parr de la liste déroulante. 0 (le minimum) n'enregistre que les informaons criques, alors que 4 (le maximum) enregistre tout. |
| Journal déporté | Acvez ou désacvez la foncon journal déporté de la caméra réseau pour envoyer un journal vers un serveur déporté pour l'archiver. La caméra réseau est compatible avec les serveurs de journaux syslog. |
| Serveur de journal déporté | Saisissez l'adresse IP ou le nom d'hôte du serveur de journal que vous souhaitez uliser. |
V. 16 Channel Viewer pour Windows
Le logiciel de visualisaon 16 Channel Viewer fourni vous donne un accès puissant aux foncons de votre caméra réseau en plus de la capacité de visualiser et de gérer jusqu'à 16 caméras réseau en même temps.V-1. Installaon
1. Insérez le CD fourni dans votre lecteur de CD-ROM et si l'ulitaire de conguraon ne s'ouvre pas automaquement, veuillez rechercher et ouvrir le chier "Autorun.exe" dans le dossier "Autorun". 2. Cliquez sur "16 Channel Viewer" pour installer le logiciel ulitaire. text_image
Setup Utility Multi-Language QIG User Manual 16-Channel Viewer Includes Adobe Readertext_image
Setup - IPCam Surveillance Software Welcome to the IPCam Surveillance Software Setup Wizard This will install IPCam Surveillance Software 3.0.7.1 on your computer. It is recommended that you close all other applications before continuing. Click Next to continue, or Cancel to exit Setup. Next > Canceltext_image
Setup - IPCam Surveillance Software Select Destination Location Where should IPCam Surveillance Software be installed? Setup will install IPCam Surveillance Software into the following folder. To continue, click Next. If you would like to select a different folder, click Browse. C:\Program Files\Internet Camera\Viewer Browse... At least 18.0 MB of free disk space is required. < Back Next > Canceltext_image
Setup - IPCam Surveillance Software Select Additional Tasks Which additional tasks should be performed? Select the additional tasks you would like Setup to perform while installing IPCam Surveillance Software, then click Next. Additional icons: ✓ Create a desktop icon ✓ Create a Quick Launch icon < Back Next > Canceltext_image
Setup - IPCam Surveillance Software Ready to Install Setup is now ready to begin installing IPCam Surveillance Software on your computer. Click Install to continue with the installation, or click Back if you want to review or change any settings. Destination location: C:\Program Files\Internet Camera\Viewer Additional tasks: Additional icons: Create a desktop icon < Back Install Canceltext_image
Setup - IPCam Surveillance Software Installing Please wait while Setup installs IPCam Surveillance Software on your computer. Extracting files... Canceltext_image
Setup - IPCam Surveillance Software Completing the IPCam Surveillance Software Setup Wizard Setup has finished installing IPCam Surveillance Software on your computer. The application may be launched by selecting the installed icons. Click Finish to exit Setup. Finishtext_image
IPCam surveillance SoftwareV-2. Uliser 16 Channel Viewer
 La résoluon de votre écran doit être de "1024 x 768" pour que 16 Channel Viewer fonconne correctement. Merci de paramétrer la résoluon de votre écran à "1024 x 768". L'écran principal de 16 Channel Viewer est décrit ci-dessous : text_image
Zone d'achage 2 No Signal 3 No Signal 4 No Signal 5 No Signal 6 No Signal 7 No Signal 8 No Signal 9 No Signal 10 No Signal 11 No Signal 12 No Signal 13 No Signal 14 No Signal 15 No Signal 16 No Signal 05/27 29:52:44, Camera 01, Get PW Info System Event Log Boîte d'achage des messages Conguraon Enregistrement & Système Contrôle PTZ (Orientaon/Z) Disposion de Plein écran & Scan Langue FERMER LE PROGRAMME & RÉDUIRE LA| Zone d'achage vidéo | L'image en direct de 16 caméras peut être achée dans cee zone. |
| Langue | Séleconnez la langue à parr du menu déroulant si vous voulez modier la langue d'achage. |
Disposition de l'achage | Modiez la disposition de l'achage de l'image de la caméra (cliquez sur l'icône d'achage pour modier la disposition de l'achage de la caméra). Il existe 8 sortes de dispositions d'achage disponibles. |
Plein écran | Cliquez sur ce bouton pour passer en mode plein écran (n'ache que l'image complète de la caméra), appuyez sur "Echap" pour quier le mode plein écran. |
Scan | Cliquez sur ce bouton pour que le logiciel de surveillance de la caméra réseau fasse déler automaquement toutes les images de toutes les caméras connectées. Cliquez une fois sur ce bouton pour acver la foncon Scan (l'icône Scan devient bleue ), cliquez à nouveau pour arrêter le scan (l'icône Scan devient blanche ) |
Contrôle de l'orientaon (PTZ) | Il existe 8 direcons sur la bague de commande d'orientaon PTZ. Si la caméra à laquelle vous vous connectez prend en charge la foncon PTZ, vous pouvez uliser l'anneau de commande PTZ pour modier la direcon faisant face à la caméra.Cee foncon n'est disponible que sur les caméras qui la prennent en charge. |
Accueil | Cliquez sur ce bouton pour revenir à la posion "Accueil" de la caméra (par défaut). Cee foncon n'est disponible que sur les caméras qui la prennent en charge. |
Enregistrement | Démarre l'enregistrement vidéo. |
| Conguraon | Conguraon de la caméra et opons |
Système | générales. |
Lecture | Lit les chiers vidéo sauvegardés. Une nouvelle fenêtre s'ouvre pour localiser les chiers enregistrés. |
Cliché | Prend un cliché de l'image de la caméra en cours. |
| Achage Messages | Ache tous les messages système. |
Fermer la fenêtre(arrêter la surveillance) | Arrête le logiciel de surveillance de la caméra réseau. |
Réduire la fenêtre | Réduit la fenêtre du logiciel de surveillance de la caméra réseau. |
V-3. Congurer 16 Channel Viewer
V-3-1. Ajouter une caméra/Conguraon Caméra
An de pouvoir uliser le logiciel 16 Channel Viewer, vous devez congurer/ajouter chaque caméra que vous souhaitez connecter. Cliquez sur l'icône de la clé ( ), un menu contextuel apparaît : Camera Configuration General Options Séleconnez "Conguraon Caméra" pour congurer/ajouter les caméras :  Merci de séleconner "Débloquer" ou une opon similaire si l'alerte de sécurité de Windows vous dit que "IPCamViewer" a été bloqué. text_image
Windows Security Alert To help protect your computer, Windows Firewall has blocked some features of this program. Do you want to keep blocking this program? Name: IPCamViewer Publisher: Unknown Keep Blocking Unlock Ask Me Later 'Windows Firewall has blocked this program from accepting connections from the Internet or a network. If you recognize the program or trust the publisher, you can unblock it. When should I unblock a program?V-3-1-1. Caméra
Sur l'onglet "Conguraon Caméra" vous pouvez ajouter et congurer toutes les caméras que vous souhaitez connecter au logiciel de visualisaon. Pour connecter une caméra au logiciel, vous devez saisir les informaons demandées dans la boîte de dialogue "Conguraon Caméra". Vous pouvez le faire de façon automaque en séleconnant votre caméra dans la liste de la boîte de dialogue "Rechercher Caméra" et en cliquant sur "Séleconner" (recommandé) ou vous pouvez saisir les informaons manuellement. text_image
Camera Configuration Channel Channel 1 Channel 2 Channel 3 Channel 4 Channel 5 Channel 6 Channel 7 Channel 8 Channel 9 Channel 10 Channel 11 Channel 12 Channel 13 Channel 14 Channel 15 Channel 16 Camera Scheduled Recording Audio Motion-Triggered Recording Camera Configuration 1 Name IC-010204 Model Edimax_IC-3140W IP Address 192.168.2.101 Username admin Web Port 80 Password ••••• Video Format M-JPEG Reset Camera Search Camera Name IP Model IC-010204 192.168.2.101 Edimax_IC-3140W Select Refresh OK Cancel| Canal | Séleconnez le numéro du canal que vous souhaitez paramétrer. |
| Rechercher Caméra | Toutes les caméras trouvées sur votre réseau local seront achées dans la boîte dedialogue "Rechercher Caméra". |
| Séleconner | Séleconnez une caméra listée dans la boîte "Rechercher Caméra" et cliquez sur le bouton "Séleconner" pour remplir tous les paramètres de la caméra séleconnée dans chacun des champs de la boîte "Conguraon Caméra". |
| Actualiser | Actualise la liste des caméras de votre réseau local. |
| Nom | Saisir ici un nom de référence pour la caméra. Le nom par défaut est composé des 6 premiers caractères de l'adresse MAC de la caméra. Le nom de la caméra peut être ulisé pour idener facilement son emplacement, par exemple. |
| Modèle | Ache le modèle de la caméra séleconnée. |
| Adresse IP | Saisissez l'adresse IP de la caméra. |
| Nom d'ulisateur | Saisissez le nom d'ulisateur de la caméra. |
| Port Web | Saisissez le port Internet de la caméra. La valeur par défaut est "80". |
| Mot de Passe | Saisissez le mot de passe de la caméra. Le mot de passe par défaut est "1234". Si vous avez modié le mot de passe de la caméra séleconnée, saisissez le nouveau mot de passe. |
| Format Vidéo** | Séleconnez le format d'encodage vidéo de cee caméra (MJPEG ou H.264). |
| Réinialiser | Eace tous les champs de la secon "Conguraon Caméra". |
text_image
2 No Signal 3 No Signal 4 No Signal 5 No Signal 6 No Signal EDiMAX NETWORKING PEOPLE TOGETHER v3.0.6.4 English 10/21 17:58:12, Camera 01, Get FW info 10/21 17:15:09, Camera 01, Disconnected 10/21 18:52:20, Camera 01, Stop Manual 10/21 18:52:12, Camera 01, Stop Manual 10/21 18:21:13, Camera 01, Get FW info 10/21 18:21:02, Camera 01, DisconnectedV-3-1-2. Enregistrement programmé
Vous pouvez programmer votre caméra réseau pour qu'elle enregistre automaquement en foncon de programmaons hebdomadaires ou de programmaons uniques. text_image
Camera Configuration Channel Channel 1 Channel 2 Channel 3 Channel 4 Channel 5 Channel 6 Channel 7 Channel 8 Channel 9 Channel 10 Channel 11 Channel 12 Channel 13 Channel 14 Channel 15 Channel 16 Camera Scheduled Recording Audio Motion-Triggered Recording One Time Schedules 2014/05/29 17:56:15 - 2014/05/29 18:56:15 New Edit Delete Weekly Schedules [ Mon Tue Wed Thu Fri ] 20:00:00 - 23:00:00 New Edit Delete OK Cancel| Canal | Séleconnez le nombre de canaux que vous souhaitez paramétrer. |
| Programmaons uniques | Vous pouvez spécier une programmaon unique pour une caméra séleconnée ; cee programmaon ne sera exécutée qu'une seule fois. |
| Nouveau (Programmaons uniques) | 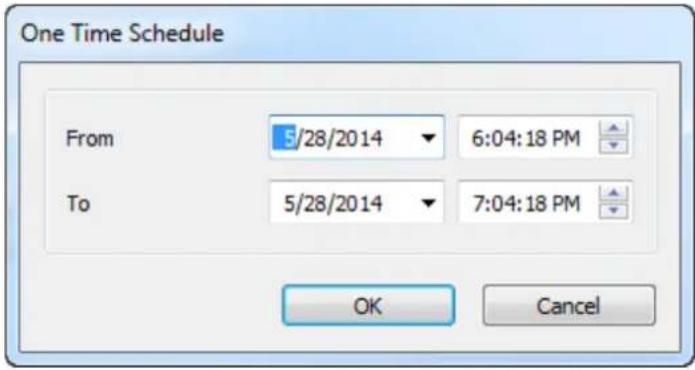 Spéciez la durée de cee programmaon unique (la date et l'heure de "Début" et de "Fin") puis cliquez sur "OK" pour sauvegarder les paramètres.Merci de noter que vous devez dénir une programmaon qui aura lieu dans le futur. Vous ne pouvez pas programmer dans le passé. Spéciez la durée de cee programmaon unique (la date et l'heure de "Début" et de "Fin") puis cliquez sur "OK" pour sauvegarder les paramètres.Merci de noter que vous devez dénir une programmaon qui aura lieu dans le futur. Vous ne pouvez pas programmer dans le passé. |
| Modier | Vous pouvez modier un élément d'enregistrement programmé. Séleconnez une programmaon dans la liste "Programmaons Uniques" et cliquez sur le bouton "Modier" pour éditer l'heure de début et de n de ce programme. |
| Supprimer | Supprimer un élément de programmaon séleconné. |
| Nouveau (Programmaon hebdomadaire) |  |
| Vous pouvez démir un programme d'enregistrement hebdomadaire pour les heures et les jours spéciés. Cochez les jours à inclure dans le programme et dénissez l'heure de début et de n journalière dans les champs "De" et "À" (format HH:MM:SS). Le bouton "Enregistrement connu" dénit une programmaon d'enregistrement en connu chaque jour, soit de 00:00:00 à 23:59:59. | |
| Modier | Vous pouvez modier un élément d'enregistrement programmé. Séleconnez une programmaon dans la liste "Programmaons Uniques" et cliquez sur le bouton "Modier" pour éditer l'heure de début et de n de cee programmaon. |
| Supprimer | Supprimer un élément de programmaon séleconné. |
V-3-1-3. Audio
Pour les caméras prenant l'audio en charge, vous pouvez uliser cet onglet pour décider si vous souhaitez entendre l'audio capturé par une caméra séleconnée. text_image
Camera Configuration Channel Channel 1 Channel 2 Channel 3 Channel 4 Channel 5 Channel 6 Channel 7 Channel 8 Channel 9 Channel 10 Channel 11 Channel 12 Channel 13 Channel 14 Channel 15 Channel 16 Camera Scheduled Recording Audio Motion-Triggered Recording Audio ✓ Mute Audio □ Record Video Only OK Cancel| Canal | Séleconnez le nombre de canaux que vous souhaitez paramétrer. |
| Audio Muet | Cochez cee case et le logiciel de surveillance de la caméra réseau n'émera pas l'audio capturé par cee caméra. |
| N'enregistrer que la vidéo | Cochez cee case et le logiciel de surveillance de la caméra réseau n'enregistrera pas l'audio capturé par cee caméra. |
V-3-1-4. Enregistrement des mouvements
La caméra réseau dispose d'une foncon de détecon de mouvements et de nombreuses opons pour la nocaon des événements. Sur cee page, vous pouvez acver ou désacver la détecon de mouvements et paramétrer la caméra pour qu'elle envoie un e-mail ou qu'elle déclenche une alarme si un mouvement est détecté.  Notez que si la caméra est ulisée pour la sécurité, il est important de surveiller ce que la caméra diuse lorsque la détecon de mouvements est ulisée. La détecon de mouvements peut ne pas être précise à 100%. text_image
Camera Configuration Channel Channel 1 Channel 2 Channel 3 Channel 4 Channel 5 Channel 6 Channel 7 Channel 8 Channel 9 Channel 10 Channel 11 Channel 12 Channel 13 Channel 14 Channel 15 Channel 16 Camera Scheduled Recording Audio Motion-Triggered Recording Motion-Triggered Recording Enable Disable Video Length 10 seconds Invoke alarm when motion is detected Send email when motion is detected OK Cancel| Canal | Séleconnez le nombre de canaux que vous souhaitez paramétrer. |
| Acver | Acve la foncon d'enregistrement des mouvements. |
| Désacver | Désacve la foncon d'enregistrement des mouvements. |
| Longueur de la vidéo | Séleconnez à parr du menu déroulant, la durée, en secondes, pendant laquelle lacaméra enregistre lorsqu'un mouvement a été détecté. |
| Déclencher une alarme lorsqu'un mouvement est déclenché | Envoie une alarme quand un mouvement a été détecté par la caméra. |
| Envoyer un e-mail lorsqu'un mouvement est déclenché | Envoie un e-mail à une adresse prédénie quand un mouvement a été détecté par la caméra. |
V-3-2. Opons générales
Cliquez sur l'icône de la clé ( ) et un menu contextuel apparaît : Camera Configuration General Options Lorsque vous séleconnez "Opons générales" merci de vous référer au chapitre suivant approprié :V-3-2-1. Général
Tous les paramètres généraux, comme le répertoire de stockage des chiers et les espaces d'enregistrement peuvent être paramétrés ici. text_image
General Options General Email Settings Security About Video Storage Settings Data Directory Available Recording Space(MB) D:\Matt Documents\Documents 344169 New Edit Delete General Settings Scan Time 3 second(s) Max. Video File Size 50 MB Cycle Recording Enable Reserve recording files As long as possible OK Cancel| Paramètres de stockage vidéo | Ulisez les boutons "Nouveau", "Modier" et "Supprimer" pour démir le dossier de stockage vidéo local. L'espace disponible dans le dossier spécié est alors aché. |
| Durée du scan | Dénit la période de pause entre chaque permutaon de caméra lorsque vous acvez la foncon "Scan". |
| Taille max du chier vidéo | Dénissez ici la taille maximum de chaque chier vidéo. Lorsque la taille a aeint cee valeur, le logiciel de surveillance de la caméra réseau ouvre un autre chier pour enregistrer la vidéo. |
| Enregistrement cyclique | Permet d'acver ou de désacver l'enregistrement cyclique. Lorsqu'il est acvél'enregistrement cyclique écrase les enregistrements plus anciens lorsque l'espace de stockage devient plein. Lorsqu'il est désacvé, l'enregistrement cesse lorsque le dispositif de stockage est plein. |
V-3-2-2. Paramètres e-mails
Si vous congurez votre caméra réseau pour envoyer des nocaons par e-mail en cas d'événements de détecon de mouvements (voir VI-3-1-4. Détecon de mouvements), vous devez congurer les paramètres e-mail ici. text_image
General Options General Email Settings Security About Email Subject Recipient Email Address New Edit Delete Sender Email Address SMTP Server SMTP Port 25 SMTP Authentication Enable Disable SMTP Account SMTP Password SMTP SSL/TLS None OK Cancel| Objet de l'e-mail | Spéciez l'objet de l'e-mail de nocaon que vous recevrez. |
| Adresse e-mail du desnataire | Ulisez les boutons "Nouveau", "Modier" et "Supprimer" pour saisir l'adresse e-mail du ou des desnataires pour la nocaon par e-mail. |
| Adresse e-mail de l'expéditeur | Spéciez l'adresse e-mail à laquelle sera envoyé l'e-mail de nocaaon. |
| Serveur SMTP | Saisissez l'adresse IP ou le nom d'hôte du serveur SMTP pour l'e-mail de l'expéditeur. Votre FAI peut vous fournir cee informaonsi vous n'êtes pas sûr. |
| Port SMTP | Spéciez ici l'adresse IP ou le nom d'hôte du serveur SMTP que vous souhaitez uliser. La valeur par défaut est 25. |
| Authencaon SMTP | Acvez ou désacvez l'authencaon SMTP.Si vous n'êtes pas sûr, consultez votre FAI. |
| Compte SMTP | En cas d'ulisaon de l'authencaon SMTP (ci-dessus), saisissez le compte SMTP (nom d'ulisateur) de votre serveur SMTP ici. Dans la plupart des cas, il s'agit du même nom que votre nom d'ulisateur POP3 (celui que vous ulisez pour recevoir vos e-mails). Contactez votre FAI si vous n'êtes pas sûr. |
| Mot de passe SMTP | Saisissez ici le mot de passe du compte SMTP de votre serveur SMTP. Dans la plupart des cas, il s'agit du même que le mot de passe POP3 (celui que vous ulisez pour recevoir vos e-mails). Contactez votre FAI si vous n'êtes pas sûr. |
V-3-2-3. Sécurité
Vous pouvez dénir un mot de passe pour protéger le logiciel 16 channel viewer. Lorsqu'il est acvé, le mot de passe est demandé à chaque ouverture du logiciel 16 channel viewer. Pour paramétrer le mot de passe, merci d'uliser l'onglet "Sécurité" dans le menu "Opons générales" : text_image
General Options General Email Settings Security About Security Enable Password Disable Confirm Password OK Cancel| Acver | Lorsqu'il est acvé, le mot de passe est demandé pour ouvrir le logiciel 16 channel viewer. |
| Désacver | Aucun mot de passe n'est requis si l'opon est désacvée. |
| Mot de Passe | Saisissez ici le mot de passe que vous souhaitez uliser. |
| Conrmer le mot de passe | Saisissez ici à nouveau le mot de passe que vous souhaitez uliser. |
text_image
Authentication Required Please input password Password: OK CancelV-3-2-4. À propos
L'onglet "À propos" ache le numéro de version du logiciel. text_image
General Options General Email Settings Security About Software Information Version: v3.0.7.1 OK CancelV-4. Modier la disposion de l'achage
Le logiciel de surveillance de cee caméra réseau dispose de huit disposions diérentes : natural_image
Grid of nine abstract geometric shapes with varying internal and square outlines (no text or symbols)Style de disposion1 : 1 caméra seulement | Ache la vidéo d'une seule caméra. | |
Style de disposion2 : 4 caméras | Ache la vidéo de 4 caméras. | |
Style de disposion3 : 6 caméras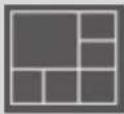 | Ache la vidéo de 6 caméras. | |
Style de disposion4 : 8 caméras | Ache la vidéo de 8 caméras. | |
Style de disposion5 : 9 caméras | Ache la vidéo de 9 caméras. | |
Style de disposion6 : 10 caméras | Ache la vidéo de 10 caméras. | |
Style de disposion7 : 13 caméras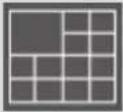 | Ache la vidéo de 13 caméras. | |
Style de disposion8 : 16 caméras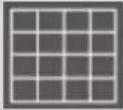 | Ache la vidéo de 16 caméras. | |