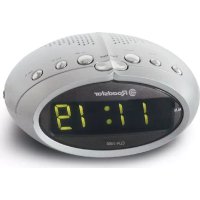
CLR2466 - Radio ROADSTAR - Free user manual and instructions
Find the device manual for free CLR2466 ROADSTAR in PDF.


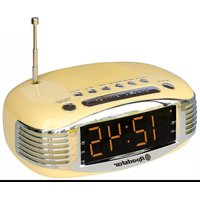
| Product type | Digital clock radio |
| Brand | Roadstar |
| Model | CLR2466 |
| Main power supply | 230 V ~ 50 Hz |
| Backup battery | 9 V (type 6F22/006P, alkaline recommended) |
| Radio bands | FM (88-108 MHz), MW (525-1650 kHz) |
| Display | 24-hour digital clock |
| Main functions | Radio, wake-up by radio or buzzer, snooze (9 min), auto-off (sleep 59 min adjustable), time and alarm setting |
| Controls | Function selector (ON/OFF/AUTO), volume/buzzer, time/minute setting buttons, alarm, snooze, sleep, band selector, station tuning |
| Built-in speaker | Yes |
| Maintenance | Clean with a soft damp cloth, no solvents or abrasives. Do not expose to humidity, rain, extreme temperatures, or dust. |
| Safety | Do not open the case. Disconnect if not used for long periods. Use only on 230 V mains. Risk of electric shock. |
| Dimensions | Not specified in the manual |
| Weight | Not specified in the manual |
| Included accessories | AC power cord, backup battery not included |
Frequently Asked Questions - CLR2466 ROADSTAR
User questions about CLR2466 ROADSTAR
0 question about this device. Answer the ones you know or ask your own.
Ask a new question about this device
Download the instructions for your Radio in PDF format for free! Find your manual CLR2466 - ROADSTAR and take your electronic device back in hand. On this page are published all the documents necessary for the use of your device. CLR2466 by ROADSTAR.
USER MANUAL CLR2466 ROADSTAR
Radio Digital Clock with Alarm
CLR-2466
Instruction manual
Bedienungsanleitung
Roadstar is a registered Trademark of Roadstar S.A. - Switzerland All rights reserved


INDEX
English Page 1
Deutsch Seite 9
Français Page 17
Italiano Pagina 25
Español Página 33
Portugues Pagina 41
- Your new unit was manufactured and assembled under strict ROADSTAR quality control. Thank-you for purchasing our product for your music enjoyment. Before operating the unit, please read this instruction manual carefully. Keep it also handy for further future references.
The exclamation point within the triangle is a warning sign alerting the user of important instructions accompanying the product.
The lightening flash with arrowhead symbol within the triangle is a warning sign alerting the user of "dangerous voltage" inside the unit.

To reduce the risk of electric shock, do not remove the cover. No user serviceable parts inside the unit. Refer all servicing to qualified personnel.

This unit operates on 230V - 50Hz. If the unit is not used for a long period of time, remove the plug from the AC mains.

This unit must not be exposed to moisture or rain.

The power switch in this unit is mounted on the secondary circuit and does not disconnect the whole unit from the mains in OFF position.

Ensure all connections are properly made before operating the unit.

This unit should be positioned so that it is properly ventilated. Avoid placing it, for example, close to curtains, on the carpet or in a built-in installation such as a bookcase.
Do not expose this unit to direct sunlight or heat radiating sources.
Make sure all batteries are inserted according to the proper polarity. Do not mix old batteries with new ones.
If the unit is not used for a long period of time (more than 1 month), remove all batteries from their compartment to avoid possible leaking.
2
CLR-2466
DIGITAL ALARM CLOCK RADIO
TABLE OF CONTENTS
• LOCATION OF CONTROLS
- POWER SUPPLY
- AC POWER
- SPECIFICATIONS
LOCATION OF CONTROLS
- FUNCTION Selector
(ON/OFF/AUTO) - VOLUME Control/Buzzer Switch
- TIME SET Button
- ALARM SET/OFF Button
- ALARM OFF
- SLEEP SET Button
- HOUR SET Button
- MINUTE SET Button
- Clock Display
- SNOOZE Button
- WAVEBAND Selector
- TUNING Control
- Battery Compartment
- SPEAKER

English English
POWERSUPPLY
This unit operates from a main supply of 230V \~ 50Hz. Connect the AC power cord to the AC household main outlet. Ensure that the voltage is as indicated on the rating plate on the rear of the unit.
Battery Back-up Power Failure Protection
This radio has a battery back up circuit that will keep the correct time and alarm settings in the event of a temporary power interruption. Install a 9-volt battery (type 6F 22/006P), not included, into the battery compartment located on the bottom of the unit.
Note: We recommend an alkaline battery for longer usable life. Change the battery every 9 to 12 months for best result and avoid possible battery leakage.
If power is temporarily interrupted the display will go blink and the radio will not play. However, the battery back-up circuit will continue to maintain the clock and alarm settings. When power is restored the clock will display the correct time and alarm settings, and no adjustment is necessary.
Note: If power is interrupted and there is no battery in the compartment or the battery is exhausted. The time and alarm settings will be lost. When power is restored the clock will begin to flash indicating that the time and alarm settings must be corrected.


4
SETTING THE CORRECT TIME
- Press and hold the TIME SET button (3)
- Press the HOUR button (7) to advance hour press MINUTE button (8) until the correct time is displayed. Your Clock Radio uses a 24 hour clock.
- Release the TIME SET Button.
SETTING THE WAKE UP TIME
- Set the FUNCTION Selector (1) to the OFF position.
- Set the alarm time by following this procedure:
- Press and hold the ALARM SET Button (4).
- Press the HOUR Button (7) to advance hour press MINUTE Button (8) until the desired alarm time is displayed. Your clock radio uses a 24 hour clock.
- Release the ALARM SET Button (4).
- To check the correct alarm time is set, press the ALARM SET Button (4).

English English
WAKE TO BUZZERALARM
- Set the alarm time as shown above.
- Set the Function Selector (1) to the AUTO position.
- Turn the VOLUME Control (2) down until you hear a click.
- To switch off the alarm either press the ALARM SET/OFF Button (5), or set the FUNCTION Selector (2) to the OFF position.
WAKETOTHERADIO
- Set the alarm time as shown above.
- Set the FUNCTION Selector (1) to the ON position.
- Set the Band Selector (11) to the desired radio band, and follow the procedure in LISTENING TO THE RADIO to tune the radio to a station.
- Set the VOLUME Control (2) to a level you feel will wake you.
- Set the FUNCTION Selector (1) to the AUTO/BUZZER position.
- To switch off the alarm either press the ALARM SET/OFF Button (5) or set the FUNCTION Selector (1) to the OFF position.


6
- Set the FUNCTION Selector (71) to the ON position.
- Set the BAND Selector (11) to the desired band (FM or MW).
- Turn the TUNING Knob (12) until the desired station is heard.
- Adjust the VOLUME Control (2) to a comfortable listening level.
- To turn off the radio, set the Function Selector (1) to the OFF position.
Note: The MW band uses a built in directional serial. You may have to rotate the clock radio for the best reception.
SNOOZE FUNCTION
When the alarm sounds, pressing the SNOOZE Button will temporary stop about 9 minutes then the alarm sounds again.
SLEEPFUNCTION
- This function enables you to go to sleep listening to the Radio.
- Set the FUNCTION Selector (1) to OFF or AUTO/BUZZER.
- Press the SLEEP Button (6). The clock display will show 59 minutes. The Radio turns on and will turn off automatically after 59 minutes
- To select a shorter time press the MINUTE Button (8) while holding the SLEEP Button (6) until the desired sloop time is displayed.
- To turn off the Radio at any time during the Sleep period, press the SNOOZE Button (10).

English English
CARE AND MAINTENANCE
To prevent fire or shock hazard, do not allow this clock radio to be exposed to rain or moisture.
This clock radio should not be exposed to direct sunlight, very high or low temperature, moisture, vibration, or placed in a dusty environment. Do not use abrasives, benzine, thinners, or other solvents to clean the surfaces of the clock radio. To clean it, wipe with a mild non-abrasive detergent solution on a clean soft cloth.
Never attempt to Inset wires, pins, or other objects into the ventilation holes or openings on the clock radio.
Note: When setting the Clock or Alarm times remember that this rclock radio has a 24 Hour clock.
AC POWER
For your own solely read following instructions carefully before attempting to connect this clock radio to the mains.
Mains Supply 230V-50Hz - AC only.
This unit is designed to operate on a 230V-50Hz supply only. Connecting it to other power sources may damage it. Ensure that supply corresponds to the information on the rating label on the bottom of the unit.


8
SPECIFICATIONS
FM Band: 88 to 108 MHz
MW Band: 525 to 1650 kHz
Power Supply: 230VCD, 50 Hz
9V DC PP35 BATTERY
(Ever Ready Silver Seal or equivalent)
Correct Disposal of This Product
(Waste Electrical & Electronic Equipment)
This marking shown on the product or its literature, indicates that it should not be disposed with other household wastes at the end of its working life. To prevent possible harm to the environment or human health from uncontrolled waste disposal, please separate this from other types of waste and recycle it responsibly to promote the sustainable reuse of material resources. Household users should contact either the retailer where they purchased this product, or their local government office, for details of where and how they can take this item for environmentally safe recycling. Business users should contact their supplier and check the terms and conditions of the purchase contract. This product should not be mixed with other commercial wastes for disposal.





Deutsch Deuts
SICHERHEITSHINWEISE


The Ground Truth image displays a single, solid horizontal line. According to Rule 2 (UNDERSCORE & LINE RULES), if the GT contains lines used for stylistic emphasis or as background (like ruled paper), the OCR result must ignore them. The provided OCR content is "\_\_\_\_", which consists of four underscores. This is incorrect because underscores are not equivalent to a solid line and are not permitted under the “Stylistic/Background Lines (Ignore)” rule. Outputting underscores for a stylistic line violates the rule and constitutes an error. Therefore, the OCR result is inconsistent with the Ground Truth.
ALIMENTAZIONE AC

- Radio Digital Clock with Alarm
- CLR-2466
- INDEX
- 2
- DIGITAL ALARM CLOCK RADIO
- TABLE OF CONTENTS
- LOCATION OF CONTROLS
- English English
- POWERSUPPLY
- Battery Back-up Power Failure Protection
- 4
- SETTING THE CORRECT TIME
- SETTING THE WAKE UP TIME
- WAKE TO BUZZERALARM
- WAKETOTHERADIO
- 6
- SNOOZE FUNCTION
- SLEEPFUNCTION
- CARE AND MAINTENANCE
- AC POWER
- 8
- SPECIFICATIONS
- Deutsch Deuts
- SICHERHEITSHINWEISE
- The Ground Truth image displays a single, solid horizontal line. According to Rule 2 (UNDERSCORE & LINE RULES), if the GT contains lines used for stylistic emphasis or as background (like ruled paper), the OCR result must ignore them. The provided OCR content is "\_\_\_\_", which consists of four underscores. This is incorrect because underscores are not equivalent to a solid line and are not permitted under the “Stylistic/Background Lines (Ignore)” rule. Outputting underscores for a stylistic line violates the rule and constitutes an error. Therefore, the OCR result is inconsistent with the Ground Truth.
- ALIMENTAZIONE AC
Brand : ROADSTAR
Model : CLR2466
Category : Radio