ScanExpress S40 Plus - To scan MUSTEK - Free user manual and instructions
Find the device manual for free ScanExpress S40 Plus MUSTEK in PDF.
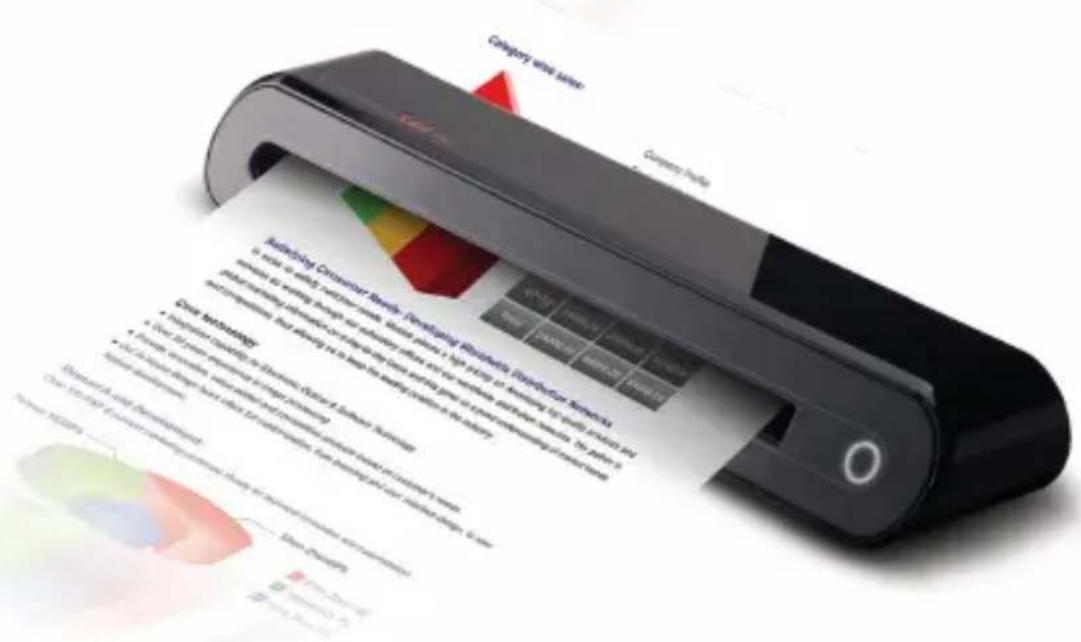
| Product Type | Portable sheet-fed scanner |
| Dimensions (L x W x H) | 293 mm x 63.7 mm x 39 mm |
| Weight | 420 g |
| Power | Via USB port (bus-powered) |
| Optical resolution | 600 dpi (H) x 600 dpi (V) |
| Interface | USB 2.0 |
| Scanning speed | 2.7 ppm @ A4 300 dpi (B&W and color) |
| Maximum scanning area | 216 x 355 mm (large format) |
| Light source | LED |
| Scanning modes | Color, Grayscale, Line art |
| Output formats | JPG, BMP (Windows), PNG (Mac), TIFF, PDF |
| Supported operating systems | Windows XP / Vista / 7, Mac OS X 10.4+ |
| Included software | ScanExpress Plus, Cardiris, ABBYY FineReader, ArcSoft Media Impression (PC) |
| Main functions | One-touch scanning, TWAIN scanning, OCR, business card scanning |
| Maintenance and cleaning | Use of calibration and cleaning paper; cleaning stick for the sensor |
| Safety | Avoid water, humidity, dust, shocks, and extreme temperatures; do not open the housing |
| Included accessories | USB cable, installation CD, carrying case, photo protection sleeve, cleaning stick, calibration page |
| Minimum PC configuration | Pentium III 300 MHz, 256 MB RAM (512 MB for Vista), 850 MB disk, USB port |
| Minimum Mac configuration | PowerPC or Intel, 512 MB RAM, 256 MB disk, USB port |
Frequently Asked Questions - ScanExpress S40 Plus MUSTEK
User questions about ScanExpress S40 Plus MUSTEK
0 question about this device. Answer the ones you know or ask your own.
Ask a new question about this device
Download the instructions for your To scan in PDF format for free! Find your manual ScanExpress S40 Plus - MUSTEK and take your electronic device back in hand. On this page are published all the documents necessary for the use of your device. ScanExpress S40 Plus by MUSTEK.
USER MANUAL ScanExpress S40 Plus MUSTEK
ScanExpress S40 Plus
A4 Portable Scanner
User Manual

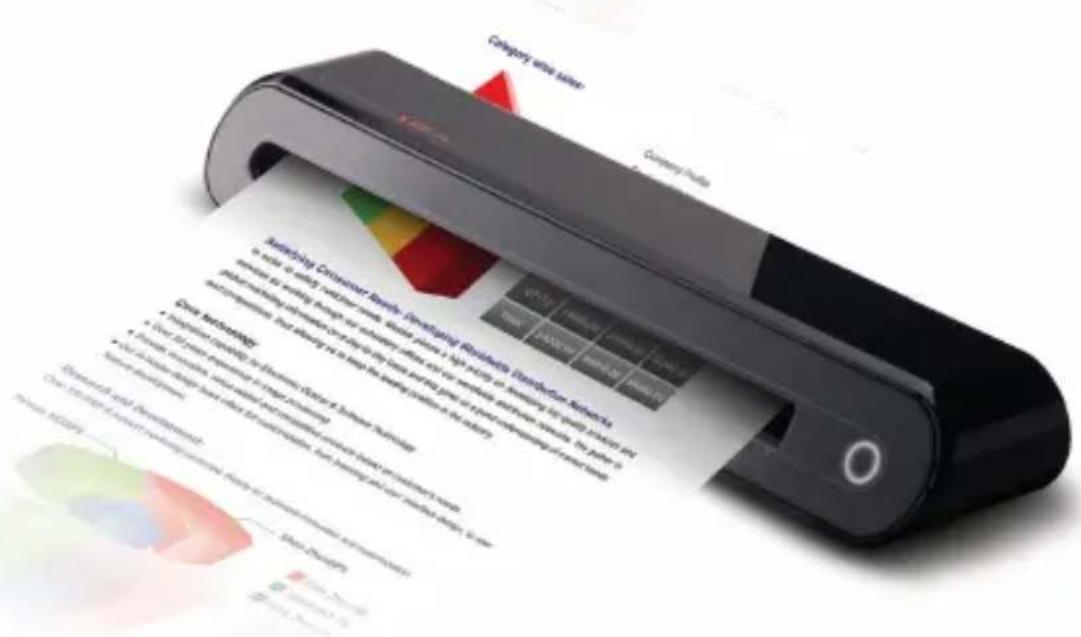
Thank you for purchasing this Portable Scanner. With this ideal portable scanner, you can easily carry it around with you to special events or meetings. A convenient USB interface power supply is used, there is no need for batteries and AC power supply. Read the following instructions for more details.
The style and parts of the product shown in this manual may be different from the actual unit due to various models.
Contents
Contents 2
Safety Information 3
Getting Familiar with the Product 4
-Package Contents 4
- Scanner Parts 4
Installing Software 5
- Installing the Scanner Driver 5
- Installing Other Softwares 7
Installing Hardware 8
Scanning Operation 9
- Inserting Document 9
- Direct Scanning 9
- Scanning using ScanExpress Plus panel 10
TWAIN Software Scanning 13
- About TWAIN Driver 13
-Scanning using TWAIN 13 - Main TWAIN settings 14
-Enhanced Setting 15 - Filters Setting 15
-Using TWAIN in Photoshop CS5 and CS4 16
Business card scanning 18
- Insert a Business card 18
-Scanning the Business card 18 - Edit 20
- Export and Synchronize 21
Scanning with ABBYY Findreader 22
Calibrating and Cleaning the Scanner 24
-Using the Calibration and Cleaning Paper 24
Troubleshooting 25
Specification 26
Safety Information
- Keep away from water or moisture and dusty areas.
- Never store in hot and very cold areas.
- Only use attachments/accessories specified by the manufacturer.
- No objects filled with liquids, such as vases, shall be placed on apparatus.
- Avoid dust contamination when the scanner is not in use.
- When left unused for a long period of time, the unit should be disconnected from the USB cable and PC.
- Avoid environments where the scanner would be exposed to direct sunlight (or any other source of excessive heat) for long periods of time.
- Protect the scanner from potential liquid spills such as soda, coffee, tea, etc.
- Be carefully to keep it without dropping it or strong impact.
- Operate the scanner on a level, well-grounded work surface, free of excessive vibration.
- Don't open the scanner case alone without technical support because there is danger of electrical shock.
Getting Familiar with the Product
Package Contents
Scanner
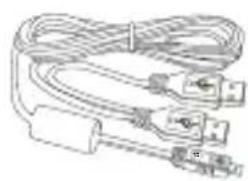
USB Cable

Installation CD

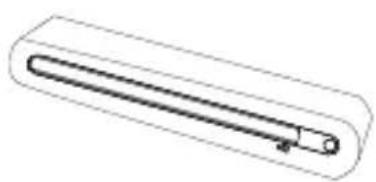
Cleaning Stick
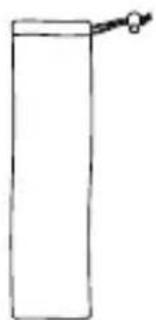
Carry Sack PhdtserMentive

Calibration card and Cleaning Paper
Sleeve
Scanner Parts
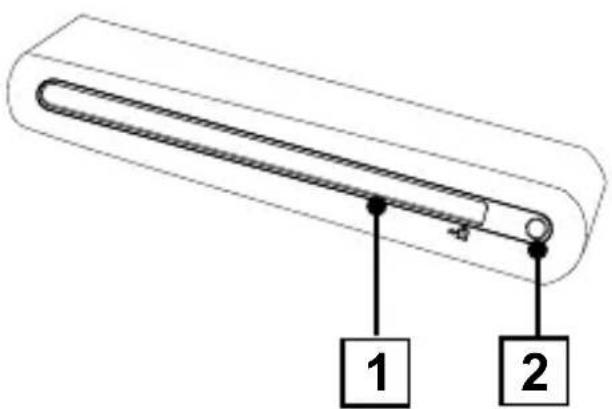
Front View
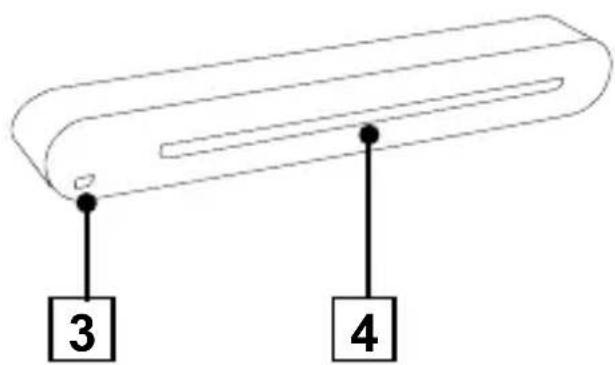
Rear View
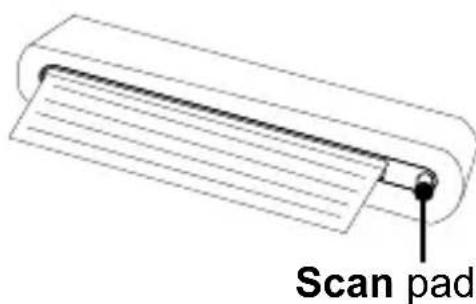
- Paper Feed Slot
-
LED Power Indicator/Scan pad
-
USB Port
- Paper withdraw slot
Installing Software
ATTENTION:
Complete the software installation before connecting the scanner. Do not connect USB cable to the scanner or PC at this stage.
Installing the Scanner Driver
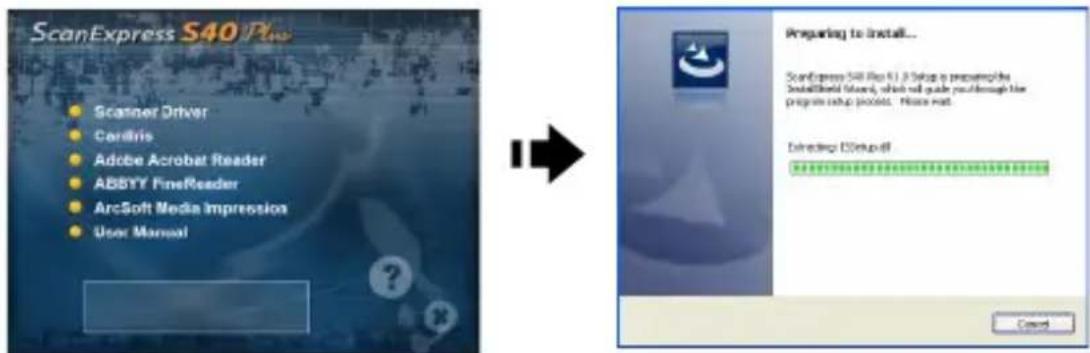
Insert the software Installation CD into your CD- or DVD-ROM drive. The CD will auto-run and will display the pop-up menu on the screen. ScanExpress S40 Plus Driver is a must install software for direct scanning. You can choose to install other softwares as your preference.
Note: If the Autorun does not work, click on AUTORUN.exe (PC OS), or click the icon on the MAC desktop (MAC OS).
MAC's driver
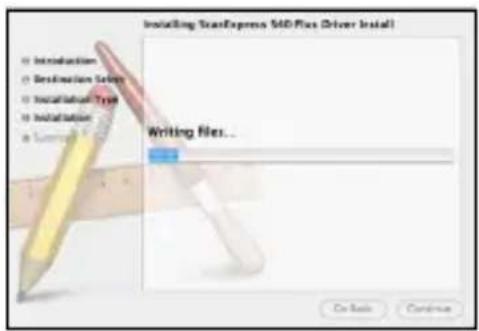
- Double-click ScanExpress S40 Plus Driver, and the installation wizard will appear on the screen.
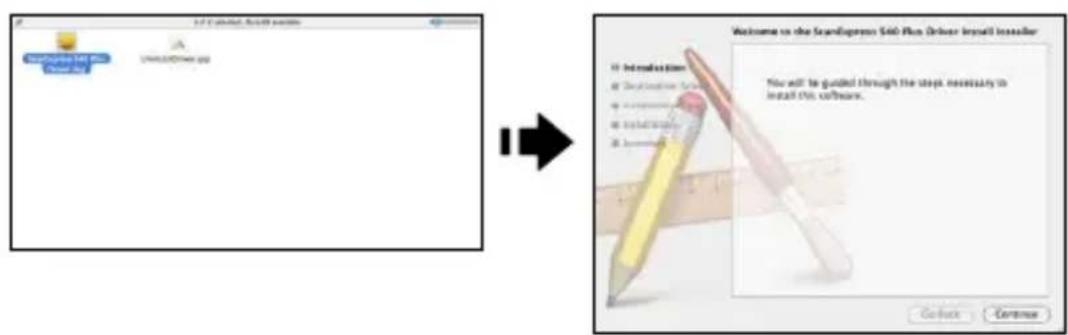
- Select a destination to install the TWAIN driver (if other hard disks are available).
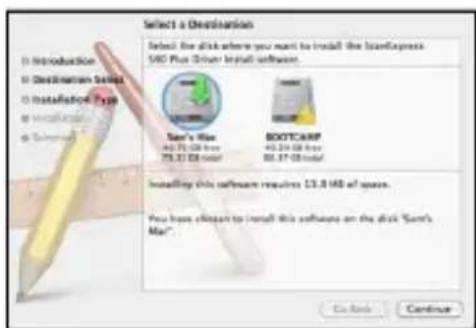
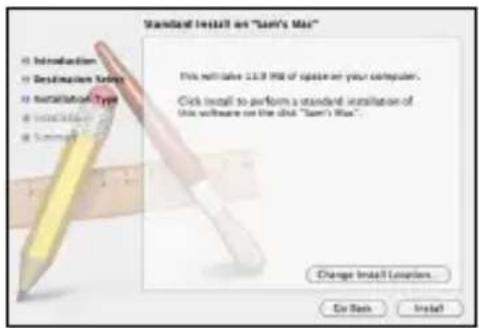
- Once the destination has been selected, click "Install" button to continue the installation procedure.
- Please be patience, the installation procedure will take a while.
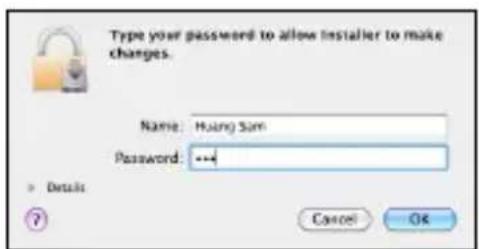
Note: A reminder window will pop-up on the screen if you set a password on your computer. Enter the password and then click "OK" to continue the installation procedure. For more password settings, refer to your Mac's manual.
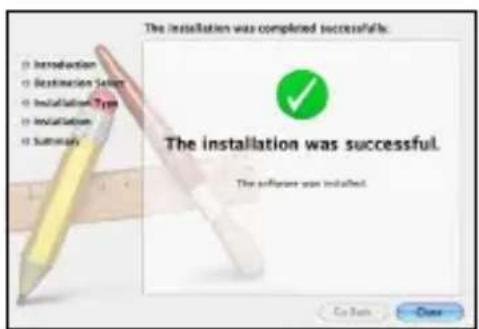
- Click "Close" when the installation procedure is complete.
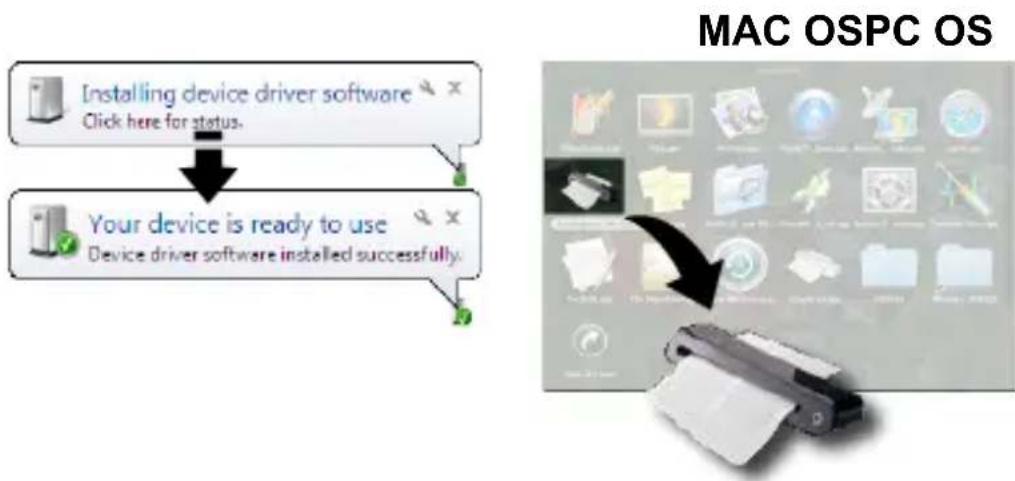
- The scanner is now ready for use.
PC's driver
- Click the Scanner Driver.
-
Please be patience, the installation procedure will take a while.
-
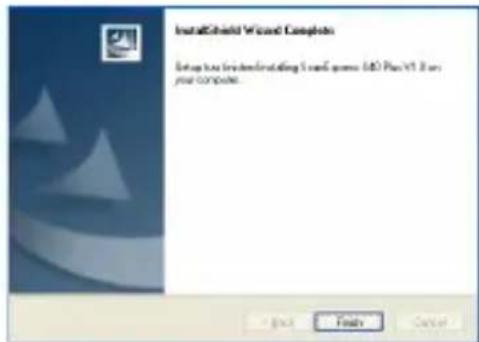
Click "Finish" when the installation procedure is complete.
-
The scanner is now ready for use.
Installing Other Softwares
Cardlris: Install this program to perform an OCR (optical Character Recognition) operation for business cards. and export all the data, including card images to E-mail, FrontRange GoldMine, HTML(.html), IBM Lotus Notes, Innomatix InfoContacts II, Outlook, Outlook Express, Palm Desktop, Text (.csv), vCard(.vcf), ACT! and XML(.xml).
Adobe Acrobat Reader (PC only): Install this program for reading PDF files.
ABBYY FineReader: Install this program to perform an OCR (optical Character Recognition) operation for documents. This program allows to scan text, and to convert it to a text document.
Arcsoft Media Impression (PC only): This program will help you to manage your folders and process photos. It gives access to organize, view, edit, share and protect your picture, music, and video files.
Installing Hardware

- With the computer turned on, connect the two A-Type USB ends of the USB cable to 2 USB ports of your computer and the other end to the scanner.
- When the computer detects the new hardware being inserted, the icon ( ) will appear under the Applications (MAC OS) or pop-up message as below (PC OS).
Note: Follow on screen instructions to complete the hardware installation as necessary.
Scanning Operation
Inserting Document
- Slowly insert the document facing up into the paper feed slot of the scanner, making sure the document remains in position.
- Gently push forward until the document is grasped by the feed slot.
Note: Position the paper aligning with the right side of the feed slot if it is smaller than A4 size.
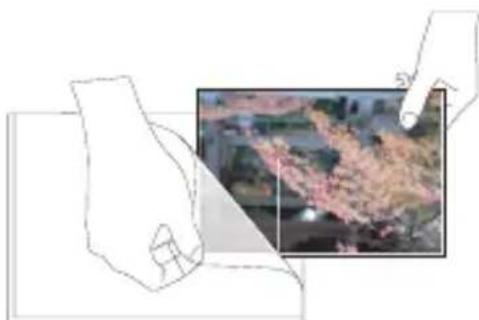
Using to use the Photo Protect Sleeve
To protect your precious photos during scanning, place the photo into supplied protective sleeve prior to scanning. Make sure the sealed end goes first into the feed slot for scanning.
Note: Do not place the photo into protective sleeve if the photo you wish to scan has been laminated.
Direct Scanning
-
Insert your document into the feed slot, tap scan) on the scanner to start scanning.
-
The scanned image will be saved in the Path you specified in the Scan Setting menu in Page 12, and then displayed in the scan area.
Note: A Calibration window will appear the first time prior to scanning. Follow the Calibrating and Cleaning the Scanner section on page 22.
Scanning using ScanExpress Plus panel
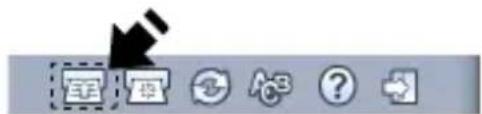
- Select on the ScanExpress S40 Plus ( ) to start the program as following:
MAC OS: Applications > ScanExpress Plus.
PC OS: Start > All Programs > ScanExpress S40 Plus > ScanExpress Plus.
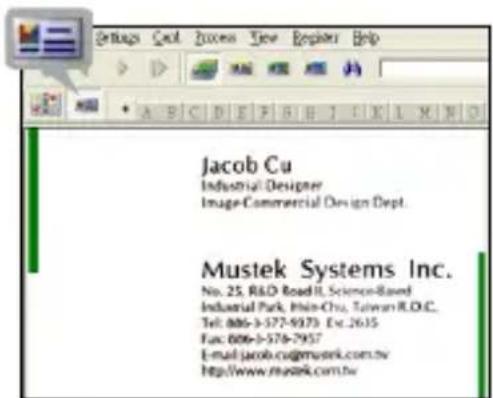
- The ScanExpress Plus panel appears on screen as below.
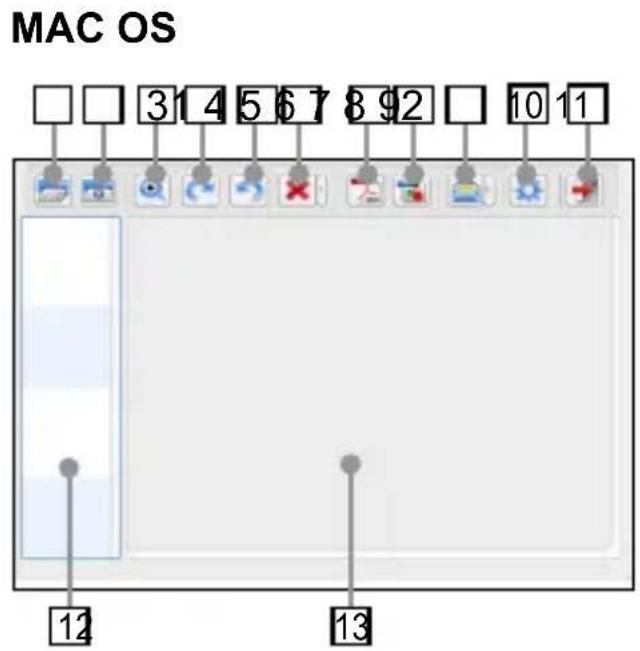
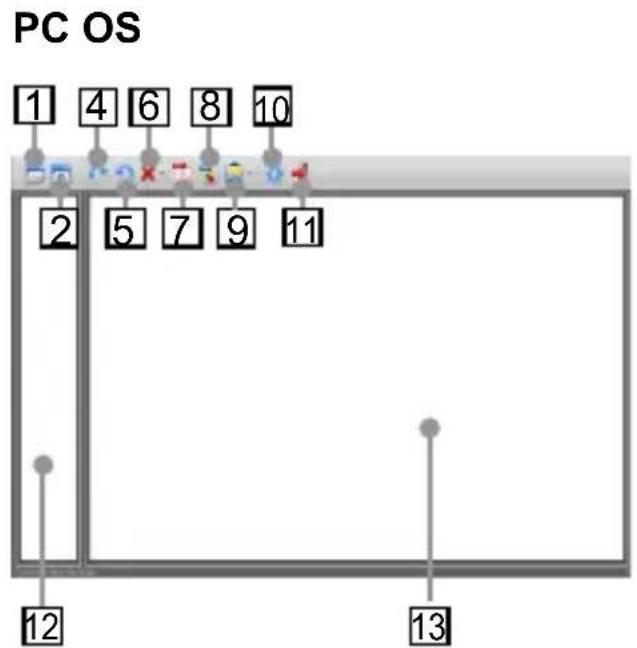
1 Scan
2 Calibrate and Clean
3+Zoom in/out
4 Rotate clockwise 90^
Rotate counter-clockwise 90^
6Delete
Export image(s) into PDF file.
Export image(s) into TIFF file.
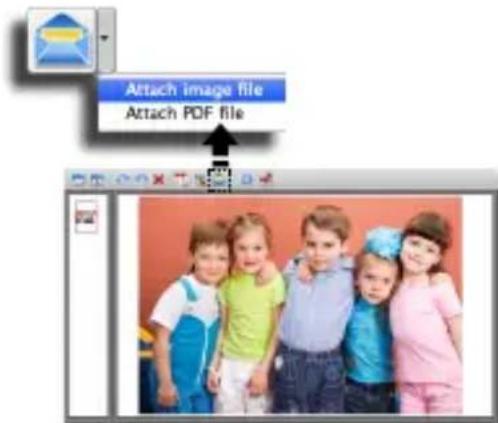
9 Attach Image or PDF file to an email
10 Scan Setting
1 Exit
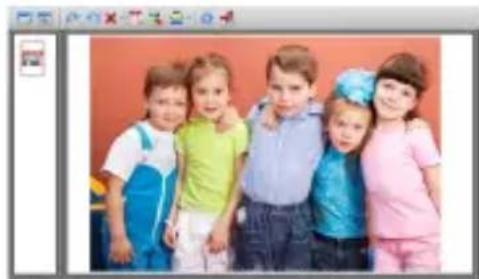
12 Thumbnail image
13 Scan area
- Set up the (Scan Setting) as describing on Page 12.
- Press (Scan) in the ScanExpress S40 Plus panel to begin to scan.
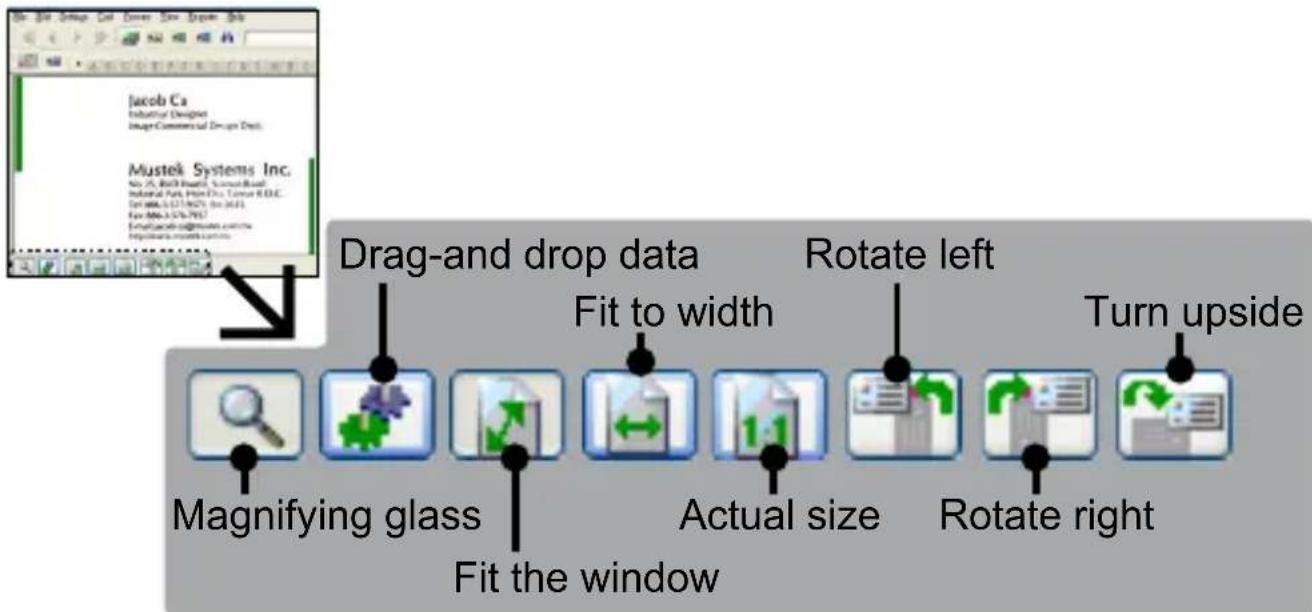
- Press or (Rotate) on the panel if you wish to rotate the image.
Note: You may repeat steps 3 4 to scan more pages to be saved in the same file.
- Press (PDF) or (TIFF) to export the image(s) into a PDF or TIFF file.
- Press (Zoom) to zoom in or out the scanned images. (MAC only)
Note: To exit the scan panel, press (Exit) on the panel.
Attach scanned image to email
- Press (attach the email) to attach the image as TIF, JPEG or BMP images or PDF format to send email.
Note: Select a preferred email software in the Scan Setting if more email softwares in your PC.
Scan Setting
- Click the "Scan setting" icon on the panel. The scan setting window will pop-up on the screen.
MAC OS PC OS
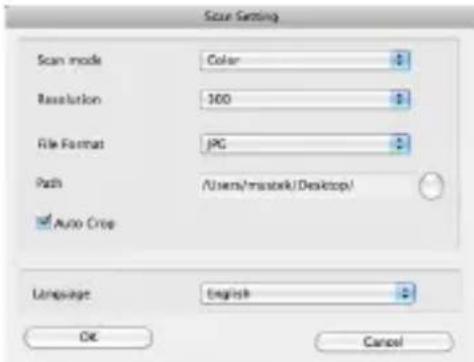
- Select the preferred Scan Mode, Resolution, File Format, Path, AutoCrop and Language settings and click "OK".
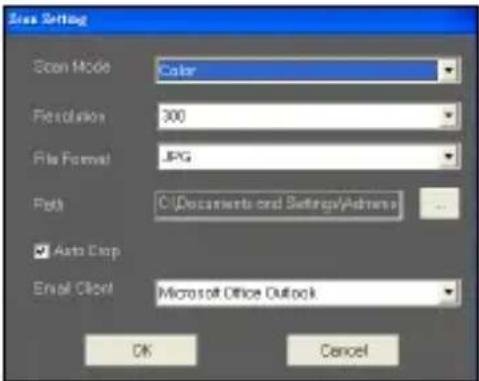
- Select the preferred Scan Mode, Resolution, File Format, Path, AutoCrop and Email Client settings and click "OK".
Note 1: Specify a directory in the Path for direct scanning.
Note 2: Select "AutoCrop" to automatically trim unwanted background in the scanned image.
TWAIN Software Scanning
About TWAIN Driver
- The TWAIN user interface is a scanning option provided with your scanner. TWAIN is an industry standard that allows scanning from a twain compliant application. It is easily accessed from within the supplied scanner software or an application that supports TWAIN such as Media Impression, or Photoshop. Before you start with the steps below, be sure you have installed and configured the supplied scanner software. For more details, refer to TWAIN Help for PC in supplied software CD.
Scanning using TWAIN
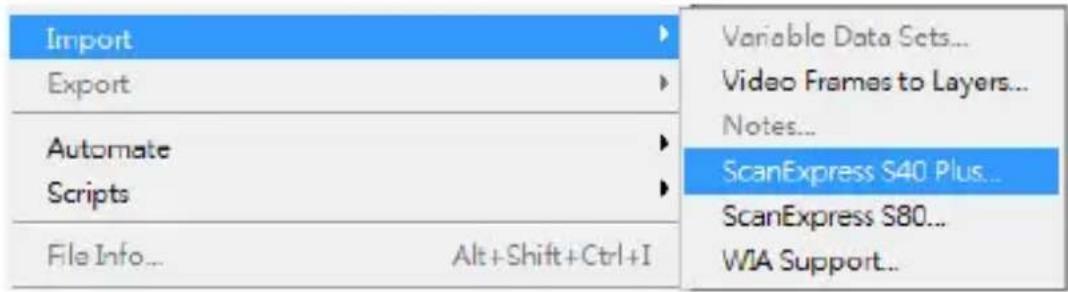
- Start the TWAIN-compliant application (eg. Media Impression, or PhotoShop).
- Click on File Import select ScanExpress S40 Plus to start the scanner's TWAIN driver. The TWAIN panel will appear on the screen.
- Click (Scan) or tap (Scan) button to start scanning procedures. After scanning is finished, the scanned document will be displayed in the TWAIN-compliant application.
Main TWAIN settings
Click Main tab to adjust the scan mode, size, resolution and output.
MAC OS PC OS

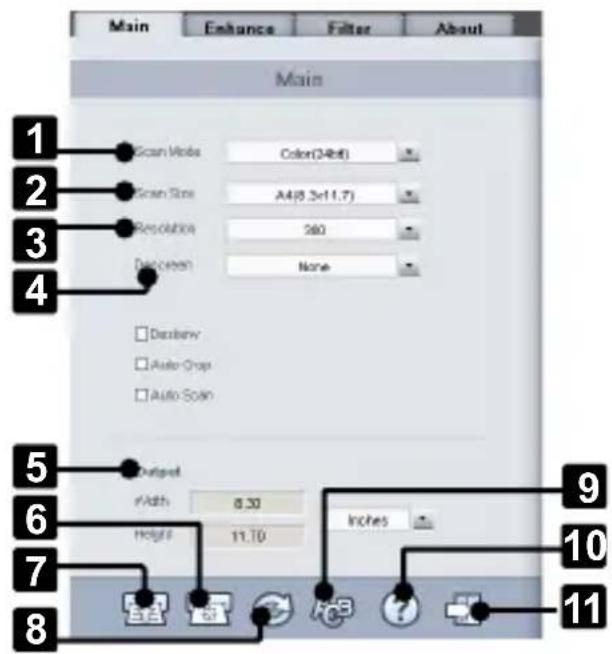
1 Scan Mode
2 Scan Size
3 Resolution
4 Descreen
5 Output
6 Calibrate and Clean
7 Scan
8 Reset
9 Change TWAIN window language
10Help
11 Exit
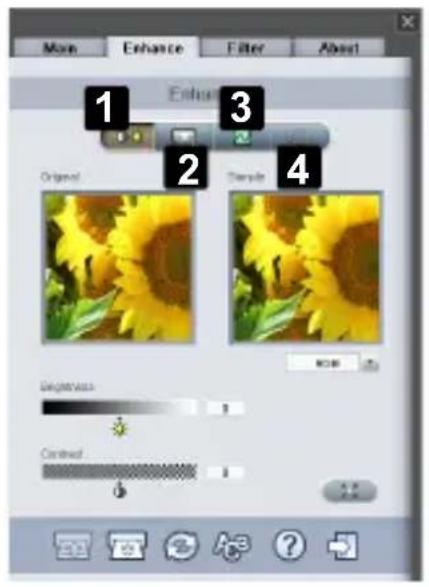
Enhance Setting
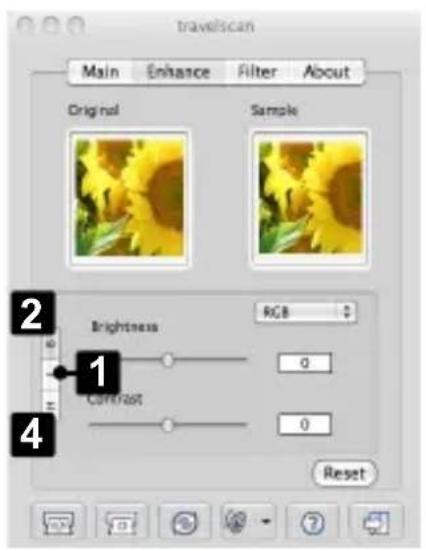
Click Enhance tab to set up the desired scanning effect, such as the brightness/contrast, curve and hue/saturation.
MAC OS
PC OS
Level Control
2 Brightness/ Contrast Control
3 Curve Control
4 Hue/ Saturation Control
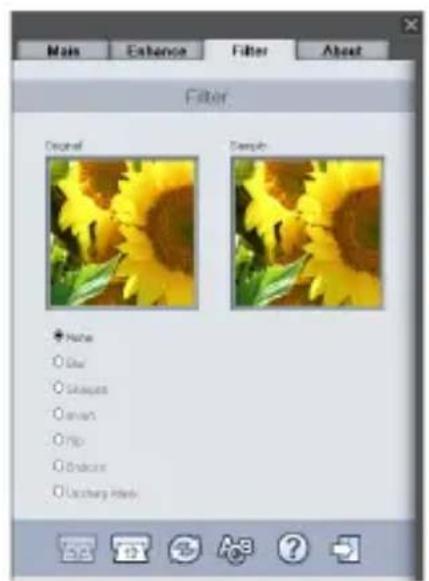
Filters Setting
Click Filter tab to adjust the individual effects of the scanned image by applying various filters to the image, prior to scanning.
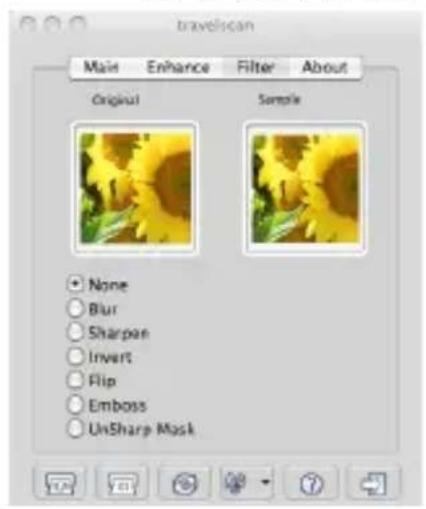
MAC OS PC OS
Using TWAIN in Photoshop CS5 and CS4
- If you are a MAC OS user using Photoshop CS5 or CS4:
- Download the Photoshop CS5 Optional Plugins (for CS5) or Adobe Photoshop CS4 Optional plug-ins and ReadMe English, Spanish and French (for CS4) from Adobe website as below:
CS5: http://www.adobe.com/support/downloads/detail. jsp?ftpID=4687
CS4: http://www.adobe.com/support/downloads/detail. jsp?ftpID=4047 - Extract the downloaded file and find "TWAIN-plugin" file.
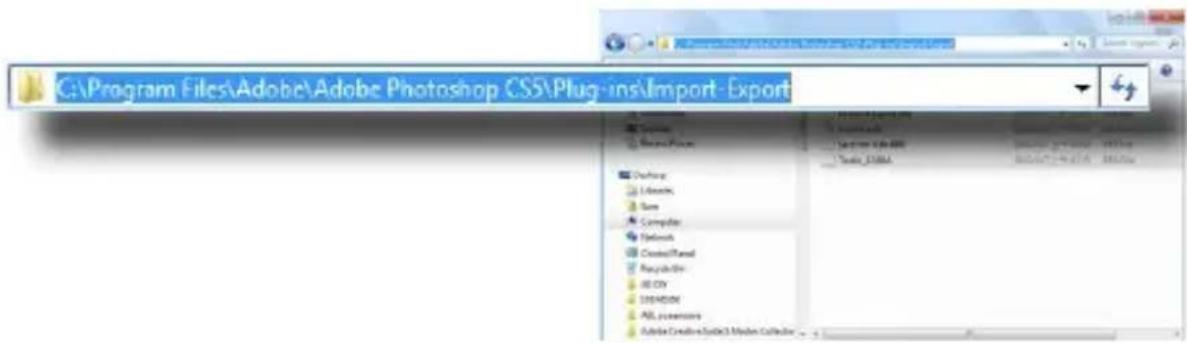
- Quit Photoshop, and place "TWAIN-plugin" in the CS5/CS4 plug in directory: Applications\Adobe Photoshop CS5(CS4)\Plug-Ins\Import-Export\
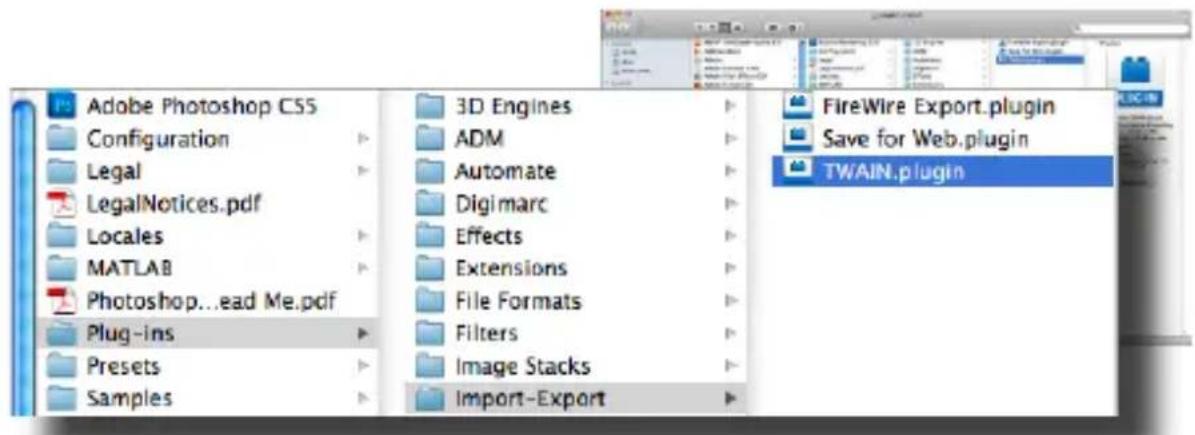
- Restart Photoshop to enable the plug-in.
- If you are a Windows OS user using Photoshop CS5, you must manually install the TWAIN plug-in following below steps:
- Download the Photoshop CS5 Optional Plugins from Adobe website as below: http://www.adobe.com/support/downloads/detail.jsp?ftplD=4688
- Extract the downloaded file and find "Twain_32.8BA" file in the Win32 or Win64 folder depending on your operating system (32-bit or 64-bit).
Note 1: You may not see the extension filename of .8BA.
Note 2: To check whether your system is 32-bit or 64-bit, click the Start button and then right-click on My Computer. From the drop-down list, select Properties.
-
Enable the TWAIN plug-in:
-
For Windows 32-bit editions - Quit Photoshop, and place "Twain_32.8BA" (32-bit) in the CS5 plug in directory: C:\Program Files\Adobe\Adobe Photoshop CS5\Plug-Ins\Import-Export\
- For Windows 64-bit editions - Quit Photoshop, and place "Twain_32.8BA"(64-bit) in the CS5 plug in directory: C:\Program Files (x86)\Adobe\Adobe Photoshop CS5\Plug-Ins\Import-Export\
- Restart Photoshop to enable the plug-in.
Business card scanning
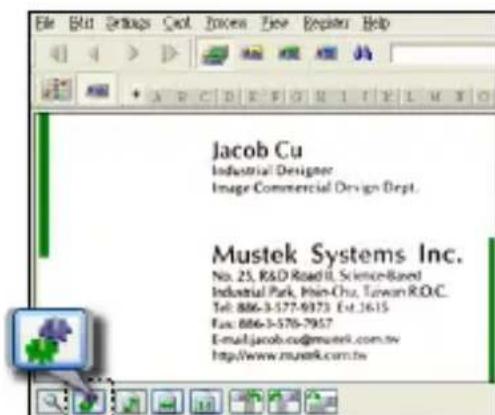
Insert a Business card
- To avoid the business card from shifting when scanning, place the business card against the right side of the paper feed slot, and then gently push forward until the business card is grasped by the feed slot.
Scanning the Business card
-
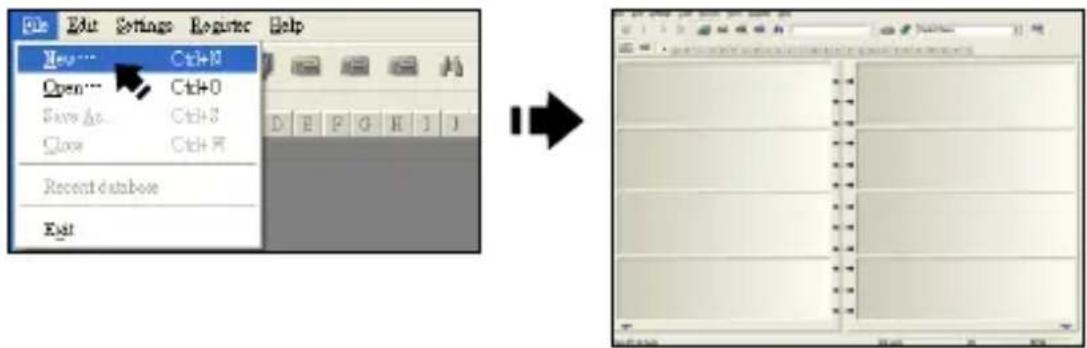
Click Start > All programs > I.R.I.S. Applications > Cardiris > Cardiris.
-
Click File > New to create a new sheet.
- Click (Scan Cards) button to bring up the Scan setting dialog window.

Note: Click Calibrate button to start the calibration procedure if this is the first time using the scanner.

- Set the Scan Size to Business Card (3.5x2.2), and the Resolution to 400 at least.

- Select the preferred Scan Mode, then click the Scan to start the scan procedure.
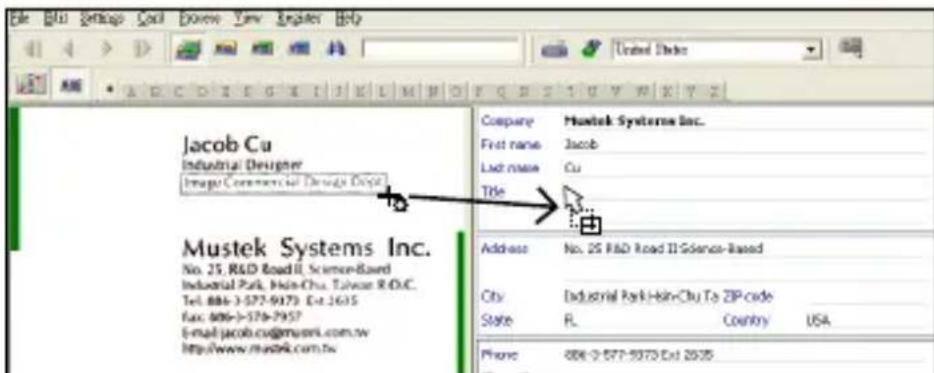
- Click (Card view) button on the upper toolbar.
- Click (Recognize cards) button to start the character recognition. Make sure the correct country is selected in the country select field to align with your business card's languages.
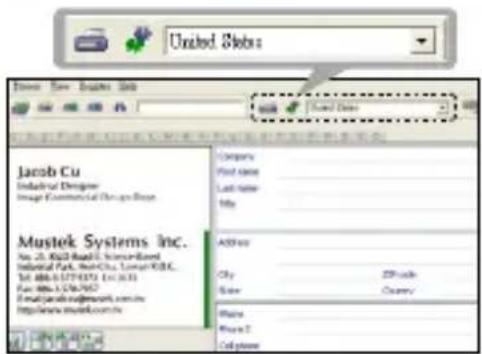
Edit
- Select and click a function below to adjust the preview of the scanned card.
- Click the (Drag-and-drop data) button.
- Select the area you wish to edit or recognize again using a mouse.
- Drag and drop the selected square to the target field.
Note: Drag-and-drop operation works only in the Card view (
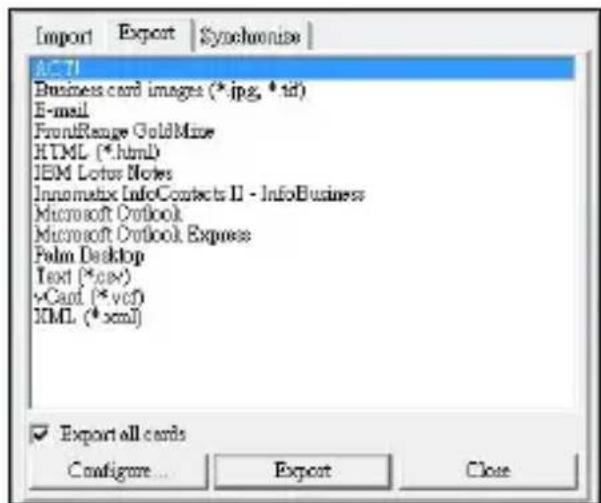
Export and Synchronize
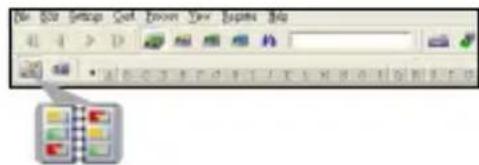
To export and synchronize the data with other softwares, please switch to (Album view).
-
Click File > Import, Export and Synchronize... > Synchronize tap.
-
Click Export tab.
-
Select a preferred format you wish to export the scanned business card, and then click Export. The supported formats include as follow: .jpg, .tif, E-mail, FrontRange GoldMine, HTML(.html), IBM Lotus Notes, Innomatix InfoContacts II, Outlook, Outlook Express, Palm Desktop, Text (.csv), vCard(.vcf) and XML(xml).
-
Alternatively, repeat the steps above 1-2 to select Synchronize.
-
Select a preference software you wish to synchronize the scanned business card, and then click Synchronize. The supported softwares included are as follow: ACT!, FrontRange GoldMine, IBM Lotus Notes, Outlook, Outlook Express, Palm Desktop and Pocket PC.
For more BCR functions, please refer to Cardiris Help located in Help >Help Topics.
Scanning with ABBYY Findreader
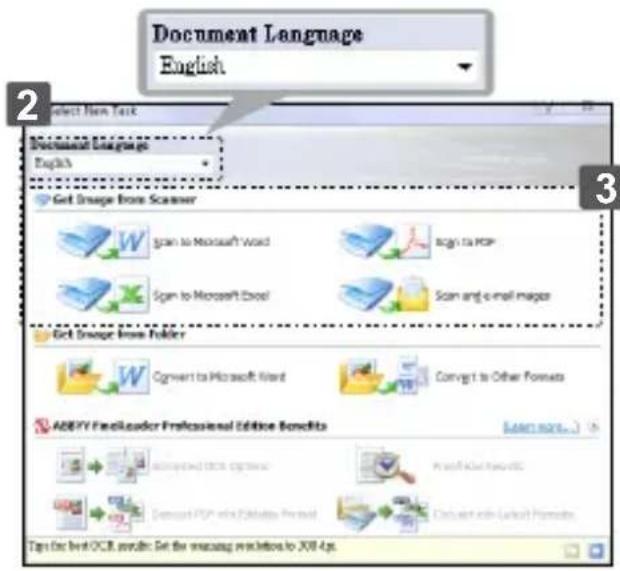
- Click Start > All programs > ABBYY FineReader 9.0 Sprint > ABBYY FineReader 9.0 Sprint. The Select New Task window appears on the screen.
- Select language for the document to be scanned.
- Select a desired file format, and the scan menu appears on the screen.
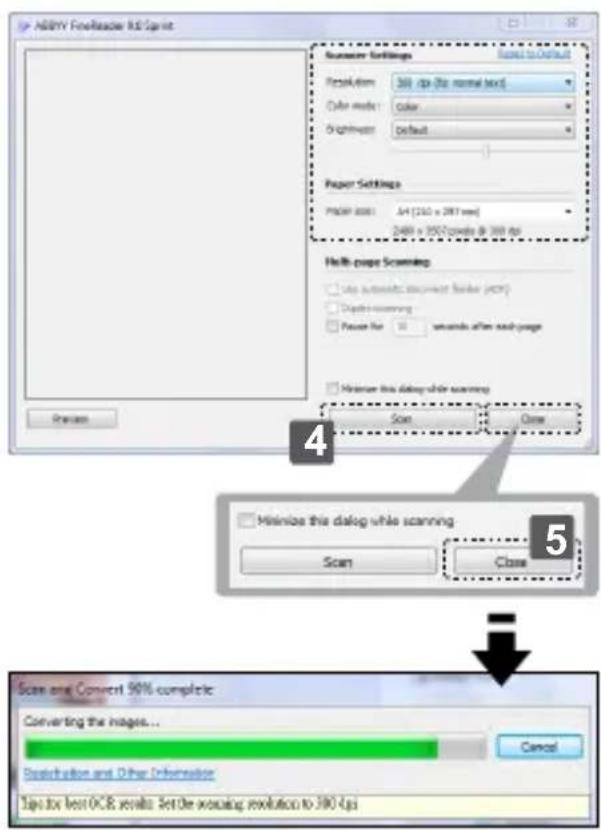
- Select a desired Resolution (300dpi at least), Color mode, Brightness and Paper size, and then click Scan button.
Note: Do not touch the Scan pad on the scanner, otherwise the Direct Scan with one touch button will be launched and scan automatically.
- After the document has rolled through the scanner, click the Close button to process.
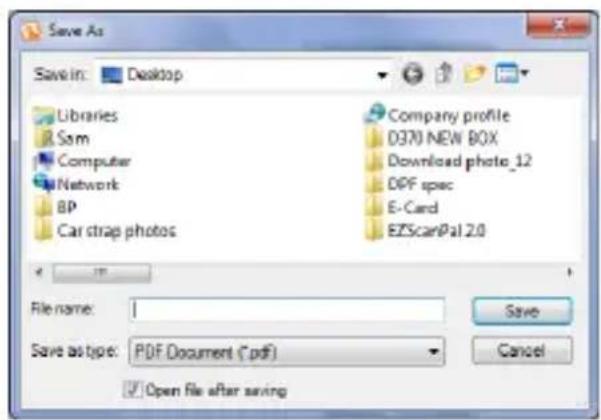
Note: The Save As dialogue window will appear on the screen if you select the converted file format is PDF.
- Click for in the right window to rotate the document if the direction is incorrect.
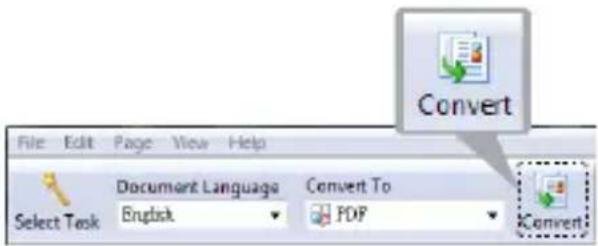
- Draw the outline to re-define the text, picture or table using (Draw Text Area), (Draw Picture Area), (Draw Table Area) tools if the OCR quality is poor.
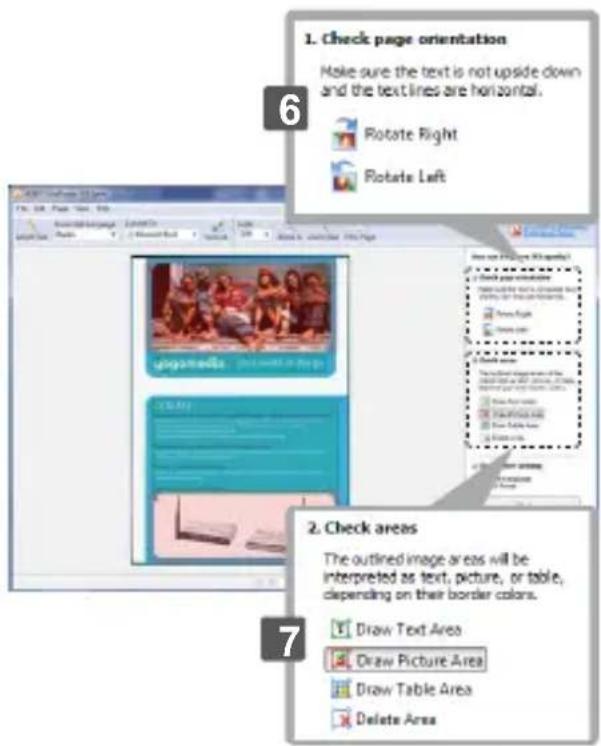
- Once the text, picture or table have been re-defined, then press (Convert).
- The corresponding software will open when the converting process is finished.
- For more detailed operations, refer to ABBYY FineReader Sprint Help in the software.
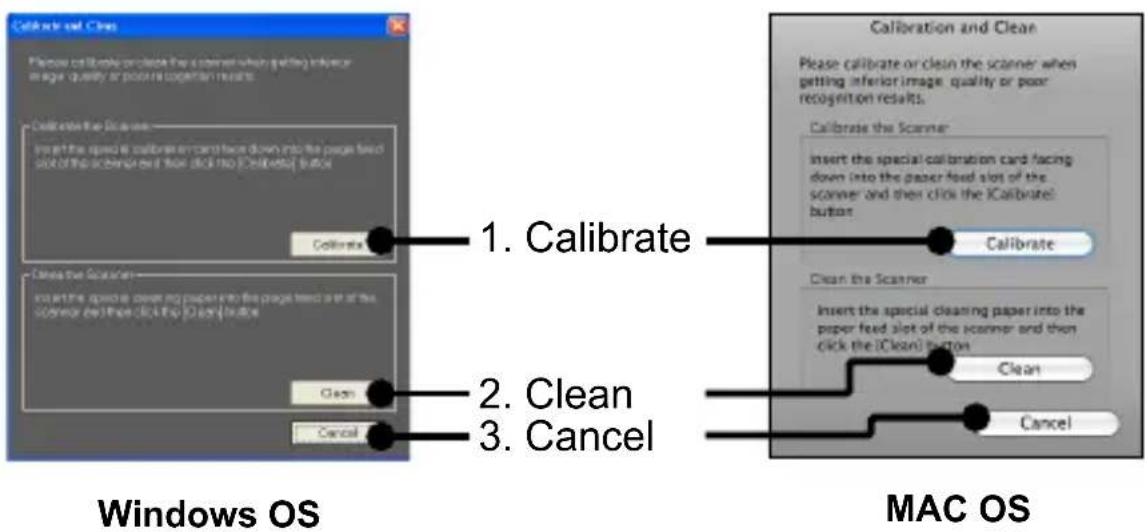
Calibrating and Cleaning the Scanner
- To get high image quality and good recognition results, clean and calibrate the scanner before scanning documents from time to time.
- Make sure the cleaning stick and calibration papers are clean without any dust prior to use.
Using the Calibration and Cleaning Paper
- Click the (Calibrate and Clean) on the ScanExpress Plus panel, then a Calibrate and Clean window will appear on the screen.
- Insert supplied calibration or cleaning paper with the white side facing up into the feed slot and click Calibrate and Clean respectively.
- The paper will go through the feed roller to complete the task.
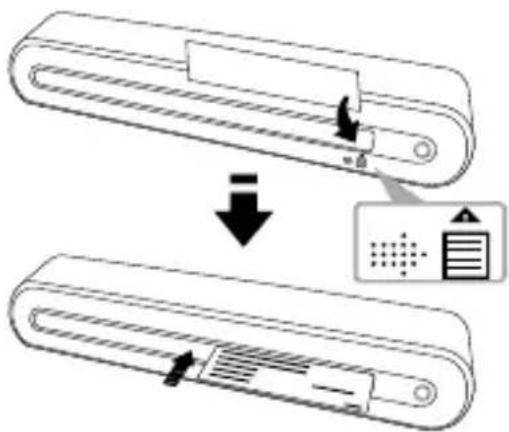
Using the Cleaning Stick
CAUTION: Do not insert the cleaning stick into the slot at the front side of the scanner.
- Insert the thin end of the cleaning stick into the slot at the rear of the scanner.
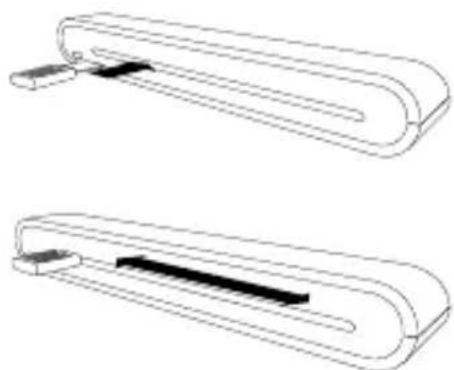
- Move the cleaning stick from one side to the other slightly a few times to clean the sensor of the scanner.
Attention: To protect the components inside of the scanner, do not move the sensor cleaning stick excessively.
- Remove the cleaning stick gently away from the slot and preserve it for later use.
Troubleshooting
- Check to make sure the USB cable is firmly plugged into the scanner and the computer.
- Please calibrate or clean the scanner if the scan result is poor quality.
Specification
| Scanner Type Color CIS Sheet feed | |
| Resolution Optical: 600 dpi (H) x 600 dpi (V) | |
| Scan Area Max. 216 x 355 mm / 85" x 139" (Legal Size) | |
| Light Source LED | |
| Interface USB 2.0 | |
| Scanning Mode Color mode, Gray Mode, Line Art | |
| Scanning Speed 2.7ppm @ A4 300 dpi B/W & color4ppm @ A4 200 dpi B/W & color | |
| System Support Windows XP / Vista / 7 | |
| Supported formats JPG, BMP(Windows), PNG(MAC), TIFF, PDF | |
| Scan via email (MAC OS) | JPG, PNG, TIFF, PDF |
| System Requirements | Mac OS computer with Power PC or Intel processor/ Mac OSX 10.4 superior/512MB RAM/256MB available hard disk space/CD-ROM Drive/At least 2 available USB ports |
| PC Pentium III 300 or Equivalent Processor /256MB (512MB for Vista) RAM/850MB available hard disk space/CD-ROM Drive /At least 2 available USB ports | |
| Power Consumption U | SB bus powered 5V, 500mA |
| Dimension 293mm x 63.7mm x 39mm / 115" x 25" x 15.3" | |
| Weight 420g / 0.92lbs | |
This symbol on the product or in the instructions means that your electrical and electronic equipment should be disposed at the end of its life separately from your household waste. There are separate collection systems for recycling in the EU. For more information, please contact the local authority or your retailer where you purchased the product.


ScanExpress S40 Plus
Scanneur portable A4
10 Help (Aide)
11 Exit (Quitter)

m = 311 ;
ScanExpress S40 Plus
Escáner portátil A4
Manual del usuario
ESPNOL
CS5: http://www.adobe.com/support/downloads/detail.
jsp?ftpID=4687
CS4: http://www.adobe.com/support/downloads/detail.
jsp?ftpID=4047
http://www.adobe.com/support/downloads/detail.jsp?ftplD=4688
Exportary sincerizar
Attach scanned image to email
3 Resolution (Resolucao)
4 Descreen (Uniformizar)
5 Output (Sáida)
6 Calibrate and Clean
(Calibrar/Limpar)
Scan (Digitalizar)
8 Reset (Repor)
9 Change TWAIN window language