
DJ050SP - Camera LEXIBOOK - Free user manual and instructions
Find the device manual for free DJ050SP LEXIBOOK in PDF.

| Product type | Digital camera |
| Brand | Lexibook |
| Model | DJ050SP |
| Maximum image resolution | 8 Megapixels (3264 x 2448 px) |
| Maximum video resolution | VGA (640 x 480 px) |
| Sensor type | CMOS |
| Lens | f=7.23 mm, F2.8 |
| Zoom | Digital (T/W buttons) |
| LCD screen | 2.4-inch TFT |
| Internal memory | 16 MB (approx. 1 photo) |
| External memory | SD/MMC card up to 8 GB |
| File formats | JPEG (photo), AVI (video) |
| Power supply | 3 AAA 1.5V batteries (not included) |
| Flash | Auto, on, off, red-eye reduction |
| Self-timer | 2 or 10 seconds |
| Image stabilizer | Yes |
| White balance | Auto, daylight, cloudy, incandescent, fluorescent |
| ISO | Auto, 100, 200, 400 |
| Scene modes | Auto, night portrait, night landscape, portrait, landscape, sport, party, beach, high sensitivity |
| Connection | USB 1.1 |
| PictBridge | Yes |
| System compatibility | Windows 2000/XP/Vista, Mac OS X (10.2.6+) |
| Warranty | 1 year |
| Maintenance | Soft cloth slightly dampened with water; avoid humidity and heat |
| Safety | Do not disassemble, respect battery polarity, do not expose to fire |
| Package contents | Camera, USB cable, wrist strap |
Frequently Asked Questions - DJ050SP LEXIBOOK
User questions about DJ050SP LEXIBOOK
0 question about this device. Answer the ones you know or ask your own.
Ask a new question about this device
Download the instructions for your Camera in PDF format for free! Find your manual DJ050SP - LEXIBOOK and take your electronic device back in hand. On this page are published all the documents necessary for the use of your device. DJ050SP by LEXIBOOK.
USER MANUAL DJ050SP LEXIBOOK
Appareil photo numérique High Tech High Tech Digital Camera
MODE D'EMPLOI - INSTRUCTION MANUAL
A
B
C
E
PRÉSENTATION DE VOTRE APPAREIL PHOTO
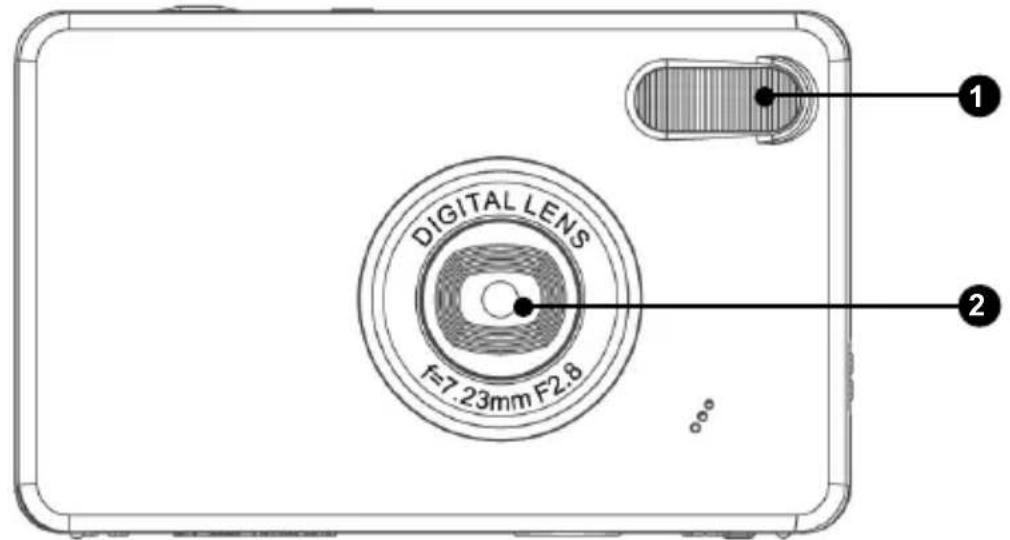
Image A
natural_image
Diagram of a device with cylindrical batteries and a camera lens, showing no text or symbolsPlease refer to image A
- Flash
- Camera lens
- LCD
- LED
- T (zoom in)/W (zoom out) buttons
- Mode button
- Up/Flash button
- Right/Delete button
- Menu/OK button
- Down/Self-timer button
- Left/Scene button
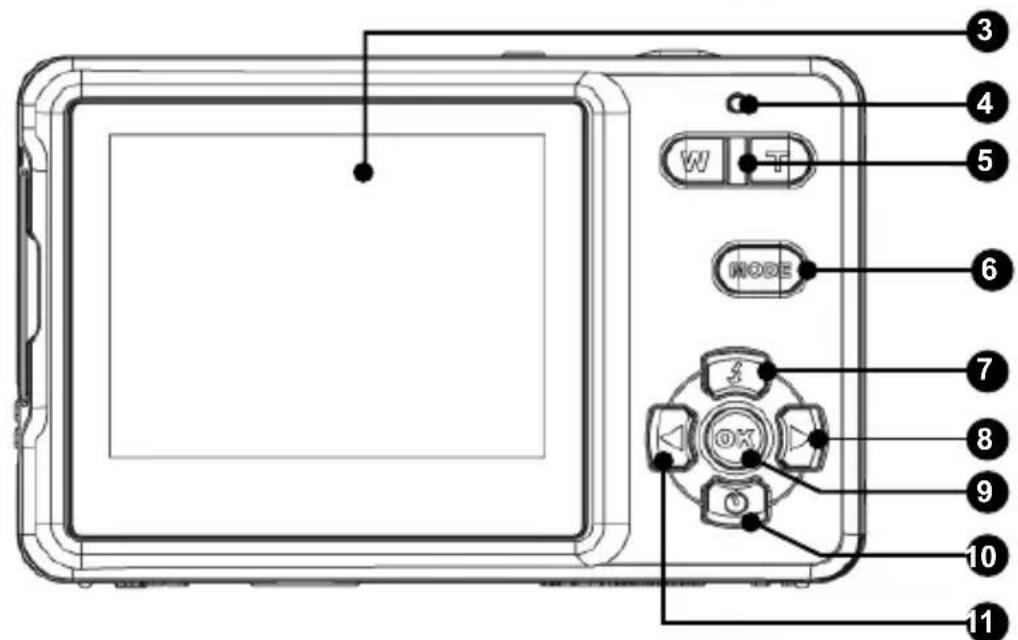
Please refer to image B
- Shutter button
- Strap hole
- Power button
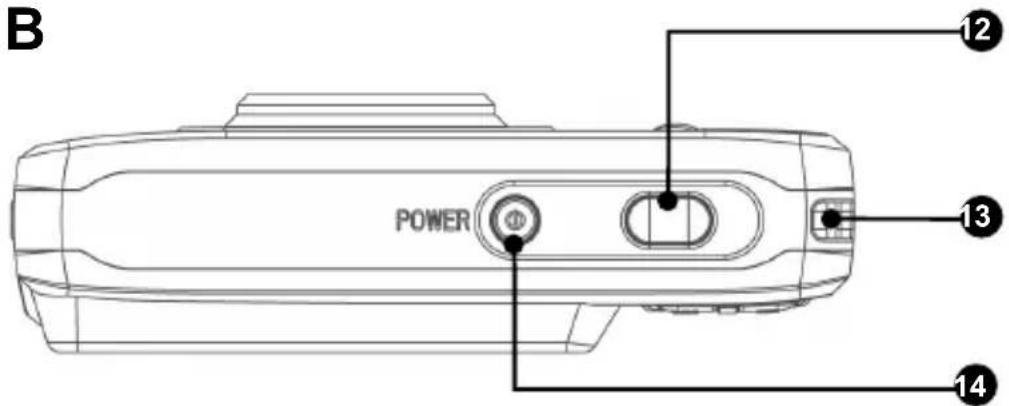
Please refer to image C
- SD Card slot
- Macro/Far switch
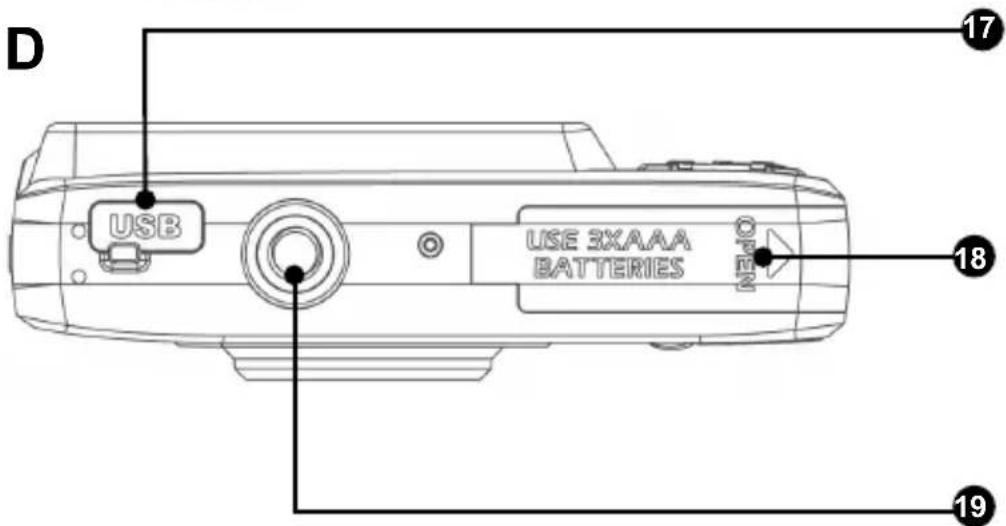
Please refer to image D
- USB jack
- Battery compartment
- Tripod hole (tripod not included)
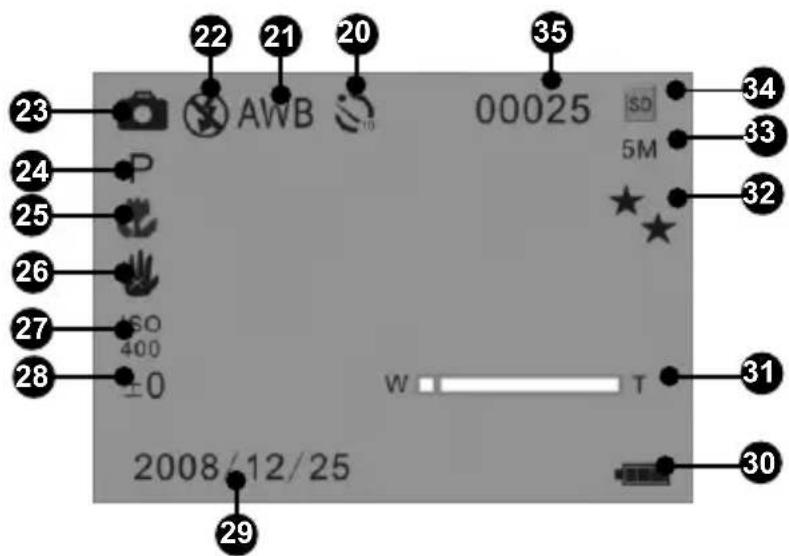
Please refer to image E
- Self-timer
- White balance
- Flash
- Camera mode
-
Scene
-
Macro
-
Anti-shake
-
ISO
-
Exposure
-
Date
-
Battery level
-
Zoom
-
Image quality
-
Image size
-
SD card inserted
-
Number of photos left to take
CONTENTS OF THE PACKAGING
1 x DJ050 digital camera
1 x USB cable
1 x hand strap
WARNING: All packaging materials, such as tape, plastic sheets, wire ties and tags are not part of this product and should be discarded for your child's safety.
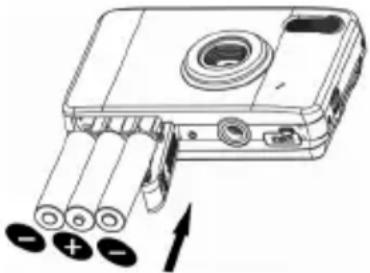
INSERTING NEW BATTERIES
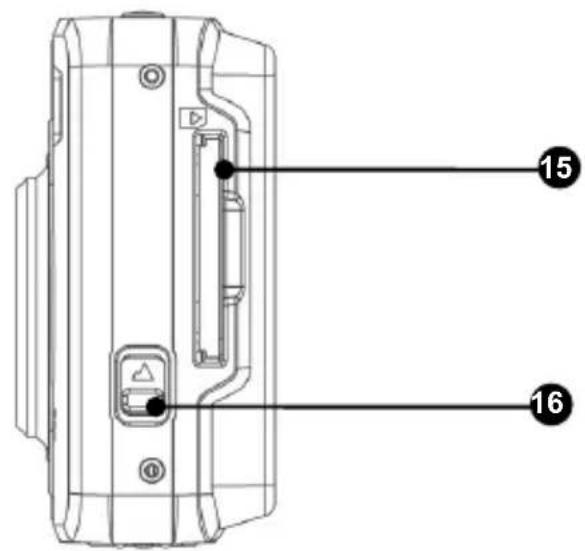
Please refer to image D.
- Make sure the camera is off.
- Slide open the battery door in the direction of the arrow.
- Insert 3 x LR03/AAA 1,5V type batteries = (not included) observing the polarity indicated inside the battery compartment.
- Close the battery compartment.
natural_image
Diagram of a handheld device with multiple batteries and an arrow indicating direction (no text or symbols)Note: When the low battery icon 📁 appears on the LCD screen, replace the batteries.
Non-rechargeable batteries are not to be recharged. Rechargeable batteries are to be removed from the product before being charged. Rechargeable batteries are only to be charged under adult supervision. Different types of batteries or new and used batteries are not to be mixed. Only batteries of the same or equivalent type as recommended are to be used. Batteries are to be inserted with the correct polarity. Exhausted batteries are to be removed from the product. The supply terminals are not to be short circuited. Do not throw batteries into a fire. Remove the batteries if you are not going to use the product for a long period of time.
WARNING: Malfunction or loss of memory may be caused by strong frequency interference or electrostatic discharge. Should any abnormal function occur, remove the batteries and insert them again.
Important note: All files stored in the unit's internal memory will be lost when switching off the camera or replacing the batteries. Make sure you transfer the files to your computer before turning off the product or changing the batteries.
INSTALLING A MEMORY CARD
Please refer to image C.
Your digital camera has a limited built-in memory of 16MB (1 picture / no video). Insert a SD card (8GB maximum, not included) to increase the memory size of the camera.
- Turn the camera off.
- Push the SD card firmly into the SD slot until you hear a 'click' sound. Turn the camera on and should appear.
Note:
- When an external memory card has been inserted in the camera, all photos/videos taken will be stored on the external memory card.
• To remove the card, push it in slightly to release it from the slot.
IMPORTANT NOTE: It is highly recommended to add a SD card to increase the storage capacity of the unit.
INSTALLING THE SOFTWARE AND THE CAMERA DRIVER
Follow these instructions to install the 'PhoTags Express' and 'Webcam Express' software and the camera driver on your computer system.
- Insert the CD Software (included) into your CD-ROM drive. The CD will auto run, and the installation menu will appear.
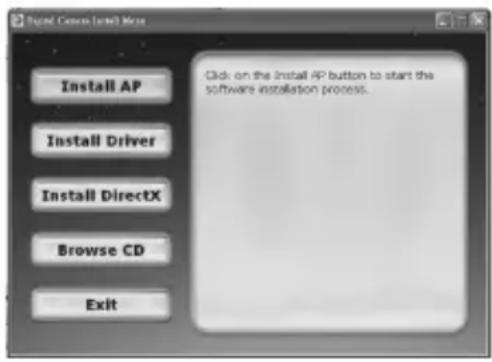
Click ‘Install AP’ on the ‘Digital Camera Install Menu’ window and select a language from the drop down list.
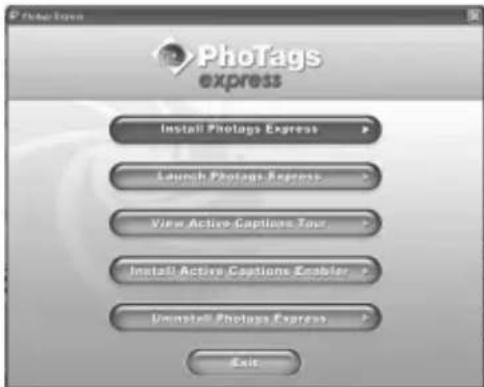
Click 'Install PhoTags Express' and follow the instructions to install 'PhoTags Express' and 'WebCam Express'. 'PhoTags Express' and 'WebCam Express' software offer many applications for photo editing and printing. When the installation is completed, a confirmation window will be displayed. Untick the 'Start the application' option and click the 'Finish' button to close the window and go back to the installation menu. Now you can install the camera driver.
- Click 'Install Driver', and then follow the instructions to install the camera driver.
- You will need to reboot your computer after the driver installation. The 'Instant USB Camera' driver allows you to use your digital camera as a webcam.
Note:
- If the CD does not auto run, click 'Start', 'Run', then type in 'D:\autorun.exe' in the Run dialog text box (where D:\ is your CD-ROM drive) and press Enter.
- You must install the driver before downloading photos/videos from the camera or using it as a webcam.
- Make sure the camera is not connected to your computer before installing the driver and the software.
- When launching the ‘PhoTags Express’ software for the first time, a registration dialog box is displayed on-screen. You can choose to register the program, skip the registration process or to stop displaying this dialog box again.
IMPORTANT NOTE: Lexibook will not be held responsible for any damages or loss of data resulting of the installation and/or use of this software.
TURNING THE CAMERA ON AND OFF
Press and hold the POWER button to turn the camera on or off. When you turn the camera on, the LCD screen lights up and a 'beep' sounds to confirm the camera is ready for use.
Note: The camera will auto power off after 60 seconds of inactivity.
CHANGING MODES
When the camera is turned on, press the MODE button to switch between the following modes:
Camera mode – takes photos
Video mode – captures video files
▶ Playback mode – reviews and edits files
TAKING PHOTOS (Camera Mode)
Turn the camera on to enter camera mode and take photos.
Taking a photo
Press the SHUTTER button to take a photo. The LED lights up and the number of photos left to shoot at this resolution are displayed on the LCD screen.
Note:
- When the camera's built-in memory is full, if you try to take a photo, the LCD screen will display a warning message.
- When the SD card inserted in the camera is full, the camera will beep twice if you try to take a photo. Make sure you transfer your photos to your computer.
Zoom
- To zoom in, press the T button.
- To zoom out, press the W button.
The wslide bar shows the zoom level.
Macro/Far shooting
- To shoot an object that is very close, slide the MACRO/FAR button to the left position. 🖼 appears on the LCD.
- To shoot an object that is far away, slide the MACRO/FAR button to the right. Appears on the LCD.
Flash function
To use the flash, repeatedly press the UP/FLASH button until your desired setting is shown by the icon on the screen:
| Flash is on | |
| Auto flash is on | |
| Flash with red-eye reduction is on | |
| Flash is off |
Note: When the "Macro" function is turned on ( 🔊 appears on the LCD.), the flash is disabled. Make sure to turn off the "Macro" function to be able to use the flash.
Self-timer
- Press the DOWN/SELF-TIMER button repeatedly to select a countdown time of 0 or seconds.
- Press the SHUTTER button to start the countdown and take the photo.
- To turn off the self-timer feature, press the DOWN/SELF-TIMER button repeatedly until the or icons disappeared from the LCD screen.
Deleting last photo taken
- To delete the last photo taken, press the RIGHT/DELETE button.
- Use the LEFT or RIGHT buttons to select 'Yes' or 'No' and press the MENU/OK button to confirm.
MENU SETTINGS (Camera Mode)
Changing the menu settings
- Press the MENU/OK button to access the menus.
- Press the LEFT or RIGHT button to select the menu.
- Press the UP or DOWN button to select a setting and press the MENU/OK button.
- Use the UP or DOWN buttons to change a setting and press the MENU/OK button to confirm.
Scene menu
Choose the scenery setting that most suits your environment and lighting. You can select from Auto, Night Portrait, Night Scenery, Portrait, Scenery, Sport, Party, Beach or High Sensitivity.
To quickly change the scenery setting before taking a photo, press the LEFT button repeatedly when in camera mode.
Image size menu
Change the image size and resolution according to the quality level you require. The higher the image quality the more memory space it will take.
Anti-shake menu
When turned on, the anti-shake function helps to prevent vibrations from your hand or environment blurring the picture.
Setup menu
- Exposure
Controls the brightness of your photos.
2. ISO
Helps compensate for poor light conditions when you don't want to use the flash. A low value will help to prevent spots or blotches appearing on your photo.
3. White balance
Adjusts the colour of your light source.
4. Sharpness
Changes the photo's sharpness making edges more or less distinct.
5. Quality
Adjusts the resolution. The higher the resolution the more memory is required reducing the total number photos you can store.
6. Date/Time
Sets the date, time and year/month/day format. When setting the date and time, the UP or DOWN buttons will change the value and the LEFT and RIGHT buttons will move you on to the next set of digits.
7. Auto power off
Set the camera to automatically turn off when it has been left idle for 1, 2 or 3 minutes, or you can turn this feature off.
8. Language
Selects 1 of the 6 languages available (English, German, Spanish, Portuguese, Italian and French).
9. Frequency
A higher frequency increases the camera shutter speed so the effect of light fluctuations from sources such as fluorescent lamps are reduced. Select "50HZ" or "60HZ".
10. Format
Caution: Formatting will delete all stored photos and videos even if they have been protected.
11. Default setting
Resets the camera to the factory's default settings.
CAPTURING VIDEO CLIPS (Video Mode)
- Switch on the camera and press the MODE button repeatedly until the video icon appears. The amount of video time you have left displays at the top of the screen.
- Press the SHUTTER button to start videoing. The recording length is displayed on the LCD screen.
- Press the SHUTTER button again to stop videoing and automatically save it in AVI format.
- For Zoom, Macro or Far shooting functions see the 'Taking Photos' section.
Note:
- The flash function is disabled in video mode.
- You can use Media player and Quick time to play AVI files on your computer.
- The video clip's length may change according to the memory space available on the camera's built-in memory or on the SD card.
Deleting last video taken
- To delete the last video taken, press the RIGHT/DELETE button.
- Use the LEFT or RIGHT buttons to select 'Yes' or 'No' and press the MENU/OK button to confirm.
To adjust the white balance or image size settings:
- In video mode, press the MENU/OK button.
- Use the LEFT or RIGHT buttons to select 'White balance' or 'Image size' menu.
- Use the UP or DOWN buttons to select the setting.
- Press the MENU/ OK button to confirm.
PLAYBACK MODE
Viewing your files
- Switch on the camera and press the MODE button repeatedly until the photo /video 'Playback' icon ▶appears.
- Use the LEFT or RIGHT buttons to display the previous or next photo or video.
- To view your files as thumbnails, press the W button until the thumbnails appear. Use the LEFT/RIGHT/UP or DOWN buttons to select a thumbnail and press MENU/OK to access it.
- To zoom in and out of a photo, press the W or T buttons.
- To watch your video, press the SHUTTER button to start or pause the video. Press the UP button to stop it and go back to the display mode.
- Press the MODE button at any time to go back to camera mode.
Note:
- 'No file' appears when there are no stored photos or videos.
Protecting files
- To protect a file from accidental deletion, enter playback mode and use the LEFT or RIGHT buttons to display the desired photo or video.
- Press the MENU/OK button.
- Use the LEFT and RIGHT buttons to select the 'Protect' menu.
- Use the UP or DOWN buttons to select 'Lock' or 'Unlock' and press the MENU/OK button to confirm.
Deleting files
- In playback mode, use the LEFT or RIGHT buttons to display the desired photo or video.
- Press the MENU/OK button.
- Use the LEFT and RIGHT buttons to select the 'Delete' menu and press the MENU/OK button to confirm.
- Use the UP or DOWN buttons to select delete 'This image', 'All' or 'Cancel' and press the MENU/OK button.
- Use the LEFT or RIGHT buttons to select 'Yes' or 'No' and press the MENU/OK button to confirm.
Editing files (photos only)
Cropping
- Select the photo for cropping and press the MENU/OK button.
- Use the LEFT or RIGHT buttons to select the 'Crop image' menu.
- Use the UP and DOWN buttons to select 'Crop' and press the MENU/OK button.
- Use the UP/DOWN/RIGHT or LEFT buttons to select an area.
- Use the T and W buttons to zoom in and out of an area.
- Press the SHUTTER button twice to crop and save it as a new photo.
Rotating
- Select the photo for rotating and press the MENU/OK button.
- Use the LEFT or RIGHT buttons to select the 'Rotate' menu.
- Use the UP and DOWN buttons to select '90°', '180°' or '270°' and press the MENU/OK button.
Printing
- Select the photo for printing and press the MENU/OK button.
- Use the LEFT or RIGHT buttons to select the 'PictBridge' menu.
- Use the UP and DOWN buttons to select 'PictBridge' and press the MENU/OK button. The LCD will display, 'Please connect to device'.
- Connect the camera to the compatible printer with the USB cable for printing.
DOWNLOADING YOUR PHOTOS AND VIDEOS
Manual downloading
-
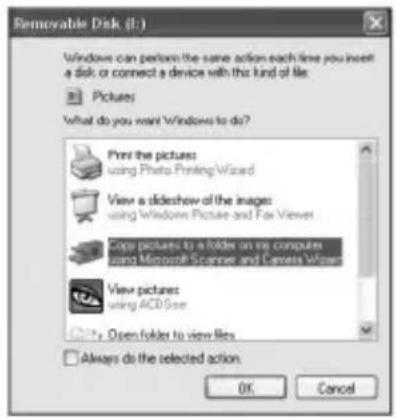
Turn on the camera and then connect it to your computer via the USB cable provided. 'MSDC' will appear on the LCD screen. This pop-up window will appear:
-
Select 'Copy pictures to a folder on my computer' and click 'OK'.
-
Follow the computer's onscreen commands until you are notified that downloading is complete.
OR, you can follow step 1 above and then:
-
Click on the 'Start' button in Windows.
-
Click on 'My computer' icon.
-
Click on 'Removable storage device' to view the images. The images are stored in a subfolder called 'DCIM' - - > « 100DSCIM ».
-
You can copy and paste the images into any directory you choose.
Downloading using 'PhoTags Express'
-
Turn on the camera and then connect it to your computer via the USB cable provided. You will hear a small 'beep' sound and 'MSDC' will appear on the LCD screen.
-
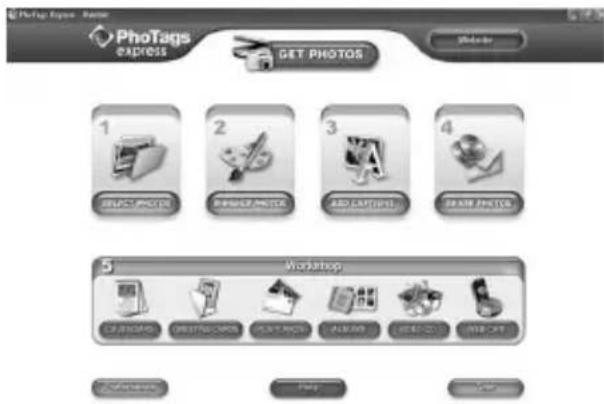
Launch the 'PhoTags Express' program and click the 'Get Photos' button on the main menu screen.
-
The 'Get Photos Wizard - Device Selection' window will appear. Select the 'Removable disk' driver from the 'Active Devices' list of on the left of the screen.
Note: Make sure you have selected the 'Removable disk' driver or you won't be able to download your photos/videos.
-
Select the 'Custom' or the 'Express' copy method and click the 'Next' button.
-
With the 'Custom' method, you can sort the photos by name, keyword and categories. Click the 'Next' button to continue. With the 'Express' copy
method, you will go directly to the following step.
-
Choose where to place your photos. Click the 'Browse' button to select the destination folder where you want all your photos to be saved.
-
Click the 'Finish' button to transfer the photos/videos from your camera to the destination folder.
WEBCAM MODE
Connected to your PC, your camera can be used as a webcam.
Webcam mode
- Turn the digital camera off.
- Connect the video camera to your computer using the USB cable provided.
- Press and hold the SHUTTER button, then press the POWER button once to switch on the camera. Do not release the SHUTTER button until
'PC CAM' appears on the LCD screen. You are now in webcam mode. To view the real-time images taken by the webcam, go to 'My Computer' and double click the new drive called 'Instant USB Camera'.
Capture a video clip
- Put your camera in webcam mode and connect it to your computer then launch the 'Webcam Express' software.
- In 'Capture' mode, click the 'Capture' button to start the video capture.
- Click the 'Stop' button to stop the video capture.
Take snapshots
- Put your camera in PC CAM mode and connect it to your computer then launch the 'Webcam Express' software.
- In 'Capture' mode, click the 'Snapshot' button to take a snapshot.
Instant messaging (chat)
You can use your camera as a webcam with your instant messaging client (Yahoo Messenger, MSN Messenger, Skype...).
Example:
- Put your camera in webcam mode and connect it to your computer then launch MSN Messenger.
- On the MSN interface, select 'Actions', then 'Start a Video Conversation'.
- Select the person you want to chat with, and press 'OK'.
TROUBLESHOOTING
Q: My camera doesn't turn on when I press the POWER button. What do I do?
A:
- Check that you have installed the batteries correctly.
- Place new batteries or fully recharged batteries in your camera.
Q: I can't see the LCD screen. What do I do?
A:
-
Your camera may have gone into power saving mode. Press the POWER button and see if it turns on.
-
Your batteries may be low. Place new batteries or fully recharged batteries in your camera.
- Check that you have installed the batteries correctly.
Q: Why does nothing happen when I press the SHUTTER button?
A:
- The camera may be still be doing a previous action such as recharging the flash, saving, copying or erasing a photo. Wait a few seconds and try again.
- The camera's built-in or SD card memory may be full. If this is the case, you need to delete photos from you camera. Make sure you transfer any photos you want to keep to your computer first.
- The timer may be counting down wait a few seconds.
Q: Why are my pictures unclear?
A:
- The lens may be dirty. Gently blow any loose dust from the lens. Then breathe gently on the lens and wipe it with a soft, clean cloth that has no chemicals on it.
- Make sure you hold the camera steady until after the red LED light has gone out.
- You may be too close to your subject. Try moving further away.
Q: Why are my pictures too dark?
A:
- The flash may be turned off. See the 'Taking Pictures' section for how to set the flash.
- The flash may need replacing. Take the camera to your nearest dealer for servicing.
- You may need to move closer to your subject or your subject may need to move to a lighter area.
- Your exposure, ISO, white balance or scene settings may be incorrect for your environment. See the 'Settings Menu' section for how to change these settings.
Q: Why are my pictures too light?
A:
- You may not need the flash function. See the 'Taking Pictures' section for how to change the flash setting.
- Your exposure, ISO, white balance or scene settings may be incorrect for your environment. See the 'Settings Menu' section for how to change these settings.
Q: What do I do when a memory card error message appears?
A:
Check the memory card instruction manual to make sure it is compatible and has been correctly formatted for your camera.
Q: I have taken photos but my computer does not recognize my camera. What do I do?
A:
- Ensure that you have in fact taken photos. Press the SHUTTER button a few times to take some sample photos and then try downloading them again. It is also recommended that you have an SD card inserted in the camera.
- Always use the USB cable that came with the camera. Make sure it is firmly connected to the camera and the computer.
- Give your computer time to recognize the USB connection device. Try refreshing the device options list until you see the removable device appearing.
If the computer does not recognize your device, check the 'Specifications' section to see if your computer meets the system requirements.
SPECIFICATIONS
| Image Sensor CMOS Sensor | |
| Image Resolution 3264 x 2448 Pixels (8M)3648 x 2048 Pixels (HD 7M)2592 x 1944 Pixels (5M)2048 x 1536 Pixels (3M)1920 x 1080 Pixels (HD 2M)640 x 480 Pixels (VGA) | |
| Video Resolution 640 x 480 Pixels (VGA)320 x 240 Pixels (QVGA) | |
| File Format JPEG / AVI | |
| External Memory SD / MMC Card (up to 8GB) | |
| LCD Screen 2.4 Inch TFT LCD | |
| Lens f=7.23mm, F2.8 | |
| Zoom Yes | |
| Exposure -3.0EV to +3.0EV | |
| White Balance Auto, Daylight, Cloudy, Incandescent, Fluorescent | |
| ISO Auto / 100 / 200 / 400 | |
| Scene Auto / NightPortrait / Night Scenery / Portrait / Scenery /Sport / Party / Beach / High Sensitivity | |
| Flash Auto / Flash On / Flash with Red Eye Reduction / Off | |
| Self-timer | 2 or 10 Second Delay |
| Anti-shake | Yes |
| PictBridge | Yes |
| Interface | USB 1.1 |
| System Requirements | Windows 2000 / XP / VistaTM / Mac OS X (10.2.6 or higher) |
| Battery | 3 x AAA |
| Working Temperature | 0-40°C |
MAINTENANCE
Only use a soft, slightly damp cloth to clean the unit. Do not use detergent. Do not expose the unit to direct sunlight or any other heat source. Do not immerse the unit in water. Do not dismantle or drop the unit. Do not try to twist or bend the unit.
WARRANTY
NOTE: Please keep this instruction manual, it contains important information. This product is covered by our one-year warranty. To make use of the warranty or the after-sales service, please contact your retailer and supply proof of purchase. Our warranty covers material or installation-related defects attributable to the manufacturer, with the exception of wear caused by failure to respect the instructions for use or any unauthorised work on the equipment (such as dismantling, exposure to heat or damp, etc).
Reference: DJ050series
Designed in Europe – Made in China
©2009 Lexibook®
Lexibook UK Ltd,
Wimbledon Village, Business Centre Ltd,
Thornton House, Thornton Road,
Wimbledon,
London SW19 4NG
Tel: 0808 1003015,
http://www.lexibook.com
This product is not a toy.
Environmental Protection
Unwanted electrical appliances can be recycled and should not be discarded along with regular household waste! Please actively support the conservation of resources and help protect the environment by returning this appliance to a collection centre (if available).
CE

CONOZCA SU CÁMARA
Véase la figura A
natural_image
Diagram of a digital camera module with multiple batteries and an attached lens, showing no text or symbols.MODO WEBCAM
natural_image
Diagram of a camera module with attached batteries and an arrow indicating direction (no text or symbols)
natural_image
Diagram of a camera module with attached batteries and an arrow indicating direction (no text or symbols)natural_image
Diagram of a camera module with multiple batteries and a circular lens, showing no text or symbolsInstant Messenger (Chat)
natural_image
Diagram of a digital camera module with battery and indicator lights, no text or symbols present

- PRÉSENTATION DE VOTRE APPAREIL PHOTO
- Image A
- Please refer to image A
- Please refer to image B
- Please refer to image C
- Please refer to image D
- Please refer to image E
- CONTENTS OF THE PACKAGING
- INSERTING NEW BATTERIES
- Please refer to image D.
- INSTALLING A MEMORY CARD
- Please refer to image C.
- Note:
- INSTALLING THE SOFTWARE AND THE CAMERA DRIVER
- TURNING THE CAMERA ON AND OFF
- CHANGING MODES
- TAKING PHOTOS (Camera Mode)
- Taking a photo
- Zoom
- Macro/Far shooting
- Flash function
- Self-timer
- Deleting last photo taken
- MENU SETTINGS (Camera Mode)
- Changing the menu settings
- Scene menu
- Image size menu
- Anti-shake menu
- Setup menu
- ISO
- White balance
- Sharpness
- Quality
- Date/Time
- Auto power off
- Language
- Frequency
- Format
- Default setting
- CAPTURING VIDEO CLIPS (Video Mode)
- Deleting last video taken
- To adjust the white balance or image size settings:
- PLAYBACK MODE
- Viewing your files
- Protecting files
- Deleting files
- Editing files (photos only)
- Cropping
- Rotating
- Printing
- DOWNLOADING YOUR PHOTOS AND VIDEOS
- Manual downloading
- Downloading using 'PhoTags Express'
- WEBCAM MODE
- Capture a video clip
- Take snapshots
- Instant messaging (chat)
- Example:
- TROUBLESHOOTING
- Q: My camera doesn't turn on when I press the POWER button. What do I do?
- A:
- Q: I can't see the LCD screen. What do I do?
- Q: Why does nothing happen when I press the SHUTTER button?
- Q: Why are my pictures unclear?
- Q: Why are my pictures too dark?
- Q: Why are my pictures too light?
- Q: What do I do when a memory card error message appears?
- Q: I have taken photos but my computer does not recognize my camera. What do I do?
- MAINTENANCE
- WARRANTY
- CONOZCA SU CÁMARA
- Véase la figura A
- MODO WEBCAM
- Instant Messenger (Chat)
Brand : LEXIBOOK
Model : DJ050SP
Category : Camera