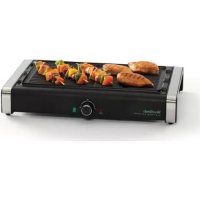
6111 - Barbecue Focus Electrics - Free user manual and instructions
Find the device manual for free 6111 Focus Electrics in PDF.
User questions about 6111 Focus Electrics
0 question about this device. Answer the ones you know or ask your own.
Ask a new question about this device
Download the instructions for your Barbecue in PDF format for free! Find your manual 6111 - Focus Electrics and take your electronic device back in hand. On this page are published all the documents necessary for the use of your device. 6111 by Focus Electrics.
USER MANUAL 6111 Focus Electrics
Register this and other Focus Electronics products through our website:
www.registerfocus.com
Important Safeguards 2
Before Using for the First Time 3
Using Your Electric Indoor Grill 4
Helpful Hints 5
Cleaning Your Electric Indoor Grill 5
Grilling Chart 6
Recipes 7
Warranty. 8
SAVE THIS INSTRUCTION MANUAL FOR FUTURE REFERENCE
IMPORTANT SAFEGUARDS

CAUTION
To prevent personal injury or property damage, read and follow all instructions and warnings.
When using electrical appliances, basic safety precautions should always be followed including:
- Read all instructions.
- Do not touch hot surfaces. Use handles or knobs.
- To protect against fire, electric shock, and injury to persons do not immerse cord, plugs, or other electric parts in water or other liquids.
- Close supervision is necessary when this appliance is used by or near children.
Always unplug from outlet when not in use and before cleaning. Allow to cool before putting on or taking off parts and before cleaning. - Do not operate any appliance with a damaged cord or plug, after the appliance malfunctions, or has been damaged in any manner. For service information see warranty page.
- The use of accessory attachments not recommended by Focus Electronics may cause fire, electric shock, or injury.
- Do not use this appliance outdoors.
Do not let cord hang over the edge of the table or counter, or touch hot surfaces. - Do not place on or near a hot gas or electric burner, or in a heated oven.
- Attach plug to appliance first, then plug cord into wall outlet. To disconnect, turn any control to "OFF," then remove plug from wall outlet.
- Do not use appliance for other than intended use.
- Extreme caution must be used when moving an appliance containing hot oil or other hot liquids.
- Do not attempt to repair this appliance yourself.
- A short power-supply cord is provided to reduce risks resulting from becoming entangled in or tripping over a longer cord.
- Longer extension cords are available, but care must be exercised in their use. While use of an extension cord is not recommended, if you must use one, ensure that the marked electrical rating of the extension cord is equal to or greater than that of the appliance. If the plug is of the grounded type, the extension cord must be a grounding-type 3-wire cord. To avoid pulling, tripping or entanglement, position the extension cord so that it does not hang over the edge of the counter, table or other area where it can be pulled on by children or tripped over.
- This appliance has a polarized plug (one blade is wider than the other). To reduce the risk of electric shock, this plug is intended to fit into a polarized outlet only one way. If the plug does not fit fully into the outlet, reverse the plug. If it still does not fit, contact a qualified electrician. Do not attempt to modify the plug in any way.
- Do not use an outlet or extension cord if the plug fits loosely or if the outlet or extension cord feels hot.
-
Do not use glass cover if chipped, cracked or has deep scratches as weakened glass can shatter during use. Discard immediately. See Replacement Part section in this booklet on how to obtain a replacement.
-
Keep the cord away from hot parts of the appliance and hot surfaces during operation.
- Lift cover slowly, directing steam away from you.
- Set cover on hot pad, trivet or other heat protective surface. Do not set hot cover directly on the counter, table or other surface.
- Do not place the glass cover in the microwave oven as it has a metal ring.
- Do not touch the metal probe on the plug or let it touch any surface after use, as it will be hot.
- For household use only.
SAVE THESE INSTRUCTIONS
BEFORE USING FOR THE FIRST TIME
Please check all packaging material carefully before discarding. Many accessory parts are contained within the packaging material.
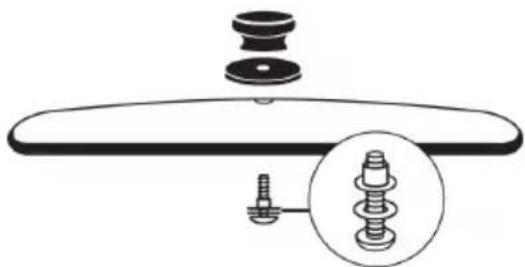
Follow assembly directions below to properly assemble cover knob before use. Do not use cover without cover knob properly assembled to topside of cover.
Parts Included:
Cover Knob
Tool Required:
Common Phillips screwdriver
Disc
Phillips screw with washer and plastic sleeve attached.
Assemble the Cover Knob:
-
Position disc and cover knob on topside of cover aligning hole in disc and cover knob with hole in cover.
-
Insert screw with washer and plastic sleeve attached, through cover hole into knob. Tighten with screwdriver until secured. Do not over tighten to prevent stripping of threads. Do not use cover without cover knob attached.
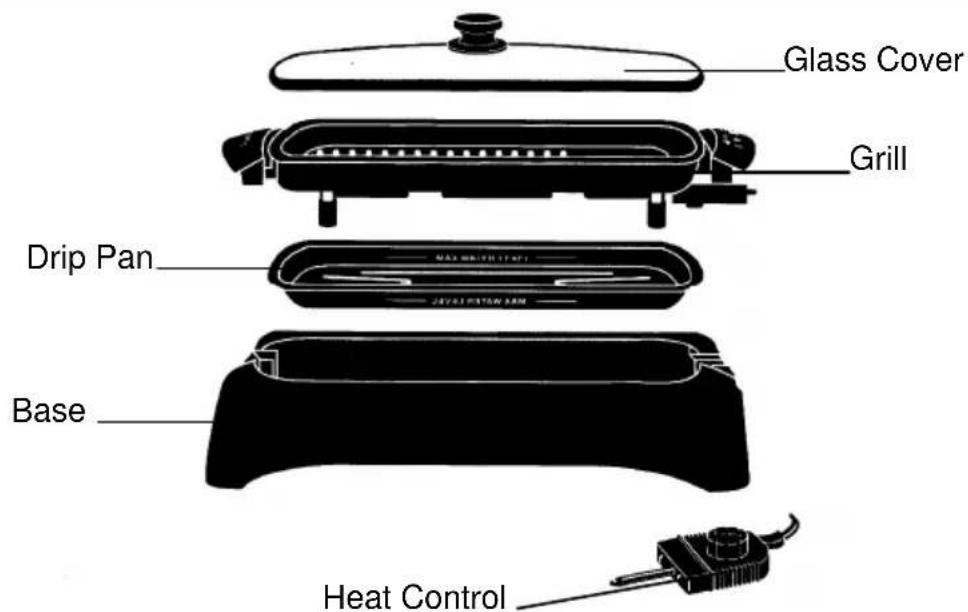
-
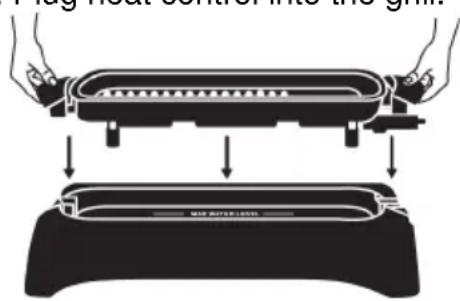
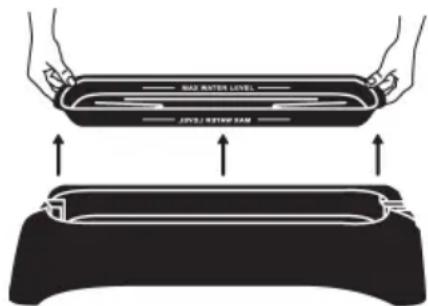
Always use grill on a dry, level, heat-resistant surface, away from any edge. Never use grill without drip pan in base. Do not use grill unless securely positioned in base.
-
Place drip pan into base. Fill drip pan with water to maximum water level line, about 3 cups.
-
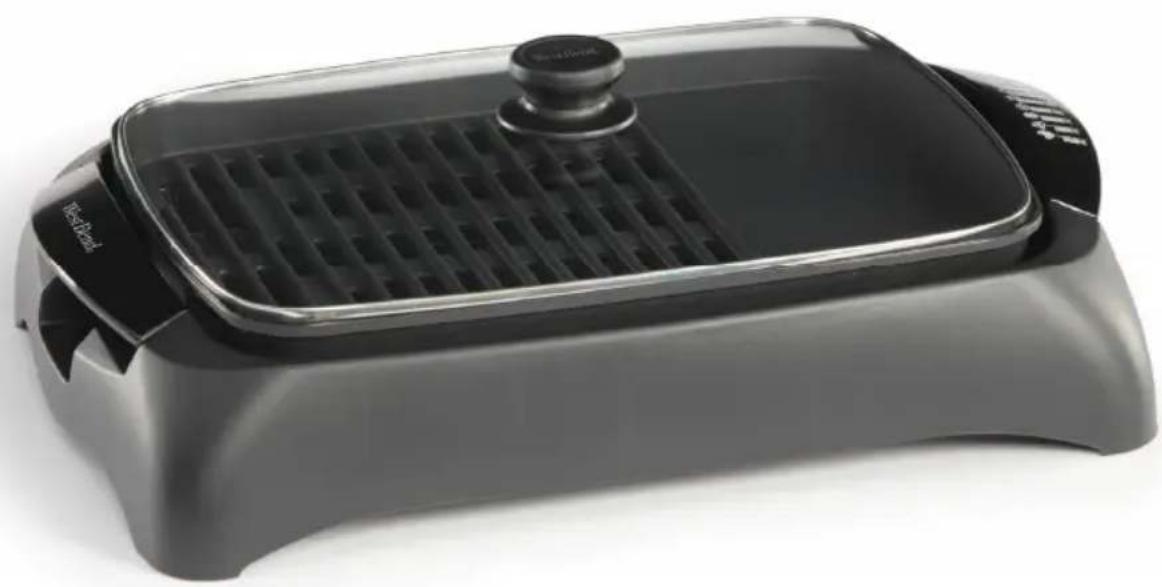
Position grill onto base with handles in recessed areas of base. Grill may be positioned with control to left or right end of base. Plug heat control into the grill.
-
With the heat control set to "OFF" position, plug cord into a 120 volt, AC electric outlet only.
-
Preheat grill, uncovered, at recommended setting for food being cooked. Refer to grilling chart in this manual or on handle for selecting the heat setting and grilling times.
-
When signal light on heat control goes out indicating grilling temperature has been reached, add the food. If desired, cover may be placed on grill to shorten cooking time and help contain spatters. Heat may be increased or decreased, depending on personal preference and type or amount of food being prepared. The signal light will go on and off periodically to indicate that proper temperature is being maintained.
-
Use hot pads when handling grill and cover as handles become warm. For turning food, nylon, plastic or wooden cooking tools are recommended for use on the non-stick surface. Do not use sharp edged cooking tools or knives.
-
When grilling is completed, set heat control at "WARM" for serving, or set dial at "OFF" if food will be removed immediately from grill. After dial is set at "OFF", unplug cord from wall outlet. Let grill cool completely before removing heat control.
-
Unplug cord from electric outlet after use and allow the electric grill to cool completely before cleaning.
-
A small amount of smoke and/or odor may occur upon heating due to the release of manufacturing oils – this is normal.
- Some minor expansion/contraction sounds may occur during heating and cooling – this is normal.
HELPFUL HINTS
- Always place water in drip pan to maximum water level line to help reduce smoking and make clean up easier.
- Always use hot pads when handling grill as handles and grill become hot during use.
- Begin grilling at recommended heat setting. Adjust heat setting if needed during cooking.
- The heat control dial can be set at "LO", "MED", "HI" or in between for grilling or at "WARM" for serving. Approximate temperatures of each setting are "WARM" (180^) , "LO" (250^) , "MED" (325^) and "HI" (375^) .
- Use solid end of grill to fry eggs, hash browns, grill pancakes, French toast, sandwiches, vegetables or warm buns. Brush vegetables with olive oil or vegetable oil for an attractive appearance.
- Tender cuts of meat are best for grilling; to tenderize less tender cuts of meat, marinate before grilling.
- Fish and seafood may be baked with melted butter or a flavored butter during grilling.
- For best results, use tongs to turn meats to avoid piercing the skin. Use a wide spatula to turn fish, steaks, hamburgers, etc.
- If using a barbecue sauce, baste meat during the last 5 minutes of grilling.
CLEANING YOUR ELECTRIC INDOOR GRILL
- After using grill, allow to cool completely before cleaning.
- Remove heat control. Lift grill out of base using handles. Carefully lift drip pan out of base. Dispose of any liquid in the drip pan.
- Wash base, drip pan, cover and grill in warm, soapy water using a non-metal cleaning pad. Do not use metal scouring pads or harsh scouring powders. A soft bristled brush may be used to clean underside of grill. After washing, rinse and dry. The drip pan, grill and cover may be cleaned in an automatic dishwasher. Position pieces in dishwasher so they do not touch one another or other objects being washed. DO NOT PUT
PLASTIC BASE IN DISHWASHER, AS WARPAGE WILL OCCUR.
| FOOD HEAT | SETTING COMMENTS | |
| Bacon, 7 slices MED | Do not preheat. Grill 6-7 minutes per side until crisp. | |
| Bratwurst/raw sausages | MED | Turn frequently for uniform browning, grill until well done, total time 30-35 minutes. |
| Chicken Breasts, 3 - 4 boneless or bone-in | MED | Grill 10-15 minutes per side. (boneless) 25-30 minutes per side (bone-in) or until juices run clear. |
| Chicken Pieces, 6 - 8 MED | Grill 20-25 minutes per side or until juices run clear | |
| Eggs, fried 1 - 2 MED | Use solid end of grill only. Melt 1-tsp. butter or margarine. Grill 2 minutes per side, or to desired doneness. | |
| Fish Steaks, 2 - 4, 3/4 -1 inch thick | LO 10-12 minutes per side or until fish flakes. | |
| Frankfurters/other precooked sausages | MED | Turn frequently with tongs for uniform browning, 10-15 minutes or until heated through. |
| Grilled Sandwiches, 1 - 2 | HI | Use solid end of grill only. Grill 2-3 minutes per side, or until heated through and golden brown. |
| Ham Steak, 1/2 -1 inch thick | MED | Score any fat on sides. Grill 10-12 minutes per side or until heated through. |
| Hamburgers, 4 - 6, 1/2 inch thick | HI | Grill 5 minutes per side (rare), 6 minutes per side (medium), 7 minutes per side (well), or to desired doneness. |
| Pancakes/French Toast, 1 - 2 | MED | Use solid end of grill only. Grill 11/2 minutes per side or until golden brown. |
| Pork/Lamb Chops 2 - 4, 3/4 -1 inch thick | HI | 8-10 minutes per side. Pork should be well done. |
| Shrimp, shelled fresh or frozen, thawed | LO | 6-8 minutes per side or until shrimp turn pink. |
| Steak, 2 1-inch thick | HI | Score any fat on sides. Grill 5-7 minutes (rare), 6-9 minutes (medium), 8-10 minutes per side (well), or until desired doneness. |
| Vegetables MED | Brush with olive or vegetable oil. Grill onions, mushrooms, peppers, etc. on solid end while grilling other foods. |
RECIPES
Teriyaki Marinade
1/3 cup Soy sauce
1 tbsp. Sugar
1/3 cup Dry white wine
1 clove Garlic, minced
13 cup Vegetable oil
1/4 tsp.Ground ginger
2 tbsp. Dried minced onion
- Combine all ingredients in small bowl, set aside.
- Place beef, chicken or pork in 9 x13-inch baking pan. Pour prepared marinade over meat; cover and place in refrigerator for several hours. Spoon marinade over meat occasionally.
- Drain meat thoroughly before grilling. Makes approximately 1 cup.
Lemon Butter
14 cup Butter
1 / 2 tsp. Onion salt
1 tbsp. Dried parsley flakes
1/4 tsp. Pepper
1 tbsp. Lemon juice
- Melt butter in small saucepan over low heat. Add remaining ingredients; stir to combine.
- Use to baste fish, seafood, meats or vegetables during grilling.
Dill Butter
14 cup Butter
1 tsp. Dried dill weed
1/4 tsp. Onion powder
- Melt butter in small saucepan over low heat. Add remaining ingredients; stir to combine.
- Use to baste fish, seafood, meats or vegetables during grilling.
Beef Kebabs
1 ½ lbs Beef sirloin steak, cut in 1-inch
1 Large onion, cut in 1-inch pieces
cubes
1 Green pepper, cut in 1-inch pieces
1 cup Marinade
1 Red pepper, cut in 1-inch pieces
12 Medium mushrooms
12 Cherry tomatoes
- Marinate beef cubes in refrigerator for several hours, using one of the following recipes or one of your favorite marinade recipes.
- Drain beef cubes thoroughly before grilling.
- Thread onto skewers, alternating meat and vegetables. Leave space between for even cooking.
- Preheat grill at "MED". Place kebabs lengthwise on grill. Grill 15 to 20 minutes or to desired doneness, turning occasionally. Serves 4-6.
Herb Marinade
1 / 2 cup Vegetable oil
1 tsp. Dried marjoram leaves
1/3 cup Red wine vinegar
1/4 tsp. Pepper
3 tbsp. Worcestershire sauce
1/4 tsp. Salt
1 tsp. Dried thyme leaves
- Combine all ingredients in small bowl, set aside.
- Place beef, chicken or pork in 9x13-inch baking pan. Pour prepared marinade over meat; cover and place in refrigerator for several hours. Spoon marinade over meat occasionally.
- Drain meat thoroughly before grilling. Makes approximately 1 cup.
Italian Herb Rub
2 tsp. Italian herb seasoning
1 / 2 tsp. Garlic powder
3 / 4 tsp. Salt
1 / 4 tsp. Pepper
- Combine all ingredients in small bowl. Rub into surface of meat before grilling. Use with beef, chicken, or pork.
PRODUCT WARRANTY
Appliance 1 Year Limited Warranty
Focus Electronics, LLC ("Focus Electronics") warrants this appliance from failures in the material and workmanship for one (1) year from the date of original purchase with proof of purchase, provided the appliance is operated and maintained in conformity with the provided Instruction Manual. Any failed part of the appliance will be repaired or replaced without charge at Focus Electronics' discretion. This warranty applies to indoor household use only.
This warranty does not cover any damage, including discoloration, to any non-stick surface of the appliance. This warranty is null and void, as determined solely by Focus Electronics if the appliance is damaged through accident, misuse, abuse, negligence, scratching, or if the appliance is altered in any way.
THIS WARRANTY IS IN LIEU OF ALL IMPLIED WARRANTYES, INCLUDING WARRANTYES OF MERCHANTABILITY, FITNESS FOR A PARTICULAR PURPOSE, PERFORMANCE, OR OTHERWISE, WHICH ARE HEREBY EXCUSED. IN NO EVENT SHALL FOCUS ELECTRICS BE LIABLE FOR ANY DAMAGES, WHETHER DIRECT, INDIRECT, INCIDENTAL, FORSEEABLE, CONSEQUENTIAL, OR SPECIAL, ARISING OUT OF OR IN CONNECTION WITH THIS APPLIANCE.
If you think the appliance has failed or requires service within its warranty period, please contact the Focus Electronics Customer Service Department at (866) 290-1851, or e-mail us at service@focuselectrics.com. A receipt proving the original purchase date will be required for all warranty claims, hand written receipts are not accepted. You may also be required to return the appliance for inspection and evaluation. Return shipping costs are not refundable. Focus Electronics is not responsible for returns lost in transit.
Valid only in USA and Canada
REPLACEMENT PARTS
Replacement parts, if available, may be ordered directly from Focus Electronics, LLC several ways. Order online at www.Focuselectrics.com, e-mail service@focuselectrics.com, over the phone by calling (866)290-1851, or by writing to:
Focus Electrics, LLC
Attn: Customer Service
P.O.Box 2780
West Bend, WI 53095
To order with a check or money order, please first contact Customer Service for an order total. Mail your payment along with a letter stating the model or catalog number of your appliance, which can be found on the bottom or back of the unit, a description of the part or parts you are ordering, and the quantity you would like. Your check should be made payable to Focus Electronics, LLC.
Your state/province's sales tax and a shipping fee will be added to your total charge. Please allow two weeks for processing and delivery.
This manual contains important and helpful information regarding the safe use and care of your new Focus Electronics product. For future reference, attach dated sales receipt for warranty proof of purchase and record the following information:
Date purchased or received as gift:
Where purchased and price, if known:
Item number and Date Code (shown bottom/back of product):
WestBend®
GRIL ÉLECTRIQUE D'INTÉRIEUR
Mode d'emploi
1/3 tasse Vin blanc sec
Focus Electronics, LLC
Attn: Service clientèle
P.O.Box 2780
West Bend, WI 53095
Focus Electronics, LLC
Attn: Customer Service
P.O.Box 2780
West Bend, WI 53095