AE2380 - Radio PHILIPS - Free user manual and instructions
Find the device manual for free AE2380 PHILIPS in PDF.

| Brand | Philips |
| Model | AE2380 |
| Product type | Portable radio |
| Reception bands | FM, MW, LW |
| Number of presets | 30 (10 per band) |
| Mains power | Mains plug V~ (local voltage) |
| Battery power | 4 R20, UM1 or D batteries (alkaline recommended) |
| Alarm function | Buzz or radio, hours and minutes setting |
| Timer (SLEEP) | 120, 60, 30 or 10 minutes |
| Key lock | LOCK function |
| Display | Frequency, time or alarm (switchable) |
| Headphone jack | 3.5 mm jack |
| FM antenna | Telescopic, adjustable |
| MW/LW antenna | Built-in, rotate the unit |
| Controls | On/off, volume, tuning, presets 1‑5 + 5+ |
| Sound adjustment | NEWS‑MUSIC slider |
| Cleaning | Soft, lint-free cloth slightly damp |
| Safety | Do not open the device, do not expose to moisture or excessive heat |
| Compliance | CE standards for radio interference |
| Recycling | Packaging and batteries recyclable, follow local regulations |
Frequently Asked Questions - AE2380 PHILIPS
User questions about AE2380 PHILIPS
0 question about this device. Answer the ones you know or ask your own.
Ask a new question about this device
Download the instructions for your Radio in PDF format for free! Find your manual AE2380 - PHILIPS and take your electronic device back in hand. On this page are published all the documents necessary for the use of your device. AE2380 by PHILIPS.
USER MANUAL AE2380 PHILIPS
Portable Digital Radio
AE2380

Let's make things better.

PHILIPS
Important notes for users in the U.K.
Mains plug
This apparatus is fitted with an approved 13 Amp plug. To change a fuse in this type of plug proceed as follows:
1 Remove fuse cover and fuse.
2 Fix new fuse which should be a BS1362 5 Amp, A.S.T.A. or BSI approved type.
3 Refit the fuse cover.
If the fitted plug is not suitable for your socket outlets, it should be cut off and an appropriate plug fitted in its place.
If the mains plug contains a fuse, this should have a value of 5 Amp. If a plug without a fuse is used, the fuse at the distribution board should not be greater than 5 Amp.
Note: The severed plug must be disposed of to avoid a possible shock hazard should it be inserted into a 13 Amp socket elsewhere.
How to connect a plug
The wires in the mains lead are coloured with the following code: blue = neutral (N), brown = live (L). As these colours may not correspond with the colour markings identifying the terminals in your plug, proceed as follows:
- Connect the blue wire to the terminal marked N or coloured black.
- Connect the brown wire to the terminal marked L or coloured red.
- Do not connect either wire to the earth terminal in the plug, marked E (or 12 ) or coloured green (or green and yellow).
Before replacing the plug cover, make certain that the cord grip is clamped over the sheath of the lead – not simply over the two wires.
Norge
Philips Consumer Electronics
Philips, Glaslaan 2
5616 JB Eindhoven, The Netherlands
General information......8
Alimentation....13
Commandes....14
Généralités....15
Controles ....20
General information....57
Säätimet....62
Virtalähde....63
Yleistietoja 64
Troubleshooting....12
Horloge/radio 16
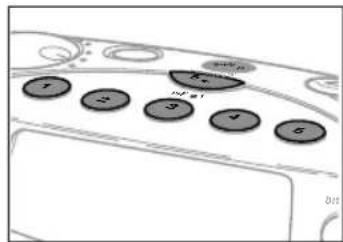
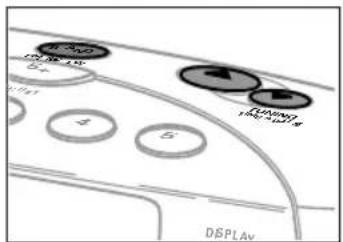
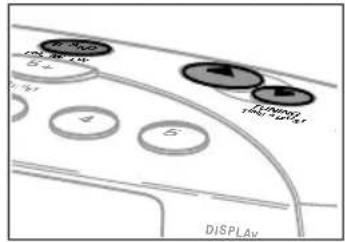
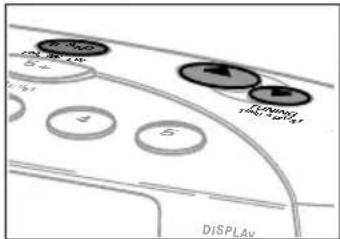
1 POWER ON-OFF ...switches the set on and off
2VOLUME....adjusts the volume
3 NEWS--MUSIC.....selects the sound
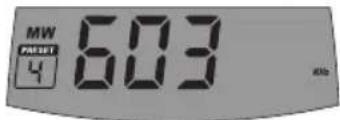
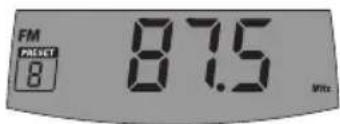
4 BAND
FM·MW·LW......selects the waveband
5 5 +......enables to store and to select more than 5 radio stations per waveband
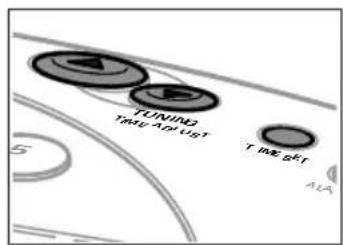
6 ▲TUNING ......tunes to radio stations upwards
TIME ADJUST.....adjusts the hours and minutes upwards
7▼TUNING ......tunes to radio stations downwards
TIME ADJUST.....adjusts the hours and minutes downwards
8TIME SET......activates/confirms the time setting
9 ALARM SET......activates/confirms the alarm time setting
10 FM antenna
11 PRESET 1–5......stores radio stations and selects the preset stations
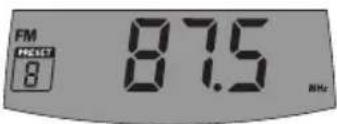
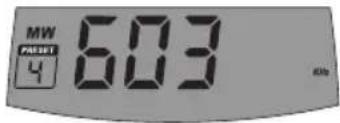
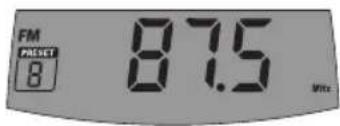
12 DISPLAY FREQUENCY-TIME-ALARM
switches between frequency, time or alarm display
13·BUZZ......selects the buzzer as alarm signal
-RADIO......selects the radio as alarm signal
- OFF ....deactivates the alarm function
143.5 mm headphone socket
15....display
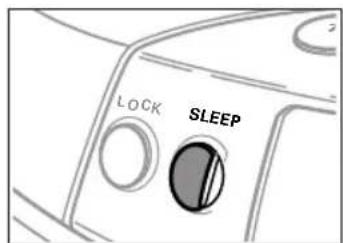
16 SLEEP ......activates the sleep timer
17 LOCK....locks all buttons
18 MAINS V\~....socket to connect the mains lead
19 RESET......clears all settings
Environmental information
All redundant packing material has been omitted. We have done our utmost to make the packaging easily separable into three mono materials: cardboard (box), polystyrene foam (buffer) and polyethylene (bags, protective foam sheet).
Your set consists of materials which can be recycled if disassembled by a specialized company. Please observe the local regulations regarding the disposal of packing materials, exhausted batteries and old equipment.
POWER SUPPLY
Mains supply
The type plate is located on the bottom of the set.
1 Check whether the voltage as shown on the type plate corresponds to your local voltage. If it does not, consult your dealer or service organization.
2 Connect the AC mains lead to the MAINS V\~ inlet and to the wall socket. This switches on the mains supply.

natural_image
Diagram showing a cable inserted into a car's rear panel with a plug inserted (no text or symbols present)Connecting the set to the mains switches off the battery supply. Disconnecting the set from the mains has one of the following effects:
- If batteries are inserted:
- The set switches on the battery supply;
or - If no batteries are inserted: → flanches and the current time is displayed. After a short time all settings will be lost.
To disconnect the set from the mains completely, remove the mains plug from the wall socket.
For users in the U.K.: Please follow the instructions on page 4.
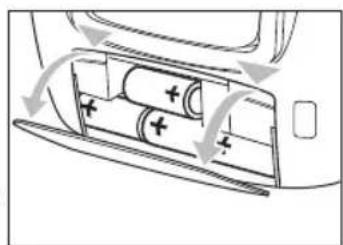
Batteries (not supplied)
- Open the battery compartment and insert 4 batteries of type R20, UM1 or D-cells (preferably alkaline).
Notes: - Remove batteries if they are exhausted or if the set is not going to be used for a long time.
- Old and new or different types of batteries should not be used in combination.
natural_image
Diagram of battery charging process showing two batteries moving through a car (no text or symbols)Batteries contain chemical substances, so they should be disposed of properly.
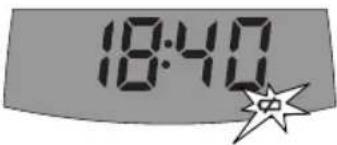
- Indication of weak batteries: → starts flashing.

This set complies with the radio interference requirements of the European Community.
GENERAL INFORMATION
English
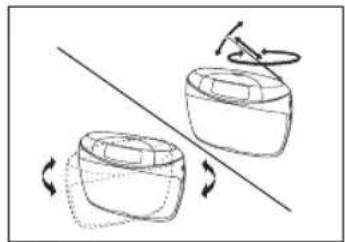
Antennas
- FM: Extend the telescopic antenna fully and turn it for optimum reception. If the signal received is too strong (e.g. near a transmitter) retract the antenna.
- MW/LW: Direct the internal MW/LW antenna by turning the set. The FM antenna is not needed.
natural_image
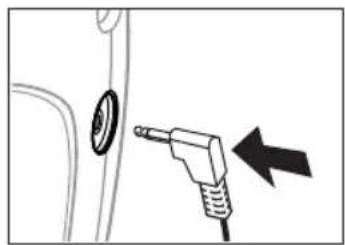
Diagram showing two containers with rotating arrows, one above a diagonal line and the other below (no text or symbols)Connecting headphones
- You can connect headphones to the ⏰headphone socket.
→The loudspeakers will then be switched off.
natural_image
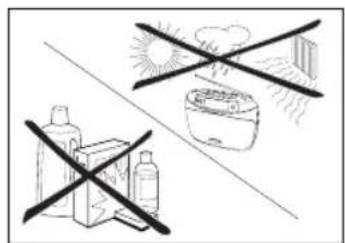
Diagram showing a plug inserted into a socket with an arrow indicating direction (no text or symbols)Maintenance
Do not expose the set or the batteries to humidity, rain, sand or excessive heat (caused by heating equipment or direct sunlight).
You can clean the set with a soft, slightly dampened lint-free cloth. Do not use any cleaning agents as they may have a corrosive effect.
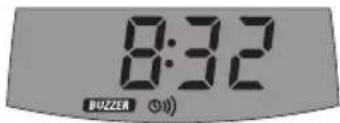
CLOCK/RADIO
Clock setting
1 Press TIME SET.
The clock digits □.□□ flash.
2 Press TIME ADJUST ▲ or ▼ to set the current time.
3 Press TIME SET again or do not press any key for at least 5 seconds.
The current time is displayed.
English
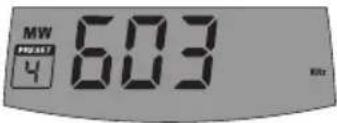
Tuning to radio stations
1 Press POWER ON-OFF to switch on the radio.
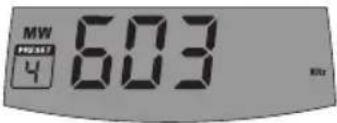
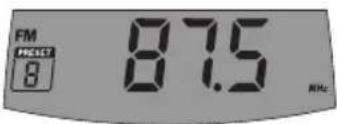
2 Press BAND repeatedly to select the desired waveband.
→ FM, MW or LW is shown.
3 Keep TUNING ▲ or ▼ pressed for longer than 1 second.
→ The radio tunes to a station with sufficient strength, the current frequency is displayed and a beep tone is heard.
4 Repeat searching (step 3) until you find the desired station.
- To tune to a weak station briefly press TUNING ▲ or ▼ as often as necessary for optimum reception.
- Press POWER ON-OFF to switch the radio off.
→ The current time is displayed (if the clock is set).


Volume and sound adjustment
- Adjust the volume by using VOLUME.
- Push the NEWS--MUSIC slider to select the desired sound.

FEATURES
English
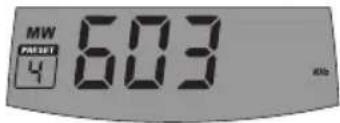
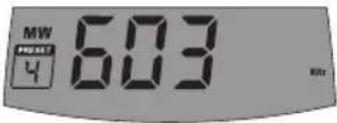
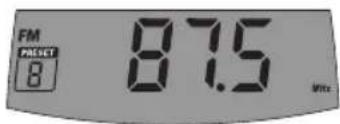
Storing radio stations
You can store up to 30 radio stations (10 stations per waveband).
1 Tune to a desired radio station.
2 Keep one of the PRESET (1–5) keys pressed for more than 2 seconds until a double beep is heard.
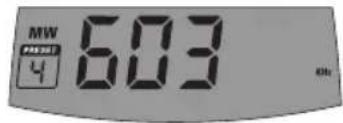
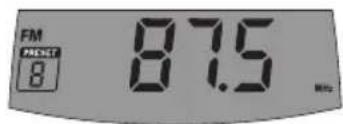
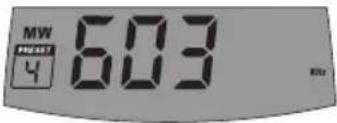
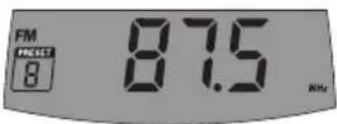
The waveband, the frequency and the preset number of the stored station are displayed.
- To store more than 5 stations per waveband press 5+ before assigning a station to a PRESET (1–5) key (see step 2).
• To clear all presets press RESET.
Tuning to a preset radio station
1 To tune to presets 6 -10 first press 5+.
2 Press a PRESET (1–5) key for less than 2 seconds.
→A single beep is heard and playback starts. The waveband, the frequency and the preset number of the stored station are displayed.
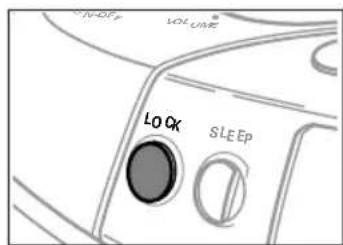
Lock function
You can lock the buttons of the set. When a key is pressed, no action will be executed then.
1 Press LOCK.

2 To deactivate the lock function press LOCK again.
Notes: — If the lock function is activated, the clock display will switch to the radio display automatically. To return to the clock display, deactivate the lock function and press DISPLAY FREQUENCY-TIME-ALARM, if necessary, repeatedly.
- To switch the alarm off when the lock function is activated, press LOCK.
FEATURES
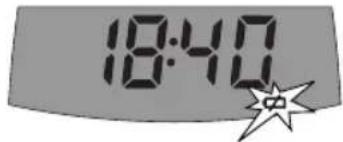
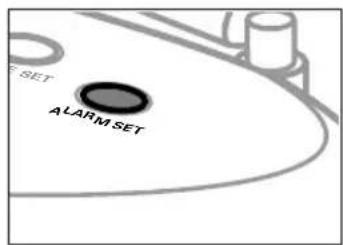
Alarm time setting
The set can be used as an alarm clock, whereby the buzzer or radio is switched on at a set time.
1 Press ALARM SET.
→ and the alarm clock digits flash.
2 Press TIME ADJUST ▲ or ▼ to set the desired alarm time.
3 Press ALARM SET again or do not press any key for 5 seconds.
English

Alarm clock activation and deactivation
- Push the slider to -BUZZ or -RADIO to select the desired alarm sound and to activate the alarm clock.
→ and either or are currently a current time.
- Push the slider to -OFF to deactivate the alarm clock.
Notes: - If no key is pressed, the alarm clock will be switched off after 1 hour.
- You can switch the alarm off for 24 hours by pressing any key on the set.
- The beep tone of the buzzer will become louder after 10 seconds.
natural_image
Simple line drawing of a vehicle's side profile with an oval object and directional arrows (no text or symbols)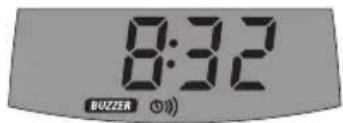
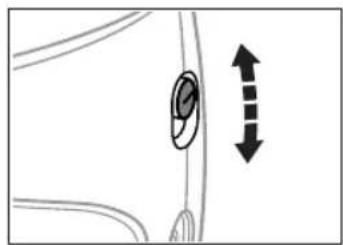
Sleep timer
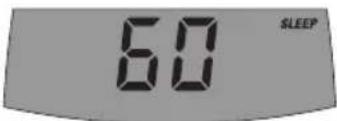
The sleep timer is a set period of time before the set switches off.
1 Press SLEEP repeatedly within 5 seconds until the desired sleeper time is displayed.
→ SLEEP and either 120, 60, 30, 10 or OFF are shown.
2 As soon as the desired time is displayed, do not press any key again.
→ SLEEP and the frequency and waveband of the current radio station are displayed. After the chosen time has elapsed, SLEEP goes off and the radio switches off.
- To deactivate the sleep timer before the chosen time has elapsed press POWER ON-OFF or SLEEP.

TROUBLESHOOTING
English
WARNING
Under no circumstances should you try to repair the set yourself as this will invalidate the guarantee. Do not open the set as there is a risk of electric shock.
If a fault occurs, first check the points listed below before taking the set for repair.
If you are unable to solve a problem by following these hints, consult your dealer or service centre.
Problem Possible cause Solution
| No sound Volume is not adjusted. Adjust the volume. | ||
| Headphones are connected. Disconnect the headphones. | ||
| Mains lead is not connected Connect the mains lead properly. properly. | ||
| Batteries are exhausted. Insert fresh batteries. | ||
| Batteries are inserted Insert the batteries correctly. incorrectly. | ||
| Radio switches off by itself Sleep timer has been activated. Switch the radio on again. | ||
| Poor radio reception Weak radio signal. Adjust the antenna by turning for optimum reception. | ||
| Alarm does not work Alarm time is not set/alarm is Set the alarm time/activate not activated. the alarm. | ||
| No reaction to controls | Lock function is activated. | Press LOCK. |
| Electrostatic discharge. | Press RESET or disconnect the set from the power supply; reconnect after a few seconds. | |
| Malfunction, loss of time settings and radio presets | Batteries are getting exhausted. | Replace batteries, readjust settings. |
ALIMENTATION
natural_image
Diagram of a cable inserted into a device with a plug inserted (no text or symbols visible)Français
Piles (non fournies)
natural_image
Diagram of a car showing battery arrangement with arrows indicating direction (no text or symbols)natural_image
Diagram showing two containers with rotating arrows, no text or symbols presentFrançais
Relier un casque
natural_image
Diagram showing a connector with a USB cable and a circular button, no text or symbols presentEntretien
natural_image
Illustration of crossed-out kitchen appliances and a cooking pot (no text or symbols)HORLOGE/RADIO
FONCTIONS SPECIALES
Français
FONCTIONS SPECIALES

natural_image
Simple line drawing of a vertical object with an arrow indicating direction (no text or symbols)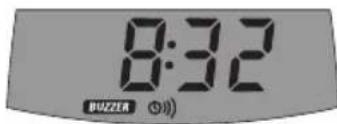
Minuterie
natural_image
Diagram showing a cable inserted into a car's rear panel with a plug inserted (no text or symbols present)natural_image
Diagram of a car back panel with battery cells and directional arrows indicating flow (no text or symbols)natural_image
Diagram showing two containers with rotating arrows, one above a diagonal line and the other below (no text or symbols)Español
natural_image
Diagram showing a connector inserted into a car seat with an arrow indicating direction (no text or symbols present)Mantenimiento
natural_image
Illustration of two crossed-out signs with sun and food items, no text or symbols presentRELOJ/RADIO
Ajuste del reloj
1 Presione TIME SET.

CARACTERÍSTICAS


Función de bloqueo

Español
natural_image
Simple line drawing of a vehicle's side profile with an oval object and directional arrows (no text or symbols)
PROBLEMAS Y SOLUCIONES
ADVERTENCIA
natural_image
Diagram showing a cable inserted into a device with a plug inserted (no text or symbols visible)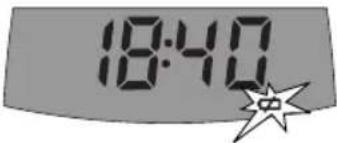
natural_image
Diagram of battery charging inside a car, showing charge distribution arrows (no text or symbols)natural_image
Diagram showing two containers with rotating arrows, one above a diagonal line and the other below (no text or symbols)natural_image
Close-up of a car's seatbelt with a plug inserted, showing a black arrow pointing to the right side (no text or symbols)Wartung und Pflege
UHR/RADIO
Einstellen der Uhr


Sperrfunktion
BESONDERHEITEN

natural_image
Simple line drawing of a vehicle's side profile with an oval object and directional arrows (no text or symbols)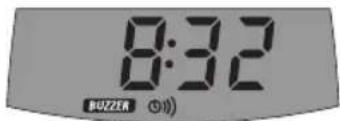
FEHLERBEHEBUNG
WARNUNG
natural_image
Diagram showing a cable inserted into a device with an arrow pointing to a plug (no text or symbols present)natural_image
Diagram of a car showing battery arrangement with arrows indicating direction (no text or symbols)
natural_image
Diagram showing two containers with rotating arrows, one above a diagonal line and the other below (no text or symbols)natural_image
Close-up of a cable being inserted into a car's seat, with an arrow indicating the insertion direction (no text or symbols present)Onderhoud
KLOK/RADIO

VOORZIENINGEN

Blokkeerfunctie
VOORZIENINGEN

natural_image
Diagram showing a cable inserted into a device with an attached plug (no text or symbols present)
natural_image
Diagram showing battery arrangement inside a car with arrows indicating direction (no text or symbols)natural_image
Diagram showing two containers with rotating arrows, one above a diagonal line and the other below (no text or symbols)natural_image
Diagram showing a connector with a USB cable and a circular component, no text or symbols presentManutenzione
OROLOGIO/RADIO
CARATTERISTICHE


natural_image
Simple line drawing of a vehicle's side profile with an oval object and directional arrows (no text or symbols)
Timer spegnimento
natural_image
Diagram showing a cable inserted into a device with an attached plug (no text or symbols present)natural_image
Diagram showing battery arrangement inside a car with arrows indicating direction (no text or symbols)natural_image
Diagram showing two containers with rotating arrows, one above a diagonal line and the other below (no text or symbols)Ansluta hörlurar
natural_image
Diagram showing a plug inserted into a cable with a magnified inset, no text or symbols presentUnderhåll
KLOCKA/RADIO
Ställa klockan
1 Tryck på TIME SET.
▶ Då blinkar klocksiffrorna 0.00.
Låsfunktion


FELSÖKNING
WARNING
natural_image
Diagram showing a cable inserted into a device with an attached plug (no text or symbols present)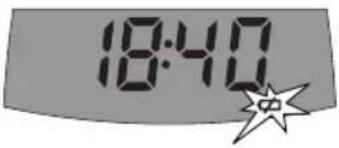
Batterier (ekstra)
natural_image
Diagram of a car interior showing battery arrangement with arrows indicating direction (no text or symbols)Batterier indeholder kemikalier og skal derfor bortkastes på forsvarlig vis.
natural_image
Diagram showing two containers with rotating arrows, one above a diagonal line and the other below (no text or symbols)natural_image
Diagram showing a connector with a USB cable and a circular component, no text or symbols presentVedligeholdelse
UR/RADIO
Indstilling af uret
1 Tryk på TIME SET.
Indstilling på radiostationer
→ FM, MW eller LW vises.
3 Hold TUNING ▲ eller ▼ i ca. 1 sekund.

- Tryk på POWER ON-OFF for at slukke for radioen.
SPECIALFUNKTIONER

SPECIALFUNKTIONER

natural_image
Simple line drawing of a vehicle's side profile with an oval object and directional arrows (no text or symbols)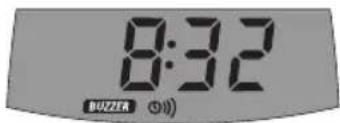
Dansk
Sleep-timer
natural_image
Diagram of a car's rear panel showing cable and plug connection (no text or symbols)natural_image
Diagram of a car back panel with battery cells and directional arrows indicating flow (no text or symbols)natural_image
Diagram showing two containers with rotating arrows, one above a diagonal line and the other below (no text or symbols)natural_image
Close-up of a medical or electronic device component with a black arrow pointing to a cable (no text or symbols visible)Huolto
KELLO/RADIO
Kellon asetus
1 Paina TIME SET.
Lukitustoiminto
KÄYTTÖMAHDOLLISUUKSIA
Herätysajan asetus

natural_image
Simple line drawing of a vehicle's side profile with an oval object and directional arrows (no text or symbols)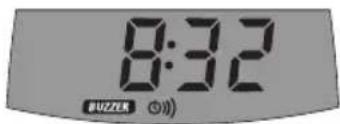
Uniajastin
natural_image
Diagram of a cable inserted into a device with a plug inserted (no text or symbols visible)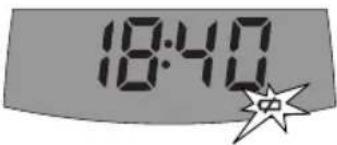
natural_image
Diagram of a car interior showing battery arrangement with arrows indicating direction (no text or symbols)natural_image
Diagram showing two containers with rotating arrows, one above a diagonal line and the other below (no text or symbols)natural_image
Diagram showing a connector with a black arrow pointing to it, no text or symbols presentManutenção
RELÓGIO/RÁDIO
Acertar o relógio
1 Pressione TIME SET.

CARACTERÍSTICAS
Acertar o despertador

natural_image
Simple line drawing of a car interior with an oval object and directional arrows (no text or symbols)
Tempo de sonolência
natural_image
Diagram of a car rear panel with a black cable inserted into the socket (no text or symbols visible)natural_image
Diagram of a battery holder with two batteries and one moving inside, showing charge direction arrows (no text or symbols)natural_image
Diagram showing two containers with rotating arrows, no text or symbols presentnatural_image
Close-up of a medical or electronic device component with a metallic connector and arrow indicating direction (no text or symbols)Συντήρηση
РОЛОЇ/РАДІОФΩΝΟ


natural_image
Simple line drawing of a vertical object with an arrow indicating upward and downward motion (no text or symbols)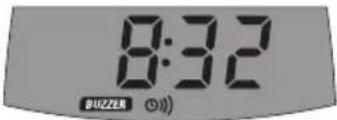
natural_image
Diagram showing a cable inserted into a device with a plug inserted (no text or symbols present)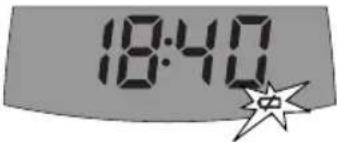
natural_image
Diagram of a car's rear battery pack with two batteries and one partially filled (no text or symbols)PRZEŁĄCZNIKI
natural_image
Diagram showing two containers with rotating arrows, no text or symbols presentnatural_image
Close-up of a medical or electronic device component with a black arrow pointing to a connector (no text or symbols visible)Konserwacja
ZEGAR/RADIO
Regulacja zegara

FUNKCJE ODBIORNIKA
Blokada klawiszy

natural_image
Simple line drawing of a vehicle's side profile with an oval object and directional arrows (no text or symbols)