SJM160 - Kettle KENWOOD - Free user manual and instructions
Find the device manual for free SJM160 KENWOOD in PDF.
Download the instructions for your Kettle in PDF format for free! Find your manual SJM160 - KENWOOD and take your electronic device back in hand. On this page are published all the documents necessary for the use of your device. SJM160 by KENWOOD.
USER MANUAL SJM160 KENWOOD
Head Office Address:
Kenwood Limited, New Lane, Havant, Hampshire PO9 2NH, UK
www.kenwoodworld.com
Designed and engineered by Kenwood in the UK Made in China
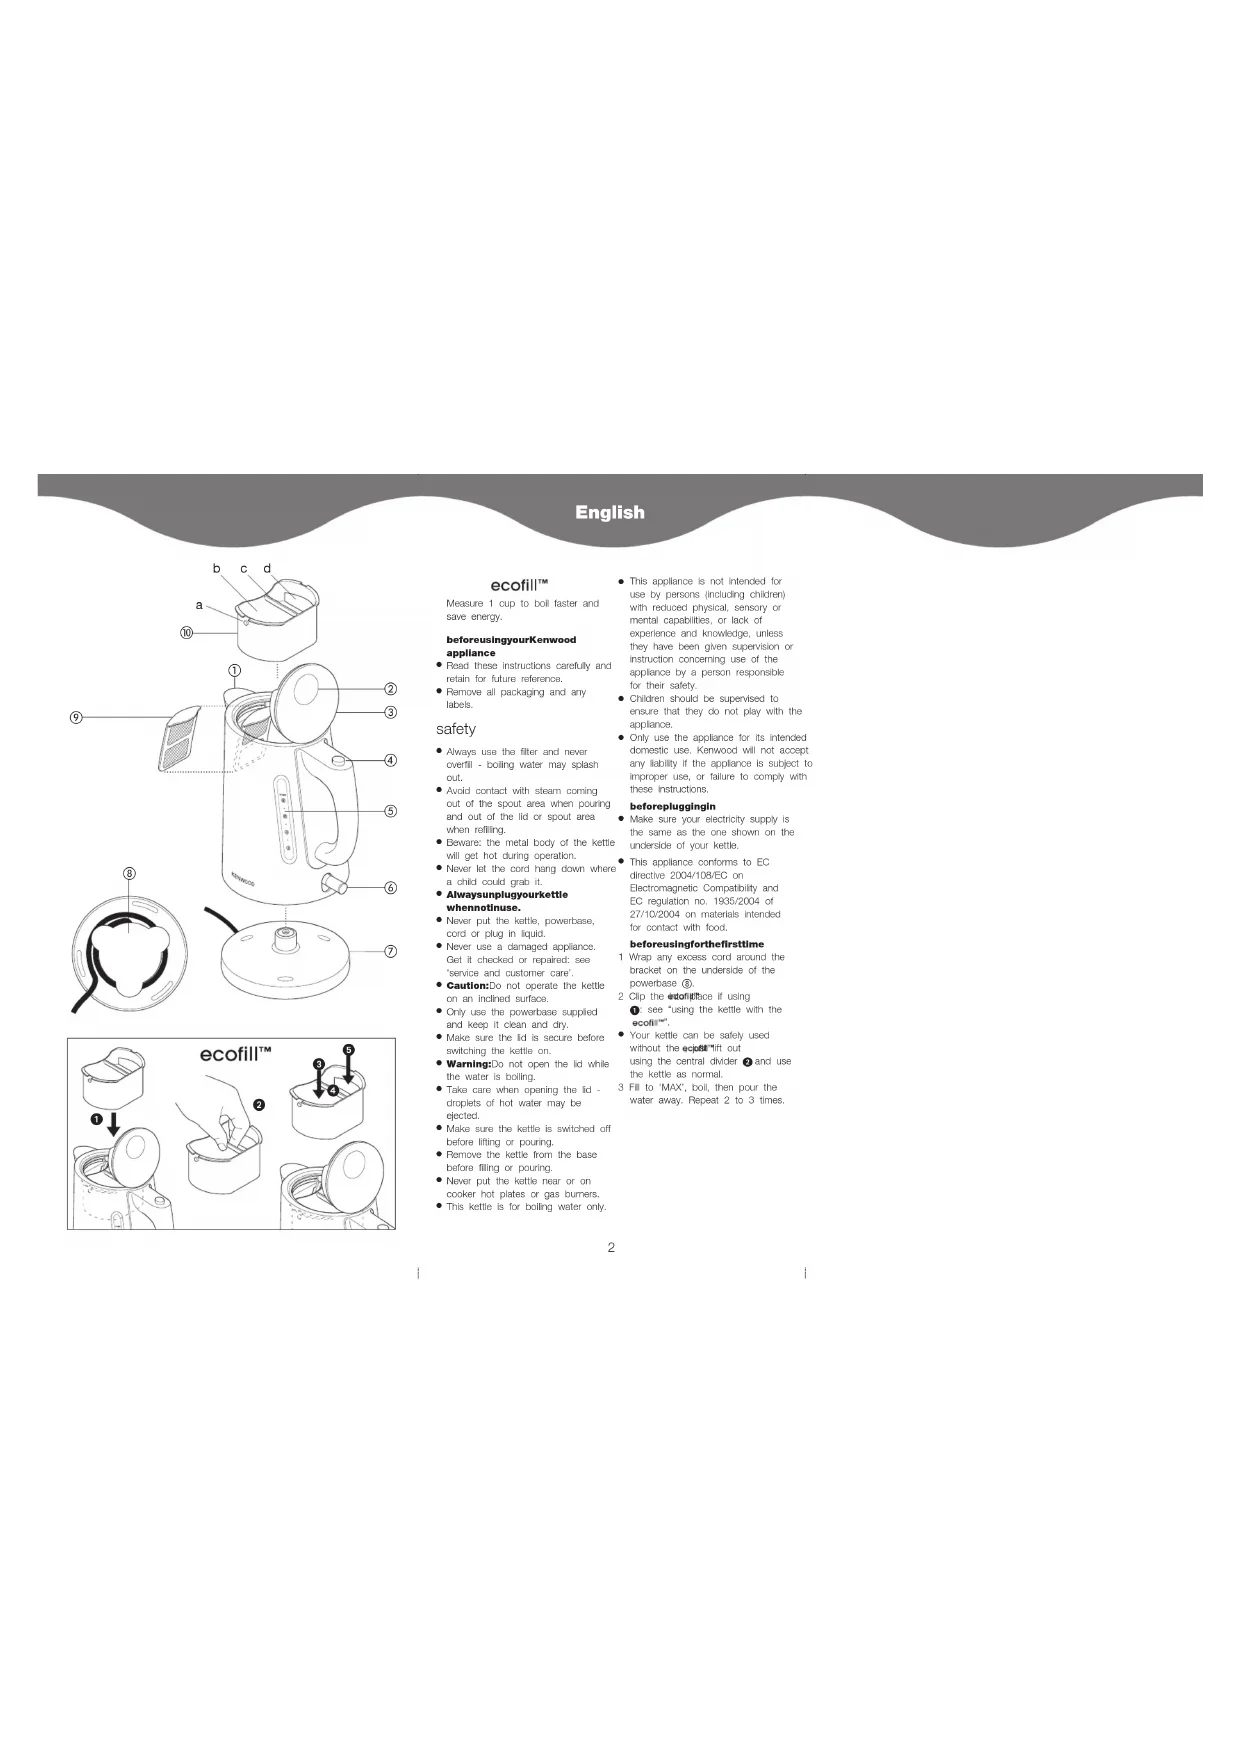
UNFOLDMeasure 1 cup to boil faster and
before using your Kenwood
Read these instructions carefully and
retain for future reference.
Remove all packaging and any
Always use the filter and never
Avoid contact with steam coming
out of the spout area when pouring
and out of the lid or spout area
will get hot during operation.
Never let the cord hang down where
a child could grab it.
Always unplug your kettle
Never put the kettle, powerbase,
cord or plug in liquid.
Never use a damaged appliance.
Get it checked or repaired: see
‘service and customer care’.
Caution: Do not operate the kettle
on an inclined surface.
Only use the powerbase supplied
and keep it clean and dry.
Make sure the lid is secure before
switching the kettle on.
Warning: Do not open the lid while
the water is boiling.
Take care when opening the lid -
droplets of hot water may be
Make sure the kettle is switched off
before lifting or pouring.
Remove the kettle from the base
before filling or pouring.
Never put the kettle near or on
cooker hot plates or gas burners.
This kettle is for boiling water only.
This appliance is not intended for
use by persons (including children)
with reduced physical, sensory or
mental capabilities, or lack of
experience and knowledge, unless
they have been given supervision or
instruction concerning use of the
appliance by a person responsible
Children should be supervised to
ensure that they do not play with the
Only use the appliance for its intended
domestic use. Kenwood will not accept
any liability if the appliance is subject to
improper use, or failure to comply with
Make sure your electricity supply is
the same as the one shown on the
underside of your kettle.
This appliance conforms to EC
directive 2004/108/EC on
Electromagnetic Compatibility and
EC regulation no. 1935/2004 of
27/10/2004 on materials intended
for contact with food.
before using for the first time
1 Wrap any excess cord around the
bracket on the underside of the
2 Clip the into place if using
: see “using the kettle with the
Your kettle can be safely used
without the , just lift out
using the central divider and use
the kettle as normal.
3 Fill to ‘MAX’, boil, then pour the
water away. Repeat 2 to 3 times.
햵 lid release button
햶 water level windows
햷 on/off switch with indicator light
1 Fill the kettle through either the
spout or lid. To open the lid, press
the lid release button. The water
level must be between ‘MAX’ and
Be economical: do not boil more
water than you need.
To improve the quality of your drinks
always use fresh water.
Empty the kettle after each use.
2 Check the lid is closed. Close the lid
by pushing down on the finger pad
3 Plug in and switch on. The indicator
4 Your kettle will boil and switch off
automatically. To re-boil, wait a few
seconds - the on/off switch needs
If you experience problems
with your kettle switching on
and off during use or
switching off before boiling,
check that the flat element is
free from scale - see
Your kettle is fitted with a filter to
hold back limescale particles.
If you find drops of water under your
kettle, don’t worry - it is just
If you switch on with too little water,
your kettle will cut out automatically.
Switch off, remove from the
powerbase and let it cool down
before re-filling. When it has cooled
down, the switch will reset itself.
using the kettle with the
1 Ensure the is clipped
into place correctly.
2 Pour the water into the
compartment until level with the
top of the central divider for a 1
cup measure. Adjust your fill rate to
match your required cup measure.
If the is fitted and you wish
to measure more than 1 or 2 cups,
pour the water directly into the
Before cleaning, unplug your kettle
and let it cool down.
the outside and powerbase
Wipe with a damp cloth, then dry.
Do not use abrasives - they will
scratch the metal and plastic
Even though your kettle comes with
a filter, you still need to clean the
inside (and the filter) regularly.
Wash in warm soapy water, dry and
refit by clipping back into position.
2 Slide the filter out 햺.
3 either rinse under the tap or use a
or when descaling your kettle, drop
the filter in too. Rinse thoroughly.
4 Slide the filter back in to refit.
Regular descaling of the flat element
will improve the performance of your
kettle. If the kettle is not descaled
regularly the build up of limescale
may result in the following:
problems may be experienced
with the kettle switching on and
off during use or switching off
the kettle may take longer to boil.
the flat element may be damaged.
Please note: Failure to descale your
kettle may invalidate your guarantee.
When limescale starts to build up on
the heating element, buy a suitable
descaler and descale your kettle.
After descaling, boil with fresh water
several times and discard. Clean any
descaler off the kettle - it can
Some regions of the country have
chalky water. This makes boiled
water look cloudy and leaves a
deposit on the side of the kettle. This
is normal but can be removed with
Alternatively, to reduce limescale
build up, use filtered water to fill your
service and customer
If the cord is damaged it must, for
safety reasons, be replaced by
KENWOOD or an authorised
If you need help with:
using your appliance or
servicing or repairs
Contact the shop where you bought
Designed and engineered by
At the end of its working life, the product
must not be disposed of as urban
It must be taken to a special local
authority differentiated waste collection
centre or to a dealer providing this
Disposing of a household appliance
separately avoids possible negative
consequences for the environment and
health deriving from inappropriate
disposal and enables the constituent
materials to be recovered to obtain
significant savings in energy and
resources. As a reminder of the need to
dispose of household appliances
separately, the product is marked with
a crossed-out wheeled dustbin.
4Meet 1 kop af zodat het water
Retire todas as embalagens e
Børn bør overvåges for at sikre, at
>YT YCPTW YLW ^[CPNQLW K^DW YTZ, YT UVT_`R IJR UVCUJN RF INFYEMJYFN QJ YF FXYNOB FUTVVEQQFYF.