
Theater Sound - Docking station ISOUND - Free user manual and instructions
Find the device manual for free Theater Sound ISOUND in PDF.

| Product Type | Docking Station / Bluetooth Soundbar |
| Brand | ISOUND |
| Model | Theater Sound |
| Output Power | 18W + 18W (stereo) |
| Standby Power Consumption | Less than 1W |
| Power Supply | AC adapter included |
| Bluetooth Connectivity | Yes, 10 meters range |
| Bluetooth Pairing Code | 0000 |
| Audio Modes | AUX/Line, Bluetooth, FM Radio |
| FM Radio | Yes, with FM antenna included |
| Radio Presets | Up to 20 stations |
| Equalizer | Flat, Rock, Jazz, Pop, Classic |
| 3D Effect | Yes, can be enabled/disabled |
| Auxiliary Audio Input | 3.5mm jack |
| RCA Audio Input | Yes (via adapter) |
| Remote Control | Yes, with CR2025 battery included |
| Wall Mountable | Yes, with brackets and screws included |
| Clock Function | Yes, adjustable |
| Alarm Function | Yes, adjustable |
| Sleep Timer | Yes |
| Display | Yes (LED) |
| LED Indicators | Blue (on), Red (standby), flashing (Bluetooth) |
| Maintenance | Clean with soft dry cloth |
Frequently Asked Questions - Theater Sound ISOUND
User questions about Theater Sound ISOUND
0 question about this device. Answer the ones you know or ask your own.
Ask a new question about this device
Download the instructions for your Docking station in PDF format for free! Find your manual Theater Sound - ISOUND and take your electronic device back in hand. On this page are published all the documents necessary for the use of your device. Theater Sound by ISOUND.
USER MANUAL Theater Sound ISOUND
Theater Sound
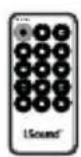
Remote Control
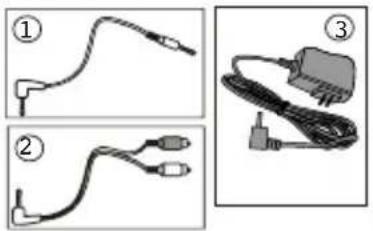
3.5mm Audio Cable
RCA Cable
- AC Adapter
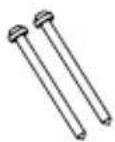
- 2 Mounting Screws
2 Mounting Anchors
- User's Guide/Warranty Card
- Registration
- 3.5mm Audio Cable
- RCA Cable
- AC Adapter
Theater Sound

Remote Control
Wall Mount Fittings
Screw x 2pcs
CONTENTS
Safety Information 3-5
Welcome 6
Set up 7
Your Theater Sound 8-9
Remote Controls 10-11
FM Radio 12
Clock, Alarm, and Sleep Timer 12-13
Operating and Connecting an External Device 13-14
Bluetooth Set Up 15
Wall Mounting the Theater Sound 16
Troubleshooting 17
Maintenance 18
SAFETY INFORMATION
IMPORTANT SAFETY INSTRUCTIONS - READ CAREFULLY BEFORE USE.

This symbol indicates that there are important operating maintenance instructions in the literature accompanying this unit.

This symbol indicates that dangerous voltage constituting a risk of electric shock is present within this unit.
Keep these instructions.
- Do not use this unit near water.
- Clean only with a lightly damp cloth.
- Do not block any ventilation openings.
- Install in accordance with the supplied Quick Start Guide and this User's Guide.
- Protect the power cord from being walked on or pinched, particularly at plugs, and the point where it exits from the unit.
- Do not allow the power cord to overhang the edge of a table.
- Unplug this unit when unused for long periods of time.

WARNING! TO REDUCE THE RISK OF FIRE OR ELECTRICAL SHOCK, DO NOT EXPOSE THIS UNIT TO RAIN OR MOISTURE. THE UNIT MUST NOT BE EXPOSED TO DRIPPING AND SPLASHING AND NO OBJECTS FILLED WITH LIQUIDS SHOULD BE PLACED ON TOP OF IT OR NEAR IT.
NOTE: No naked flames such as candles should be placed near or underneath the unit.
This unit has been produced according to all current safety regulations. The following safety tips should safeguard users against careless use and the dangers connected with such use.
- Although this appliance has been carefully manufactured and rigorously checked prior to leaving the factory, as with all electrical appliances it is possible for problems to develop. If you notice smoke, an excessive buildup of heat or any other unexpected phenomena, you should disconnect the plug from the main power socket immediately.
- Ensure that the unit is sufficiently ventilated! Never place next to or underneath curtains!
- The main plug or appliance coupler is used as the disconnect device, the disconnect device shall remain readily operable.
- This set should only be connected to a main power supply which matches that stated on the label on the rear of it-do not attempt to connect it to any other type of supply.
- The socket-outlet must be installed near the equipment and should be readily accessible.
- To prevent overload, don't share the same main supply socket with too many other items of equipment.
- Apparatus with Class 1 construction shall be connected to a main socket outlet with a protective grounding connection.
- Keep away from rodents. Rodents enjoy biting into electric flexes.
- Always hold the plug when pulling out the plug from the main supply socket. Do not pull on the flex. The flex can become overloaded and cause a short circuit.
- Set up the unit so that no one is able to trip over the flex.
- Do not place heavy items on the flex, which may damage it.
- Take note that the flex cannot be reached and pulled by young children, avoiding injury.
- Do not set up the unit near heat sources. The casing and the flex could be damaged by the impact of heat.
-
Avoid placing the unit on any surfaces that may be subject to vibrations or shocks.
-
When you leave your home for long periods of time, unplug the AC power cable for safety reasons.
- The unit becomes warm when in operation. Do not place any covers or blankets on the unit in order to prevent overheating.
- The ventilation holes are not to be blocked. Do not set up near radiators.
- Do not place in direct sunshine. When placing on a shelf leave 5cm (2 inches) free space around the whole unit.
- Do not allow water or moisture to enter the unit. Do NOT use in wet or moist areas such as Bathrooms, steamy kitchens or near swimming pools.
- Do not use this unit where moisture condensation may occur.
- Any repairs must be carried out by qualified personnel only.
- Liquids spilled into the unit can cause serious damage. Switch the set OFF and disconnect the main power supply, then consult a qualified service person before attempting to use the unit again.
- Do NOT remove the safety covers. There are no useable or serviceable parts inside. You may invalidate the warranty.
- Qualified personnel must only service this apparatus.
- Take good care of the remote control, do not drop.
- Never place hot objects or open flame sources on or close to the unit. High temperatures can melt plastic and lead to fires.
- To clean, use a soft dry cloth. Do NOT use solvents or petrol based fluids. For stubborn stains, you may use a damp cloth with diluted detergent.
WELCOME!
Congratulations on purchasing the Theater Sound Premium Bluetooth Speaker. The Theater Sound allows you to play audio content from a television, iPad, iPhone, iPod, Blackberry, Bluetooth enabled mobile phone, mp3 player, tablet, computer or any device with a 3.5mm or RCA output.
Please read the warning section carefully before using your Theater Sound.
NOTE:
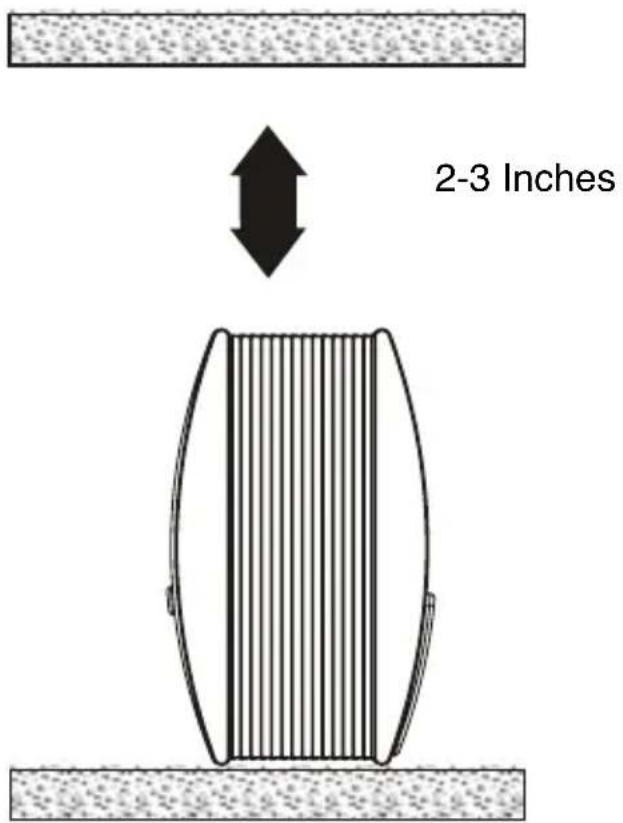
Ventilation
When placing the Theater Sound on an entertainment center, bookshelf, or any type of enclosed space, be sure to allow at least 2-3 inches of space around the unit for ventilation. If the unit is enclosed in a tight space, without ventilation, heat generated can produce a potential hazard.
SET UP
Setting up your Theater Sound
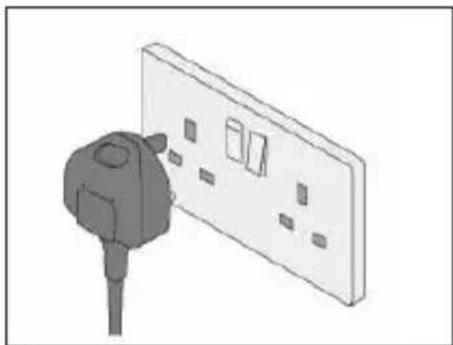
Plug the power cable into a standard three pin wall socket and switch the power ON at the wall (if the wall has an ON/OFF switch).
The Remote Control Battery
- The remote uses 1 "CR 2025" battery (included).
- Remove the transparent sheet.
YOUR THEATER SOUND
Features Defined
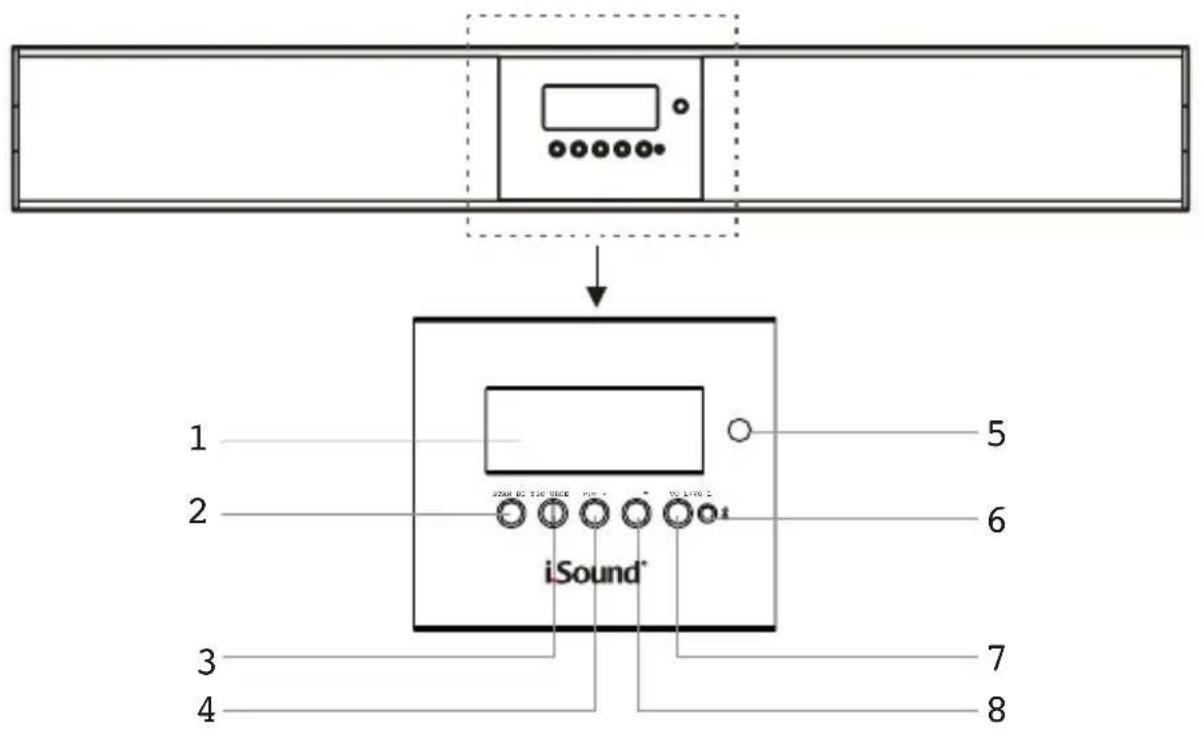
Features Defined
- LCD display
- STAND BY button: Press to turn the Theater Sound OFF or ON
- SOURCE Press to switch between AUX/Line, Bluetooth, and FM
- MUTE button: Press to mute the volume
- REMOTE SENSOR Ensure this area is not covered or blocked by any object
- Power indicator Blue LED represents power on, Red LED rep resents standby on
- VOL + Press to increase the volume
- VOL - Press to reduce the volume
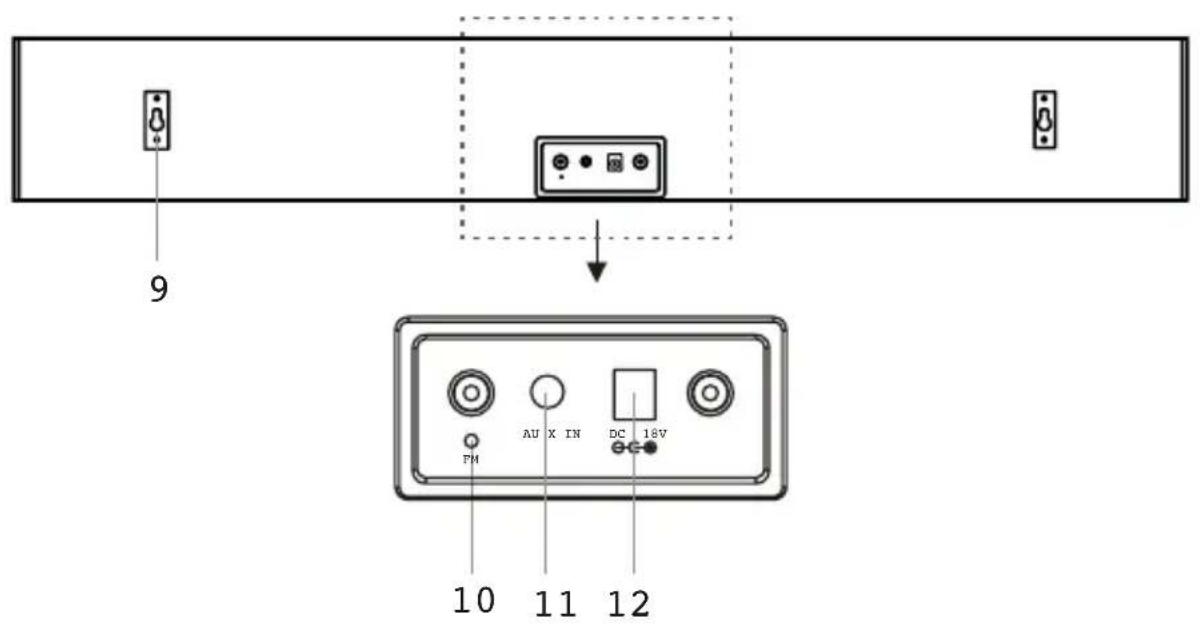
- Mounting Bracket
- FM Antenna
- AUX/LINE in jack To insert either RCA cable or 3.5mm auxiliary cable
- DC power in
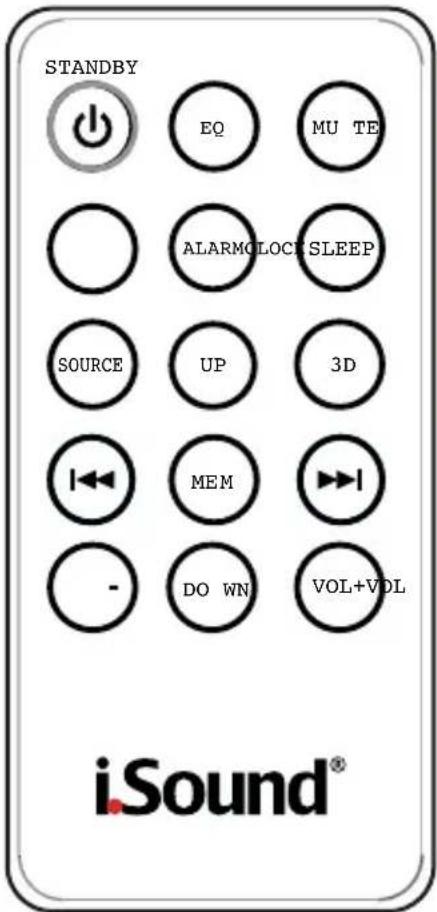
LOCATIONS OF REMOTE CONTROL
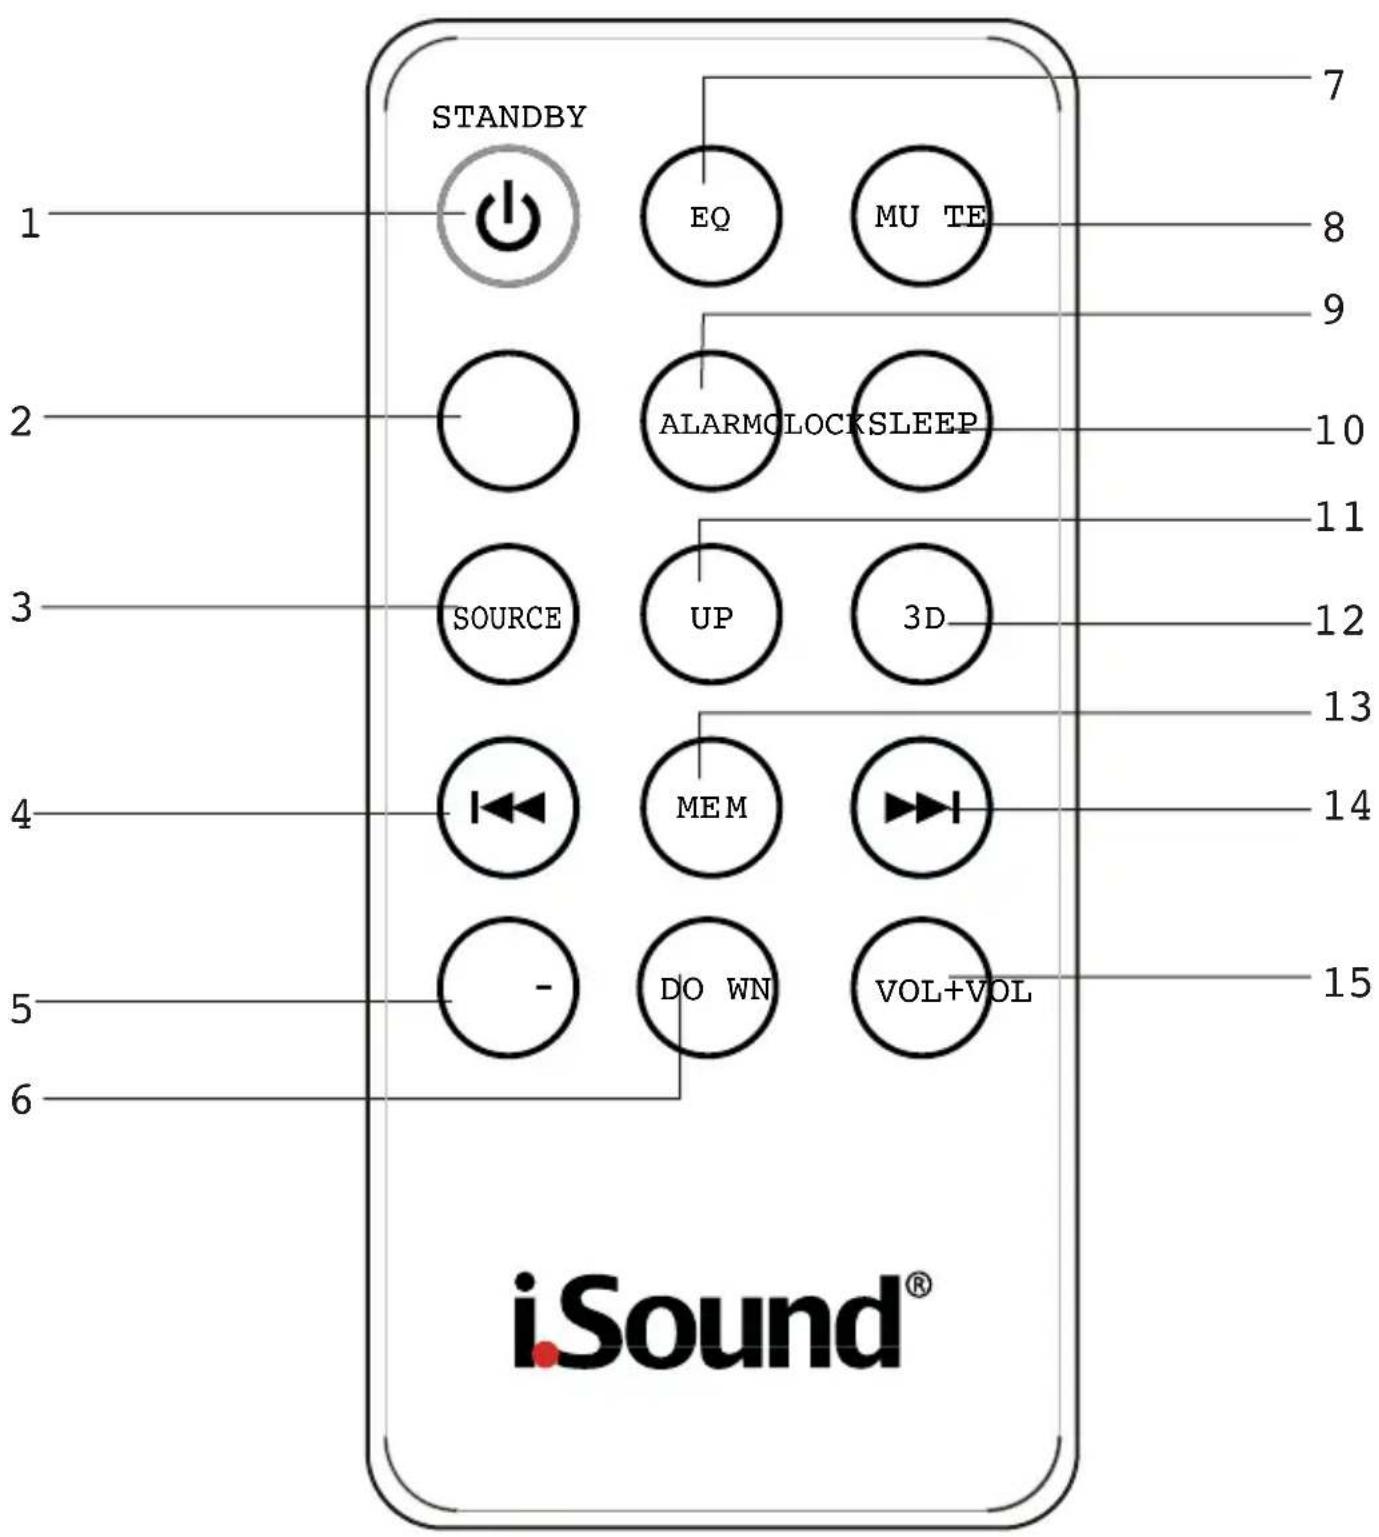
Controls Defined
- STAND BY button: Press to turn the Theater Sound off or on.
- CLOCK Press to set the time.
- SOURCE Press to switch between AUX/Line, Bluetooth, and FM radio.
- TUNE BACK Press to tune the FM radio. This button is for radio only.
- VOL- Press to reduce the volume.
- SEARCH DOWN Press to navigate down radio stations. This button is for radio only.
- EQ button Press to select FLAT, ROCK, JAZZ, POP and CLASSICAL.
- MUTE button Press to mute the volume.
- ALARM Press to set the alarm.
- SLEEP Press repeatedly to set the sleep timer.
- SEARCH UP Press to navigate up radio stations. This button is for radio only.
- 3D Press to turn 3D sound effects on and off.
- MEM Press to cycle through saved radio stations.
- TUNE FORWARD Press to tune the FM radio. This button is for radio only.
- VOL + Press to increase the volume.
FM RADIO
FM Antenna
Adjust the FM Wire Antenna (included) to get the best reception signal.
Tuning the FM Radio
- Press the STANDBY button to turn the Theater Sound on.
- Press the SOURCE button to switch to FM radio mode.
- Press the or buttons on the remote to tune the FM radio.
Listening to a Saved Radio Station
- Press the STANDBY button to turn the Theater Sound on.
- Press the SOURCE button to switch to FM radio mode.
- Press the UP and DOWN buttons on the remote to cycle through saved radio stations.
Saving a Radio Station
- Follow the instructions for tuning the FM radio.
- After tuning to the desired station, press the MEM button.
- Press the UP or DOWN buttons on the remote to select a preset.
- Press the MEM button to save the current radio station to the selected preset.
Up to 20 stations can be saved to the Theater Sound's memory.
CLOCK, ALARM AND SLEEP TIMER
Setting the Clock
- Press the STANDBY button to turn the power off.
- Press the CLOCK button on the remote control.
- The hour on the display will begin blinking.
- Press the 14 or 2 buttons on the remote to adjust the hour.
-
Press the CLOCK button again on the remote control. The minutes on the display will begin blinking.
-
Press the I and buttons on the remote to adjust the minutes.
- Press the CLOCK button again to finish setting the time.
Setting the Sleep Timer
- Press the STANDBY button to turn the power on.
- Press the SOURCE button on the Theater Sound to switch to the desired sleep timer source.
- Press the SLEEP button repeatedly to set the sleep timer.
- After the set sleep time has expired, the Theater Sound will automatically power off
Setting the Alarm
- Press the STANDBY button to turn the power on.
- Adjust the volume to the desired level.
- Press the STANDBY button to turn the power off.
- Press the ALARM button on the remote control.
- The alarm time on the display will begin blinking.
- Press the or buttons on the remote to adjust the hour.
- Press the ALARM button again on the remote control. The minutes on the display will begin blinking.
- Press the and buttons on the remote to adjust the minutes.
- Wait 5 seconds to finish setting the alarm.
- ALARM will appear on the display when the alarm is set.
- Press and hold the ALARM button for 2-3 seconds to cancel the alarm.
OPERATING AND CONNECTING AN EXTERNAL DEVICE
You can connect external devices (iPad, iPhone, iPod, smartphones, mp3 players, tablets, computers, television...etc.) to the Theater Sound in several ways:
Using a RCA Audio Cable
Plug the red and white ends of the included RCA cable into the red and white RCA outputs of your audio device. Plug the other 3.5mm auxiliary end of the RCA cable into the AUX IN located on the back of the Theater Sound.
Using a 3.5MM Auxiliary Cable
You can also connect an external device to your Theater Sound using the AUX IN socket on the back of the unit. To play the external device you will need to select AUX using the SOURCE button.
Once the device is connected, you can control playback as you would usually.
Press the VOLUME + and - buttons on the audio device to increase or reduce the volume.
Press the MUTE button to turn the sound off. Press it again to return to the previous volume level.
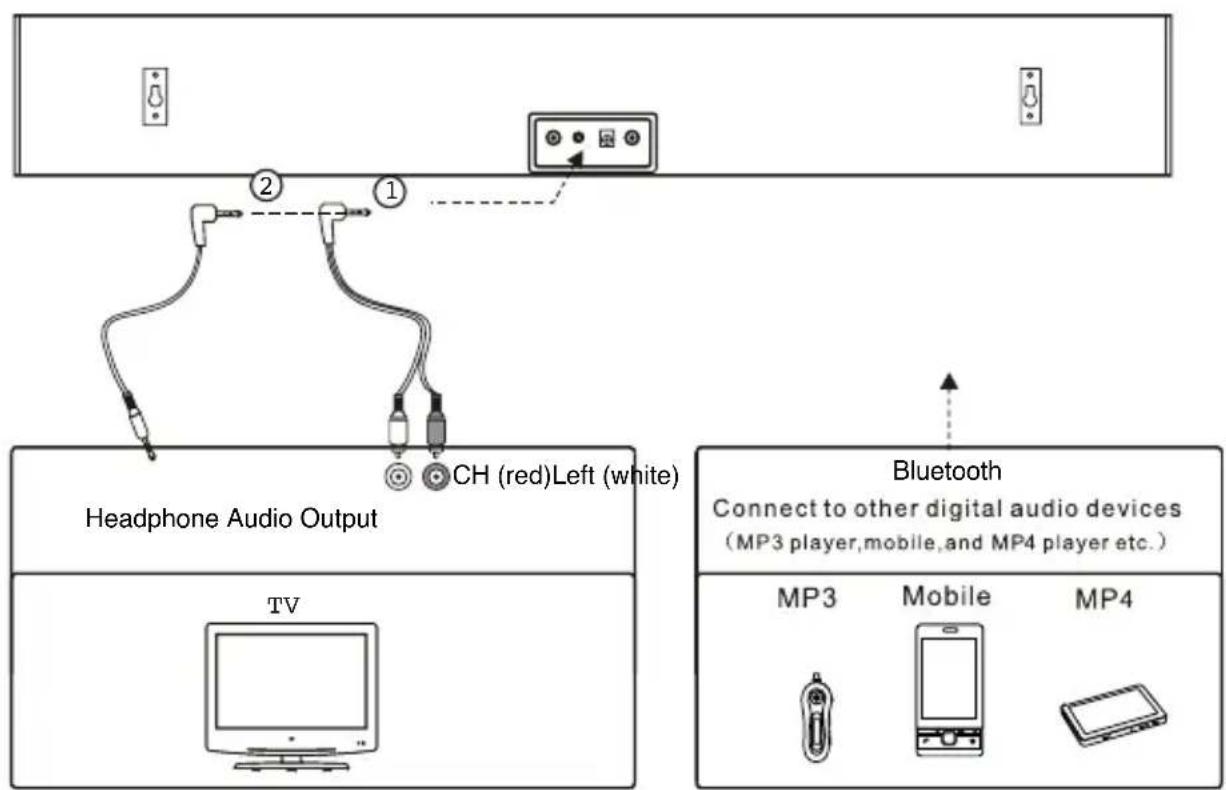
BLUETOOTH SET UP
- Switch on the Theater Sound. Press the SOURCE button and select BT function.
- The BT blue LED will flash 3 seconds and then stop for 30 seconds. It is now searching for the last paired device.
- If there is no device found, the blue LED will flash again. At this time, you can pair with a new device. Turn on a Bluetooth enabled device such as an iPod, iPhone, iPad, Blackberry, smartphone, computer... etc. When a device is connected and paired with the Theater Sound, it will show the name of F-3089N. Enter password 0000 to connect.
- If the initial set up connection is successful, the next time the speaker is turned on, the speaker will automatically pair to the last device it was connected with.
- If there is no Bluetooth enabled device found, the BT blue LED will continue to flash non-stop.
NOTE:
- The Theater Sound only connects to one device at a time. Turn off the Theater Sound in order to pair it with another Bluetooth enabled device.
- The transmission range for the Theater Sound is a standard 10 meters or 32 feet.
- Interference may occur during playback when using the Bluetooth connection near other wireless devices. If playback through Bluetooth is problematic, move the Theater Sound and the audio device to a different location, or use the 3.5mm audio cable to hardwire the connection.
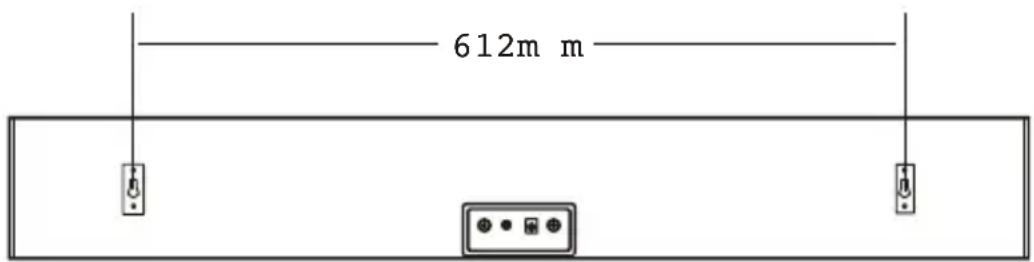
WALL MOUNTING THE THEATER SOUND
We recommend having this speaker professionally mounted.
By using the included wall mounting accessories, the speaker can be mounted onto a wall.
You will need
2 screws
2 anchors
- Level
- Manual or Power Screwdriver
- Pencil
- Tape Measure
- Use the TAPE MEASURE to decide how high you would like to hang the Theater Sound on the wall. The Theater Sound must be hung within 6 feet of an AC power outlet for the attached AC power cord to reach.
- Mark the position of the mounting screws on the wall using a pencil.
- Line the LEVEL up on both of your marks to ensure they are level. If they are not, adjust the marks as needed to make them level.
- After you've double checked your markings, drill holes in the wall suitable for the screws or anchors. Be sure to use the correct types of anchors and screws for your wall.
- Screw the wall mounting screws into the anchors if necessary.
- Use the LEVEL to check that the mounting screws are level.
- Slide the brackets of the Theater Sound onto the screws in the wall and make sure there is a firm and stable connection before letting go of the unit.
- Finally, use the LEVEL to confirm that the Theater Sound is level.
TROUBLESHOOTING
Problem: No power
Solution: Check that the power is switched on at the wall outlet.
Check if the power cord is properly connected to the power outlet.
Problem: No sound
Solution: Check that the volume control is NOT at minimum setting. Check that it is NOT set to mute.
Problem: No sound from Bluetooth first connection
Solution: Check if you have entered password or not. The password is "0000".
Problem: Function disturbed
Solution: If none of the above solutions work, then switch off and unplug your Theater Sound. Leave it off for 2 minutes to reset, and then switch it back on.
Problem: The remote control will not work
Solution: Inspect or replace the batteries. Make sure there are no obstacles obscuring the front of the Speaker.
MAINTENANCE
- Do not use harsh or abrasive cleaning agents or solvents.
- Do not attempt to disassemble your product.
- Do not paint your product.
- Do not drop, throw or try to bend your product.
- Do not expose your product to open flames.
Technical Specifications
Size: 810 mm( L) × 113.5 mm( H) × 61 mm( D)
Output power: 18W+18W
Standby power consumption: less than 1W
ESPANOL
ID del Bluetooth: F-3089N
Contrasena: 0000
INCLUDE:
Specifications Techniques
Grandeur: 810mm (L) x 113.5mm (H) x 61mm (P)
All dreamGEAR/i.Sound products come with a limited warranty and have been subjected to a thorough series of tests to ensure the highest level of dependability and compatibility. It is unlikely that you will experience any problem, but if a defect should become apparent during the use of this product, dreamGEAR warrants to the original consumer purchaser that this product will be free from defects in material and workmanship for a period of 120 days from the date of your original purchase. If a defect covered by this warranty occurs, dreamGEAR, at its option, will repair or replace the product purchased at no charge. If a replacement is necessary and your product is no longer available, a comparable product may be substituted at the sole discretion of dreamGEAR.
This warranty does not cover normal wear and tear, abusive use or misuse, modification, tampering or by any other cause not related to either materials or workmanship. This warranty does not apply to products used for any industrial, professional or commercial purposes.
For service on any defective product under the 120-day warranty policy, please contact Consumer Support to obtain a Return Authorization Number.
NOTE: dreamGEAR will not process any defective claims without a Return Authorization Number.
Consumer Support Hotline:
877-999-DREAM (3732) (U.S. and Canada only) or 310-222-1045 (International)
Consumer Support Email: support@dreamgear.net
Websites:
www.dreamgear.net www.isound.net
