HK5R - Coffee machine INVENTUM - Free user manual and instructions
Find the device manual for free HK5R INVENTUM in PDF.
User questions about HK5R INVENTUM
0 question about this device. Answer the ones you know or ask your own.
Ask a new question about this device
Download the instructions for your Coffee machine in PDF format for free! Find your manual HK5R - INVENTUM and take your electronic device back in hand. On this page are published all the documents necessary for the use of your device. HK5R by INVENTUM.
USER MANUAL HK5R INVENTUM
Legislation requires that all electrical and electronic equipment must be collected for reuse and recycling. Electrical and electronic equipment marked with the symbol indicating separate collection of such equipment must be returned to a municipal waste collection point.
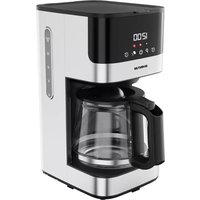
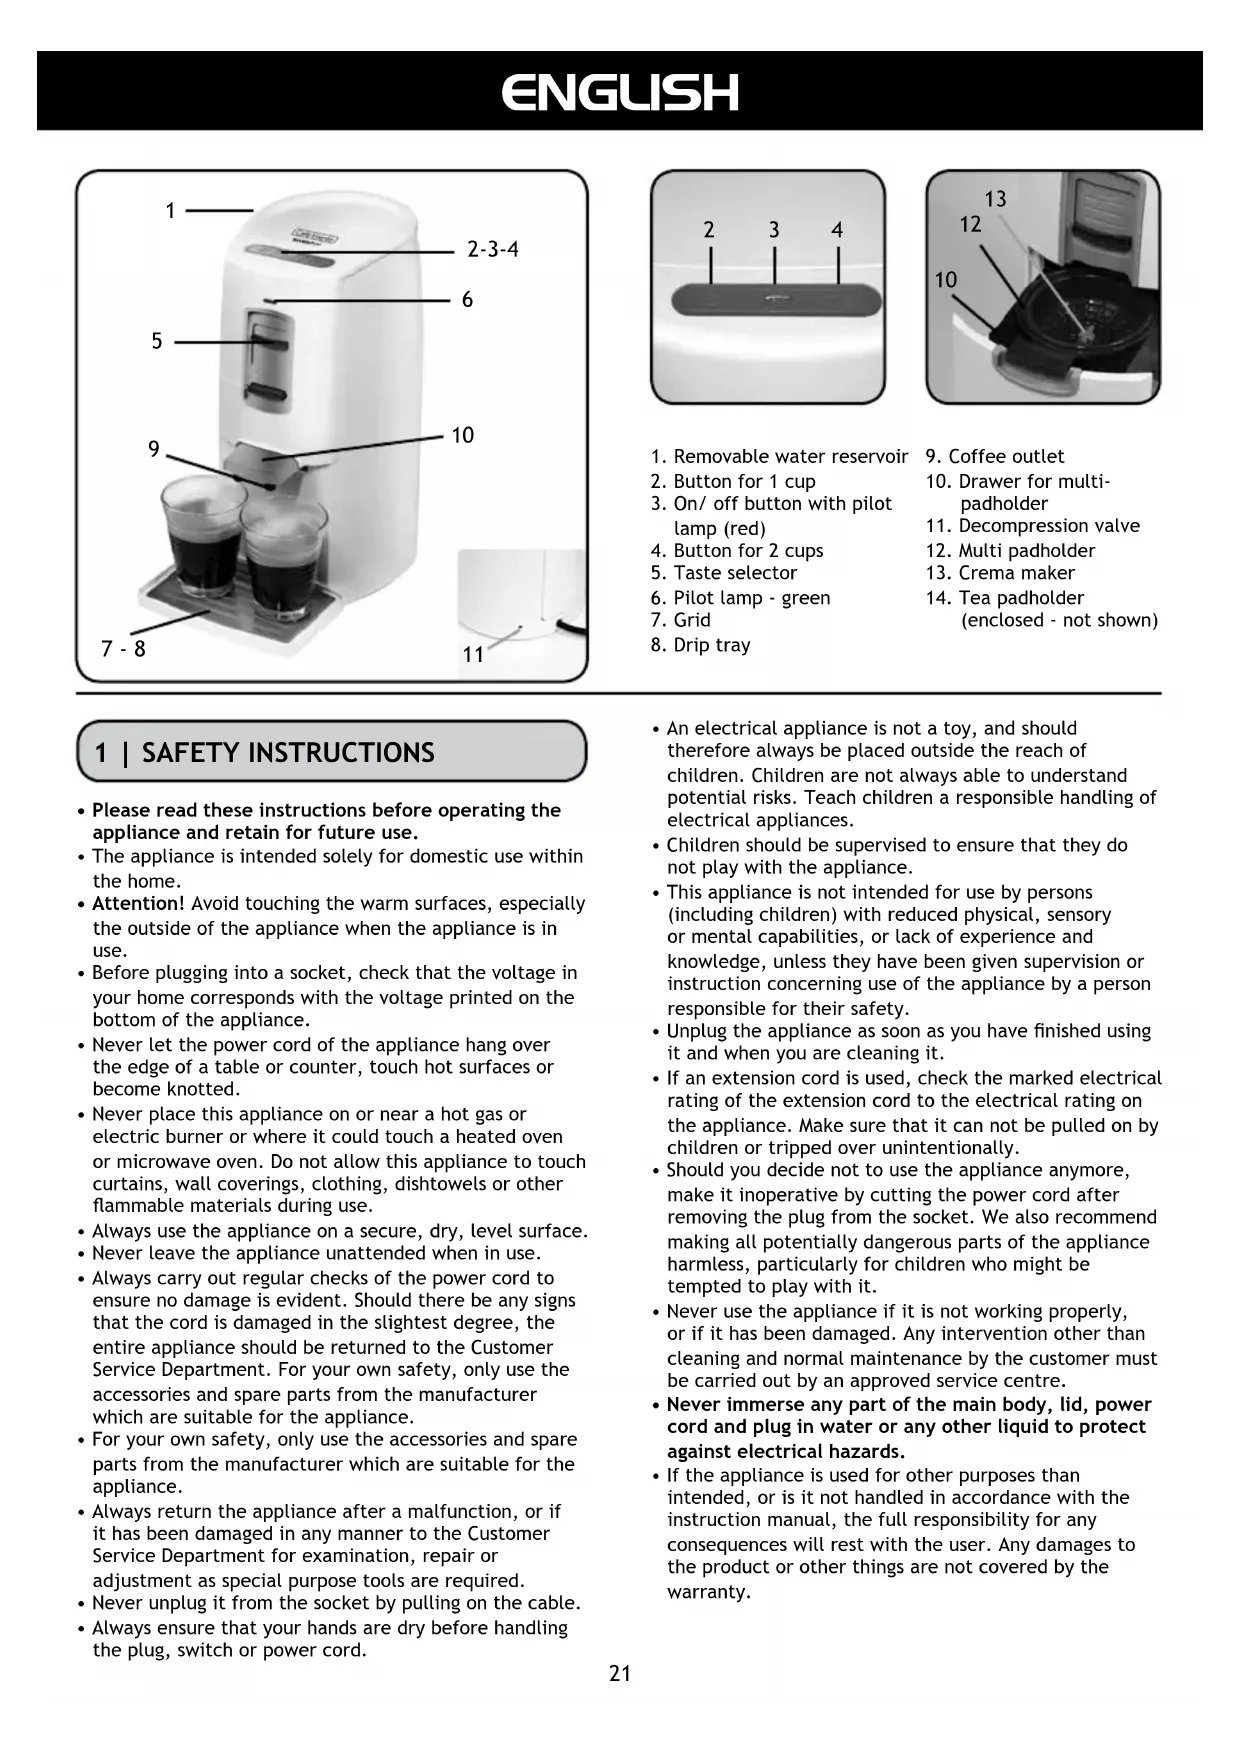
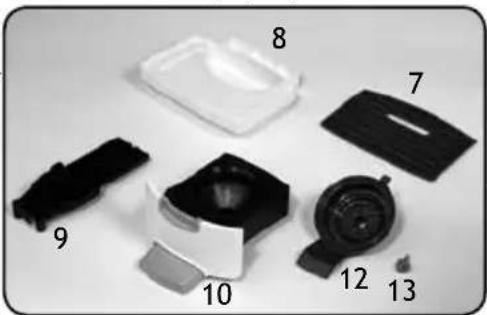
DESCRIPTION OF THE APPLIANCE
- SAFETY INSTRUCTIONS PAGE 21
- BEFORE FIRST USE PAGE 22
- RINSING THE MACHINE
- TASTE SELECTOR PAGE 22
- MAKING COFFEE PAGE 22
- MAKING TEA PAGE 23
- CLEANING & MAINTENANCE
CLEANING SEPARATE PARTS
PAGE 23
DESCALING PAGE 24
PAGE 23
- SOLVING AMALFUNCTION
GE 24
GARANTIE & SERVICE PAGE 27
PAGE 24
NEDERLANDS
8 | SOLUTIONS AUX PERTUBATIONS
- Removable water reservoir
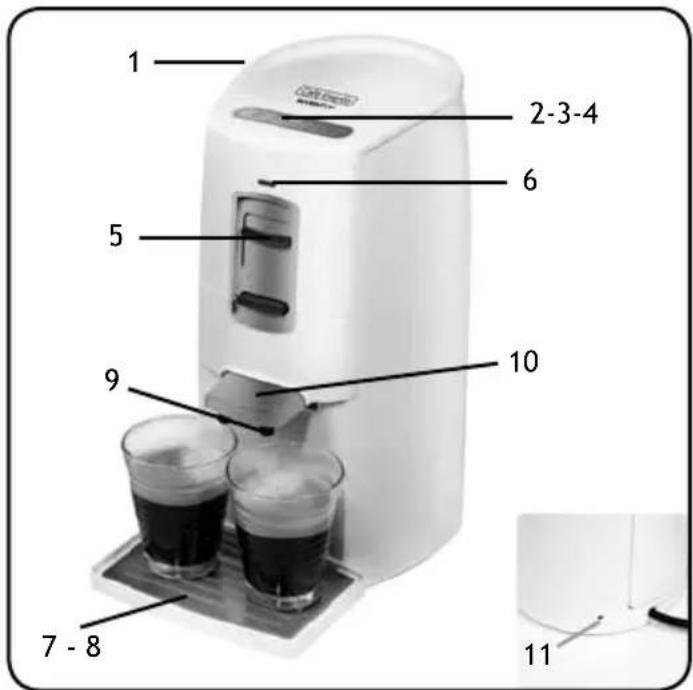
- Button for 1 cup
- On/off button with pilot lamp (red)
- Button for 2 cups
- Taste selector
- Pilot lamp - green
- Grid
-
Drip tray
-
Coffee outlet
- Drawer for multipadholder
- Decompression valve
- Multi padholder
- Crema maker
- Tea padholder (enclosed - not shown)
1 | SAFETY INSTRUCTIONS
- Please read these instructions before operating the appliance and retain for future use.
- The appliance is intended solely for domestic use within the home.
- Attention! Avoid touching the warm surfaces, especially the outside of the appliance when the appliance is in use.
- Before plugging into a socket, check that the voltage in your home corresponds with the voltage printed on the bottom of the appliance.
- Never let the power cord of the appliance hang over the edge of a table or counter, touch hot surfaces or become knotted.
- Never place this appliance on or near a hot gas or electric burner or where it could touch a heated oven or microwave oven. Do not allow this appliance to touch curtains, wall coverings, clothing, dishtowels or other flammable materials during use.
Always use the appliance on a secure, dry, level surface. - Never leave the appliance unattended when in use.
- Always carry out regular checks of the power cord to ensure no damage is evident. Should there be any signs that the cord is damaged in the slightest degree, the entire appliance should be returned to the Customer Service Department. For your own safety, only use the accessories and spare parts from the manufacturer which are suitable for the appliance.
- For your own safety, only use the accessories and spare parts from the manufacturer which are suitable for the appliance.
- Always return the appliance after a malfunction, or if it has been damaged in any manner to the Customer Service Department for examination, repair or adjustment as special purpose tools are required.
- Never unplug it from the socket by pulling on the cable.
-
Always ensure that your hands are dry before handling the plug, switch or power cord.
-
An electrical appliance is not a toy, and should therefore always be placed outside the reach of children. Children are not always able to understand potential risks. Teach children a responsible handling of electrical appliances.
- Children should be supervised to ensure that they do not play with the appliance.
- This appliance is not intended for use by persons (including children) with reduced physical, sensory or mental capabilities, or lack of experience and knowledge, unless they have been given supervision or instruction concerning use of the appliance by a person responsible for their safety.
- Unplug the appliance as soon as you have finished using it and when you are cleaning it.
- If an extension cord is used, check the marked electrical rating of the extension cord to the electrical rating on the appliance. Make sure that it can not be pulled on by children or tripped over unintentionally.
- Should you decide not to use the appliance anymore, make it inoperative by cutting the power cord after removing the plug from the socket. We also recommend making all potentially dangerous parts of the appliance harmless, particularly for children who might be tempted to play with it.
- Never use the appliance if it is not working properly, or if it has been damaged. Any intervention other than cleaning and normal maintenance by the customer must be carried out by an approved service centre.
- Never immerse any part of the main body, lid, power cord and plug in water or any other liquid to protect against electrical hazards.
- If the appliance is used for other purposes than intended, or is it not handled in accordance with the instruction manual, the full responsibility for any consequences will rest with the user. Any damages to the product or other things are not covered by the warranty.
2 BEFORE FIRST USE
Before you use the appliance for the first time, please do as follows: Carefully unpack the appliance and remove all the packaging material. Keep the material (plastic bags and cardboard) out of reach of children. Check the appliance after unpacking for any damage, possible from transportation.
Before plugging into a socket, check whether the voltage in your home corresponds with the voltage printed at the bottom of the appliance. Place the appliance on a stable and heat resistant surface.
WARNING! Before you make the very first cup of coffee, you must rinse the appliance with water. Follow the steps in chapter 3 carefully to make sure the boiler is filled with water correctly.
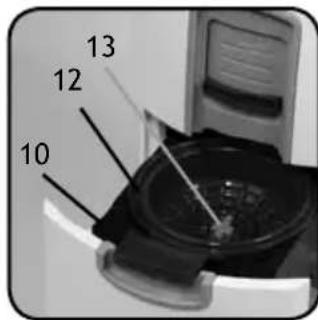
Clean the outside of the appliance with only a damp cloth and dry it with a dry cloth. Clean the parts: the multi-pad holder 12, the crema maker 13, the drawer 10, the coffee outlet 9, the grid 7 and the drip tray 8 with warm water and some washing-up liquid or in the
dishwasher and make sure that the parts are dry before next use. See chapter: CLEANING & MAINTENANCE. Connect the appliance to an earthed socket.
3 | RINSING THE MACHINE
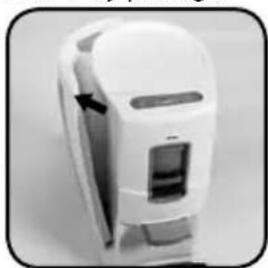
- Remove the removable water reservoir 1 by pulling it
backward at a 45 degree angle from the coffee pad machine.
- Fill the water reservoir with cold water to the maximum level and place it in the coffee pad machine. Make sure the reservoir is placed correctly.
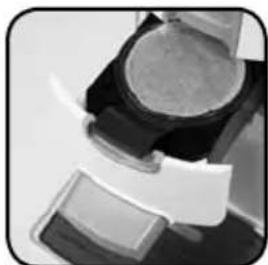
- Open the drawer 10 for the coffee padholder by gently pulling the drawer out of the coffee pad machine. The drawer will now slide open.
- Place a coffeepad in the multi padholder 12 with the round side downwards and press it lightly. Please make sure that the coffee is evenly devided.
- Close the drawer 10 gently inwards until it can't move any.
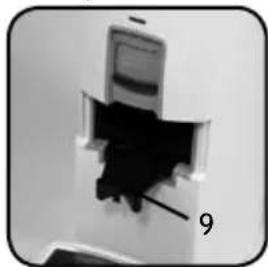
- Put a large mug or bowl under the coffee outlet 9 to collect the water.
- Connect the appliance to an earthed socket.
- Switch the coffee pad machine on with the on/off button 3 and press directly the 1-cup
- button and 2-cups - button at the same time. To rinse the appliance, don't let it heat up.
- The coffee pad machine will now fill the boiler and rinse the appliance.
- The coffee pad machine will switch off automatically as soon as the rinsing is done.
- The coffee pad machine is now ready for use.
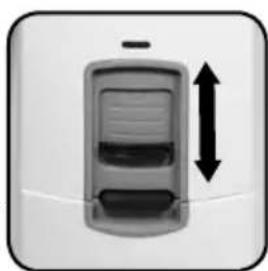
4 TASTE SELECTOR
With the taste selector 5 you can select and adjust your individual water amount/ coffee strenght. You can slide the taste selector upwards and downwards.
- When you slide the taste selector downwards, you will get stronger coffee with a smaller amount of water.
- Place the taste selector in the middle and you will get a standard amount of coffee.
- When you slide the taste selector completely upwards, the coffee will get thinner because the appliance will use more water. We advise to place a small selection.
5 | MAKING COFFEE
- Fill the removable water reservoir 1 with cold water to the maximum level and place it in the coffee pad machine. Make sure the reservoir is placed correctly.
- Switch the coffee pad machine on with the on/off button 3 and the appliance will now heat up the water. The red light will blink slowly while heating. This will take 2 minutes.
- Open the drawer 10 for the coffee padholder by gently pulling the drawer out of the coffee pad machine. The drawer will now slide open.
- Place a coffeepad in the multi-pad holder 13 with the round side downwards and press it lightly. Make sure that the coffee is well spread and loose. Depending on the number of cups of coffee you want to make, you can place one or two coffeepads in the multi padholder. This coffee pad machine can be used with almost all available coffeepads. You can place one or two coffeepads and coffeepads of different sizes in the multi padholder 12. The coffee pad machine will automatically adapt to the number of coffeepads you have placed (max. 2 coffeepads).
Warning: do not use the holders for grounded coffee.
- Slide the drawer 10 gently inwards until it can't move any further. The green light 6 will light up indicating that the drawer 10 is locked correctly. The appliance can not make coffee when the green light is not lit.
- Place one or two cups under the coffee-outlet 9.
- Adjust the taste selector for the amount of water which suits your own taste the best.
If you choose to get more water, your cup will be filled more, but the coffee will get thinner. If you choose less water, your cup will become less full, but the coffee will get stronger.
- Press gently on the button of the number of cups you want to make, 1 or 2, respectively button or
- The coffee pad machine will now make coffee with the amount of water you have selected and will pour it into the coffeecup. When you want the appliance to stop making coffee prematurely, press any button.
- If you want to make more cups of coffee, you have to wait until the green pilot lamp 6 doesn't blink any longer. You can than open the drawer to place new coffeepads.
WARNING! As long as the pilot lamp 6.2 blinks, you should not remove the water reservoir and you should not open the drawer.
6 | MAKING TEA
To make tea with your coffee pad machine it is necessary to replace the coffee padholder with the enclosed tea padholder. The tea padholder is enclosed in the box. You will recognize the tea padholder from the different color and the teamaker (with a "T") in the middle of the holder.
- Fill the removable waterreservoir 1 with cold water to the maximum level and place it in the coffeepadmachine.
- Switch the coffeepadmachine on with the on/off button 3 and the appliance will now heat up the water. The red light will blink slowly while heating. This will take 2 minutes.
- Open the drawer 10 by gently pulling the drawer out of the coffeepadmachine. The drawer will now slide open.
- Place a teapad in the teepadholder 14 with the round side downwards and press it lightly. Make sure that the tea is well spread and loose.
Depending on the cups of tea you want to make, you can place one or two teapads in the teypadholder.
- Slide the drawer 10 gently inwards until it can't move any further. The green light 6 will light up indicating that the drawer 10 is locked correctly. The appliance can not make tea when the green light is not lit.
- Place one or two cups under the coffee outlet 9.
- Adjust the taste selector for the amount of water which suits your own taste the best. If you choose to get more water, your cup will be filled more, but the tea will get thinner. If you choose less water, your cup will become less full, but the tea will get stronger.
Press gently on the button of the number of cups you want to make, 1 or 2, respectively button - The coffee pad machine will now make tea with the amount of water you selected and will pour it into the teacup. When you want the appliance to stop making tea prematurely, press any button.
- If you want to make more cups of tea, you have to wait until the green pilot lamp 6 doesn't blink any longer. You can than open the drawer to place new teapads.
WARNING! As long as the pilot lamp 6 blinks, you should not remove the waterreservoir and you should not open the drawer.
7 | CLEANING & MAINTENANCE
We advise to clean the coffee pad machine on a regular bases. Regular cleaning will prolong the life of your appliance and will guarantee optimal brewing results.
Please do as follows:
Check before cleaning if the coffee pad machine is switched off und unplugged. Clean the outside of the appliance with only a damp cloth and dry it with a dry cloth. Never use any abrasives! Never place the appliance in or under running water.
CLEANING SEPARATE PARTS
- Remove the drawer 10 by pulling and slightly lifting it towards you. This movement unlocks the drawer and you can take it out of the machine.
- Remove the coffee outlet 9 the same way as the drawer.
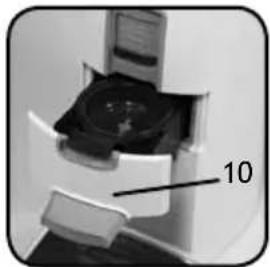
To place the coffee outlet and the drawer back, all you need to do is to place the items correctly on the sliders. Push the drawer back in the machine. A "click" indicates that the drawer is placed correctly in the guides.
- Clean the separate parts: the multi padholder 12, the crema maker 13, the drawer 10, the coffee outlet 9, the grid 7 and the drip tray 8 with warm water and some washing-up liquid or in the dishwasher and make
sure that the parts are dry before next use.
- Pay attention to clogging the small drains in the middle of the padholder 12 and the outside of the
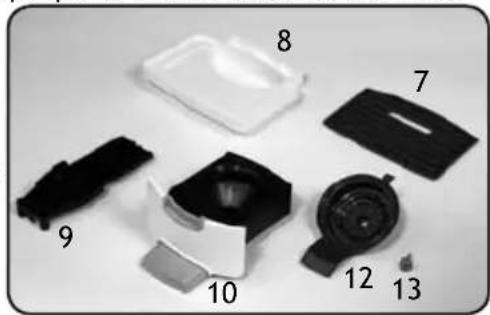
crema maker 13. Remove the crema maker 13 by pushing it out, from below, with a blunt object like a pen or the back of a teaspoon. This also concerns the teamaker in the tea padholder 14.
- Check every day if the drip tray 8 is empty and there are no used coffeepads in the appliance. If the drip tray is full, it will overflow and the liquid will flow under the appliance.
Make sure the grid is placed correctly, with the opening under the coffee outlet.

DESCALING
We advise to descale your coffee pad machine on a regular bases. The period depends on the condition of your water and the frequency of use. We advise to descale the coffee pad machine approx. every three months. You can use a special descalingproduct for coffeemachines.
When you use a descalingproduct especially for coffeemachines, you will have to follow the instructions on the package of the descalingproduct accordingly.
- Switch off the coffee pad machine with the on/off 3 button.
- Fill the reservoir according the instructions on the package of the descalingproduct.
- Place a large mug or bowl under the coffee outlet to collect the descalingmixture.
- Open the drawer for the coffee padholder by pulling the drawer gently outwards. The drawer will now slide open.
- Place a new or used coffeepad in the multi padholder with the bulging side down and press it lightly. The coffee pad machine will be better descaled when you do this and it cannot be clogged with descalingbits.
- Push the drawer gently inwards until it can't go further.
- Switch the coffee pad machine on with the on/off button 3 and press directly the 1-cup button and 2-cups button at the same time. Do not let the machine heat up.
- The coffee pad machine will now rinse with the descendingmixture.
- The coffee pad machine will automatically switch itself off when the rinsingprocess is ended. Repeat the process until the water reservoir is empty. After the descending you will have to rinse the machine upto 3 times with 1 liter of fresh cold water to make sure that there is no descalingproduct left behind in the coffee pad machine to avoid a bad taste to the coffee.
Attention! If you haven't used the coffee pad machine for a while, for instance if you have been away on a holiday, you should remove all the separate parts for cleaning and rinse the coffee pad machine with fresh water. Place the cleaned parts in the machine. This prevents an additional taste.
8 | SOLVING A MALFUNCTION
When the appliance has a malfunction, one or two pilot lamps will blink fast.
| Lamp Color | Condition Explanation | |
| 3/6 red/green | constantly Co | Caffeepadmachine is ready for use. |
| 3 red blinking | slowly | Appliance is heating up. |
| 3 red blinking | fast | Malfunction in the appliance, see the following table. |
| 6 green constantly | Drawer is locked correctly and the appliance is ready for making coffee. | |
| 6 green blinking | slowly | Don’t open the drawer, it is still locked. Please wait a couple of seconds until the pilot lamp lights constantly. |
| 6 green off | Drawer is not locked, open the drawer and lock it again. |
Check the following steps to solve the malfunction yourself.
| Cause |
| Water reservoir is not placed correctly |
| Solution |
| Empty the reservoir, fill it up again to the maximum-level and place it on the coffee pad machine. |
| Cause |
| Waterlevel is under the minimum |
| Solution |
| Fill the water reservoir to the maximum level. |
| Cause |
| Boiler overheated |
| Solution |
| Switch the appliance off and rinse it as described in the chapter “Rinsing the machine”. |
| Cause |
| Less or no coffee at all comes out of the coffee outlet. |
| Solution |
| • Remove the crema maker by pushing it out, from below, with a blunt object like a pen or the back of a teaspoon and rinse it with warm water. One grain of coffee can cause it to be blocked. • Check to see if the coffee outlet is clogged and if necessary clean it. • Check the position of the taste selector. • We advise to loosen the coffee in the coffeepads before you place them in the machine. This will ensure a better transit of the water and will give a finer layer of coffeecrema. |
| Coffeepaddrawer won't open (vacuum). |
| Solution |
| You can solve the vacuum yourself by decompressing the appliance using the valve behind the small hole on the back of the appliance.Procedure: Make sure the water reservoir is placed on the appliance. At the back of the appliance you will find a small hole in the housing. Put a thin, blunt object inside the hole and press to activate the valve. Keep pressing it during several seconds until the water stops flowing back into the waterreservoir and both pilot lamps (red and green) light up constantly.Careful: the water that is being pumped back, is hot. You have successfully decompressed the appliance.After you can open the coffee pad drawer again, you must clean the crema maker and the multi padholder. If you do not clean the parts, the cause of the vacuum will not be solved and when reusing the appliance it will get locked again.Cleaning the crema maker: Remove the crema maker by pushing it out, from below, with a blunt object like a pen or the back of a teaspoon and rinse it with warm water. One grain of coffee can cause it to be blocked. |
| Cause |
| The lock does not work - the pilot lamp 6 keeps blinking. |
| Solution |
| • Make sure the coffeepad(s) has (have) been placed correctly. • Coffee pad drawer is not locked, open the drawer and lock it again. • Check the multi padholder - at the back there should be a protrusion sticking out, when this has broken off the machine is not able to make coffee. Order a new multi padholder at your supplier. |
GARANTIE & SERVICE
- This product is guaranteed for a period of 2 years from the date of purchase against mechanical and electrical defect.
- Guarantee can only be given if proof of purchase (e.g. till receipt) can be shown. Therefore keep it in a safe place. The guarantee period starts at date of purchase.
-
Guarantee is not valid in case of:
-
normal wear;
- damage through misuse use or when the instructions were not followed correctly;
- lack of maintenance;
- not following the operation- and safety instructions;
- incompetent montage or repairs made by yourself or others;
-
using accessories and spare parts which are not suitable for the appliance; for assessment by our technical department.
-
The guarantee is not valid for:
-
normal wear;
external cables; - (interchangeable) signal- and controllamps for assessment by our technical department.
Return to your supplier of send the appliance, including a copy proof of purchase and description of the complaint, stamped to:
Inventum Holland BV
new E.T.P. bvba
Generatorstraat 17
Passstraat 121
3903 LH VEENENDAAL
9100 Sint Niklaas
THE NETHERLANDS
BELGIUM
AVC Service GmbH
Hohenstrasse 24
70736 Fellbach
GERMANY
- Pack it carefully (preferably in the original carton).
Ensure unit is clean. - Enclose your name and address and quote model number on all correspondence.
When the guarantee is no longer valid or when the period of guarantee has passed, we will charge any costs that flow out of an assessment and/or repairing.
On request we will supply a statement before repairing. Without requesting a statement, we assume that you, by sending the appliance, automatically order to repair the appliance.
A guarantee period of two months is valid for repairs done by our technical department and the used spare parts, counting from the repairdate. When a malfunction occurs within this period which directly flows out of the repairs and the used spare parts, the consumer has the right of repairs without any costs.
Inventum Holland BV