
KZ813D - Coffee machine INVENTUM - Free user manual and instructions
Find the device manual for free KZ813D INVENTUM in PDF.

| Brand | Inventum |
| Model | KZ813D |
| Product type | Filter coffee machine |
| Tank capacity | 1.25 L (10 cups) |
| Power supply | 220-240 V~, 50/60 Hz |
| Programming | Programmable timer with 24h clock |
| Functions | Coffee strength adjustment, automatic shut-off after 40 min, manual drip-stop system |
| Hot plate | Yes, keep warm |
| Material | Plastic, glass (carafe) |
| Filter type | Paper filter size 1x4 |
| Maintenance | Descaling recommended after approximately 60 cycles |
| Descaling indicator | Yes, flashing symbol on display |
| Safety | Automatic shut-off at end of cycle, overheat protection, shut-off on empty tank |
| Removable parts | Filter holder, drip device, glass carafe, tank lid |
| Warranty | 2 years, full manufacturing warranty |
| After-sales service | Exchange during warranty, paid repair after |
| Cleaning | Removable parts washable with warm soapy water |
| Dimensions (approx.) | 22 x 18 x 32 cm |
Frequently Asked Questions - KZ813D INVENTUM
User questions about KZ813D INVENTUM
0 question about this device. Answer the ones you know or ask your own.
Ask a new question about this device
Download the instructions for your Coffee machine in PDF format for free! Find your manual KZ813D - INVENTUM and take your electronic device back in hand. On this page are published all the documents necessary for the use of your device. KZ813D by INVENTUM.
USER MANUAL KZ813D INVENTUM
natural_image
Exterior view of a modern Schematic coffee maker with black filter and digital display (no text or symbols on main device)- safety instructions page 10
- appliance description page 13
- prior to first use page 13
- making coffee page 13
- controlling the coffee strength page 14
- pause page 14
- switching off page 14
- clock and timer function page 14
- cleaning and maintenance page 15
- de-scaling page 15 General terms and conditions of service and warranty page 31
Deutsch
1 safety instructions
- Carefully read the entire instruction manual prior to using the appliance and store it carefully for future reference.
- Only use this appliance for the purposes described in the instruction manual.
- This appliance was designed for making coffee, which means that certain parts of the appliance become hot and that the appliance gives off steam. Therefore, please take the following into account:

Caution! Avoid contact with the hot surfaces and/or steam!

Caution! Avoid contact with metal parts, this could result in personal injury!
• Always check that the water outlet, filter holder and glass jug are properly positioned before making coffee. If not, hot water may run out of the appliance or splash upwards from the riser tube. This could result in personal injury and/or damage to the appliance.
• Do not remove parts from the appliance while making coffee. This could result in personal injury and/or damage to the appliance.
- Only connect the appliance to alternate current, to an earthed wall socket, with a mains voltage that corresponds with the information provided on the information plate of the appliance.
- Never bend the power cord sharply or allow it to run across hot parts.
- Fully unwind the cord to prevent it from overheating.
- Never place the appliance near appliances that give off heat, such as ovens, gas cookers, hotplates, etc. Keep the appliance away from walls or other objects that could catch flame, such as curtains, towels (cotton or paper), etc.
• Always make sure the appliance is placed on an stable, flat and heat-resistant surface and is only used indoors. - Do not leave the appliance unsupervised if the appliance is operational.
-
Do not use the appliance if the plug, cord or appliance are damaged, or if the appliance no longer functions properly or if it is damaged in any other way. If this is the case, consult the retailer or our maintenance service.
-
If the connection cord of this appliance becomes damaged, it must be replaced by the manufacturer, its customer service or a similarly qualified person in order to prevent hazardous situations.
- Do not pull the cord and/or appliance to remove the plug from the wall socket.
- Never touch the appliance with wet or damp hands.
- Keep the appliance out of reach of children. Children do not see the dangers associated with handling electrical appliances. Therefore, never allow children to operate electrical appliances without supervision. Keep the appliance and cord out of reach of children younger than 8 years of age.
- The appliance may be used by children of 8 years and older and by persons with restricted physical, sensory or mental capacities or a lack of experience or knowledge, provided that they use the appliance under supervision and are instructed about the safe use of the appliance, and understand the associated hazards.
• Children must not play with the appliance. - The appliance must not be cleaned or maintained by children, unless they are over 8 years of age and this is done under supervision.
- If the appliance is being cleaned or is not being used, fully switch off the appliance and remove the plug from the socket.
- Always make sure the appliance is switched off and cooled down and that the plug has been removed from the socket, before you remove parts from the appliance.
- If the appliance does not function after it has been switched on, it is possible that the fuse or earth leakage circuit breaker has been activated in the electrical distribution box. The load on the group can be too high or an earth leakage could have occurred.
- In case of a breakdown, never make repairs yourself; a tripped safety device in the appliance could indicate a defect that cannot be remedied by removing or replacing this safety device. Only original parts should be used.
- The water reservoir deforms when using hot water, therefore only fill it with cold water. Always use the coffee machine with a closed filter cover.
- Do not switch on the appliance when the water reservoir is empty.
- Never use a cracked glass jug or a glass jug with a loose or damaged handle.
- Handle the glass part carefully when using and cleaning.
- Do not place the glass jug containing hot liquid on a hot or cold surface.
- Do not use the glass jug for other purposes than described here.
- Do not place an empty glass jug back on the hot plate.
- Never submerge the appliance, cord or plug in water.
- This appliance is intended for household and similar use, such as:
- in staff kitchens, in shops, offices and other work environments;
- by guests of hotels, motels and other residential environments;
- in Bed&Breakfast type environments;
- farms.
- If the appliance is not used as intended, no compensation can be claimed in case of defects or accidents and the warranty will be invalidated.
- Legislation requires that all electrical and electronic equipment must be collected for reuse and recycling. Electrical and electronic equipment marked with the symbol indicating separate collection of such equipment must be returned to a municipal waste collection point.
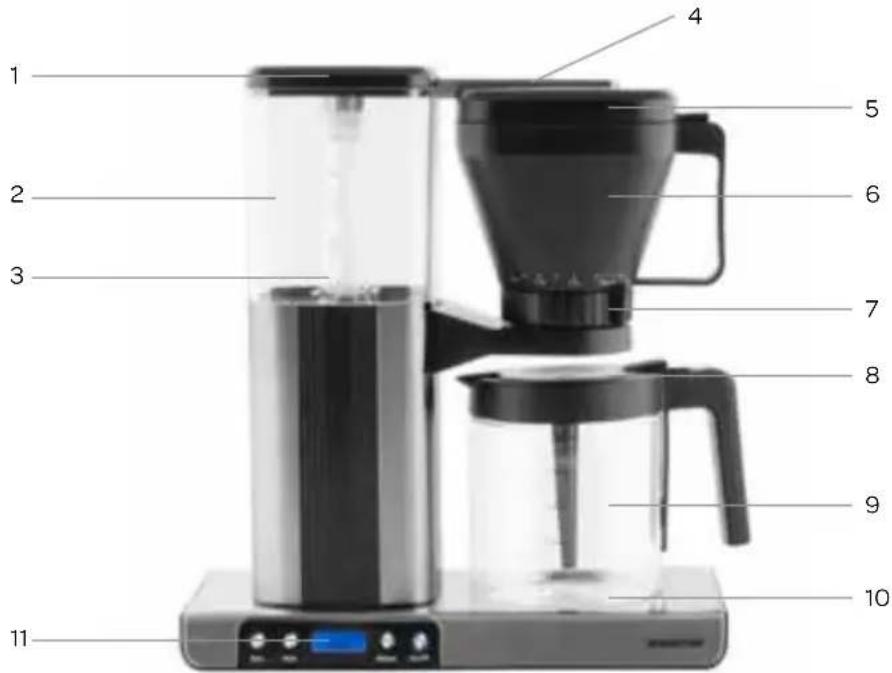
2 appliance description
- Water reservoir cover
- Water reservoir
- Risertube
- Water outlet
- Cover filter holder
- Filter holder
- Coffee strength controller
- Cover with mixing tube
- Glass jug
- Hot plate
- Control panel
3 prior to first use
Before using the coffee machine for the first time, proceed as follows: Carefully unpack your coffee machine and remove all packaging material and possible promotional stickers. Keep the packaging (plastic bags and cardboard) out of reach of children. After unpacking the appliance, carefully check it for external damage that may have occurred during transport.
Place the coffee machine on a flat, stable and heat-resistant surface. It is best to clean the interior of the new coffee machine prior to using it for the first time. Clean the appliance as described in section CLEANING AND MAINTENANCE. Then fill the water reservoir with cold water up to the 1.25L mark and allow the appliance to make two or three runs without coffee. The appliance will not function when switching it on with an empty water reservoir, the indicator led at the On/Off button will flash.
4 making coffee
Check that the voltage stated on the information plate matches the voltage used in your region. Place the coffee machine on a flat, stable and heat-resistant surface. Insert the plug in an earthed wall socket.
- Raise the cover of the water reservoir and – using the glass jug – fill the reservoir with cold water to the required level (0.25L to 1.25L = 2 to 10 cups). Do not fill the reservoir above the 1.25 mark. Place the cover back on the reservoir.
- Remove the filter holder from the appliance. You do this by first removing the cover and then rotating the filter holder counterclockwise by the handle. Place a paper coffee filter (size 1 x 4) of which the edges have been folded back in the filter holder. This prevents the filter bag from folding inwards and closing. Add the required coffee (extra-fine grind) and softly shake it to flatten out the coffee. For 10 cups, according to taste, you can use 5 to 6 measuring spoons of coffee, or 6 grams of coffee per cup.
- Fasten the filter holder in the appliance again, making sure it is properly positioned, and then close it with the cover.
- Place the glass jug on the hot plate.
Warning: Ensure the water outlet, filter holder and glass jug are properly positioned before you start making coffee, so that no hot water can be released while making coffee. The water outlet must be placed firmly on the riser tube in the centre of the water reservoir and the filter holder must be properly secured. Do not remove the water outlet, filter holder and/or glass jug while making coffee. This could result in personal injury and/or damage to the appliance.
- Open the coffee strength controller by turning it clockwise. Adjust the coffee strength controller in accordance with the volume of water in the water reservoir. See section Controlling the coffee strength for more information.
-
Switch on the appliance by pressing the On/Off button. The indicator led lights up and the coffee will be made. The hot plate under the glass jug is now switched on automatically.
-
Once the filter process has been completed, you must turn the coffee strength controller count-clockwise to the drip stop indication ( ^ Drip step ^ ). Remove the glass jug from the hot plate and pour the coffee.
Attention: When the water reservoir is empty, there can still be water in the filter. The filtering process is only completed once all the water has passed the filter.
- Coffee tastes best immediately after it has been made, so do not wait too long before serving. The glass jug can immediately be placed back on the hot plate or you can pour the coffee into a thermos jug.
5 controlling the coffee strength
This coffee machine comes with a coffee strength controller. By means of this controller you determine how fast the water flows through the coffee (extra-fine grind), which affects the strength of the coffee. When making a small amount of coffee, you must select a low flow speed, so that the coffee has sufficient time to acquire taste. Contrary, in the case of a large amount of coffee, the flow speed should be higher. Adjust the coffee strength controller in accordance with the volume of water in the water reservoir, between 1.25L and 0.25L.
Attention: When you turn the coffee strength controller to a lower position than 0.25L, you are activating the drip stop ( ^*** Drip stop).
Warning: When setting the coffee strength too low in relation to the amount of water, the coffee filter could overflow.
6 pause
If you want to interrupt the coffee making process, in order to pour a few cups for example, you must press the On/Off button to switch off the coffee machine temporarily. Turn the coffee strength controller to the drip stop (Drip stop) position to prevent the appliance from continuing to drip. You can resume the coffee making process by pressing the On/Off button once more, after which the indicator led lights up. The coffee strength controller must be turned to the required strength again. If there is insufficient water in the water reservoir, no coffee can be made and the indicator led at the On/Off button starts to flash.
Attention: Activating the drip stop ( ^Drip stop ) is a manual action and this function must also be switched off manually.
7 switching off
After use, always switch off the appliance by pressing the On/Off button. The indicator led switches off.
If you do not switch off the appliance after making coffee, the appliance will keep the coffee warm for about 40 minutes. After these 40 minutes the coffee machine switches off automatically. Then remove the plug from the socket.
Attention: After making coffee, do not forget to turn the coffee strength controller to the drip stop ( ^• Drip stop ^• ) position, to prevent the appliance from continuing to drip.
Allow the appliance to cool down properly and then remove the paper filter bag, throw it away and clean the filter holder. You must also remove any residual water in the water reservoir to prevent scaling. This is done as follows: Make sure the appliance is off and has fully cooled down, remove the plug from the socket, remove the water outlet, filter holder and glass jug from the appliance and then hold the appliance upside down above the sink. Then place back all components correctly in the appliance.
8 clock and timer function
To have the coffee machine brew coffee automatically at the required time, you must set the clock to the current time.
- By means of the Hour and Minute buttons you are able to set the current time (24 hour display).
- Press the Auto or On/Off button to confirm the time. The word CLOCK in the screen stops flashing, the time has been set.
- Press the Auto button twice in quick succession, the word TIMER starts to flash in the screen.
- By means of the Hour and Minute buttons you can set the time at which the coffee machine should start making coffee (24 hour display).
- Press the Auto button to confirm the time. The word TIMER in the screen stops flashing, the time has been set. After 5 seconds the current time is shown in the screen again. When you hold down the Auto button, you are able to see the set time for the timer.
- Press the Auto button once more, the indicator led lights up. The timer function is switched on and the coffee machine will now make coffee at the time set by you. Once the set time has been reached, the indicator led switches off and the indicator led at the On/Off button lights up.
If you want to switch off the timer function after setting it, press the Auto button once more, after which the indicator led switches off and the timer function has been switched off. You can adjust the set time by following the above-mentioned steps again.
Attention: Ensure the coffee strength controller is always set correctly and is no longer in the drip stop position ( ^• Drip stop ^• ) as the filter will otherwise overflow while making coffee!
9 cleaning and maintenance
Regularly clean the coffee machine. This is not only beneficial for the life span of the appliance, it also ensures optimum use of the appliance and, of course, good tasting coffee.
Cleaning should involve the following:
- Prior to cleaning, always check that the coffee machine is switched off, cooled down and that the plug has been removed from the socket.
- Remove all separate components from the appliance. Remove the filter holder by first removing the cover and then loosening the filter holder anti-clockwise.
- After each use, clean all separate components in hot water and a mild washing-up liquid. Then rinse thoroughly with hot water and wipe dry.
• Regularly clean the outside of the appliance and the hot plate with a slightly damp cloth and then wipe it dry with a dry cloth - Place back all components correctly in the appliance.
Attention:
- Never use abrasives when cleaning. Never rinse the appliance under the tap or submerge it in water.
- Never submerge the appliance, cord or plug in water.
10 de-scaling
Regularly de-scale your coffee machine. The de-scaling intervals depend on the hardness of the mains water and the frequency at which the coffee machine is being used. Due to scaling, the heating element can become obstructed. This causes overheating, as a result of which the coffee machine is switched off automatically as a safety precaution and will no longer function. The coffee machine will have to be repaired. When the appliance must be de-scaled, the icon 📁 will flash on the display while making coffee. We recommend de-scaling the appliance after making coffee 60 times. You can de-scale the coffee machine with a special de-scaling agent for coffee machines or with kitchen grade vinegar. If you use a special de-scaling agent for coffee machines, you must observe the instructions on the packaging of this agent.
When using kitchen grade vinegar, proceed as follows:
- Switch off the appliance by pressing the On/Off button. Remove the plug from the socket and remove all separate components.
- To remove any remaining water, hold the appliance upside down above the sink.
- Place an empty filter bag in the filter holder and place all separate components back in the appliance. Fill the water reservoir with clean, cold water and cold kitchen grade vinegar up to the 1.25L mark. The water and kitchen grade vinegar ratio should be 4:1.
- Switch on the appliance by pressing the On/Off button. Press down the On/Off button for approximately 3 seconds, the icon will flash on the display. Press the On/Off button again to start the de-scaling process.
- The de-scaling process has been completed when the water reservoir and coffee filter are empty. Empty the glass jug and remove the filter bag from the filter holder. Repeat steps 1 and 2 to allow any remaining water to run out of the water reservoir and place all separate components back in the appliance.
- After de-scaling, allow a full reservoir of cold water to flow through the appliance at least 3 times, to remove all de-scaling liquid and vinegar residues and thus prevent a sour taste in the coffee.
Caution! If the coffee machine has not been used for some time, e.g. due to vacation, it is recommended to remove and clean all separate components. Then place the cleaned separate components back in their place and allow the coffee machine to make one run with clean water. In this way you will prevent a possible foreign taste.
general terms and conditions of service and warranty
We do not need to remind you of the importance of service. After all, we develop our products to a standard so that you can enjoy them for many years, without any concerns. If, nevertheless, there is a problem, we believe you are entitled to a solution straight away. Hence our products come with an exchange service, on top of the rights and claims you are entitled to by law. By exchanging a product or part, we save you time, effort and costs.
2-year full manufacturer's warranty
- Customers enjoy a 2-year full manufacturer's warranty on all Inventum products. Within this period, a faulty product or part will always be exchanged for a new model, free of charge. In order to claim under the 2-year full manufacturer's warranty, you can either return the product to the shop you bought it from or contact the Inventum costumer service department via the form at www.inventum.eu/service-aanvraag.
- The 2-year warranty period starts from the date the product is bought.
- In order to claim under the warranty, you must produce a copy of the original receipt.
- The warranty applies only to normal domestic use of Inventum products within the Netherlands.
Breakdowns or faults outside the warranty period
- Breakdowns or faults in small or large domestic appliances outside the warranty period, can be reported to the costumer services department via the form at www.inventum.eu/service-aanvraag or by calling the costumer services department.
- The costumer services department may ask you to send the product for inspection or repair. The costs of dispatch will be at your expense.
- The inspection to establish whether repair is possible involves a charge. You need to grant your permission for this, in advance.
- In the event of a large domestic appliance, Inventum, at your request, can send out a service engineer. In that case, you will be charged the call-out costs, as well as parts and labour.
- In the event of an instruction to repair, the repair costs must be paid in advance. In the event of a repair by a service engineer, the costs of the repair must be settled with the engineer onsite, preferably by means of PIN payment.
Warranty exclusions
- The following is excluded from the aforesaid warranties:
• normal wear and tear;
- improper use or misuse;
• insufficient maintenance;
- failure to comply with the operating and maintenance instructions;
- unprofessional installation or repairs by third parties or the customer himself;
• non-original parts used by the customer;
- use for commercial or business purposes;
- removal of the serial number and/or rating label.
-
In addition, the warranty does not apply to normal consumer goods, such as:
-
dough hooks, baking tins, (carbon) filters, etc.;
- batteries, bulbs, carbon filters, fat filters etc.;
• external connection cables; -
glass accessories and glass parts such as oven doors;
• and similar items. -
Transport damage not caused by Inventum is also excluded. Therefore, inspect your new device before starting to use it. If you detect any damage, you must report this to the store where you purchased the product within 5 working days, or to the Inventum customer service department via the form at www.inventum.eu/service-aanvraag. If transport damage is not reported within this period, Inventum does not accept any liability in this respect.
-
The following are excluded from warranty and/or replacement: faults, loss of and damage to the device as a result of an event that is normally insured under the home contents insurance.
Important to know
- The replacement or repair of a faulty product, or a part thereof, does not lead to an extension of the original warranty period.
- If a complaint is unfounded, all costs arising from it will be at the customer's expense.
- Following expiry of the warranty period, all costs of repair or replacement, including administration costs, dispatch and call-out charges, will be charged to the customer.
- Inventum cannot be held liable for damage caused by external events, unless this liability arises from mandatory statutory provisions.
- These warranty and service provisions are governed by Dutch law. Disputes will be settled exclusively by the competent Dutch court.
instagram.com/inventum1908

facebook.com/inventum1908

youtube.com/inventum1908

- Deutsch
- safety instructions
- appliance description
- prior to first use
- making coffee
- controlling the coffee strength
- pause
- switching off
- clock and timer function
- cleaning and maintenance
- Cleaning should involve the following:
- Attention:
- de-scaling
- When using kitchen grade vinegar, proceed as follows:
- general terms and conditions of service and warranty
- 2-year full manufacturer's warranty
- Breakdowns or faults outside the warranty period
- Warranty exclusions
- Important to know
Brand : INVENTUM
Model : KZ813D
Category : Coffee machine