
CG600 - Barbecue INVENTUM - Free user manual and instructions
Find the device manual for free CG600 INVENTUM in PDF.

| Product type | Electric contact table grill (double-sided) |
| Brand | Inventum |
| Model | CG600 |
| Color | Black and stainless steel (estimated) |
| Dimensions (L x D x H) | Approximately 42 x 30 x 17 cm (estimated) |
| Weight | Approximately 5 kg (estimated) |
| Power supply | 220-240 V ~ 50 Hz (estimated) |
| Power | 1800 W (estimated) |
| Cooking surface | Approximately 30 x 25 cm (estimated) |
| Cooking plates | Removable, non-stick coating, dishwasher safe |
| Drip tray | Removable, dishwasher safe |
| Heating system | Opti-Heat: central heating elements + aluminum plates |
| Temperature control | Rotary thermostat from 100 °C to 230 °C |
| Timer | 0-30 minutes, automatic shut-off, 'Always on' function |
| Indicator light | Green 'ready' light |
| Thickness selector | Adjustable to adapt pressure on food |
| Handle | Handle with lock for transport and vertical storage |
| Capacity | Up to 6 hamburgers, 6 chicken breasts or 4 panini |
| Care and cleaning | Plates and drip tray dishwasher safe; exterior with damp cloth |
| Safety | Timer auto shut-off; cool-touch handle; lockable lid |
| Spare parts and repairability | Original parts recommended; repair by authorized service |
| Warranty | 24 months (subject to domestic use and presentation of receipt) |
| Included accessories | Grill, drip tray, user manual (estimated) |
| General information | Manual available in French, German, English, Dutch |
Frequently Asked Questions - CG600 INVENTUM
User questions about CG600 INVENTUM
0 question about this device. Answer the ones you know or ask your own.
Ask a new question about this device
Download the instructions for your Barbecue in PDF format for free! Find your manual CG600 - INVENTUM and take your electronic device back in hand. On this page are published all the documents necessary for the use of your device. CG600 by INVENTUM.
USER MANUAL CG600 INVENTUM
Legislation requires that all electrical and electronic equipment must be collected for reuse and recycling. Electrical and electronic equipment marked with the symbol indicating separate collection of such equipment must be returned to a municipal waste collection point.
DESCRIPTION OF THE APPLIANCE PAGE 16
- SAFETY INSTRUCTIONS PAGE 16
- INTRODUCTION PAGE 17
- BEFORE FIRST USE PAGE 17
- GRILLING PAGE 17
- GRILLING GUIDE PAGE 18
- REMOVING THE GRILLPLATES PAGE 18
- INSERTING THE GRILLPLATES PAGE 18
- USING THE HEIGHT SELECTOR PAGE 18
- CLEANING & MAINTENANCE PAGE 18
10.FREQUENTLY ASKED QUESTIONS PAGE 19
11.RECIPIES PAGE 19
GUARANTEE & AFTER SALES SERVICE
PAGE 22
NEDERLANDS
Panini-combinations:
Gegrilldekip,gruyerekaas,tomaatenbasilicum
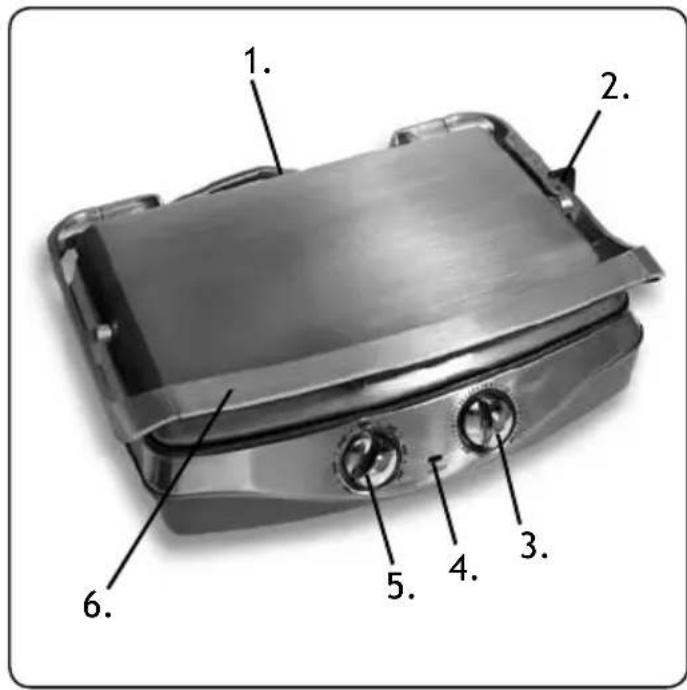
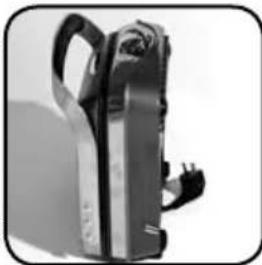
- Drip tray
- Height selector/Locking lever
- Timer (0-30 min.)
- Control light - green
- Temperature knob with light
- Handle
- Grillplate - bottom
- Grillplate - top
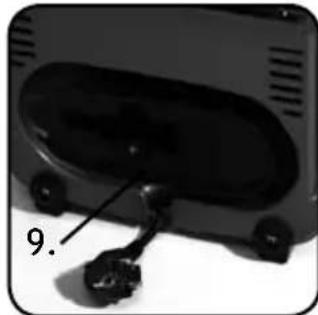
- Cord storage
1 | SAFETY INSTRUCTIONS
- Please read these instructions before operating the appliance and retain for future use.
- The appliance is intended solely for domestic use within the home.
- Attention! Avoid touching the metal parts. They become hot during use.
- Before plugging into a socket, check that the voltage in your home corresponds with the voltage printed on the bottom of the appliance.
- Never let the power cord of the appliance hang over the edge of a table or counter, touch hot surfaces or become knotted.
- Never place this appliance on or near a hot gas or electric burner or where it could touch a heated oven or microwave oven. Do not allow this appliance to touch curtains, wall coverings, clothing, dishtowels or other flammable materials during use.
- Always use the appliance on a secure, heat resistant, level surface.
- Never leave the appliance unattended when in use.
- Do not place anything on top of or underneath this appliance while it is operating.
- If the supply cord is damaged, it must be replaced by the manufacturer, its service agent or similarly qualified persons in order to avoid a hazard.
- The appliances are not intended to be operated by means of an external timer or separate remote-control system.
- For your own safety, only use the accessories and spare parts from the manufacturer which are suitable for the appliance.
- The temperature of accessible surfaces may be high when the appliance is operating.
-
Always return the appliance after a malfunction, or if it has been damaged in any manner to the Customer Service Department for examination, repair or adjustment as special purpose tools are required.
-
Never unplug it from the socket by pulling on the cable.
- Always ensure that your hands are dry before handling the plug, switch or power cord.
- An electrical appliance is not a toy, and should therefore always be placed outside the reach of children. Children are not always able to understand potential risks. Teach children a responsible handling of electrical appliances.
Children should be supervised to ensure that they do not play with the appliance. - This appliance is not intended for use by persons (including children) with reduced physical, sensory or mental capabilities, or lack of experience and knowledge, unless they have been given supervision or instruction concerning use of the appliance by a person responsible for their safety.
- Be sure to turn the appliance off and unplugging it as soon as you have finished using it and when you are cleaning it.
- If an extension cord is used, check the marked electrical rating of the extension cord to the electrical rating on the appliance. Make sure that it can not be pulled on by children or tripped over unintentionally.
- Should you decide not to use the appliance anymore, make it inoperative by cutting the power cord after removing the plug from the socket. We also recommend making all potentially dangerous parts of the appliance harmless, particularly for children who might be tempted to play with it.
- Never use the appliance if it is not working properly, or if it has been damaged. Any intervention other than cleaning and normal maintenance by the customer must be carried out by an approved service centre.
- Never immerse the appliance, power cord or plug in water or any other liquid to protect against electrical hazards.
-
Attention: when placing food on or removing food from the grill, prevent the grill from accidentally closing by holding the handle for the upper grill plate with an oven mitt.
-
If the appliance is used for other purposes than intended, or is it not handled in accordance with the instruction manual, the full responsibility for any consequences will rest with the user. Any damages to the product or other things are not covered by the warranty.
2 | INTRODUCTION
This grill has an extra large capacity. Sized to fit six burgers, six chicken breasts or four Panini. And, since the grill cooks food from both sides at the same time, it grills quickly and efficiently.
Opti-heat system:
the precision placement of the grill's heating elements, along with the internal temperature sensor, helps maintain even heat across the cooking surface.
Non-stick coating:
the premium non-stick coated grill plates eliminate the annoyance of food that sticks. That means you won't waste time scraping bits of the plates.
Controls:
the raised controls illuminate so you know when thr grill is 'On' or 'Off' and how much cooking time remains. Choose from a variety of temperatures to toast your favorite Panini or sear a juicy steak. Select 'Always on' for continuous grilling or set the timer for a designated cooking time.
Adjustable grill height:
adjust the grill for various thickness of food. Slide the height selector into the desired position, so you can accommodate everything from thick steaks to more delicate grilled cheese sandwiches.
Removable dishwasher-safe grill plates:
take the hassle out of clean up by placing the removable grill plates in the dishwasher.
Internal drip tray:
as the grill sears the outside of meats and poultry, excess fat drains away into the handy, hidden drip tray. After the grill cools, simply slide the tray out and dispose of the drippings after each use. The tray can be placed in the dishwasher for clean up.
Upright storage:
save space in the kitchen with the convenient upright storage of the grill. Just close the grill, slide the locking lever into the locked position, and tuck the grill away standing upright for space saving convenience.
3 BEFORE FIRST USE
Before you use the appliance for the first time, please do as follows: Carefully unpack the appliance and remove all the packaging material. Keep the material (plastic bags and cardboard) out of reach of children. Check the appliance after unpacking for any damage, possible from transportation. Place the appliance on a heat resistant flat and stable surface.
Clean the outside of the appliance with only a damp cloth and dry it with a dry cloth. Clean the removable grill plates and drip tray with soapy water or place them in the dishwasher. Rinse the parts and dry thoroughly.
Before plugging into a socket, check that the voltage in your home corresponds with voltage printed on the appliance.
4 | GRILLING
- Choose the heat setting. Turn the temperature knob clockwise to the desired heat setting - 65^ to 230^ . Consider the following general tips for selecting a heat setting.
100^ - use this setting to keep grilled foods warm until serving.
150^ - choose this setting for toasting breads or sandwiches such as grilled cheese and other Panini-style sandwiches.
200^ - this setting is ideal for grilled burgers, pork chops and chicken breasts.
230^ - try this setting for searing the outside of meats, such as steaks, when you want the outside brown, while the inside stays juicy and pink.
- Preheat the grill. The grill does not begin operating, until the timer is set. To set the timer, turn the timer knob clockwise from the 'Off' position to the desired number of minutes or counterclockwise to the 'Always on' position. Preheat the grill for 5 minutes before inserting food. You will know the grill is preheated when the green 'Ready' light comes on.
- Place food on the preheated grill. Carefully open the grill using the handle and a pot holder, avoiding contact with the hot grill plates. Place the food on the lower grill plate. Carefully close the grill, sandwiching the food in between the hot grill plates. See the Grilling guide on the next page for suggested grilling times.
- Set the timer. To set the timer, turn the timer knob clockwise to the desired number of minutes or counterclockwise to 'Always on'. The 'Always on' feature lets you operate your grill for longer cooking times without needing to watch or reset the timer. If you select a cooking time, as the grilling time elapses, the timer knob will tick and gradually count down to zero. A bell will sound when the timer reaches zero and the grill will stop heating. To cook another round, set the timer again.
- Remove food from the grill. When the food is done, lift the handle and carefully remove it from the grill using a heat-resistant, non-metal utensil. Check the internal temperature of meats and poultry to make sure they are at the desired level of doneness.
Unplug the cord from the outlet when finished cooking. Allow to cool before cleaning or removing the grill plates.
5 | GRILLING GUIDE
| Food Cooking time Temperature | |
| Beef steaksThinThick | 2 - 3 min.5 - 7 min. |
| Ground meat patties 5 - 6 min. 200°C | |
| Pork chops | 5 - 7 min. 200°C |
| Lamb chops 3 - 4 min. | 200°C |
| Chicken boneless, half breast | 5 - 8 min.5 - 6 min. |
| Sandwich, Panini, Focaccia | 2 - 5 min. 150°C |
| Fish fillets 3 - 4 min. | 200°C |
| Shrimp 2 - 3 min. 200°C |
Note: Cooking times will vary depending on the size and thickness of the food. Adjust cooking times, as needed, to make sure foods are thoroughly cooked.
6 | REMOVING THE GRILLPLATES
Always remove the plug from the wall outlet before removing the grill plates from the grill.
Always allow the grill plates to cool fully before removing the grill plates from the grill. Do not remove the grill plates while the unit is in use.
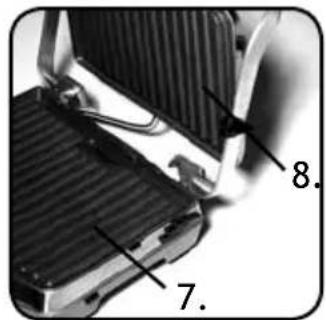
Hold the top grill plate and press the 'Release'-button on the right side of the top housing. Set the top plate aside.
Press the 'Release'-button on the right side of the lower housing. Remove the lower grill plate and set it aside.
7 | INSERTING THE GRILL PLATES
Never plug the cord into the outlet with the grill plates removed from the grill.
Select the bottom grill plate, with the slotted hole, and insert it into the catches on the bottom grill housing. The slotted hole must be aligned in the back of the grill.
Press the front of the grill plate down, locking it in place in the lower housing.
Select the top grill plate, without the slotted hole, and insert it into the catches on the upper grill housing. Press the front of the grill plate, locking it in place in the upper housing.
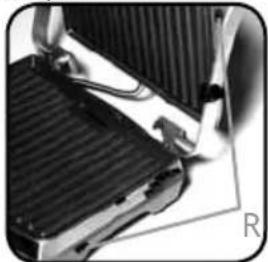
8 | USING THE HEIGHT SELECTOR
The adjustable height selector may be hot while the grill is in use. Use care when adjusting it.
The grill includes an adjustable height feature that lets you control how much pressure is placed on delicate foods like grilled cheese sandwiches. It provides a stop for the upper housing which limits how far it will close.

- Preheat the grill with the top housing fully closed.
- Open the grill and place your food on the lower plate.
- Set the adjustable height to the desired height and carefully close the grill, lowering the top housing until it rests on the slider.
- If you need to adjust the height, open the grill, reset the slider, and carefully close the grill again.
9 | CLEANING AND MAINTENANCE
Make sure that before cleaning or storage the timer knob is turned to 'OFF' and the appliance is unplugged. After use, allow the grill to completely cool before cleaning or storing.
Clean the housing with a clean, damp cloth. Clean the removable grill plates and drip tray with soapy water or place them in the dishwasher.
Metal utensils will damage the non-stick coating. Use only non-metal, temperature resistant utensils, such as wood or nylon.
Never use any abrasives for cleaning the appliance. Never immerse the appliance, power cord or plug in water or any other liquid to protect against electrical hazards.
Your grill includes a locking feature that holds the grill together so you can conveniently store it upright. Allow the grill to cool completely. Clean the grill plates and housing as needed. Close the grill. Slide the storage lock lever to the locked position.
10 | FREQUENTLY ASKED QUESTIONS
1
RECIPES
The grill is not getting hot; what am I doing wrong?
Be sure the power cord is plugged into a suitable outlet. Then, check to make sure both the heat setting knob and the timer are set. The grill does not begin heating until you set the timer.
My burger patties are only getting grill marks on one side. Why?
Check the adjustable grill height selector lever on your grill. If it is set too high, it may not be sandwiching your burger patties snugly enough to form grill marks on both sides.
When I grill frozen chicken breasts, they are brown on the outside and still pink inside. How can I make sure they are safely cooked?
Be sure to thaw meats and poultry first before grilling. This will ensure that they are evenly cooked through.
Is it okay to grill a thick cut pork chop alongside a thinner pork chop?
It is best to cook meat of the same thickness at the same time. So, either cook one chop and then the other.
Boneless Lemon Garlic Pork Chops (serves 6)
6 boneless pork loin chops
1 shallot, finely minced
1 tablespoon Dijon mustard
1 tablespoon cider vinegar
2 cloves fresh garlic, finely minced
1 tablespoon coarsely ground black pepper
1 tablespoon olive oil
zest of 1 lemon
juice of 1 lemon
Place all the ingredients except the olive oil into a storage bag to marinate. Marinate the pork in the refrigerator for at least 4 hours or over night. Remove from the refrigerator at least one hour prior to cooking.
Preheat the grill at 200^ until the Ready light comes on. Brush both sides of the grill with the olive oil and place the chops on the grill.
Grill the chops for 5 to 7 minutes.
Tips for grilling perfect Panini
- Use good quality bread.
- Use a combination of ingredients for the filling but don't make the sandwich overly complex. Three to four ingredients is ideal for letting individual flavors shine through.
- Try to select one ingredient that will help bind the sandwich together. Cheese is a good choice because as it melts, it gets sticky. Garlic mayonnaise, olive tapenade, or even barbecue sauce can achieve a similar effect.
- Do not overstuff the Panini or the exterior will cook before the interior has a chance to.
- Once assembled, brush both sides of the sandwich lightly with olive oil.
- Preheat the grill at 150^ until the Ready light comes on.
- When the grill is hot, brush it lightly with olive oil. Place the sandwich in the grill and close the lid. Grill for 3 to 4 minutes or until golden brown.
Panini-combinations:
Grilled chicken, gruyere, tomato and basil
Grilled eggplant, fresh mozzarella and olive tapenade
Feta cheese, spinach, pine nuts and roasted garlic
Smoked salmon, vegetable cream cheese and fresh dill Sliced beef, cheddar cheese, corn relish and barbecue sauce
GARANTIE & SERVICE
- This product is guaranteed for a period of 2 years from the date of purchase against mechanical and electrical defect.
- Guarantee can only be given if proof of purchase (e.g. till receipt) can be shown. Therefore keep it in a safe place. The guarantee period starts at date of purchase.
-
Guarantee is not valid in case of:
-
normal wear;
- damage through misuse use or when the instructions were not followed correctly;
- lack of maintenance;
- not following the operation- and safety instructions;
- incompetent montage or repairs made by yourself or others;
- using accessories and spare parts which are not suitable for the appliance; for assessment by our technical department.
The guarantee is not valid for:
- normal wear;
external cables; - (interchangeable) signal- and controllamps for assessment by our technical department.
Return to your supplier of send the appliance, including a copy proof of purchase and description of the complaint, stamped to:
Inventum Holland BV
new E.T.P. bvba
Generatorstraat 17
Passstraat 121
3903 LH VEENENDAAL
9100 Sint Niklaas
THE NETHERLANDS
BELGIUM
AVC Service GmbH
Hohenstrasse 24
70736 Fellbach
GERMANY
- Pack it carefully (preferably in the original carton).
Ensure unit is clean. - Enclose your name and address and quote model number on all correspondence.
When the guarantee is no longer valid or when the period of guarantee has passed, we will charge any costs that flow out of an assessment and/or repairing.
On request we will supply a statement before repairing. Without requesting a statement, we assume that you, by sending the appliance, automatically order to repair the appliance.
A guarantee period of two months is valid for repairs done by our technical department and the used spare parts, counting from the repairdate. When a malfunction occurs within this period which directly flows out of the repairs and the used spare parts, the consumer has the right of repairs without any costs.
Inventum Holland BV

- NEDERLANDS
- | SAFETY INSTRUCTIONS
- | INTRODUCTION
- Opti-heat system:
- Non-stick coating:
- Controls:
- Adjustable grill height:
- Removable dishwasher-safe grill plates:
- Internal drip tray:
- Upright storage:
- BEFORE FIRST USE
- | GRILLING
- | GRILLING GUIDE
- | REMOVING THE GRILLPLATES
- | INSERTING THE GRILL PLATES
- | USING THE HEIGHT SELECTOR
- | CLEANING AND MAINTENANCE
- | FREQUENTLY ASKED QUESTIONS
- 1
- RECIPES
- Boneless Lemon Garlic Pork Chops (serves 6)
- Panini-combinations:
- GARANTIE & SERVICE
Brand : INVENTUM
Model : CG600
Category : Barbecue