
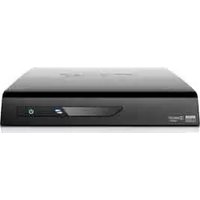
MMFH36US - Media player Fantec - Free user manual and instructions
Find the device manual for free MMFH36US Fantec in PDF.
| Product Type | HD Media Player |
| Brand | Fantec |
| Model | MMFH36US |
| Dimensions | 201 × 165 × 51 mm |
| Weight | Approx. 800 g (without hard drive) |
| Power | AC Input 100-240V, 50/60 Hz; DC Output 12V, 2A |
| Video Connectors | Composite (AV), Component (YPbPr), HDMI |
| Audio Connectors | Analog Stereo (AV), Digital Coaxial, HDMI |
| USB Connectors | High-speed USB 2.0 (PC) and USB Host (1.1 for devices) |
| Audio Formats | MP3, WMA, WAV, AAC, AC3 |
| Video Formats | AVI, VOB, DAT, MPG, MPEG, DVD; codecs MPEG1/2/4, DivX, Xvid |
| Image Formats | JPEG/JPG |
| Subtitles | SSA, SMI, SRT, SUB (for MPEG4) |
| Main Functions | HD video playback, music, photo, DVD, slideshow, zoom, repeat |
| TV Outputs | SD Proscan, 720p, 1080i |
| Remote Control | Yes (included) with navigation, playback, and setup buttons |
| Care and Cleaning | Do not repair yourself; disconnect if liquid or damaged cable; avoid poorly ventilated environments |
| Safety | Adapter may heat up to 60 °C; do not cover; risk of electric shock if opened |
| Spare Parts and Repairability | Power adapter included; refer to an authorized agent for repair |
| General Information | Warranty does not cover damages from unauthorized repair, accident, or commercial use |
Frequently Asked Questions - MMFH36US Fantec
User questions about MMFH36US Fantec
0 question about this device. Answer the ones you know or ask your own.
Ask a new question about this device
Download the instructions for your Media player in PDF format for free! Find your manual MMFH36US - Fantec and take your electronic device back in hand. On this page are published all the documents necessary for the use of your device. MMFH36US by Fantec.
USER MANUAL MMFH36US Fantec
BRIEF INTRODUCTION....2
FEATURE....2
SPECIFICATION....2
PRODUCT DETAILS....3
PACKING LIST 3
FRONT VIEW 4
BACK VIEW 5
REMOTE CONTROL 5
BASIC OPERATION....7
REQUIREMENT FOR SYSTEM OF SOFTWARE & HARDWARE ...... 7
PARTITION AND FORMAT OF HARD DISK 7
CONNECTION AND USAGE OF THE MEDIA PLAYER 9
CONNECTION GUIDE ... FEHLER! TEXTMARKE NICHT DEFINIERT.
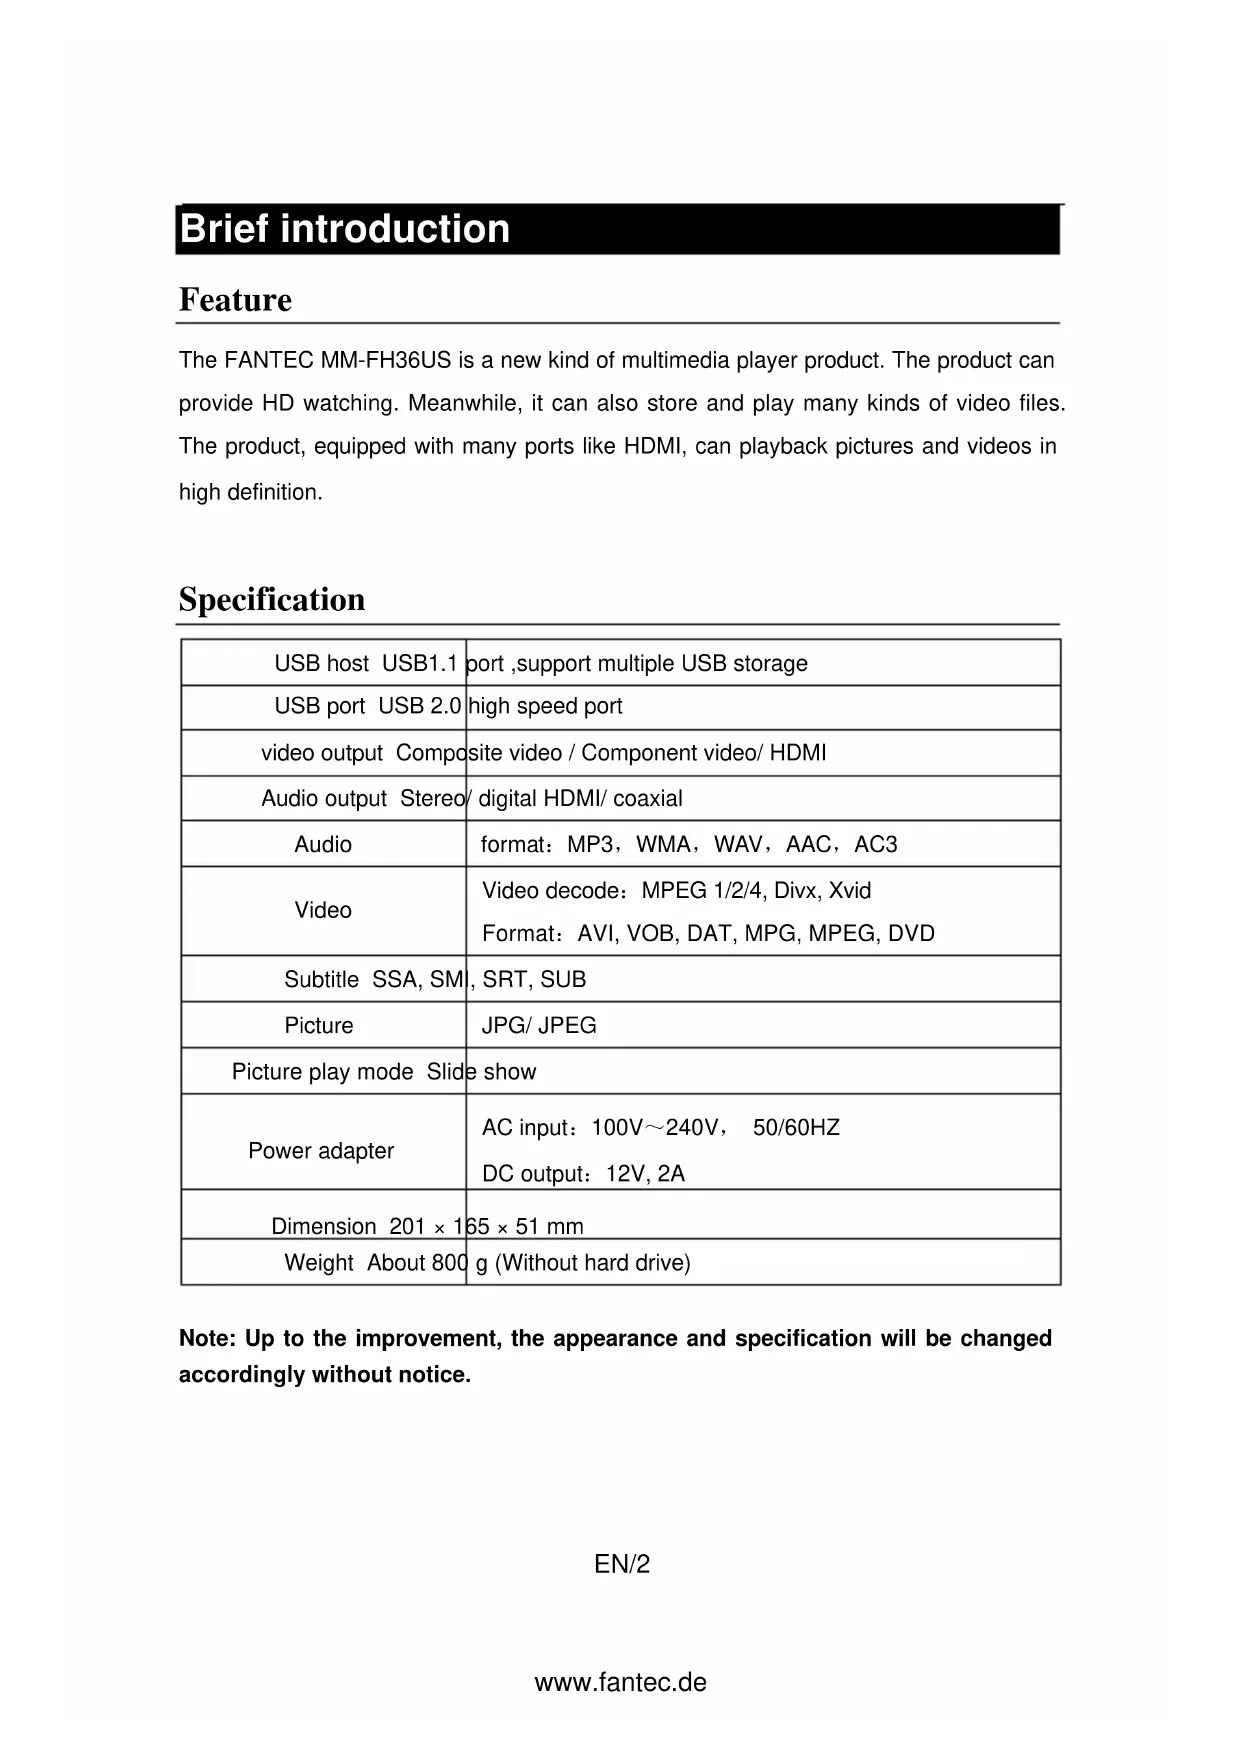
The FANTEC MM-FH36US is a new kind of multimedia player product. The product can provide HD watching. Meanwhile, it can also store and play many kinds of video files. The product, equipped with many ports like HDMI, can playback pictures and videos in high definition.
Specification
| USB host USB1.1 | port ,support multiple USB storage |
| USB port USB 2.0 | high speed port |
| video output Composite video / Component video/ HDMI | |
| Audio output Stereo/ digital HDMI/ coaxial | |
| Audio | format: MP3, WMA, WAV, AAC, AC3 |
| Video | Video decode: MPEG 1/2/4, Divx, XvidFormat: AVI, VOB, DAT, MPG, MPEG, DVD |
| Subtitle SSA, SMI, SRT, SUB | |
| Picture | JPG/ JPEG |
| Picture play mode Slide show | |
| Power adapter | AC input: 100V~240V, 50/60HZDC output: 12V, 2A |
| Dimension 201 × 165 × 51 mm | |
| Weight About 800 g (Without hard drive) | |
Note: Up to the improvement, the appearance and specification will be changed accordingly without notice.
Product details
Packing list
Check the accessories after receive the product. If there are some missing, please contact immediately with your supplier to insure your consumer's right.
| No. | Name | |
| 1 Media player 1 pcs | ||
| 2 | Power Adapter | |
| 3 | Remote Control | |
| 4 | AV cable | |
| 5 | USB cable | |
| 6 | User Manual | |
| 7 | Batteries | |
| 8 | Screws | |
Qui:
2
S€
Front view
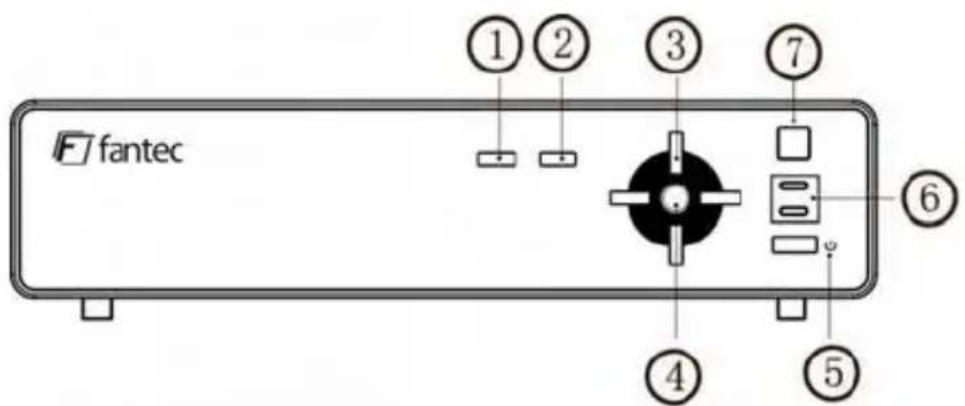
1) Button definition:
| Button | button | definition instruction | |
| 1 | SETUP | setup button | Press shortly to enter the setup menu |
| 2 | ■ | Stop button | Press shortly to stop current operation |
| 3 | ◀ | Left button Press | shortly to move cursor left |
| ▶ | Right button Press | shortly to move cursor right | |
| ▲ | Up button Press | shortly to move cursor up | |
| ▼ | Down button | Press shortly to move cursor down | |
| 4 | ENTER | Enter button | Press shortly to confirm the current operation |
| 5 | ◎ | Power button | Press shortly to switch on/off the power |
2) LED / IR definition:
| LED/IR | LED/IR definition | Instruction | |
| 6 | Power: | Power LED | Blue light when switch on, red light when stand-by. |
| HDD | Read-write LED | LED light twinkles when data transmit. | |
| 7 | IR | IR receiver | Remote control receiver. |
Back View

1) Port definition
| Port | Port definition Instruction | |
| 1 DC IN Power port | To input power | |
| 2 AV | Composite video output port | To output composite video and audio |
| 3 YPbPr | Component video output port | To output progressive scan component video |
| 4 Coaxial Audio output port | To output digital audio signal | |
| 5 HDMI High definition port | To output digital signal via HDMI port | |
| 6 USB | USB port | This USB port is used for PC communication |
| 7 USB HOST | Outside USB port | To play from USB storage devices via USB port |
Remote control
| BUTTON | FUNCTION |
| POWER | Turn on and off in the standby mode |
| MUTE | Turn on and off audio output |
| SETUP | Enter the setup menu |
EN/5
| TV OUT Press | to switch between SD Proscan, 720P, 1080I |
| MODE | When picture Slideshow, it changes the transition mode between pictures. |
| SUB-T | Selection key for MPEG4 Subtitle file. It activates and deactivates the subtitles while video playing. Can use the up button or down button to select a subtitle language that is available on the DVD. |
| ANGLE | Rotation the images. Select to view the same scene from different angle, if the DVD recorded with multiple angles. |
| ZOOM | Press to zoom when playing back photos or Video programs. open or close the image scaling function |
| Previous. | |
| Next. | |
| Skip backward. Open the picture in the zoom feature, this key to narrowing the picture. | |
| Skip forward. Open the picture in the zoom feature, this key to enlarge picture. | |
| VOL + Volume | Up |
| VOL - Volume | Down |
| Stop. | |
| II/▶ | Pause / Play. |
| ENTER | Enter. |
| Up | |
| Down | |
| Left | |
| Right | |
| DVD play | Highlight the folder with DVD content and press DVD key to enter into DVD navigation function. |
| MEDIA TYPE | Pressing once it selects from Picture, Video, Music and All Media section. |
| INFO | Display information of media file. In DVD mode, select the button can view the time, title or chapter on playing. |
| AUDIO | Switching Audio channel |
| OPTION Be able to select preview on or preview off on in file mode | |
| REPEAT Change Repeat play mode. | |
| SLIDE SHOW Plays pictures in continuous mode. | |
Basic operation
Requirement for System of Software & Hardware
Hardware
■PC and Notebooks
Software
■ Windows 2000 / Windows XP / Windows VISTA
Partition and Format of hard disk
NOTE:
- The product can't be recognized by the PC if the hard disk is unformatted or totally new. Please partition and format the hard disk first before use.
- Please note that every time partition and formatting will delete all the data of the hard disk.
- To ensure the stability, the process of partition and format under Windows 2000/Windows XP/ Vista is recommended.
Partition and formatting under Windows 2000 / Windows XP
The operation process is available for OS Windows 2000 / XP / Vista. To make sure that the product can work normally, partition and formatting before first use is necessary.
A. Startup the operation system of Windows and make sure that the system working in
EN/7
the normal status.
B. Connect the Player to the PC, plug the adapter into the DC IN port and connect the device to the PC through USB cable.
C. Once the product enters the working status, the indicator will turn on. The system green icon appears on the right corner.
D. Right click" my computer", select "management" option and open the window of "hard disk management".
E. Please select the "hard disk management" option under the directory of "storage" of console in the right corner. Find a note of "unknown" in the hard disk management information directory.
F. Right click the area of "unknown" on the hard disk, and click "signature" option.
G. Check the hard disk and click "sure" in the window of "write signature".
H. The “unknown” prompt of hard disk disappears and a “basic” prompt status appears. Now it is able to start partition and formatting operation.
I. Right click the chart of "unassigned" and select "create hard disk partition" option
J. Enter “creating hard disk partition guide”, and click “next step” to continue
K. Please select the option of “main hard disk partition” in the “select partition type” and then click “next step” to continue
L. At the “assign the partition capacity”
- Please install the value defaulted by the system and then click "next step" to continue.
M. Keep the value defaulted by the system and assign a driver letter for the hard disk and then click "next step" to continue.
N. In the formatting partition
- Please set the option of "FAT32" or "NTFS" in the option of using file system;
- Check the option of "run fast formatting" and then click "next step "to continue.
O. Click "finish" and guide complete
P. The created disk is able to browse in the window of “computer management” It is able to browse the partition in “my computer” and have reading/writing operation after finish the partition formatting operation.
Connection and usage of the Media Player
This product possesses of an USB interface, so it can support hot plug & play. It is able to connect and use in the follow system.
In Microsoft operation system
A. Startup the PC
• Make sure the pc works normally
B. Connect the USB cable
- Plug one end of the cable into the player's interface
- Plug the other end of the cable into the USB of the PC
C. Connect the power cable
D. Common usage
- The operation is the same as the common hard disk accessing, reading and writing
- The LED indicator flickers during the reading and writing process.
- The LED indicator stops flickering or slow down flickering during no reading or writing operation and stand by status.
- Please don't draw out the FANTEC MM-FH35US from the PC when the device is under reading or writing status. Otherwise, it may cause damage to the hard disk or loss of data.
Exit and draw out the product
As a USB device, it supports hot plug. Please follow the procedure below to ensure a normal exit from the system and protect the integrality of the system and the safety of the product.
In Microsoft operation system
A. Make sure the product is not under reading or writing status
- No reading or writing operation command implements.
- No flickering on the player's LED indicator
B. Click the green icon right down the system screen
- The green icon illustrates as follow.
- Right click the green icon, the option of USB device directory appears.
C. Click the device need to exit.
D. The system prompt: The device has been removed from the system safely.
E. Click "sure", and the system will shut the dialogue box.
F. Remove the player from the PC.
G. Finish.
Connection Guide
1. Power connection
Take out power adapter from the package and connect it.
2. Connection of TV audio output
The player is designed with multi-output, including composite (AV), component (YPbPr) and HDMI. Individuals can select different interfaces according various needs. The product can detect video output automatically, making the operation friendly and convenient. Please refer to the following instruction for connection to avoid any problems.
Composite output mode (AV)

Plug the yellow connector into the AV output of MM-FH36US and AV input of TV, and plug the red and white connector into the audio input of TV or HIFI. Turn on the TV and select AV mode. Turn on the product and TV displays the interface of initiation.
EN/10
Component output connection (YPbPr)
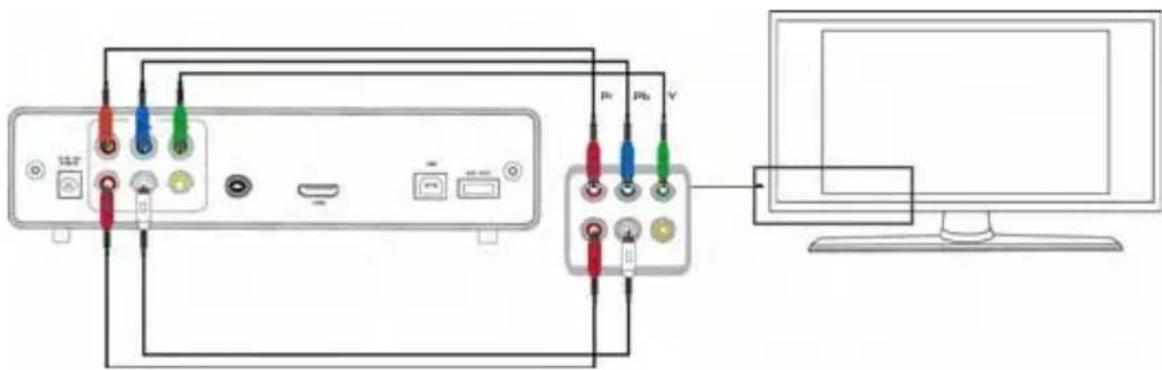
Component output mode: Plug the YPbPr cable into the output of product and input of TV. Because the cable is only for video signal, another AV cable is necessary. Plug the red and white connector of AV cable into the audio output of product and audio input of TV or HIFI. Turn on TV and select YPbPr mode. Turn on the product and TV displays the interface of initiation.
Coaxial output connection
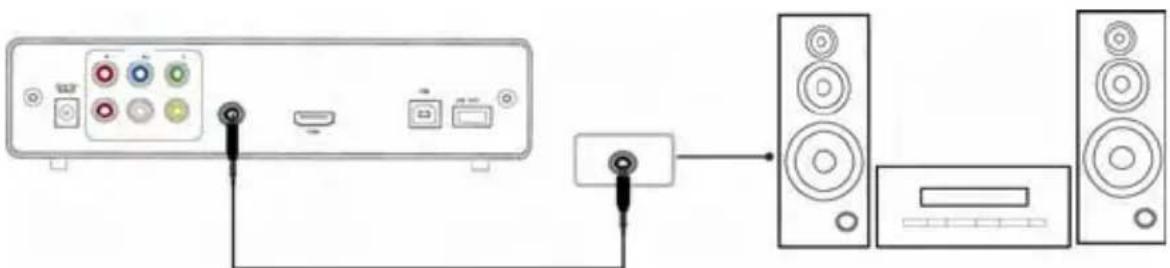
Coaxial output mode: Connect the product coaxial connector with the other one from video or audio device by coaxial cable. Then enter the product's audio interface, select the Digital Output option "SPDIF/RAW" or "SPDIF/PCM". It is available to enjoy 5.1 high quality sounds through a multi channel decoder/amplifier with coaxial input.
HDMI output connection

HDMI is an output with best audio and video effect which provides digital video and audio
EN/11
composited at the same time. Connect HDMI cable to output of player and with HDMI input of TV set. Select HDMI mode in TV until it displays the interface of initiation.
Connect to the PC
This HDD & Player is also a personal multimedia file storage device and can be used by connecting to the PC as a common USB hard drive.
-
Connect to the power supply. While using the HDD player with PC, power supply is also needed.
-
Connect to PC with USB cable.
Connect the HDD player to PC with USB cable then you can copy and transfer data.
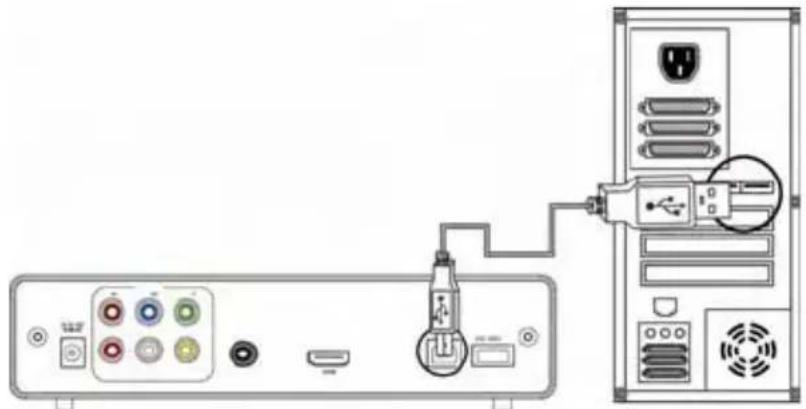
natural_image
Diagram showing connection between a computer tower and an audio jack, with no visible text or symbols.Follow the instruction of the above picture and connect the device to PC.
Power on the PC and enter the system. The PC detects the device automatically and then the device can be used as an external USB storage device.
After data transfer finished, please remove the USB storage device safely (click the USB device icon to stop the USB device and then pull out the USB cable).
Notes:
- Please don't power off when it connect to PC for reading and writing.
- If there is no USB detected after connected with USB cable, maybe the PC is operating other program, please pull off the USB cable and wait about 10 seconds then connect again.
Operation of FANTEC MEDIA PLAYER
Power on the HDD Player, the system shows the main menu after a few seconds. Then you could press the up and down key to choose the storage device and press the ENTER key to enter folders. Then press the left and right key to choose which you like. By pressing ENTER, you could enter the corresponding folder.
Picture Playing
On main menu, press the direction key to choose the picture file. By pressing ENTER key, it will begin to play normally. Press the REPEAT key on remote control to choose playback mode.
Music playing
Press direction key to select music, and press ENTER key to enter music playback and begin playing. Press the REPEAT key on remote control to choose playback mode.
Movies playing
Press direction key to select movies, and press ENTER key to play.
MPEG4 Subtitle Operation:
Put subtitle file and video file into the same folder, in file library, first press SUB-T key to choose file Subtitle, than choose video file and press ENTER key to play.
EN/13
DVD playing
How to play the sample movie <
a. Connect the player with computer by USB cable. Then you can see the content on hard drive of the player from computer.
b. Create a folder on the hard drive of the unit. For example: On disk "E:\" create e:\car folder. Then copy all the files of DVD <
c. Then unplug USB cable. Connect the FANTEC MM-FH36US to the TV.
d. Enter the file manager, select <
Note: All contents of DVD must copy to the car folder of the unit, include the empty folders. Otherwise it will not playing.
SYSTEM SETUP
Press SETUP key to access system setup menu.
System setup options
| SETUP Project set Detailed settings menu | ||
| GENERAL SETUP | OSD Language | English, French, German, Italian, Swedish, Danish, Spanish |
| Screen Saver ON or OFF | ||
| TV Type | Multi. System, NTSC, PALa. NTSC (Taiwan, the United States, Japan, etc.) b. PAL (Europe, mainland China and other countries) | |
| Video Output | SD PROSCAN, 720P, 1080IDefault setting is SD PROSCAN mode. AV, YPBPR and HDMI output are activated at the | |
EN/14
| same time. In selecting 720P or 1080i mode, YPBPR and HDMI output are activated at the same time, AV-output is disabled.Advice: If your TV supports the YPbPr or HDMI display mode, use 720P or 1080i mode to watch. | ||
| Defaults Reset. | To restore the factory settings. | |
| AUDIO SETUP | Downmix | Left/Right, Stereo |
| Audio Out | Analog.AV and YPBPR analog audio output. | |
| SPDIF/RAW.Digital and HDMI digital audio output. | ||
| SPDIF/PCM.Optical and HDMI digital audio output. | ||
| LPCM Output LPCM 48K/LPCM 96K | ||
| PHOTO SETUP | Slide Time | 5S, 10S, 15S. Set seconds of browsing to the next picture. |
| Slide Mode | LR to Center, Center to LR, Edge to Center, Side L to R, Fade Out In, Random, Top to Bottom, Bottom to Top, TB to Center, Center to TB, Side TB, Left to Right, Right to Left | |
| VIEO SETUP | Subtitle | English, French, Spanish, German, Italian, OFF. |
Maintenance Notice
To protect the normal use of all accessories, please kindly make sure understand and pay attention to following points.
● Power input is 100V\~240V, output 12V/2A.
● Under normal working status, power adapter will keep warming, but body temperature of 60 degree or under is normal.
● Under normal working status please be sure of aeration, do not put the device in bed, sofa, or similar area where cooling effect is avoided.
- Please do not teardown personally, but send it back to the pointed service agent, or there will be danger of electronic shock.
- Please pull out the cable and shut the device immediately when cable broken or liquid in, and send to pointed agent for repair.
FAQ
Question: When connect the newly bought device to system, there is no disk icon but the green icon appears.
Answer: It may because the device is not formatted, pleasure format the hard disk.
Q: It works well, but the data transfer speed is very slow.
A: lease check version of USB port of your computer
Q: The hard disk cannot be recognized under Windows 2000 / XP / Vista operation system.
A: It may because the original USB driver gets lost. Please reinstall your operation system, research the driver disk or serve the internet to research the USB2.0 driver procedure.
EN/16
Q: Portable hard disk can't be recognized by the Windows 2000 / Windows XP and the system prompt that a device, incapable of identify connected
A: This is caused by the loss of the USB driver of operation system. Please install the operation system again.
Q: Can it be turned off when connect to PC?
A: No, it can't.
Q: Can it copy between the USB peripheral device through USB?
A: No, it can't.
Q: Is it possible to connect the device via USB to PC and to TV at the same time?
A: No, if you connect the USB cable to PC, the player will deactivate all video interfaces.
Q: Why is the use of external storage devices to play video files via USB HOST not recommended and will effect mosaic phenomenon?
A: The USB HOST of the player is the USB1.1 interface. the player may have a greater rate of the video file will be the speed restrictions.
Q: I used my player to transfer files back and forth between different computers. Will defragmenting the player hard disk do any harm to it?
A: Defragmenting the player hard disk may be useful after having transferred many files to and from the player. It is never harmful to use the defragment on the player. Make sure no other programs are running while using the Windows® defragment utility.
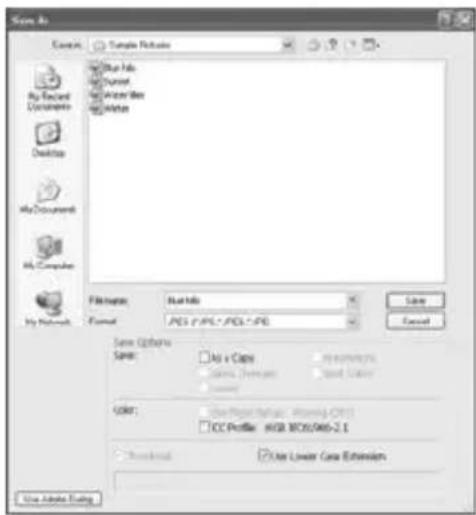
Q: Why do some photo formats, cannot be shown in the photo function?
A: In the JPEG format there are different modes. The player doesn't support all the modes. So you have to change your photo format first as follow:
(1) Use Photoshop to open the photo.
EN/17
(2) Choose "File" then "save as" from the menu, as the picture on the left hand side shows, select the picture format as JPEG, input the file name and click the "save" icon.
(3) After click on the "save" icon, a new window will appear as the picture on the right hand side shows, select "Baseline (standard)" or "Baseline optimized".
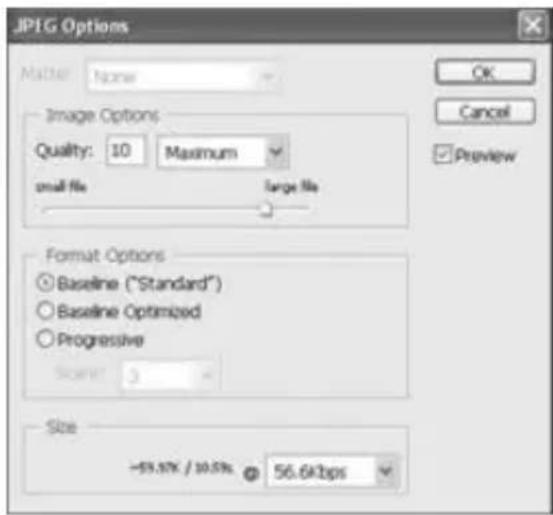
(4) Click the "OK" icon.
Q: When the player is powered on, why will the TV have a short flashing, blue screen or screensaver?
A: This is normal, when the system initializes, it will setup the corresponding parameters so it can output the correct video signal to the TV, during the initializing time, the TV will receive incorrect signals or the signals will not be stable and will cause the TV screen to flash, some TV's will treat this as no signal, and will display a blue screen or screensaver.
Q: Why is there no sound on movie or music playback when using YPbPr component output?
A: YPbPr output is a video output only, and does not include sound signals, when using YPbPr output, please plug the A/V OUT or the S/PDIF jack to output sound.
Others
The accessories of products may vary, according to different series and models. Please refer to packing list or contact your agent for information. The illustration may be a little different from the real product.
Note
In some sporadic circumstances an interaction of remote control frequencies and home entertainment equipment is possible.
Copyrights
All rights reserved. No part of this manual may be reproduced, stored in a retrieval system, or transmitted in any form or by any means, electronic, mechanical, photocopying, recording or otherwise, without the prior written permission from the copyright holder. According to copyright law, no recorded data may be used for purposes other than personal enjoyment without permission from the copyright holder.
Trademarks
Microsoft and Windows are registered trademarks of Microsoft Corporation.
All other trademarks are property of their respective holders.
Warranty
What your warranty does not cover:
- Acts of nature, such as fire, static discharge.
- Damage from unauthorized repair, alteration or accident.
- Damage from misuse or neglect.
- A unit that has been modified or incorporated into other products or is used for institutional or other commercial purposes.
- Loss of customer's software, firmware, information, or memory data.
- Improper handling or installation.
EN/19
INHALT
EINLEITUNG 2
AUSSTATTUNG 2
SPEZIFIKATIONEN....2
1) Anschlüsse
natural_image
Diagram showing connection between a computer tower and an electronic device via USB cable (no text or symbols present)
natural_image
Diagram showing connection between a device with ports and a connected audio equipment (no text or symbols present)natural_image
Diagram showing connection between a computer tower and an electronic device via USB cable (no text or symbols present)


- BRIEF INTRODUCTION....2
- PRODUCT DETAILS....3
- BASIC OPERATION....7
- CONNECTION GUIDE ... FEHLER! TEXTMARKE NICHT DEFINIERT.
- Product details
- Packing list
- Front view
- Back View
- 1) Port definition
- Remote control
- Basic operation
- Requirement for System of Software & Hardware
- Hardware
- Software
- Partition and Format of hard disk
- NOTE:
- Partition and formatting under Windows 2000 / Windows XP
- Connection and usage of the Media Player
- In Microsoft operation system
- Exit and draw out the product
- Connection Guide
- Power connection
- Connection of TV audio output
- Composite output mode (AV)
- Connect to the PC
- Notes:
- Operation of FANTEC MEDIA PLAYER
- Picture Playing
- Music playing
- Movies playing
- DVD playing
- SYSTEM SETUP
- Maintenance Notice
- FAQ
- EN/17
- Others
- Note
- Copyrights
- Trademarks
- Warranty
- INHALT
- EINLEITUNG 2
- 1) Anschlüsse
Brand : Fantec
Model : MMFH36US
Category : Media player