CO 1190 - Coffee machine FRITEL - Free user manual and instructions
Find the device manual for free CO 1190 FRITEL in PDF.
User questions about CO 1190 FRITEL
0 question about this device. Answer the ones you know or ask your own.
Ask a new question about this device
Download the instructions for your Coffee machine in PDF format for free! Find your manual CO 1190 - FRITEL and take your electronic device back in hand. On this page are published all the documents necessary for the use of your device. CO 1190 by FRITEL.
USER MANUAL CO 1190 FRITEL
natural_image
Black and white photo of a Fritei coffee maker with open lid, accompanied by a steamed breakfast item and a cup on a plate (no visible text or symbols)USER MANUAL AND RECIPES
Congratulations on the purchase of this fantastic design coffee maker. Please read this user manual and the guarantee terms attentively before using the coffee maker. Keep the manual carefully. Persons, who have not read this user manual, are not allowed to use this coffee maker.
text_image
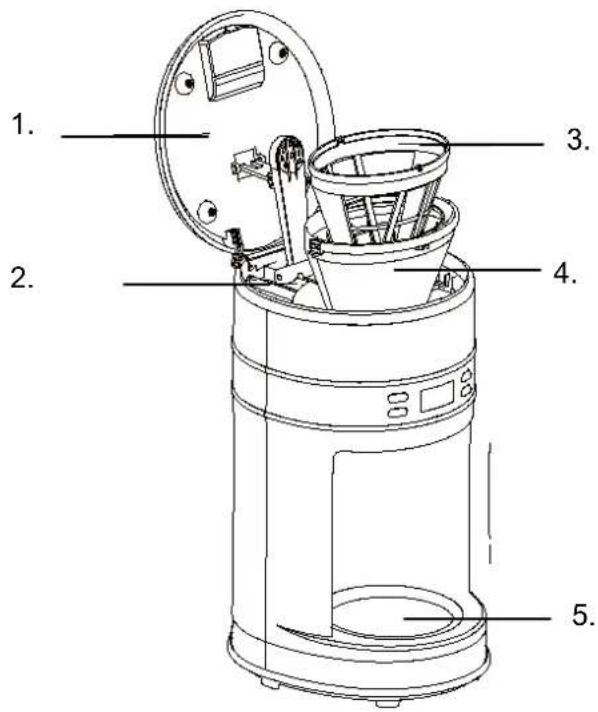
1. 2. 3. 4. 5.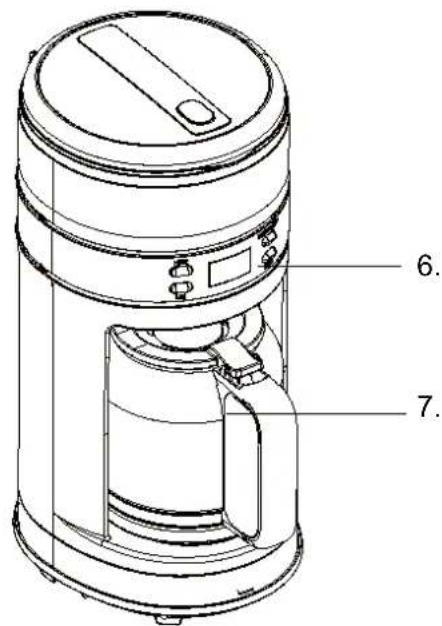
text_image
Technical line drawing of a portable water heater with labeled parts 6 and 7PRODUCTBESCHRIJVING
- Lid
- Water tank
- Nylon filter
- Filter holder
- Keep warm plate
- Control panel with LCD display
- Glass coffee jar
CONDITIONS DE GARANTIE
This coffee maker is constructed and assembled in accordance with the European CE safety standards.
IMPORTANT SAFETY PRESCRIPTIONS
- Only use this coffee maker for making coffee. NEVER fill the coffee maker with other liquids but water, or with food.
- NEVER fill the water tank above the MAX level (see MAX water level on the coffee jar). If the water tank overflows, the coffee maker might get damaged.
- This appliance may be used by children of min. 8 years old, by persons with reduced physical, sensory or mental capabilities or lack of experience and knowledge on condition they are supervised and instructed to use the appliance in a safe way and understand the hazards involved. Children may not play with the appliance. Cleaning and user maintenance shall not be made by children unless they are older than 8 years and supervised. Keep the appliance and its cord out of reach of children less than 8 years.
- ALWAYS place the appliance on a solid base, such as a kitchen counter or table, so that the appliance won't move or turn over.
- NEVER open the lid during the coffee making. The hot steam which is then released might cause burns.
- The coffeemaker can get hot on certain spots during the coffee making. Only touch the coffee jar handle or the control buttons.
- NEVER place an empty coffee jar on the keep warm plate when the coffee maker is switched on. The coffee jar could crack because of the heat.
- NEVER place a hot coffee jar on a warm or cold surface.
- NEVER use the coffee maker without water.
- NEVER use the coffee maker if the glass jar is cracked or if the handle is loose. Do not use the coffee jar for other purposes or other coffee makers.
- NEVER use accessories from other coffee makers.
- NEVER IMMERse the motor housing, the power supply cord or the plug in water or any other liquid. Only clean the appliance with a damp cloth.
- Switch off the appliance immediately after use and wait until the motor has completely stopped turning. Then remove the plug from the power point. Also proceed this way when the appliance is not in use, before cleaning and moving.
- DO NOT use the appliance if the power supply cord or plug is damaged.
- NEVER use extension cords, sockets, time switches or remote controls. Place the appliance near a power point and connect it directly.
- DO NOT use the appliance outdoors.
- DO NOT use abrasive cleaning products.
- NEVER let the cord hang over the edge of the table or the counter.
- NEVER place the power supply cord near heat sources such as cookers, heating or ovens.
- NEVER use the appliance when it is damaged or has fallen, when it shows a disturbance or when the power cord is damaged. In all these cases, please return the appliance to your sales point or to a registered service point.
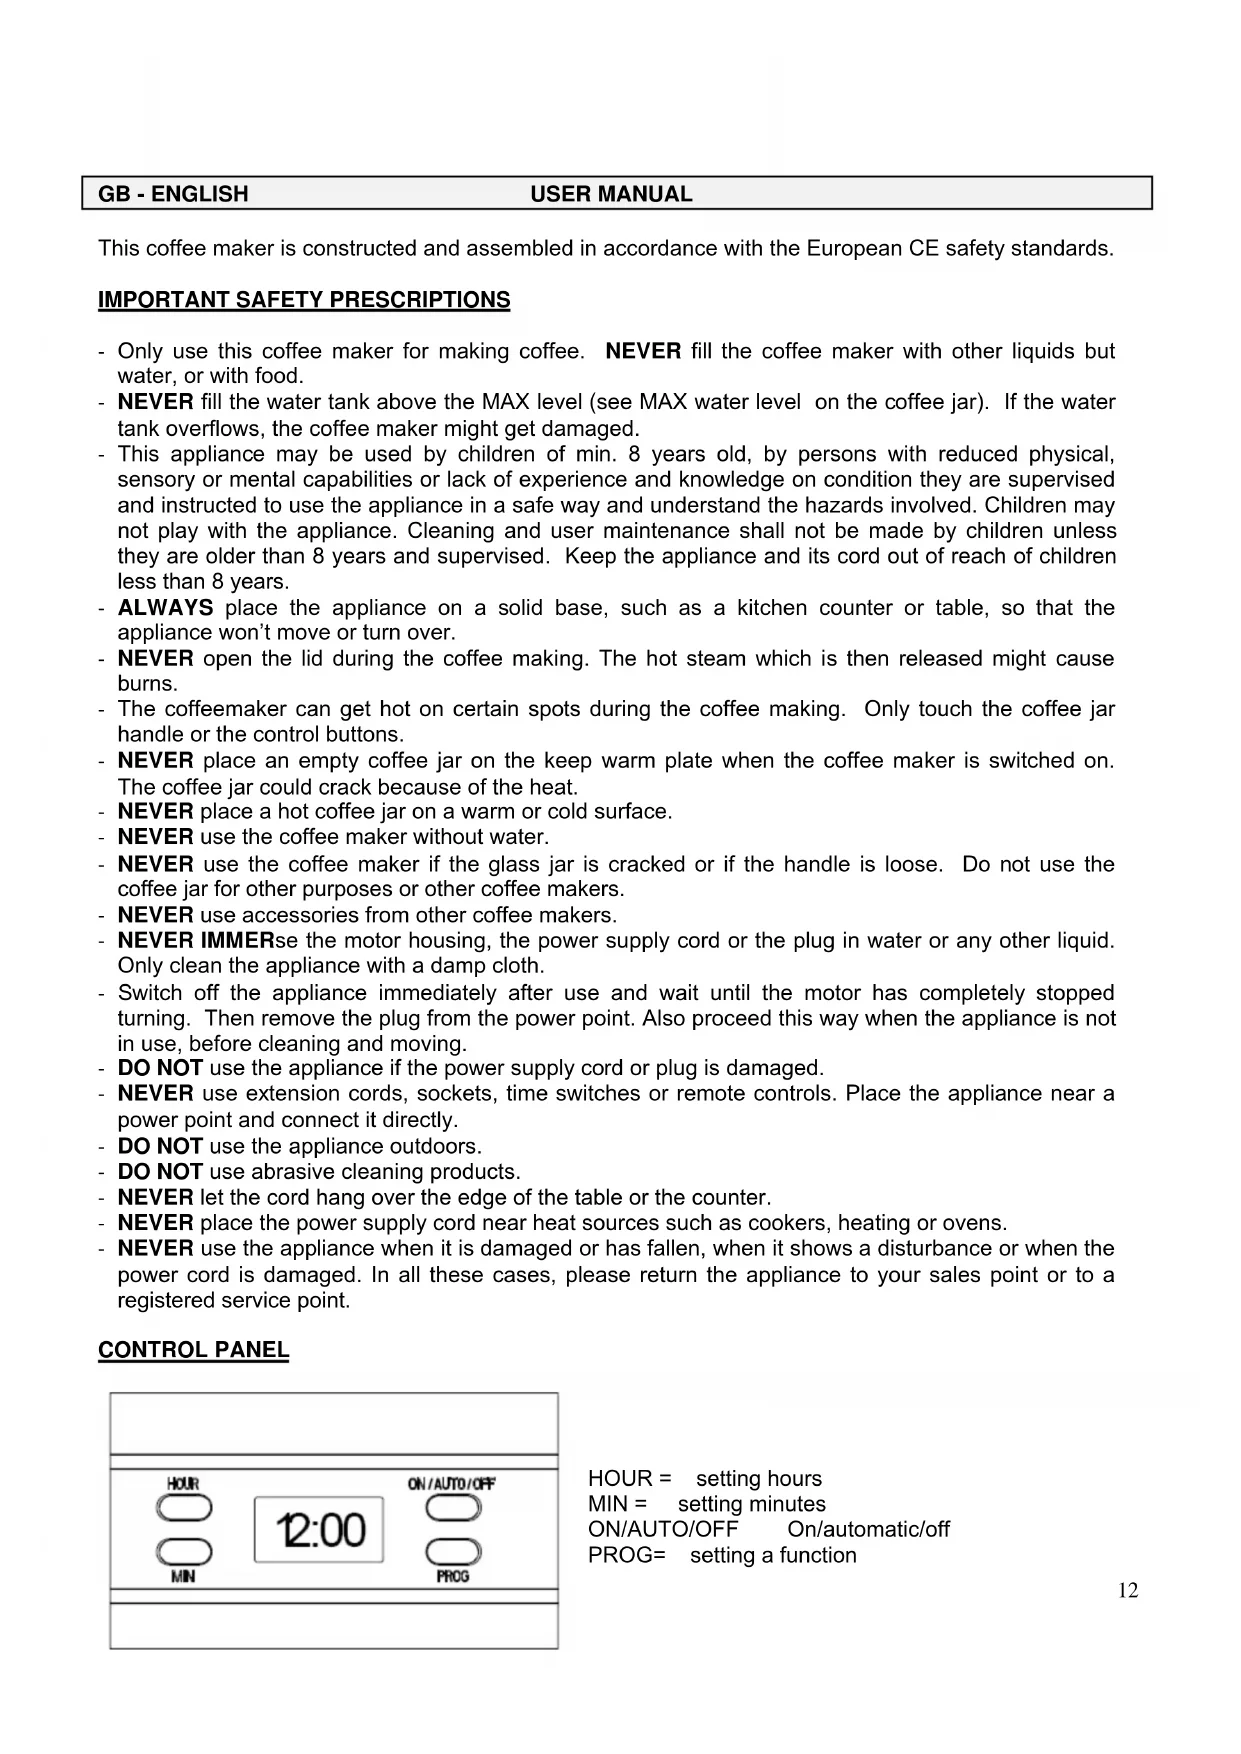
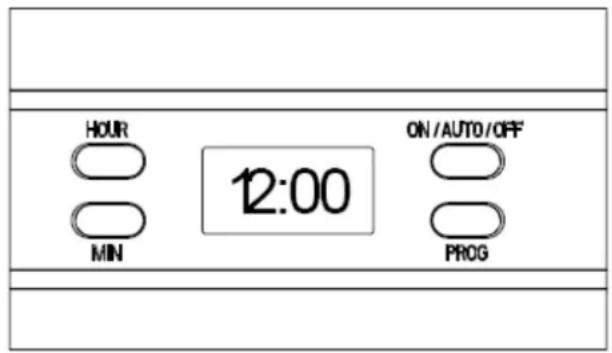
CONTROL PANEL
text_image
HOUR MIN 12:00 ON/AUTO/OFF PROGHOUR = setting hours
MIN = setting minutes
ON/AUTO/OFF On/automatic/off
PROG= setting a function
- Check if the mains voltage of your appliance (230 Volt) corresponds with the mains voltage in your home.
- Remove all packagings and stickers. Then clean the parts as described in ‘Maintenance and cleaning’, before using the appliance for the first time.
- Check the coffee maker on possible defects.
- Fill the water tank with water (see MAX water level on coffee jar) and let it run through. Repeat this a few times.
- Fill the coffee jar with the desired quantity of water (NEVER exceed the MAX. water level). Open the lid, pour in the water and close the lid.
- Open the filter holder. You can either use the nylon filter or use a paper filter (size 1x4)
- Add the desired quantity of coffee and close the filter holder.
- Place the coffee jar on the keep warm plate.
- Plug in the coffee maker. The LCD display now shows „12:00“ and „:“ will blink.
- Press the ON/AUTO/OFF button. The control lamp is now red. The coffee maker starts working.
- The coffee making process can be interrupted by pressing ON/AUTO/OFF twice. The control lamp is now blue. After about 10 sec. the control lamp goes out.
- To restart the coffee maker, press ON/AUTO/OFF once. The control lamp is now red.
Tip: you can remove the coffee jar for pouring coffee at any time. Thanks to the anti drip function, the coffee will stop dripping during about 30 seconds. After that, the coffee will continue running. - After the coffee is ready and if you leave the coffee jar on the keep warm plate, the coffee will be kept warm. After two hours, the coffee maker will switch off automatically if this is not done manually in the meantime. For the best coffee aroma, it is recommended to drink the coffee right after it is made.
- Attention: fresh made coffee is very hot. Be careful not to get burned when pouring the coffee.
- If you are not using the coffee maker, switch it off and plug it out.
TIMER FUNCTION
If you wish to use the timer function, you can program your coffee maker as follows. i.e. it is now 17.10 and you wish the coffee maker to start at 20.15.
1) Press PROG. once. The LCD display shows „CLOCK“ in the top right corner.
2) Press HOUR and MIN until you have set the actual time (fig.1)
3) Press PROG. once. The LCD display shows „TIMER“ in the top left corner.
4) Press HOUR and MIN until you have set the desired start time (fig.2)
5) Press PROG. again until the words „CLOCK“ and „TIMER“ do not show on the display anymore. The blue control lamp of the PROG. button will blink.
6) Press ON/AUTO/OFF twice. The blue control lamp will blink. On the LCD display you will see the actual time. By pressing PROG. you will see the delayed start time.
REMARK:
- Press ON/AUTO/OFF once to cancel the delayed start time.
- Press ON/AUTO/OFF twice to start the coffee making process right away
- If you wish to modify the delayed start time, repeat steps 1-5

Fig.1
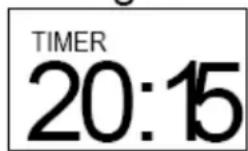
Fig.2
When the delayed start time is reached, the blue control lamp of the ON/AUTO/OFF button will not blink anymore, but will turn red. The coffee maker now starts making coffee.
MEMORY FUNCTION
If the power is cut off during no longer than 15 seconds, the coffee maker will continue automatically where it stopped. But if the power is cut off during more than 15 seconds, the coffee maker will have to be started (and programmed) again.
MAINTENANCE AND CLEANING
1) ALWAYS plug out the coffee maker before cleaning it.
2) Clean the removable parts in warm water with detergent and dry carefully.
3) Clean the housing of the coffee maker with a damp cloth to remove stains.
4) During the brewing process, there could be condensation forming on top of the filter holder and this could drip on the housing. To limit this dripping, dry the surface with a dry cloth after each use.
5) Use a damp cloth to clean the keep warm plate. NEVER use abrasive cleaning products.
6) Replace the removable parts. The coffee maker is now ready for use again.
Descaling:
For the coffee maker to function optimally, it must be descaled every now and then. Please use a descaling product suited for coffee makers.
1) Fill the coffee jar to the MAX water level with descaling solution (for the right proportion water- descaling product, see instructions on descaling product)
2) Fill the water tank with descaling solution and place the coffee jar on the keep warm plate.
3) Press ON/AUTO/OFF once. The control lamp will turn red. The descaling solution is now running through.
4) After the coffee jar contains about 1 cup of descaling solution, interrupt the process by pressing ON/AUTO/OFF twice. The control lamp is now blue and will go out after about 10 seconds.
5) Let the descaling solution work for about 15 minutes.
6) Repeat steps 3-5 again.
7) Press ON/AUTO/OFF once and let the rest of the descaling solution run through.
8) Rinse the coffee maker by having water run through 3x (fill the coffee jar to the MAX water level)
TIPS FOR DELICIOUS COFFEE
1) A clean coffee machine is essential for making good coffee. Clean and descale your coffee maker regularly as mentioned above. ALWAYS use fresh, cold water for making coffee.
2) Keep your coffee in a dry and cool place in a closed container.
3) For the best aroma, use whole coffee beans and grind them just before use.
4) Do not re-use filters or coffee.
5) Do not reheat cooled off coffee.
GUARANTEE PRESCRIPTIONS
Your guarantee starts on the day of purchase and is valid for 2 years and will only apply after submitting the purchase invoice. The guarantee will expire irrevocably and immediately when the coffee maker is used for purposes other than domestic (i.e. professional).
- The guarantee covers every repair and/or replacement free of charge of the parts recognized defective by our technical department and if the damage is due to faulty manufacture, construction or material.
- The guarantee is only valid for the original user.
- Carriage, both ways, is for the purchaser's account.
The guarantee expires in the following cases :
- Incorrect connection, e.g. electric voltages.
- Abnormal use, misuse handling, lack of care.
- Modifications or repairs made to the appliance by persons not authorized by us as manufacturer.
- When reference numbers altered or removed.
USEFUL INFORMATION
DO NOT use the appliance in case of a malfunction of when the power cord is damaged. Please address your sales point immediately.
THE APPLIANCE HAS BEEN DESIGNED FOR DOMESTIC USE. THE GUARANTEE CONDITIONS EXPIRE UPON PROFESSIONAL USE;
DEFECT AND/OR DAMAGES FOLLOWING TO THE NON OBSERVANCE OF THE USER MANUAL ARE NOT COVERED BY THE GUARANTEE.
ENVIRONMENT

DO NOT throw the appliance away with the normal household waste at the end of its life, but hand it in at an official collection point for recycling. By doing this you will help to preserve the environment.
LIABILITIES
All liabilities, towards both consumer(s) and third parties, that could result from not observing all the safety regulations prescribed in this user manual, can under no circumstances be charged to the manufacturer. In case of non-observation of these safety regulations, the user of the deep fryer, or any other person not having observed these safety regulations, protects the manufacturer from all responsibilities that he could be charged with.