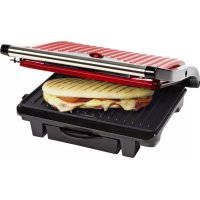
ASW113R - Barbecue BESTRON - Free user manual and instructions
Find the device manual for free ASW113R BESTRON in PDF.


| Brand | Bestron |
| Model | ASW113R |
| Product type | Panini grill / Electric barbecue |
| Power | 1000 W |
| Voltage | 220-240 V ~ 50/60 Hz |
| Dimensions (W x D x H) | Approx. 30 x 25 x 15 cm |
| Weight | Approx. 2.5 kg |
| Plate material | Metal with non-stick coating |
| Removable plates | No (fixed) |
| Heating indicator light | Yes (red) – turns off at temperature |
| Removable drip tray | Yes |
| Handle and locking latch | Yes |
| Usage | Indoor only |
| Cleaning | Damp cloth – do not immerse |
| Safety | Hot surfaces – use handle |
| Warranty | 60 months (5 years) |
| Included accessories | Removable drip tray |
| Main functions | Grill meat, fish, panini, vegetables |
| Preheating | Approx. 5 minutes |
| Recycling | Do not dispose of with household waste – recycling center |
| Certifications | CE |
Frequently Asked Questions - ASW113R BESTRON
User questions about ASW113R BESTRON
0 question about this device. Answer the ones you know or ask your own.
Ask a new question about this device
Download the instructions for your Barbecue in PDF format for free! Find your manual ASW113R - BESTRON and take your electronic device back in hand. On this page are published all the documents necessary for the use of your device. ASW113R by BESTRON.
USER MANUAL ASW113R BESTRON
Chicken Pesto Panini's
Ingredients:
CONDITIONS DE GARANTIE
Congratulations on your purchase of this Panini Grill with which you can grill a healthy and tasty piece of meat, fish or complete panini's. The grill has grill plates in the housing and in the lid for even heating from above and below. The grill plates are easy to clean.
SAFETY INSTRUCTIONS - General
- Please read these instructions carefully, and retain them for future reference.
- Use this appliance solely in accordance with these instructions.
- This appliance is not intended for use by persons (including children) with reduced physical, sensory or mental capabilities, or lack of experience and knowledge, unless they have been given supervision or instruction concerning use of the appliance by a person responsible for their safety.
Children should be supervised to ensure that they do not play with the appliance. - Have any repairs carried out solely by a qualified electrician. Never try to repair the appliance yourself.
SAFETY INSTRUCTIONS - Electricity and heat

Certain parts of the appliance may get hot. Not touch these parts to prevent burning yourself.
- Make sure that the mains voltage is the same as that indicated on the type plate on the appliance before use.
- Regularly check the appliance's power cord to make sure it is not damaged. Do not use the appliance if the power cord is damaged. Have a damaged power cord replaced by a qualified service department.
Always plug the appliance into an earthed wall socket.
Always remove the plug from the wall socket by pulling on the plug, not the power cord.
Always remove the plug from the wall socket when the appliance is not in use. - When using an extension lead always make sure that the entire cable is unwound from the reel.
- Use only approved extension leads.
- The appliance needs space to allow heat to escape, thereby avoiding the risk of fire. Make sure that the appliance has sufficient space around it, and does not come into contact with flammable materials. The appliance must not be covered.
- Never use the appliance in the vicinity of flammable materials.
- Make sure that the appliance, the power cord or the plug do not come into contact with heat sources, such as a hot hob or naked flame.
- Make sure that the appliance, the power cord and plug do not come into contact with water or other liquids.
Certain parts of the appliance can become hot. Do not touch
SAFETY INSTRUCTIONS - During use
- Never use the appliance outdoors.
- Never use the appliance in humid rooms.
- Place the appliance on a flat, stable and heat-resistant surface where it cannot fall.
- Make sure that your hands are dry when you touch the appliance, the power cord or the plug.
- Switch off the appliance and remove the plug from the wall socket in the event of a malfunction during use, and before cleaning the appliance or storing it after use.
- Never leave the appliance unattended when in use.
- Never move the appliance when it is switched on or is still hot. Switch off the appliance, and wait until it has cooled down before moving it.
- Make sure there is sufficient free space around the appliance (at least 10cm ), as well as above the appliance (at least 30cm ).
- Parts of the appliance will become hot during use. Therefore always hold the handle to open and close the lid.
- Do not put heavy objects on the lid to keep the appliance closed.
- Make sure that water does not come into contact with the hot grill plates during or shortly after use. This can cause a grill plate to buckle.
- Do not touch the appliance if it has fallen into water. Remove the plug from the plug socket immediately. Do not use the appliance anymore.
- Clean the appliance thoroughly after use (see "Cleaning and maintenance").
- Never use the appliance in the vicinity of a bird cage. Fumes released from the non-stick coating when the baking plates are hot can cause stress to birds.
- This appliance may not be used through an external timer or by means of a remote control.
OPERATION - General
The appliance is intended only for domestic use, not for professional use.
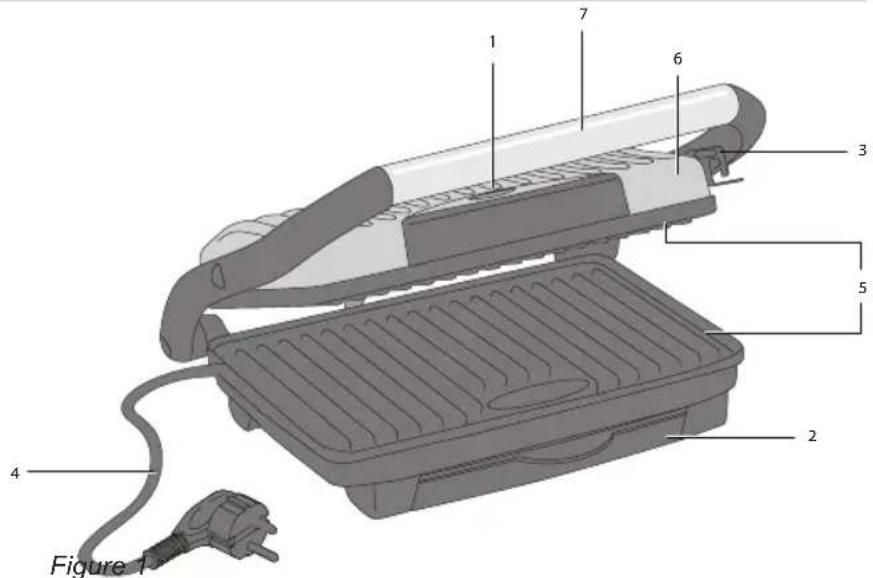
- "Heating" pilot light
- Drip tray (removable)
- Safe lid locking system
- Power cord and plug
- Grills plates
- Lid
- Handle
OPERATION - Before use for the first time
- Remove the packaging.
- Clean all the accessories to remove any residues that may be left from the manufacturing process (see "Cleaning and maintenance").
- Put the plug into the wall socket and allow the grill to heat up for 10 minutes. This will remove any packaging odor from the appliance.

- The appliance may emit a little smoke and a characteristic smell when you switch it on for the first time. This is normal, and will soon stop. Make sure the appliance has sufficient ventilation.
Keep house birds away from the appliance when it is in use; fumes released from the non-stick coating when the baking plate is hot can cause stress to birds.
OPERATION - Preparations
- Place the grill on a level, stable and heat-resistant surface.
- Place the drip tray (2) at the front of the grill between the front feet.
- Close the lid (6).
- Put the plug (4) in the wall socket. The red light (1) will light and the appliance starts preheating the grill plates (5).
Once the grill plates have reached cooking temperature the red lamp will go out. This takes approximately 2 minutes.
OPERATION -Grilling
- Open the lid.
- Lay the food that you want to grill on the lower grill plate.

Do not use the safety clip (3) of the appliance for squeezing the product. The weight of the top cover I provide an equal pressure
Note To be able to handle food with different thicknesses, there is play in the cover so that it can easily adjust to the thickness of the food.
- Close the lid.
- Grill the food until it is cooked. The cooking time required is different for each product.
- Open the lid and remove the food from the grill plate.
Note Do not use a fork, knife or other sharp object! You can damage the non stick coat with it. Warranty
becomes void when damaging the baking plate with sharp objects!
- Remove the plug from the wall socket once you have finished using the appliance. Bon appetit!
CLEANING AND MAINTENANCE
Clean the appliance after each use.
- Remove the plug from the wall socket and allow the appliance to cool down completely.
- Remove the food remaining from the under baking plate with a kitchen paper while it is still hot.
- The upper baking plate is easier to clean when it is cooled down.
- Clean the drip tray with a bit of soap.
- Clean the housing and the top cover with a moistures cloth.
CLEANING AND MAINTENANCE - Stow away
- Close the appliance and lock the clip at the right site.
- Place the appliance at a flat and solid ground in vertical position with the handle up or just normal as you use the appliance.

-
Make sure the plug has been removed from the wall socket before cleaning the appliance.
-
Never use corrosive or scouring cleaning products or sharp objects (such as a knife or a hard brush) to clean the appliance.
- Never immerse the appliance, the power cord or the plug in water or any other liquid.
THE ENVIRONMENT

-
Dispos of packaging material, such as plastic and boxes, in the appropriate waste containers. When this product reaches the end of its useful life do not dispose of it by putting it in a dustbin; hand it in at a collection point for the reuse of electrical and electronic equipment. Please refer to the symbols on the product, the user's instructions or the packaging.
-
The materials can be re-used as indicated. Your help in the re-use, recycling or other means of making use of old electrical equipment will make an important contribution to the protection of the environment.
- Contact your municipality for the address of the appropriate collection point in your neighbourhood.
TECHNICAL DETAILS
Type: ASW113-ASW113S-ASW113R
Output: 1000W
Power supply: 220-240V ~50/60Hz
GUARANTEE TERMS
The importer guarantees the appliance against defects caused by manufacturing and/or material faults for 60 months from the date of purchase, subject to the following conditions.
-
No charges will be made for labour costs or materials during the warranty period. Any repairs carried out during the warranty period do not extend the warranty period.
-
The importer automatically becomes the owner of any faulty parts that he replaces or a faulty appliance (in the event of replacement of the appliance).
-
All claims submitted under warranty must be accompanied by the original bill of sale.
-
Claims under warranty must be submitted to the dealer where the appliance was purchased or to the importer.
-
The warranty is issued solely to the first purchaser and cannot be transferred.
-
The warranty does not cover damage caused by:
a. Accidents, incorrect use, wear and/or neglect.
b. Faulty installation and/or use in a manner contravening the prevailing legal, technical or safety regulations.
c. Connection to a mains voltage other than the voltage specified on the type plate.
d. Unauthorized modifications
e. Repairs carried out by third parties.
f. Careless transport, i.e. without suitable packaging materials or protection.
- No claims may be made under this warranty for:
a. Losses incurred during transport.
b. The removal or changing of the appliance's serial number.
- The guarantee does not cover power cords, lamps or glass parts.
- No claims can be submitted under this warranty for damage other than the repair or replacement of faulty parts. The importer can never be held responsible for any consequential loss or damage or any other consequences, resulting either directly or indirectly from the appliance supplied by the importer.
- In case of claims under guarantee you can contact your dealer where the appliance is purchased. Bestron offers you also the possibility to send the appliance directly to our Service Department. Do not send your appliance without consulting us. The package may be refused and any any costs will be for your account. Please contact the Service Department and they will tell you how to pack and send the appliance.
- This appliance is not suitable for professional use.
SERVICE
If a fault should occur please contact the BESTRON service department:
THE NETHERLANDS:
BESTRON NEDERLAND BV
Bestron Service
Moeskampweg 20
5222 AW 's-Hertogenbosch
Tel: +31 (0) 73 - 623 11 21
Fax: +31 (0) 73 - 621 23 96
Email: info@bestron.com
Internet: www.bestron.com
CE DECLARATION OF CONFORMITY
This product conforms to the essential requirements of the following EU safety directives:
EMC Directive 2004/108/EC
Low Voltage Directive 2006/95/EC

R. Neyman
Quality control
RECIPES
Grill - Kebab
Ingredients:
- 350 g escalope
2 large onions - 50 g bacon
- 2 peppers
- oil
For the maninade:
125 ml water
4 Tbsp red wine
1 Tbsp vinegar
1 clove garlic
1 pinch thyme
pepper
salt
Preparation:
Cut the meat into cubes. Quarter the onions. Slice the pepper and bacon. Place all the ingredients onto a skewer in alternate order. Leave the skewers to marinate for about an hour. Remove and leave to drain. Drizzle with oil and grill on the Panini grill for about 10 mins.
Chicken kebabs to grill
Ingredients:
- 2 chicken breast fillets
- sauce (Teriyaki sauce)
a little white wine
Preparation:
First make the marinade - mix about 5 Tbsp of Teriyaki sauce with a little dry white wine. Slice the chicken breast fillets thinly and leave them to marinate in the sauce for at least 2 hours. Afterwards, place them on the skewers in a fan shape and onto the Panini Grill - continue to drizzle them with the remaining marinade.
Hamburger
Ingredients:
- 2 cups sour cream (2 x 150g)
- 6 spring onions
- 6 Tbsp breadcrumbs
2 Tsp Worcestershire sauce
2 Tsp pepper
800 g minced beef - 8 hamburger buns
lettuce
2 tomatoes
1 onion (Spanish onion)
4 Tsp mustard
2 Tbsp mayonnaise
2 Tbsp tomato ketchup
Preparation:
Slice the onions into rings, slice the tomatoes and place in a bowl. Finely chop the spring onions. Add 50% of the green part. Mix well the minced beef, spring onions, sour cream, Worcestershire sauce and the pepper. Form burgers from the minced beef mixture. The best thing is to make balls first
and then press them flat against a bread board. The meat should be quite thin. Mix the mustard, mayonnaise and ketchup together. This is the sauce for later. Place the onions, tomatoes and the sauce on the dining table. Brown the meat on both sides on the Panini grill. Shortly before the end of grilling them, place the bread buns on the grill. This will make the bread crispy too.
Vegetable kebabs to grill
Ingredients:
medium large mushrooms, as desired
1 red pepper
20 cherry tomatoes
20 small sweet onions, or 1 red, strong, large onion, finely chopped
1 fresh pineapple, cut into squares (about 1 1/2 to 2 cm)
3 Tbsp olive oil
1 Tbsp Balsamic vinegar
salt as needed
- freshly ground pepper
1 Tbsp flour (bread flour)
3 cloves garlic, crushed
tarragon, fresh or dried
1 yellow pepper
1 green pepper
a little ground chilli
Preparation:
Clean the mushrooms, onions, tomatoes and peppers, cut into bite-sized pieces as needed and then place in a large bowl. Drizzle over olive oil, and a couple of splashes of Balsamic vinegar. Season with a little salt, freshly ground black pepper and a little ground chilli pepper. Then sprinkle over the garlic, tarragon and the bread flour. Mix well. If needed, add a little more olive oil and one or two splashes of Balsamic. Leave the ingredients to marinate for about 30 minutes and then place on the skewer. Do not put the pineapple in the marinade. Place the rest of the marinade into small cups. Place the kebabs on the Panini grill for about 10 minutes and drizzle over the remaining marinade.
Sandwiches
Ingredients.
4 slices thick sliced bread
2 portions chicken fillet sliced very thinly
- 2 onions finely sliced into rings
1 clove of garlic, finely chopped
salt and pepper
1 Tsp paprika
2 Tbsp sauce (garlic sauce from a jar)
1 hand full rocket, roughly chopped
2 Tsp Chinese mixed herbs
Preparation:
Sprinkle the chicken fillet slices with herbs and cook them thoroughly on the Panini Grill. Salt and fry the garlic and onions until golden yellow. Cover
2 toasted slices of bread with rocket, then the onions, the chicken fillet slices, garlic sauce and a little more rocket. Place another slice of bread on top and grill everything for about 4-6 mins on the Panini Grill.
Italian - Sandwich
Ingredients:
2 slices of bread per sandwich
1 Tbsp olive oil
- 1 / 2 small onion
12 small red pepper
3 anchovies or alternatively:
- 2 sun-dried tomatoes in oil (up to 3 tomatoes)
- 50 g mozzarella
- 6 black olives
1 Tbsp chopped parsley
- 12 Tsp chopped thyme
Preparation:
Drizzle the bread with olive oil. Slice the onion into rings and the pepper into thin strips. If you are using sun-dried tomatoes instead of anchovy fillets, cut these into thin strips. Slice the mozzarella. Spread the prepared ingredients with the olives onto the bread and sprinkle with parsley and thyme, then grill in the Panini grill for 4-6 minutes.
Chicken Pesto Paninis
Ingredients:
1 Focaccia bread, quartered
- 12 cup of basil pesto from a jar
- 200g of cooked chicken breast thinly sliced
- 200g of green pepper finely cubed
150 g red onion sliced into rings
- 250 g grated gouda cheese
Preparation:
Pre-heat your Panini grill.
Slice every Foccacia quarter in half and spread each side with the pesto. Then add the ingredients such as the chicken breast, pepper, onion and the cheese. Cover with the other half of the bread and grill the paninis in the pre-heated grill for about 5 mins or until golden brown and the cheese has melted.
Marc's Panini
Ingredients:
1 Foccaccia bread, quartered, or 4 Ciabatta rolls
1 tomato
1 cucumber
4 slices melting cheese
4 slices ham or salami
- herb butter
salt and pepper
- herbs as desired
Preparation:
Slice the Panini bread lengthwise and spread with the herb butter. Place the ham or the salami on the bottom half. Slice the cucumber and tomato and place on the bread, season and sprinkle with fresh herbs. Add the slices of cheese and cover with the
other half of the Panini. Grill the Paninis in the preheated
grill for about 5 mins or until golden brown
and the cheese has melted.
Korean Fire Meat
Ingredients:
- 1 kg pork sliced into slices of about 1cm thick
- 1 leek
3 cloves garlic - 5 Tbsp Soya sauce
- 5 Tbsp oil (sunflower oil)
2 Tbsp vinegar (wine vinegar) - 1 squeezed lemon
7 Tsp Chinese mixed herbs
2 Tsp Cayenne pepper
Preparation:
Finely chop or crush the garlic. Mix this together with all the liquid ingredients and herbs to make a sauce. Slice the leek into rings. Now you need a bowl (at best with a lid) to marinate the meat in. Close the lid (or cover the bowl) and place in the fridge. Leave it to marinate for 1-3 days, after 12 the time has passed stir with a spoon (or turn the meat slices) so that the marinade is evenly distributed. After marinating, place the meat pieces on the preheated
Panini grill and cook as desired.
Thai-Fish
Ingredients:
- 1 kg fish fillets (e.g. redfish, hake, shark catfish, etc.)
1 Tbsp cumin
2 Tbsp oyster sauce
100 ml oil (e.g. sesame, sunflower or nut oil)
1 Tsp green curry paste - 1 / 2 lemon juice
salt - sugar
Preparation:
The fish can be fresh or frozen, but must then be thawed. Now salt the fillets and lightly sugar them. Mix the oil, oyster sauce, cumin, lemon juice and curry paste in a screw-top jar or shaker. The longer and more intensively it's shaken, the longer the emulsion-type state of the marinade will be maintained (an advantage for marinating). Pour the marinade over the fish and leave to marinate in the fridge for at least 2 hours. Then, place on the pre-heated Panini grill and grill each side for about 3-4 minutes.

- Chicken Pesto Panini's
- CONDITIONS DE GARANTIE
- SAFETY INSTRUCTIONS - General
- SAFETY INSTRUCTIONS - Electricity and heat
- SAFETY INSTRUCTIONS - During use
- OPERATION - General
- OPERATION - Before use for the first time
- OPERATION - Preparations
- OPERATION -Grilling
- CLEANING AND MAINTENANCE
- CLEANING AND MAINTENANCE - Stow away
- THE ENVIRONMENT
- TECHNICAL DETAILS
- GUARANTEE TERMS
- SERVICE
- THE NETHERLANDS:
- CE DECLARATION OF CONFORMITY
- Neyman
- Quality control
- RECIPES
- Grill - Kebab
- Preparation:
- Chicken kebabs to grill
- Hamburger
- Vegetable kebabs to grill
- Sandwiches
- Italian - Sandwich
- Ingredients:
- Chicken Pesto Paninis
- Pre-heat your Panini grill.
- Marc's Panini
- Korean Fire Meat
- Thai-Fish
Brand : BESTRON
Model : ASW113R
Category : Barbecue