
AKS700SD - Kitchen scale BESTRON - Free user manual and instructions
Find the device manual for free AKS700SD BESTRON in PDF.
| Product type | Kitchen scale |
| Brand | Bestron |
| Model | AKS700SD |
| Power supply | CR2032 battery (included) |
| Maximum weighing capacity | 10 000 g (10 kg) |
| Accuracy | 1 g |
| Units of measurement | g, lb:oz, ml, fl. oz |
| Main functions | Weighing, water and milk volume measurement, tare function, zero setting, auto shut-off after 2 minutes |
| Display | LCD with function icons |
| Material | Plastic |
| Dimensions (approx.) | 20 x 15 x 2 cm |
| Weight (approx.) | 300 g |
| Warranty | 60 months (5 years) |
| Cleaning | Damp cloth, no abrasive products |
| Safety | Use by children aged 8 years and older under supervision |
| Auto shut-off | Yes, after 2 minutes of inactivity |
| Error display | 'Lo' for low battery, 'Err' for overload |
| Package contents | Scale, CR2032 battery, user manual |
Frequently Asked Questions - AKS700SD BESTRON
User questions about AKS700SD BESTRON
0 question about this device. Answer the ones you know or ask your own.
Ask a new question about this device
Download the instructions for your Kitchen scale in PDF format for free! Find your manual AKS700SD - BESTRON and take your electronic device back in hand. On this page are published all the documents necessary for the use of your device. AKS700SD by BESTRON.
USER MANUAL AKS700SD BESTRON
natural_image
Abstract black arrow symbol pointing right, no text or symbols presentBESTRON®
AKS700W/Z/R/SD
NL
Instruction manual kitchen scale

1 x CR2032

_
| _
一
1
VEILIGHEIDSVOORSCHRIFTEN - Algemeen
R. Neyman Quality control
CONDITIONS DE GARANTIE
DÉCLARATION DE CONFORMITÉ CE
SAFETY INSTRUCTIONS - General
- Please read these instructions carefully and retain them for future reference.
• Use this appliance solely in accordance with these instructions. - This appliance can be used by children older than 8 years and persons with reduced physical, sensory or mental capabilities or lack of experience and knowledge, but only if they have been given supervision or instruction concerning use of the appliance in a safe way and understand the hazards involved.
• Children should be supervised to ensure that they do not play with the appliance. - Cleaning and maintenance must not be done by children, except if they are older than 8 years and supervised.
- Have any repairs carried out solely by a qualified electrician. Never try to repair the appliance yourself.
SAFETY INSTRUCTIONS - During use
- Never submerge the appliance in water or another liquid.
- We accept no liability for damage caused by incorrect usage or the ignoring of the regulations in this manual.
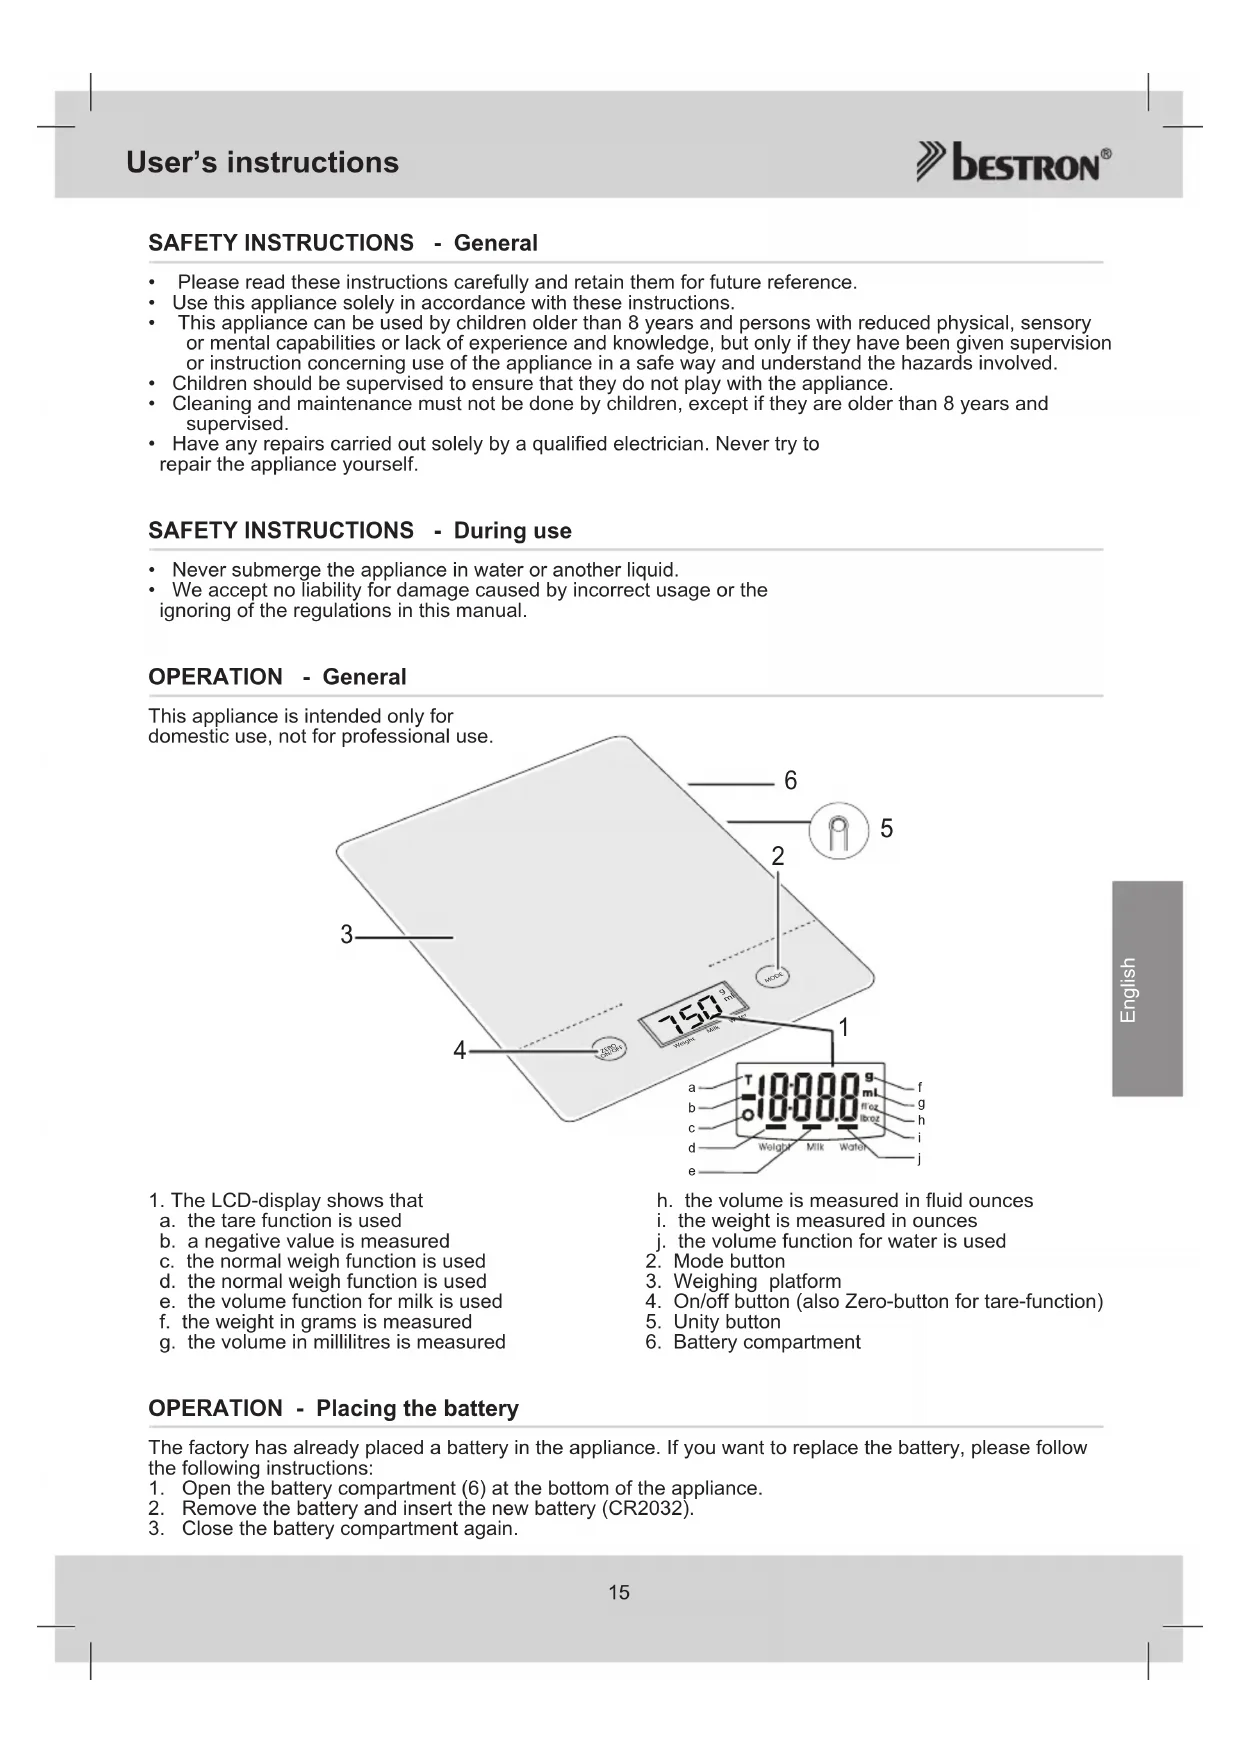
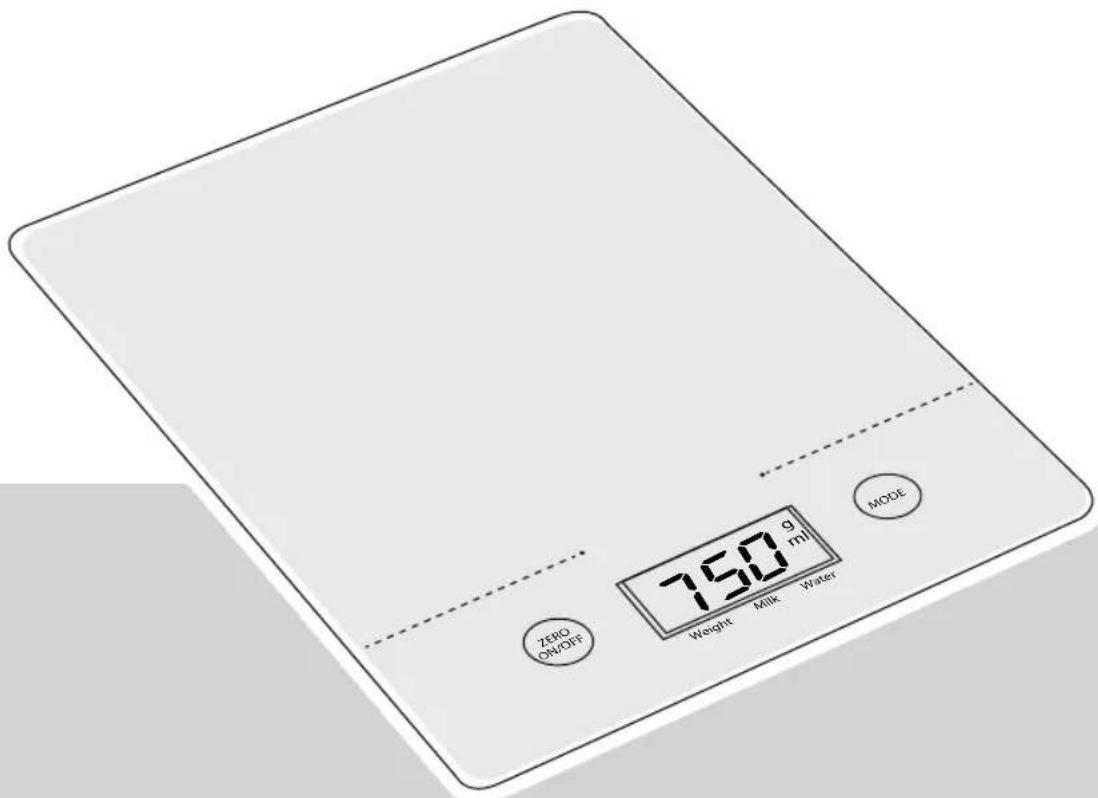
OPERATION - General
This appliance is intended only for domestic use, not for professional use.
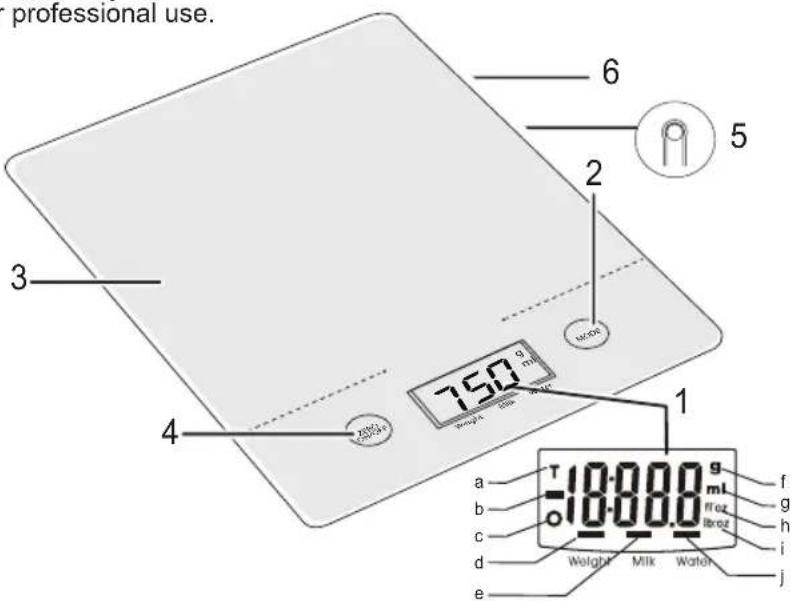
- The LCD-display shows that
a. the tare function is used
b. a negative value is measured
c. the normal weigh function is used
d. the normal weigh function is used
e. the volume function for milk is used
f. the weight in grams is measured
g. the volume in millilitres is measured
h. the volume is measured in fluid ounces
i. the weight is measured in ounces
j. the volume function for water is used
-
Mode button
-
Weighing platform
-
On/off button (also Zero-button for tare-function)
-
Unity button
-
Battery compartment
OPERATION - Placing the battery
The factory has already placed a battery in the appliance. If you want to replace the battery, please follow the following instructions:
- Open the battery compartment (6) at the bottom of the appliance.
- Remove the battery and insert the new battery (CR2032).
- Close the battery compartment again.
- Place the device on a solid flat surface.
- Turn on the device by pressing the on/off button (4). Wait until the LCD-display has settled.
- Select the weighing system of your choice by pressing the Unity-button (5). In the display (1) shows a dash alternating under g (European measuring system) and lb:oz (British/American measuring system).
- You can turn off the device by pressing the on/off button.

The device switches itself off when it's not used for 2 minutes. The appliance will remember your choice of system after switch-off.
OPERATION - Weighing
- Place the device on a solid flat surface.
- Optionally, you can place a bowl on the weighing plateau (3) for adding all the ingredients. Always do this before you turn on the device.
- Turn on the device by pressing the on/off button (4). Wait until the LCD-display has settled.
- Start the weighing by placing the ingredients on the plateau (or bowl). The display shows the weight now.
OPERATION - Water volume measurement
- Place the device on a solid flat surface.
- Place a bowl on the weighing plateau (3) for adding the water. Always do this before you turn on the device.
- Turn on the device by pressing the on/off button (4). Wait until the LCD-display has settled.
- Press the mode button (2) until there are dashes under ml (fl. oz) and water.
- Pour the water in the bowl. The display shows the amount of water now.
OPERATION - Milk volume measurement
- Place the device on a solid flat surface.
- Place a bowl on the weighing plateau (3) for adding the milk. Always do this before you turn on the device.
- Turn on the device by pressing the on/off button (4). Wait until the LCD-display has settled.
- Press the mode button until there are dashes under ml (fl. oz) and milk.
- Pour the milk in the bowl. The display shows the amount of milk now.
OPERATION - TARE function
When you want to weigh multiple products after another without emptying the scales, you can use the tare function:
- Place the device on a solid flat surface.
- Optionally, you can place a bowl on the weighing plateau (3) for adding all the ingredients. Always do this before you turn on the device.
- Turn on the device by pressing the on/off button (4). Wait until the LCD-display has settled.
- Place the first ingredients on the weighing plateau (or in the bowl). The display shows the weight now.
- Now press the Zero-button (4) to reset the value in the display to zero.
- Repeat steps 4 and 5 until you have weighed all ingredients.

After you have removed everything from the weighing plateau, it will display a negative value. Press the Zero-button to reset the display. The appliance is now ready for use again.
Lo: Appears on the display when the batterie is low. You need to replace the batterie as soon as possible.
Err: Appears on the display when the scale is overloaded. Remove a small amount to prevent damage.
CLEANING AND MAINTENANCE
- This kitchen scale is a precision instrument. Please avoid heavy striking. Do not keep it laden with weights for a long period.
- Wipe the base unit with a clean damp of cloth. Dry thoroughly afterwards.
- Don't use harsh or abrasive cleaning agents or solvents.
THE ENVIRONMENT

- Dispose of packaging material, such as plastic and boxes, in the appropriate waste containers. When this product reaches the end of its useful life do not dispose of it by putting it in a dustbin; hand it in at a collection point for the reuse of electrical and electronic equipment. Please refer to the symbols on the product, the user's instructions or the packaging.
- The materials can be re-used as indicated. Your help in the re-use, recycling or other means of making use of old electrical equipment will make an important contribution to the protection of the environment.
- Contact your municipality for the address of the appropriate collection point in your neighbourhood.
GUARANTEE TERMS
The importer guarantees the appliance against defects caused by manufacturing and/or material faults for 60 months from the date of purchase, subject to the following conditions.
- No charges will be made for labour costs or materials during the warranty period. Any repairs carried out during the warranty period do not extend the warranty period.
- The importer automatically becomes the owner of any faulty parts that he replaces or a faulty appliance (in the event of replacement of the appliance).
- All claims submitted under warranty must be accompanied by the original bill of sale.
- Claims under warranty must be submitted to the dealer where the appliance was purchased or to the importer.
- The warranty is issued solely to the first purchaser and cannot be transferred.
- The warranty does not cover damage caused by:
a. Accidents, incorrect use, wear and/or neglect.
b. Faulty installation and/or use in a manner contravening the prevailing legal, technical or safety regulations.
c. Connection to a mains voltage other than the voltage specified on the type plate.
d. Unauthorized modifications.
e. Repairs carried out by third parties.
f. Careless transport, i.e. without suitable packaging materials or protection.
- No claims may be made under this warranty for:
a. Losses incurred during transport.
b. The removal or changing of the appliance's serial number.
- The guarantee does not cover power cords, lamps or glass parts.
- No claims can be submitted under this warranty for damage other than the repair or replacement of faulty parts. The importer can never be held responsible for any consequential loss or damage or any other consequences, resulting either directly or indirectly from the appliance supplied by the importer.
- In case of claims under guarantee you can contact your dealer where the appliance is purchased. Bestron offers you also the possibility to send the appliance directly to our Service Department. Do not send your appliance without consulting us. The package may be refused and any any costs will be for your account. Please contact the Service Department and they will tell you how to pack and send the appliance.
- This appliance is not suitable for professional use.
SERVICE
If a fault should occur please contact the BESTRON service department: www.bestron.com/service
CE DECLARATION OF CONFORMITY
This product conforms to the essential requirements of the following EU safety directives:
• EMC Directive 2014/30/EU
• Low Voltage Directive 2014/35/EU
• RoHS – Directive 2011/65/EU

R. Neyman
Quality control
_
| _
一
1


Bestron Customer Service WhatsApp bestron.com/whatsapp


- BESTRON®
- VEILIGHEIDSVOORSCHRIFTEN - Algemeen
- CONDITIONS DE GARANTIE
- DÉCLARATION DE CONFORMITÉ CE
- SAFETY INSTRUCTIONS - General
- SAFETY INSTRUCTIONS - During use
- OPERATION - General
- OPERATION - Placing the battery
- OPERATION - Weighing
- OPERATION - Water volume measurement
- OPERATION - Milk volume measurement
- OPERATION - TARE function
- CLEANING AND MAINTENANCE
- THE ENVIRONMENT
- GUARANTEE TERMS
- SERVICE
- CE DECLARATION OF CONFORMITY
Brand : BESTRON
Model : AKS700SD
Category : Kitchen scale