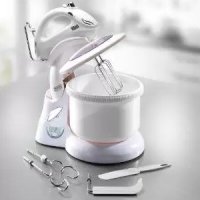
MultiMixx - Hand blender BEEM - Free user manual and instructions
Find the device manual for free MultiMixx BEEM in PDF.



| Product type | Food processor and hand blender |
| Brand | BEEM |
| Model | MultiMixx (M29.001) |
| Dimensions (H x W x D) | 230 x 370 x 340 mm |
| Net weight | 2.81 kg |
| Voltage | 220 - 240 V~ |
| Frequency | 50/60 Hz |
| Power | 300 W |
| Protection class | II |
| Protection type | IPXO |
| Speeds | 4 levels (1-4) + Turbo button |
| Integrated scale | Yes, max capacity 3 kg |
| LED lighting | Yes (blue) |
| Functions | Mixing, kneading, beating, weighing |
| Included accessories | Whisks, dough hooks, blade beater, spatula, mixing bowl, lid, base |
| Accessory material | Stainless steel and plastic |
| Cleaning | Accessories dishwasher safe, motor unit and base wipe with damp cloth |
| Safety | Automatic shut-off in case of overheating, accessory locking, overload protection |
| Warranty | 2 years |
| Repairability | Spare parts available (bowl, whisks, hooks, lid, spatula) |
Frequently Asked Questions - MultiMixx BEEM
User questions about MultiMixx BEEM
0 question about this device. Answer the ones you know or ask your own.
Ask a new question about this device
Download the instructions for your Hand blender in PDF format for free! Find your manual MultiMixx - BEEM and take your electronic device back in hand. On this page are published all the documents necessary for the use of your device. MultiMixx by BEEM.
USER MANUAL MultiMixx BEEM
natural_image
White kitchen mixer with hand mixer and kitchen stand, no visible text or symbolsFood processor & hand mixer
natural_image
Close-up of a white kitchen grater with a labeled component (17) and handle, no visible text or symbols beyond the number.
Inhalt
1 Päckchen Backpulver –
1 Tasse Milch -
General instructions ..... 15
Safety instructions ..... 17
Appliance description 19
Before using for the first time ..... 20
Operating the hand mixer ..... 2 0
Using the mixer stand ..... 2 1
Instructions for use 23
Recipe suggestions....24
Cleaning and care 25
Storage 25
Technical data 25
Spare parts and other accessories .. 26
Troubleshooting 26
Dear Customer,
Before using the appliance, please read the instructions contained in this user manual on startup, safety, intended use as well as cleaning and care.
Open the fold-out page at the beginning and end of the user manual in order to view the illustrations during reading.
Keep this user manual in a safe place and pass it on to any future owners together with the appliance.
General instructions
Copyright
This document is copyrighted. Any duplication or reprinting, in whole or in part, and the reproduction of the illustrations, even in modified form, is only permitted with the written approval of the manufacturer.
Notes on environmental protection
The packaging materials used can be recycled. When no longer required, dispose of the packaging materials according to local environmental regulations.
This product may not be disposed of in the domestic refuse within the European Union. Dispose of the appliance via communal collection points.
Guarantee
We will remedy any faults due to material flaws or manufacturing faults free of charge within the guarantee period of two years.
For commercial or equivalent use, e.g. in hotels, guest houses or communal premises, or if the customer is not a consumer as defined by the German Civil Code, the guarantee period shall be six months. This does not infringe the warranty disclaimer.
The guarantee does not cover faults caused in particular by improper use, failure to observe instructions in the user manual and safety precautions, use of force, modifications, unauthorised attempted repairs and attempted repairs by unqualified third parties. Faults caused by normal wear are also excluded.
Please visit our website www.beem.de to obtain more information on comprehensive guarantee conditions, available accessories and spare parts as well as user manuals in various languages
Symbols used
DANGER
This indicates an imminent hazardous situation, which could lead to severe physical injury or death.
Follow these instructions to avoid ▶ danger.
WARNING
This indicates a possible hazardous situation, which could lead to physical injury.
Follow these instructions to avoid ▶ danger.
ATTENTION
This indicates a potentially hazardous situation, which could lead to material damage.
Follow these instructions to avoid ▶ danger.
NOTE
A note contains additional information to simplify the use of the appliance.
Intended use
This appliance is intended primarily for non-commercial use in closed rooms for stirring food, kneading dough and whipping cream or egg whites in normal domestic quantities. If used commercially, please observe the conditions of the modified guarantee period.
Any use other than previously stated is considered as improper use.
WARNING
If not used for its intended purpose and/or used in any other way, the appliance may be or become a source of danger.
Use the appliance only for its intended purpose.
Observe the procedures described in this user manual.
No claims of any kind will be accepted for damage resulting from use of the appliance for other than its intended purpose.
The risk must be borne solely by the user. If used commercially, please pay attention to the changes in the guarantee period.
Limitation of liability
All technical information, data and instructions contained in this user manual represent the latest status at the time of printing.
No claims can be made based on the specifications, illustrations and descriptions of this user manual.
The manufacturer assumes no liability for damage or injury resulting from failure to observe the user manual, use for other than the intended purpose, unprofessional repairs, unauthorised modifications or use of non-approved spare parts and/or consumables.
Declaration of Conformity
BEEM hereby declares that this appliance complies with the fundamental requirements and other relevant provisions of 2006/95/EC and 2004/108/EC directives. The full declaration of conformity can be found under www.beem.de.
Safety instructions
Persons (including children) who are unable to operate the appliance due to their physical, mental or motor response abilities may only use the appliance under supervision or instruction by a responsible person.
Make sure that children do not play ■ with the appliance.
Inspect the appliance for visible signs of damage before use. Do not use a damaged appliance.
Do not leave the appliance unattended during operation.
Never use the appliance after a malfunction, for example, after it has fallen down or if it has been damaged in any other way.
Never open the appliance nor remove covers or housing parts.
Only allow repairs to the appliance ■ to be carried out by an authorised specialist or by the works customer service; this particularly applies to replacing a damaged connecting cable. Unqualified repairs can lead to considerable danger for the user. They will also invalidate the guarantee.
Repairs to the appliance during the guarantee period may only be carried out by service centres authorised by the manufacturer, otherwise the guarantee will become invalid in the event of damage or subsequent damage.
Defective parts may only be replaced with original spare parts. Only original spare parts guarantee that the safety requirements are met.
DANGER
Danger from electric current!
Pull the plug out of the mains socket, if you are not using the appliance, - before you insert or remove stir- ring tools, if a malfunction occurs during op- eration, before you clean the appliance.
Never immerse the appliance or the mains plug in water or other liquids. Do not rinse them under running water.
Do not use the appliance if the housing, mains cable or mains plug is damaged.
Do not open the housing of the appliance. Danger from electric current if live connections are touched and/or the electrical and mechanical configuration is changed.
Keep the connecting cable away ▶ from the rotating stirring tools.
Risk of suffocation!
▶ Never play with packaging material. Risk of suffocation.

WARNING
Risk of injury from rotating parts!
Always disconnect the mains plug ▶ before assembling, disassembling, cleaning or storing the appliance.
To prevent injury during operation, ▶ avoid any contact of your fingers, hair, clothing, dough scrapers, knives and other tools with the stirring tools.
After switching off, wait until the appliance has completely stopped.
Danger of burns!
Do not use the appliance during ▶ cooking or with hot liquids.
Only use the original kneading and stirring hooks for processing food with this appliance.
Risk of acid burns!
Do not use this appliance to process vinegar or lemon essence.
ATTENTION
Only use the accessories supplied. Use of other parts can lead to personal injury or damage to property.
Do not pull the connecting cable ▶ to remove the plug from the mains socket.
When using for prolonged periods ▶ of time, allow the appliance to cool down occasionally to avoid overheating.
Do not use fragile receptacles made of materials such as thin glass or fine porcelain when working with the appliance.
Do not use sharp objects or abrasive cleaning agents to clean the surfaces.
Requirements for the place of use
For safe and trouble-free operation of the appliance, the place of operation must satisfy the following requirements:
Do not operate the appliance in the immediate vicinity of sinks.
Do not operate the appliance in the ■ vicinity of gas flames, electric hotplates or other sources of heat. The appliance can be damaged by the effect of external heat sources.
■The mains socket must be easily accessible and allow fast disconnection in the event of an emergency.
Electrical connection
For safe and trouble-free operation of the appliance, the following instructions on the electrical connection must be observed:
Before connecting the appliance, ■ compare the connection data (voltage and frequency) on the rating plate with those of your mains power supply. The data must correspond in order to avoid damage to the appliance. If in doubt, ask your electrical appliance retailer.
The mains socket must be protected by at least a 10 A automatic circuit breaker.
Ensure that the mains cable is undamaged and is not laid over hot surfaces or sharp edges.
The connecting cable must not be ■ strained or bent.
Always unwind the mains cable completely before connecting the appliance to the mains socket.
Do not allow the connecting cable to hang over edges (trip wire effect).
The electrical safety of the appliance is only assured when it is connected to a properly installed protective earth (PE) conductor system. Connection to a mains socket without PE conductor is forbidden. If in doubt, the electrical system must be checked by a qualified electrician. The manufacturer assumes no liability for injury or damage caused by a missing or interrupted protective earth conductor.
Appliance description
(see illustration on the left fold-out)
Hand mixer1
Mains connecting cable2
Pedestal3
Handle4
Ejector button5
Turbo button6
7 Speed controller
8 Lighting
9 Stirring tool socket
10 Scraper socket
Stirring hook11
12 Kneading hook
13 Scraper
14 Hand spatula
15 Mixer stand
16 Hand mixer socket
17 Hand mixer release
"Tip" release18
19 Scales display
20 Scales ON/OFF switch
21 Tare button
22 Base with integrated scales
23 Mixing bowl with drive gear teeth
24 Lid, mixing bowl
25 Feeder opening
26 Lid recess
27 User manual (not illustrated)
Speed controller
Level Function
| 0 Appliance switched off. | |
| 1 - 4 | Continuous operation: Position 1: lowest speed Position 4: highest speed |
| Maximum speed for pressing the switch. | |
Before using for the first time
Unpacking
Remove the appliance, all accessory parts and the user manual from the box.
Remove all packaging materials and protective foils from the product and the accessories before using it for the first time.
NOTE
Do not remove the rating plate or any warning signs on the appliance. If possible, keep the original packaging during the guarantee period in order to be able to pack the appliance properly in the event of a guarantee claim. Transport damage will invalidate the guarantee.
Check the delivery contents
Check for visible signs of damage or missing items.
Report incomplete or damaged contents to your supplier immediately.
Before using for the first time
Clean the appliance and the accessories as described in the section Cleaning and care (page 25).
Operating the hand mixer
Switching on and off
Push the speed regulator (7) to the right to switch on the appliance. The speed can set from level 1 to level 4. The higher the level, the faster the mixer speed.
To switch to maximum speed, press the Turbo button (6).
To switch off the appliance, push the speed regulator (7) to the left to level 0.
Inserting the stirring tools/scraper (image A1, A2)
Pull the plug out of the mains socket before inserting/replacing the stirring tools (11/12) and the scraper (13).
Insert the stirring tools (11/12) into the opening on the socket on the underneath of the appliance one after another until they snap in. The stirring tool with the cogwheel on the shaft must be inserted into the larger opening of the hand mixer, the stirring tool with the stud is inserted into the smaller opening (image A1).
Insert the scraper (13) into its socket in the appliance (10; image A2)
WARNING
Never insert the scraper (13) into the hand mixer.
NOTE
Only insert stirring tools of the same type into the appliance.
Removing the stirring tools/scraper (image B1)
ATTENTION
Press the ejector button (5) only ▶ when the appliance has stopped completely.
Press the ejector button (5) down-♦ wards to remove the stirring tools (image B1).
To remove the scraper, simply pull it ♦ out of its socket (10).
Using the hand mixer (image C1-C3)
Use a tall receptacle made of plastic or stainless steel for stirring or kneading.
If necessary, remove the hand mixer. Press the release (17) and pull it up to remove it from the appliance (image C1).
If required, (see instructions for use) insert the stirring hook (11) or the kneading hook (12) into the appliance as described in the section Inserting the stirring tools/scaper (page 20).
Insert the plug into the mains socket.
Immerse the stirring tools into the ingredients.
Switch on the hand mixer with the speed controller (7) and set the desired speed.
A blue indicator light switches on during operation to provide optimum visibility for the dough (image C2).
NOTE
The tougher the mass to be stirred, the slower the speed to be set (see Speed table page 23).
If you decide to take a break, place the appliance upright on its pedestal (3) so that drips can drip from the stirring tools into the stirring receptacle (image C3).
Switch off the hand mixer before re- moving it from the stirred mixture in order to avoid soiling.
Remove the stirring tools from the appliance as described in the section Removing the stirring tools (page21).
◆Clean the appliance as described in the section Cleaning and care (page 25).
Using the mixer stand
The hand mixer can be used on a mixer stand. Together with the integrated scales, this provides you with a convenient food processor.
Operating the scales
The mixer stand is equipped with an integrated scales for exact weighing of the ingredients. To use the scales, proceed as follows:
◆ Put the mixing bowl onto the base of the mixer stand (22).
◆Press the ON/OFF switch (20) to switch on the scales.
If necessary, press the tare button (21) to set the scales to "0".
Add the ingredients to the mixing bowl until the desired weight has been reached
NOTE
Reset the scales to "0" after adding each ingredient by pressing the tare button (21) in order to weigh in additional ingredients.
Do not exceed the permitted overall weight of approx. 3 kg when filling the mixing bowl with ingredients.
Press the ON/OFF button (20) to switch off the scales or wait until they switch off automatically after approx. one minute.
The scales only work correctly when the hand mixer socket (16) is folded up.
Stirring with the mixer stand (images D1, D2)
To use the mixer stand with the hand mixer, lock the hand mixer into the socket of the mixer stand (16).
Proceed as follows:
Insert the required stirring tools into the hand as describe in the section Inserting the stirring tools/scraper page 20.
Lock the hand-held appliance in the socket of the mixer stand (16) so that it snaps in.
Insert the scraper (13) into its socket (10) on the mixer stand as described in the section Inserting the stirring tools/scaper page 20.
Fill the mixing bowl (23) with the ingredients as described in the section Operating the scales (page 21).
Push the lid of the mixing bowl (24) ◆ into the socket (26; image D1) on the mixer stand.
- Press the release button (18) of the mixer stand to lower the hand mixer - into the mixing bowl (image D2). - Switch on the hand mixer.
After filling the ingredients, open the feeder opening in the lid (25) to refill with further ingredients.
After stirring, press the release button (18) and tip the hand mixer upwards. Remove the mixing bowl to continue processing the contents.
NOTE
The mixing bowl revolves automatically during stirring. The scraper (13) removes the ingredients from the edges to achieve optimum mixing.
Disassembling the mixer stand
After using the mixer stand, disassemble and clean it as follows:
◆Press the release button (17; image C1) to remove the hand mixer.
Remove the stirring tools from the appliance as described in the section Removing the stirring tools/scaper (page 21).
Remove the scraper as described in the section Removing the stirring tools/scaper (page 21).
Clean the accessories as described in the section Cleaning and care (page 25).
Instructions for use
Table of use
| Stirring tool | Application Level Duration | ||
| Kneading hook | For kneading thick doughs such as yeast, bread or pasta dough. | 1 - 3 | 5-10 minutes |
| Stirring hook | For whisking egg whites, cream, mousse, junket, mayonnaise or for stirring medium thick doughs such as sponge cakes or biscuits. | 3 - 5 | 2-5 minutes |
Speed table
| Level | Application |
| 1 | Kneading thick dough ■ |
| 2 | Mixing dry ingredients at low speed ■Mixing liquid ingredients ■Adding liquids ■ |
| 3 | Kneading crumble ■Alternate addition of dry and liquid ingredients, ■■Mixing stirred cake at medium speed■Butter cream■Icing sugar■Mashed potato |
| 4 | ■Beating egg whites■Whipping cream |
 | ■Switch to maximum speed. |
Recipe suggestions
Whipped cream
Ingredients:
600 ml whipping cream (well cooled, -30 % fat)
3 packet of vanilla sugar –
3 packets of cream stiffener –
Add the whipping cream to the mixing bowl, insert the stirring hooks and the scraper and run the motor at high speed. Add the vanilla sugar and cream stiffener while stirring and whip the cream until it is stiff.
Stirred cake
Ingredients:
250 g of soft butter –
200 g of sugar -
5 eggs -
1 packet of vanilla sugar –
100 g ground hazel nuts –
100 g grated chocolate –
500 g of flour –
1 packet of baking powder –
1 cup of milk –
Fit the scraper and stirring hooks and beat the sugar and vanilla sugar at low level until it foams. While stirring, add the eggs one by one. Weigh in the flour and add the baking powder. Stir the flour, baking powder and milk together. Finally mix in the hazel nuts and the chocolate. Put the batter into a greased cake tin. Bake the cake at medium heat (175 °C) for approx. 45 minutes.
Yeast dough
Ingredients:
500 g wheat flour (type 405) -
250 ml of milk –
80 g melted butter
70 g of sugar –
2 egg yolks
4 yeast cube
1 pinch of salt –
Add the flour to the bowl and form a hollow in the middle. Dissolve the yeast in lukewarm milk and pour it into the hollow. Cover the bowl with a kitchen towel and allow the dough to rise at a warm draught-free location for 15 minutes.
Put the mixing bowl onto the mixer stand. Fit the kneading hooks. Switch on the appliance at a low speed. Add the rest of the ingredients to the dough and allow the appliance to knead until the dough is even and does not stick to the sides of the bowl. Remove the mixing bowl from the appliance. Cover the the bowl with a kitchen towel again and leave it at a warm location for 30 minutes. The yeast dough is then ready for further processing. This dough can be processed further as pizza base, yeast bun, sweet rolls as required.
Example: take the yeast dough out of the bowl with floured hands and roll it out to a size that will fit onto a baking tray covered with baking paper. Put fruit, e.g., pieces of apple or quartered plums onto the rolled-out dough. Sprinkle a little sugar or crumble over the fruit and then bake the yeast cake at medium heat (175 °C) for roughly 30 minutes.
Crumble
Ingredients:
600 g of flour –
1 pinch of salt –
400 g of sugar -
400 g butter -
a little cinnamon, as required –
Weigh the ingredients into the mixing bowl in the above-mentioned order. Insert the kneading hooks and the scraper into the appliance. Switch on the appliance and stir the ingredients. The crumble dough is ready when it looks crumbly. Spread the crumbs onto the fruit on the cake.
Cleaning and care
Before beginning work, pay attention to the safety instructions in the section Safety instructions (page 17)!
Cleaning the appliance
Switch off the appliance and pull the plug out of the mains socket.
Clean the stirring tools, the scraper, ◆ the spatula and the mixing bowl with warm water and washing up liquid or put them into the dishwasher.
Wipe the hand mixer and the mixer ♦ stand with a damp cloth.
Dry all parts thoroughly before reas-sembly.
NOTE
The mixing bowl, stirring tools, ▶ scraper and spatula are suitable for dishwashers.
Storage
If you do not intend to use the appliance for a longer period of time, clean it as described in the section Cleaning and care Cleaning and care (page 25).
Store the appliance and all accessory parts at a dry, clean and frost-free location, which is protected against direct sunlight.
Technical data
| Model | Multi-MiXXfood processor andhand mixer |
| Type number M29.001 | |
| Dimensions(H x W x D) | 230 x 370 x 340 mm |
| Net weight 2.81 kg | |
| Operating voltage | 220 - 240 V~ |
| Mains frequency | 50/60 Hz |
| Power | 300 W |
| Protection class | II |
| Type of protection | IPXO |
Spare parts and other accessories
| Item* Article No. Designation | |
| 23 900795011 Mixing bowl | |
| 11.12 900795016 Stirring and kneading hooks | |
| 24 900795021 Lid, mixing bowl | |
| 13 900795026 Scraper | |
| 14 900795031 Hand spatula |
* numbering according to the description of the appliance
Troubleshooting
The following table will help you locate and eliminate minor faults:
| Fault Possible cause Remedy | ||
| Plug not inserted into socket. Insert plug. | ||
| The appliance does not work after turning the speed controller. | Automatic circuit breaker in electrical distribution board tripped. | Switch on the automatic circuit breaker again. |
| The internal safety switch has switched off the appliance as a result of overheating. | Allow the appliance to cool down. | |
| The automatic circuit breaker in the electrical distribution board trips. | Too many appliances connected to the same power circuit. | Reduce the number of appliances on the power circuit. |
| No fault detected. | Contact customer service. | |
| Motor runs extremely slowly or stops. | Dough is too thick. Add liquid. | |
NOTE
If you cannot resolve the problem with the steps described above, please contact customer service.
Sommaire
natural_image
Close-up of a gloved hand using a power tool on a white electric shaver (no visible text or symbols)
natural_image
Close-up of a hand holding a small mechanical component with a circular annotation (no visible text or symbols)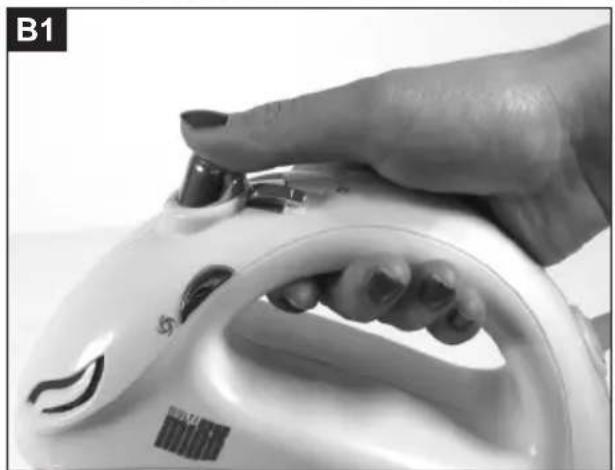
natural_image
Close-up of a hand using a white electric vacuum cleaner with a handle (no visible text or symbols)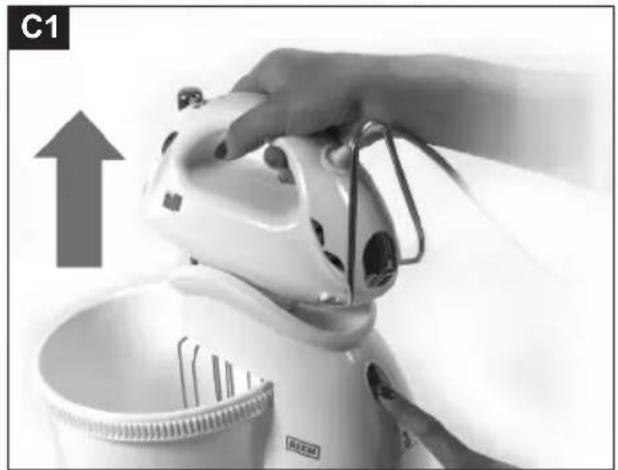
natural_image
Close-up of a hand using an electric motor to press down a cup of food (no visible text or symbols)
natural_image
Close-up of a hand using an electric iron shaver to handle a small glass container (no text or symbols visible)
natural_image
White electric hand mixer with metal handles, no visible text or symbols on the device itself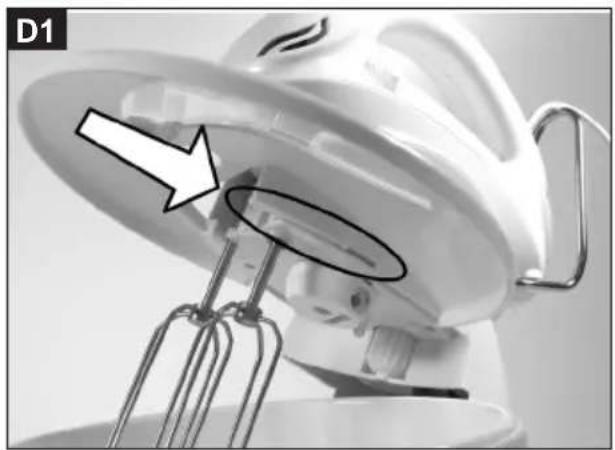
natural_image
Close-up of a white industrial machine with a metal stand and a magnified circular component, no visible text or symbols.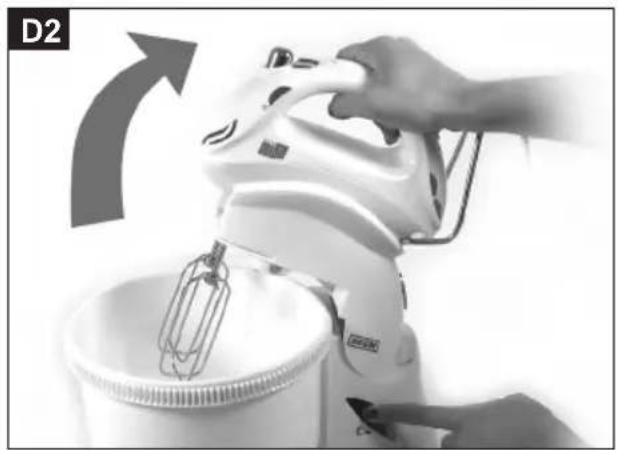
natural_image
Close-up of a hand using a white kitchen mixer with a whisk, showing a hand holding the motor and a hand adjusting it (no text or symbols visible)Elements of Lifestyle

BEEM GmbH
Subject to printing error.
For service in other countries contact your local dealer.



- Inhalt
- General instructions
- Copyright
- Notes on environmental protection
- Guarantee
- Symbols used
- DANGER
- WARNING
- ATTENTION
- NOTE
- Intended use
- Limitation of liability
- Declaration of Conformity
- Safety instructions
- Requirements for the place of use
- Electrical connection
- Appliance description
- Speed controller
- Before using for the first time
- Unpacking
- Check the delivery contents
- Operating the hand mixer
- Switching on and off
- Inserting the stirring tools/scraper (image A1, A2)
- Removing the stirring tools/scraper (image B1)
- Using the hand mixer (image C1-C3)
- Using the mixer stand
- Operating the scales
- Stirring with the mixer stand (images D1, D2)
- Disassembling the mixer stand
- Instructions for use
- Recipe suggestions
- Whipped cream
- Stirred cake
- Yeast dough
- Crumble
- Cleaning and care
- Cleaning the appliance
- Storage
- Sommaire
Brand : BEEM
Model : MultiMixx
Category : Hand blender