
BSR 1282 - Vacuum Cleaner CLATRONIC - Free user manual and instructions
Find the device manual for free BSR 1282 CLATRONIC in PDF.

User questions about BSR 1282 CLATRONIC
0 question about this device. Answer the ones you know or ask your own.
Ask a new question about this device
Download the instructions for your Vacuum Cleaner in PDF format for free! Find your manual BSR 1282 - CLATRONIC and take your electronic device back in hand. On this page are published all the documents necessary for the use of your device. BSR 1282 by CLATRONIC.
USER MANUAL BSR 1282 CLATRONIC
natural_image
Red and white robotic vacuum cleaner with blue hood and control buttons (no visible text or symbols)CE
DEUTSCH
Inhalt
Overview of the Components ...... Page 3
Illustrations Page 4
Instruction Manual Page 30
Technical Data Page 33
Disposal Page 33
JEZYK POLSKI
Spis treści
Unterseite
Onderaanzicht • Vue du dessous • Vista inferior • Vista inferior Visione dal basso • Bottom View • Widok z dołu • Alulnézet • Вид знизу • Вид снизу
Abbildungen
Afbeeldingen • Illustrations • Ilustraciones • Figuras • Ilustrazioni • Illustrations • Ilustracje • Illusztrációk • Малюнки • Иллюстрации
natural_image
Technical line drawing of a mechanical assembly with labeled component A (no text or symbols present)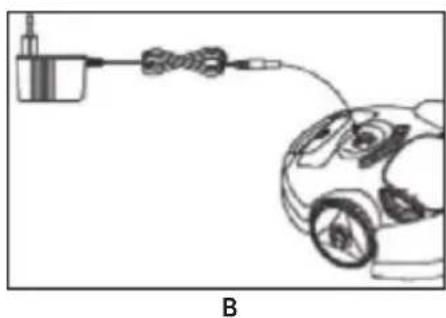
natural_image
Diagram of an electric vehicle connected to a battery and cable, showing wiring (no text or symbols)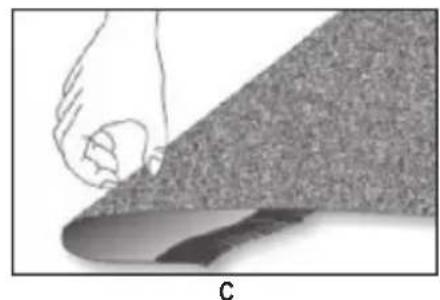
natural_image
Illustration of a hand pressing down on a textured surface, labeled 'C' at the bottom (no text or symbols on the diagram itself)
natural_image
Technical line drawing of a mechanical device with internal components and a top component (no text or symbols)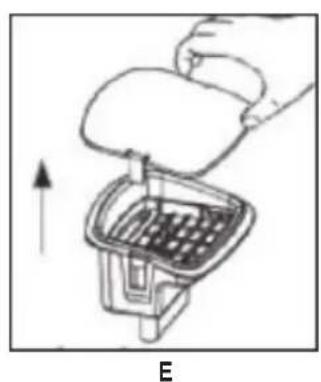
natural_image
Illustration of a hand placing a component into a container with an upward arrow, labeled 'E' (no text or symbols on the diagram itself)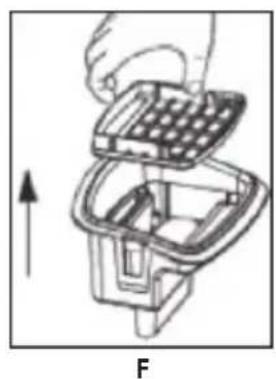
natural_image
Diagram of a hand holding a grid-based device with an arrow indicating upward motion (no text or symbols)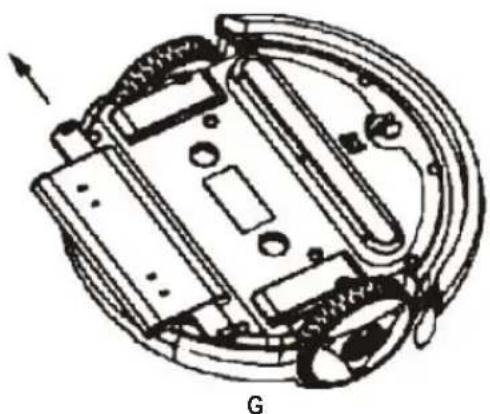
natural_image
Technical diagram of a mechanical device with internal components and a labeled section G (no text or symbols beyond label)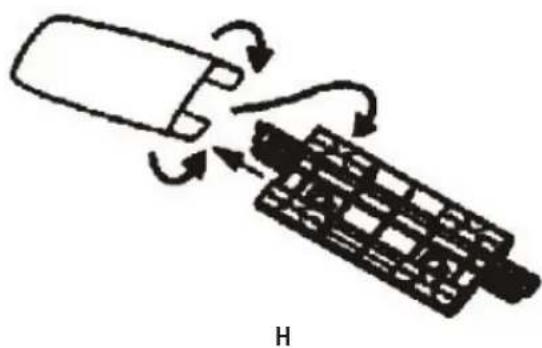
natural_image
Diagram of a mobile phone with a hand inserting a card into a keyboard (no text or symbols)Bedienungsanleitung
Thank you for choosing our product. We hope you will enjoy using the appliance.
General Safety Instructions
Read the operating instructions carefully before putting the appliance into operation and keep the instructions including the warranty, the receipt and, if possible, the box with the internal packing. If you give this device to other people, please also pass on the operating instructions.
- The appliance is designed exclusively for private use and for the envisaged purpose. This appliance is not fit for commercial use.
- The power adaptor is only intended for use in dry environments.
- Ensure that output power, voltage, and polarity of the power adapter match the specifications on the type label!!
- Do not touch the connected power adaptor with wet hands!
- Disconnect from mains power supply before cleaning.
- Ensure that the mains cable is not bent or kinked; do not walk or drive over the cable; do not subject the cable to heat sources.
- The device and the mains lead have to be checked regularly for signs of damage. If damage is found the device must not be used.
- Do not try to repair the appliance on your own. Always contact an authorized technician. To avoid the exposure to danger, always have a faulty cable be replaced only by the manufacturer, by our customer service or by a qualified person and with a cable of the same type.
- Use only original spare parts.
- Pay careful attention to the following "Special Safety Instructions".
Symbols in these Instructions for Use
Important information for your safety is specially marked. It is essential to comply with these instructions in order to avoid accidents and prevent damage to the machine:
WARNING:
This warns you of dangers to your health and indicates possible injury risks.
CAUTION:
This refers to possible hazards to the machine or other objects.
i NOTE:
This highlights tips and information.
Children and Frail Individuals
- In order to ensure your children's safety, please keep all packaging (plastic bags, boxes, polystyrene etc.) out of their reach.
WARNING!
Caution! Do not allow small children to play with the foil as there is a danger of suffocation!
- This device is not intended to be used by individuals (including children) who have restricted physical, sensory or mental abilities and/or insufficient knowledge and/or experience, unless they are supervised by an individual who is responsible for their safety or have received instructions on how to use the device.
• Children should be supervised at all times in order to ensure that they do not play with the device.
Special Safety Instructions
WARNING:
- Never try to repair the adaptor yourself, always contact the customer service.
- Avoid skin, eye, and mucosa contact with the battery acid in case of battery leakage. In case of contact with battery acid, flush immediately with clear water and contact a physician.
- Remove a leaking battery immediately from the appliance. Clean the terminals before inserting a new battery.
-
Do not disassemble, burn, submerge, or short-circuit the battery.
-
Only use the supplied power adaptor.
- Do not suck up liquids!
- Do not suck up hot ashes or pointed or sharp objects!
- Do not use the device in damp rooms!
- Never use without the filter. Check that the filter is inserted correctly!
- Ensure that your floor is free of objects which could get caught in the brushes or in the nozzle or which could obstruct the appliance during cleaning, before taking the appliance into operation. Ensure that the appliance cannot get caught in cables or curtains. It could for instance get caught in the cable of a table lamp and drag it off the table.
- Do not insert any foreign objects into the appliance. They could touch live components.
- Turn the appliance off if liquids or foreign objects have entered the casing. Have the appliance checked before using it again.
- Store the appliance dry and at temperatures between 0 °C and 40 °C.
- Do not place heavy objects on top of the appliance. Protect the appliance from heat, open flames, direct sunlight, moisture, and vibration. Do not drop the appliance.
- Do not lubricate the rollers. This would lead to dust or dirt sticking to the rollers.
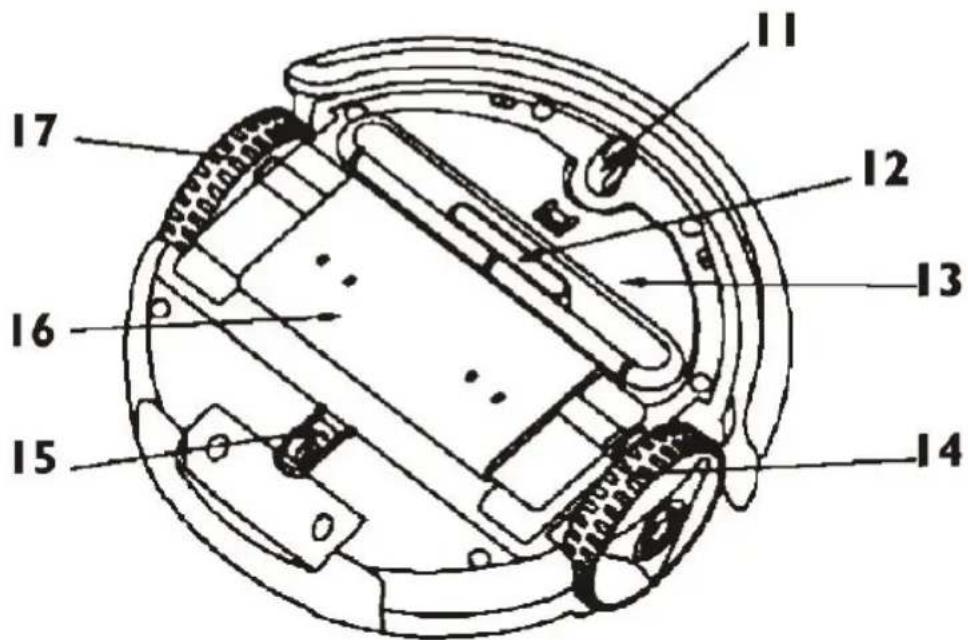
Overview of the Components
1 On/OFF switch
2 Dust container
3 Unlock buttons dust container
4 Status indicators
5 Shock absorbers
6 Drive wheel
7 Ventilation openings
8 Carrying handle
9 Battery compartment
10 Adaptor jack
11 Front wheel
12 Nozzle
13 Suction aid
14 Drive wheel
15 Rear wheel
16 Floor cloth holder
17 Drive wheel
Basic Functions
- The appliance vacuums loose dust through the nozzle. For more efficient cleaning, a floor cloth is attached (at the bottom).
- The appliance changes direction after touching a wall or other obstructions.
- The sensor at the bottom recognizes steps and hollows, so that the appliance cannot fall down.
Start-up

NOTE:
Direct mains power operation is not possible.
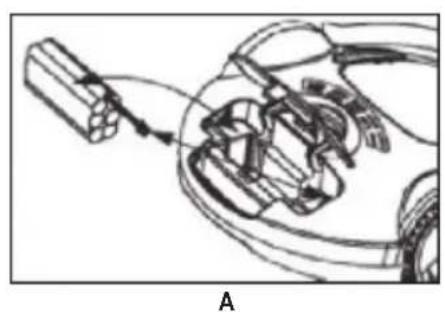
Connect the Battery Cable (Fig. A)
- Ensure that the appliance is not connected to mains power.
- Open the battery compartment: Slightly press the lid down and lift it up.
- Insert the battery cable plug into the jack inside the battery compartment.
- Close the battery compartment.
Charge the Battery (Fig. B)

CAUTION:
Place the mains cable in such way that it does not become a trip hazard.
- The adaptor jack (10) is next to the On/Off switch (1).
- Lift the jack cover and connect the adaptor cable.
- Connect the adaptor's mains plug to a freely accessible wall outlet.
-
Charging starts. The green status indicator (4) starts flashing.
-
The green status indicator (4) lights up as soon as the battery is fully charged. Disconnect the appliance from mains power and close the cover.
-
Your appliance is now ready to use.

NOTE:
Charging takes 12 hours before first use and 6 hours for following charges.
Operating Instructions
Prepare the Room

CAUTION:
- Observe the appliance if you are using it in a room, to remove obstructions, if necessary, so that the appliance effectively can clean the entire room.
- The appliance is not suitable for plush/deep pile carpeting.
- Ensure that your floor is free of objects which could be caught in the nozzle or which could obstruct the appliance during cleaning. Especially, leave no plastic bags lying on the floor.
- Ensure that the appliance cannot come into contact with cables, cords or fringes of curtains, table cloths, or carpets. Fold carpet fringes under the carpet. (Fig. C)
- Remove all objects which could tip over (e.g. vases, small lamps, decorations).
- The distance between two objects (e.g. wall and shelf) must be at least 40 cm for the appliance to fit through.
- The appliance can get stuck under furniture, which is just high enough off the floor. Block the way, for instance with pot plants, which are heavy enough not to be tipped over.
Use Instructions

CAUTION:
- Do not leave the appliance without supervision during operation, so you can interfere if it is obstructed by furniture/objects.
-
Switch the appliance immediately off if something gets stuck in the nozzle and remove the obstruction.
-
Ensure that the dust container is empty, attached, and free of dirt (see chapter "Cleaning and Maintenance").
- Place the appliance in the center of the room to be cleaned.
- Set the On/Off switch to position I to switch the appliance on. The appliance starts cleaning the floor. The green and red status indicators are flashing in turn. The appliance changes direction upon touching an obstruction.
- The appliance cleans the floor until it is switched off (On/Off switch in position O) or the battery is exhausted. The flashing red status indicator signals an empty battery. Charge the battery as described in chapter "Charge the Battery".
- Empty the dust container after every use and remove dirt as described in the following chapter.
Cleaning and Maintenance

WARNING:
• Always disconnect the device from the power adaptor before cleaning!
- Do not submerge the device in water. Only the dust container and the filter can be rinsed off.

CAUTION:
- Do not use a wire brush or other abrasives for cleaning.
- Do not use aggressive or abrasive cleaning agents.
Clean the casing with a dry cloth.
Ensure before and after each use that the nozzle and the ventilation openings are clean. For best performance, you should empty the dust container and clean the filter after every use.
Empty the Dust Container and Clean the Filter

CAUTION:
- Replace all parts only when they are completely dry!
- Do not wash the filters in the washing machine and do not use a hair dryer.

NOTE:
Use a brush to clean the filter.
- Press the two unlock buttons (3) of the dust container down to loosen the dust container.
- Lift the dust container out of the appliance. (Fig. D)
- Carefully remove the dust container cover. Slightly pull one of the locks on the side slightly away from the dust container to unlock the cover. (Fig. E)
- Hold the dust container over a dustbin and remove the filter. (Fig. F)
- Empty the container into the dustbin and carefully beat or brush off the filter.
-
Both components can be cleaned under running water. They must be completely dry before being replaced.
-
Brush out the container compartment in the appliance before replacing the dust container. Turn the appliance upside down and brush off the nozzles and the bottom of the appliance. Wipe the casing with a dry or slightly damp cloth.
- Replace the filter in the dust container (the plastic grid must be aligned upward).
- Replace the dust container in the appliance so that it clicks into place.
Clean/Replace/Attach the Floor Cloth
Over time, dirt can collect on the floor cloth. You can clean or replace the floor cloth.
- Turn the appliance upside down and place it on the floor or on a table.
- The floor cloth is attached to a plastic holder (16). It is attached to the appliance on the left and right sides next to the drive wheels (14) and (17). Take the narrow end piece of the holder between your fingers and pull it outward towards the drive wheel until it comes free. Now you can remove the holder from the appliance. (Fig. G)
- Turn the holder around and pull the cloth out of the 4 clips.
- Now you can wash it in lukewarm water and a mild detergent. The supplied cloths are not suitable for the washing machine! Leave the cloth to dry completely before using it again.
- Dispose of the cloth after it is worn and use a new one. Place it in the holder and press the ends into the 4 clips. (Fig. H)
- Press the holder into the interlocks at the bottom of the appliance and check for proper fit.
i NOTE:
- You can also use commercially available cloths as a floor cloth.
- A screwdriver is supplied for easy attachment of the floor cloth.
Troubleshooting
| Problem Possible Cause Solution | ||
| The appliance does not work. | The battery is not properly connected. | Connect the battery properly (see chapter “Start-up”). |
| The battery is not charged. Charge the battery (see chapter “Start-up”). | ||
| The battery is not charged. The green status indicator does not flash. | The appliance is not properly connected to the adaptor and/or the adaptor is not properly connected to a mains power supply. | Connect the adaptor properly to the appliance and the wall outlet. |
| Wall outlet is defective. Try a different wall outlet. | ||
| Adaptor is defective. Contact customer service. | ||
| The battery is not being charged. The green status indicator flashes. | Appliance is defective. Contact customer service. | |
| Insufficient suction power. Nozzle | is blocked. Clean the nozzle. | |
| Dust container is full. | Empty the dust container. | |
| Filter is dirty. | Clean the filter. | |
| Floor cloth is dirty. | Clean or replace the floor cloth. | |
Noise development
The sound pressure level in the ear of an operator (LpA) was measured according to DIN EN ISO 3744.
Sound pressure level detected: 70 dB(A) (no limit)
Technical Data
Model: BSR 1282
Net weight: 1.85 kg
Power Adaptor
Protection class: II
Input: AC 220-240 V, 50/60 Hz
Output: DC 16.8 V, 300 mA
Polarity: ____
Batteries: 12 x 1.2 V, 800 mAh
Operating time: max. 30 minutes
Charging time: 6 hours
Subject to technical changes without prior notice!
This device has been tested according to all relevant current CE guidelines, such as electromagnetic compatibility and low voltage directives, and has been constructed in accordance with the latest safety regulations.
Disposal
Remove Batteries / Battery Disposal
This device contains rechargeable Ni-MH batteries.
Remove the batteries before disposing of the device.
You are bound by law to return used batteries.
WARNING
- Disconnect from mains power supply before removing the batteries!
-
Remove the batteries only in discharged condition.
-
Open the battery compartment: Press the lid slightly down and open.
- Remove the adaptor cable plug from the jack in the battery compartment.
- Remove the battery pack.
Return the battery pack at a collection point for exhausted batteries. Enquire at your municipal offices for further information.
Meaning of the "Dustbin" Symbol
Protect our environment: do not dispose of electrical equipment in the domestic waste.
Please return any electrical equipment that you will no longer use to the collection points provided for their disposal.
This helps avoid the potential effects of incorrect disposal on the environment and human health.
This will contribute to the recycling and other forms of reutilization of electrical and electronic equipment.
Information concerning where the equipment can be disposed of can be obtained from your local authority.
Instrukcja obsługi

- DEUTSCH
- Inhalt
- JEZYK POLSKI
- Spis treści
- Unterseite
- Abbildungen
- Bedienungsanleitung
- General Safety Instructions
- Symbols in these Instructions for Use
- WARNING:
- CAUTION:
- i NOTE:
- Children and Frail Individuals
- WARNING!
- Special Safety Instructions
- Overview of the Components
- Basic Functions
- Start-up
- NOTE:
- Connect the Battery Cable (Fig. A)
- Charge the Battery (Fig. B)
- Operating Instructions
- Prepare the Room
- Use Instructions
- Cleaning and Maintenance
- Empty the Dust Container and Clean the Filter
- Clean/Replace/Attach the Floor Cloth
- Noise development
- Technical Data
- Power Adaptor
- Disposal
- Remove Batteries / Battery Disposal
- WARNING
- Meaning of the "Dustbin" Symbol
- Instrukcja obsługi
Brand : CLATRONIC
Model : BSR 1282
Category : Vacuum Cleaner