
WakeUp iPod Speaker 129.110.05 - Docking station Boynq - Free user manual and instructions
Find the device manual for free WakeUp iPod Speaker 129.110.05 Boynq in PDF.
| Product Type | Docking station / alarm clock for iPod |
| Brand | Boynq |
| Model | WakeUp iPod Speaker 129.110.05 |
| Dimensions (W x D x H) | 165 x 145 x 150 mm |
| Weight | 980 g |
| Power Supply | AC adapter 100-240V AC, output 18V DC / 1.33A |
| Speakers | 2 x 10W RMS (3 inches), extended range |
| FM Radio | Automatic search, 9 presets |
| Equalizer | Treble and bass control |
| iPod Compatibility | iPod with 30-pin connector (video, nano, mini, photo, classic, touch) |
| Alarm Functions | Wake by iPod, radio or buzzer; snooze function; sleep mode |
| Connectivity | Auxiliary input (3.5mm line-in), 3.5mm line-out |
| Sync | USB 2.0 port for iTunes sync |
| Remote Control | With snooze button, volume control, navigation |
| Display | LCD for time, radio and minutes |
| Care and Cleaning | Use a soft, dry cloth. Do not use abrasive products. |
| Safety | Use only the supplied adapter. Do not expose to moisture. |
| Spare Parts | 6 interchangeable iPod connectors provided (various models) |
| Repairability | Manufacturer support available at www.boynq.com |
| General Information | FCC Class B and ICES-003 compliant. Made for iPod. |
Frequently Asked Questions - WakeUp iPod Speaker 129.110.05 Boynq
User questions about WakeUp iPod Speaker 129.110.05 Boynq
0 question about this device. Answer the ones you know or ask your own.
Ask a new question about this device
Download the instructions for your Docking station in PDF format for free! Find your manual WakeUp iPod Speaker 129.110.05 - Boynq and take your electronic device back in hand. On this page are published all the documents necessary for the use of your device. WakeUp iPod Speaker 129.110.05 by Boynq.
USER MANUAL WakeUp iPod Speaker 129.110.05 Boynq
natural_image
Black BOYRQ smartphone models with digital display screens, displayed against a dark background (no readable text or symbols on devices)

boynq®

PRODUCT DRAWING & ACCESOIRES
PRODUCT DRAWING & ACCESOIRES
A. WakeUp
C. Inserts

natural_image
Diagram of stacked rectangular blocks with a numbered label '5' pointing to one block (no text or symbols on the blocks themselves)F. Power adapter

H. Equalizer Card

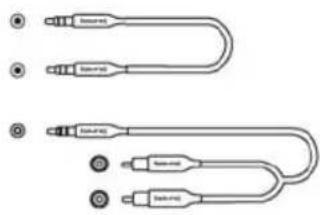
D. E. Cables
G. Instruction Manual

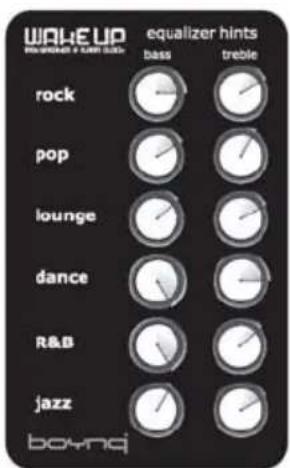
EQUALIZER
"WE HAVE PREPARED A SPECIAL EQUALIZER CARD THAT CAN HELP YOU TO ADJUST AND OPTIMIZE THE BASS AND TREBLE SETTINGS TO DIFFERENT STYLES OF MUSIC."
"ENJOY!"
... THE BOYNQ SOUND TECHNICIANS
PRODUCT DRAWING & ACCESOIRES
B. WakeUp Remote control


NOTICENOTICE
ENGLISH:
FCC REQUIREMENTS
This device complies with Part 15 of the FCC Rules. Operation is subject to the following two conditions: (1) this device may not cause harmful interference, and (2) this device must accept any interference received, including interference that may cause undesired operation.
Warning:
Changes or modifications to this unit not expressly approved by the party responsible for compliance could void the user's authority to operate the equipment.
Note:
This equipment has been tested and found to comply with the limits for a Class B digital device, pursuant to Part 15 of the FCC Rules. These limits are designed to provide reasonable protection against harmful interference in a residential installation. This equipment generates, uses and can radiate radio frequency energy and, if not installed and used in accordance with the instructions, may cause harmful interference to radio communications. However, there is no guarantee that interference will not occur in a particular installation. If this equipment does cause harmful interference to radio or television reception, which can be determined by turning the equipment off and on, the user is encouraged to try to correct the interference by one or more of the following measures:
Reorient or relocate the receiving antenna.
Increase the separation between the equipment and receiver.
Connect the equipment into an outlet on a circuit different from that to which the receiver is
needed.
Consult the dealer or an experienced radio/TV technician for help.
"This Class B digital apparatus complies with Canadian ICES-003."
FRANÇAIS:
RÉGLEMENTATIONS FCC
Correct Disposal of This Product
(Waste Electrical & Electronic Equipment)
(Applicable in the European Union and other European countries with separate collection systems)
This marking shown on the product or its literature, indicates that it should not be disposed with other household wastes at the end of its working life. To prevent possible harm to the environment or human health from uncontrolled waste disposal, please separate this from other types of wastes and recycle it responsibly to promote the sustainable reuse of material resources.
Household users should contact either the retailer where they purchased this product, or their local government office, for details of where and how they can take this item for environmentally safe recycling.
Business users should contact their supplier and check the terms and conditions of the purchase

Congratulations on purchasing your new high-quality 'Made for iPod', stereo speaker & Alarm clock with integrated docking station, better known as the "WakeUp™" by boynq ^® .
Quick start
The WakeUp™ is very easy in use. Just follows the steps below and be ready to enjoy!
Step 1) Connect the AC adaptor to the back of the WakeUp™ and the other end into a wall socket and press the on/off button.
Step 2) Set the clock to the correct time
Step 3) Take out the remote control and insert the correct insert matching your iPod
Step 4) Insert your iPod (please remove any 'skin' or case before inserting to prevent damage on the WakeUp™ or iPod)
Step 5) Select 'iPod' as audio source for the speakers, select your favorite tune on your iPod and press play.
Step 6) Enjoy!
Contents of the box:
A. WakeUp™
B. WakeUp ^TM remote control
C. 6 docking inserts; iPod video 30GB / iPod Video 60, 80GB / iPod nano 1 ^st & 2 ^nd generation / iPod 10, 15, 20GB models / iPodmini
D. Line-in cable (45 cm, 3.5mm jack to 3.5mm jack) / FM antenna
E. Line-out cable (100 cm, 3.5mm jack to double cinch)
F. Power adapter
G. Instruction manual
H. Equalizer Card
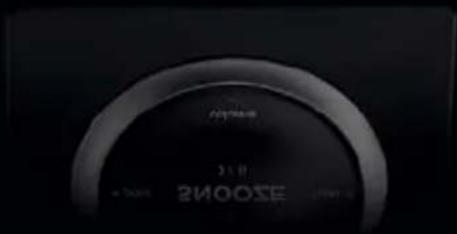
Product details:
1) Volume control, turn to adjust the volume (volume range is 00-40)
2) Treble control switch, turn to adjust the treble sound settings
3) Bass control switch, turn to adjust the bass sound settings
4) On/off button, push for switching the WakeUp™ on/off
5) iPoddock connector (male 30-pin)
6) Left integrated speaker (10W, 4 Ohm)
7) Right integrated speaker (10W, 4 Ohm)
8) Line-in connection (3,5mm), to connect auxiliary sound devices to the WakeUp™
9) Line-out connection (3,5mm), to connect the WakeUp™ to your Home stereo installation
10) iPod dock connector (female 30-pin), to enable data synchronization between the iPod and the computer
11) DC power jack
12) FM Radio Control buttons
13) Source, Brightness & Sleep Control buttons
14) Alarm/Set & Clock setting Controls
15) Remote Control
Press the power button on the WakeUp ^™ to put the WakeUp ^™ to sleep, press again to wake. The WakeUp ^™ can also be switched on and off via the remote control by keeping the Snooze button pressed for 5 sec.
Note: when the WakeUp ^™ is in Standby mode you can set the alarm without needing to switch the WakeUp ^™ on.
MANUAL WAKEUP™
ENGLISH
- Setting the time: Please note time will be displayed in 24H mode. Press & Hold HOUR or MIN until the Hour and Min display flashes. Press HOUR and MIN to set the time, after the time is set, wait for 5 sec without pressing a button to confirm the time.
- Selecting Audio Source: Press the SOURCE button to cycle through the selectable audio sources: iPod -> Radio -> Aux (line in) -> iPod
- Volume The ring around the Radio Display LCD is the Volume control of the WakeUp ^™ , turn clockwise to increase the Volume output and counter-clockwise to reduce.
- Adjust the EQ setting: To adjust the EQ setting of the WakeUp™ to your preference simply turn the Bass Ring (Hour Display LCD) and the Treble (Minute Display LCD). Clockwise will increase the Treble and Bass intensity, counter-clockwise will reduce the intensity. Note: Our team of Sound Technicians have prepared a special Equalizer Card that can help you to adjust and optimize the bass and treble settings to different styles of music.
Audio Souces:
- iPod
To enable playback from the iPod press SOURCE until iPod lights up. Select a song on your iPod and press play.
Press NEXT or PREVIOUS to select a different song. Please use the iPod controls when more detailed menu navigation is desired.
- Radio:
1) To enable Radio playback press SOURCE until Radio lights up. The Radio Display LCD will light up with the selected FM Frequency.
2) Press NEXT or PREV to manually select a frequency (frequency will increase or decrease by 0.1MHz)
3) Keep NEXT or PREV pressed to automatically search the next or previous available Radio Channel.
4) The WakeUp ^™ has 9 memory positions for Radio channels, press PRESET to cycle through the programmed channels
5) If a Channel which is found during manual or automatic search is stored on a Preset, FM and the corresponding preset number will blink in the display.
6) To store a frequency, please select a frequency and press PRESET until the Preset Number flashes. Select the desired preset number by NEXT and PREV. Press PRESET to final confirm to store the channel on the selected preset. A frequency can only be stored once.
Note: To improve radio reception please connect the Line in cable to the WakeUpTM, the line-in cable doubles as an FM antenna.
- Aux (line-in)
Connect an auxiliary audio device to the Line-in connection on the back of the WakeUp™ and press SOURCE to select AUX.
Audio playback through the WakeUp™ speaker system is now activated.
- Alarm:
To set the Alarm, please press and hold ALARM/SET until the Alarm flashes in the display. The alarm time (HOUR MIN), audio Source (SOURCE) and volume for alarm can now be set. Press ALARM/SET to confirm the Alarm configuration and Alarm will light up in the display. To disable the alarm please press Alarm.
MANUAL WAKEUP™
ENGLISH
Wake up with iPod:
1) On your iPod select the song, album or playlist you would like to wake up with and press play. If you select the last number of an album or playlist, please place the iPod in repeat mode to ensure the Alarm will keep playing music.
2) Put the iPod in Pause/Sleep mode (hold down play/pause button) and insert into the WakeUp ^™ .
3) The WakeUp™ can be put to sleep by pressing the on/off button. Please ensure the Alarm audio source is set to iPod.
To wake up with a buzzer sound, please select AUX as Audio source for the Alarm.
Sleep:
Press SLEEP until Sleep flashes in the display and adjust the preferred sleep time by pressing HOUR and MIN. Press Sleep to confirm the sleep timeout and sleep will be highlighted in the display to indicate the function is activated. Press SLEEP to deactivate the sleep function.
Good to know!
- Recharging: the iPod will recharge when docked in the WakeUp™ on the AC adapter and automatically when the USB docking cable is attached to the WakeUp™.
- Synchronization: To use the WakeUp ^™ as data synchronization docking station, please connect the original iPod USB docking cable (30-pin dock connector) to the WakeUp ^™ and the computer. No extra software, besides iTunes and iPod software is needed. Once the iPod is inserted into the WakeUp ^™ , the computer will automatically recognize the iPod.
- Line-in: Auxiliary sound devices such as iPod shuffle/ MP3 players/ MiniDisc or CD players, can be connected to the WakeUp™ Line-in connector at the back of the WakeUp™.
- Line-out: simply connect the supplied line-out cable to the line-out connection on the WakeUp™ and to a Line-in connection on your Home Stereo.
Specifications:
• Made for iPod Stereo Speaker & Alarm clock.
• FM Radio with auto scan feature and 9 Memory Presets.
- Alarm clock, wake up to your favourite iPod tune, Radio or buzzer.
- Remote control with Snooze button.
- Docking station for recharging the iPod.
- Docking station for data synchronization via USB.
• Enhanced 2 x 10W RMS full range drivers (3").
- Crisp, clear, powerful and distortion free high quality Audio.
- Treble and Bass EO control for optimal sound control.
- Including 6 different docking inserts to fit all iPod models.
- Stereo line-in connection for iPodshuffle and auxiliary audio devices (cable included).
- Stereo Line-out for connection to home stereo, (cable included).
- Magnetically shielded against High Frequency (mobile phone) interference.
• Power adaptor input 100\~240V, 18V DC/ 1.33A output.
• Frequency range 20Hz – 20KHz.
• Weight: 980 gr.
• Dimensions: 165x145x150
* actual product specifications may vary for technical reasons
MANUAL WAKEUP™
ENGLISH
Remote Control
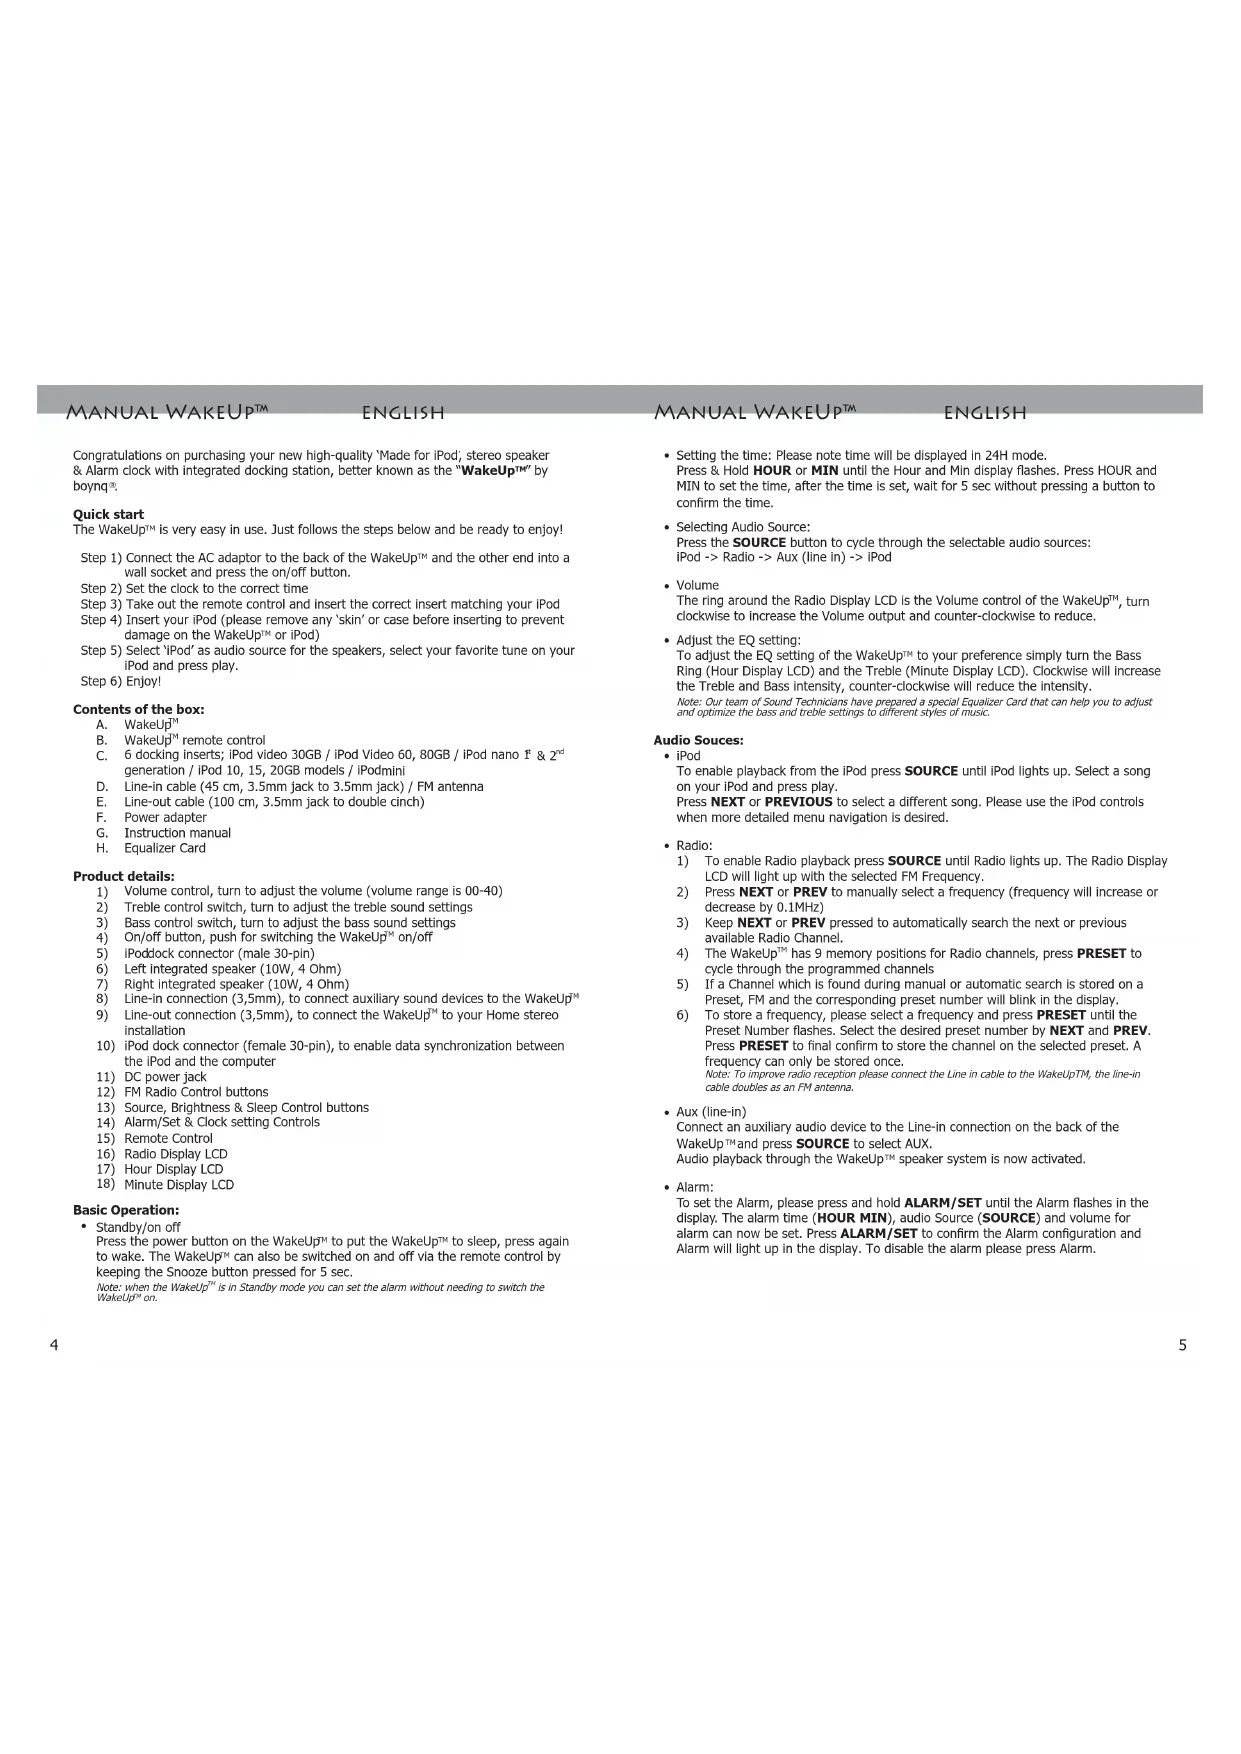
The Remote Control allows you to control not only the basic functions of the WakeUp ^™ , but also gives you the freedom to remotely snooze the Alarm! The Snooze button is the central control of the WakeUp ^™ remote.
Remote control Buttons:
1) Snooze / play / pause / Power
2) Volume Up
3) Volume Down
4) Previous
5) Next
Remote Control Operation:
- Turn on/off the WakeUp™:
Keep the Snooze button pressed for 5sec to turn the WakeUp™ on or to put the WakeUp™ to sleep. - Change volume:
Press Volume+ or Volume - to change the volume output of the WakeUp™ accordingly (please note volume ranges from 00-40) - Snooze the Alarm:
When the Alarm sounds, press Snooze to activate snooze mode. During 'snooze' the word alarm will blink to indicate the Alarm is still active. Press ALARM/SET to cancel the alarm, the word Alarm will also disappear from the display. Standard Snooze time is 9 min
- iPod playback specific controls:
- Snooze: will play or pause the iPod
- Previous: skip to the previous track on the iPod (album or playlist). Keep pressed to rewind within the song
- Next: skip to the next track on the iPod (album or playlist). Keep pressed to fast-forward within the song.
- Radio playback:
- Snooze: will mute the sound, when the sound is muted the volume indicator on the Display LCD will flash
- Previous & Next: press to cycle through the programmed Radio channels.
- Aux (line-in) playback:
- Snooze: will mute the sound, when the sound is muted the volume indicator on the Display LCD will flash
Replacing the Remote battery
The Remote Control Battery is already installed. When the Remote Control stops operating or its range seems reduced, it is time to replace the battery with a new one.
1) Take the battery holder from the Remote Control (located at the back)
2) Discard the empty battery in the appropriate manner and place a new CR2032 - 3V Lithium Battery, please ensure the polarity of the battery is correct (+ side should be facing up)
3) Insert the battery holder back into the Remote Control.
Important Notes:
- Each docking insert has an inscription on the bottom side to indicate the supported iPod model. Only use a corresponding appropriate insert to insert your iPod. Incorrect usage of inserts could damage iPod and/or WakeUp™. Some iPod models could have limitations or function differently when used with the WakeUp™. This is completely normal and please refer to your iPod manual for further details.
- Always use the AC adaptor supplied with the WakeUp™ for power supply. Usage of a different AC adapter on the WakeUp™ will lead to loss of warranty and possible damage to WakeUp™ and iPod.
System requirements:
- A computer platform with a USB 2.0 host connector port.
• PC with operating system Windows 2000 SP4, Windows XP SP2, Mac OS X 10.3.9

Made for iPod
The "Made for iPod" logo indicates that this product has been designed specifically to work with iPod. The manufacturer certifies that this accessory has been made in accordance with the high standards of quality and performance that you expect from iPod and Apple.
The WakeUp™ Is Made for:
- iPod video 30, 60, 80GB
- iPod nano 1, 2, 4 GB and nano 2nd generation 2, 4, 8GB
- iPod photo
- iPod mini 4, 6GB
- iPod with dock connector (10, 15, 20GB only)
- iPod nano 3rd generation, iPod Classic 80, 160GB, iPod touch 8, 16GB
Please visit www.boynq.com for a more detailed manual and trouble shooter on the WakeUp™ or other products within the boynq collection.
WakeUp™ name and logo are trademarks of youSP BV. boynq© 2007. All Rights Reserved. Package and product design © 2007 by youSP B.V., The Netherlands.
iPod is a trademark of Apple Computer, Inc., registered in the US and other countries.
The "Made for iPod" logo indicates that this product has been designed specifically to work with iPod. The manufacturer certifies that this accessory has been made in accordance with the high standards of quality and performance that you expect from iPod and Apple.
MANUAL WAKEUP™
FRANÇAIS
- Lecture Aux (line-in):