
CD1592 - Cd player/recorder AudioSonic - Free user manual and instructions
Find the device manual for free CD1592 AudioSonic in PDF.
| Brand | AudioSonic |
| Model | CD1592 |
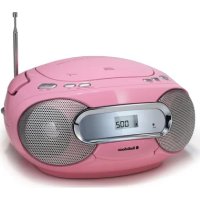
| Product type | CD player/recorder |
| Power supply | Mains 230 V~50 Hz or 6 C-type batteries (LR20) |
| Output power | 2 x 5 W RMS (estimated) |
| Disc compatibility | Audio CD, CD-R/RW, MP3 |
| Radio functions | FM and AM with FM telescopic antenna and built-in AM antenna |
| Playback | Play, pause, stop, forward/backward, repeat, random, program (20 CD tracks, 99 MP3 tracks) |
| USB port | Play MP3 files from USB flash drive |
| Clock | 12/24 h display with standby setting |
| Alarm | 2 independent alarms with source selection (buzzer, radio, CD, USB) and snooze function (9 min) |
| Auto standby | Adjustable timer from 10 to 90 minutes |
| Dimensions (approx.) | 38 x 22 x 14 cm |
| Weight (approx.) | 2.5 kg |
| Maintenance | Clean with a damp cloth; do not use solvents or immerse |
| Safety | Class 1 laser; do not open the casing; unplug before maintenance |
| Warranty | 24 months |
| Included accessories | AC power cord |
Frequently Asked Questions - CD1592 AudioSonic
User questions about CD1592 AudioSonic
0 question about this device. Answer the ones you know or ask your own.
Ask a new question about this device
Download the instructions for your Cd player/recorder in PDF format for free! Find your manual CD1592 - AudioSonic and take your electronic device back in hand. On this page are published all the documents necessary for the use of your device. CD1592 by AudioSonic.
USER MANUAL CD1592 AudioSonic
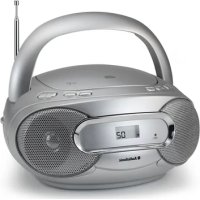
natural_image
Black AudioSonic portable radio with control panel and antenna (no visible text or symbols on device body)

Stereo radio
CD / MP3 / USB
CD-1592

AudioSonic


You can find all information and spare parts at service.tristar.eu
Dear customer,
Congratulations and thank you for purchasing this high quality product. Please read the instruction manual carefully so that you will be able to make the best possible use of the appliance. This manual includes all the necessary instructions and advice for using, cleaning and maintaining the appliance. If you follow these instructions you will be guaranteed of an excellent result, it saves you time and will avoid problems. We hope you will have a great deal of pleasure from using this appliance.
SAFETY INSTRUCTIONS
Please read the instruction manual carefully before using the device. Please keep these instructions, the guarantee certificate, the sales receipt and, if possible, the carton with the inner packaging.
Warning: To reduce the risk of electric shock, do not remove cover (or back). No user-serviceable parts inside. Refer servicing to qualified service personnel.
Warning: The battery (battery or batteries or battery pack) shall not be exposed to excessive heat such as sunshine, fire or the like.
Warning: The mains plug is used as disconnect device, the disconnect device shall remain readily operable.
- Invisible laser radiation when open and interlocks defeated. Avoid exposure to beam of laser.
- No naked flame sources such as lighted candles should be placed on the apparatus.
• Attention should be drawn to environmental aspects of battery disposal.
• Use of the apparatus in moderate climates.
• The rating and marking information are located at the bottom of the unit.
• Excessive sound pressure from earphones and headphones can cause hearing loss. - The mains plug of unit should be obstructed or should be easily accessed during intended use.
- To be completely disconnect the power input, the mains plug of apparatus shall be disconnected from the mains.
- Caution! Danger of explosion if the battery is incorrectly replaced. Replace only with the same or equivalent type.
• To prevent fire or shock hazard do not expose this appliance to rain or moisture.
• Caution: risk of electric shock do not open.
• Warning: Shock hazard-do not open.

LIGHTNING FLASH WITH ARROWHEAD SYMBOL - within an equilateral triangle, is intended to alert the user to the presence of uninsulated dangerous voltage within the products enclosure that may be of sufficient magnitude to constitute a risk of electric shock to persons.

EXCLAMATION POINT - within an equilateral triangle, is used to indicate that a specific component shall be replaced only by the component specified in that documentation for safety reason.
The following label has been affixed to the unit, listing the proper procedure for working with the laser beam:
CLASS 1 LASER PRODUCT LABEL - This label is attached to the place as illustrated to inform that the apparatus contains a laser component.

WARNING LABEL INFORMING OF RADIATION - This label is placed inside the unit. As shown in the illustration. To warn against further measures on the unit. The equipment contains a laser radiating laser rays according to the limit of laser product of class 1.
HEED WARNINGS - All warnings on the appliance and in the operating instructions should be adhered to.
WATER AND MOISTURE - The appliance should not be used near water, for example, near a bathtub, washbowl, kitchen sink, laundrytub, swimming pool or in a wet basement.
VENTILATION - The appliance should be situated so that its location or position does not interfere with its proper ventilation. Do not place on bed, sofa, rug or similar surface that may block the ventilation openings, in a built-in installation, such as a bookcase or cabinet that may impede the flow of air through the ventilation openings.

AudioSonic
Instruction Manual
HEAT - The appliance should be situated away from heat sources such as radiators, stoves, or other appliances (including amplifiers) that produce heat.
POWER SOURCE - The appliance should be connected to a power supply only of the type described in the operating instructions or as marked on the appliance.
POWER CORD PROTECTION - Power supply cords should be routed so that they are not likely to be walked on or pinched by items placed upon or against them.
POWER LINES - An outdoor antenna should be located away from power lines.
OBJECT and LIQUID ENTRY - Care should be taken so that objects do not fall and liquids are not spilled into the enclosure through openings.
ESD WARNING - The display does not function properly or no reaction to operation of any the control may due to the electrostatic discharge. Switch off and unplug the set. Reconnect after a few seconds.
DAMAGE REQUIRING SERVICE - The appliance should be serviced by qualified service personnel when:
a. The power-supply cord or plug has been damaged.
b. Objects have fallen into, or liquid has been spilled into the appliance enclosure.
c. The appliance has been exposed to rain.
d. The appliance has been dropped, or the enclosure damaged.
e. The appliance does not appear to operate normally."
SERVICING - The user should not attempt to service the appliance beyond that described in the user operating instructions. All other servicing should be referred to qualified service personnel.
Notes:
a. Dirty or scratched CD may cause a skipping problem. Clean or replace the CD.
b. If an error display or malfunction occurs, disconnect the AC cord and remove all the batteries. Then turn the power back on."
Notes: CONCERNING COMPACT DISCS.
Since dirty, damaged or warped discs may damage the appliance, care should be taken of the followings items:
a. Usable compact discs. Use only compact disc with the mark shown below.
b. CD compact disc only with digital audio signals."
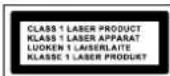
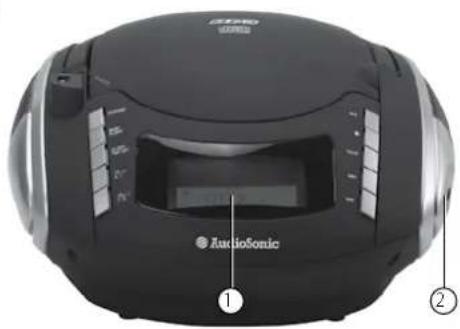
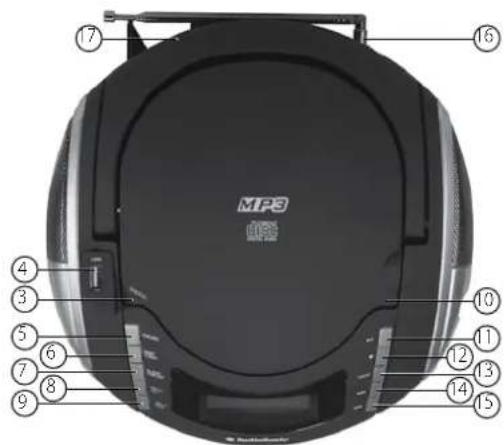
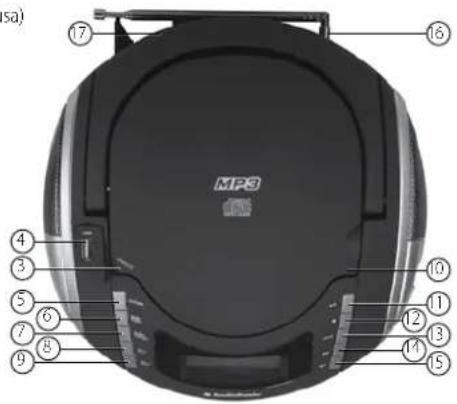
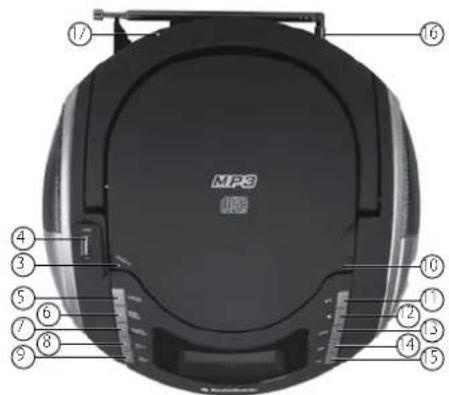
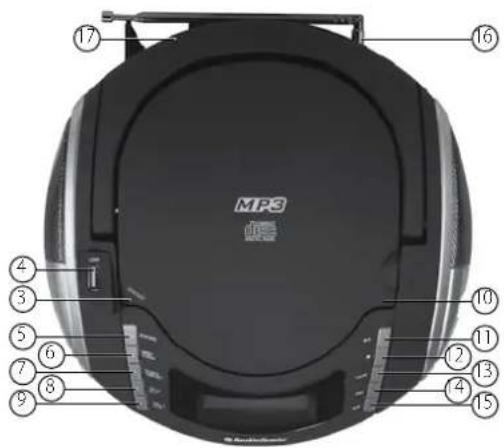
PARTS DESCRIPTION
- LCD Display
- Tuning control
- Snooze
- USB slot
- Standby / Function
- Band / Album
- Sleep / Time set
- Vol + / Alarm 1
- Vol-/Alarm 2
- CD door
- Play / Pause
- Stop
- Mode
- Skip +
- Skip -
- FM Antenna
- AC power cord
BEFORE THE FIRST USE
• Take the appliance and accessories out the box. Remove the stickers, protective foil or plastic from the device.
- Place the device on a flat stable surface and ensure a minimum of 10 cm. free space around the device. This device is not suitable for installation in a cabinet or for outside use.
POWER SOURCES
AC power
You can power your portable system by plugging the detachable AC power cord into the AC inlet at the back of the unit and into a wall AC power outlet. Check that the rated voltage of your appliance matches your local voltage. Make sure that the AC power cord is fully inserted into the appliance.
Battery power
Insert 6 x "C" size batteries into the battery compartment. Be sure that the batteries are inserted correctly to avoid damage to the appliance. Always remove the batteries when appliance will not be used for a long period of time, as this will cause leakage to the batteries and subsequently damage to your appliance.
Notes: Use batteries of the same type. Never use different types of batteries together. When using the appliance with batteries, disconnect the AC power cord.
USE
Basic function
- Press the "ST / FUNC" button in the standby mode, to switch on the system. (FM radio mode as default mode when switch on the system.)
- Press the "ST/FUNC" button to switch the system to the CD mode.
- Press and hold the "ST / FUNC" button for 3 seconds to switch off the system. (No matter in which mode.)
Radio
- Press the "ST/FUNC" button to select the "RADIO" mode.
- Press the "BAND / ALBUM" button to select AM or FM.
- Adjust radio frequency to your desired station by using the "TUNING" control.
For better reception
- FM: This appliance has a FM antenna located at the rear cabinet. Make sure this antenna is fully extended.
- AM: This appliance is equipped with a built - AM antenna. Rotate the appliance to get better reception.
CD / MP3 operation
- Press the "ST / FUNC" button to select "CD" mode.
- Open the CD door and place a CD / MP3 disc with the label up in the CD compartment.
- Close the CD door.
- "Focus search is performed when:
- For CD disc - Total number of tracks is read and appears on the display.
- For MP3 disc - "MP3" appears on the display."
• It will start automatically from the first track. - Press the "VOL + / AL 1" or "VOL - / AL 2" button to adjust the volume to the desired level.
- Press the "PLAY / PAUSE" button again when you want to stop playback temporarily.
- Press the "STOP" button when finished.
Folder select
Press the "BAND / ALBUM" button to select a folder. (Folder select function can only operate if the discis stored with at least 2 directories / files.)
Program
- Up to 20 tracks of CD disc, 99 tracks of MP3 disc can be programmed for disc play in any order. Be sure to press the "STOP" button before use.
- Press the "MODE" button, the display will show "P01".
- Select desired track by using the "SKIP+" or "SKIP-" button. (You may select a desired album by pressing the "ALBUM" button).

AudioSonic
Instruction Manual
- Press the "MODE" button again to confirm the desired track into the program memory.
- Repeat step 2 and 3 to enter additional tracks into the program memory.
- When all the desired tracks have been programmed, press the "PLAY / PAUSE" button to play the disc in the order you have programmed.
- Press the "STOP" button twice to terminate programmed playback.
Mode
- Press the "MODE" button during playing CD / MP3 disc, each press switches the mode function as follows:
- Repeat 1
• Repeat album (*mp3 only) - Repeat all
- Random
- Normal playback
USB operation
• Plug your USB device into the port.
- Press the "FUNCTION" button to select "CD" mode.
• If there is no disc on the disc tray. It will read and play automatic your USB device.
• If There is a disc on the disc tray. It will read and play automatic your DISC,
- Press and hold the "PLAY / PAUSE" button for a few seconds to entry USB mode when playing CD.
- Playback will start automatically from the first track and the display will show "USB".
- Press the "STOP" button when you're finished.
PROGRAMME MODE
The programme mode works the same as the CD / MP3 programme mode.
Clock setting
- Press and hold the "ST/FUNC" button to switch unit in the standby mode.
- Press and hold the "SLEEP / TIME SET" button to entry the clock set mode. The display will show "24H" and is flashing.
- Adjust the time format (12H / 24H) by pressing the "SKIP +" or "SKIP -" button.
- Press the "SLEEP / TIME SET" button to confirm the time format, the display will
show "AM 12:00" if 12H format is set or "0:00" if 24H is set.
- Adjust the hour by pressing the "SKIP +" or "SKIP -" button, press the "SLEEP / TIME SET" button to confirm.
- Adjust the minutes by pressing the "SKIP +" or "SKIP -" button, press the "SLEEP / TIME SET" button to confirm.
- Notes: Because the clock setting is at standby mode, the display is dim.
Alarm setting
• Alarm setting must be after completed clock setting.
- Press and hold the "ST/FUNC" button to switch unit at standby mode.
- Press the "VOL + / AL 1" or "VOL - / AL 2" button to entry alarm set mode.
- Adjust hour by pressing the "SKIP+" or "SKIP-" button, press the "VOL + / AL 1" or "VOL - / AL 2" button to confirm.
- Adjust minute by pressing the "SKIP +" or "SKIP -" button, press the "VOL + / AL 1" or "VOL - / AL 2" button to confirm.
- Pressing the "SKIP +" or "SKIP -" button to select:
- Press the "VOL + / AL 1" or "VOL - / AL 2" button to confirm.
- Adjust alarm volume by pressing the "SKIP +" or "SKIP -" button, press the "VOL + / AL 1" or "VOL - / AL Z" button to confirm.
• After confirm the alarm volume, the display will automatically scan your setting one time.
• The display will show "1" or "2". Alarm setting is now complete. - Press the "VOL + / AL 1" or "VOL - / AL 2" button to activate the alarm on / off function.
- Note: If you need to reset the alarm, press and hold the "VOL + / AL 1" or "VOL - / AL 2" button for 3 seconds to re-entry the alarm set mode.
Snooze
When the alarm is triggered. You may press the "SNOOZE" button to delay the alarm for another 9 minutes.
Sleep
- In CD mode, press and hold the "SLEEP / TIME SET" button for 3 seconds, the display will show "SLEEP 90". That means, after 90 minutes the appliance will automatically turn to the standby mode.
- Press the "SLEEP" button again to select the automatically turn off time, from 90, 80, 70, 60, 50, 40, 30, 20, 10 minutes.
- Press the "SLEEP" button to "SLEEP 00" to cancel the sleep function.
CLEANING AND MAINTENANCE
- Clean the appliance with a damp cloth. Never use harsh and abrasive cleaners, scouring pad or steel wool, which damages the device.
- Never immerse the device in water or any other liquid. The device in not dishwasher proof.
GUARANTEE
- This product is guaranteed for 24 months granted. Your warranty is valid if the product is used in accordance to the instructions and for the purpose for which it was created. In addition, the original purchase (invoice, sales slip or receipt) is to be submitted with the date of purchase, the name of the retailer and the item number of the product.
- For the detailed warranty conditions, please refer to our service website: www.service.tristar.eu
GUIDELINES FOR PROTECTION OF THE ENVIRONMENT
This appliance should not be put into the domestic garbage at the end of its durability, but must be offered at a central point for the recycling of electric and electronic domestic appliances. This symbol
on the appliance, instruction manual and packaging puts your attention to this important issue. The materials used in this appliance can be recycled. By recycling used domestic appliances you contribute an important push to the protection of our environment. Ask your local authorities for information regarding the point of recollection.
Packaging
The packaging is 100% recyclable, return the packaging separated.
Product
This device is equipped with a mark according to the European Directive 2012/19/EU on Waste Electrical and Electronic Equipment (WEEE). By ensuring that this product will be correctly processed into waste, it will help prevent possible negative consequences for the environment and human health.
EC declaration of conformity
This device is designed, manufactured and marketed in accordance with the safety objectives of the Low Voltage Directive "No 2006/95/EC", the protection requirements of the EMC Directive 2004/108/EC "Electromagnetic Compatibility" and the requirement of Directive 93/68/EEC.
Geachte klant,
natural_image
Top-down view of a black audio recording device with labeled parts (no readable text or symbols beyond labels)
AVANT LA PREMIÈRE UTILISATION
PEZRD PIERWSZE UŻYTKOWANIE
natural_image
Black AudioSonic CD or audio recorder device with control panel and display (no visible text or symbols)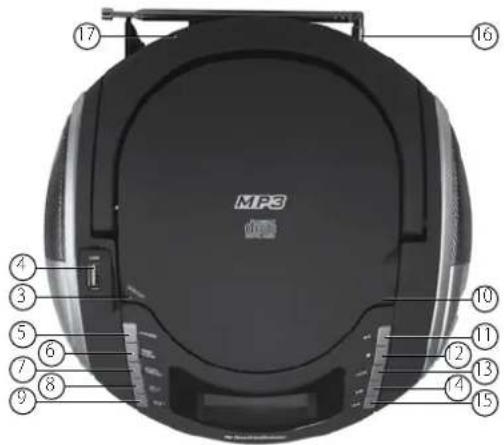
FÖRE FÖRSTA ANVÄNDNING
P∅ED PRVNÍM POUŽITÍM
natural_image
Front view of a black Bosch Micronis CD-ROM device with labeled parts (no readable text beyond branding)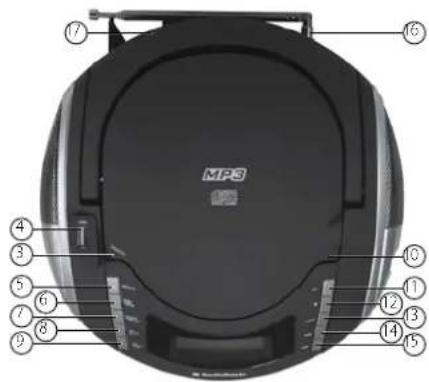
PRED PRVÝM POUŽITÍM
- Stereo radio
- SAFETY INSTRUCTIONS
- AudioSonic
- Notes:
- Notes: CONCERNING COMPACT DISCS.
- PARTS DESCRIPTION
- BEFORE THE FIRST USE
- POWER SOURCES
- AC power
- Battery power
- USE
- Basic function
- Radio
- For better reception
- CD / MP3 operation
- Folder select
- Program
- Mode
- PROGRAMME MODE
- Clock setting
- Alarm setting
- Snooze
- Sleep
- CLEANING AND MAINTENANCE
- GUARANTEE
- GUIDELINES FOR PROTECTION OF THE ENVIRONMENT
- Packaging
- Product
- EC declaration of conformity
- AVANT LA PREMIÈRE UTILISATION
- PEZRD PIERWSZE UŻYTKOWANIE
- FÖRE FÖRSTA ANVÄNDNING
- P∅ED PRVNÍM POUŽITÍM
- PRED PRVÝM POUŽITÍM
Brand : AudioSonic
Model : CD1592
Category : Cd player/recorder