
MCD712 - Hi-Fi System PHILIPS - Free user manual and instructions
Find the device manual for free MCD712 PHILIPS in PDF.

| Brand | Philips |
| Model | MCD712 |
| Category | Hi-Fi System |
| Product type | DVD Micro Hi-Fi |
| Main unit dimensions (W x H x D) | 248 x 110 x 307 mm |
| Speaker dimensions (W x H x D) | 170 x 270 x 220 mm |
| Total net weight | 11 kg (with packaging) |
| Main unit weight | 2 kg |
| Weight per speaker | 2.8 kg |
| Power supply | AC 220-230 V, 50 Hz |
| Operating power consumption | 52 W |
| Eco standby power consumption | < 1 W |
| Standby power consumption | < 4 W |
| Playback sources | DVD, VCD, SVCD, CD, USB, FM tuner, AUX |
| Supported audio formats | MP3, WMA, Audio CD |
| Supported video formats | DivX, MPEG-1, MPEG-2 |
| Supported image formats | JPEG, Kodak |
| Nominal output power | 2 x 50 W RMS |
| Frequency response | 20 Hz - 20 kHz |
| Signal-to-noise ratio | > 65 dB |
| FM tuner | 87.5 - 108 MHz |
| Speaker impedance | 4 ohms |
| Special features | Progressive scan, DSC, DBB, RDS, timer, sleep timer |
| Connectivity | SCART, S-Video, Component, Composite video, USB (2.0), Coaxial output, Headphone jack |
| Maintenance | Unplug before cleaning; use a dry cloth |
| Safety | Do not expose to moisture; do not open the casing; listen at moderate volume |
| Included accessories | Remote control with CR2025 battery, 2 speakers, FM antenna, composite video cable, quick start guide, user manual |
| Repairability | Do not repair yourself; consult a qualified technician |
| DVD region code | 2 (Europe) |
Frequently Asked Questions - MCD712 PHILIPS
User questions about MCD712 PHILIPS
0 question about this device. Answer the ones you know or ask your own.
Ask a new question about this device
Download the instructions for your Hi-Fi System in PDF format for free! Find your manual MCD712 - PHILIPS and take your electronic device back in hand. On this page are published all the documents necessary for the use of your device. MCD712 by PHILIPS.
USER MANUAL MCD712 PHILIPS
natural_image
Black electronic audio equipment including a speaker, CD, and remote control unit (no visible text or symbols)EN User manual
DA Brugervejledning
DE Benutzerhandbuch
| 2 Your DVD Micro Theater 8 | |
| Introduction | 8 |
| What's in the box 8 | |
| Overview of the main unit 9 | |
| Overview of the remote control 10 | |
| 3 | Connect 12 |
| Place the unit 12 | |
| Connect speakers 12 | |
| Connect FM antenna 12 | |
| Connect TV 13 | |
| Connect power 14 |
| 4 Get started | 15 |
| Prepare the remote control | 15 |
| Set clock | 15 |
| Turn on | 15 |
| Find the correct viewing channel | 16 |
| Select the correct TV system | 16 |
| Change system menu language | 16 |
| Turn on Progressive Scan | 16 |
| 5 | Play | 18 |
| Play a disc | 18 | |
| Play from USB | 19 | |
| Play DivX video | 19 | |
| Play MP3/WMA/picture files | 19 | |
| Play control | 20 | |
| Play options 20 | ||
| Picture view options | 21 |
| 6 Adjust settings | 22 |
| General setup | 22 |
| Audio setup | 22 |
| Video setup 23 | |
| Preference setup | 23 |
| 7 Tune to FM radio stations | 25 |
| Program radio stations automatically | 25 |
| Program radio stations manually | 25 |
| Tune to a preset radio station | 25 |
| Set RDS clock | 25 |
| Show RDS information | 26 |
| 8 Adjust volume level and sound effect | |
| 27 | |
| Adjust volume level | 27 |
| Select a sound effect | 27 |
| Mute sound | 27 |
| Listen through headphone | 27 |
| 9 Other features | 28 |
| Activate demonstration mode | 28 |
| Adjust brightness of display panel | 28 |
| Set the alarm timer | 28 |
| Set the sleep timer | 28 |
| Connect other devices | 28 |
| 10 Product information | 30 |
| Specifications | 30 |
| Supported disc formats | 31 |
| USB playability information | 31 |
| RDS program types | 32 |
| 11 Troubleshooting | 33 |
1 Important
Safety


This 'bolt of lightning' indicates uninsulated material within your unit may cause an electrical shock. For the safety of everyone in your household, please do not remove product covering.
The ‘exclamation point’ calls attention to features for which you should read the enclosed literature closely to prevent operating and maintenance problems. WARNING: To reduce the risk of fire or electric shock, this apparatus should not be exposed to rain or moisture and objects filled with liquids, such as vases, should not be placed on this apparatus.
CAUTION: To prevent electric shock, match wide blade of plug to wide slot, fully insert.
Important Safety Instructions
① Read these instructions.
② Keep these instructions.
③ Heed all warnings.
④ Follow all instructions.
⑤ Do not use this apparatus near water.
⑥ Clean only with dry cloth.
⑦ Do not block any ventilation openings. Install in accordance with the manufacturer's instructions.
⑧ Do not install near any heat sources such as radiators, heat registers, stoves, or other apparatus (including amplifiers) that produce heat.
⑨ Protect the power cord from being walked on or pinched, particularly at plugs, convenience receptacles, and the point where they exit from the apparatus.
⑩ Only use attachments/accessories specified by the manufacturer.
⑪ Use only with the cart, stand, tripod, bracket, or table specified by the manufacturer or sold with the apparatus. When a cart is used, use caution when moving the cart/apparatus combination to avoid injury from tip-over.

⑫ Unplug this apparatus during lightning storms or when unused for long periods of time.
⑬ Refer all servicing to qualified service personnel. Servicing is required when the apparatus has been damaged in any way, such as power-supply cord or plug is damaged, liquid has been spilled or objects have fallen into the apparatus, the apparatus has been exposed to rain or moisture, does not operate normally, or has been dropped.
⑭ Battery usage CAUTION – To prevent battery leakage which may result in bodily injury, property damage, or damage to the unit:
• Install all batteries correctly, + and - as marked on the unit.
• Do not mix batteries (old and new or carbon and alkaline, etc.).
- Remove batteries when the unit is not used for a long time.
⑮ Apparatus shall not be exposed to dripping or splashing.
⑯ Do not place any sources of danger on the apparatus (e.g. liquid filled objects, lighted candles).
⑰ This product may contain lead and mercury. Disposal of these materials may be regulated due to environmental considerations. For disposal or recycling information, please contact your local authorities or the Electronic Industries Alliance: www.eiae.org.
Safety-Important notes for users in the U.K.
Mains plug
This apparatus is fitted with an approved 13 Amp plug. To change a fuse in this type of plug proceed as follows:
① Remove fuse cover and fuse.
② Fix new fuse which should be a BS1362 5 Amp, A.S.T.A. or BSI approved type.
③ Refit the fuse cover.
If the fitted plug is not suitable for your socket outlets, it should be cut off and an appropriate plug fitted in its place. If the mains plug contains a fuse, this should have a value of 5 Amp. If a plug without a fuse is used, the fuse at the distribution board should not be greater than 5 Amp.
Note: The severed plug must be disposed off to avoid a possible shock hazard should it be inserted into a 13 Amp socket elsewhere.
How to connect a plug
The wires in the mains lead are coloured with the following code: blue = neutral (N), brown = live (L).
As these colours may not correspond with the colour markings identifying the terminals in your plug, proceed as follows:
Connect the blue wire to the terminal • marked N or coloured black.
Connect the brown wire to the terminal marked L or coloured red.
Do not connect either wire to the earth • terminal in the plug, marked E (or 12 ) or coloured green (or green and yellow).
Before replacing the plug cover, make certain that the cord grip is clamped over the sheath of the lead - not simply over the two wires.
Copyright in the U.K.
Recording and playback of material may require consent. see Copyright Act 1956 and The performer's Protection Acts 1958 to 1972.

Caution
Use of controls or adjustments or performance of procedures other than herein may result in hazardous radiation exposure or other unsafe operation.

Warning
Where the MAINS plug or an appliance • coupler is used as the disconnect device, the disconnect device shall remain readily operable.

Warning
Never remove the casing of this unit.
Never lubricate any part of this unit.
Place this unit on a flat, hard and stable surface.
Never place this unit on other electrical equipment.
Only use this unit indoors. Keep this unit away • from water, moisture and liquid-filled objects. Keep this unit away from direct sunlight, naked • flames or heat.
Never look into the laser beam inside the unit.
Hearing safety
Listen at a moderate volume.
Using headphones at a high volume can • impair your hearing. This product can produce sounds in decibel ranges that may cause hearing loss for a normal person, even for exposure less than a minute. The higher decibel ranges are offered for those that may have already experienced some hearing loss. Sound can be deceiving. Over time your • hearing 'comfort level' adapts to higher volumes of sound. So after prolonged listening, what sounds 'normal' can actually be loud and harmful to your hearing. To guard against this, set your volume to a safe level before your hearing adapts and leave it there.
To establish a safe volume level:
Set your volume control at a low setting. • Slowly increase the sound until you can • hear it comfortably and clearly, without distortion.
Listen for reasonable periods of time:
Prolonged exposure to sound, even • at normally ‘safe’ levels, can also cause hearing loss. Be sure to use your equipment • reasonably and take appropriate breaks.
Be sure to observe the following guidelines when using your headphones.
Listen at reasonable volumes for • reasonable periods of time. Be careful not to adjust the volume as • your hearing adapts. Do not turn up the volume so high that • you can't hear what's around you. You should use caution or temporarily • discontinue use in potentially hazardous situations. Do not use headphones while operating a motorized vehicle, cycling, skateboarding, etc.; it may create a traffic hazard and is illegal in many areas.
Notice

This product complies with the radio interference requirements of the European Community.
Any changes or modifications made to this device that are not expressly approved by Philips Consumer Lifestyle may void the user's authority to operate the equipment.

Your product is designed and manufactured with high quality materials and components, which can be recycled and reused.

When this crossed-out wheeled bin symbol is attached to a product it means that the product is covered by the European Directive 2002/96/EC.
Please inform yourself about the local separate collection system for electrical and electronic products.
Please act according to your local rules and do not dispose of your old products with your normal household waste. Correct disposal of your old product helps to prevent potential negative consequences for the environment and human health.

Your product contains batteries covered by the European Directive 2006/66/EC, which cannot be disposed with normal household waste. Please inform yourself about the local rules on separate collection of batteries because correct disposal helps to prevent negative consequences for the environmental and human health.
Environmental information
All unnecessary packaging has been omitted. We have tried to make the packaging easy to separate into three materials: cardboard (box), polystyrene foam (buffer) and polyethylene (bags, protective foam sheet.)
Your system consists of materials which can be recycled and reused if disassembled by a specialized company. Please observe the local regulations regarding the disposal of packaging materials, exhausted batteries and old equipment.

Be responsible Respect copyrights
The making of unauthorized copies of copy-protected material, including computer programs, fi les, broadcasts and sound recordings, may be an infringement of copyrights and constitute a criminal offence. This equipment should not be used for such purposes.

Offi cal DivX® Certifi ed product. Plays all versions of DivX® video (including DivX® 6) with standard playback of DivX® media fi les.

DOLBY.
DIGITAL
Manufactured under license from Dolby Laboratories. Dolby and the double-D symbol are trademarks of Dolby Laboratories.

VIDEO
'DVD Video' is a trademark of DVD Format/Logo Licensing Corporation.
Norge
This apparatus includes this label:


Note
The type plate is located on the bottom of the • apparatus.
2 Your DVD Micro Theater
Congratulations on your purchase, and welcome to Philips! To fully benefit from the support that Philips offers, register your product at www.Philips.com/welcome.
Introduction
With this unit, you can:
• watch video from DVD/VCD/SVCD or USB devices
• enjoy audio from discs or USB devices
• view pictures from discs or USB devices
- Listen to FM radio
You can enrich sound output with these sound effects:
• Digital Sound Control (DSC)
• Dynamic Bass Boost (DBB)
The unit supports these media/disc formats:


You can play DVD discs with the following region codes:
DVD region code Countries

Europe
What's in the box
Check and identify the contents of your package:
Main unit•
2 speakers (cable length: 1.5m)•
Remote control with battery•
Composite video cable (yellow)
FM wire antenna•
User manual•
Quick start guide•
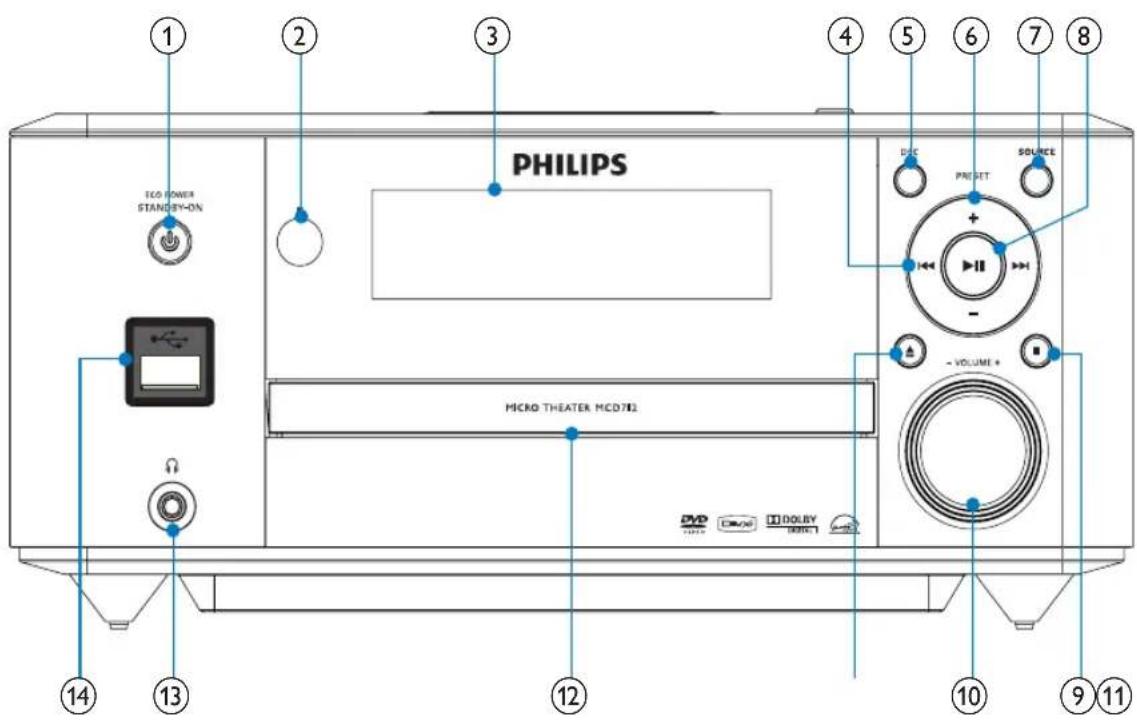
Overview of the main unit
English
① STANDBY-ON/ECO POWER
Turn on the apparatus or switch to • the Eco Power standby mode.
② Remote control sensor
③Display panel
• Display current status.
④
- Skip to the previous/next track.
- Skip to the previous/next title or chapter.
• Tune to a radio station.
⑤DSC
• Select a preset sound setting.
⑥PRESET +/-
• Select a preset radio station.
⑦SOURCE
- Select a source.
⑧ ▶ II
• Start or pause play.
⑨ ■
Stop play.
Erase a program.
In demo mode, activate or deactivate demonstration.
⑩VOLUME -/+
Adjust volume. Adjust time.
⑪
Open or close the disc • compartment.
⑫Disc compartment
13
Headphone socket.
14
USB socket.
Overview of the remote control
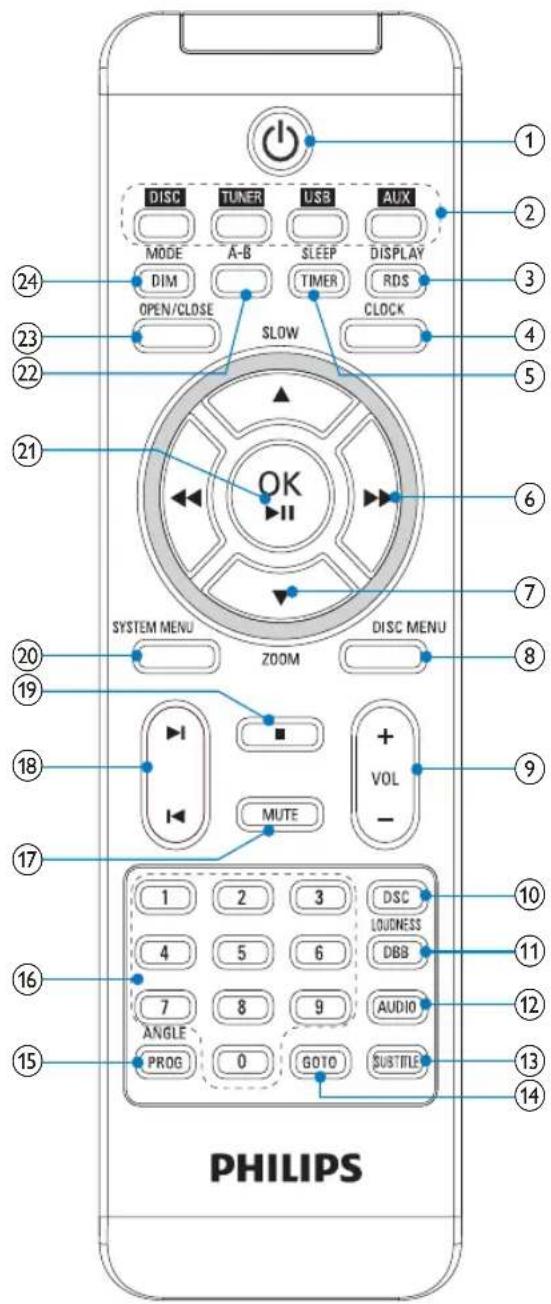


• Turn on the apparatus or switch to the Eco Power standby mode.

Source selection keys
- Select a source.
③DISPLAY/RDS
Display play information on a connected TV.
For selected FM radio stations: • display RDS information.
④CLOCK
Set the clock.
⑤SLEEP/TIMER
Set the sleep timer.
Set the alarm timer.


Search within a track.
Tune to a radio station.
For menus, navigate left/right.
Move an enlarged picture left/right.
Rotate or invert pictures.
⑦ ▲SLOW/▼ZOOM
• For menus, navigate up/down.
Rotate or invert pictures.
- (▲SLOW) For video: select a slow play mode.
• (▼ZOOM) For video: zoom in/out.
⑧DISC MENU
• For video discs: access or exit the disc menu.
For video discs with playback •
control(PBC): turn on/off PBC.
⑨VOL +/-
- Adjust volume.
- Adjust time.
⑩DSC
• Select a preset sound setting.
⑪LOUDNESS/DBB
• Turn on or off automatic loudness adjustment.
• Turn on or off dynamic bass enhancement.
⑫AUDIO
• For VCD, select stereo, mono-left or mono-right channel.
- For DVD/DivX video, select an audio language.
⑬SUBTITLE
Select a subtitle language.
⑭GOTO
During disc play, specify a position to • start play.
⑮ANGLE/PROG
Select a DVD camera angle. Program tracks. Program titles/chapters for DVD play. Program radio stations.
⑯Numeric keypad
Select a title/chapter/track directly.
⑰MUTE
Mute or restore volume.
18
Skip to the previous/next track. Skip to the previous/next title or chapter. Select a preset radio station.
19
Stop play. Erase a program.
⑳SYSTEM MENU
- Access or exit the system setup menu.
②1OK / ▶II
- Confirm a selection.
• Start or pause play.
②A-B
- Repeat a specific section within a track/disc.
②3OPEN/CLOSE
- Open or close the disc compartment.
⑳MODE/DIM
• Select repeat play modes.
• Select shuffle play modes.
- Select a brightness level for the display screen.
3 Connect
Place the unit
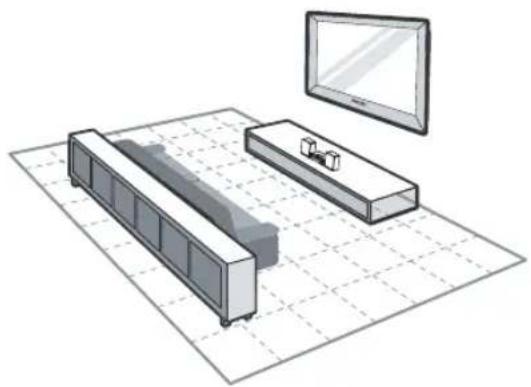
natural_image
Isometric line drawing of a modern office setup with monitor, cabinet, and display (no text or symbols)1 Place the unit near to the TV.
2 Place the left and right speakers at equal distance from the TV and at an angle of approximately 45 degrees from the listening position.

Note
To avoid magnetic interference or unwanted noise, never place this apparatus and speakers too close to any radiation devices. Never place this unit in an enclosed cabinet. Install this unit near the AC outlet where the AC power plug can be easily reached.
Connect speakers

Note
- Ensure that the colors of the speaker wires and terminals are matched.
For optimal sound, use the supplied speakers only.
Connect only speakers with impedance that is the same or higher than the supplied speakers. Refer to the Specifications section of this manual.
1 Hold down the socket flap.
2 Insert the stripped part of the wire completely.
- Insert the right speaker wires to "R", left speaker wires to "L". Insert the red wires to "• +", black wires to "-".
3 Release the socket fl ap.

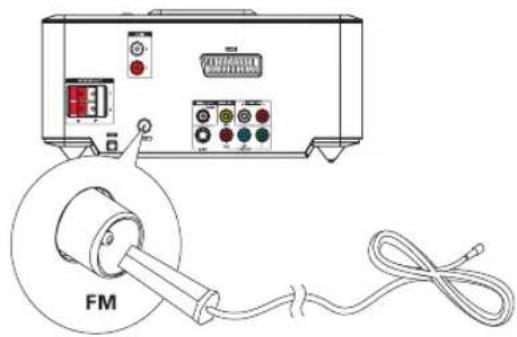
Connect FM antenna
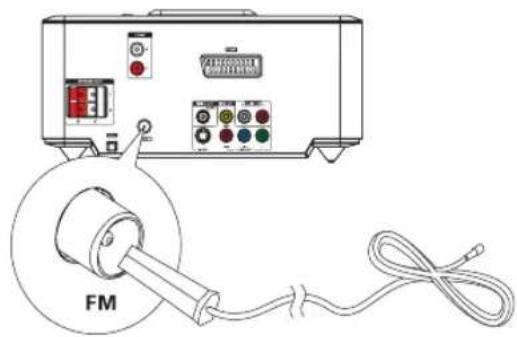

Tip
For optimal reception, fully extend and adjust the position of the antenna.
For better FM stereo reception, connect an • outdoor FM antenna to the FM AERIAL jack. The unit does not support MW radio • reception.
1 Connect the supplied FM wire antenna to the FM AERIAL socket on the unit.
Connect TV
Connect video cables
With this connection, you can watch video from the unit on the TV screen.
You can select the best video connection that your TV supports.
Option 1: Connect through SCART (for a standard TV).
Option 2: connect through component • video (for a standard TV or Progressive Scan TV).
• Option 3: connect through S-Video (for a standard TV).
• Option 4: connect through composite video (CVBS) (for a standard TV).
Option 1: Connect through SCART

1 Connect a scart cable (not supplied) to: the • SCART socket on this unit. the • SCART socket on the TV.
Option 2: Connect through component video
Connect a progressive scan TV through component video for higher quality video.
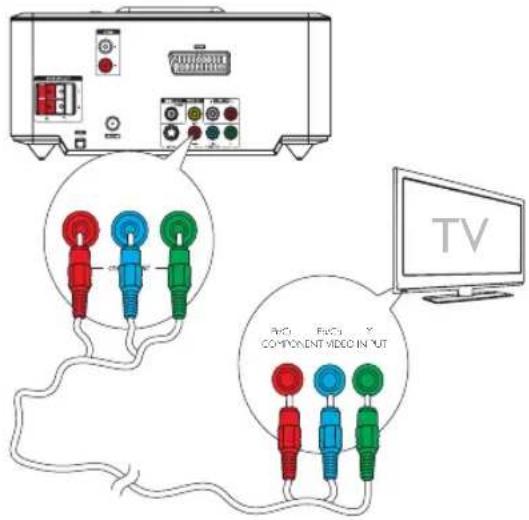

Note
The progressive scan video quality is only available when a progressive scan TV is connected.
If your TV does not support progressive scan, you cannot view the picture.
For how to activate progressive scan on your • TV, refer to the TV user manual.
Connect a progressive scan TV through component video for higher quality video.
1 Connect component video cables (red/blue/green - not supplied) to:
- the VIDEO OUT (Pr/Cr Pb/Cb Y) sockets on this unit. the component input sockets on the TV.
Option 3: Connect through S-Video
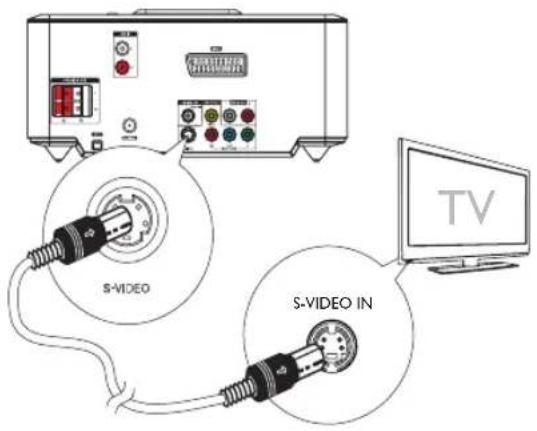
1 Connect an S-video cable (not supplied) to:
the • S-Video socket on this unit.
the • S-Video socket on the TV.
Option 4: Connect through composite video

1 Connect the supplied composite video cable to:
the • VIDEO OUT socket on this unit.
the video input socket on the TV.
Connect audio cables
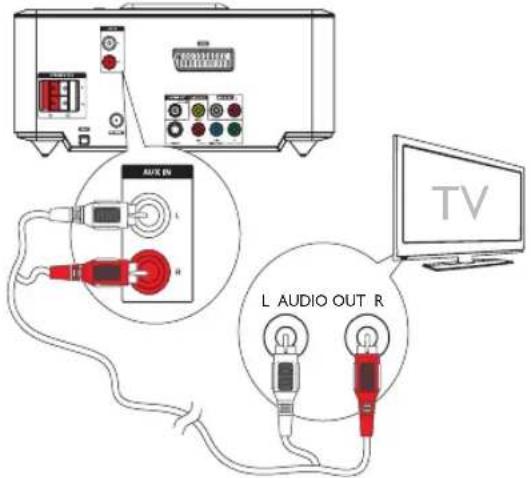
1 To play sound from the TV through this unit, connect audio cables (red/white - not supplied) to:
the • AUX IN L/R sockets on this unit. the audio output sockets on the TV.
Connect power
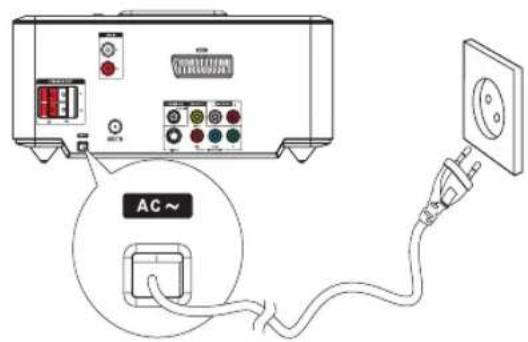

Caution
Risk of product damage! Ensure that the power supply voltage corresponds to the voltage printed on the back or the underside of the unit.
Before connecting the AC power cord, ensure you have completed all other connections.
1 Connect the AC power cord to the wall socket.
4 Get started

Caution
Use of controls or adjustments or performance of procedures other than herein may result in hazardous radiation exposure or other unsafe operation.
Always follow the instructions in this chapter in sequence.
If you contact Philips, you will be asked for the model and serial number of this apparatus. The model number and serial number are on the bottom of the apparatus. Write the numbers here:
Model No. ____
Serial No. ____
Prepare the remote control

Caution
Risk of explosion! Keep batteries away from heat, sunshine or fire. Never discard batteries in fire.
For first-time use:
1 Remove the protective tab to activate the remote control battery.
To replace the remote control batteries:
1 Open the battery compartment.
2 Insert one lithium CR2025 battery with correct polarity (+/-) as indicated.
3 Close the battery compartment.

Note
Before you press any function button on the remote control, first select the correct source with the remote control.
Set clock
1 In the Eco Power standby mode, press and hold CLOCK to activate the clock setting mode.
The hour digits are displayed and begin to blink.
2 Press + VOL - to set the hour, then press CLOCK again..
The minute digits are displayed and begin to blink.
3 Press + VOL - to set the minute.
4 Press CLOCK to confirm the clock setting.
Turn on
1 Press ⏻ .
The unit switches to the last selected → source.
Switch to Eco Power standby mode
1 Press ⏻ to switch the unit to Eco Power Standby mode.
The backlight on the display panel → turns off.
The blue Eco Power indicator turns on.

Tip
In the Eco Power mode, you can press • CLOCK to switch to the standby mode and view the clock (if set). If the system remains in the standby mode for • more than 90 seconds, it switches to the Eco Power mode automatically.
Find the correct viewing channel
1 Press ⏻ to turn on the unit.
2 Press DISC to switch to disc mode.
3 Turn on the TV and switch to the correct video-in channel in one of the following ways:
- Go to the lowest channel on your TV, then press the Channel Down button until you see the Philips screen.
- Press the source button repeatedly on the remote control of your TV.

Tip
The video-in channel is between the lowest and highest channels and may be called FRONT, A/V IN, VIDEO etc. See the TV user manual on how to select the correct input on the TV.
Select the correct TV system
Change this setting if the video does not appear correctly. By default, this setting matches the most common setting for TVs in your country.
1 Press SYSTEM MENU.
2 Select [Preference Page].
3 Select [TV Type] and then press ▶.
4 Select a setting and then press OK /▶II.
• [PAL] - For TV with PAL color system.
• [Multi] - For TV that is compatible with both PAL and NTSC.
• [NTSC] - For TV with NTSC color system.
5 To exit the menu, press SYSTEM MENU.
Change system menu language
1 Press SYSTEM MENU.
2 Select [General Setup Page].
3 Select [OSD Language] and then press ▶▶
4 Select a setting and then press OK / ▶II.
5 To exit the menu, press SYSTEM MENU.
Turn on Progressive Scan
Progressive scan displays twice the number of frames per seconds than interlaced scanning (ordinary TV system). With nearly double the number of lines, progressive scan offers higher picture resolution and quality.
Before you turn on this feature, ensure that: The TV supports progressive scan signals. You have connected this unit with the TV through component video.
1 Turn on the TV.
2 Ensure that the TV progressive scan mode is deactivated (see the TV user manual).
3 Switch the TV to the correct viewing channel for this unit.
4 Press DISC.
5 Press SYSTEM MENU.
6 Press ◀◀/▶▶ to select [Video Setup Page] in the menu, then press ▼.
7 Select [Component] > [Pr/Cr Pb/Cb Y], then press OK /▶II.
8 Select [TV Mode] > [Progressive], then press OK /▶II.
A warning message is displayed.
9 To proceed, select [Ok] and press OK / ▶II
The progressive setup is complete.

Note
If a blank/distorted screen is displayed, wait • for 15 seconds for auto recovery or turn off progressive scan manually.
10 Turn on the progressive scan mode on the TV.
Turn off progressive scan manually
1 Turn off the progressive scan mode on the TV.
2 Press SYSTEM MENU to exit the menu.
3 Press DISC followed by numeric key "1" to turn off the progressive scan mode on the unit.
The blue Philips DVD background → screen is displayed.

Note
In the progressive mode, if you press • DISC followed by numeric key "1" during normal play, the progressive scan mode will be turned off on the unit.
5 Play

Note
- With some disc/file types, play may differ.
Play a disc

Caution
- Never look at the laser beam inside the unit. - Risk of product damage! Never play discs with accessories such as disc stabilizer rings or disc treatment sheets. - Never put any objects other than discs into the disc compartment.
1 Press DISC to select the DISC source.
2 Press OPEN/CLOSE.
→ The disc tray opens.
3 Place a disc onto the tray and press OPEN/CLOSE.
→ Ensure that the label faces up.
4 Play starts automatically.
• To stop play, press ■.
• To pause or resume play, press OK /▶II
• To skip to the previous/next title/chapter/track, press ◄/▶.
If play does not start automatically:
- Select a title/chapter/track and then press OK /▶II

Tip
• To play a locked DVD, enter the 4-digit parental control password.
Use the disc menu
When you load a DVD/(S)VCD disc, a menu may be displayed on the TV screen.
To access or exit the menu manually:
1 Press DISC MENU.
For VCD with PlayBack Control (PBC) feature (version 2.0 only):
With the PBC feature, you can play VCD interactively according to the menu screen.
1 During play, press DISC MENU to enable/disable PBC.
When PBC is enabled, the menu → screen is displayed.
When PBC is disabled, normal play is resumed.
Select an audio language
You can select an audio language on DVDs or DiVx video.
1 During disc play, press AUDIO.
The language options appear. If the selected audio channels is unavailable, the default disc audio channel is used.

Note
For some DVDs, the language can only be changed from the disc menu. Press DISC MENU to access the menu.
Select a subtitle language
You can select a subtitle language on DVDs or DivX ^® discs.
During play, press • SUBTITLE.

Tip
For some DVDs, the language can only be changed from the disc menu. Press DISC MENU to access the menu.
Play from USB

Note
- Ensure that the USB device contains playable music, pictures or video.
1 Insert the USB device.
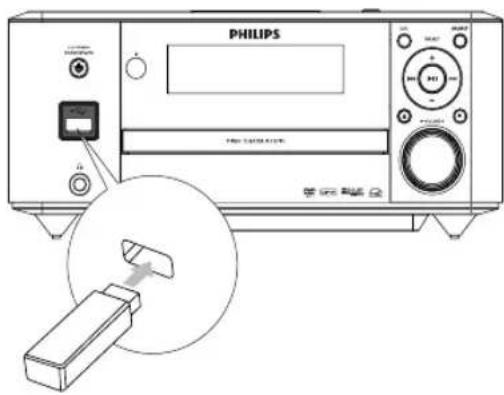
2 Press USB to select the USB source.
3 Press ▲/▼ to select a folder, then press OK /▶II to confirm.
4 Press ▲/▼ to select a file from the folder.
5 Press OK /▶II to start play.
To stop play, press ■.
To pause or resume play, press • OK /▶II
• To skip to the previous/next file, press ◀/▶.
• To return to the upper-level menu, press DISC MENU, then press OK to confirm.
Play DivX video
You can play DivX fi les copied onto a CD-R/RW, recordable DVD or USB device.
1 Insert a disc or connect a USB device.
2 Select a source:
• For discs, press DISC.
• For USB devices, press USB.
3 Select a file to play and press OK / ▶II.
To stop play, press ■.
To pause or resume play, press • OK / ▶
To change a subtitle language, press • SUBTITLE.

Note
You can only play DivX videos rented or • purchased through the DivX registration code of this unit.
Subtitle fi les with the following fi lename • extensions (.srt, .smi, .sub, .ssa, .ass) are supported but do not appear on the fi le navigation menu.
The subtitle fi lename has to be the same as • the fi le name of the video.
Play MP3/WMA/picture files
You can play MP3/WMA/picture fi les copied onto a CD-R/RW, recordable DVD or USB device.
1 Insert a disc or connect a USB device.
2 Select a source:
• For discs, press DISC.
• For USB devices, press USB.
3 Press ▲/▼ to select a folder, then press OK /▶II to confirm.
4 Press ▲▼ to select a file from the folder.
5 Press OK /▶II to start play.
To stop play, press ■.
To pause or resume play, press • OK / ▶
• To skip to the previous/next file, press ◀◀/▶
• To return to the upper-level menu, press DISC MENU, then press OK to confirm.
Play control
Select repeat/shuffle play options
1 During play, press MODE/DIM repeatedly to select a repeat option or the shuff e play mode.
To resume normal play, press • MODE/DIM repeatedly until no option is displayed.
Repeat A-B (DVD/VCD/CD/MP3/WMA)
1 During music or video play, press A-B at the start point.
2 Press A-B at the end point.
→ The selected section starts to play repeatedly.
• To cancel repeat play, press A-B again.

Note
- The section A and B can be set only within the same track/title.
Search forward/backward
1 During play, press ◀◀/▶ repeatedly to select a search speed.
• To resume play at normal speed, press OK /▶II.
Search by time or chapter/track number
1 During video/audio play, press GOTO until a time fi eld or chapter/track fi eld is displayed.
- For the time fi eld, enter the play position in hours, minutes and seconds.
• For the chapter/track fi eld, enter the chapter/track.
Play starts automatically at your • selected point.
Resume video play from last stopped point

Note
This feature is only available for DVD/VCD play.
1 In stop mode and when the disc has not been removed, press OK /▶II
To cancel resume mode and stop play completely:
1 In stop mode, press .
Play options
Display play information
1 During play, press DISPLAY/RDS repeatedly to display play information.
Program

Note
You cannot program picture fi les/discs.
For video discs/audio CDs:
1 In stop mode, press ANGLE/PROG to access the program menu.
2 Enter the tracks/chapters to add to the program.
3 Repeat step 2 until the program is complete.
4 Select [Start], then press OK /▶II to play the program.
For Divx/MP3/WMA fi les:
1 Select a file, then press ANGLE/PROG to add the file to the program list.
2 Repeat step 1 until the program is complete.
3 In stop mode, press DISC MENU until the program list is displayed.
4 Press OK /▶II to play the program.
To delete a file from the [Program List]:
1 Press DISC MENU until the program list is displayed.
2 Select a file, then press ANGLE/PROG to delete the file from the program list.
Zoom in/out image
1 During video play, press ▼ (ZOOM) repeatedly to zoom in/out the image. When the image is zoomed in, you • can press ◀◀/▶▶ to pan through the image.
Slow-motion play
1 During video play, press ▲ (SLOW) repeatedly to select a slow play option. → The sound is muted. → To resume play at normal speed, press ▶II.
Change the audio channel

Note
- This feature is only available for VCD/DivX play.
1 During play, press AUDIO repeatedly to select an audio channel available on the disc:
- Mono Left
- Mono Right
- Stereo
Select a camera angle

Note
This feature is only available for DVDs • recorded with multiple camera angles.
1 During play, press ANGLE/PROG repeatedly to select a camera angle.
Picture view options
Preview pictures
1 During play, press . ■
The thumbnails of 12 pictures are → displayed.
2 Select one of the following:
a picture
the slide show option
the menu option
the next/previous page (if available)
3 Press OK to:
play the selected picture
start slide show of all pictures
• enter the menu where each remote key function is explained
• turn to the next/previous page (if available)
Select a slide show play mode
1 During play, press ANGLE/PROG repeatedly to select a slide-show play mode.
Rotate picture
1 During play, press ◀◀/▶▶/▲/▼ to rotate the picture anti-clockwise/clockwise.
6 Adjust settings
1 Press SYSTEM MENU.
2 Select a setup page.
3 Select an option and then press .▶▶
4 Select a setting and then press OK /▶II.
To return to the previous menu, •
press
To exit the menu, press • SYSTEM
MENU.
General setup
On [General Setup Page], you can set the following options:
[TV Display]
The TV format determines the aspect ratio of display according to the type of TV you have connected.
![PHILIPS MCD712 - [TV Display] - 1](/content/2026/02/353053/images/73c6f29be4640b2b7fb073e92fe4419d04d9853abf4069b7f448625be7cad6b3.jpg)
4:3 Pan Scan (PS)
![PHILIPS MCD712 - [TV Display] - 2](/content/2026/02/353053/images/9b8b9975f82326549e2e4fbbfb5811713c7b5f288897f656ec6d18793b7aa809.jpg)
4:3 Letter Box (LB)
![PHILIPS MCD712 - [TV Display] - 3](/content/2026/02/353053/images/bdf5bdb81dd1e65385eba011ca1cf66854b0ee6e895fae16c2786da53e31c3ee.jpg)
16:9 (Wide Screen)
• [4:3 Pan Scan] – For 4:3 screen TV: full-height display with the trimmed sides.
• [4:3 Letter Box] – For 4:3 screen TV: wide-screen display with black bars on the top and bottom of the screen.
• [16:9] – For wide-screen TV: display ratio 16:9.
[OSD Language]
Select the preferred language for on-screen display.
[Screen Saver]
The screen saver protects the TV screen damage due to prolonged exposure to a static image.
- [On] – Enable the screen saver.
- [Off] – Disable the screen saver.
[DIVX (R) VOD]
Display the DivX ^® registration code.
![PHILIPS MCD712 - [DIVX (R) VOD] - 1](/content/2026/02/353053/images/ea273078384db488dec2c04788bc54d9392fcf7275c02fb416c49829d2f16faa.jpg)
Tip
Enter this DivX registration code when you • rent or purchase video from http://vod.divx.com/. The DivX videos rented or purchased through the DivX® VOD (Video On Demand) service can be played only on the device to which it is registered.
Audio setup
On [Audio Setup Page], you can set the following options:
[Digital Audio Setup] > [Digital Audio Setup Page] > [Digital Output]
Select audio formats supported by the connected device.
- [Off] – Turn off the digital output.
- [All] – If the connected device supports multi-channel audio formats, select this option.
- [PCM Only] – If the connected device cannot decode multichannel audio, select this option.
[Dolby Digital Setup] > [Dual Mono]
Select audio signals output to speakers.
- [Stereo] – Output multichannel sound signals to both speakers.
• [L-Mono] – Output left mono sound signals to both speakers.
• [R-Mono] – Output right mono sound signals to both speakers.
[3D] > [3D Processing Page] > [Reverb Mode]
Select a virtual surround sound mode.
[HDCD] > [HDCD Setup Page] > [Filter]
When you play a HDCD (High Definition Compatible Digital) disc, select the audio output cutoff frequency.
[Night Mode]
Make loud sound level softer and soft sound level louder so that you can watch the DVD movies at a low volume, without disturbing others.
- [On] – enjoy quiet viewing at night (DVDs only).
- [Off] – enjoy surround sound with its full dynamic range.
Video setup
On [Video Setup Page], you can set the following options:
[Component]
Set the video output according to the video connection. If the composite connection is used, this setting is not required.
- [S-Video] – If the S-Video connection is used, select this option.
- [Pr/Cr Pb/Cb Y] – If the component connection is used, select this option.
- [RGB] – If the SCART connection is used, select this option.
[Picture Setting] > [Picture Setting Setup]
Customize picture color settings.
[TV Mode]
Select the video output mode. To select the progressive scan mode, ensure that you have connected a progressive scan TV and set
[Component] to [Pr/Cr Pb/Cb Y].
- [Progressive] – For progressive scan TV: turn on the progressive scan mode.
- [Interlace] – For ordinary TV: turn on the interlace mode.
Preference setup
On [Preference Page], you can set the following options:
[TV Type]
Change this setting if the video does not appear correctly. By default, this setting matches the most common setting for TVs in your country.
• [PAL] - For TV with PAL color system.
• [Multi] - For TV that is compatible with both PAL and NTSC.
• [NTSC] - For TV with NTSC color system.
[Audio]
Select the preferred audio language for disc play.
[Subtitle]
Select the preferred subtitle language for disc play.
[Disc Menu]
Select the preferred disc menu language.
![PHILIPS MCD712 - [Disc Menu] - 1](/content/2026/02/353053/images/c3ca53ff650384ea4afecf78944e2d08d6dca2d1c8eea59da27dc219bee3a61b.jpg)
Note
If the language you have set is not available on the disc, the disc uses its own default language. For some discs, the subtitle/audio language can only be changed from the disc menu.
[Parental]
Restricts access to discs that are unsuitable for children. These types of discs must be recorded with ratings.
Press OK▶II
Select a rating level, then press OK/▶II. Press the numeric keys to enter the password.
![PHILIPS MCD712 - [Parental] - 1](/content/2026/02/353053/images/a19e2f0fa61af762dea159ad9e72ec35fdb2d11067c2c1b2c220117a92f56ad4.jpg)
Note
Rated discs above the level you set in •
[Parental] require a password to be played.
The ratings are country-dependent. To allow all discs to play, select [8 Adult].
Some discs have ratings printed on them but are not recorded with ratings. This function has no effect on such discs.

Tip
You can set or change the password. (See •
"Preference setup - Password setup".)
[Default]
Resets all the settings of this unit to factory default, except for the password and parental settings.
[Password Setup] > [Password Setup Page] > [Password Mode]
This setting allows you to enable/disable the password for parental control. If the password is enabled, when you play a prohibited disc, this 4-digit password is required.
- [On] - Enable the password for parental control.
- [Off] - Disable the password for parental control.
[Password Setup] > [Password Setup Page] > [Password]
You can change password here. The default password is 1234.
• [Change]
![PHILIPS MCD712 - • [Change] - 1](/content/2026/02/353053/images/16da1cbd8a3f25aaae81ea41c15a2ed74aa8cfd08334239c6dd97a50cbd5106f.jpg)
Note
If you forget the password, enter '1234' before • you set a new password.
7 Tune to FM radio stations
1 Ensure that you have connected and fully extended the supplied FM antenna.
2 Press TUNER.
3 Press and hold
4 When the frequency indication starts to change, release the button.
→ The FM tuner tunes to a station with strong reception automatically.
5 Repeat steps 3-4 to tune to more stations.
To tune to a weak station:
Press ◀◀/▶ repeatedly until you find optimal reception.
Program radio stations automatically

Note
You can program a maximum of 20 preset radio stations.
1 Press ◀◀▶/ to select a preset number to start programming.
2 Press and hold ANGLE/PROG for 2 seconds to activate automatic programming.
→ [AUTO] (auto) is displayed briefly.
All available stations are programmed in the order of waveband reception strength.
The first programmed radio station is broadcast automatically.
Program radio stations manually

Note
You can program a maximum of 20 preset • radio stations.
1 Tune to a radio station.
2 Press ANGLE/PROG to activate programming.
3 Press ◀◀◀/ to allocate a number from 1 to 20 to this radio station, then press ANGLE/PROG to confirm. The preset number and the frequency → of the preset station are displayed.
4 Repeat the above steps to program other stations.

Note
To overwrite a programmed station, store another station in its place.
Tune to a preset radio station
1 Press ◀◀◀/ to select a preset number that you want.
Set RDS clock
You can use time signal broadcast together with the RDS signal to set the clock of the unit automatically.
1 Tune to a RDS radio station that transmits time signals.
The unit reads the RDS time and sets the clock automatically.

Note
The accuracy of the transmitted time depends • on the RDS station that transmits the time signal.
Show RDS information
RDS (Radio Data System) is a service that allows FM stations to show additional information. If you tune to a RDS station, a RDS icon and the station name are displayed. When automatic programming is used, RDS stations are programmed first.
1 Tune to a RDS station.
2 Press DISPLAY/RDS repeatedly to scroll through the following information (if available): Station name→ Program type such as →[NEWS] (news), [SPORT] (sport), [POP M] (pop music)... Frequency→

Note
See "Product information - RDS program • types" for definitions of RDS program types.
8 Adjust volume level and sound effect
Adjust volume level
1 During play, press VOL +/- to increase/decrease the volume level.
Select a sound effect

Note
You cannot use different sound effects at the same time.
Select a preset sound effect
1 During play, press DSC repeatedly to select:
• [ROCK] (rock)
• [JAZZ] (jazz)
• [POP] (pop)
• [CLASSIC] (classic)
• [FLAT] (fl at)
Enhance bass
1 To turn on bass enhancement, press LOUDNESS/DBB repeatedly during play until the DBB logo is displayed.
To turn off bass enhancement, press •
LOUDNESS/DBB repeatedly until the DBB logo disappears.
Select automatic loudness control
Automatic loudness control increases the treble and bass effect at low volume levels (the higher the volume, the lower the treble and bass levels).
1 To turn on automatic loudness control, press LOUDNESS/DBB during play until the loudness icon is displayed. To turn off automatic loudness • control, press LOUDNESS/DBB until the loudness icon disappears.
Mute sound
1 During play, press MUTE to mute/unmute sound.
Listen through headphone
1 Plug a headphone into the socket on the unit.
9 Other features
Activate demonstration mode
You can see an overview of all features.
1 In the standby mode with clock display (if set), press ■ on the main unit to activate the demonstration mode.
A demonstration of major available → features starts.
To deactivate the demonstration mode:
1 Press ■ on the main unit again.
Adjust brightness of display panel
1 In standby mode, press MODE/DIM repeatedly to select different levels of brightness for the display panel.
Set the alarm timer
1 Ensure that you have set the clock correctly.
2 In standby mode, press and hold SLEEP/TIMER.
→ The hour digits are displayed and begin to blink.
3 Press + VOL - to set the hour, then press SLEEP/TIMER again.
The minute digits are displayed and begin to blink.
4 Press + VOL - to set the minute.
5 Press SLEEP/TIMER to confirm.
→ [OFF] (off) begins to blink.
6 To activate the wake-up timer, press + VOL - to select [ON] (on) while [OFF] (off) is blinking. A clock icon appears on the display.→ The unit turns on automatically at → the set time and switches to the last selected source. To deactivate the alarm timer, select → [OFF] (off) at step 6.
Set the sleep timer
1 When the unit is turned on, press SLEEP/TIMER repeatedly to select a set period of time (in minutes).
The unit turns off automatically after the set period of time.
Connect other devices
Listen to an audio player
You can listen to audio player with red/white audio output sockets through this unit.
1 Connect a red/white audio cable (not supplied) to the AUX IN L/R sockets and to the audio output sockets on the audio player.
2 Select the AUX source.
3 Start play on the audio player.
Record to a digital recorder
You can record audio from this unit to a digital recorder.
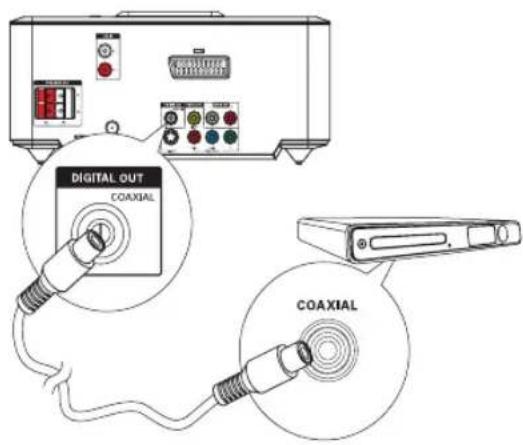
1 Connect a coaxial cable (not supplied) to: the • COAXIAL socket the digital input socket on the digital • recorder
2 Play audio to be recorded.
3 Begin to record on the digital recorder (see the digital recorder user manual).
10 Product information

Note
Product information is subject to change • without prior notice.
Specifications
Amplifi er
| Rated Output Power | 2X50W RMS |
| Frequency Response | 20 -20000 Hz, ±3dB |
| Signal to Noise Ratio | >65dB |
| Aux Input | 500 mV RMS 20kohm |
Disc
| Laser Type Semiconductor | |
| Disc Diameter | 12cm/8cm |
| Video Decoding | MPEG-1 / MPEG-2 / DivX |
| Video DAC | 12Bits |
| Signal System | PAL / NTSC |
| Video Format | 4:3 / 16:9 |
| Video S/N | >48dB |
| Audio DAC | 24Bits / 96kHz |
| Total Harmonic Distortion | <1% (1 kHz) |
| Frequency Response | 4Hz - 20kHz (44.1kHz)4Hz - 22kHz (48kHz)4Hz - 24kHz (96kHz) |
| S/N Ratio | >65dBA |
Tuner (FM)
| Tuning Range | 87.5 - 108MHz |
| Tuning grid | 50KHz |
| Sensitivity - Mono, 26dB S/N Ratio | <22 dBf |
| Sensitivity - Stereo, 46dB S/N Ratio | >43 dBf |
| Search Selectivity >28dBf | |
| Total Harmonic Distortion | <3% |
| Signal to Noise Ratio >55dB | |
Speakers
| Speaker Impedance 2X4ohm | |
| Speaker Driver, Base 5" | |
| Speaker Driver, Tweeler 0.2" | |
| Sensitivity >80dB/m/W±4dB/m/W |
General information
| AC power 220 - 230 V, 50 Hz | |
| Operation Power Consumption | 52W |
| Eco Standby Power Consumption | <1W |
| Standby Power Consumption | <4W |
| Composite Video Output | 1.0Vp-p, 75ohm |
| Coaxial Output 0.5Vpp ± 0.1Vpp 75ohm | |
| Headphone Output 2X15mW 32ohm | |
| USB Direct Version 2.0 | |
| Dimensions- Main Unit(W × H × D)- Speaker Box(W × H × D) | 248 × 110 × 307mm170 × 270 × 220 mm |
| Weight- With Packing- Main Unit- Speaker Box | 11 kg2 kg2 × 2.8 kg |
Supported disc formats
• Digital Video Discs (DVDs)
• Video CDs (VCDs)
• Super Video CDs (SVCDs)
• Digital Video Discs + Rewritable (DVD+RW)
- Compact Discs (CDs)
Picture (Kodak, JPEG) files on CDR(W)
• DivX(R) disc on CD-R(W):
• DivX 3.11, 4.x and 5.x
WMA
Supported MP3-CD formats:
ISO 9660
• Max. title/album name: 12 characters
• Max. title number plus album: 255.
• Max. nested directory: 8 levels.
• Max. album number: 32.
• Max. MP3 track number: 999.
• Supported sampling frequencies for MP3 disc: 32 kHz, 44.1 kHz, 48 kHz.
• Supported Bit-rates of MP3 disc are: 32, 64, 96, 128, 192, 256 (kbps).
The following formats are not supported:
- Files like *.VMA, *.AAC, *.DLF, *.M3U,
• *.PLS, *.WAV
• Non-English Album/Title name
• Discs recorded in Joliet format
• MP3 Pro and MP3 with ID3 tag
USB playability information
Compatible USB devices:
USB fl ash memory (USB 2.0 or USB1.1) • USB fl ash players (USB 2.0 or USB1.1) • memory cards (requires an additional • card reader to work with this apparatus)
Supported formats:
USB or memory fi le format FAT12, •
FAT16, FAT32 (sector size: 512 bytes)
MP3 bit rate (data rate): 32-320 Kbps and variable bit rate
WMA v9 or earlier•
Directory nesting up to a maximum of 8 • levels
Number of albums/ folders: maximum 99•
Number of tracks/titles: maximum 999•
ID3 tag v2.0 or later•
File name in Unicode UTF8 (maximum • length: 128 bytes)
Unsupported formats:
Empty albums: an empty album is an • album that does not contain MP3/WMA fi les, and is not be shown in the display.
- Unsupported fi le formats are skipped. For example, Word documents (.doc) or MP3 fi les with extension .dlf are ignored and not played.
• AAC, WAV, PCM audio fi les
- DRM protected WMA files (.wav, .m4a, .m4p, .mp4, .aac)
• WMA fi les in Lossless format
RDS program types
| NO TYPE No RDS programme type | |
| NEWS News services | |
| AFFAIRS Politics and current affairs | |
| INFO Special information programs | |
| SPORT Sports | |
| EDUCATE Education and advanced training | |
| DRAMA Radio plays and literature | |
| CULTURE Culture, religion and society | |
| SCIENCE Science | |
| VARIED Entertainment programs | |
| POP M Pop music | |
| ROCK M Rock music | |
| MOR M Light music | |
| LIGHT M Light classical music | |
| CLASSICS Classical music | |
| OTHER M Special music programs | |
| WEATHER Weather | |
| FINANCE Finance | |
| CHILDREN Children's programs | |
| SOCIAL Social Affairs | |
| RELIGION Religion | |
| PHONE IN Phone In | |
| TRAVEL Travel | |
| LEISURE Leisure | |
| JAZZ Jazz Music | |
| COUNTRY Country Music | |
| NATION M National Music | |
| OLDIES Oldies Music | |
| FOLK M Folk Music | |
| DOCUMENT Documentary | |
| TES Alarm Test | |
| ALARM Alarm |
11 Troubleshooting

Caution
• Never remove the casing of this unit.
To keep the warranty valid, never try to repair the system yourself.
If you encounter problems when using this unit, check the following points before requesting service. If the problem remains unsolved, go to the Philips web site (www.philips.com/support). When you contact Philips, ensure that your unit is nearby and the model number and serial number are available.
No power
- Ensure that the AC cord of the apparatus is connected properly.
- Ensure that there is power at the AC outlet.
As a power-saving feature, the system • switches off automatically 15 minutes after track play reaches the end and no control is operated.
No disc detected
- Insert a disc.
Check if the disc is inserted upside down. - Wait until the moisture condensation at the lens has cleared.
- Replace or clean the disc.
• Use a fi nalized CD or correct format disc.
No picture
- Check the video connection.
• Turn on the TV to the correct Video-In channel.
• Progressive scan is activated but the TV does not support progressive scan.
Black and white or distorted picture
The disc does not match the TV color • system standard (PAL/NTSC).
Sometimes a slight picture distortion may • appear. This is not a malfunction.
Clean the disc.
A distorted picture may appear during • progressive scan setup.
The aspect ratio of the TV screen cannot be changed even though you have set the TV display format.
The aspect ratio is fixed on the loaded • DVD disc.
The aspect ratio may not be changed for • some TV systems.
No sound or poor sound
Adjust the volume.
Disconnect the headphones.
Check that the speakers are connected • correctly.
Check if the stripped speaker wires are • clamped.
Remote control does not work
• Before you press any function button, first select the correct source with the remote control instead of the main unit.
- Reduce the distance between the remote control and the unit.
- Insert the battery with its polarities (+/- signs) aligned as indicated.
- Replace the battery.
Aim the remote control directly at the • sensor on the front of the unit.
Disc does not play
- Insert a readable disc and ensure that the label side faces up.
Check the disc type, color system and • regional code. Check for any scratches or smudges on the disc. - Press SYSTEM MENU to exit the system setup menu.
- Disable the password for parental control or change the rating level.
Moisture has condensed inside the • system. Remove the disc and leave the system turned on for about an hour. Disconnect and reconnect the AC power plug, and then turn on the system again. As a power-saving feature, the system • turns off automatically 15 minutes after disc play reaches the end and no control is operated.
Poor radio reception
Increase the distance between the unit • and your TV or VCR. Fully extend the FM antenna. Connect an outdoor FM antenna instead.
Unable to select Progressive Scan
Ensure the video output mode is set to • [Pr/Cr Pb/Cb Y].
Audio or subtitle languages cannot be set
The disc is not recorded with sound or • subtitles in multiple languages. The audio or subtitle language setting is • prohibited on the disc.
Cannot display some fi les in USB device
The number of folders or fi les in the USB • device has exceeded a certain limit. This phenomenon is not a malfunction. The formats of these fi les are not • supported.
USB device not supported
The USB device is incompatible with the unit. Try another one.
Timer does not work
Set the clock correctly.
- Switch on the timer.
Clock/timer setting erased
• Power has been interrupted or the power cord has been disconnected.
- Reset the clock/timer.
Indholdsfortegnelse
1 Vigtigt 2
Sikkerhed 2
Meddelelse 4
2 Dit DVD Micro Theater 6
Indledning 6
Be responsible Respect copyrights

Bemærk
Identifi kationspladen fi ndes i bunden af • apparatet.
2 Dit DVD Micro Theater
natural_image
Isometric line drawing of a modern living room layout with a TV and display (no text or symbols)Tilslut FM-antenne

Tip
Always follow the instructions in this chapter in sequence.
[Ops. Dolby Digital] > [Dobb Mono]
Be responsible Respect copyrights

Hinweis
natural_image
Isometric line drawing of a modern office setup with monitor, cabinet, and display (no text or symbols)
Achtung
Always follow the instructions in this chapter in sequence.
Discs: 32 kHz, 44,1 kHz, 48 kHz
Be responsible Respect copyrights

Nota
natural_image
Isometric line drawing of a modern office setup with monitor, built-in cabinet, and floor plan (no text or symbols)natural_image
Line drawing of an electronic device with a motor and cable, no text or symbols present
Consejo
Always follow the instructions in this chapter in sequence.
Types de programme RDS 32
11 Dépannage 33
1 Important
Sécurité
Be responsible Respect copyrights

Remarque
natural_image
Isometric line drawing of a modern office setup with a monitor, built-in cabinet, and two rectangular furniture (no text or symbols)Attention
Always follow the instructions in this chapter in sequence.
Confi guration audio
1 Connectez un câble coaxial (non fourmi) :
Be responsible Respect copyrights
Philips Consumer Electronics
Philips, Glaslaan 2
5616 JB Eindhoven, The Netherlands

Nota
natural_image
Isometric line drawing of a modern office or living room layout with a monitor, sofa, and counter (no text or symbols)Attenzione
Always follow the instructions in this chapter in sequence.
Password] > [Mod Password]
Password] > [Password]
• *.VMA, *.AAC, *.DLF, *.M3U,
• *.PLS, *.WAV
Be responsible Respect copyrights
Opmerking
2 Uw DVD Micro Theatre
natural_image
Isometric line drawing of a modern living room layout with a TV, built-in cabinet, and monitor on a grid floor (no text or symbols)Let op
Always follow the instructions in this chapter in sequence.
Be responsible Respect copyrights

Kommentar
• Digital Sound Control (DSC)
• DBB (Dynamic Bass Boost)
natural_image
Isometric line drawing of a modern office setup with monitor, cabinet, and display (no text or symbols)Ansluta FM-antennen


Tips
Var försiktig
Always follow the instructions in this chapter in sequence.
- Important
- Safety
- Important Safety Instructions
- Safety-Important notes for users in the U.K.
- Mains plug
- How to connect a plug
- Copyright in the U.K.
- Caution
- Warning
- Hearing safety
- Listen at a moderate volume.
- To establish a safe volume level:
- Listen for reasonable periods of time:
- Be sure to observe the following guidelines when using your headphones.
- Notice
- Environmental information
- Be responsible Respect copyrights
- DOLBY.
- DIGITAL
- VIDEO
- Norge
- This apparatus includes this label:
- Note
- Your DVD Micro Theater
- Introduction
- With this unit, you can:
- You can enrich sound output with these sound effects:
- What's in the box
- Overview of the remote control
- ③DISPLAY/RDS
- ④CLOCK
- ⑤SLEEP/TIMER
- ⑦ ▲SLOW/▼ZOOM
- ⑧DISC MENU
- ⑨VOL +/-
- ⑩DSC
- ⑪LOUDNESS/DBB
- ⑫AUDIO
- ⑬SUBTITLE
- ⑭GOTO
- ⑮ANGLE/PROG
- ⑯Numeric keypad
- ⑰MUTE
- 18
- 19
- ⑳SYSTEM MENU
- ②1OK / ▶II
- ②A-B
- ②3OPEN/CLOSE
- ⑳MODE/DIM
- Connect
- Connect speakers
- Tip
- Connect TV
- Connect video cables
- Option 2: Connect through component video
- Get started
- Prepare the remote control
- For first-time use:
- To replace the remote control batteries:
- Set clock
- Turn on
- Switch to Eco Power standby mode
- Find the correct viewing channel
- Select the correct TV system
- Change system menu language
- Turn on Progressive Scan
- Turn off progressive scan manually
- Play
- Play a disc
- If play does not start automatically:
- Use the disc menu
- To access or exit the menu manually:
- For VCD with PlayBack Control (PBC) feature (version 2.0 only):
- Select an audio language
- Select a subtitle language
- Play from USB
- Insert the USB device.
- Play DivX video
- Play MP3/WMA/picture files
- Play control
- Select repeat/shuffle play options
- Repeat A-B (DVD/VCD/CD/MP3/WMA)
- Search forward/backward
- Search by time or chapter/track number
- Resume video play from last stopped point
- Play options
- Display play information
- Program
- Zoom in/out image
- Slow-motion play
- Change the audio channel
- Select a camera angle
- Picture view options
- Preview pictures
- Select a slide show play mode
- Rotate picture
- Adjust settings
- General setup
- [TV Display]
- [OSD Language]
- [Screen Saver]
- [DIVX (R) VOD]
- Audio setup
- [Digital Audio Setup] > [Digital Audio Setup Page] > [Digital Output]
- [Dolby Digital Setup] > [Dual Mono]
- [3D] > [3D Processing Page] > [Reverb Mode]
- [HDCD] > [HDCD Setup Page] > [Filter]
- [Night Mode]
- Video setup
- [Component]
- [TV Mode]
- Preference setup
- [TV Type]
- [Audio]
- [Subtitle]
- [Disc Menu]
- [Parental]
- [Default]
- [Password Setup] > [Password Setup Page] > [Password Mode]
- [Password Setup] > [Password Setup Page] > [Password]
- • [Change]
- Tune to FM radio stations
- Program radio stations automatically
- Program radio stations manually
- Tune to a preset radio station
- Set RDS clock
- Show RDS information
- Adjust volume level and sound effect
- Adjust volume level
- Select a sound effect
- Select a preset sound effect
- Enhance bass
- Select automatic loudness control
- Mute sound
- Listen through headphone
- Other features
- Activate demonstration mode
- Adjust brightness of display panel
- Set the alarm timer
- Set the sleep timer
- Connect other devices
- Listen to an audio player
- Record to a digital recorder
- Product information
- Supported disc formats
- Supported MP3-CD formats:
- USB playability information
- Compatible USB devices:
- Supported formats:
- Unsupported formats:
- Troubleshooting
- No power
- No disc detected
- No picture
- Black and white or distorted picture
- The aspect ratio of the TV screen cannot be changed even though you have set the TV display format.
- No sound or poor sound
- Remote control does not work
- Disc does not play
- Poor radio reception
- Unable to select Progressive Scan
- Audio or subtitle languages cannot be set
- Cannot display some fi les in USB device
- USB device not supported
- Timer does not work
- Clock/timer setting erased
- Indholdsfortegnelse
- Vigtigt 2
- Dit DVD Micro Theater 6
- Bemærk
- Dit DVD Micro Theater
- [Ops. Dolby Digital] > [Dobb Mono]
- Achtung
- Consejo
- Dépannage 33
- Sécurité
- Remarque
- Attention
- Confi guration audio
- Attenzione
- Password] > [Mod Password]
- Password] > [Password]
- Opmerking
- Uw DVD Micro Theatre
- Let op
- Tips
- Var försiktig
Brand : PHILIPS
Model : MCD712
Category : Hi-Fi System