
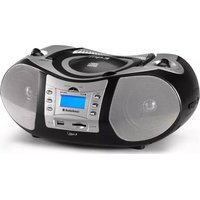
CL1461 - Radio AudioSonic - Free user manual and instructions
Find the device manual for free CL1461 AudioSonic in PDF.
| Product type | Alarm clock radio with iPod/iPhone docking station |
| Brand | AudioSonic |
| Model | CL1461 |
| Power supply | DC 5V 2A mains adapter (included); backup lithium battery CR2032 3V (not included) |
| Main functions | FM radio, dual alarm, sleep function, time synchronization with iPhone/iPod, AUX input, infrared alarm snooze sensor |
| Radio reception | FM, with built-in antenna |
| iPod/iPhone compatibility | Docking station for iPhone and iPod (recent models); charges iPod/iPhone (except iPod shuffle) |
| Display | Digital display with time, alarm, indicators |
| Controls | Buttons: On/Off, volume, up/down adjustment, memory, alarm 1/2, sleep, function, alarm snooze/dimmer, time/memory setting |
| Sensor | Infrared sensor to turn off alarm by waving hand |
| AUX input | 3.5 mm jack for external audio source (cable not included) |
| Radio presets | 20 FM presets |
| Sleep timer | From 10 to 90 minutes |
| Snooze function | Alarm repeats every 9 minutes |
| Safety | Do not expose to moisture, flames, do not block ventilation |
| Cleaning | Soft cloth with mild non-abrasive detergent; avoid solvents |
| Reparability | Not specified; no spare parts indicated |
Frequently Asked Questions - CL1461 AudioSonic
User questions about CL1461 AudioSonic
0 question about this device. Answer the ones you know or ask your own.
Ask a new question about this device
Download the instructions for your Radio in PDF format for free! Find your manual CL1461 - AudioSonic and take your electronic device back in hand. On this page are published all the documents necessary for the use of your device. CL1461 by AudioSonic.
USER MANUAL CL1461 AudioSonic
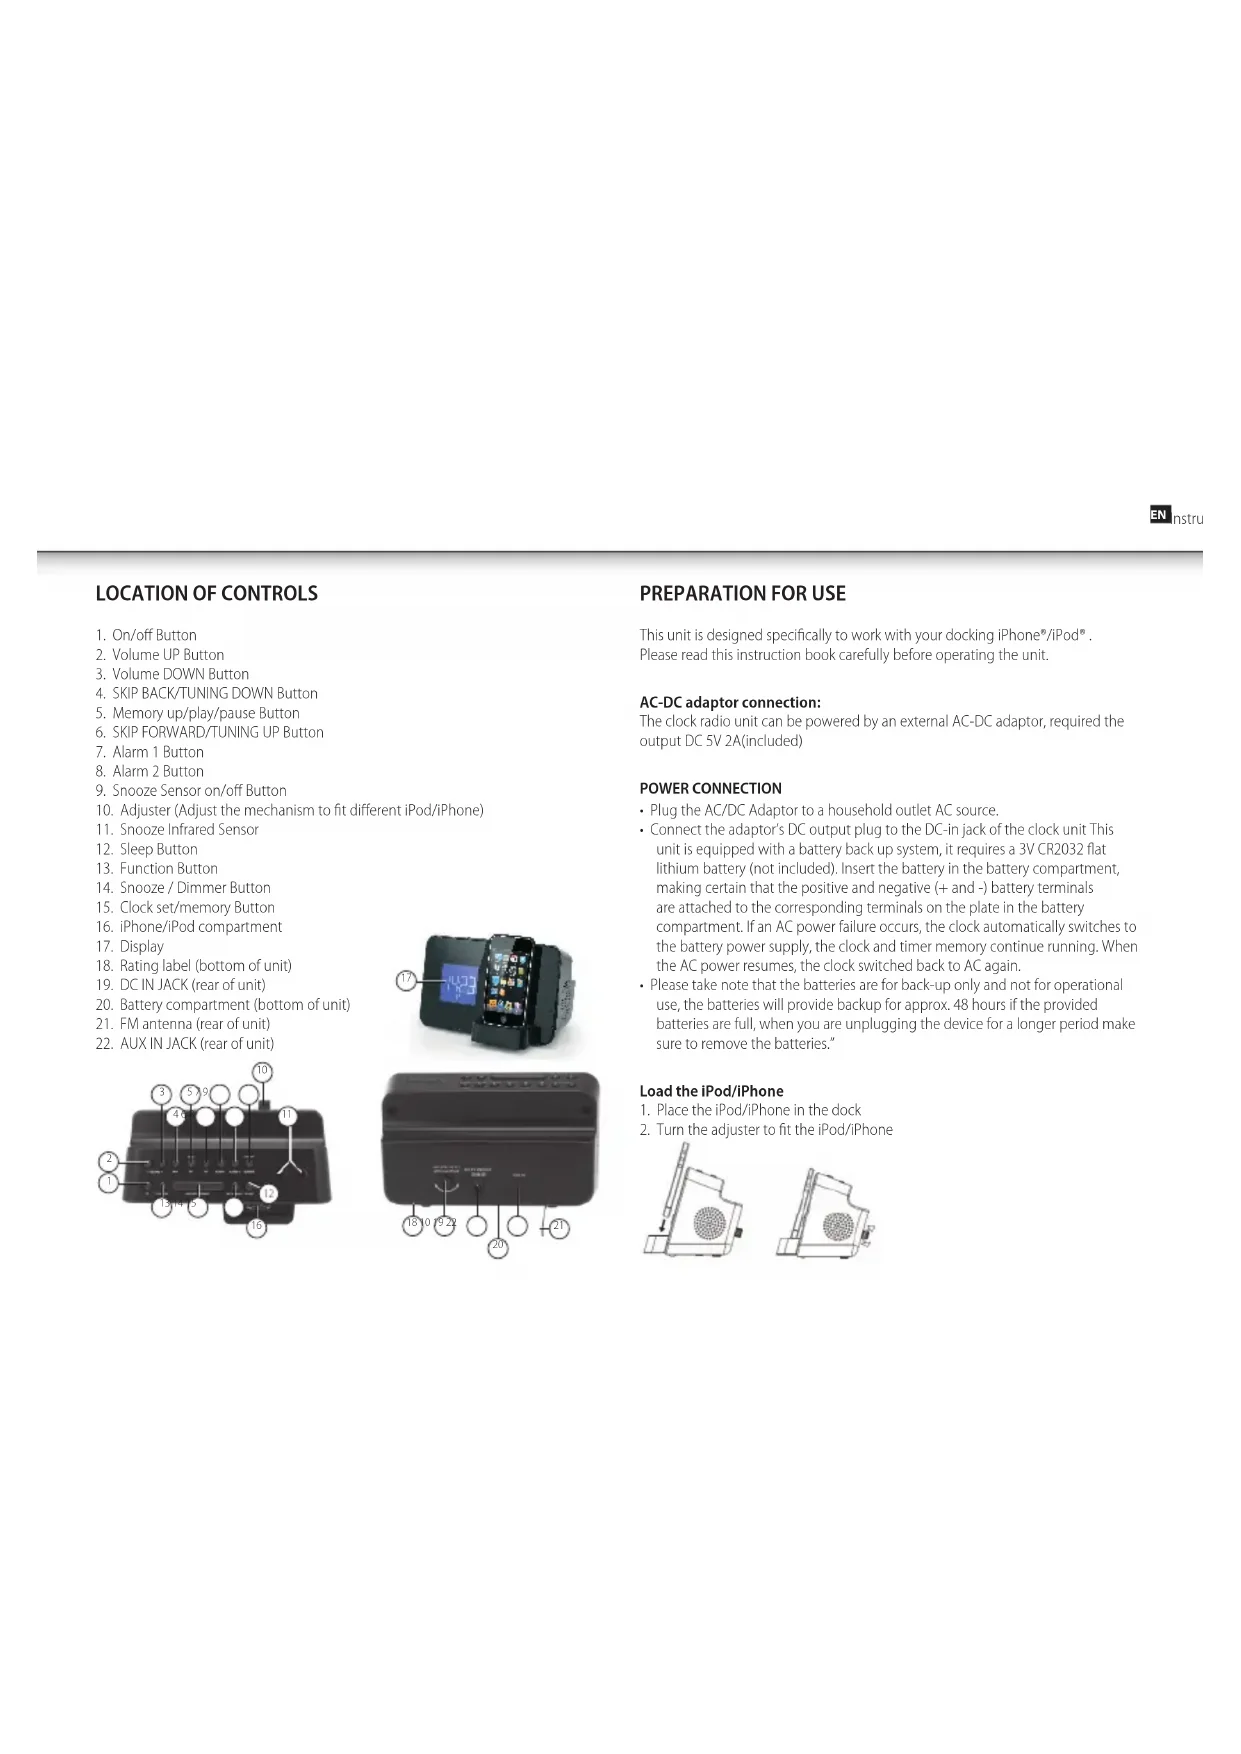
- On/off Button
- Volume UP Button
- Volume DOWN Button
- SKIP BACK/TUNING DOWN Button
- Memory up/play/pause Button
- SKIP FORWARD/TUNING UP Button
- Alarm 1 Button
- Alarm 2 Button
- Snooze Sensor on/off Button
- Adjuster (Adjust the mechanism to fit different iPod/iPhone)
- Snooze Infrared Sensor
- Sleep Button
- Function Button
- Snooze / Dimmer Button
- Clock set/memory Button
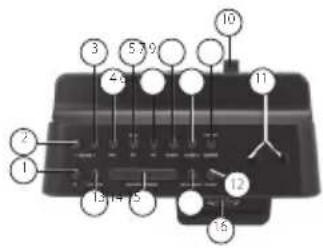
- iPhone/iPod compartment
- Display
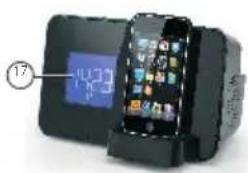
- Rating label (bottom of unit)
- DC IN JACK (rear of unit)
- Battery compartment (bottom of unit)
- FM antenna (rear of unit)
- AUX IN JACK (rear of unit)
PREPARATION FOR USE
This unit is designed specifically to work with your docking iPhone*/iPod. Please read this instruction book carefully before operating the unit.
AC-DC adaptor connection:
The clock radio unit can be powered by an external AC-DC adaptor, required the output DC 5V 2A(included)
POWER CONNECTION
- Plug the AC/DC Adaptor to a household outlet AC source.
- Connect the adaptor's DC output plug to the DC in jack of the clock unit. This unit is equipped with a battery back up system, it requires a 3V CR2032 flat lithium battery (not included). Insert the battery in the battery compartment, making certain that the positive and negative (+ and -) battery terminals are attached to the corresponding terminals on the plate in the battery compartment. If an AC power failure occurs, the clock automatically switches to the battery power supply, the clock and timer memory continue running. When the AC power resumes, the clock switched back to AC again.
- Please take note that the batteries are for back-up only and not for operational use, the batteries will provide backup for approx. 48 hours if the provided batteries are full, when you are unplugging the device for a longer period make sure to remove the batteries."
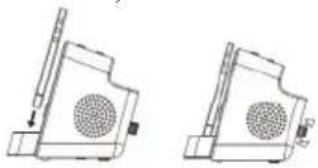
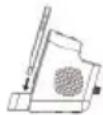
Load the iPod/iPhone
- Place the iPod/iPhone in the dock
- Turn the adjuster to fit the iPod/iPhone

AudioSonic
Instruction Manual
OPERATION INSTRUCTIONS
Setting time using iPhone / iPod time Sync
The clock radio time sync feature allows you to sync the time setting on the clock radio to the time from your iPhone or recent model iPod(IPod touch, iPod nano and iPod classic; older iPod models such as iPod mini do not support this feature).
- Plug the AC adaptor cable into the AC Adapter jack located at the back of the unit, time sync flashes on the lower part of the display.
- Once sync is completed, time updated will appear on the display.
- If sync was not successful, sync failed will appear on the display. If this happens, please try again, with a different iPhone / iPod if needed. If sync still fails, please set time manually.
iPhone time is automatically updated to the correct time via cell phone towers, the time on your iPod is accurate only to the time on the computer the last time the iPod wasynced to it. It's possible to have up to 59 seconds difference between the clock radio andynced iPod / iPhone.
Setting clock Time (manually)
With the power off, press and hold the clock set/memory button; "12Hr" will blink. Press the Tune UP or Tune DOWN button to set the unit to the 24 hour (24 Hr) mode or 12 Hour (12Hr) mode. Press the clock set/memory button and the hours will blink. Press the Tune UP or DOWN to set the current hour, then press the clock set/memory button again; the minute digits will blink. Press the Tune UP or Tune DOWN to set the current minutes.
When done and you press clock set/memory button once again and the display time will blink 4 times to indicate the current time is set.
Setting Alarm Time
To preview the alarm time, Press the ALARM button once.
- While the display is showing the alarm time and you hold the ALARM button for 3 seconds and the hours will blink.
- Press the Tune UP or Tune DOWN to set the alarm hour.
- Press the ALARM button again; the minute digits will blink. Press the Tune UP or Tune DOWN to set the alarm minutes.
- Press the ALARM button and you can change the sound mode (Buzzer, Radio, iPhone®/iPod®) for the alarm.
- Press Tune UP or Tune DOWN to choose different sound mode. The alarm volume will gradually increase. Then press the ALARM button when done
- To delay the alarm, press SNOOZE. It will come on again in approx. 9 minutes. You may repeat this cycle several times during the alarm cycle.
- To stop the alarm, press ALARM button
- To stop the alarm from coming on the following day, hold the ALARM button to turn it off. The alarm icon or will disappear to indicate the alarm is disarmed.
Note: To wake to iPhone™/iPod™, your iPhone™/iPod™ must be properly docked and off or no alarm will sound.
Note: If you select wake to iPhone® / iPod® but no iPhone® / iPod® is present, the alarm will automatically switch to buzzer alarm.
Listening to your iPhone© / iPod®
When the iPhone / iPod is docked and in standby mode, press the function button to select iPod/Phone mode. The iPhone / iPod icon will appear on the display..
Charging your iPhone© / iPod®
When you docked your iPhone® / iPod® and it recharges (until fully charged).
Note: iPod® Shuffles will NOT charge.
Listening to Radio
- Press the On/off button to turn the unit on.
- Press the FUNCTION button to select the Radio Mode.
- Use the Tune UP or Tune DOWN button to select the desired FM station.
If you press and hold the Tune UP or Tune DOWN button for one second, then release, the unit will automatically scan to the next broadcasting station. - Press the On/Off button to turn the radio off.
To Set/Recall the radio presets
- Press the On/off button to turn the unit on.
- Press the FUNCTION button to select the Radio Mode.
- Use the Tune UP or Tune DOWN button to select the desired FM station.
- Press the clock set/memory button; "P01"will blink in the display.
- Press the clock set/memory button again to set the preset.
- Repeat steps 2 through 4 to set more presets.
The unit can preset 20 stations totally FM. - When "P01-P20" is blinking, press Tune UP or Tune DOWN to select the Preset number.
- When recalling preset stations, press Mem - up to select the Preset number.
Sleep Operation
- When listening to radio or iPhone® / iPod®, press sleep button to enter sleep mode. You can just adjust the sleep timer from 90 mins to 10 mins by pressing the sleep button. The unit will automatically turn off after the selected time.
- Press On/Off button to cancel sleep function.
AUX in
- The AUX in jack can be used to playback alternate audio signal sources on the unit speakers.
- This AUX in jack requires a 3.5mm audio cable for input signal.
Note: This unit does not provide a recording signal from AUX in to the iPhone® / iPod®. It's purpose is to allow other types of audio devices to playback on the unit speaker.
Note: The 3.5mm audio cable is not included.
SNOOZE INFRARED SENSOR FUNCTION
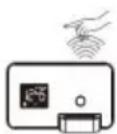
In alarm On mode, use the infrared sensor to turn snooze function On
Hand on top of sensor within 1 second snooze off for 9 minutes.
WARNING
- No naked flame sources, such as lighted candles, should be placed on the apparatus.
- Do not place the product in closed bookcases or racks without proper ventilation.
- The mains plug will have to be easily reachable because it's the only way to completely turn of the CI-1461.
- The ventilation should not be impeded by covering the ventilation openings with items, such as newspapers, table-cloths, curtains, etc.
- It shall not be exposed to dripping or splashing and that no objects filled with liquids, such as vases, shall be placed on the apparatus.
- Do not connect FM antenna to outside antenna.
- The unit should not be exposed to direct sunlight, very high or low temperature, moisture, vibrations or placed in dusty environment
- Do not use abrasive, benzene, thinner or other solvents to clean the surface of the unit. To clean, wipe it with mild non-abrasive detergent solution and clean soft cloth.
- Never attempt to insert wires, pins or other such objects into the vents or opening of the unit.
- Disconnect device warning: Main plug is used as the connection; so it should always remain ready operate.
- Batteries shall not be exposed to excessive heat such as sunshine, fire or the like.
CAUTION
- Danger of explosion if battery is incorrectly replaced
- Replace only with the same or equivalent type

AudioSonic
Gebruiksaanwijzing
LOKATIE VAN DE BEDIENINGSELEMENTEN
ChargerVoteiPhone/iPod
Come collocare I'iPod/iPhone
Cbbp3BaHe cdaanTep-npeo6pa3yBaTeN OT npOMeHnIB Ha npab TOK:
PapnoTO hacOBHmK MoKeJa 6bIe 3axpaHbAo Hpe3 BbHwea adantepnepo6p3aybaTeN ot npomeHHB Ha npab Tok C mXOHa MOHocT Ha npab Tok DC SV2A (BkIOueH B KOMnneKaTa)
CBbP3BAHE KbM EJEKTPO3AXPAHBAHE
Bkuiyepa ananepa-npeo6pa3ybaTeon OT npomehnHa npab TOK B eektpuueckn KOHTaT B DOMA BN.
Cbpxe HxOHNH Ieep Ha aanTepa KbM Jxaka Ha acOBnHa (DC-in).To3 npen e 60pydBaH cocnyprntenHa cnTeMa 3a pa6oTa Ha 6atepn, 3a KOrTo e Hc0xOIMMe enHa nOscKa IITnEBA 6atepna 3V CR2032 (He e BkIOUeHa B KomIeKta).NCTabe 6atepna T B H3D0I N KATO BHMMABATE NIOKCTNE (+ -) Da CbOTBETCBAT Ha nONOXtENH N OTPiuCA tEPmHaH NaIIaTKaHa Ha IIbHOHa HTH3D0T 3a 6atepna. AKe oEeKTPO3axPAHbAHeTO Ha IpOMeHNIB TO b6de pKeBcHato, YacOBHKnBT N MaETTA Ha TaImepa PnpdbXbaTda FyHKIOHHPat. Korato 6bde npKbCHATO eNKeTPO3axPAHbAHeTO Ha NPOMeHNIB TO, eNKeTPO3axPAHbAHeTO Ha ypeDa ABOMATNUHO Ce PpeBKNIOVA Ha 3axPbHBHeOT Gatepna. Korato eNKeTPO3axPAHbAHeTO 6bde Bb3ctAHOBEO, HacOBHKnBT ce npEeBKNIOVA ObpatHO Ha npOMeHNIB TOK.
MOna OT6eKETe, He 6atePNTe cnyKaT CaMo 3a oCnpyBaHe, a He n 3a nbHoueHHo FyHKIOHOHPaHe Ha ypeA. No To3N HauMH, 6atePrtata ne noJbPka paB0TaHa ypeA B npOdbIckHne Ha 48 qaca, aKO e HanbHNo 3apeHcHa. Korato NkIOuBaHe ypeA ot MPekata 3a No-npOdbIckHTeHbPme, MoJI MaXHete 6atePrtata."
IocTabaHHe Ha iPod/iPhone

- NocTabete iPod/iPhone B rHe3doto
2.3aBpTeTe KOnyTe H MaexHaHn3Ma 3a HaCTpoBaHe 3a DaΦKcmpate/HaCTPOTE THe3I0TO KbMa pa3Mepa H a Buaip iPod/iPhone
HHCTPYKUN 3A PABOTACYPEDA
HactpoKaHaBpeMeToCn3non3BaHeHaFyHKUaTa3aCnHXPOHM3uPaHe c iPhone /iPod
Функьгета 3a синхрониране Ви поьога Да синхронирапс
Настойкпerte 3a Врeme На радноTO-ясовнК с TeЗи Н BAши iPhone, ИИ
СКорошен молд На iPod (IPod touch, iPod nano N iPod classic; no-сту
MODENI iPod кATO iPod mini He noДьржТаЗN Функьч).
1. BkIoueTe Kabena Ha aIaIntepa 3a npOMeHnB TOK B Jxka 3a npOMeHnB TOK (AC) HAMpaAe Ha TbpaHa YpeDa; npT ToBa B DoHNHa PaH DaCnPiEe 3aONuBa 3a npMnIRBa CmBOITb,Sync".
2. Pn npKIOUbaHe Ha CmHxpoHN3aIIMrTa, HOBOTo HAcTpoEHO Bpeme Ie ce 3nnneHa DnCnner.
3.AKO cHxpoHn3aIyra e HeycneHHa,Ha Icnnner lce ce n3nnne CMBONbT „sync failed".Ako TOBa ce cnuyu,MOla ONITaIte OTHOBO,ako e Heo6xoJIMC paaNCH iPhone / IPod. Ako OTHOBO cHxpoHn3aIyra e HeycneHHa,MOla HactpOte pbHPOBcMeTo.
HactpoKNTe 3a BpemTo Ha IPhone aBOMaTuHc Ke KopmPata KbM npaBnHOTo Bpeme NocpeCTBOM CnHana Ha MPekaTa Ha KneTbHHTe TeneOHO TaKa, ye HactpoKNTe 3a BpemTo BbB BauIM IPOd ca ToHN Camo KbM daHHNte Ha KOMIIObpa KbM MOMeHa HcHxPOHImPaHETo IM 3a NocJeH nBt. Bb3MOJHo eJa ce NoIyHAT do paZnKn Do 59 ckyHm MeXy paMTO-HacOBHKn TaKa CnHXPOHImPaHNTe IPod / IPhone.


- PREPARATION FOR USE
- AC-DC adaptor connection:
- POWER CONNECTION
- Load the iPod/iPhone
- AudioSonic
- OPERATION INSTRUCTIONS
- Setting time using iPhone / iPod time Sync
- Setting clock Time (manually)
- Setting Alarm Time
- Listening to your iPhone© / iPod®
- Charging your iPhone© / iPod®
- Listening to Radio
- To Set/Recall the radio presets
- Sleep Operation
- AUX in
- SNOOZE INFRARED SENSOR FUNCTION
- WARNING
- CAUTION
- LOKATIE VAN DE BEDIENINGSELEMENTEN
- ChargerVoteiPhone/iPod
- Come collocare I'iPod/iPhone
- Cbbp3BaHe cdaanTep-npeo6pa3yBaTeN OT npOMeHnIB Ha npab TOK:
- CBbP3BAHE KbM EJEKTPO3AXPAHBAHE
- IocTabaHHe Ha iPod/iPhone
- HHCTPYKUN 3A PABOTACYPEDA
Brand : AudioSonic
Model : CL1461
Category : Radio