Avata 2 - Drone DJI - Free user manual and instructions
Find the device manual for free Avata 2 DJI in PDF.
Download the instructions for your Drone in PDF format for free! Find your manual Avata 2 - DJI and take your electronic device back in hand. On this page are published all the documents necessary for the use of your device. Avata 2 by DJI.
USER MANUAL Avata 2 DJI
Antennas Forehead Support microSD Card Slot Proximity Sensor 5D Button Back Button Headband Battery Compartment Headband Adjustment Knob Mask Lens Battery Level LEDs Power Button/Link Button USB-C Port IPD (Interpupillary Distance) Slider / Diopter Adjustment Knob Camera
Battery Level LEDs Lock Button
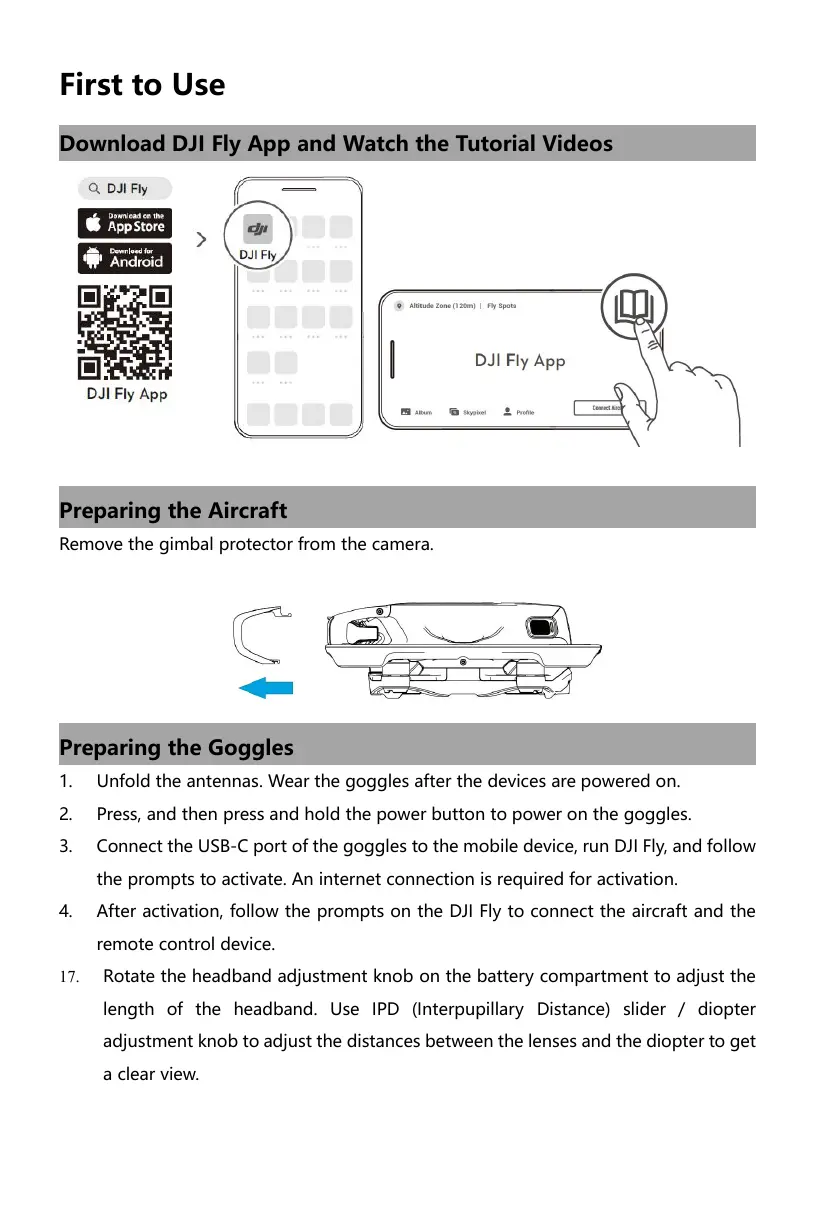
First to Use 0 mu nm | Pép Di Fly App Remove the gimbal protector from the camera. Unfold the antennas. Wear the goggles after the devices are powered on.
Press, and then press and hold the power button to power on the goggles.
Connect the USB-C port of the goggles to the mobile device, run Dl Fly, and follow the prompts to activate. An internet connection is required for activation.
4. After activation, follow the prompts on the Di Fly to connect the aircraft and the
remote control device.
17. Rotate the headband adjustment knob on the battery compartment to adjust the
length of the headband. Use IPD (Interpupillary Distance) slider / diopter adjustment knob to adjust the distances between the lenses and the diopter to get a clear view.
2. Power on/off: press then press and hold for 2 seconds.
Follow the steps below to link the aircraft, goggles, and remote control devices. The goggles need to be linked to the aircraft first, and then to the remote control devices. Preparation before linking:
1. Power on the aircraft, goggles, and remote control devices.
2. Press and then press and hold the power button to power devices on or off.
Link the aircraft with the goggles
1. Press the power button on the goggles. The goggles will start to beep continually.
Press and hold the power button on the aircraft until the battery level LEDs start to blink in sequence.
3. Once linking is completed, the battery level LED of the aircraft turn solid and
display the battery level, the goggles stop beeping, and image transmission can be displayed normallÿ. Link the remote control devices with the goggles
1. Press the power button on the goggles. The goggles will start to beep continually.
2. Press and hold the power button of the remote control device until it starts to
beep continually and the battery level LEDs blinks in sequence.
3. Once linking is successful, the remote control device stops beeping and both the
battery level LEDs turn solid and display the battery level.
DJI Avata 2 must be activated before using for the first time. Make sure all devices are linked after powering on the aircraft, goggles, and remote control device. Connect the USB-C port of the goggles to the mobile device, run DJI Fly, and follow the prompts to activate. An internet connection is required for activation. Di Fiy App
Press down or toggle to the right to open the menu from the FPV view of the goggles. Toggle the button forward to open the camera settings panel and toggle backward to open the shorteut menu. After a settings panel is opened, toggle the button to navigate the menu or adjust the parameter value. Press the button to confirm the selection.
Press to return to the previous menu or exit the current view.
Tilt left or right or rotate the motion controller to rotate the aircraft. Tilt the motion controller up and down to control the tilt of the gimbal. Tilt the motion controller 90° up or down, then press the accelerator to make the aircraft ascend or descend. Press the accelerator to fly in the direction of the circle in the goggles. Push the accelerator out to y the aireraft Le <- nn backward.
Specifications Aircraft (Model: QF3WAK) Takeoff Weight Approx. 350 g Operating Temperature -10° to 40° C (14° to 104° F) Transmission
2.4 GHz: <20 dBm (FCC/CE/SRRC/MIC)
DJI Avata 2 Intelligent Flight Battery + Keep batteries clean and dry. DO NOT allow liquid to come into contact with the batteries. DO NOT leave batteries covered in moisture or out in the rain. DO NOT drop the batteries into water. Otherwise, an explosion or fire may occur. + DO NOT use non-DJl batteries. It is recommended to use DJI chargers. + DO NOT use swollen, leaking, or damaged batteries. In such situations, contact DJI or a DJI authorized dealer. + The batteries should be used at a temperature between -10° to 40° C(14° to 104° F). High temperatures can cause an explosion or fire. Low temperatures will reduce the performance of a battery. + DO NOT disassemble or pierce the battery in any way. + The electrolytes in the battery are highly corrosive. If any electrolytes come into contact with your skin or eyes, immediately wash the affected area with water and seek medical support. + Keep the batteries out of the reach of children and animals. + DO NOT use a battery if it is involved in a crash or heavy impact. + Extinguish any battery fire using water, sand, or a dry powder fire extinguisher. + DO NOT charge the battery immediately after flight. The battery temperature may be too high and may cause serious damage to the battery. Allow the battery to cool down to close to room temperature before charging. Charge the battery at a temperature range of 5° to 40° C (41° to 104° F). The ideal charging temperature range is 22° to 28° C (72° to 82° F). Charging at the ideal temperature range can prolong battery life. + DO NOT expose the battery to fire. DO NOT leave the battery near heat sources such as a furnace, heater, or inside a vehicle on a hot day. Avoid storing the battery in direct sunlight. + DO NOT store the battery for an extended period after fully discharging. Othervwise, the battery may over-discharge and cause irreparable damage to the battery cell.
+ _lfa battery with a low power level has been stored for an extended period, the battery will enter deep hibernation mode. Recharge the battery to bring it out of hibernation. This equipment complies with radiation exposure limits set forth for an uncontrolled environment. This equipment should be installed and operated With minimum distance 20cm between the radiator & your body. FCC Compliance Notice Supplier’s Declaration of Conformity Product name: DJI Avata 2 Model Number: QF3W4K Responsible Party: DJI Research LLC Responsible Party Address: 17301 Edwards Road, Cerritos, CA 90703 Website: www.dji.com We, DJI Research LLC, being the responsible party, declares that the above mentioned model was tested to demonstrate complying with all applicable FCC rules and regulations. This device complies with Part 15 of the FCC Rules. Operation is subject to the following two conditions: (1) This device may not cause harmful interference, and (2) This device must accept any interference received, including interference that may cause undesired operation. Any changes or modifications not expressly approved by the party responsible for compliance could void the user's authority to operate the equipment. This equipment has been tested and found to comply with the limits for a Class B digital device, pursuant to part 15 of the FCC Rules. These limits are designed to provide reasonable protection against harmful interference in a residential installation. This equipment generates, uses and can radiate radio frequency energy and, if not installed and used in accordance with the instructions, may cause harmful interference to radio communications.
However, there is no guarantee that interference will not occur in a particular installation. If this equipment does cause harmful interference to radio or television reception, which can be determined by turning the equipment off and on, the user is encouraged to try to correct the interference by one or more of the following measures: —Reorient or relocate the receiving antenna. —Increase the separation between the equipment and receiver. —Connect the equipment into an outlet on a circuit different from that to which the receiver is connected. —Consult the dealer or an experienced radio/TV technician for help. RF Exposure Information The aircraft complies with FCC radiation exposure limits set forth for an uncontrolled environment. In order to avoid the possibility of exceeding the FCC radio frequency exposure limits, human proximity to the antenna shall not be less than 20cm during normal operation. This transmitter must not be co-located or operating in conjunction with any other antenna or transmitter. ISED Compliance Notice CAN ICES-003 (B) / NMB-003(B) This device contains licence-exempt transmitter(s)/receiver(s) that comply With Innovation, Science and Economic Development Canada's licence-exempt RSS(s). Operation is subject to the following two conditions: (1)This device may not cause interference.(2)This device must accept any interference, including interference that may cause undesired operation of the device. L'émetteur/récepteur exempt de licence contenu dans le présent appareil est conforme aux CNR d'innovation, Sciences et Développement économique Canada applicables aux appareils radio exempts de licence. L'exploitation est autorisée aux deux conditions suivantes :(1)L'appareil ne doit pas produire de brouillage; (2)L'appareil doit accepter tout brouillage radioélectrique subi, même si le brouillage est susceptible d'en compromettre le fonctionnement.
EU Compliance Statement: SZ DJI TECHNOLOGY CO. LTD. hereby declares that this device (DJI Avata 2) is in compliance with the essential requirements and other relevant provisions of the Directive 2014/53/EU. A copy of the EU Declaration of Conformity is available online at www.dji.com/euro-compliance EU contact address: DJI GmbH, Industriestrasse 12, 97618, Niederlauer, Germany GB Compliance Statement: SZ DJI TECHNOLOGY CO. LTD. hereby declares that this device (DJI Avata 2) is in compliance with the essential requirements and other relevant provisions of Radio Equipment Regulations