
IC-SAT100 - Communication ICOM - Free user manual and instructions
Find the device manual for free IC-SAT100 ICOM in PDF.
| Product Type | Satellite transceiver |
| Brand | Icom |
| Model | IC-SAT100 |
| Satellite network | Iridium® (global coverage) |
| Battery type | Li-ion, model BP-300 |
| Battery voltage | 7.2 V |
| Battery capacity | 2270 mAh (minimum), 2350 mAh (typical) |
| Approximate battery life | 14.5 hours (TX: RX: standby = 5:5:90) |
| Charge time (supplied charger) | Approximately 3.1 hours for BP-300 |
| RF output power | 7 W |
| Audio power | 1500 mW |
| Protection rating | IP67 (dust and waterproof, with covers attached) |
| Operating temperature range | -30 °C to +60 °C |
| Charging temperature range | 0 °C to +60 °C |
| Maximum number of call groups | 15 |
| Communication | One-to-many (push-to-talk) |
| Connectivity | Bluetooth® (on some versions), micro USB for charging |
| Built-in GPS receiver | Yes |
| Emergency button | Yes ([EMER]) |
| Display | LCD screen, available languages (French, English, etc.) |
| Supplied accessories | Battery, charger, AC adapter, antenna, belt clip, USB cable |
| Cleaning | Soft dry cloth; after exposure to salt water, rinse with fresh water |
| Repairability | Contact your Icom distributor or dealer for any issues |
| Safety information | Do not use non-Icom batteries, do not expose to temperatures >50°C, do not short-circuit terminals |
Frequently Asked Questions - IC-SAT100 ICOM
User questions about IC-SAT100 ICOM
0 question about this device. Answer the ones you know or ask your own.
Ask a new question about this device
Download the instructions for your Communication in PDF format for free! Find your manual IC-SAT100 - ICOM and take your electronic device back in hand. On this page are published all the documents necessary for the use of your device. IC-SAT100 by ICOM.
USER MANUAL IC-SAT100 ICOM
Thank you for choosing this Icom product.
This product is designed and built with Icom's state of the art technology and craftsmanship.
With proper care, this product should provide you with years of trouble-free operation.
Important
READ ALL INSTRUCTIONS carefully and completely before using the transceiver. SAVE THIS INSTRUCTION MANUAL — This instruction manual contains important operating instructions for the IC-SAT100.
For Advanced features and instructions, see the OPERATING MANUAL on the Icom website for details.
https://www.icomjapan.com/support/
Explicit definitions
| WORD | DEFINITION |
| △ DANGER! | Personal death, serious injury or an explosion may occur. |
| △ WARNING! | Personal injury, fire hazard or electric shock may occur. |
| CAUTION | Equipment damage may occur. |
| NOTE | If disregarded, inconvenience only. No risk of personal injury, fire or electric shock. |
Features
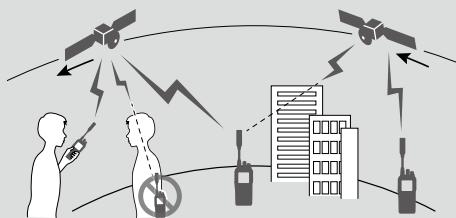
Real-Time Communication with the Iridium® LEO (Low Earth Orbit) satellite network, covering all over the globe including the Poles
- One-to-many communication (Maximum 15 Groups)
- 1500 mW powerful audio
- Multiple language (Chinese, English, French, Japanese, and Spanish)
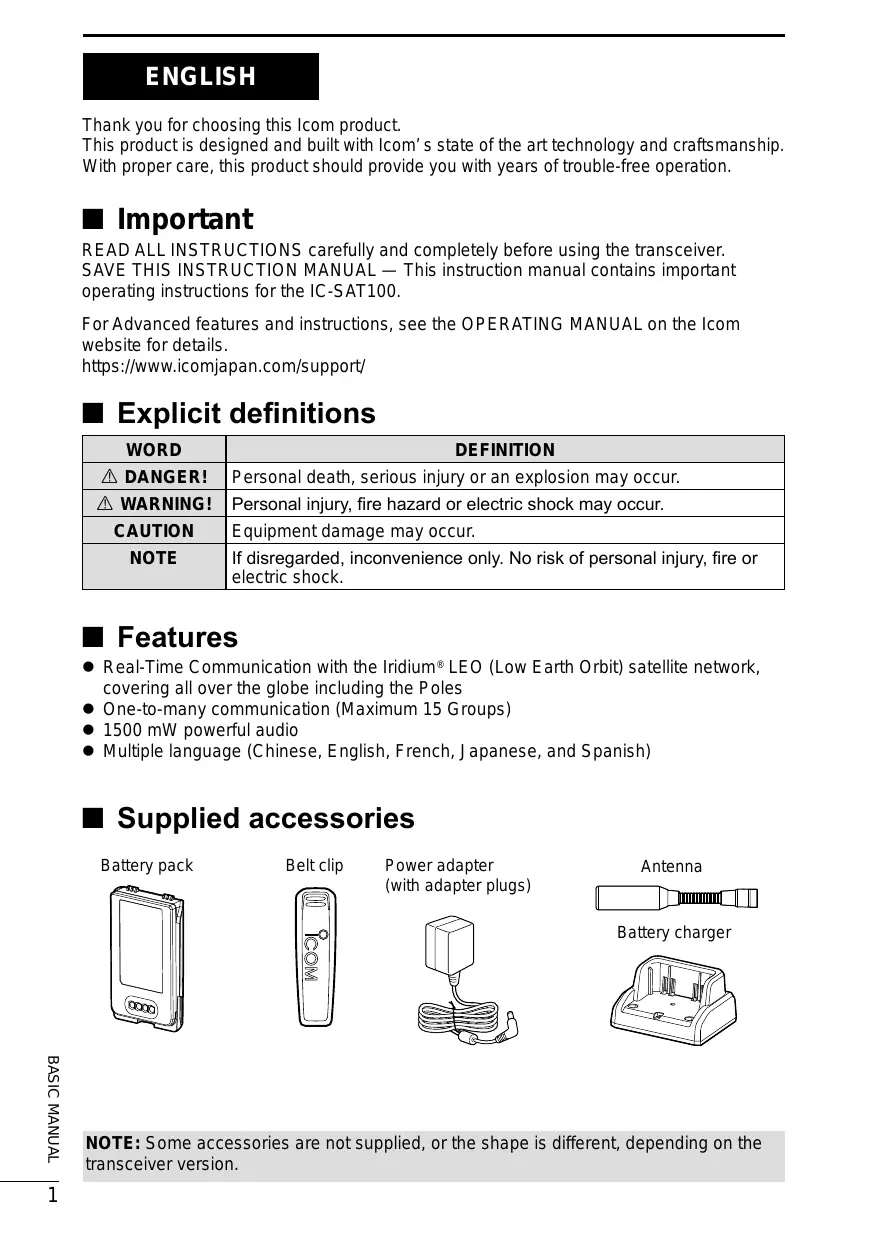
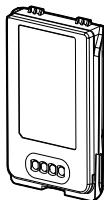
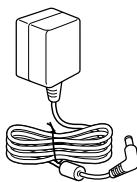
Supplied accessories
Battery pack

Belt clip
Power adapter (with adapter plugs)

Antenna
Battery charger
NOTE: Some accessories are not supplied, or the shape is different, depending on the transceiver version.
Precautions
DANGER! NEVER use or charge Icom battery packs with non-Icom transceivers or non-Icom chargers. Only Icom battery packs are tested and approved for use with Icom transceivers or charged with Icom chargers. Using third-party or counterfeit battery packs or chargers may cause smoke, fire, or cause the battery to burst.
WARNING! NEVER hold the transceiver so that the antenna is very close to, or touching exposed parts of the body, especially the face or eyes, while transmitting.
WARNING! NEVER operate the transceiver with a headset or other audio accessories at high volume levels. The continuous high volume operation may cause a ringing in your ears. If you experience the ringing, reduce the volume level or discontinue use.
CAUTION: DO NOT short the terminals of the battery pack. Shorting may occur if the terminals touch metal objects such as a key, so be careful when placing the battery packs (or the transceiver) in bags, and so on. Carry them so that shorting cannot occur with metal objects. Shorting may damage not only the battery pack, but also the transceiver.
CAUTION: DO NOT use harsh solvents such as Benzine or alcohol when cleaning. This could damage the equipment surfaces. If the surface becomes dusty or dirty, wipe it clean with a soft, dry cloth.
CAUTION: DO NOT place or leave the transceiver in excessively dusty environments. This could damage the transceiver.
DO NOT place or leave the transceiver in direct sunlight or in areas outside of the specified temperature range: -30^(-22^) +60^(+140^)
BE CAREFUL! The transceiver meets IP67* requirements for dust tight and waterproof protection. However, once the transceiver has been dropped, dust and waterproof protections cannot be guaranteed due to the fact that the transceiver may be cracked, or the waterproof seal damaged, and so on. * Only when the jack cover or the optional speaker microphone is attached.
NEVER place the transceiver in an insecure place to avoid inadvertent use by unauthorized persons.
In some countries, using a satellite communication device may be prohibited, or a license is required. Make sure you comply with all applicable laws and regulations in your area.
About E-marking: Detailed installation notes for Icom mobile transceivers to be fitted into vehicles are available. Please contact your Icom dealer or distributor.
Icom and the Icom logo are registered trademarks of Icom Incorporated (Japan) in Japan, the United States, the United Kingdom, Germany, France, Spain, Russia, Australia, New Zealand, and/or other countries.
The Bluetooth® word mark and logos are registered trademarks owned by Bluetooth SIG, Inc. and any use of such marks by Icom Inc. is under license. Other trademarks and trade names are those of their respective owners.
3M, PELTOR, and WS are trademarks of 3M Company. All other products or brands are registered trademarks or trademarks of their respective holders.
Iridium, and the Iridium logo are registered trademarks of Iridium Satellite LLC and its affiliates.
Important notes
About the GPS receiver
- Do not cover the antenna with anything that will block the satellite signals.
- GPS signals cannot pass through metal objects. When using the transceiver inside a vehicle, you may not receive GPS signals. We recommend you use it near a window.
-
The GPS receiver may not work if used in the following locations:
-
Tunnels or high-rise buildings
- Underground parking lots
- Under a bridge or viaduct
- In remote forested areas
-
Under bad weather conditions (rainy or cloudy day)
-
The Global Positioning System (GPS) is built and operated by the U.S. Department of defense. The Department is responsible for accuracy and maintenance of the system. Any changes by the Department may affect the accuracy and function of the GPS system.
■ Recommendation
CLEAN THE TRANSCEIVER
THOROUGHLY IN A BOWL OF FRESH
WATER after exposure to saltwater, and dry it before operating. Otherwise, the transceiver's keys, switches, and controllers may become unusable, due to salt crystallization, and/or the charging terminals of the battery pack may corrode.
NOTE: If the transceiver's waterproof protection appears defective, carefully clean it with a soft, damp (fresh water) cloth, then dry it before operating. The transceiver may lose its waterproof protection if the case, jack cap, or connector cover is cracked or broken, or the transceiver has been dropped. Contact your Icom distributor or your dealer for advice.
Icom is not responsible for the destruction, damage to, or performance of any Icom or non-Icom equipment, if the malfunction is because of:
- Force majeure, including, but not limited to, fires, earthquakes, storms, floods, lightning, other natural disasters, disturbances, riots, war, or radioactive contamination.
- The use of Icom transceivers with any equipment that is not manufactured or approved by Icom.
Table of contents
Important. 1
■ Explicit definitions. 1
Features. 1
Supplied accessories 1
Precautions 2
Important notes 3
■ Recommendation 3
1 PANEL DESCRIPTION. 5
■ Front, top and side panels. 5
■ Function display 6
2 BATTERY CHARGING 7
■ Battery caution 7
Charging caution 8
■ Battery charger. 9
3 MENU SCREEN. 10
■ Construction 10
Receiving and transmitting 11
5 OPTIONS 12
6 INFORMATION 13
■ About CE and DOC. 13
Disposal 13
■ Certification. 13
FCC information. 13
■ Safety training information 14
■ Front, top and side panels
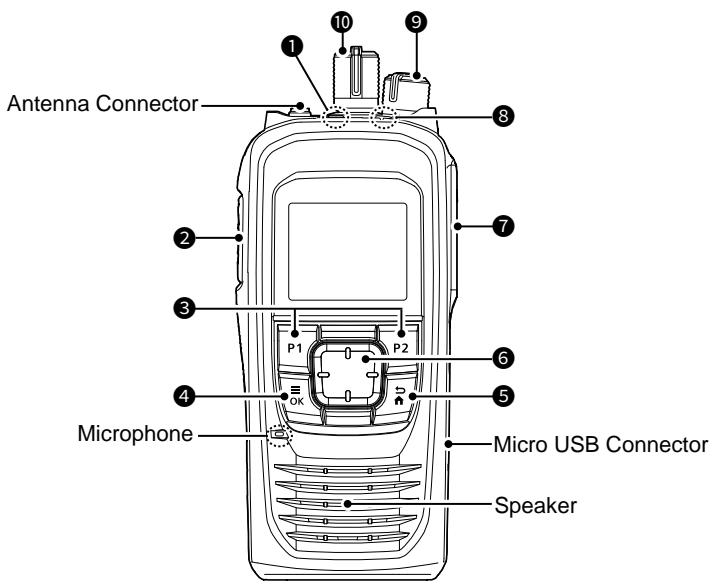
1 EMERGENCY KEY [EMER]
Hold down to transmit an Emergency call.
2 PTT SWITCH [PTT]
Hold down to transmit, release to receive.
P1/P2 KEYS [P1]/[P2]
Push to use the function assigned in the "Key Setup" menu*.
*[OK] > Functions > Key Setup
4 MENU/OK KEY [OK]
- Push to enter the Menu screen.
- Push to select an item in the Menu screen.
BACK/HOME KEY [BACK]
- Push to return to the previous Menu screen.
- Hold down to exit the Menu screen.
6 DIRECTIONAL KEY [UP]/[DOWN]/ [LEFT]/[RIGHT]
Push to select a menu item, setting, and so on.
7 MULTI-CONNECTOR
Connects to an optional headset.
STATUS INDICATOR
- Lights green while receiving.
- Blinks green while the "OPEN" status.
- Lights red while transmitting.
- Blinks orange while registering, or no satellites found.
9 VOLUME/POWER SWITCH [VOL]
- Rotate to turn the transceiver ON or OFF.
- Rotate to adjust the audio output level.
10 TALKGROUP SELECTOR
Rotate to select a talkgroup.
Function display
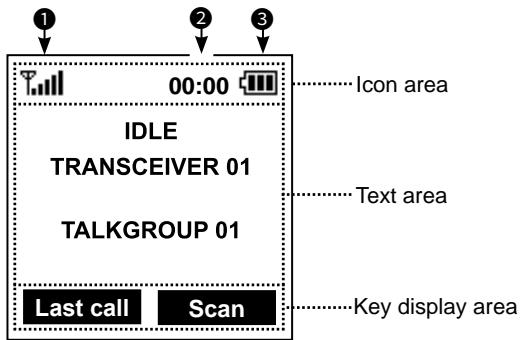
① The display is shown in English as an example. Select other languages on the Menu screen, if necessary. ([OK] > Display > Language)
Icon Area
Indicators
SIGNAL STRENGTH
Displays the relative receive signal strength level.
NOTE: The antenna icon “ T ” disappears if the connection with a satellite is not established. Keep the antenna vertical and wait until you are connected, or move your position to the place with a clear view of the sky.
CLOCK
Displays the current time.
BATTERY
Displayed or blinks to indicate the battery status.
Icons
The following icons are displayed in the Icon Area.
LOCK
Displayed when the Lock function is ON.
SURVEILLANCE
Displayed when the Surveillance function is ON.
VIBRATION
Displayed when the Vibration function is ON.
Bluetooth®
(For only the transceiver with the Bluetooth function)
- " " is displayed when Bluetooth is activated.
- "3" is displayed when a Bluetooth device is connected.
MESSAGE
- Displayed when a message have been received.
- Displayed if unread messages are still in the Message memory.
RECORD
Displayed when the Record function is ON.
USB
Displayed when a USB device is connected.
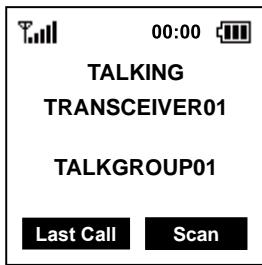
Text Area
Displays the status, preset transceiver name, and selected Talkgroup Name.
| Status | Description |
| IDLE | The selected Talkgroup is not active. |
| OPEN | The selected talkgroup is active but no one is talking. |
| REQUESTING | Requesting the transmission. |
| TALKING | Transmitting |
| LISTENING | Receiving |
| SCANNING | Scanning a call |
| BUSY | Cannot transmit because the audio is being received. |
Key Display Area
Displays the names of the function assigned to [P1] and [P2].
■ Battery caution
Misuse of Li-ion batteries may result in the following hazards: smoke, fire, or the battery may rupture. Misuse can also cause damage to the battery or degradation of battery performance.
DANGER! NEVER solder the battery terminals, or NEVER modify the battery pack. This may cause heat generation, and the battery may burst, emit smoke or catch fire.
DANGER! NEVER place or leave battery packs in areas with temperatures above 50^ (122^) . High temperature buildup in the battery cells, such as could occur near fires or stoves, inside a sun-heated vehicle, or in direct sunlight for long periods of time may cause the battery cells to rupture or catch fire. Excessive temperatures may also degrade the battery pack's performance or shorten the battery cell's life.
DANGER! NEVER strike or otherwise impact the battery pack. Do not use the battery pack if it has been severely impacted or dropped, or if the pack has been subjected to heavy pressure. Battery pack damage may not be visible on the outside of the case. Even if the surface of the battery does not show cracks or any other damage, the cells inside the battery may rupture or catch fire.
DANGER! NEVER place battery packs near a fire. Fire or heat may cause them to rupture or explode. Dispos of used battery packs in accordance with local regulations.
DANGER! NEVER let fluid from inside the battery get in your eyes. This can cause blindness. Rinse your eyes with clean water, without rubbing them, and immediately go to a doctor.
WARNING! NEVER put the battery pack in a microwave oven, high-pressure container, or in an induction heating cooker. This could cause a fire, overheating, or cause the battery cells to rupture.
WARNING! NEVER let fluid from inside the battery cells come in contact with your body. If it does, immediately wash with clean water.
WARNING! NEVER use deteriorated battery packs. They could cause a fire.
CAUTION: DO NOT continue to use the battery pack if it emits an abnormal odor, heats up, or is discolored or deformed. If any of these conditions occur, contact your Icom dealer or distributor.
CAUTION: DO NOT expose the battery pack to rain, snow, saltwater, or any other liquids. Do not charge or use a wet pack. If the pack gets wet, be sure to wipe it with a clean dry cloth before using.
CAUTION: DO NOT use the battery pack out of the specified temperature range for the transceiver (-30^ +60^ (-22^ +140^)) and the battery itself (-20^ +60^ (-4^ +140^)) . Using the battery out of its specified temperature range will reduce its performance and battery cell's life. Please note that the specified temperature range of the battery may exceed that of the transceiver. In such cases, the transceiver may not work properly because it is out of its operating temperature range.
CAUTION: DO NOT leave the pack fully charged, completely discharged, or in an excessive temperature environment (above 50^ , 122^ ) for an extended period of time. If the battery pack must be left unused for a long time, it must be detached from the transceiver after discharging. You may use the battery pack until the remaining capacity is about half, then keep it safely in a cool and dry place at the following temperature range:
-20^ +50^ (-4^ +122^) (within a month)
-20^ +40^ (-4^ +104^) (within three months)
-20^ +20^ (-4^ +68^)
(within a year)
BE SURE to replace the battery pack with a new one approximately five years after manufacturing, even if it still holds a charge. The material inside the battery cells will become weak after a period of time, even with little use. The estimated number of times you can charge the pack is between 300 and 500. Even when the pack appears to be fully charged, the operating time of the transceiver may become short when:
- Approximately 5 years have passed since the pack was manufactured.
- The pack has been repeatedly charged.
Attention to the swelled battery pack
The battery cells may deteriorate and swell due to their characteristics if used in an environment and conditions such as: frequently charged, recharged immediately after full charge, used or saved in a hot place, or charged by methods other than the instructions. If the battery pack swells, it has reached the end of its life due to deterioration. Replace it with a brand new one.
Charging caution
DANGER! NEVER charge the battery pack in areas with extremely high temperatures, such as near fires or stoves, inside a sun-heated vehicle, or in direct sunlight. In such environments, the safety/ protection circuit in the battery will activate, causing the battery to stop charging.
WARNING! NEVER charge the transceiver during a lightning storm. It may result in an electric shock, cause a fire or damage the transceiver. Always disconnect the pc ver adapter before a storm.
WARNING! NEVER charge or leave the battery in the battery charger beyond the specified time for charging. If the battery is not completely charged by the specified time, stop charging and remove the battery from the battery charger. Continuing to charge the battery beyond the specified time limit may cause a fire, overheating, or the battery may rupture.
WARNING! Occasionally observe the battery pack condition while charging. If any abnormal condition occurs, discontinue using the battery pack.
CAUTION: DO NOT insert the transceiver (battery attached to the transceiver) into the charger if it is wet or soiled. This could corrode the battery charger terminals or damage the charger. The charger is not waterproof.
CAUTION: DO NOT charge the battery pack outside of the specified temperature range: 10^ 45^ ( 50^ 113^ ). Otherwise, the charging time will be longer, but the battery will not reach a full charge. While charging, at a point after the temperature goes out of the specified range, the charging will automatically stop.
CAUTION: DO NOT use the power adapter unless the power outlet is easily accessible and near the unit. Remove it from the AC power outlet when not in use.
2 BATTERY CHARGING
■ Battery charger
NOTE:
- Before attaching or detaching a battery pack, BE SURE to turn OFF the transceiver by rotating [VOL] fully counter clockwise until it makes a "click" sound. Otherwise, a transceiver malfunction could occur.
BE SURE to remove the transceiver from the charger while operating the transceiver.
Supplied battery charger
Charging time:
Approximately 3.1 hours for the BP-300
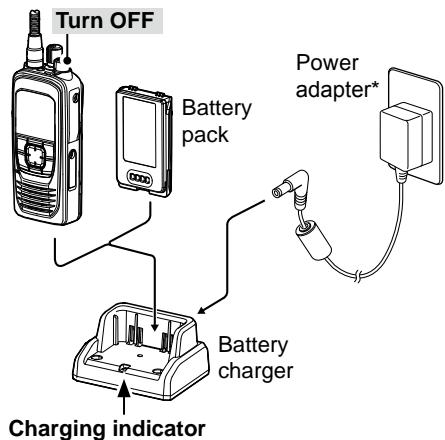
Lights orange: Charging
Lights green: Charged
Blinks red: When a charging error has occurred.
- May not be supplied, or the shape may be different, depending on the transceiver version.
NOTE: If the charging indicator alternately blinks green and orange, remove the battery pack or the transceiver from the charger, then reinsert it. If the charging indicator alternately still blinks green and orange, ask your dealer for details.
Extend Battery Life function
The charger has the Extend Battery Life function switch on the bottom panel.
- OFF: The battery is fully charged. The operating time of the transceiver is maximum.
- ON: The battery is not fully charged to not shorten the battery life cycle.
① The battery life cycle is extended. But the operating time of the transceiver becomes shorter.
Micro USB Connector
You can also use the Micro USB Connector to charge instead of the supplied battery charger.
① “” is displayed while charging.
① Charging time may longer than using a battery charger.
You can use the Menu screen to set infrequently changed values or function settings.
Construction
The Menu screen is constructed in a tree structure.
You can go to the next tree level with [RIGHT] or [OK], go back a level with [LEFT] or [BACK].
To select an item, push [UP] or [DOWN].
See the OPERATING MANUAL for each menu item's details. You can download the OPERATING MANUAL from the Icom website.
① The menu items contained in the transceiver may be different, depending on the transceiver's version or preset settings. Ask your dealer for details.
https://www.icomjapan.com/support/
| Talkgroup |
| Refresh Talkgroup |
| Talkgroup List |
| PTT Option |
| Talk Timer |
| Mic Gain |
| Call Recorder |
| Received Message |
| Message List |
| Location Sharing |
| Position Format |
| Distance Format |
| Bluetooth* |
| Bluetooth ON/OFF |
| BT Device List |
| Bluetooth Reset |
| BT Auto Connect |
| BT Audio Setting |
| BT Device Info |
| Key Beep (VS-3) |
| PWR Save (VS-3) |
| PTT Beep (VS-3) |
| One touch PTT |
| Waiting Pairing |
| Functions |
| Auto Keypad Lock |
| Key Setup |
| P1 Key |
| P2 Key |
| PC Command |
| Clock |
| Clock Display |
| Time Format |
| Clock Time Zone |
| DST |
| Display |
| Backlight |
| Contrast |
| Language |
| Beep/Vibration |
| System Beep Lv |
| Emer Beep Lv |
| Key Beep Lv |
| Ringer Lv |
| Opening Beep Lv |
| System Vibration |
| Emer Vibration |
| Key Vibration |
| Receive Vibration |
| Opening Vibration |
| Information |
| Battery Information |
| RSSI |
| My Position |
| Firmware Info |
| Satellite Info |
| Certification |
- For only the transceiver with the Bluetooth function.
Receiving and transmitting
Turning ON the transceiver
-
Rotate [VOL] to turn ON the transceiver.
-
The transceiver searches a satellite.
- When the transceiver connected and registered to the satellite, the status "IDLE," transceiver name, and Talkgroup name is displayed.
① Push [Last Call] to playback the received call.*
*See page 9 of the IC-SAT100 OPERATING MANUAL for Last Call Play function details.
① Push [UP] or [DOWN] to display the Talkgroup List.
① Rotate Talkgroup selector to select a talkgroup.
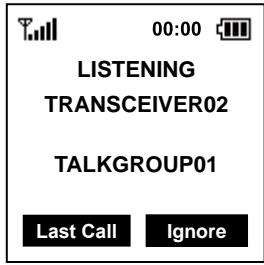
Receiving
When receiving, "LISTENING," and the source transceiver's name is displayed, and audio should be heard.
① Rotate [VOL] to adjust the audio output level.
Transmitting
CAUTION: DO NOT transmit without an antenna.
- Hold down [PTT].
① “REQUESTING” is displayed while the transceiver requests the transmission. - When "TALKING" is displayed, speak at your normal voice level.
① You can continuously transmit up to the period of time allowed by the system.
NOTE:
- If the connection becomes poor while transmitting, the transceiver sounds the beep "PuPu" in 1.5 seconds interval.
- You cannot transmit while listening to the received audio. Before transmitting, confirm the receiving is finished by the beep "Pi" and the display "OPEN."
Scan and Ignore
[Scan]
Push to scan a call.
[Ignore]
Push to ignore the received call.
① The Ignore function will be canceled if there are no more calls for 90 seconds or longer.
NOTE:
- The transceiver receives and transmits using several satellites orbiting the same orbit. Receiving and transmitting may fail depending on the satellite position or any obstacles between the transceiver and satellites.
- Your body can also be an obstacle. Do not hook the transceiver on your waist.
BATTERY PACK
BP-300 BATTERY PACK Voltage: 7.2 V
Capacity: 2200 mAh (minimum), 2350 mAh (typical)
Approximate battery life*: 14.5 hours
- Operating periods are calculated under the following conditions.
TX:RX:standby = 5:5:90
CHARGERS
- BC-241 DESKTOP CHARGER + BC-242 AC ADAPTER To rapidly charge a single battery pack.
- BC-214N MULTI CHARGER + AD-140 CHARGER ADAPTER + BC-157S AC ADAPTER
To rapidly charge up to 6 battery packs.
- BC-247 DOCKING STATION + BC-242 AC ADAPTER The wall-mountable charger.
OTHERS
- OPC-656 DC POWER CABLE
Use with a 13.8 V power source instead of the power adapter. (Use with the BC-214N)
FA-S102U ANTENNA
AH-38 ANTENNA + OPC-2113 COAXIAL CABLE (Approximately 10 m, 32 feet) - AH-40 ANTENNA The antenna with a magnet base and cable (Approximately 1.5 m, 4.9 feet).
- OPC-2422 COAXIAL CABLE An extension cable for use with the AH-40 (Approximately 5 m, 16 feet).
- AH-41 ACTIVE ANTENNA + OPC-2462 COAXIAL CABLE (Approximately 59 m, 193.5 feet)
- MBB-5 BELT CLIP
- HM-222 SPEAKER MICROPHONE With an Emergency key. The HM-222 meets IP68 requireme
- VS-3 Bluetooth® HEADSET (For only the transceiver with the Bluetooth function)
The Bluetooth® headset with a [PTT] switch.
About the third party Bluetooth® headsets: Icom has checked the PTT operation with some 3M Peltor headsets such as the WS Headset XP, WS ProTac XP and WS Alert XP. (Compatibility not guaranteed.)
VS-5MC PTT SWITCH CABLE + HS-94*1, HS-95*2, HS-97*3 HEADSET VS-5MC: Used to connect a headset to a transceiver. *1Ear-hook type *2Neck-arm type *3HS-97: Throat microphone
- HM-163MC TIEPIN TYPE MICROPHONE +EH-15B EARPHONE,SP-28 EAR HOOK TYPEEARPHONE, SP-26 TUBE EARPHONE
- SP-32 TUBE TYPE EARPHONE ADAPTER For use with EH-15B.
- SP-27 TUBE EARPHONE, SP-29 EAR HOOK TYPE EARPHONE, SP-40 EARPHONE + AD-135 EARPHONE ADAPTER AD-135: Used to connect an earphone to the transceiver's multi-connector.
- AD-118 ACC ADAPTER
Used to connect a headset with Hirose-6-pin connector to the transceiver's multi-connector.
- RS-SAT100 APPLICATION SOFTWARE Enables you to text chat through a satellite communication network by connecting an IC-SAT100 using Bluetooth®.
Some options may not be available in some countries. Ask your dealer for details.
About CE and DOC
CE
Hereby, Icom Inc. declares that the versions of ICSAT100 which have the "CE" symbol on
the product, comply with the essential requirements of the Radio Equipment Directive, 2014/53/EU, and the restriction of the use of certain hazardous substances in electrical and electronic equipment Directive, 2011/65/EU. The full text of the EU declaration of conformity is available at the following internet address:
https://www.icomjapan.com/support/
Disposal

The crossed-out wheeledbin symbol on your product, literature, or packaging reminds you that in the European Union, all electrical and electronic
products, batteries, and accumulators (rechargeable batteries) must be taken to designated collection locations at the end of their working life. Do not dispose of these products as unsorted municipal waste. Dispose of them according to the laws in your area.
Technical Information
Output Power: 7 W
SAR 10g: 4.46 W/kg
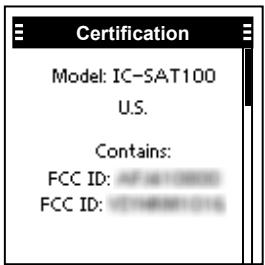
■ Certification
Refer to the "Certification" screen for certifications acquired with the transceiver. ([OK] > Information > Certification)
FCC information
This device complies with part 15 of the FCC Rules. Operation is subject to the condition that this device does not cause harmful interference.
This equipment has been tested and found to comply with the limits for a Class B digital device, pursuant to part 15 of the FCC Rules.
These limits are designed to provide reasonable protection against harmful interference in a residential installation. This equipment generates, uses and can radiate radio frequency energy and, if not installed and used in accordance with the instructions, may cause harmful interference to radio communications. However, there is no guarantee that interference will not occur in a particular installation. If this equipment does cause harmful interference to radio or television reception, which can be determined by turning the equipment off and on, the user is encouraged to try to correct the interference by one or more of the following measures:
- Reorient or relocate the receiving antenna.
- Increase the separation between the equipment and receiver.
- Connect the equipment into an outlet on a circuit different from that to which the receiver is connected.
- Consult the dealer or an experienced radio/ TV technician for help.
CAUTION: Changes or modifications to this transceiver, not expressly approved by Icom Inc., could void your authority to operate this transceiver under FCC regulations.
Safety training information

Your Icom radio generates RF electromagnetic energy while transmitting. This radio is designed for and classified as for "Occupational Use Only."
This means it must be used only during the course of employment by individuals aware of the hazards, and the ways to minimize such hazards. This radio is NOT intended for use by the "General Population" in an uncontrolled environment. This radio has been tested and complies with the FCC and IC RF exposure limits for "Occupational Use Only". In addition, your Icom radio complies with the following Standards and Guidelines with regard to RF energy and electromagnetic energy levels and evaluation of such levels for exposure to humans:
FCC KDB Publication 447498 D03, Evaluating Compliance with FCC Guidelines for Human Exposure to Radio Frequency Electromagnetic Fields.
American National Standards Institute (C95.1-2019), IEEE Standard for Safety Levels with Respect to Human Exposure to Radio Frequency Electromagnetic Fields, 0 Hz to 300 GHz.
- American National Standards Institute (C95.3-2021), IEEE Recommended Practice for Measurement and Cpmutations of Electric, Magnetic, and Electromagnetic Fields With RExpect to Human Exposure to Such Fields.0 Hz to 300 GHz.
- The accessories listed on page 1 are authorized for use with this product. Use of accessories other than those specified may result in RF exposure levels exceeding the FCC requirements for wireless RF exposure.
- Health Canada Safety Code 6 - Limits of Human Exposure to Electromagnetic Energy in the Frequency Range from 3 kHz to 300 GHz.

To ensure that your expose to RF electromagnetic energy is within the FCC allowable limits for occupational use, always adhere to the following guidelines:
- DO NOT operate the radio without a proper antenna attached, as this may damage the radio and may also cause you to exceed FCC RF exposure limits. A proper antenna is the antenna supplied with this radio by the manufacturer or an antenna specifically authorized by the manufacturer for use with this radio.
- DO NOT transmit for more than 50% of the total radio use time ("50% duty cycle"). Transmitting more than 50% of the time can cause FCC RF exposure compliance requirements to be exceeded. The radio is transmitting when "TALKING" is displayed on the function display. You can cause the radio to transmit by pushing the [PTT] switch.
- ALWAYS keep the antenna at least 2.5 cm (1 inch) away from the body when transmitting and only use the Icom belt-clips which are listed on page 12 when attaching the radio to your belt, or other place, to ensure FCC and IC RF exposure compliance requirements are not exceeded.
The information listed above provides the user with the information needed to make him or her aware of RF exposure, and what to do to assure that this radio operates within the FCC RF exposure limits of this radio.
Electromagnetic Interference/Compatibility
During transmissions, your Icom radio generates RF energy that can possibly cause interference with other devices or systems. To avoid such interference, turn off the radio in areas where signs are posted to do so. DO NOT operate the transmitter in areas that are sensitive to electromagnetic radiation such as hospitals and blasting sites.
Occupational/Controlled Use
The radio transmitter is used in situations in which persons are exposed as consequence of their employment provided those persons are fully aware of the potential for exposure and can exercise control over their exposure.
DEUTSCH
| Talkgroup |
| Refresh Talkgroup |
| Talkgroup List |
| PTT Option |
| Talk Timer |
| Mic Gain |
| Call Recorder |
| Received Message |
| Message List |
| Location Sharing |
| Position Format |
| Distance Format |
| Bluetooth* |
| Bluetooth ON/OFF |
| BT Device List |
| Bluetooth Reset |
| BT Auto Connect |
| BT Audio Setting |
| BT Device Info |
| Key Beep (VS-3) |
| PWR Save (VS-3) |
| PTT Beep (VS-3) |
| One touch PTT |
| Waiting Pairing |
| Functions |
| Auto Keypad Lock |
| Key Setup |
| P1 Key |
| P2 Key |
| PC Command |
| Clock |
| Clock Display |
| Time Format |
| Clock Time Zone |
| DST |
| Display |
| Backlight |
| Contrast |
| Language |
| Beep/Vibration |
| System Beep Lv |
| Emer Beep Lv |
| Key Beep Lv |
| Ringer Lv |
| Opening Beep Lv |
| System Vibration |
| Emer Vibration |
| Key Vibration |
| Receive Vibration |
| Opening Vibration |
| Information |
| Battery Information |
| RSSI |
| My Position |
| Firmware Info |
| Satellite Info |
| Certification |
TX: RX: Standby = 5: 5: 90
LADEGENERATE
- BC-241 TISCHLAGEGERÄT + BC-242 NETZGERÄT
TECLAS P1/P2 [P1]/[P2]
TECLA MENU/ACEPTAR [OK]
| Talkgroup |
| Refresh Talkgroup |
| Talkgroup List |
| PTT Option |
| Talk Timer |
| Mic Gain |
| Call Recorder |
| Received Message |
| Message List |
| Location Sharing |
| Position Format |
| Distance Format |
| Bluetooth* |
| Bluetooth ON/OFF |
| BT Device List |
| Bluetooth Reset |
| BT Auto Connect |
| BT Audio Setting |
| BT Device Info |
| Key Beep (VS-3) |
| PWR Save (VS-3) |
| PTT Beep (VS-3) |
| One touch PTT |
| Waiting Pairing |
| Functions |
| Auto Keypad Lock |
| Key Setup |
| P1 Key |
| P2 Key |
| PC Command |
| Clock |
| Clock Display |
| Time Format |
| Clock Time Zone |
| DST |
| Display |
| Backlight |
| Contrast |
| Language |
| Beep/Vibration |
| System Beep Lv |
| Emer Beep Lv |
| Key Beep Lv |
| Ringer Lv |
| Opening Beep Lv |
| System Vibration |
| Emer Vibration |
| Key Vibration |
| Receive Vibration |
| Opening Vibration |
| Information |
| Battery Information |
| RSSI |
| My Position |
| Firmware Info |
| Satellite Info |
| Certification |
TOUCHES P1/P2 [P1]/[P2]
| Talkgroup |
| Refresh Talkgroup |
| Talkgroup List |
| PTT Option |
| Talk Timer |
| Mic Gain |
| Call Recorder |
| Received Message |
| Message List |
| Location Sharing |
| Position Format |
| Distance Format |
| Bluetooth* |
| Bluetooth ON/OFF |
| BT Device List |
| Bluetooth Reset |
| BT Auto Connect |
| BT Audio Setting |
| BT Device Info |
| Key Beep (VS-3) |
| PWR Save (VS-3) |
| PTT Beep (VS-3) |
| One touch PTT |
| Waiting Pairing |
| Functions |
| Auto Keypad Lock |
| Key Setup |
| P1 Key |
| P2 Key |
| PC Command |
| Clock |
| Clock Display |
| Time Format |
| Clock Time Zone |
| DST |
| Display |
| Backlight |
| Contrast |
| Language |
| Beep/Vibration |
| System Beep Lv |
| Emer Beep Lv |
| Key Beep Lv |
| Ringer Lv |
| Opening Beep Lv |
| System Vibration |
| Emer Vibration |
| Key Vibration |
| Receive Vibration |
| Opening Vibration |
| Information |
| Battery Information |
| RSSI |
| My Position |
| Firmware Info |
| Satellite Info |
| Certification |
TASTI P1/P2 [P1]/[P2]
| Talkgroup |
| Refresh Talkgroup |
| Talkgroup List |
| PTT Option |
| Talk Timer |
| Mic Gain |
| Call Recorder |
| Received Message |
| Message List |
| Location Sharing |
| Position Format |
| Distance Format |
| Bluetooth* |
| Bluetooth ON/OFF |
| BT Device List |
| Bluetooth Reset |
| BT Auto Connect |
| BT Audio Setting |
| BT Device Info |
| Key Beep (VS-3) |
| PWR Save (VS-3) |
| PTT Beep (VS-3) |
| One touch PTT |
| Waiting Pairing |
| Functions |
| Auto Keypad Lock |
| Key Setup |
| P1 Key |
| P2 Key |
| PC Command |
| Clock |
| Clock Display |
| Time Format |
| Clock Time Zone |
| DST |
| Display |
| Backlight |
| Contrast |
| Language |
| Beep/Vibration |
| System Beep Lv |
| Emer Beep Lv |
| Key Beep Lv |
| Ringer Lv |
| Opening Beep Lv |
| System Vibration |
| Emer Vibration |
| Key Vibration |
| Receive Vibration |
| Opening Vibration |
| Information |
| Battery Information |
| RSSI |
| My Position |
| Firmware Info |
| Satellite Info |
| Certification |
AD-118 ADATTATORE ACC
- Important
- Explicit definitions
- Features
- Supplied accessories
- Precautions
- Important notes
- About the GPS receiver
- ■ Recommendation
- Table of contents
- PANEL DESCRIPTION. 5
- BATTERY CHARGING 7
- MENU SCREEN. 10
- OPTIONS 12
- INFORMATION 13
- ■ Front, top and side panels
- EMERGENCY KEY [EMER]
- PTT SWITCH [PTT]
- P1/P2 KEYS [P1]/[P2]
- MENU/OK KEY [OK]
- BACK/HOME KEY [BACK]
- DIRECTIONAL KEY [UP]/[DOWN]/ [LEFT]/[RIGHT]
- MULTI-CONNECTOR
- STATUS INDICATOR
- VOLUME/POWER SWITCH [VOL]
- TALKGROUP SELECTOR
- Function display
- Icon Area
- Indicators
- SIGNAL STRENGTH
- CLOCK
- BATTERY
- Icons
- LOCK
- SURVEILLANCE
- VIBRATION
- Bluetooth®
- MESSAGE
- RECORD
- USB
- Text Area
- Key Display Area
- ■ Battery caution
- Attention to the swelled battery pack
- Charging caution
- BATTERY CHARGING
- ■ Battery charger
- NOTE:
- Supplied battery charger
- Charging time:
- Extend Battery Life function
- Micro USB Connector
- Construction
- Receiving and transmitting
- Turning ON the transceiver
- Receiving
- Transmitting
- Scan and Ignore
- [Scan]
- [Ignore]
- BATTERY PACK
- CHARGERS
- OTHERS
- About CE and DOC
- CE
- Disposal
- Technical Information
- ■ Certification
- FCC information
- Safety training information
- Electromagnetic Interference/Compatibility
- Occupational/Controlled Use
- DEUTSCH
- LADEGENERATE
- TASTI P1/P2 [P1]/[P2]
Brand : ICOM
Model : IC-SAT100
Category : Communication