
Celebrity 150 - Headphones JBL - Free user manual and instructions
Find the device manual for free Celebrity 150 JBL in PDF.
| Product Type | 1 DIN Car Radio |
| Brand | JBL |
| Model | Celebrity 150 |
| Dimensions (W x H x D) | 178 x 50 x 87 mm |
| Power Supply | 12 V DC (negative ground) |
| Output Power | 4 x 50 W (peak) |
| Recommended Speaker Impedance | 4 Ω |
| Radio Tuner | AM/FM (FM: 87.5-108 MHz, AM: 522-1620 kHz) |
| USB/SD Playback | Yes (FAT32) |
| Bluetooth | Version 5.0, profiles A2DP, AVRCP, HFP, HSP |
| AUX Input | 3.5 mm Jack |
| Hands-free Function | Yes |
| Audio Settings | Bass, Treble, Balance, Fader, DSP (Rock, Pop, Classic, Flat) |
| Fuse Rating | 10 A |
| Care & Cleaning | Clean with a soft, dry cloth, avoid solvents |
| Safety | Do not expose to moisture, avoid high temperatures, disconnect battery before installation |
| Spare Parts | Not supplied, contact after-sales service |
| General Information | Detachable faceplate, standard 1 DIN installation |
Frequently Asked Questions - Celebrity 150 JBL
User questions about Celebrity 150 JBL
0 question about this device. Answer the ones you know or ask your own.
Ask a new question about this device
Download the instructions for your Headphones in PDF format for free! Find your manual Celebrity 150 - JBL and take your electronic device back in hand. On this page are published all the documents necessary for the use of your device. Celebrity 150 by JBL.
USER MANUAL Celebrity 150 JBL
Congratulations on your purchase of the JBL Celebrity 150 in-car head unit! For correct installation and connection, as well as the correct use of functions during operation, we recommend that you read this manual first. Save it, it will be useful to you in the future.
The JBL Celebrity 150 head unit has a standard installation size of 1DIN and contains:
AM/FM tuner,
- Player for audio files from USB flash drives,
- Player for audio files from SD memory cards,
- Bluetooth module that allows the head unit to work in hands free mode and play music from the connected device through the car audio system (BT Audio mode)
- AUX input for connecting any audio sources with headphone output (players, smartphones, tablets, etc.)
II. INSTALLATION AND CONNECTION OF THE HEAD UNIT
Choosing a place to install
- The head unit is intended for use inside the car.
- To mount it, choose a regular place in the panel, provided by the car manufacturer.
- If the dimension of footprint is not in 1-DIN format, select a suitable adapter frame to accommodate a standard 1-DIN footprint.
- If the design of the panel does not provide for a regular place for the installation of the head unit, choose the mounting location where the unit will not interfere with the normal driving function of the driver.
- Avoid installing the unit where it would be subject to high temperature, such as from direct sunlight, or from hot air, form the heater, or where it would be subject to dust, dirt, or excessive vibration.
Choosing an installation method
- Use only the parts included with the unit to ensure proper installation. To use of unauthorized parts can cause malfunctions.
- Consult with your nearest dealer if installation requires the drilling of holes or other modifications of the vehicle.
- Install the unit where it does not get in the driver's way and cannot injure the passenger if there is a sudden stop. Like an emergency stop.
- To avoid short circuits, disconnect the battery from the vehicle electrical system (if possible). After making connections, connect the positive terminal of the battery first, then the negative one.
Before final assembly of the unit, make sure all connections are correct and the system is working properly.
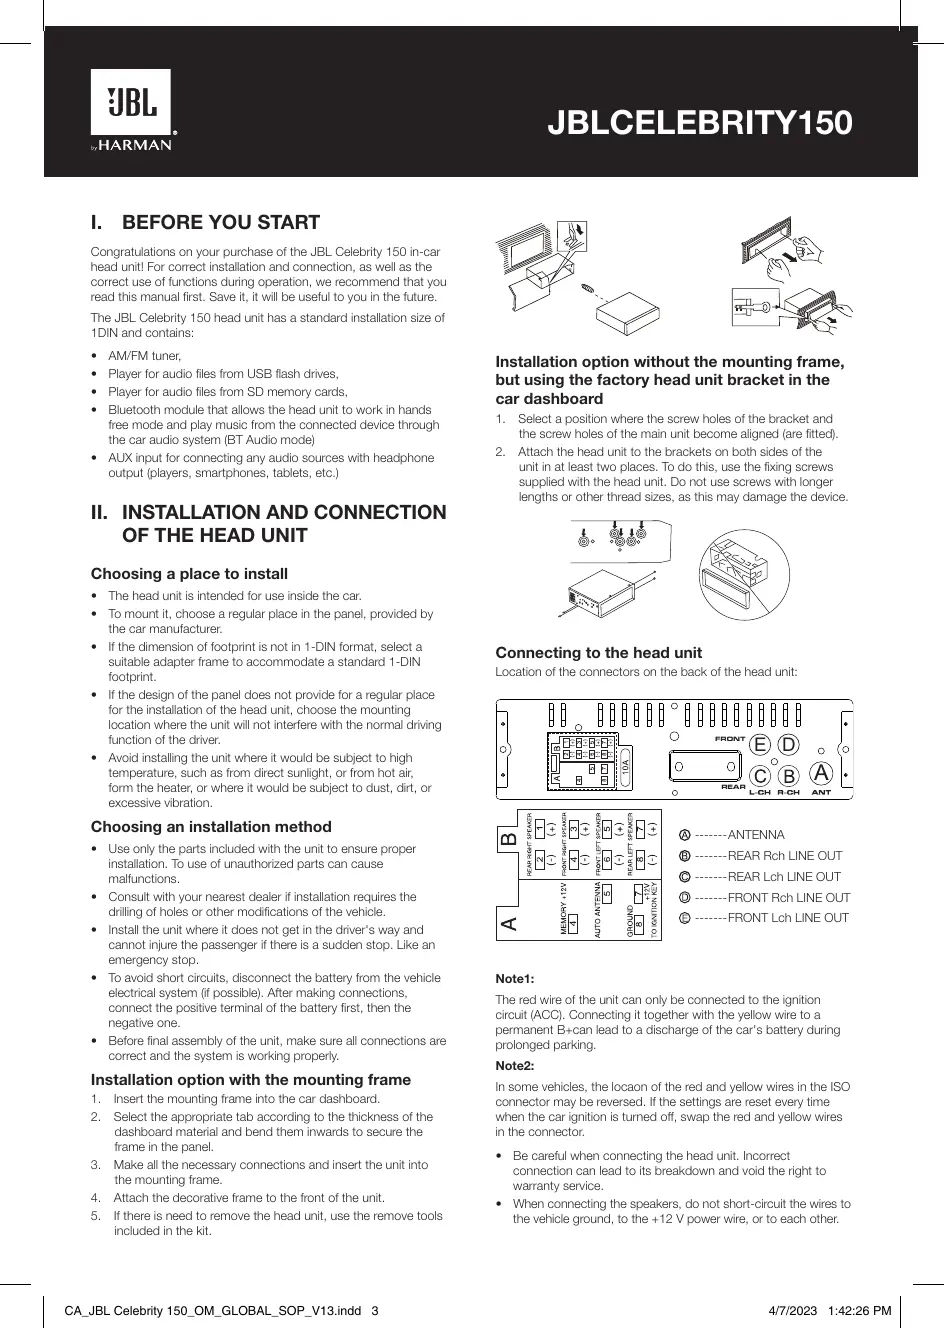
Installation option with the mounting frame
- Insert the mounting frame into the car dashboard.
- Select the appropriate tab according to the thickness of the dashboard material and bend them inwards to secure the frame in the panel.
- Make all the necessary connections and insert the unit into the mounting frame.
- Attach the decorative frame to the front of the unit.
- If there is need to remove the head unit, use the remove tools included in the kit.
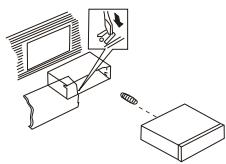
Installation option without the mounting frame, but using the factory head unit bracket in the car dashboard
- Select a position where the screw holes of the bracket and the screw holes of the main unit become aligned (are fitted).
- Attach the head unit to the brackets on both sides of the unit in at least two places. To do this, use the fixing screws supplied with the head unit. Do not use screws with longer lengths or other thread sizes, as this may damage the device.
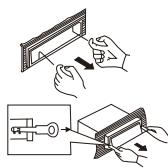
Connecting to the head unit
Location of the connectors on the back of the head unit:
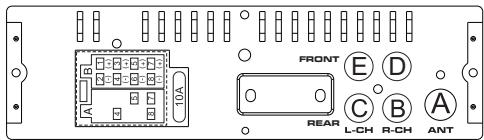
AANTENNA
REAR Rch LINE OUT
REAR Lch LINE OUT
FRONT RCH LINE OUT
FRONT Lch LINE OUT
Note1:
The red wire of the unit can only be connected to the ignition circuit (ACC). Connecting it together with the yellow wire to a permanent B+can lead to a discharge of the car's battery during prolonged parking.
Note2:
In some vehicles, the locaon of the red and yellow wires in the ISO connector may be reversed. If the settings are reset every time when the car ignition is turned off, swap the red and yellow wires in the connector.
- Be careful when connecting the head unit. Incorrect connection can lead to its breakdown and void the right to warranty service.
-
When connecting the speakers, do not short-circuit the wires to the vehicle ground, to the +12V power wire, or to each other.
-
The yellow wire must be connected to a wire that has a constant voltage of +12 Volts even with the ignition off. If you do not find such a wire, connect to the positive terminal of the battery after the fuse box.
- The black wire of the unit can be connected to a grounded metal part of the vehicle. If you cannot find a suitable bolt or screw, contact your nearest vehicle dealer for assistance. To ensure reliable contact, remove paint and dirt from the areas of the surface that the wire is in contact with.
- The blue wire is used to power the active antenna or control the switching on of the connected amplifier (remote control signal).
III. FRONT PANEL LAYOUT AND CONTROLS
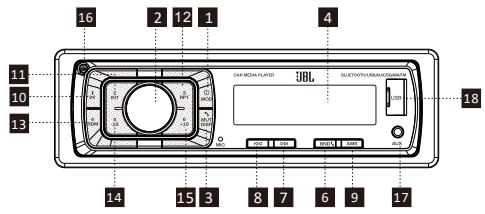
- Power/MOD Button
- Volume/Sel Button
- Display/Mute/Button
- LCD Display
- Reset Button
- Band switch/ID3 select
- Tune Seek & Track forward Button
- Tune Seek & Track reverse Button
- Automatically memory storing
- Play/pause & Preset Button 1
- Intro & Preset Button 2
- Repeat & Preset Button 3
- Random & Preset Button 4
- Preset Button 5
- Preset Button 6
- Release Button
- AUX IN JACK
- USB connector
- SD/MMC slot
General settings
POWER /MOD conversion
Under power off status, short press is power on,
Under power on status, short press is switching mode, long press is power off.
SOUND ADJUSTMENT
Turn on (2) can adjust the desired volume quality.
Press SEL button (2) will change in the following order.
Option:
VOL BAS TRE BAL FAD LOUD DSP DX STEREO
(Volume) (Bass) (Treible) (Balance) (Fader)
VOLUME
Adjust volume level by using VOL/SEL (2) knob. Turn the VOL knob to left to decrease the sound level, turn the VOL knob to right to increase the sound level.
Note: The unit is initially set to volume mode.
BASS
Press VOL/SEL button(2) one time. Adjust bass level by using VOL/SEL(2) Knob.
TREBLE
Press VOL/SEL button(2) two times. Adjust treble level by using VOL/SEL(2) Knob.
BALANCE
Press VOL/SEL button(2) three times. Adjust sound balance between left and right speakers by using VOL/SEL(2)Knob.
FADER (optional)
Press SEL button(2) four times. Adjust sound balance between front and rear speakers by using VOL/SEL(2)Knob.
LOUD ON/OFF MODE
In loud on mode the bass and treble response will be boosted.
DSP OFF/ON
Select "DSP ON" FLAT ROCK POP CLASS DSP OFF menu male.
LOCAL/DX
"LOCAL" position in areas with strong signals to let radio stop at only strong stations during manual turning select distant position in areas with weak signals to listen to all stations.
STEREO/MONO
When FM station are weak and are disturbed/listening can be improve by selecting MONO.
AREA SETUP
In Radio mode. Press SEL button for several seconds. LCD will be show from BEEP ON AREA USA/EUR. At AREA USA/EUR. You can use VOL + - to select the AREA frequency.
Note: *On Remote Control
Short press "MUT/DISP" button to turn on the mute, Press"MUT/ DISP" again to turn off the mute.
Long press "MUT/DISP", LCD screen shows clock "00:00". Short press "MUT/DISP", the hour flashes, rotate "VOL +/-" to adjust hour. Press "SEL" button, minute flashes, rotate "VOL +/-" to adjust the minute. If there is no operation within 5 seconds, the unit will memorize the current time and return to current mode.
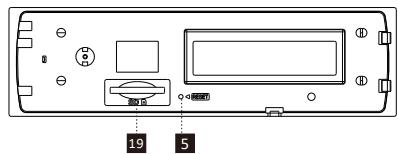
RESET
RESET button (5) is placed on the housing and must be activated with either a ball point pen or thin metal object. (Do not use sharp object to avoid damaging the unit.) The RESET button (5) is to be activated for the following reasons:
- Initial installation of the unit when all wiring is completed.
- All the function buttons do not operate.
- Error symbol on the display.
Radio tuner mode
BAND SELECTION
At tuner mode, press BAND button (6) to select the desired band. The reception band will change in the following order:
FM1 FM2 FM3 MW1(AM1) MW2(AM2)
STATION SELECTION
During radio mode, Press "SEEK▶" or "SEEK▶" buttons shortly to automatically search a station, Press "SEEK▶" or "SEEK▶" buttons more than 1 second is operated as manual turning mode.
AUTOMATICALLY MEMORY STORING & PROGRAM SCANNING
- Automatically Memory Storing
Press AMS(MP3) button (9) for several seconds, the radio searches from the current frequency and checks the signal strength until one cycle search is finished.
And then 6 strongest stations are stored into the corresponding preset number button.
- Program Scanning
Press AMS(MP3) button (9) shortly to scan preset station. When the AMS mode is carry out, "INT" appear on LCD display, the unit scan each stored station for 5 seconds, you also can press the corresponding number button or AMS button. Your desired station will start playing.
STATION STORING
Press preset button (10~15)
RADIO MODE.
M1 ~ M6
- PRESET MEMORY is loaded when key is pressed for less than 1 second.
- PRESET MEMORY is saved when key is pressed for longer than 1 sec.
Playback from USB flash drives and SD memory cards
Supported USB flash drives and SD memory cards
The head unit works with USB flash drives and memory cards formatted only in the FAT32 file system.
PLAY/PAUSE
Press button (10) pause function is activated. Music track play time INDICATOR flashes. Press it again to resum palying, press it more than 1 second is TOP function.
INT
Press button (11): During INTRO ON, INT indicator comes on and begins playing the first 10sec of each song, until the last song is played. It begins playing the entire track from where INT started.
RPT
Press preset button (12): Flash play mode: REPEAT ON / OFF is activated. When REPEAT ON, RPT INDICATOR comes on and repeats the current music track.
RDM
Press preset button (13): During RANDOM ON, RDM INDICATOR is turned on and each track of disc is played in random instead of normal order.
SELECT TRACKS
During USB/SD operation, press SEEK "▶" (8) button or SEEK "▶" (7) button to move to the previous track or the following track, Track number shows on display. During USB/SD, hold SEEK "▶" (8) button or SEEK "▶" (7) to fast reverse or fast forward. Music play starts from when you release the button.
Press preset button (14-15):
- MP3 MODE: 10 TRACK UP / DOWN is activated.
When the total track is 10 or less, KEY is inactivated.
Bluetooth mode
1. Pairing connect.
Turn on car unit, put your mobile near the unit, activate your mobile bluetooth function. Soon the phone will find the new bluetooth device "CAR AUDIO". Input the pairing password "8888" and clk OK. The phone will prompt the matching successful. When the pairing connect is successful, on the LCD, it shows BT ON, and the bluetooth logo will stop blinking. Then you may perform the bluetooth operation.
REMARK: depend on bluetooth mobile, the bluetooth system support "HSP" "HFP" "A2DP" and AVRCP bluetooth profile.
2. Handsfree phone service
If your mobile phone have matched with the unit. You can dial calls out through your mobile phone. It will turn to unit automatically when calling come in and the calling phone number will indicat on the LCD screen.
- Press the "BAND" button shortly to accept the call. Then you can talk with the other party through the mic on the panel.
- Press "MUTE" button shortly to reject the call when calling come in.
- Press "MUTE" button shortly to hang up after you finish the talk.
3. Advance Audio distributing profile(A2DP) playing.
Through mobile and unit A2DP connected, press "MODE" and turn to A2DP mode at the same time, the music playing in mobile can turn to the unit audio system play. "A2DP" will display on LCD. Press button in the panel can select the music track.
- Press button shortly to pause the music playing.
- Press "BAND" (mode) longy to temporarily disconnect the bluetooth.
- Press "BAND" (mode) button longy again to reconnect the bluetooth.
4. Phone number book.
This bluetooth system can automatically store incoming call numbers, up to 10 phone numbers.
- Press "MUTE"(mode) button longy to enter the phone number book and press VOL button to look up the phone number.
- Press "BAND" button once can call out you desired phone number.
5. Interrupt bluetooth connection/reconnection.
Pressing the "BAND" button shortly to interrupt the bluetooth connection when your are talking a call and the voice can turn to mobile speaker.
Press "BAND" button again to reconnection.
NOTE: Different mobile phone have different responses. We do not guarantee all the operation of connectable devices.
6. How to delete stored phone number?
You just can store ten number of missed, rejected and ANS under separately, and the first number will auto deleted when the 11th number calling.
7. How to use "RECEIVED" "MISSED" "REJECTED" "MANU ANS/AUTO ANS" Functions.
Press "MUTE" for 3 seconds to enter into "RECEIVED" "MISSED" "REJECTED" "MANU ANS/AUTO ANS". Turn VOL button for choosing the telephone number.
AUX IN mode
You can connect any third-party audio source (player, smartphone, tablet, etc.) with a headphone output to the head unit. To do this, use a mini-jack 3.5mm adapter (purchased separately) by inserting it into the AUX input on the front panel.
To listen to music from an external source through the car audio system, press the MODE button (1) until the head unit enters the AUX mode.
Note:
Adjust the volume of the connected source so that the overall volume of the audio system in AUX mode roughly matches the volume of other sources, such as a USB flash driveor radio tuner. To quickly adjust the volume, use the knob (2) on the head unit.
Specifications
General:
Power supply: 12 V DC on-board network
Type of on-board network: with a negative terminal on the body ("mass")
Supply voltage range: 11.0 - 14.4 V
Recommended speaker impedance: 4 ohms
Rated Output Power: 4 × 50 W peak
Installation dimensions (W x H x D): 178 x 50 x 87 mm
Fuse rating: 10 A
Tone Controls:
Bass (at 100 Hz): -10 dB / +10 dB
Treble (at 10K): -10 dB / +10 dB
USB/SD:
Signal to noise ratio: no less than 70 dB
Channel separation: no less than 70 dB
Frequency response: 20Hz - 20kHz
FM Radio:
Frequency coverage: 87.5 - 108 MHz (Europe)
65.0 - 74.0 MHz (OIRT)
87.5 - 108 MHz (S.America)
87.5 - 107.9 MHz (N.America)
Sensitivity (S/N -30 dB): ≤15 dBu
Channel Separation: >30 dB
AM Radio:
Frequency coverage: 522 - 1620 KHz (Europe/OIRT)
520 - 1620 KHz (S.America)
530 - 1710 KHz (N.America)
Sensitivity (S/N -20 dB): <42 dB
Bluetooth:
Bluetooth version: 5.0
Bluetooth profile: AVCTP, AVDTP, GAVDP, RFCOMM, SPP, A2DP, AVRCP, HFP, HID
Bluetooth transmitter frequency range: 2.402 G~2.48 G
Bluetooth transmitter power: 4dBmax
Bluetooth transmitter modulation: GFSK(1 Mbps), /4 -DQPSK (2 Mbps), 8-DPSK (3 Mbps)
The maximum operation temperature is 70^
No naked flame sources, such as lighted candles, should be placed on the apparatus.
I. AVANT DE COMMENCER
65,0 - 74,0 MHz (OIRT)
87,5 - 108 MHz (América del Sur)
| →FM1→FM2→FM3→MW1(AM1)→MW2(AM2) |
| ← |
電台選擇
The Bluetooth® word mark and logos are registered trademarks owned by Bluetooth SIG, Inc. and any use of such marks by HARMAN International Industries, Incorporated is under license. Other trademarks and trade names are those of their respective owners.

HARMAN International Industries, Incorporated 8500 Balboa Boulevard, Northridge, CA 91329 USA www.jbl.com
© 2023 HARMAN International Industries, Incorporated. All rights reserved. JBL is a trademark of HARMAN International Industries, Incorporated, registered in the United States and/or other countries. Features, specifications and appearance are subject to change without notice.
CA_JBL Celebrity 150 OMXGLOBAL_SOP_V13

- INSTALLATION AND CONNECTION OF THE HEAD UNIT
- Choosing a place to install
- Choosing an installation method
- Installation option with the mounting frame
- Installation option without the mounting frame, but using the factory head unit bracket in the car dashboard
- Connecting to the head unit
- Note1:
- Note2:
- FRONT PANEL LAYOUT AND CONTROLS
- General settings
- POWER /MOD conversion
- SOUND ADJUSTMENT
- VOLUME
- BASS
- TREBLE
- BALANCE
- FADER (optional)
- LOUD ON/OFF MODE
- DSP OFF/ON
- LOCAL/DX
- STEREO/MONO
- AREA SETUP
- RESET
- Radio tuner mode
- BAND SELECTION
- STATION SELECTION
- AUTOMATICALLY MEMORY STORING & PROGRAM SCANNING
- STATION STORING
- Playback from USB flash drives and SD memory cards
- Supported USB flash drives and SD memory cards
- PLAY/PAUSE
- INT
- RPT
- RDM
- SELECT TRACKS
- Bluetooth mode
- Pairing connect.
- Handsfree phone service
- Advance Audio distributing profile(A2DP) playing.
- Phone number book.
- Interrupt bluetooth connection/reconnection.
- How to delete stored phone number?
- How to use "RECEIVED" "MISSED" "REJECTED" "MANU ANS/AUTO ANS" Functions.
- AUX IN mode
- Note:
- Specifications
- General:
- Tone Controls:
- USB/SD:
- FM Radio:
- AM Radio:
- Bluetooth:
- AVANT DE COMMENCER
- 電台選擇
Brand : JBL
Model : Celebrity 150
Category : Headphones