REOLINK TrackMix - Surveillance Camera

TrackMix - Surveillance Camera REOLINK - Free user manual and instructions

Find the device manual for free TrackMix REOLINK in PDF.

📄 51 pages English EN Download 💬 AI Question 22 questions ⚙️ Specs
Notice REOLINK TrackMix - page 2
View the manual : Français FR Deutsch DE English EN Español ES Italiano IT
Pick your language and provide your email: we'll send you a specifically translated version.
Product Type Outdoor surveillance camera
Brand Reolink
Model TrackMix
Resolution 4K Ultra HD (3840x2160)
Night vision Infrared up to 15 meters
Day/night mode Automatic switching
Field of view Horizontal: 96°-38°; Vertical: 55°-21°
Pan and tilt Motorized, controllable via app
Motion detection PIR sensor
Power supply Built-in rechargeable battery (charges via USB 5V/9V or Reolink solar panel)
Dimensions (L x H x W) 228 x 147 x 129 mm
Weight (including battery) 1.4 kg
Operating temperature -10°C to +55°C
Operating humidity 20% to 85%
Ingress protection rating IP65 (weather resistant)
Connectivity Wi-Fi 2.4 GHz, Reolink app (iOS/Android), PC client
Storage Recording on microSD card (not included) or Reolink NVR (optional)
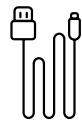
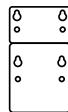
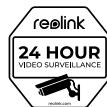
Box contents Camera, USB cable, drilling template, quick start guide, surveillance sign, screw kit
Maintenance and cleaning Clean the dome with a soft, dry cloth; keep the charging port clean and dry
Safety Certifications FCC, CE, ISED; WPA2-PSK/WPA-PSK encryption recommended
Warranty 2-year limited (purchase from authorized dealers)
Repairability Spare parts available via Reolink support; built-in battery not user-replaceable

Frequently Asked Questions - TrackMix REOLINK

How to install the TrackMix camera?
Drill holes according to the template, fix the base with the provided screws, then adjust the angle via the Reolink app after setup.
What to do if the camera does not turn on?
Check that the power switch is on. Charge the battery with a 5V/2A power adapter until the indicator turns green. If the issue persists, contact Reolink support.
How to connect the camera to Wi-Fi?
Download the Reolink app, create an account, press '+', scan the QR code on the camera and follow the instructions. Make sure the Wi-Fi password is correct and the signal is strong.
Why is the image blurry?
Clean the dome with a soft cloth. Point the camera towards a well-lit area. Update the firmware via the app. If necessary, reset the camera to factory settings.
How to optimize battery life?
Use the camera in event-only mode, reduce live streaming frequency, and charge the battery at temperatures between 0°C and 45°C. Avoid extreme temperatures.
Can you use a Reolink solar panel?
Yes, the battery can be charged with a compatible Reolink solar panel (sold separately). The orange indicator shows charging, green when complete.
Is the camera rain resistant?
Yes, IP65 rating protects against rain and snow. However, do not immerse it in water and protect the charging port with the rubber cap.
What to do if the QR code does not scan?
Move the camera closer or farther from the phone to adjust focus. Ensure sufficient lighting. If the problem persists, contact support.
How to reset the camera to factory settings?
Press and hold the reset button (located under the cover) for about 10 seconds until the indicator flashes. See the manual for details.
What installation height is recommended?
Install the camera 2-3 meters above the ground to maximize PIR sensor range. Tilt it slightly downward for better detection.

User questions about TrackMix REOLINK

12 questions about this device. Answer the ones you know or ask your own.

Ask a new question about this device

The email remains private: it is only used to notify you if someone responds to your question.

What is the light mode in the Reolink app for the TrackMix camera?
Frequently Asked Questions - 05/06/2026
Response Notice-Facile

The PDF manual for the REOLINK TrackMix does not detail the display settings of the Reolink app. However, the "light mode" is a visual comfort feature of the app itself, not of the camera.

It is a setting that allows you to choose the display theme of the Reolink interface on your phone or computer:

  • Light mode: white background with dark text - preferred for use in daylight or to reduce eye strain in bright light
  • Dark mode: dark background with light text - preferred in low light or at night

This setting does not affect the operation of your camera, only your browsing comfort in the Reolink app. You can usually change it in the Settings or Preferences of the app on your device.

Respond (be the first)
What are the three tracking modes of the REOLINK TrackMix (digital tracking, digital tracking priority, pan/tilt tracking priority) and which one should I choose?
Frequently Asked Questions - 05/06/2026
Response Notice-Facile

The REOLINK TrackMix offers three tracking modes to adapt the camera's behavior to your needs:

  • Digital tracking: The camera uses digital zoom to follow a detected object without using the pan/tilt motors. This mode is useful for wide coverage while maintaining minimal pivoting. It consumes fewer resources than the other modes.
  • Digital tracking priority: The camera prioritizes digital zoom first, then activates the pan/tilt motors only if the object moves out of the zoom field of view. This is a good compromise to save wear on the motors while maintaining good accuracy.
  • Pan/tilt tracking priority: The camera prioritizes the rotation and tilt motors to follow the object. This mode offers maximum coverage and the best tracking fluidity, but the motors work harder.

Which one to choose?

  • Choose digital tracking if you want to minimize motor wear and cover a large area.
  • Choose digital tracking priority for a good balance between energy savings/wear and tracking quality.
  • Choose pan/tilt tracking priority if accuracy and tracking fluidity are priorities and you accept faster motor wear.
Respond (be the first)
Does the TrackMix have automatic tracking to follow people? What should I do if the automatic tracking does not work?
Frequently Asked Questions - 05/06/2026
Response Notice-Facile

The REOLINK TrackMix does not have automatic tracking (auto-tracking) for people. This is a limitation of the model - the camera does not have the capability to identify and autonomously track moving objects or people.

However, you have several options to monitor people on your terrace:

Option 1: Manual tracking via the Reolink app

The TrackMix has controllable pan and tilt motors directly from the mobile app or the Reolink PC client. When a person is detected by the PIR sensor (sensitivity adjustable from 1 to 50, range up to 10 meters), you can manually orient the camera towards them by controlling the vertical tilt via the app.

Option 2: Optimize PIR detection

Reduce the PIR sensitivity so that only nearby people trigger an alert. Install the camera at a height of 2-3 meters (as recommended) to maximize the detection range on your terrace. You will then receive an immediate notification when a person passes by.

Option 3: Change Reolink model

If automatic tracking is essential, some recent Reolink models offer advanced AI with auto-tracking, but the TrackMix is not one of them. Check the product sheets of other Reolink references if this feature is indispensable.

Respond (be the first)
Which REOLINK models offer left-right rotation in addition to up-down?
Frequently Asked Questions - 05/06/2026
Response Notice-Facile

The TrackMix supports motorized up/down only (vertical tilt of 55°-21°). For full left-right rotation (horizontal pan), the camera would need to be manually oriented during installation, as this model does not have a pan motor.

REOLINK offers other cameras with more movement flexibility. On this page, you will find references to the Argus Series B310 and the P430 which offer different movement capabilities. For complete motorized pan/tilt coverage, it is recommended to contact REOLINK support or check their motorized dome camera models.

Respond (be the first)
How to check and control the WiFi signal strength of the REOLINK TrackMix camera?
Frequently Asked Questions - 05/06/2026
Response Notice-Facile

To check the WiFi signal strength of the REOLINK TrackMix camera, use the status LED indicator:

  • Blue light on: WiFi connection successful and the camera is operational
  • Blue light blinking: the camera is in standby mode, waiting for a signal
  • Red light: WiFi connection failed or lost

If the light remains red, apply these solutions in order: first, ensure that you have entered the correct WiFi password. Then move the camera closer to your router to ensure a strong signal, as the TrackMix operates exclusively on 2.4 GHz WiFi. This frequency offers better range but requires sufficient proximity for a stable connection.

Also check the security settings of your router: change the encryption method to WPA2-PSK or WPA-PSK if you are using a different standard. Also adhere to the limitations: your SSID (network name) must be less than 31 characters and the password less than 64 characters. Use only characters available on the keyboard.

For a more in-depth check of the connection quality and signal level, consult the Reolink mobile app (iOS/Android) after adding the camera. The app displays additional details about the status and strength of the WiFi connection in real-time.

Respond (be the first)
How to adjust the PIR sensitivity of the REOLINK TrackMix to detect only people?
Frequently Asked Questions - 05/06/2026
Response Notice-Facile

The PIR sensitivity of the TrackMix is adjustable on a scale from 1 to 50, and neither 0 nor 100 are valid options. Here’s how to set it up:

Recommended settings for detecting people

  • Moderate to high sensitivity (25-40): ideal for reliably detecting people without too many false alerts
  • Very low sensitivity (1-10): to be avoided if the camera is currently not detecting anything - you risk getting even fewer detections
  • Maximum sensitivity (40-50): do not use continuously (risk of alerts for animals, branches, etc.), but useful for initial testing

To activate this setting

Open the REOLINK app, select your TrackMix, go to the “Motion Detection” settings, and adjust the slider to 30-35 as a starting point. Then perform tests by walking in front of the camera to check detections in the app's history.

If nothing is detected despite good sensitivity

Also check that the camera is installed at a height of 2-3 meters with a slight downward tilt - the PIR sensor has an optimal range of 10 meters and is highly dependent on position. You can also set up custom detection zones to ignore irrelevant areas (roads, vegetation).

Respond (be the first)
How to delete a video from the Playback menu of the REOLINK TrackMix camera?
Frequently Asked Questions - 05/06/2026
Response Notice-Facile

The REOLINK TrackMix camera does not offer an individual video deletion function directly from the Playback menu of the app. This is a design limitation of the product.

Here are alternative solutions to manage your recorded videos:

1. Enable Loop Recording (recommended)

The best approach is to enable the Loop Recording feature in the camera settings via the Reolink app. Once activated, old videos will be automatically overwritten by new ones when the microSD card is full. You will not have to manually manage deletions.

2. Format the microSD card

If you want to delete all recordings at once, you can:

  • Format the card directly in the camera's storage settings via the Reolink app
  • Remove the microSD card and format it on a computer

Warning: This action permanently deletes all videos. Make sure to back up important recordings beforehand.

3. Increase storage capacity

The REOLINK TrackMix supports microSD cards up to 512 GB, which significantly extends the retention period of recordings before the loop overwrites the oldest ones.

Respond (be the first)
How to test the alarm of the REOLINK TrackMix camera?
Frequently Asked Questions - 24/04/2026
Response Notice-Facile

The REOLINK TrackMix surveillance camera has a built-in alarm siren that triggers upon motion detection. To properly test this feature, you must first ensure that the alarm is activated in the settings of the Reolink app.

Start by opening the Reolink app on your smartphone and accessing the settings of the TrackMix camera. In the section dedicated to notifications and alerts, check that the “Alarm Activation” or “Siren” option is enabled. If the siren and spotlight are available in the settings, also ensure they are configured to trigger automatically upon motion detection.

To test the alarm, it is important to correctly configure the motion detection. Make sure the PIR sensor (passive infrared motion detector) is activated and set the sensitivity between 1 and 50 according to your preference. A higher sensitivity will allow for the detection of smaller movements. You can also use smart detection to distinguish between people, vehicles, and animals to reduce false alerts.

To perform the actual test, position yourself in front of the TrackMix camera and make slow, steady movements. The camera should first detect the motion (the app will send you a notification), then trigger the alarm siren and the LED spotlights if this option is enabled. Listen carefully to the sound of the siren (a prolonged and intense sound) and observe the illumination of the spotlight. Also, check that you receive an alert on your phone at the moment of triggering.

After the test, check the recorded videos in the “Events” or “Recordings” section of the Reolink app to confirm that the detection was properly captured and timestamped. Ensure that the event appears with the correct metadata (time, date, type of detection).

If you wish to refine the test, you can also set up custom detection zones via the app to limit the alarm triggering area to a specific region. This allows you to precisely test which areas trigger the alarm and which do not.

Respond (be the first)
How to configure the audio settings on the REOLINK TrackMix camera?
Frequently Asked Questions - 24/04/2026
Response Notice-Facile

To configure the audio settings of your REOLINK TrackMix surveillance camera, follow the steps below:

Accessing audio settings

  • Open the REOLINK app on your smartphone or log in to the web interface of your camera.
  • Select the TrackMix camera you wish to configure.
  • Access the settings by clicking on the gear icon.
  • Look for the section dedicated to audio, often named "Audio" or "Audio Settings".

Audio adjustment options

  • Audio On/Off: Enable this option if you want to capture or listen to sound through the camera.
  • Microphone: Ensure that the built-in microphone is activated to record or transmit sound.
  • Volume: Adjust the sound volume according to your preferences, which will affect the sound during live viewing or recordings.

Testing the settings

After configuring the audio options, test the camera to ensure that sound is captured and played back correctly. You can do this by starting a live view through the app or web interface.

Respond (be the first)
What to do when the SD card of the REOLINK TrackMix camera is full?
Frequently Asked Questions - 24/04/2026 - 2 réponses communauté
Response Notice-Facile

When the microSD card of your Reolink TrackMix surveillance camera is full, you have several practical solutions to continue recording your surveillance videos.

Enable loop recording (recommended solution)

Most Reolink cameras, including the TrackMix, offer a loop recording feature accessible via the Reolink app or Reolink Client. This option allows your camera to automatically overwrite the oldest videos when the card is full, ensuring continuous and uninterrupted recording. You will always keep the most recent recordings, ideal for real-time monitoring.

Access storage and delete unnecessary files

Log in to the Reolink app or the web interface of your camera. Go to the Playback or Recordings section, then check the video gallery. You can manually select and delete old or unnecessary recordings to quickly free up space. This operation can be performed directly from your phone or computer.

Format the microSD card

If you have backed up all important videos elsewhere, you can format the microSD card. This operation completely erases the content and resets the card. To do this, use the camera interface (in the storage settings) or format the card directly on a computer. Warning: formatting is irreversible.

Use a higher capacity microSD card

The Reolink TrackMix supports microSD cards up to 512 GB, providing considerable storage capacity. If you frequently record or over several days, replacing your card with a higher capacity (256 GB or 512 GB) will significantly extend the periods without intervention.

Consider an alternative centralized storage

You can also set up a Reolink Home Hub or an NVR to centralize the recording of your videos. This solution offers more space and simplified management if you own multiple cameras.

O olivier - 05/06/2026

dans le menu "playback" oui on peut consulter les vidéos mais aucun bouton pour sélectionner les vidéos afin de pouvoir les effacer !?
Comment fait-on pour effacer une vidéo ?

Report this response
N Notice-Facile - 28 j

Bonjour Olivier,

Excellente question, c'est effectivement contre-intuitif sur l'app Reolink. La fonction d'effacement manuel existe bien mais elle est cachee derriere un appui long, pas un bouton visible. Voici les 3 facons de supprimer des videos sur votre TrackMix.

1. Effacement manuel video par video (depuis l'app Reolink sur smartphone) - Ouvrez l'app Reolink, selectionnez la camera TrackMix - Allez dans "Playback" (Lecture) - Choisissez la date dans le calendrier en haut - Trouvez la video a supprimer dans la timeline - Faites un APPUI LONG (1-2 secondes) sur la vignette de la video : une coche apparait - Une fois en mode selection, vous pouvez cocher plusieurs videos a la suite - Une icone "Corbeille" (poubelle) s'affiche en bas a droite : appuyez dessus pour supprimer

C'est le geste qui manque dans la doc Reolink. Sans cet appui long, l'app reste en mode lecture simple et aucun bouton n'apparait, c'est ce que vous observez.

2. Formatage complet de la carte SD (efface TOUT) - App Reolink : selectionnez la camera - Engrenage en haut a droite (Parametres) - "Stockage" ou "Storage" - "Formater la carte SD" : confirmation, et toute la carte est videe en 1 clic

Utile une fois par mois pour repartir sur une carte propre.

3. Reolink Client (logiciel PC/Mac, recommande pour gros volumes) Telechargeable gratuitement sur reolink.com/software-and-manual. Plus pratique que le mobile pour selectionner des plages entieres : - Connectez la camera dans le logiciel - Onglet "Playback" - Filtre par date + heure - Selection multi avec Ctrl+clic ou Maj+clic - Bouton "Delete" visible en bas

Si vous voulez eviter de faire ca manuellement tous les mois, le plus simple reste d'activer l'enregistrement en boucle dans Parametres > Stockage (que la FAQ mentionnait) : quand la carte est pleine, les plus anciennes videos sont automatiquement remplacees par les nouvelles, sans intervention de votre part. C'est ce que font 95% des utilisateurs en surveillance continue.

Report this response
Add a response
How to set the alarm on the REOLINK TrackMix surveillance camera?
Frequently Asked Questions - 24/04/2026
Response Notice-Facile

To set the alarm on your REOLINK TrackMix surveillance camera, you need to access the REOLINK app (available on smartphone) or the REOLINK client on PC. First, launch the app, select your TrackMix camera, and then access the settings by clicking on the gear icon.

Your TrackMix is equipped with a PIR sensor (passive infrared motion sensor) that detects movements within a range of 2 to 10 meters. To activate this alarm, look for the Motion Detection or Alerts section in the settings. Ensure that detection is enabled, then adjust the sensitivity according to your needs. A higher sensitivity will detect small movements, while a lower sensitivity will reduce false alerts.

Next, configure the detection zones if this option is available. This allows you to limit alerts to important surveillance areas and ignore irrelevant areas (such as a busy road or a moving bush). This feature is particularly useful for avoiding false alarms caused by animal movements or vegetation.

Set your notification preferences to receive alerts: via push notification, by email, or both. You will receive a notification for each motion detection and can view recorded events in the app's history. Since the TrackMix is primarily designed to record motion events rather than for continuous 24/7 recording, these settings optimize battery life.

Before finalizing your settings, test the functionality by making a movement in front of the camera. You should receive an immediate notification and see the event recorded in your history. If you do not receive the notification, check that detection is enabled, that your smartphone is connected to the Internet, and that notification permissions are allowed on your mobile device.

Respond (be the first)
How to prevent rain from triggering the alarm of the REOLINK TrackMix camera?
Frequently Asked Questions - 24/04/2026
Response Notice-Facile

The REOLINK TrackMix camera triggers alarms during rain because its PIR sensor (infrared detector) has too high sensitivity. This sensor is designed to detect heat movements, and raindrops create thermal variations that unnecessarily activate alerts.

Reducing sensitivity: Access the REOLINK app or the web interface of your camera. In the motion detection settings, you will find a sensitivity scale from 1 to 50. To prevent rain from triggering the alarm, lower this value between 10 and 20 depending on your environment (start with 15 and adjust gradually). A lower sensitivity ignores small thermal movements like raindrops.

Configuring detection zones: In the advanced settings of the camera, define specific detection zones to limit monitoring to critical areas only. Exclude areas directly exposed to rain (corners at the top of walls, eaves, areas near gutters) where drops create the most disturbances.

Optimal positioning: Install the camera under a shelter or eave to minimize direct exposure to rain. The manual recommends installing the TrackMix at 2-3 meters high to maximize the range of the PIR sensor (detection up to 10 meters). Ensure that the lens and sensor are not directly hit by drops.

Regular cleaning: A dirty, wet, or droplet-covered lens can worsen the problem. Regularly clean the camera dome with a soft, dry cloth to remove moisture, rain marks, and condensation that confuse the sensor.

Progressive testing: After adjusting the sensitivity, test the camera in light rain by passing in front of it to check that it still detects real movements. Slightly increase the sensitivity if you miss legitimate detections.

Respond (be the first)

Download the instructions for your Surveillance Camera in PDF format for free! Find your manual TrackMix - REOLINK and take your electronic device back in hand. On this page are published all the documents necessary for the use of your device. TrackMix by REOLINK.

USER MANUAL TrackMix REOLINK

Operational Instruction

Apply to: Reolink TrackMix

Contents

What's in the Box 2
Camera Introduction 3
Set up the Camera 5
Charge the Camera 7
Install the Camera 9
Safety Instructions of Battery Usage 13
Troubleshooting 14
Specification 16
Notification of Compliance 16

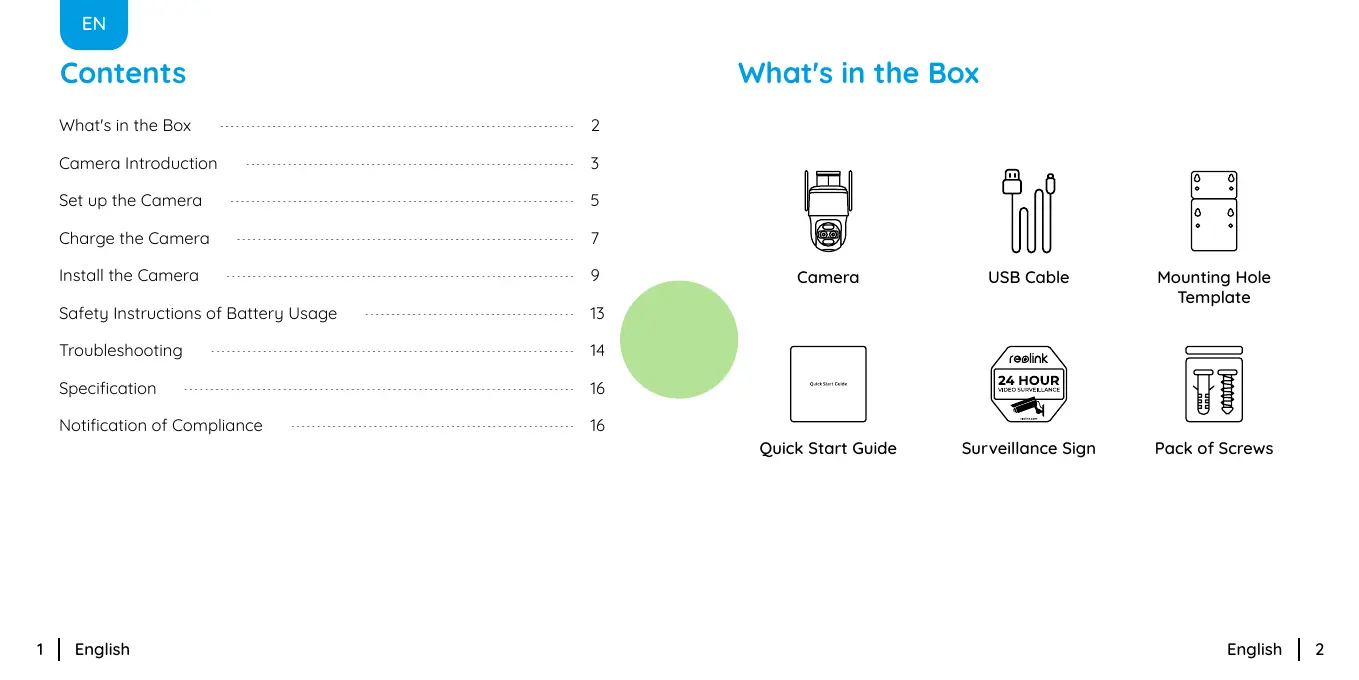
What's in the Box
REOLINK TrackMix - What's in the Box - 1
Camera

REOLINK TrackMix - What's in the Box - 2
USB Cable

REOLINK TrackMix - What's in the Box - 3
Mounting Hole Template

REOLINK TrackMix - What's in the Box - 4
Quick Start Guide

REOLINK TrackMix - What's in the Box - 5
Surveillance Sign

REOLINK TrackMix - What's in the Box - 6
Pack of Screws

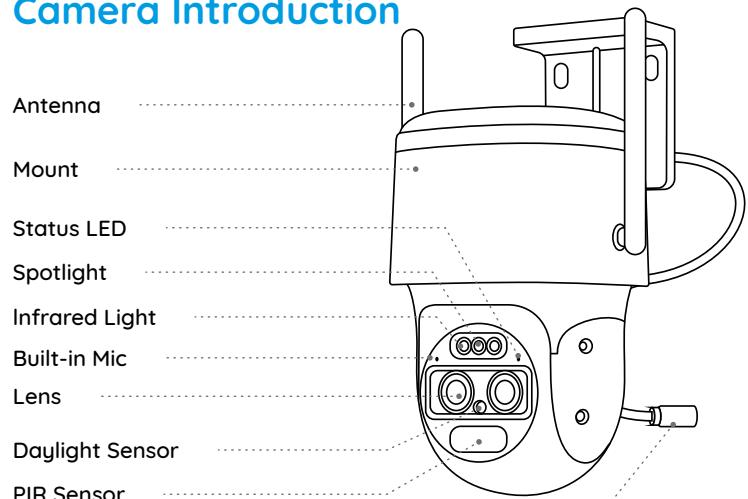
Camera Introduction

REOLINK TrackMix - Camera Introduction - 1

Power Port

Different states of the status LED:

Red Light:WiFi connection failed
Blue Light:WiFi connection succeeded

Blinking: Standby status
On: Working status

Speaker

SD Card Slot
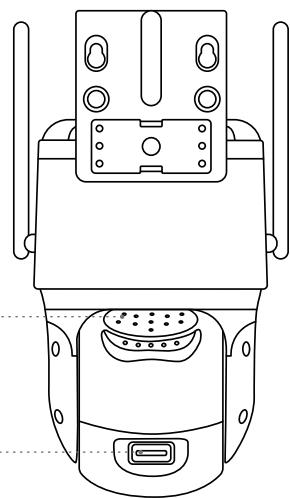
REOLINK TrackMix - Camera Introduction - 2

Set up the Camera

Step 1 Scan to download the Reolink App from the App Store or Google Play store.
REOLINK TrackMix - Set up the Camera - 1

REOLINK TrackMix - Set up the Camera - 2

Available on the

App Store

REOLINK TrackMix - Set up the Camera - 3

GET IT ON

Google Play

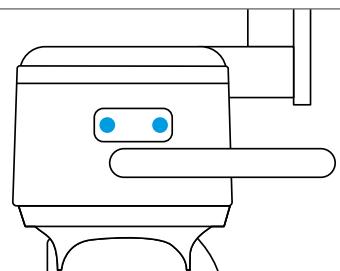
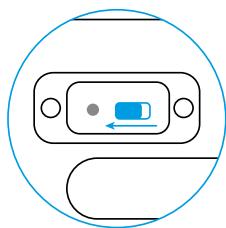
Step 2 Loosen the screw and remove the cover, then turn on the power switch to power on the camera.
REOLINK TrackMix - Set up the Camera - 4

REOLINK TrackMix - Set up the Camera - 5

Step 3 Launch the Reolink App, click the “+” button in the top right corner to add the camera. Scan the QR code on the device and follow the onscreen instructions to finish initial setup.
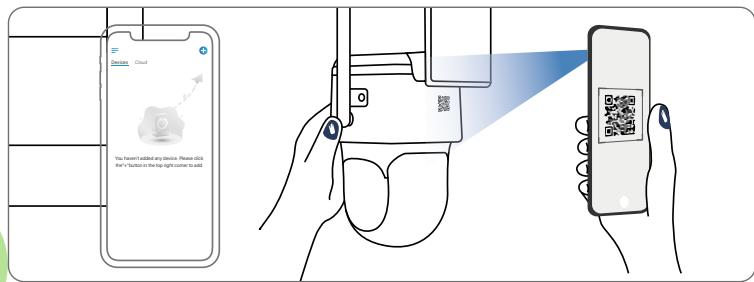
REOLINK TrackMix - Set up the Camera - 6

Set up the Camera on PC (Optional)

Step 1 Download and install the Reolink Client: Go to https://reolink.com > Support > App & Client.

Step 2 Loosen the screw and remove the cover, then turn on the power switch to power on the camera.

Step 3 Launch the Reolink Client, click the “+” button, input the UID code of the camera to add it and follow the onscreen instructions to finish initial setup.

Charge the Camera

It's recommended to fully charge the battery before mounting the camera outdoors.
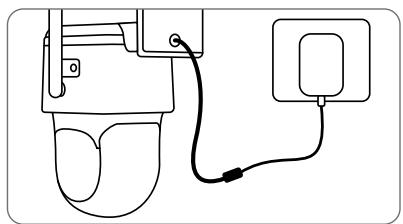
REOLINK TrackMix - Charge the Camera - 1

Charge the battery with a power adapter (not included).
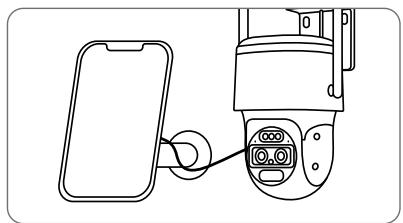
REOLINK TrackMix - Charge the Camera - 2

Charge the battery with the Reolink Solar Panel (not included if you only purchase the camera).

Charging Indicator LED

Orange LED: Charging

Green LED: Fully charged
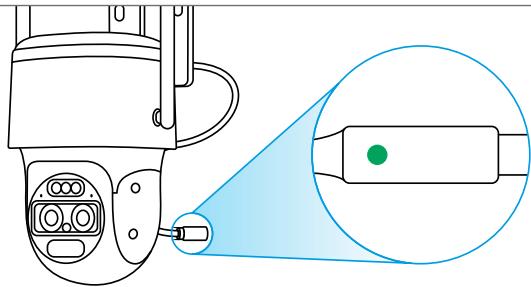
REOLINK TrackMix - Charging Indicator LED - 1

Install the Camera

  • Install the camera 2-3 meters (7-10 ft) above the ground. This height maximizes the detection range of the PIR motion sensor.
  • For better motion detection performance, please install the camera angularly.

NOTE: If a moving object approaches the PIR sensor vertically, the camera may fail to detect motion.
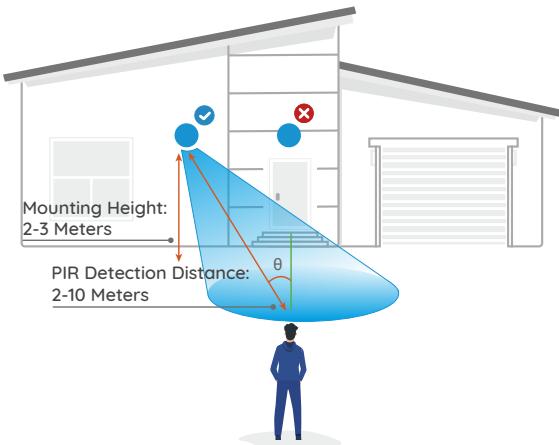
REOLINK TrackMix - Install the Camera - 1

Installation Tips

  • Do not face the camera towards any light sources.
  • Do not point the camera towards a glass window. Otherwise, it may result in poor image quality because of the window glare caused by infrared LEDs, ambient lights or status lights.
  • Do not place the camera in a shaded area and point it towards a well-lit area. Otherwise, it may result in poor image quality. To ensure best image quality, the lighting condition for both the camera and the capture object should be the same.
  • To ensure better image quality, it's recommended to clean the dome cover with a soft cloth from time to time.
  • Make sure the power port is not directly exposed to water or moisture and not blocked by dirt or other elements.
  • The waterproof camera can work properly under conditions like rain and snow. However, it doesn't mean the camera can work underwater.
  • Do not install the camera at places where rain and snow can hit the lens directly.
  • The camera may work in extreme cold conditions as low as -25^ . Because when it is powered on, the camera will produce heat. You may power on the camera indoors for a few minutes before installing it outdoors.

Mount the camera to the wall
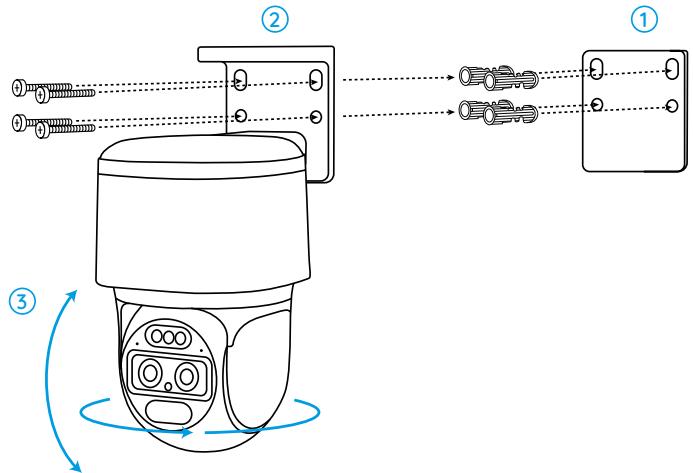
REOLINK TrackMix - Mount the camera to the wall - 1

  1. Drill holes in accordance with the mounting hole template.
  2. Install the mount base with screws included in the package.
  3. To adjust the camera direction, you may control the camera to pan and tilt via Reolink App or Client.

NOTE: Use the drywall anchors included in the package if needed.

Mount the Camera to Ceiling
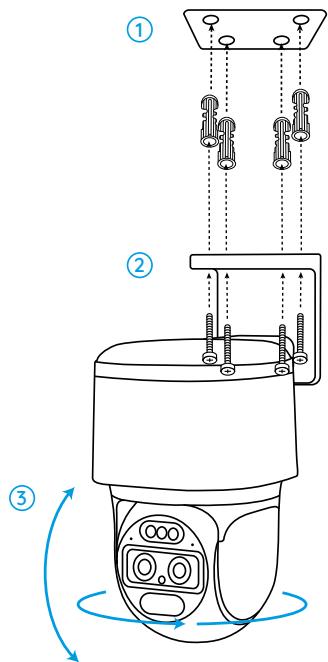
REOLINK TrackMix - Mount the Camera to Ceiling - 1

  1. Drill holes in accordance with the mounting hole template.
  2. Install the mount base with screws included in the package.
  3. To adjust the camera direction, you may control the camera to pan and tilt via Reolink App or Client.

NOTE: Use the drywall anchors included in the package if needed.

Safety Instructions of Battery Usage

Reolink TrackMix is not designed for running 24/7 at full capacity or around-the-clock live streaming. It's designed to record motion events and to live view remotely only when you need it. Learn useful tips on how to extend the battery life in this post: https://support.reolink.com/hc/en-us/articles/360006991893

  1. The battery is built-in, so do not remove it from the camera.
  2. Charge the rechargeable battery with a standard and high-quality DC 5V/9V battery charger or Reolink solar panel. Do not charge the battery with solar panels from any other brands.
  3. Charge the battery when temperatures are between 0^ and 45^ and always use the battery when temperatures are between -20^ and 60^ .
  4. Keep the USB charging port dry, clean and free of any debris and cover the USB charging port with the rubber plug when the battery is fully charged.
  5. Do not charge, use or store the battery near any ignition sources, such as fire or heaters.
  6. Do not use the battery if it gives off an odor, generates heat, becomes discolored or deformed, or appears abnormal in any ways. If the battery is being used or charged, turn off the power switch or remove the charger immediately, and stop using it.
  7. Always follow the local waste and recycle laws when you get rid of the used battery.

Troubleshooting

Camera is not Powering on

If your camera is not turning on, please apply the following solutions:

  • Make sure the power switch is turned on.
  • Charge the battery with a DC 5V/2A power adapter. When the green light is on, the battery is fully charged.

If the problem is not solved, please contact Reolink Support.

Failed to Scan QR Code on the Phone

If the camera cannot scan the QR code on your phone, please try the following solutions:

  • Vary the distance between your camera and the mobile phone so that the camera can focus better.
    Try to scan the QR code under sufficient lighting.

If the problem is not solved, please contact Reolink Support.

Failed to Connect to WiFi During Initial Setup Process

If the camera fails to connect to WiFi, please try the following solutions:

  • Ensure that you have entered the correct WiFi password.
  • Put the camera closer to your router to ensure a strong WiFi signal.
  • Change the encryption method of the WiFi network to WPA2-PSK/WPA-PSK (safer encryption) on your router interface.
  • Change your WiFiSSID or password and make sure thatSSID is within 31 characters and password is within 64 characters.
  • Set your password using only the characters available on the keyboard.

If the problem is not solved, please contact Reolink Support.

Picture Is Not Clear

If the picture from the camera is not clear, please try the following solutions:

  • Check the camera dome cover for dirt, dust or spiderwebs. Please clean the dome cover with a soft, clean cloth.
  • Point the camera to a well-lit area. The lighting condition will affect the picture quality a lot.
  • Upgrade the firmware of your camera to the latest version.
  • Restore the camera to factory settings and check it again.

If the problem is not solved, please contact Reolink Support.

Specification

Hardware Features

Infrared Night Vision: Up to 15 Meters

Day/Night Mode: Auto Switchover

Field of View: Horizontal 96^ - 38^ ; Vertical: 55^ - 21^

General

Dimension: 228^147^129mm

Weight (Battery included): 1.4KG

Operating Temperature: -10^ - +55^ (14°F-131°F)

Operating Humidity: 20% 85%

Notification of Compliance

FCC Compliance Statement

This device complies with Part 15 of the FCC Rules. Operation is subject to the following two conditions: (1) this device may not cause harmful interference, and (2) this device must accept any interference received, including interference that may cause undesired operation. Changes or modifications not expressly approved by the party responsible for compliance could void the user's authority to operate the equipment.

NOTE: This equipment has been tested and found to comply with the limits for a Class B digital device, pursuant to Part 15 of the FCC Rules. These limits are designed to provide reasonable protection against harmful interference in presidential installation. This equipment generates, uses and can radiate radio frequency energy and, if not installed and used in accordance with the instructions, may cause harmful interference to radio communications. However, there is no guarantee that interference will not occur in a particular installation. If this equipment does cause harmful interference to radio or television reception, which can be determined by turning the equipment off and on, the user is encouraged to try to correct the interference by one or more of the following measures:

  • Reorient or relocate the receiving antenna.
  • Increase the separation between the equipment and receiver.
  • Connect the equipment into an outlet on a circuit different from that to which the receiver is connected.
  • Consult the dealer or an experienced radio/ TV technician for help.

FCC RF warning statement:

This equipment complies with FCC radiation exposure limits set forth for an uncontrolled environment. This equipment should be installed and operated with minimum distance 20cm between the radiator& your body.

REOLINK TrackMix - FCC Compliance Statement - 1

Simplified EU Declaration of Conformity

Reolink declares that this device is in compliance with the essential requirements and other relevant provisions of Directive 2014/53/EU.

REOLINK TrackMix - Simplified EU Declaration of Conformity - 1

Correct Disposal of This Product

This marking indicates that this product should not be disposed with other household wastes throughout the EU. To prevent possible harm to the environment or human health from uncontrolled waste disposal, recycle it responsibly to promote the sustainable reuse of material resources. To return your used device, please use the return and collection systems or contact the retailer where the product was purchased. They can take this product for environment safe recycling.

Limited Warranty

This product comes with a 2-year limited warranty that is valid only if purchased from Reolink Official Store or a Reolink authorized reseller. Learn more: https://reolink.com/warranty-and-return/.

NOTE: We hope that you enjoy the new purchase. But if you are not satisfied with the product and plan to return, we strongly suggest that you reset the camera to factory default settings and take out the inserted SD card before returning.

Terms and Privacy

Use of the product is subject to your agreement to the Terms of Service and Privacy Policy at reolink.com Keep out of reach of children.

End User License Agreement

By using the Product Software that is embedded on the Reolink product, you agree to the terms of this End User License Agreement ("EULA") between you and Reolink. Learn more: https://reolink.com/eula/.

ISED Radiation Exposure Statement

This equipment complies with RSS-102 radiation exposure limits set forth for an uncontrolled environment. This equipment should be installed and operated with minimum distance 20cm between the radiator & your body.

Katalog

Lieberumfang 21

REOLINK TrackMix - Katalog - 1
Available on the App Store

REOLINK TrackMix - Katalog - 2
GET ON Google Play

REOLINK TrackMix - Katalog - 3
Available on the App Store

REOLINK TrackMix - Katalog - 4
GET IT ON. Google Play

REOLINK TrackMix - Katalog - 5
Available on the App Store

REOLINK TrackMix - Katalog - 6
GET IT ON. Google Play

If the camera cannot scan the QR code on your phone, please try the following solutions:

  • Vary the distance between your camera and the mobile phone so that the camera can focus better.
    Try to scan the QR code under sufficient lighting.

If the problem is not solved, please contact Reolink Support.

Use of the product is subject to your agreement to the Terms of Service and Privacy Policy at reolink.com Keep out of reach of children.

REOLINK TrackMix - Katalog - 7
Available on the App Store

REOLINK TrackMix - Katalog - 8
GET IT ON. Google Play

Operation of 5150-5250 MHz is restricted to indoor use only.

This device complies with Innovation, Science, and Economic Development Canada licence-exempt RSS standard(s). Operation is subject to the following two conditions:

(1) this device may not cause interference, and
(2) this device must accept any interference, including interference that may cause undesired operation of the device.
Manual assistant
Powered by Anthropic
Waiting for your message
Product information

Brand : REOLINK

Model : TrackMix

Category : Surveillance Camera