
BALANCE DIMPLEX - XHD23L-EU XHD26L-EU XHD26L-EU-500H XHD28L-EU - Electric fireplace DIMPLEX - Free user manual and instructions
Find the device manual for free BALANCE DIMPLEX - XHD23L-EU XHD26L-EU XHD26L-EU-500H XHD28L-EU DIMPLEX in PDF.
| Product Type | Built-in Electric Fireplace |
| Brand | Dimplex |
| Compatible Models | XHD23L-EU, XHD26L-EU, XHD26L-EU-500H, XHD28L-EU |
| Power Supply Voltage | 230-240 V AC |
| Nominal Heat Output | 1.3 kW (230 V) / 1.4 kW (240 V) |
| Standby Consumption | 0.35 W |
| Dimensions (W x H x D) | XHD23: 548 x 508 x 203 mm XHD26: 619 x 470 x 203 mm XHD28: 686 x 587 x 203 mm |
| Heating Type | Radiation and convection |
| Flame Effect | Yes, LED, adjustable speed and color |
| Remote Control | Yes, infrared, range approx. 5 m |
| Control Panel | Touch with LED display |
| Timer | Yes, adjustable from 0.5 h to 8 h |
| Temperature Range | 17 °C to 26 °C (62 °F to 78 °F) |
| Noise Level | Normal flame effect sound (audible in silence) |
| Maintenance | Disconnect before cleaning; soft cloth; vacuum fan grille |
| Safety | Thermal cut-off; do not cover; minimum distance 1 m from combustible objects |
| Installation | Recessed in existing fireplace or mantel |
| Warranty | Refer to the warranty card provided |
Frequently Asked Questions - BALANCE DIMPLEX - XHD23L-EU XHD26L-EU XHD26L-EU-500H XHD28L-EU DIMPLEX
User questions about BALANCE DIMPLEX - XHD23L-EU XHD26L-EU XHD26L-EU-500H XHD28L-EU DIMPLEX
0 question about this device. Answer the ones you know or ask your own.
Ask a new question about this device
Download the instructions for your Electric fireplace in PDF format for free! Find your manual BALANCE DIMPLEX - XHD23L-EU XHD26L-EU XHD26L-EU-500H XHD28L-EU - DIMPLEX and take your electronic device back in hand. On this page are published all the documents necessary for the use of your device. BALANCE DIMPLEX - XHD23L-EU XHD26L-EU XHD26L-EU-500H XHD28L-EU by DIMPLEX.
USER MANUAL BALANCE DIMPLEX - XHD23L-EU XHD26L-EU XHD26L-EU-500H XHD28L-EU DIMPLEX
Models XHD23L-EU XHD26L-EU XHD26L-EU-500H XHD28L-EU


EN : This product is only suitable for well insulated rooms or occasional use. DE : Dieses Produkt ist nur für gut isolierte Bereiche oder gelegentliche Verwendung geeignet. FR : Ce produit convient uniquement à des endroits bien isolés ou pour un usage occasionnel. IT : Questo produit è adatto solo per spazi ben isolati o per uso occasionale. ES : Este produit solo es adequado para espacios bien aislados o un uso occasional. NL : Dit product isuitsluitend geschikt voor goed geïsoleerde ruimten ofoor sporadisch gebruik. PL : Produkt ten jest odpwiedni wyłacznie do dorze odizolowanych moyen lub do okazónalnégo uzytku. RO : Acest produs este adecvat exclusiv spaïlor bine ventilate sau utilizāri ocazionale.

Welcome 3
IMPORTANT INSTRUCTIONS 4
Specifications 6
Installation 7
Operation. 10
Maintenance. 14

SAVE THESE INSTRUCTIONS

Conventions used in this manual:
NOTE: Procedures and techniques considered important enough to emphasize.
CAUTION: Procedures and techniques which, if not carefully followed, will result in damage to the equipment.
WARNING: Procedures, precautions and techniques which, if not carefully followed, will expose the user to the risk of fire, serious injury, or death.
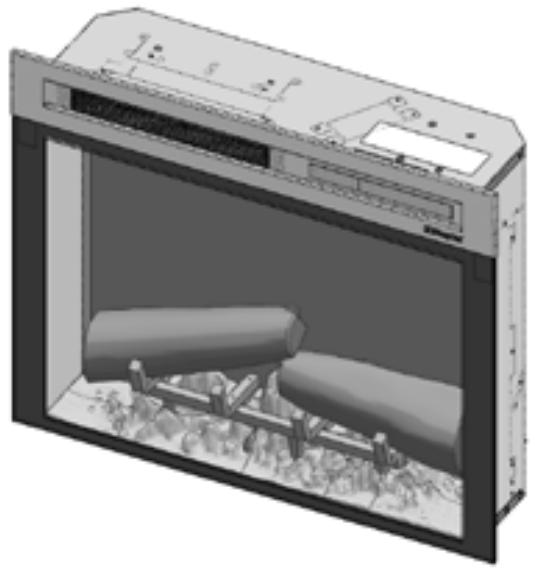
Thank you for purchasing a Dimplex Electric fireplace.
CAUTION: Read all instructions and warnings carefully before starting installation. Failure to follow these instructions may result in a possible electric shock or fire hazard and will void the warranty.

NO NEED TO RETURN TO THE STORE
Questions with operation or assembly? Require Parts Information?
Product Under Manufacturer's Warranty?
Please consult your warranty card for our contact details.
IMPORTANT INSTRUCTIONS
Read all instructions before using this appliance.
When using electrical appliances, basic precautions should always be followed to reduce the risk of fire, electrical shock and injury to persons, including the following:
- If the appliance is damaged, check with the supplier before installation and operation.
- Do not use outdoors.
- Do not use in the immediate surroundings of a bath, shower or swimming pool.
- Do not locate the appliance immediately below a fixed socket outlet or connection box.
- This appliance can be used by children aged form 8 years and above and persons with reduced physical, sensory or mental capabilities or lack of experience and knowledge if they have been given supervision or instruction concerning use of the appliance in a safe way and understand the hazards involved. Children shall not play with the appliance. Cleaning and user maintenance shall not be made by Children without supervision.
- Children of less than 3 years should be kept away unless continuously supervised. Children aged from 3 years and less than 8 years shall only switch on/off the appliance provided that it has been placed or installed in its intended normal operating position and they have been given supervision or instruction concerning use of the appliance in a safe way and understanding the hazards involved. Children aged from 3 years and less than 8 years shall not plug in, regulate and clean the appliance or perform user maintenance.
- Do not use this appliance in series with a thermal control, a program controller, a timer or any other device that switches on the heat automatically, since a fire risk exists when the appliance is accidentally covered or displaced.
IMPORTANT INSTRUCTIONS
- Ensure that furniture, curtains or other combustible material are positioned no closer than 1 metre from the appliance.
- In the event of a fault unplug the appliance.
- Unplug the appliance when not required for long periods.
- Although this appliance complies with safety standards, we do not recommend its use on deep pile carpets or on long hair type of rugs.
- The appliance must be positioned so that the plug is accessible.
- If the supply cord is damaged it must be replaced by the manufacturer or service agent or a similarly qualified person in order to avoid a hazard.
- Keep the supply cord away from the front of the appliance.
WARNING: In order to avoid overheating, do not cover the appliance. Do not place material or garments on the appliance, or obstruct the air circulation around the appliance, for instance by
curtains or furniture, as this could cause overheating and a fire risk.
WARNING: In order to avoid a hazard due to inadvertent resetting of the thermal cut-out, this appliance must not be supplied through an external switching device, such as a timer, or connected to a circuit that is regularly switched on and off by the utility.
A CAUTION: Some parts of this product can become very hot and cause burns. Particular attention has to be given where children and vulnerable people are present.
Technical Information
Model No: XHD23L-EU, XHD26L-EU, XHD26L-EU-500H, XHD28L-EU
Heat Output
230V 240V
| Nominal Heat Output | P_Nom | 1.3 | - | 1.4 | kW |
| Minimum Heat Output | P_min | - | kW | ||
| Maximum Continuous Heat Output | P_max,c | 1.3 | - | 1.4 | kW |
Auxiliary Electricity Consumption
| In Standby mode | eI SB | 0.35 | - | 0.35 | W |
with electronic room temperature control
General
Unpack the heater carefully and retain the packaging for possible future use, in the event of moving or returning the fire to your supplier.
The fire incorporates a flame effect, which can be used with or without heating, so that the comforting effect may be enjoyed at any time of the year. Using the flame effect on its own only requires little electricity.
Before connecting the heater check that the supply voltage is the same as that stated on the heater.
Please note: Used in an environment where background noise is very low, it may be possible to hear a sound which is related to the operation of the flame effect. This is normal and should not be a cause for concern.
Electrical Connection
WARNING: THIS APPLIANCE MUST BE EARTHED
This heater must be used on an AC ~ supply only and the voltage marked on the heater must correspond to the supply voltage.
Before switching on, please read the safety warnings and operating instructions.
Placement
- The Dimplex Electric fireplace does not require any special venting. Make sure there is clearance for air circulation beneath the unit and at least 1/2" behind it.
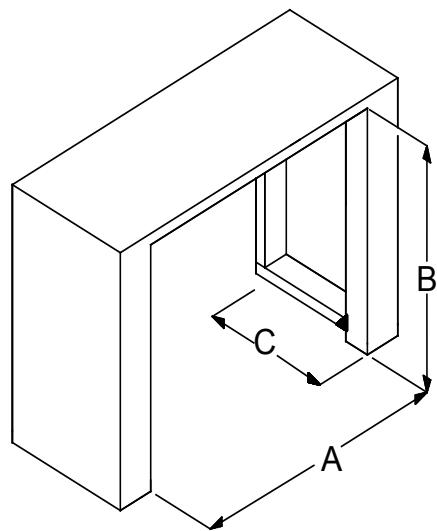
CAUTION: Do not install the fireplace directly on carpet or similar surfaces which may restrict air flow. - Install the unit in an opening with the following minimum dimensions:
Model XHD28
A 27^ (686 mm) wide
B 31-1/8" (587 mm) high
C 8'' (203 mm) deep
Model XHD26
A 24-3/8" (619 mm) wide
B 18-1/2" (470 mm) high
C 8" (203 mm) deep
Model XHD23
A 21-1/2" (548 mm) wide
B 20^ (508 mm) high
C 8" (203 mm) deep
- If installing the unit in an existing fireplace opening, seal all drafts and vents with a non-fibrous insulation material to prevent any chimney debris from falling onto the unit. Do not install into an existing fireplace opening that is prone to dampness.
Mounting
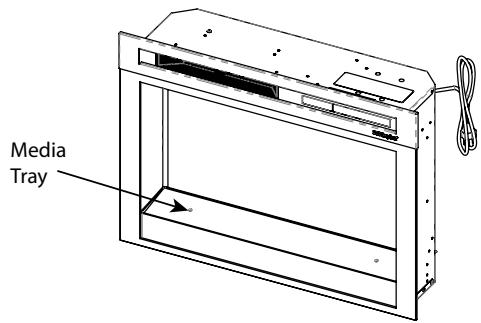
- If applicable, carefully pour and evenly distribute the supplied media in the media tray of the firebox.
2a. If installing into a Dimplex mantel, first check to see if there are holes in the side panels near the top as shown below. If so, align the front of the firebox (without front glass installed) with the front face of the mantel. Install provided screws into the front holes on the inside faces of the firebox. The screw will line up with the hole in the mantel, securing it in place.
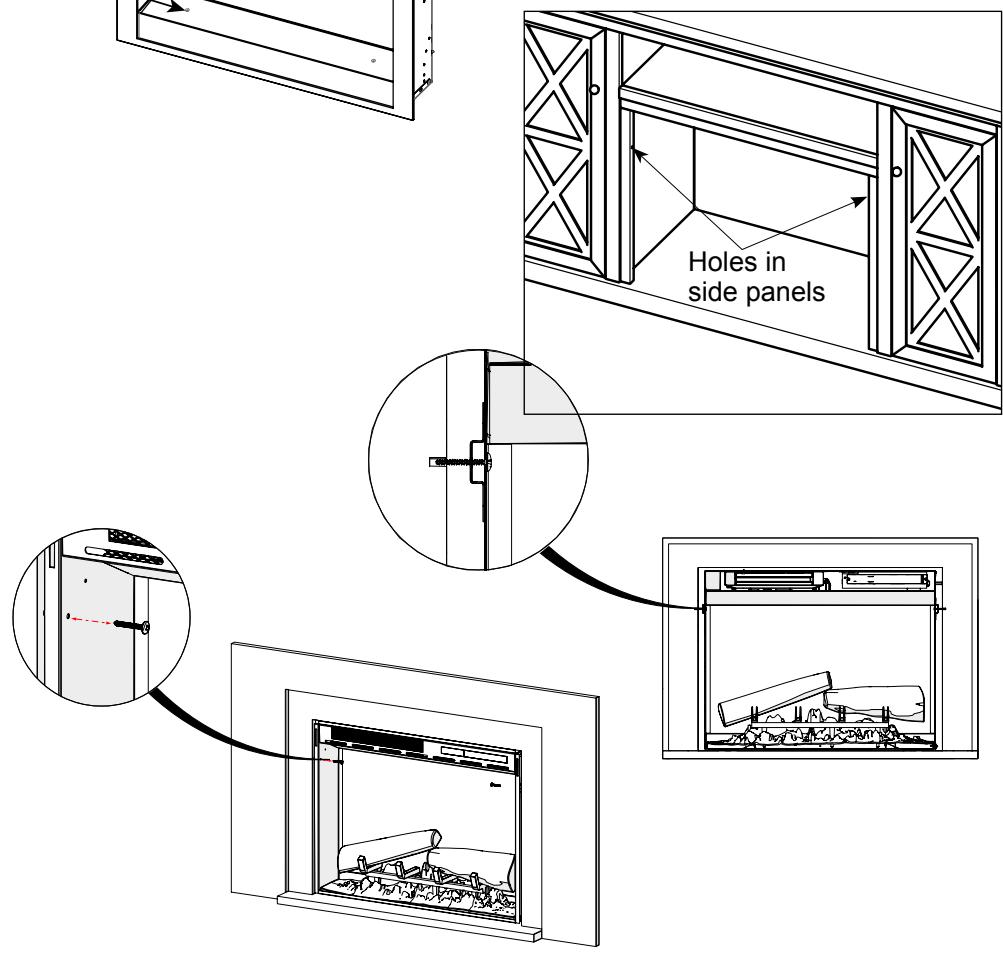
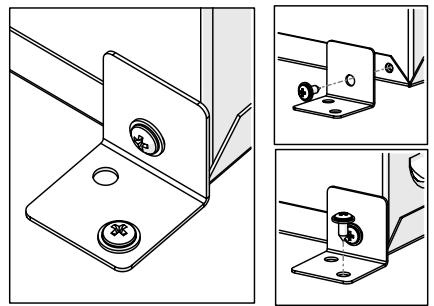
If there are no holes on the side panels of the mantel, remove the screw on the back bottom flange most convenient for securing, and use the L-bracket (provided) to secure the firebox to the mantel.
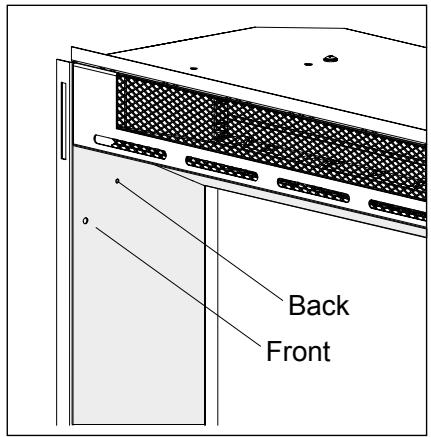
2b. If installing into a custom mantel, or into an existing opening, secure the firebox by inserting an appropriate screw through either the front hole, or back hole on the inside face of the firebox, depending on which location is more appropriate for the installation.
Grounding Instructions
This product must be grounded. If it should malfunction or breakdown, grounding provides a path of least resistance for electric current to reduce the risk of electric shock. This product is equipped with a cord having an equipment-grounding conductor and a grounding plug.
The plug must be plugged into an appropriate outlet that is properly installed and grounded in accordance with all local codes and ordinances.

DANGER: Improper connection of equipment-grounding conductor can result in a risk of electric shock. Check with qualified electrician or serviceman if you are in doubt as to whether the product is properly grounded. Do not modify the plug provided with the product – if it will not fit out, have a proper outlet installed by qualified electrician.
Touch Panel and Remote Controls
The manual controls for the Dimplex Electric fireplace are located on the front panel. When not activated, the icons are not visible. Touch the control panel to the right side of the white line to activate the icons. The selected setting displays on the left side of the panel.
A multi-function IR (infrared) remote control also is provided. The remote control has a range of approximately 30 ft (9 m). To operate correctly, the remote control must be pointed toward the front of the in electric fireplace.
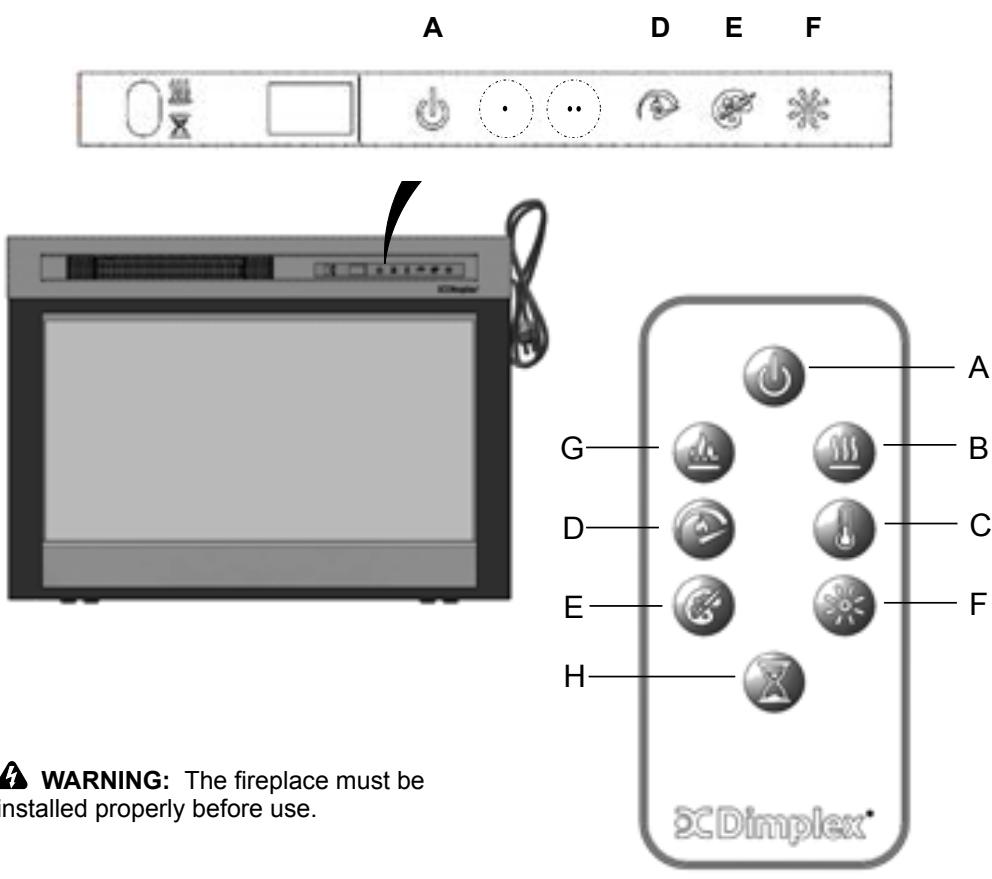
WARNING: The fireplace must be installed properly before use.
| Icon | Function | Description | |
| A | Power | Press to turn unit Off or On. ·Unit Off Press to turn everything Off. Press again to turn unit On with previous settings. ·Unit On Press to turn unit On with previous settings. - If the flame effect was On, the flame will turn on and the previous heat setting will be activated (On or Off). Display will show current heater temperature setting and after 2 sec displays the room temperature. - [remote only] If the flame effect was Off, the previous heat setting will be activated (On or Off). - [panel only] If the flame effect was Off, the flame will turn on and the previous heat setting will be activated (On or Off) | |
| B | Heat | ·Heat On Press to turn heat On (indicated by 1 short beep). Display will show current heater temperature setting and after 2 sec displays room temperature. Use the Temp icon to change the heater temperature setting. ·Heat Off Press to turn heat Off (indicated by 1 short beep). NOTE: After the heater is switched off, the fan will continue on for 60 seconds before turning off. | |
| C | Temp | Press multiple times to raise the heater temperature in 1° F (1° C) increments. Display will show current temperature. Temperature range is 62°-78° F (17°-26° C). This feature is active whenever the heat is enabled. | |
| D | Flame Speed | Press multiple times to toggle through flame speeds (minimum, medium, maximum). Display will show current speed number (F1, F2, F3 respectively). | |
| E | Color Themes | Press multiple times to change the media and flame base colors. This feature is active only when the flame effect is On. Display will show theme (t0, t1, t2, etc.)XHD28L, XHD26L or XHD23L (Log Unit) themes:·Theme t0 - no flame·Theme t1 - Natural (flame base off)·Theme t2 - Red Highlights (flame base red/orange)·Theme t3 - Blue Highlights (flame base blue) | |
| F | Brightness | Press to change the flame and logs brightness. Display will show b3, b1, b2 respectively.·High·Low·Medium | |
| G | Flame | Press to turn the flame effect On. Press again to turn the flame effect Off. | |
| H | Timer | Press multiple times to change the sleep timer by 0.5 hr from 0.5 hr to 8 hr before turning off. Press again, the remaining time on the timer displays. |
User Modes:
| Mode Name /Discription | Action (Actions cannot be input by remote control) |
| Change Celsius (°C) to Fahrenheit (°F) | Press both Temp Button (♀) and flame speed (♂) on the unit and hold until beep is heard and display flashes. (To revert back to Celsius repeat this action) |
| Disable / Enable Heat Options | Hold both Heat Button (♀) and Temp Button (♂), on the unit, for 2 seconds, when the heater has been disabled the display will read “--” and beep. To enable heat repeat this action. |
Resetting the Temperature Cutout Switch
Should the heater overheat, an automatic cutout will turn the heater off. It will not come back on without being reset.
To reset the cutout switch, unplug the unit and wait 5 minutes before plugging it back in.
Remote Control
The maximum range of use is 5 metres.
NOTE: It takes time for the receiver to respond to the transmitter.
NOTE: The reciever for the remote control is located in the display, aim the remote control in this direction when inputting commands.
Do not press the buttons more than once within two seconds for correct operation.
Battery Information
- To activate the remote control remove the clear battery isolation strip at the base of the remote control, which is used to ensure your remote control reaches you fully charged.
- To replace the remote control battery, turn over the remote control, and follow the diagram embossed on the remote control
WARNING: ALWAYS DISCONNECT FROM THE POWER SUPPLY BEFORE ATTEMPTING ANY MAINTENANCE.
Light Emitting Diode
This fire is fitted with LED (Light Emitting Diode) lamps. These LED lamps are maintenance-free and should not require replacing during the life of the product.
Cleaning
WARNING: ALWAYS DISCONNECT FROM THE POWER SUPPLY BEFORE CLEANING THE HEATER.
For general cleaning use a soft clean duster – never use abrasive cleaners. The glass viewing screen should be cleaned carefully with a soft cloth.
DO NOT use proprietary glass cleaners.
To remove any accumulation of dust or fluff the soft brush attachment of a vacuum cleaner should occasionally be used to clean the outlet grille of the fan heater.
WARNING: do not operate the product without the grille and outer glass in position as this may effect the operation of the heater.
Recycling
For electrical products sold within the European Community. At the end of the electrical products useful life it should not be disposed of with household waste. Please recycle where facilities exist. Check with your Local Authority or retailer for recycling advice in your country.
After Sales Service
Should you require after sales service or should you need to purchase any spares, please contact the retailer from whom the appliance was purchased or contact the service number relevant to your country on the warranty card.
Please do not return a faulty product to us in the first instance as this may result in loss or damage and delay in providing you with a satisfactory service. Please retain your receipt as proof of purchase.
WAARSCHUWING: DIT APPARAAT MOET WORDEN GEAARD
Service post-vanzare
MoAeAb No: XHD23L-EU, XHD26L-EU, XHD26L-EU-500H, XHD28L-EU
TeTIOBAIOTyXHICTb
230B 240B
| HomiHaNbHa TeNaOBA ПюДуКТИВHICTь | П HOM | 1.3 | - | 1.4 | KB |
| MiHIMaMbHa TeNaOBA NOTYχHICTь | П_MiH | - | KB | ||
| МakсиMaMbHa БeЗпepерВнa ТeПАОп罗ДуКТИВHICTь | П Makc, c | 1.3 | - | 1.4 | KB |
OoATKOBe CNOXIBAHH eAekTPOeHepri
IyabT AnCTaHciHOro KepyBaHHa
MaKcMaAaBnI dIaIa3OH BIKOpNCtAHNCTAHOBuTb 5MeTpIB.
YBAG: 3aImae 6arato yacy aI npimma, io bIOBicn Ha nepeabau.
YBAGA: PnIMMaH AaI PybTa DnCTAHuHOro KepyBaHHra 3HaxOAnTbCra Ha AnCnAeI, HApabTe NpBT DnCTAHuHOro KepyBaHHra B LcBOMy HApPAMky npN BBeAdEHHI KOMAHAn. He HatnckaIte KHONKb6IbSe OAnHO rpa3y IpOTAROM dBOX CekyHd AaI npABINbHOi po60tN.