
HS520 - Log saw SCHEPPACH - Free user manual and instructions
Find the device manual for free HS520 SCHEPPACH in PDF.
| Product type | Log saw (swing frame circular saw) |
| Brand | SCHEPPACH |
| Model | HS520 |
| Dimensions (L x W x H) | 860 x 775 x 990 mm |
| Weight | 75 kg |
| Power supply | 220‑240 V ~ 50 Hz (single-phase) or 380‑420 V ~ 50 Hz (three-phase) |
| Rated input power (P1) | 2.6 kW (single) / 3.0 kW (three) |
| Rated output power (P2) | 2.1 kW (single) / 2.4 kW (three) |
| Duty type | S6 40% (intermittent duty) |
| Blade diameter | 500 / 505 mm |
| No-load speed | 2800 rpm |
| Cutting speed | 74 m/s |
| Minimum cutting height (round wood) | 170 mm |
| Maximum workpiece length | 1200 mm |
| Maximum firewood section | 240 x 190 mm |
| Motor brake | Yes (stop in under 10 seconds) |
| Sound power level (machining) | 104 dB |
| Sound pressure level (machining) | 95 dB |
| Safety guards | Blade guard, stand guard, folding cover, on/off switch |
| Maintenance | Regular cleaning, oiling of moving parts, blade inspection and replacement |
| Wear parts | Saw blade, stand inserts |
Frequently Asked Questions - HS520 SCHEPPACH
User questions about HS520 SCHEPPACH
0 question about this device. Answer the ones you know or ask your own.
Ask a new question about this device
Download the instructions for your Log saw in PDF format for free! Find your manual HS520 - SCHEPPACH and take your electronic device back in hand. On this page are published all the documents necessary for the use of your device. HS520 by SCHEPPACH.
USER MANUAL HS520 SCHEPPACH
- Introduction 25
- Safety instructions 25
3.Use only as authorized. 27 - Other risks 27
- Training of the operator 28
- Technical Data 29
- Scope of delivery 29
- Assembly 30
- Setting-up and adjustment 31
- Transport of the machine 31
- Electrical Connection 32
- Commissioning 33
- Sawing operation 33
- Maintenance and service 33
- Exchange of saw blade (Abb. J4) 34
- Disposal and recycling 34
- Troubleshooting 35
1. Introduction
Manufacturer:
We hope you enjoy your new firewood circular saw and wish you success with it.
INFORMATION:
The manufacturer of this tool is, according to the current product liability law, not liable for damages caused to or by this tool because of:
- incorrect usage,
- failure to observe the manual,
- repairs by third parties, not authorized specialists,
- fitting and exchange of non-original exchange parts,
non-intended use,
falling out of the electrical installations because of inobservance of the electrical Rules and VDE-Regulations 0100, DIN 57113 / VDE0113.
We recommend that you:
Read the entire operating instructions before assembling and implementing.
This instruction manual should make it easier for you to get to know your machine and to use its range of applications as intended.
The manual contains important information on how to work with the machine in a secure, correct and efficient way, and how you can avoid risks, save repair costs, reduce down time and increase the reliability and life span of the machine.
Apart from the safety rules mentioned in these operating instructions, you should implicitly pay attention to the valid regulations of your country for the use of the machine.
Keep the manual, in a plastic cover protected against dirt and humidity, with the machine. They should be read and observed carefully by every member of staff before starting to work. Only people instructed on how to use the machine and informed about the possible risks, should be allowed to use it. The required minimum age is to be adhered to.
Besides the safety instructions in this manual and the special regulations of your country the recognized technical rules for the operation of wood processing machines need to be observed.
General instructions
- After unpacking please check all parts for possible damage during transport. In case of complaints the driver needs to be contacted as soon as possible.
- Complaints coming in later will not be recognized as such.
- Familiarize yourself with the machine by means of the operating instructions before implementing it.
- In case of replacing worn or exchange parts, as for accessories, only use original parts. You can obtain exchange parts at the specialized dealer.
- Upon ordering, please specify our article n^o 's as well as type and year of construction of the tool.
2. Safety instructions
- In these operation instructions we have indicated positions that concern your safety, with this mark:
- Take due note of all this information before and while working with the saw.
- Do not lose these safety regulations.
- When equipment is not being used it should be kept in a dry, closed place out of childrens reach.
- Keep mounted attachments sharp and clean to enable you to work well and safely.
- Pay attention to - What you do. Always work in accordance with the regulations. Do not use the tool when you are tired.
- Do not use tools that do not allow to turned on and off the switch.
- Warning! The use of other tools and accessories may put you at risk of injury.
- Warning: Always unplug the power plug or remove the spark plug connector prior to starting any of the maintenance work described in this manual.
- Give these safety regulations to all persons who work on the machine.
- Caution! Hands and fingers may be injured on the rotating saw blade.
- Do not leave the saw in the rain and never use it in damp or wet conditions.
- Provide good lighting.
- Do not saw near flammable liquids or gases.
- Wear suitable work clothes! Loose garments or jewelry may become caught up in the rotating saw blade.
- Non-slip shoes are recommended when working outdoors.
- Wear a hair net if you have long hair.
- Avoid abnormal working postures.
- The operating personnel must be at least 18 years of age. Trainees must be at least 16 years of age and may only work on the machine under supervision.
- Keep children away from the machine when the motor is running.
- Keep your workplace clean of wood scrap and any unnecessary objects.
-
An untidy work area invites accidents.
-
Do not allow other persons, especially children, to touch the tool. Keep them out of your work area.
- Persons working on the machine should not be distracted.
- Note the direction of rotation of the motor and saw blade. Use only blades whose permissible maximum speed is not lower than the maximum spindle speed of the circular saw and of the material to be cut.
- After you have switched off the motor, never slow down the saw blade by applying pressure to its side.
- Only fit blades which are well sharpened and have no cracks or deformations.
- Do not use circular saw blades made of high-speed alloy steel (HSS steel)
- Only use saw blades that are recommended by the manufacturer, comply with EN 847-1.
- Faulty saw blades must be replaced immediately.
- Never use saw blades which do not comply with the data specified in this manual.
- Never dismantle the machines safety devices or render them inoperative.
- If the table insert is worn, replace it.
- Always stand to the side of the saw blade when working with the saw.
- Never load the machine so much that it cuts out.
- Make sure that off-cuts do not catch on the saw blade crown.
- Never remove loose splinters, chips or jammed pieces of wood when the saw blade is running.
- To rectify faults or remove jammed pieces of wood, always switch off the machine first. - Unplug the power plug -
- If the sawing gap is worn, replace the table insert. Switch off the machine and pull out the mains plug.
- Carry out retooling work, adjustments, measurements and cleaning jobs only when the motor is switched off.
- Unplug the power plug -
- Before switching on, make sure that all keys and wrenches have been removed from the tool.
- Switch off the motor and unplug the power plug before you leave the workplace
- Refit all guards and safety devices immediately after you have completed any repairs or maintenance work.
- Be sure to observe the safety information and operating and maintenance instructions issued by the manufacturer, as well as the dimensions listed in the Technical Data.
- It is imperative to observe the accident prevention regulations in force in your area as well as all other generally recognized rules of safety.
- Make sure you stand squarely and keep your balance at all times.
Each time before re-using the tool, carefully check that the guards or any slightly damaged parts are working as intended. -
Check the tool for damage!
-
Protective devices or other parts with minor damage must be carefully inspected to ensure that they function correctly and as intended prior to continued use of the tool.
- Check that the moving parts are in good working order, that they do not jam, and that no parts are damaged. Make sure that all parts are fitted correctly and that all other operating conditions are properly fulfilled.
- Unless otherwise stated in the operating instructions, damaged safety devices and parts must be repaired or replaced by an authorized service center.
- This tool conforms to the applicable safety regulations. Repairs may only be performed by a specialist using original spare parts. Otherwise accidents could occur.
-
If necessary, wear suitable personal protection equipment. This could consist of:
-
Ear plugs to prevent the risk of damaging your hearing;
- A breathing mask to avoid the risk of inhaling hazardous dust.
- Eye protection to prevent foreign bodies entering the eyes.
- Safety shoes for stability and protection against falling objects.
- Always wear gloves when handling saw blades and rough materials. Whenever practicable, saw blades must be carried in a container.
- Safety goggles / face protection to avoid injuries due flying objects.
-
Protective clothing to prevent cutting injuries.
-
The operator must be informed about the conditions that influence the generation of noise (for example saw blades designed to reduce noise emissions, caring for blades and the machine).
- Faults on the machine or its guards, safety devices and blade must be reported to the person in charge as soon as they are discovered.
- Use only the transport devices to move the machine. Never use the guards for handling and moving the machine.
- All operators must receive proper training in the use, adjustment and operation of the machine.
- Do not saw any materials that contain foreign bodies such as wires, cables or ties.
- Only use sharp saw blades.
Warning! This electric tool generates an electromagnetic field during operation. This field can impair active or passive medical implants under certain conditions. In order to prevent the risk of serious or deadly injuries, we recommend that persons with medical implants consult with their physician and the manufacturer of the medical implant prior to operating the electric tool.
3. Use only as authorized
The firewood circular saw is designed exclusively with the offered tool for the processing of wood.
The machine corresponds to the valid EC guideline.
- The log saw is constructed as 1-man-operating stand and is only to be used in outdoor locations.
- The machine is designed for single-shift operation, switch-on duration S6 - 40%
- The log saw is a portable circular saw. It is only applicable to cross cut firewood with a feeding rocker according to the technical specifications.
- The saw is constructed solely for cross cutting of firewood with max. 1,2 meter length.
- Regardless of the diameter of the wood only 1 work piece is to be put on the rocker.
- Observe all safety and hazard notes on the machine and ensure they are kept complete and in a legible condition.
- The machining range and surrounding areas of the machine must be clear of interfering foreign matter to prevent accidents occurring.
- Workpieces must be completely free of foreign objects, i.e. nails or screws.
- The machine must only be used in technically perfect condition in accordance with its designated use and the instructions set out in the operating manual, and only by safety-conscious persons who are fully aware of the risks involved in operating the machine. Any functional disorders, especially those affecting the safety of the machine, should therefore be rectified immediately.
- The manufacturer's safety instructions, operating instructions and maintenance instructions as well as the dimensions given in the technical data must be observed.
- The applicable accident prevention regulations and other generally accepted safety regulations must be complied with.
- The machine may only be used, maintained, and operated by persons familiar with it and instructed in its operation and procedures. Arbitrary alterations to the machine release the manufacturer from all responsibility for any resulting damages.
- The machine may only be used with original accessories and original tools made by the manufacturer.
- Any other use exceeds authorization. The manufacturer is not responsible for any damages resulting from unauthorized use; risk is the sole responsibility of the operator.
- Only use saw blades that comply with the European standard DIN EN 847-1.
- Ensure adequate lighting.
- Make sure that the machine is secure on the ground when installing the machine.
- The area around the machine must be free of trip hazards.
- The machine may only be operated outdoors without exhaust.
4. Other risks
The machine has been built using modern technology in accordance with recognized safety rules. Some remaining hazards, however, may still exist.
- The rotating saw blade can cause injuries to fingers and hands if the work piece is incorrectly fed.
- Danger to health from wood dusts or wood chips. Always wear personal protective equipment such as eye protection and dust mask.
- Noise can be a health hazard. The permitted noise level is exceeded when working. Be sure to wear personal protective gear such as ear protection.
- Hazardous current, when using improper electrical connections.
- Even when all safety measures are taken, some remaining hazards which are not yet evident may still be present.
- Remaining hazards can be minimized by following the instructions in "Safety Precautions", "Proper Use" and in the entire operating manual.
- Defective saw blades can cause injuries. Regularly inspect the structural integrity of saw blades.
- The operating instructions supplied with the special accessories must be observed and carefully read when Scheppach special accessories are used.
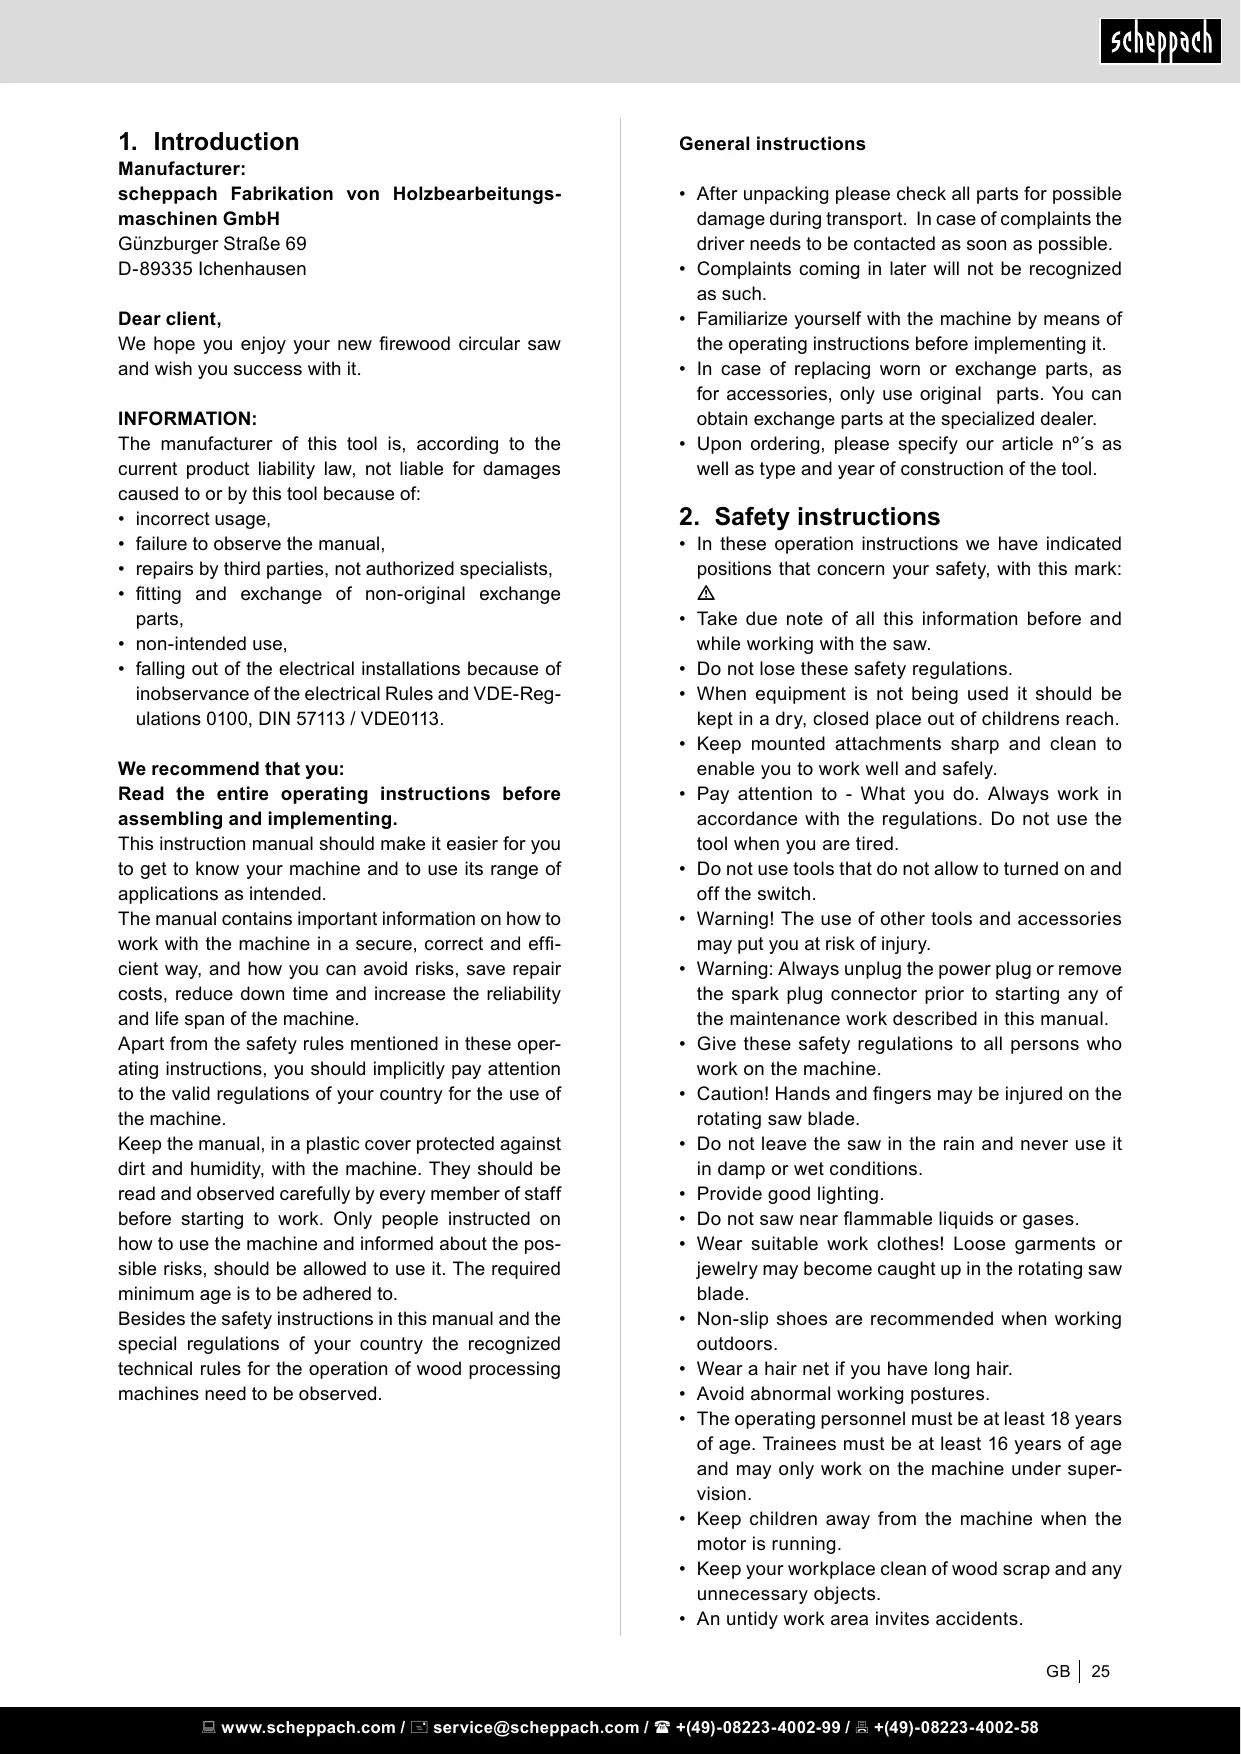
Attention: risk of accident!
The wood must always be seated on both sides of the saw blade on the v-block of the rocker. (see arrows)
| Caution Danger of accidents! Wear safety shoes. | Caution Danger of accidents! To wear ear protection. Wear safety glasses. | |
| Accident risk! Before commissioning instruction manual read. | Attention! Tool continues to run after power disconnected! Before any maintenance, cleaning or repair work, disconnect the unit from the power supply! | |
5. Training of the operator
- Forward the safety instructions to all people working on or with this machine.
- The minimum age for the operating person is 18 years. Trainees should be minimum 16 years of age, but are only allowed to work with the machine under supervision.
- People running the machine should not be distracted.
- Keep children away from the to the net connected machine.
- Wear tight fitting clothes. Take off jewelry, rings and wristwatches.
- Observe all safety and hazard warnings on the machine and keep it in readable condition.
- Be careful at work: Danger of damaging finger(s) and hand(s) by the rotating cutting tool.
- Regular pauses must be observed during operation.
-
Safety shoes and protective clothing must be worn during operation.
-
Technical Data
| HS 520 | HS 520 | ||
| Article Number | 5905108901 | 5905108902 | |
| Construction measurements: | |||
| Total length | mm | 860 | |
| Total width | mm | 775 | |
| Total height | mm | 990 | |
| Rocker support | mm | 735 | |
| Saw blade Ø | mm | 500/505 | |
| Idle speed motor | 1/min | 2800 | 2800 |
| Cutting speed saw blade | m/sec | 74 | 74 |
| Weight | kg | 75 | 75 |
| Power unit | |||
| Motor | V/Hz | 220 - 240 / 50 | 380 - 420 / 50 |
| Input power P1 | kW | 2,6 | 3,0 |
| Output power P2 | kW | 2,1 | 2,4 |
| Operating mode | S6 / 40% | S6 / 40% | |
| Rated current | A | 16 | 16 |
| Work information | |||
| Cutting height Spar | min. mm | 170 | |
| Piece of wood | max. mm | 1200 | |
| Firewood | max. mm | 240 x 190 | |
| Reserve technical changes! | |||
Specific noise values
The according to the EN 23746 for the sound pressure level resp. EN 31202 (correction factor k3 after supplement A.2 from EN 31204 calculated) for the sound pressure level on the working site ascertained noise emission value amounts under the foundations of ISO 7904 supplement a performed working conditions to.
| Sound pressure level in dB | |
| Idle LwA / Processing LwA | 98 / 104 |
| Sound pressure level on working site in dB | |
| Idle LqAeq / Processing LqAeq | 89 / 95 |
The specified values are emission values and therefore should not at the same time be reliable working site values. Although there is a correlation between emission andimmision levels, it cannot unfailingly be derived if extra precautions need to be taken or not. Factors, which influence the actual availabeimmusion value on working site, include the peculiarities of working area, other sources of noise, e.g. the number of machines and other adjoining processes. The allowed working values could vary from country to country. However, the information should qualify the user, to be able to make an estimation of the dangers and risks.
7. Scope of delivery
Remove all the parts from the box and check these for completeness (p.2). Remove all transport protection present.
-
Base frame with swivel, motor and switch
-
Wrench with locking pin
- Rear strut
- Foot, rear left and right
- Saw blade
- Strut, left and right
7.Wheel,2 units
8.- 13. Accessories bag enclosed - Protective hood, assembled
- Guard bracket
- Protective cover
- Swivel protection, 2 units
- Protective flap
8-13 Accessories bag enclosed, containing:
29x lenticular flange head screw M8x16 (Fig. 8a)
29x locking nut M 8 (Fig. 8b)
2x hexagon screw M6 (Fig. 9a)
2x locking nut M6 (Fig. 9b)
2x washer D 20 mm (Fig. 10)
2x lock washer without cap D 18 mm (Fig. 11)
2x locking nut M 4 (Fig. 12a)
2x fillster head screw M 4x610 (Fig. 12b)
1x cover panel with clinch stud (Fig. 13a)
2x plastic wascher (Fig. 13b)
1x pivot bushing, galvanised (Fig. 13c)
1x hexagon nut, self-locking M 6 (Fig. 13d)
1x hexagon screw M 5x12 (Fig. 13e)
1x collar bushing (Fig. 13g)
1x hexagon nut, self-locking M5 (Fig. 13h)
4x mushroom head screw M6x12 (Fig. 17a)
4x washer D6 (Fig. 17b)
4x hexagon nut, self-locking M6 (Fig. 17c)
Additional accessories bag enclosed for protective flap with handle (Fig. 18)
2x saw guard (Fig. 18a)
1x tension spring (Fig. 18b)
2x hexagon screw M8x35 (Fig. 18c)
2x hexagon nut M8 (Fig. 18d)
6x hexagon nut, self-locking (Fig. 18e)
1x hexagon screw M8x12 (Fig. 18f)
6x Philips screw M4x10 (Fig. 18g)
6x locking nut M4 (Fig. 18h)
3x hexagon screw M8x20 (Fig. 18j)
3x collar bushing D 8mm (Fig. 18k)
3x washer D 8mm (Fig. 18m)
8. Assembly
For packaging reasons, the swivel log saw does not come fully assembled. It must be assembled on a completely level surface.
A. Place the packaging, cardboard or similar on the floor to prevent damage. Remove the base frame from the packaging and position the machine with the swivel side on top (Fig. A).
B. Lift wheel axle slightly, slide one washer (10) and one wheel (7) (for external side see Fig. B3, B4) onto the axle on each side. Fit lock washer (11) on the axle with the saw blade wrench and knock onto the shaft with the hammer. (Secure lock washer against falling with adhesive tape) (Fig. B1 - B4).
C. Mount foot left and right (4 a, b) on the base frame, each with 4 lenticular flange head screws M8x16 (8 a) and locking nut M8 (8 b) (Fig. C1 - C4). Lightly tighten all frame screws by hand.
D. Screw rear strut (3) onto the mounted feet with 4 lenticular flange head screws M8x16 (8 a) and locking nut M8 (8 b). Mount strut left and right (6 a, b) on the side of the feet (4 a, b), each with 5 lenticular flange head screws M8x16 (8 a) and locking nut M8 (8 b). (Fig. D1, D2, D3).
E. Place machine on the feet, cut the cable tie, release the locking lever and tilt the swivel out. (Fig. E1, E2). Tighten all frame screws well. It is important here that the swivel log saw stands on a level surface. Mount swivel protection (17) on the inside of the swivel with 2 mushroom head screws M6 x 12, 2 washers 6mm and 2 self-locking nuts M6 respectively and tighten securely. Make sure that the mushroom head screws are guided in from the outside. (Fig. E3).
F. Mount guard bracket (15) on the right rear foot with 2 lenticular flange head screws M8x16 (8 a) and locking nut M8 (8 b). (Fig. F)
G. Take the protective hood with protective cover (14 and 16) out of the packaging, loosen 2 hexagon screws top and bottom and remove the protective cover. To ease assembly, remove the front saw blade flange. Slide protective hood (14) over the saw blade flange, fasten and secure with 5 lenticular flange head screws M8x16 (stuck from the inside out) (8 a) and locking nut M8 (8 b). (Fig. G1, G2, G3).
H. Mount and fasten protective cover (14) with the 2 hinges on the protective hood using 2 hexagon screws M6x12 (9 a) and 2 locking nuts M6 (9 b). (Fig. H1, H2, H3).
I. Mount complete guard panel with clinch stud (13a), to do so guide 1 hexagon screw M5 x 12 (13e) through the screw-mounted protective hood from the saw blade side and put on slide plastic washer (13b), cover panel (13a) and plastic bush (13g) onto the hexagon screw (13e) and then tighten a little with the self-locking hexagon nut M5 (13h). It must be possible for the cover panel to move. Slide plastic washer (13b) onto the threaded bolt of the cover panel (13a) and guide into the circular recess. Slide on galvanised pivot bushing (13c) and secure with self-locking hexagon nut M5 (13d). (Fig. I1, I2, I3, I4, I5). Now lightly tighten both threaded connections. It must be possible for the panel to move easily.
J. Position the saw blade, screw on by hand with flange, washer and hexagon nut. Insert locking pin and tighten the nut well using the saw blade wrench. Remove locking pin once more. (J1, J2, J3, J4). Important note! When inserting the saw blade, make sure the direction of rotation is correct. Always wear gloves when inserting and tightening the saw blade.
K. Close blade guard and secure top and bottom with the hexagon screws (Fig. K).
L. Guide electrical cable through the frame feet, screw and secure switch with 2 fillister head screws M4x60 and locking nut. Place saw blade wrench and locking pin (2) in the recess (Fig. L).
M. Check that the saw blade is central, if necessary loosen the two hexagon screws (M1) on the swivel axle (M1, M2) and align the swivel with the saw blade (M3).
Following alignment, retighten the hexagon screws (M2).
Mounting the protective flap (Fig. N1 - N5)
N.1. a. Fit saw blade inserts (18a) on the protective cover (18) from below on both sides with 3 Philips screws M4x10 (18g) and 3 locking nuts M4 (18h) respectively.
b. Screw in retaining screw (18c) for the tension spring on the protective cover with hexagon screw M8 x 35, (18c) with lock nuts M8 (18d) approx. 20mm and fit with a self-locking nut M8 (18e).
c. Fit stop screw (18f) M8x12 with self-locking nut M8 (18e).
d. Press 3 collar bushings (18k) into the lugs of the protective flap from the left.
N.2. Place the protective cover on the swivel and fit with 3 hexagon screws M8x20 (18j), 3 washers 8mm (18m) and 3 self-locking nuts M8 (18e). Tighten the nuts such that the protective cover can be moved.
N.3. Screw in retaining screw (18c) for the tension spring on the swivel trough with hexagon screw M8 x 35, (18c) 1 lock nut M8 (18d) approx. 20mm and fit with a self-locking nut M8 (18e). Open protective cover, attach tension spring (18b) and check for mobility.
9. Setting-up and adjustment
- Please pay attention that your rocker circular saw is set up stable and on a leveled floor.
- The workplace must be well lit.
- There should be no obstacles to the machine.
Test the swivel and saw blade function.
Connect the machine to the mains power supply and perform a test run by switching on briefly.
10. Transport of the machine
Rocker lock
- To transport the swivel log saw, latch the swivel lock in position (1). (O1)
- Carefully tilt the machine forwards and transport. (O2; O3)
11. Electrical Connection
The electrical motor installed is connected and ready for operation. The connection complies with the applicable VDE and DIN provisions. The customer's mains connection as well as the extension cable used must also comply with these regulations.
Check electrical connection cables regularly for damage. Ensure that the connecting cable is not attached to the mains when you are checking it.
Electrical connecting cables must correspond to the relevant VDE and DIN regulations. Only use connecting cables with the code H 07 RN.
The type designation must be printed on the connecting cable by regulation.
Faulty electrical connecting cables
Insulation damage often occurs at electrical connecting cables.
Causes include:
- Pinch points when connecting cables are run through window or door gaps.
- Kinks resulting from incorrect attachment or laying of the connection cable.
- Cuts resulting from running over the connecting cable.
- Insulation damage resulting from forcefully pulling out of the wall socket.
- Cracks through aging of insulation.
Such defective electrical connection cables must not be used as the insulation damage makes them extremely hazardous.
Three-phase motor 400 V/ 50 Hz
Mains voltage 400 Volt / 50 Hz.
Mains voltage and extension cables must be 5-lead = 3P + N + SL - (3/N/PE).
Extension cables must have a minimum cross-section of 1,5mm^2 ( ≤ 25m ).
Extension cables must have a minimum cross-section of 2,5mm^2 (>25m)
Electrical Connection
Connect the machine to the mains with a CEE plug.
The mains connection is protected with a 16 A slow-blow fuse.
Switch on the machine at the operating switch; the saw shaft starts running.
When connecting to the mains or in the event of the machine being moved to another location, the turning direction must be checked. It may be necessary to change the polarity.
Turn pole inverter in the machine socket.
Motor-brake appliance
The brake slows down the motor of the saw shaft within 10 seconds.
The electrical braking is interrupted after maximum 14 seconds.
In case the braking takes more than 10 seconds the machine should not be used again, as the brake is defective. The machine implicitly needs to be disconnected from the power supply. Only an electronic specialist should be instructed to repair this malfunction.
Operating mode / Switch-on duration
The electrical motor is dimensioned for operating mode S6 - 40%.
S6 = pass operation with load exposure
40% = related to 10 min. 4min. load; 6min. pass operation
If the motor is overloaded, it automatically switches off because a thermostat protects the motor against overloading. After a cool-down period (time varies) the motor can be switched on again.
Check electrical connection
- Switch on the machine with the power switch, the motor runs up.
Attention!
Check the direction of rotation!
- Three-phase AC motors must be checked for their direction of rotation in the event of a new connection or change of location. If necessary, the direction of rotation must be changed with the phase inverter (Fig. A)
- Upon switching off the saw shaft is slowed down within 10 seconds.
Changing of rolling direction
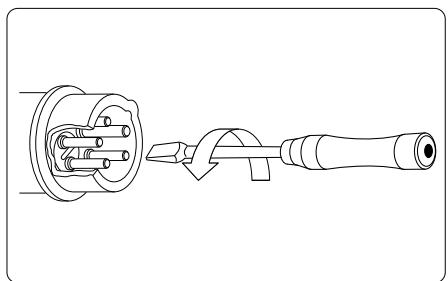
Fig. A
Alternating current motor
- The supply voltage hast to be 220-240 Volt / 50 Hz.
- Extension cables must be up to 25m long, have a cross cut of 1.5mm^2 , be over 25m long, and have a minimum 2.5mm^2 .
- The mains connection is protected with a 16 A slow-blow fuse.
- The RCD breaker must have a 30mA trip rating.
Connections and repairs
Connections and repairs of the electrical equipment should only be carried out by an electrical specialist.
In case you have further questions, please specify the following:
- Motor manufacturer; Current type of the motor
Type of current for the motor
Information of the machine type label
Information of the switch type label
If you send the motor back, always return the complete power unit with electro-control.
12. Commissioning
- Before commissioning observe the safety notes.
- All safety and auxiliary installations must be fitted.
- Check the rocker, which must return to the initial position independently. Check the saw blade for perfect fit and the correct direction of rotation.
- Functional check before start of work.
To operate the saw, press the on / off switch(Fig. L). - The saw is constructed solely for the cross cutting of firewood with max. 1 meter length.
- Regardless of the wood diameter, put only one piece with min. 060 ~mm on the rocker.
- Use both hands to swing the rocker to the saw blade.
- Then place the rocker in the initial position.
- The wood to be sawn must not be fixed by hand.
- After the complete standstill of the saw, pull the mains plug.
- Only carry out conversion, adjustment, measurement and cleaning work with the engine switched off. Wait until the rotating tool has come to a standstill and remove the mains plug.
If the saw exhibits any faults, switch it off immediately (Fig. L) and pull out the mains plug.
13. Sawing operation
- After the machine has been switched on, wait until the saw blade has reached full speed.
- Put the wood on the rocker.
- Take hold of both handle bars of the rocker with both hands and lead it evenly to the saw blade; thus the saw blade is revealed.
- Push the rocker evenly to ensure the engine speed does not drop.
- Remove the wood from the rocker after it has returned to the initial position and the saw blade is covered. Then place the next workpiece.
- Now place the next piece of wood on.
Handling with the protective cover
- Open protective cover (N4).
- Insert the material to be cut.
- Close the protective cover (1) (N5).
- Pivot the swivel (2) with the handle (A or B) to the saw blade and saw through the material to be cut.
- Pivot the swivel (2) back and open the protective cover (1).
- Add more material to be cut and close the protective cover again.
Attention
Do not leave the machine unattended during operation. Turn off the machine when not working and pull the mains plug.
Arbeitsende
- Switch off the drive motor with the On/Off switch. (Fig. L).
- Wait until the blade has completely stopped.
- Observe general maintenance instructions.
- Unplug the power cord.
- Place the jack in the transport position and secure it with the locking lever.
14. Maintenance and service
Perform maintenance, modification, adjustment and cleaning work only with the engine switched off and the mains plug or spark plug connector is unplugged.
Electrical maintenance and repair tasks must be performed by a qualified electrician.
- Keep the manual at the machine.
- Keep machine clean.
- Wear protective goggles when cleaning.
Before undertaking any maintenance or checking work, the working area must be cleaned. Keep the necessary tools within the reach of your hand.
The intervals mentioned herein are based on normal conditions of use. An excessive use of the machine shortens the intervals accordingly.
Clean the panels, screens and control levers with a soft cloth. The cloth should be dry or slightly humid with a neutral cleaning agent. Do not use any solvents like alcohol or benzene as they could damage the surfaces.
Keep oils and lubricants out of reach of unauthorised persons. Read through the instructions on the containers carefully and follow them closely. Avoid direct contact with the skin and wash off thoroughly after use.
Check all safety devices after maintenance and cleaning work.
Maintenance
Turn the engine off and let the engine cool down. Re-fit the mains plug.
Check the general condition of the machine. Be careful with loose screws, misaligned or moving parts, breakage of parts, and any other condition that could interfere with safe operation.
Remove any foreign objects and other materials that have accumulated on the saw blade and the unit. Clean the machine after each use. Then use a high-quality and thin fluid machine oil to lubricate all moving parts.
Never use a "pressure washer" to clean your unit. Water can penetrate tight areas of the machine and its transmission case and cause damage to spindles, gears, bearings, or the engine. The use of pressure washers will result in shortened life and reduce serviceability.
Experienced craftsmen can perform minor repairs on the machine itself.
- Check the saw blade regularly. Use only well-sharpened, crack-free and not distorted saws. Use only tools that comply with the European standard EN 847-1.
- Exchange immediately rocker that run out.
- Check all safety installations after each maintenance and cleaning activities.
- Ensure that there are no tools or other materials on or in the machine before putting it into operation.
- Remove possible sawdust blockages at the discharge.
Service information
Please note that the following parts of this product are subject to normal or natural wear and that the following parts are therefore also required for use as consumables.
Wear parts*: sawblade; seesaw inserts
- Not necessarily included in the scope of delivery!
15.Exchange of saw blade (Abb. J4)
- Remove the mains plug.
- Wait until stationary and allow to cool down.
- The exchange of the saw blade can only be undertaken in firewood cut position.
- Open protective cover.
- To lock the saw blade into place, insert the locking pin (1) through the corresponding opening on the saw blade guard. To do this, insert the pin completely and straight into the hole. Use the corresponding hole (depending on the saw blade type) so that the pin is at the lowest point (bottom of the tooth).
- Release the saw blade with the supplied saw blade wrench (Fig. 2).
- Remove the saw blade flange
- Carefully detach the saw blade. Wear protective gloves when doing so (caution, risk of injury!).
- Before inserting the new saw blade, clean the flange with a cloth or brush.
- Refit the saw blade and flange, and retighten the flange nut.
- Now remove the locking pin so that the saw blade can turn freely again.
- Close the protective cover.
- Test the swivel and saw blade function.
Attention! When installing the saw blade, pay attention to the correct direction of rotation!
16.Disposal and recycling
On removal of the machine the local legal regulations have to be abided by.
Please contact the manufacturer in case of disposal.
Old devices must not be disposed of with household waste!
This symbol indicates that this product must not be disposed of together with domestic waste in compliance with the Directive (2012/19/EU) pertaining to waste electrical and electronic equipment (WEEE). This product must be disposed of at a designated collection point. This can occur, for example, by handing it in at an authorised collecting point for the recycling of waste electrical and electronic equipment. Improper handling of waste equipment may have negative consequences for the environment and human health due to potentially hazardous substances that are often contained in electrical and electronic equipment. By properly disposing of this product, you are also contributing to the effective use of natural resources. You can obtain information on collection points for waste equipment from your municipal administration, public waste disposal authority, an authorised body for the disposal of waste electrical and electronic equipment or your waste disposal company.
17. Troubleshooting
| Problem | Possible Cause | Help |
| Saw blade gets loose after turning off the motor | 1. Fastening nut tightened insufficiently. | 1. Tighten fastening nut (right-handed thread) |
| Motor does not start. | 1. Failure of mains fuse2. Extension cable defective3. Connections at the motor or switch out of order4. Motor or switch defective | 1. Check the mains fuse.2. Replace defective extension cable3. Check with the help of an electrician4. Check with the help of an electrician |
| Incorrect motor rotation direction | 1. Capacitor defective2. Incorrect polarity / Incorrect connection | 1. Have this checked by an electrician2. Change direction of rotation with phase inverter / Have an electrician change the polarity of the wall plug. |
| Motor not supplying power, fuse tripping | 1. Cross section of the extension cable insufficient2. Overload due to blunt saw blade | 1. see "Electrical connection"2. Replacing the saw blade |
| Burns on the cutting surface | 1. Bodkin saw blade2. Wrong saw blade | 1. Sharpen/replace saw blade2. Change the saw blade |
| The saw does not brake when switching the machine off | 1. Mechanical brake is defective. | 1. Have the brake replaced. |
| Motor runs erratically | 1. Switch defective.2. Extension cable defective. | 1. Contact the service department.2. Replace extension cable / have this checked by an electrician. |
| Motor overheating | 1. Air flow to the motor restricted. | 1. Do not cover the drive motor with objects. |
Electrotechnical maintenance works should only be carried out by an electronics technician!
Table des matieres
X 2000/14/EC_2005/88/EC
Annex V
Annex VI
Noise: measured L_WA = 105 / 107 dB(A); guaranteed L_WA = 95 / 97 dB(A)
Notified Body:
Notified Body No.:
2004/26/EC
Emission. No:
Standard references: EN 55014-1:2006+A1:2009+A2:2011; EN 61000-3-2:2006+A1:2009+A2:2009;
EN6100-3-3:2008 (teilweise); EN 1870-6:2017; EN 60204-1:2006/A1:2009; EN 61140:2002/A1:2006;
EN 60745-1/A11:2010; EN ISO 12100:2010

- Introduction
- Manufacturer:
- INFORMATION:
- We recommend that you:
- General instructions
- Safety instructions
- Use only as authorized
- Other risks
- Attention: risk of accident!
- Training of the operator
- Specific noise values
- Scope of delivery
- 8-13 Accessories bag enclosed, containing:
- Additional accessories bag enclosed for protective flap with handle (Fig. 18)
- Assembly
- Mounting the protective flap (Fig. N1 - N5)
- Setting-up and adjustment
- Test the swivel and saw blade function.
- Transport of the machine
- Rocker lock
- Electrical Connection
- Faulty electrical connecting cables
- Three-phase motor 400 V/ 50 Hz
- Mains voltage 400 Volt / 50 Hz.
- Electrical Connection
- Motor-brake appliance
- Operating mode / Switch-on duration
- Check electrical connection
- Attention!
- Check the direction of rotation!
- Changing of rolling direction
- Alternating current motor
- Connections and repairs
- Commissioning
- Sawing operation
- Handling with the protective cover
- Attention
- Arbeitsende
- Maintenance and service
- Maintenance
- Service information
- 15.Exchange of saw blade (Abb. J4)
- 16.Disposal and recycling
- Old devices must not be disposed of with household waste!
- Troubleshooting
- Table des matieres
Brand : SCHEPPACH
Model : HS520
Category : Log saw