VI30117X - Wine cellar CATA - Free user manual and instructions
Find the device manual for free VI30117X CATA in PDF.



| Product type | Wine cellar |
| Brand | CATA |
| Model | VI30117X |
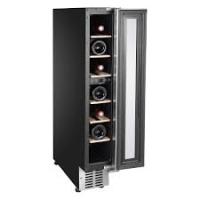
| Storage capacity | 17 bottles (750 ml standard) |
| Useful volume | 52 L |
| Dimensions (W x D x H) | 295 x 570 x 825 mm |
| Net weight | 27.2 kg |
| Power supply | 220-240 V, 50 Hz |
| Refrigerant | R600a (18 g) |
| Temperature range | 5°C to 22°C (adjustable per zone) |
| Number of temperature zones | 2 (upper and lower) |
| Interior lighting | LED, switchable |
| Child safety lock | Yes (key combination) |
| Installation type | Under counter or on floor |
| Door opening direction | Reversible (left or right) |
| Shelf material | Wood |
| Number of shelves | 4 |
| Temperature display | LED (zone display) |
| Audible alarm | Yes (in case of malfunction) |
| Maintenance | Unplug before cleaning; soft, damp cloth |
| Repairability | Contact after-sales service |
Frequently Asked Questions - VI30117X CATA
User questions about VI30117X CATA
0 question about this device. Answer the ones you know or ask your own.
Ask a new question about this device
Download the instructions for your Wine cellar in PDF format for free! Find your manual VI30117X - CATA and take your electronic device back in hand. On this page are published all the documents necessary for the use of your device. VI30117X by CATA.
USER MANUAL VI30117X CATA
natural_image
Line drawing of a multi-level industrial cabinet with shelves and rollers (no text or symbols)NOTE: Thank you for your purchase and use our compressor wine cooler! This product is used to chill red wine.
Our product will create perfect temperature and humidity environment to store your collection of wine quietly and peacefully.
Content
Safety instructions & warnings....3-4
Installation....5
Description of the appliance....6-8
Operation....8-10
Troubleshooting....11
Maintenance and cleaning....12
Technical parameters....13
Safety instructions & warnings
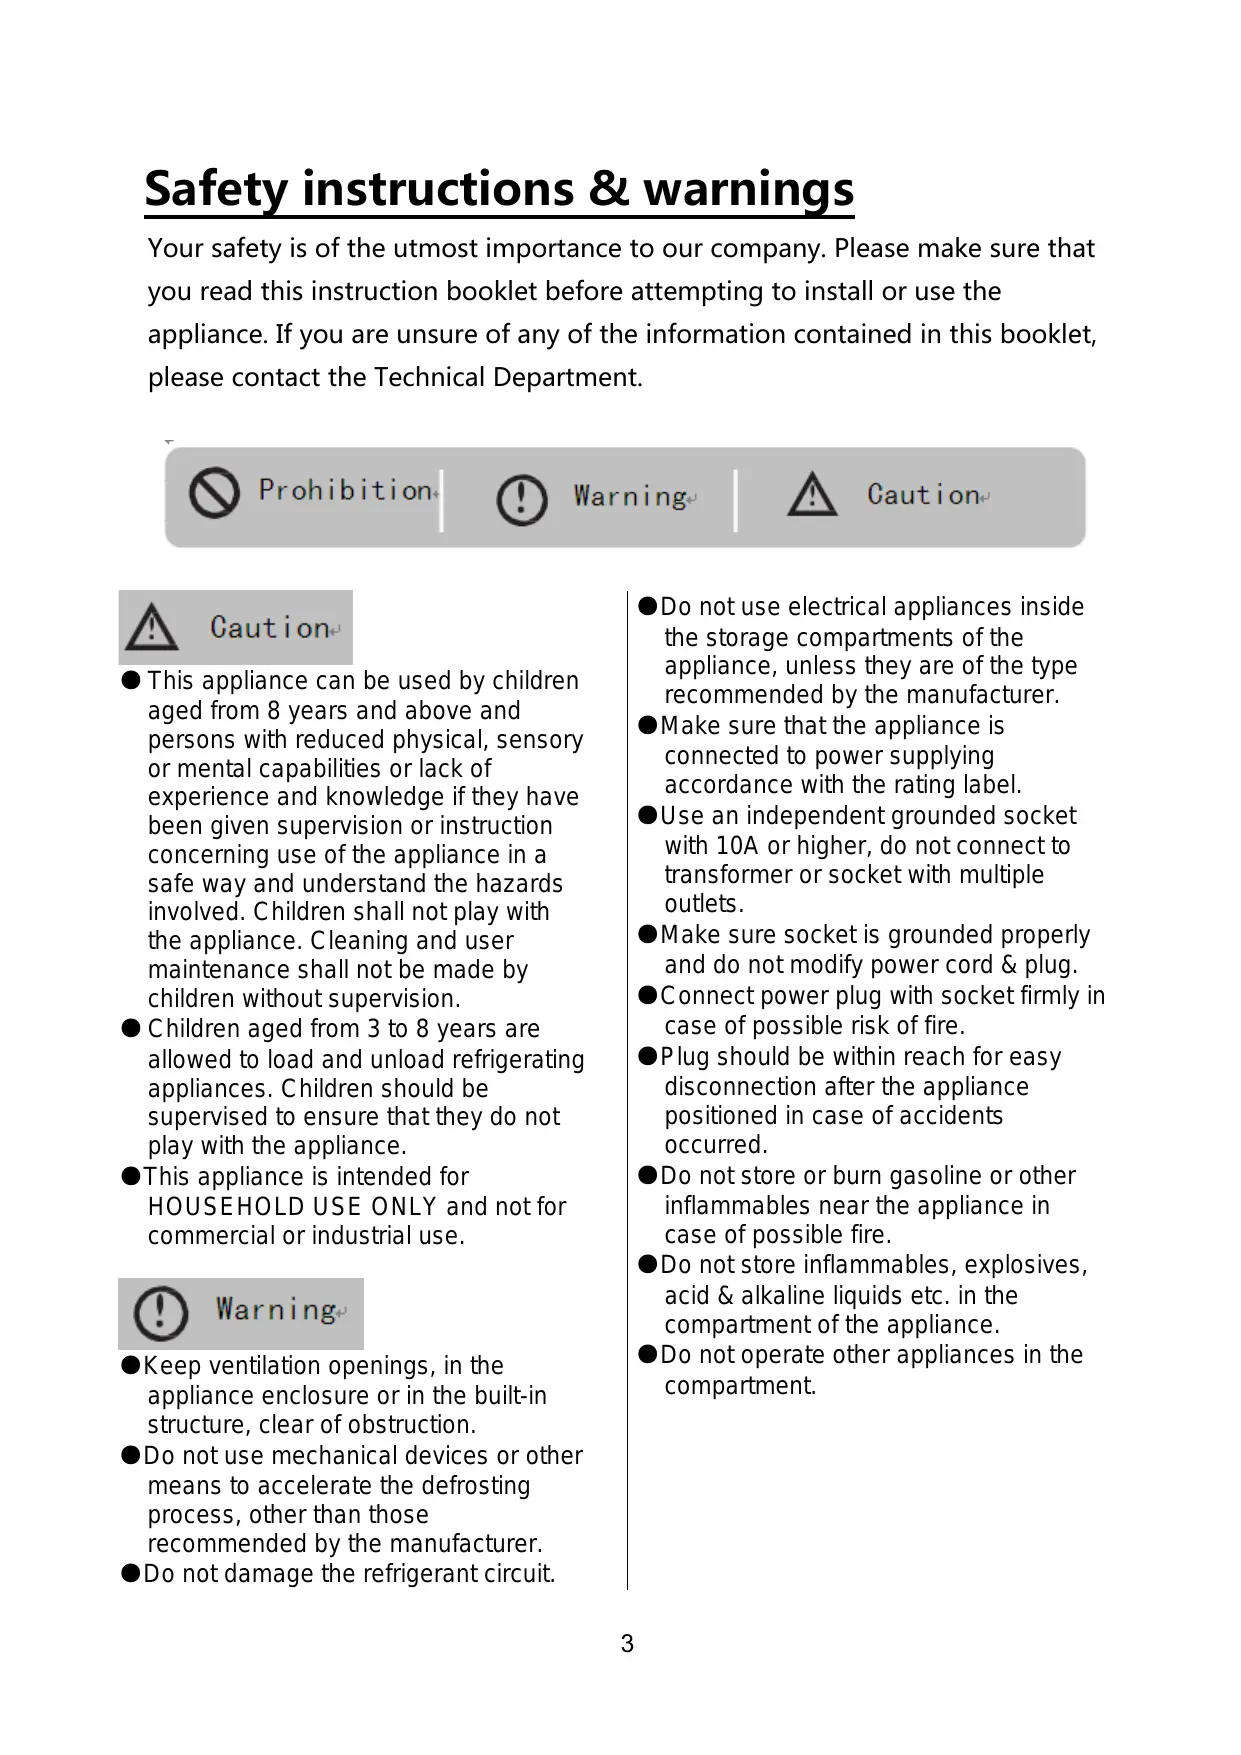
Your safety is of the utmost importance to our company. Please make sure that you read this instruction booklet before attempting to install or use the appliance. If you are unsure of any of the information contained in this booklet, please contact the Technical Department.

Prohibition

Warning

Caution

Caution
● This appliance can be used by children aged from 8 years and above and persons with reduced physical, sensory or mental capabilities or lack of experience and knowledge if they have been given supervision or instruction concerning use of the appliance in a safe way and understand the hazards involved. Children shall not play with the appliance. Cleaning and user maintenance shall not be made by children without supervision.
● Children aged from 3 to 8 years are allowed to load and unload refrigerating appliances. Children should be supervised to ensure that they do not play with the appliance.
● This appliance is intended for HOUSEHOLD USE ONLY and not for commercial or industrial use.

Warning
- Keep ventilation openings, in the appliance enclosure or in the built-in structure, clear of obstruction.
-
Do not use mechanical devices or other means to accelerate the defrosting process, other than those recommended by the manufacturer.
● Do not damage the refrigerant circuit. -
Do not use electrical appliances inside the storage compartments of the appliance, unless they are of the type recommended by the manufacturer.
● Make sure that the appliance is connected to power supplying accordance with the rating label.
● Use an independent grounded socket with 10A or higher, do not connect to transformer or socket with multiple outlets.
● Make sure socket is grounded properly and do not modify power cord & plug. - Connect power plug with socket firmly in case of possible risk of fire.
● Plug should be within reach for easy disconnection after the appliance positioned in case of accidents occurred. - Do not store or burn gasoline or other inflammables near the appliance in case of possible fire.
- Do not store inflammables, explosives, acid & alkaline liquids etc. in the compartment of the appliance.
- Do not operate other appliances in the compartment.
Child Safety
● Do not allow child play inside the appliance in case of entrapment.
● Do not allow child hang on the door to play in case of falling of the appliance.
- Do not allow child reach into compressor compartment or touch metal components at rear of the appliance in case of possible injury.
Keep away from water
- Do not spray water on the appliance or wash the appliance by pouring or filling water in case of invalid insulation and possible electric shock.
Be careful of freezing
- Do not touch surface of the liner inside the compartment, especially with wet hand, in case of frozen injury while the appliance is in operation.
Do not open the door for long periods
- Opening the door for long periods can cause a significant increase of the temperature in the compartments of the appliance.
Modification on the appliance not allowed
- Do not reconstruct the appliance by yourself which might cause damages to the appliance.
Do not open the door for long periods
● Opening the door for long periods can cause a significant increase of
the temperature in the compartments of the appliance.
Unplug the appliance under certain conditions
● Unplug the appliance before cleaning & maintenance.
● Unplug the appliance when power cut occurred.
Disposal of the appliance
- Please according to local regulations regarding disposal of the appliance for its flammable refrigerant and blowing gas.
● Before you scrap the appliance, please take off the doors to prevent children trapped. - Send the appliance to the designated disposal location.

Prohibition
Do not damage the power cord
- Do not disconnect the appliance by pulling power cord rather than pulling the plug.
- Do not set the appliance above the power cord or step on the cord intentionally.
● Put the power cord at right place when moving the appliance.
When the power cord is damaged
● Do not use damaged power cord, and get it replaced immediately by manufacturer service agent or by qualified electrician.
- If needed, extend the power cord with cord of 0.75mm2 or bigger by qualified electrician.
Installation
Position
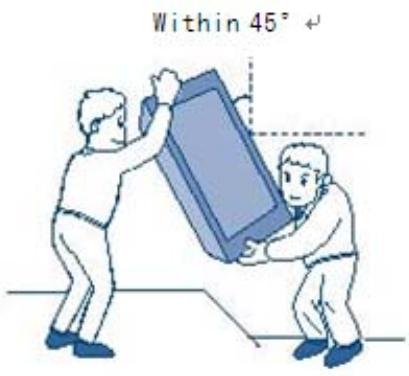
Do not lean the appliance over 45^ when moving it to position.
The appliance must be put on flat, firm & dry floor or similar noncombustible pad; do not use the package foam pad.
Do not put the appliance in the wet place.
Do not use the appliance in the frozen place.
Do not use the appliance outdoor in case of sunlight or rain.
The appliance is designed to either build under the counter or stand alone on the floor.
Demonstration for building under the counter:
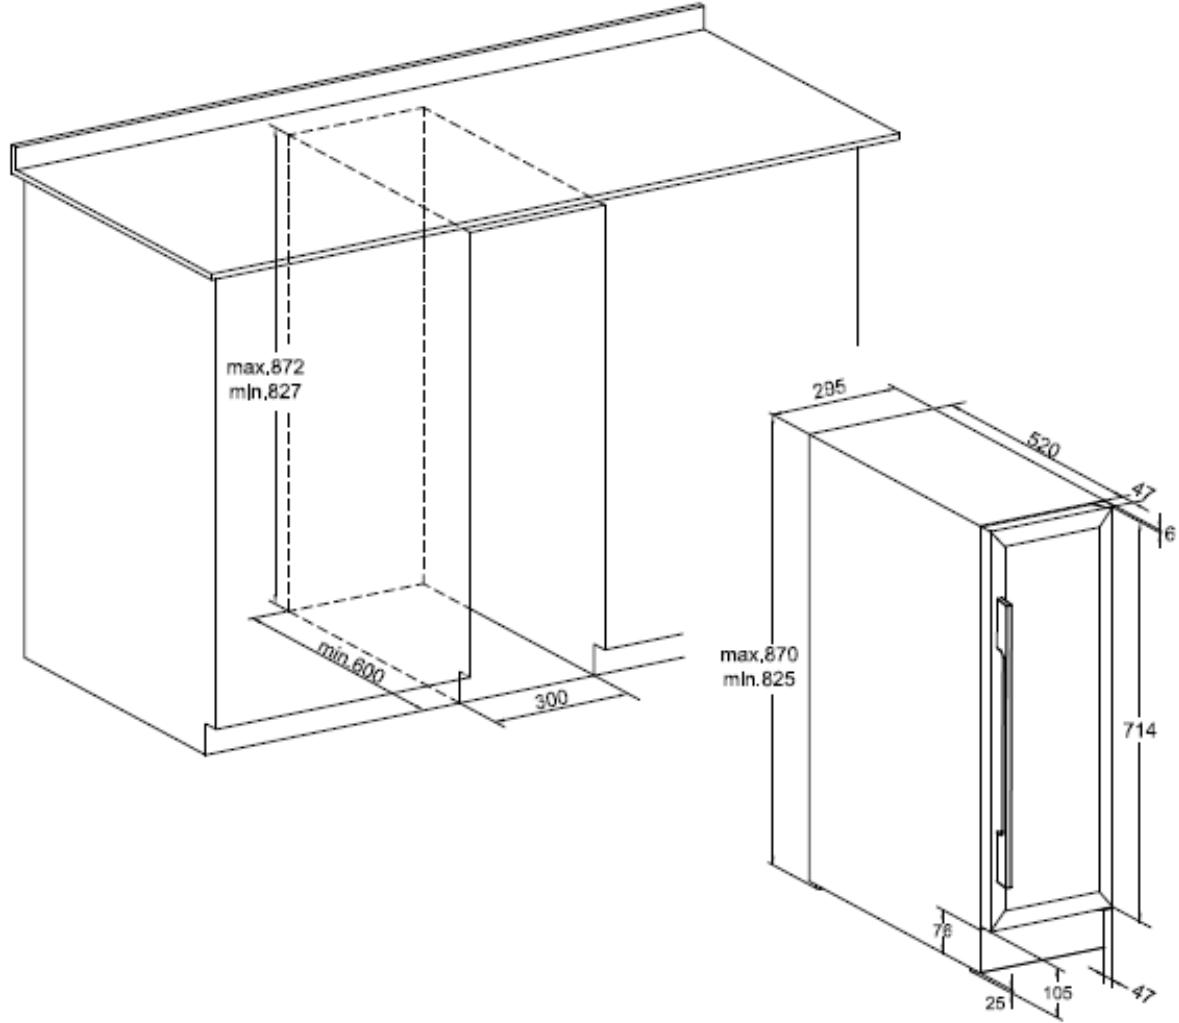
Wine bottles could be stored when you feel cooling inside after the appliance operates around 1 hour.
Description of the appliance
Accessories& name
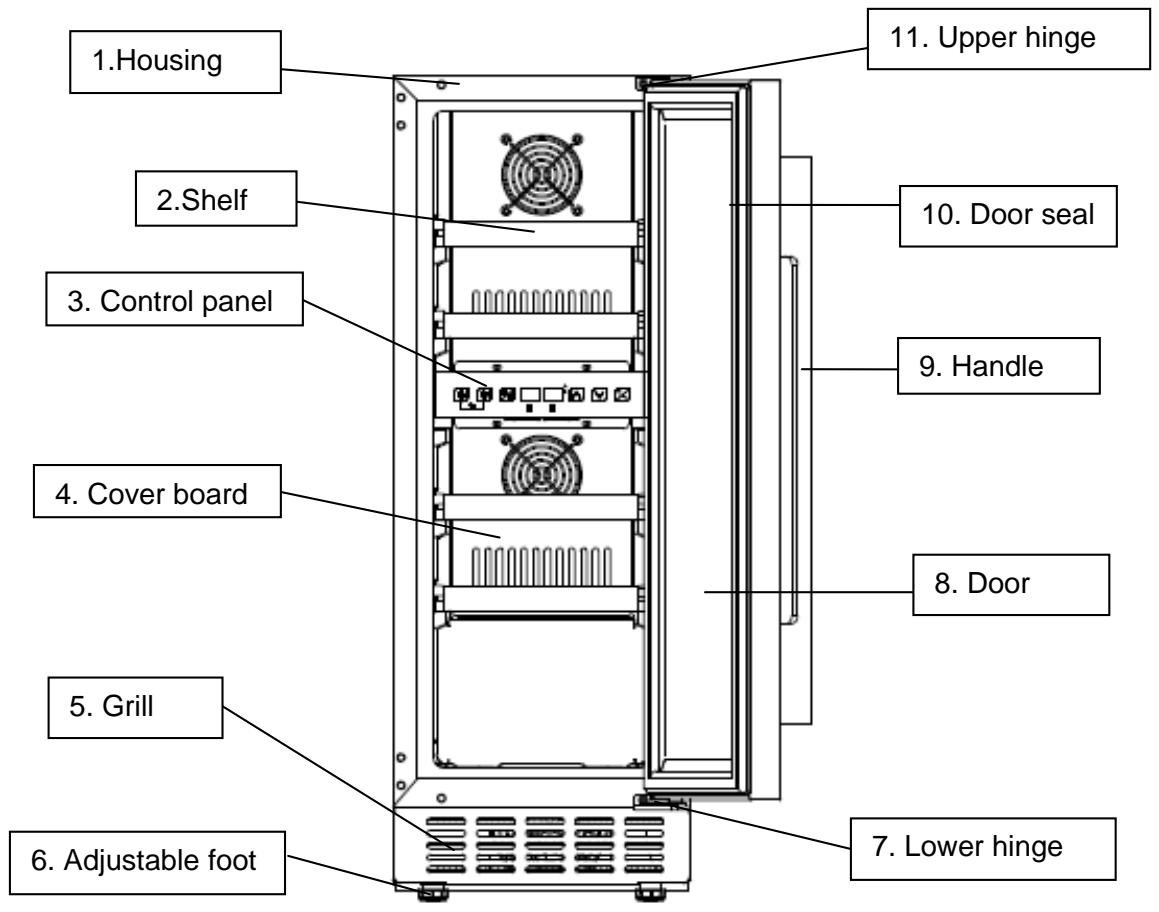
Note: Shelves, door frame, handle and other accessories could be different according to different models and configuration. All photos in this manual are for reference. The appliance you buy might not be exactly the same as shown here. Please refer to the actual product.
Installing the handle and reversing the door of wine cooler
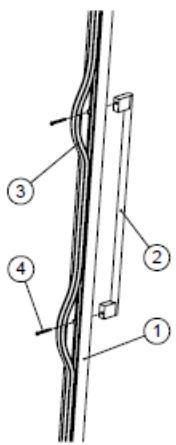
1. Install handle to the door frame of the appliance.
The handle is delivered in a separated package with screws together inside the carton.
① Reveal two small holes on the door frame from inner side by pulling out a bit the door seal ② Aim the handle to the holes and insert the screws from inside ③ Screw them up with screw-driver ④ Put back door seal to cover the screws.
2. Reversing the door
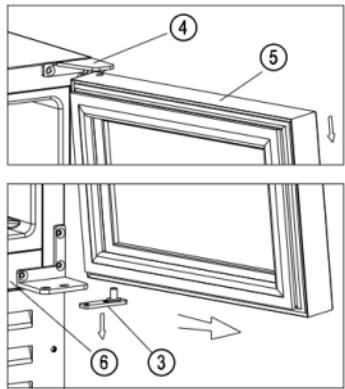
Our wine cooler is delivered with the door opening from left to right. To reverse the opening direction:
Figure 1
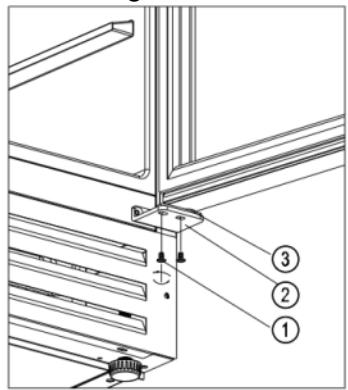
Figure 2
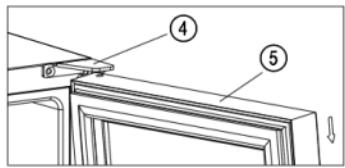
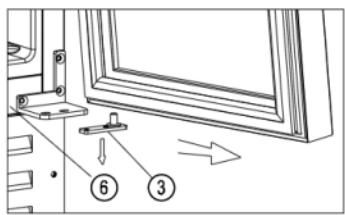
✨ Open the door at 90 degrees and keep it steady.
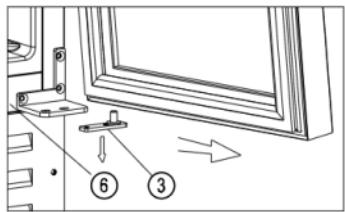
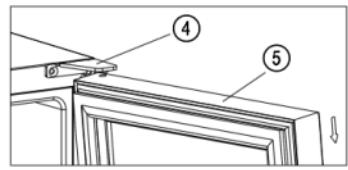
✿ Unscrew the two screws① from the right lower hinge②[Figure 1].
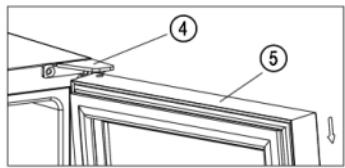
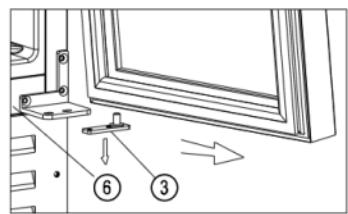
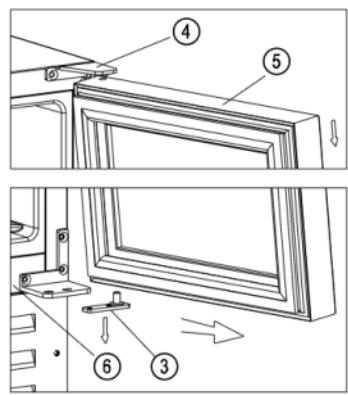
✿ Pull the door⑤ outwards slowly [follow the arrowhead direction in Figure 2] to get off the lower hinge② and continue to pull the door⑤ downwards slowly until getting off from the top right hinge④, and take off the lower hinge plate③ from the door axis hole[Figure 2].
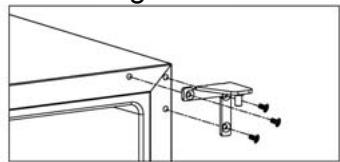
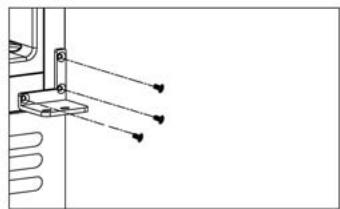
✿ Screw top right hinge④& right lower hinge② off from the cabinet⑥ and keep them
Figure 3
natural_image
Technical line drawing of a mechanical bracket with mounting holes and a clamping tool (no text or symbols)Figure 4
natural_image
Technical line drawing of a structural joint or bracket (no text or symbols)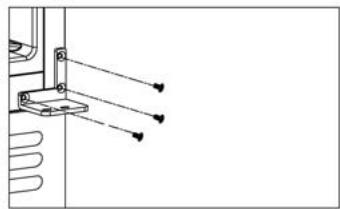
natural_image
Pure technical diagram of a mechanical assembly with no text, numbers, or symbols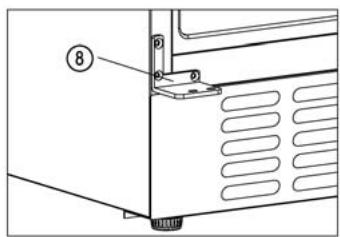
in the polybag for needs if you want to change back left opening door in the future.[Figure 3]
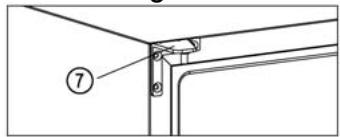
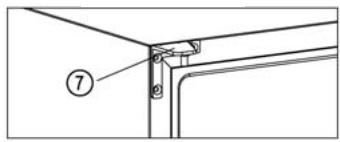
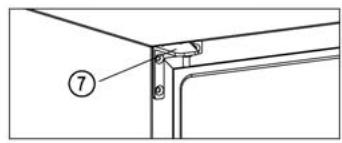
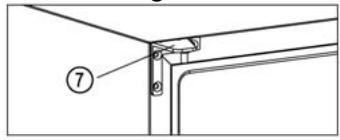
Install the top left hinge⑦& left lower hinge⑧ to the left side of the cabinet.(⑦&⑧ delivered in a separated polybag inside the packing carton).[Figure 4]
Turn the door⑤ 180 degrees upside down and insert the lower hinge plate③ to the bottom door axis hole. Fit the top door axis hole to the top left hinge⑦ and put lower hinge plate③ slowly on the left lower hinge⑧ and keep the door steady. Screw up the left lower hinge with the plate. Door reversing is finished.
Operation
Start operation
1. Cleaning the compartment
Before power on, clean inside of the appliance and check the drainage pipe in good connection. (For details, please refer to the “Maintenance and cleaning”)
2. Put the appliance still
Before power on, level the appliance on the firm & dry floor for at least 30 minutes.
3. Power on
The appliance start operation and it will cool down inside after 1 hour, otherwise you should check the power connection.
Control panel

All keys would be invalid in lock mode. Please unlock first.

ON/OFF
- Keep pressing the key 3 seconds, power down, goes to stand-by mode.
- Keep pressing the key again 3 seconds to return back to normal working.

Light
Press the key, turn on or turn off the LED lights inside. In stand-by mode, the key is invalid.

Zone switch
Press the key to switch between upper zone and lower zone for choosing which zone to set temperature. Press the key once, the LED display in chosen zone flash regularly. Press up and down key to set temperature. Press the key again; switch the zone to set temperature.

UP
Press the key once, LED Display in regular flash showing current set temperature. Continue pressing to adjust set temperature, one press increase 1°C. Regular flash quit after 5 seconds detecting no press and new set temperature save. LED display return to show actual temperature inside.

Down
Press the key once, LED Display in regular flash showing current set temperature. Continue pressing to adjust set temperature, one press reduce 1^ C. Regular flash quit after 5 seconds detecting no press and new set temperature save. LED display return to show actual temperature inside.


Child Lock (Combination key)
- Lock: Press both keys at the same time for 3 seconds to lock.
- Unlock: Press both keys at the same time for 3 seconds to unlock.

Fahrenheit/Celsius display interchange
Switch temperature display between Fahrenheit and Celsius by pressing the key for 3 seconds.

Attention
- The ex-factory temperature of this product is 12^ C, and the corresponding temperature range needs to be set according to the actual wine.
- For both upper and lower zone, the cooling temperature could be set from 5-22°C. And temperature of lower zone could only be set equal to or higher than that of upper zone.
- Alarm sound: when the system malfunction occur and alarm sound, press any key on the control panel to cancel the alarm sound.
- Error code:
When the temperature sensor of upper zone failure occur, error code displays: E1 for open circuit; E2 for short circuit.
When the temperature sensor of Lower zone failure occur, error code displays: E5 for open circuit; E6 for short circuit.
When the defrost sensor failure occur, error code displays: E3 for open circuit; E4 for short circuit.
Wine storage
The appliance equip with sufficient independent shelf to allow your collection of wine get mature quietly and peacefully.
Four been wooden shelves loading capacity: 17bottles. (standard Bordeaux with 750ml)
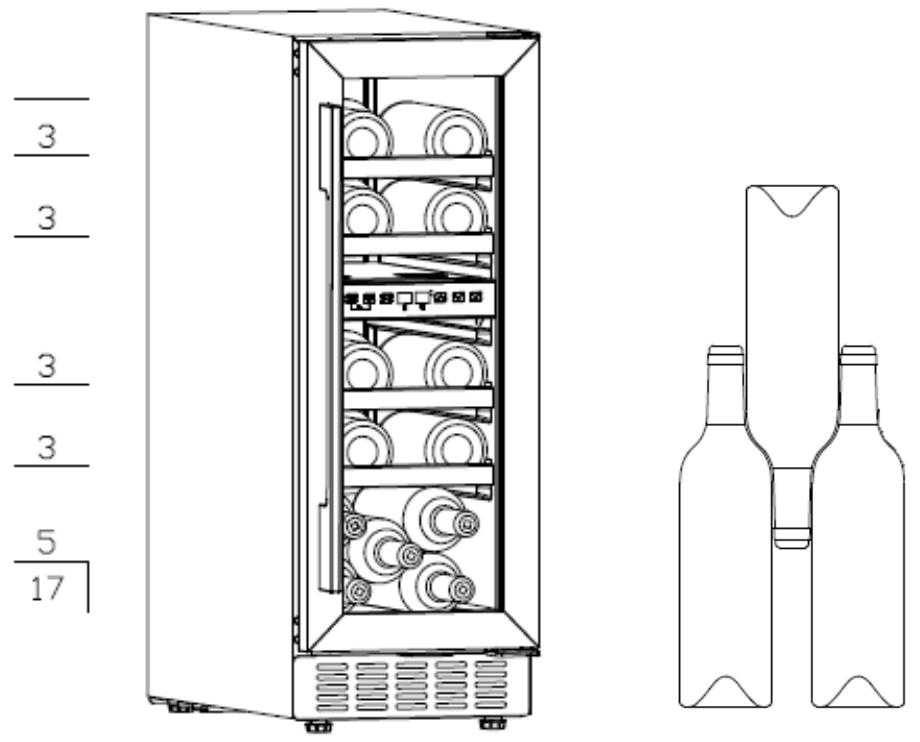
Loading capacity will vary in terms of different way of bottle arrangement or different bottle sizes.
✿ Each shelf is designed to put on 1 or 2 layers of wine bottles. More than 2 layers of bottle arrangement on one shelf are not recommended.
✨ Each shelf could pull out partly to store wine bottles easily.
✨ Open the door straight enough before pulling out shelves.
The shelf should be avoided in front of the fan as much as possible to avoid blocking the air inlet and affecting the cooling efficiency.
If the wine cooler would have no load for a long time, it is recommended to power it off, clean it carefully, and open the door for ventilation.
Below table is the recommended temperature for wine storing & drinking:
| Red Wine | 15-18°C |
| White Wine | 9-14°C |
| Rose wine | 10-11°C |
| Champagne & sparkling wine | 5-8°C |
Troubleshooting
| The appliance makes lots of noise? | ● Please adjust the front foot, keep the appliance levelling. ● Please keep the appliance a bit space from walls. |
| Liquid flowing sound inside the cabinet? | ● It is normal because of the refrigerant working inside. |
| The appliance does not start? | ● Make sure the appliance is connected to the power properly. ● Make sure switch on the power. ● The compressor re-starts after 5 minutes for a power cut. |
| Compressor runs continuously? | ● If no cold is being produced, call theafter-sale service. |
| Door does not seal tightly? | ● After long time use, the door seal might get stiff & distorted partially. 1. Heat the door seal with hot-wind blower or hot towel. 2. The door seal get softened and close the door. |
| The appliance does not cool sufficiently? | ● Please adjust temperature setting. ● Keep the appliance away from sunlight or heat. ● Please do not open the door frequently. |
| Unpleasant smells inside cabinet? | ● A little bit plastic smell for newly-buy appliance is normal and will disappear after a short time. ● Clean the compartment and ventilate it for a few hours. |
| Condensate on the glass door? | ● Please do not open the door frequently or for a long time. ● Please do not set the temperature too low. ● High ambient temperature and humidity would cause condensate. |
| The light is not working? | ● Check the power supply first. ● Call the retailer's after-sale service if the light is broken. |
Maintenance and cleaning
Cleaning
➢ Disconnect the appliance before cleaning.
Clean the appliance with soft cloth or sponge by water.
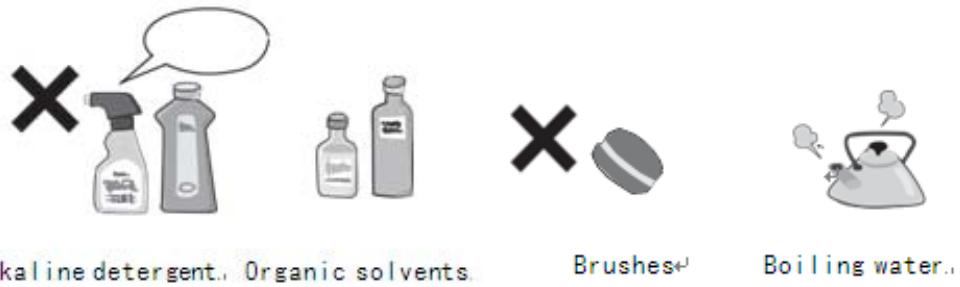
Do not use organic solvents, alkaline detergent, boiling water, washing powder or acid liquid etc.
Do not flush the compartment of the appliance.
Clean regularly surfaces that can come in contact with accessible drainage systems.
The below items will damage the surface of wine cooler:
Power cut
Most power cuts could be resolved within a short time. To protect your wines during a power cut, avoid opening the door as much as possible. During very long power cuts, take the necessary measures to protect your wine.
Out of service for long time
Remove all bottles from the appliance, switch off, defrost, clean, dry, and leave the door open to prevent mould developing within the appliance.

If the appliance is disconnected or if there is a power cut, you must wait at least five minutes before re-starting.
Moving the appliance
➢ Cut off the power supply and unplug the appliance.
Remove all bottles from the appliance.
When moving the appliance, do not lean the appliance over 45^ .
Technical parameters
| Product model | VI 30117 X |
| Voltage/frequency | 220-240V ~ /50Hz |
| Refrigerant/weight | R600a/18g |
| Effective volume | 52 L |
| Loading capacity | 17 bottles |
| Net weight | 27.2kg |
| Unit dimension (WxDxH) | 295×570×825mm |
| Packing dimension (WxDxH) | 329×625×865 mm |
Remarks :
- The Net weight includes shelves and the Unit dimension is without handle on the door.
- The manufacturer reserves all the rights to change the above parameters without prior notice. Please refer to the nameplate of your appliance.
- Loading capacity will vary in terms of different way of bottle arrangement or different bottle sizes (standard Bordeaux with 750ml is applied here).
ES
Enfriador de vino
natural_image
Line drawing of a multi-level industrial cabinet with shelves and rollers (no text or symbols)Figura 2
natural_image
Pure mechanical assembly diagram without any text, numbers, or symbolsFigura 4
natural_image
Technical line drawing of a structural joint or bracket (no text or symbols present)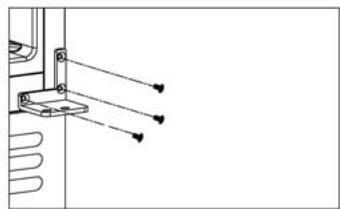
natural_image
Pure mechanical assembly diagram without any text, numbers, or symbols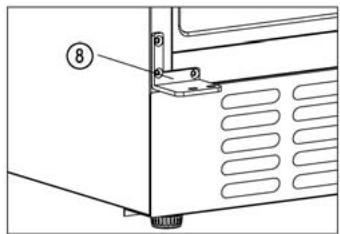
Corte de energía
natural_image
Line drawing of a multi-level industrial cabinet with rollers and ventilation grilles (no text or symbols)Figura 2
natural_image
Technical line drawing of a mechanical bracket with mounting holes and a support bracket (no text or symbols)Figura 4
natural_image
Technical line drawing of a structural joint or bracket with numbered annotation (7), no readable text or symbols present.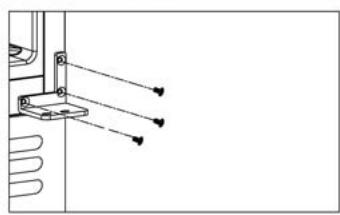
natural_image
Pure mechanical assembly diagram without any text, numbers, or symbols
Corte de energia
natural_image
Illustration of two people pushing a large rectangular object (no text or symbols visible)Parâmetros técnicos
natural_image
Line drawing of a multi-level industrial cabinet with shelves and rollers (no text or symbols)2. Inverser la porte
Figure 2
natural_image
Technical line drawing of a mechanical bracket with mounting holes and a clamping tool (no text or symbols)Figure 4
natural_image
Pure technical diagram of a mechanical assembly with no text, numbers, or symbols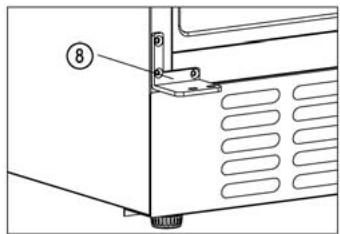
natural_image
Line drawing of a multi-level industrial cabinet with shelves and rollers (no text or symbols)Abbildung 2
natural_image
Pure mechanical assembly diagram without any text, numbers, or symbolsAbbildung 4

natural_image
Technical line drawing of a structural joint or bracket (no text or symbols present)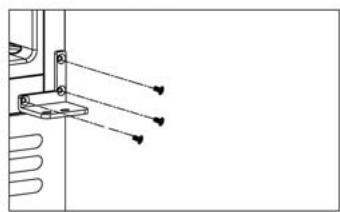
natural_image
Pure mechanical assembly diagram showing a bracket with mounting holes and three arrows indicating direction (no text or symbols)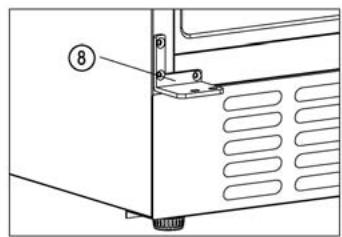
Stromausfall
- Content
- Safety instructions & warnings
- Caution
- Warning
- Child Safety
- Keep away from water
- Be careful of freezing
- Do not open the door for long periods
- Modification on the appliance not allowed
- Unplug the appliance under certain conditions
- Disposal of the appliance
- Prohibition
- Do not damage the power cord
- When the power cord is damaged
- Installation
- Position
- The appliance is designed to either build under the counter or stand alone on the floor.
- Description of the appliance
- Accessories& name
- Installing the handle and reversing the door of wine cooler
- Install handle to the door frame of the appliance.
- Reversing the door
- Operation
- Start operation
- Cleaning the compartment
- Put the appliance still
- Power on
- Control panel
- ON/OFF
- Light
- Zone switch
- UP
- Down
- Child Lock (Combination key)
- Fahrenheit/Celsius display interchange
- Attention
- Wine storage
- Troubleshooting
- Maintenance and cleaning
- Cleaning
- Power cut
- Out of service for long time
- Moving the appliance
- Technical parameters
- Remarks :
- ES
- Enfriador de vino
- Corte de energía
- Corte de energia
- Parâmetros técnicos
- Inverser la porte
- Stromausfall
Brand : CATA
Model : VI30117X
Category : Wine cellar