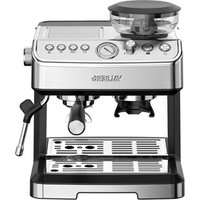
VB-FP1220BK - Multifunction robot VALBERG - Free user manual and instructions
Find the device manual for free VB-FP1220BK VALBERG in PDF.
| Product type | Multi-function food processor |
| Brand | VALBERG |
| Model | VB-FP1220BK |
| Motor power | 1200 W |
| Power supply | 220-240 V ~ 50/60 Hz |
| Protection class | II |
| Main functions | Chop, blend, slice, grate, knead, whisk, emulsify |
| Included accessories | Blades, slicing/grating disc, mixing disc, dough hook, mixing bowl, blender jug, pusher |
| Speeds | 2 speeds (low, high) + Pulse function |
| Safety | Bowl and lid lock, non-slip suction feet, automatic overload shut-off |
| Care and cleaning | Bowl, lids, blades, discs and pusher washable with warm soapy water; wipe motor base with a damp cloth |
| Available spare parts | Bowl, blades, discs, hook, drive sleeve, pusher |
| Repairability | Do not repair yourself; contact customer service for an approved center |
| Warranty | 2 years from date of purchase |
Frequently Asked Questions - VB-FP1220BK VALBERG
User questions about VB-FP1220BK VALBERG
0 question about this device. Answer the ones you know or ask your own.
Ask a new question about this device
Download the instructions for your Multifunction robot in PDF format for free! Find your manual VB-FP1220BK - VALBERG and take your electronic device back in hand. On this page are published all the documents necessary for the use of your device. VB-FP1220BK by VALBERG.
USER MANUAL VB-FP1220BK VALBERG
Thank you for choosing this VALBERG product. VALBERG products are chosen, tested, and recommended by ELECTRO DEPOT, so you can be sure you are getting a top-quality, easy-to-use product that won't let you down. We're confident your new device will be a pleasure to use every day!
Welcome to ELECTRO DEPOT.
Table of Contents
A Product overview
Parts Specifications
B Product usage
Using the Food Processor How to release suction cup feet after use
Cleaning and maintenance
Cleaning and maintenance Troubleshooting Storage
Parts
A Pusher
B Lid with food chute
Maxi-blend canopy
D Removable drive sleeve
E Bowl motor shaft (not shown)
F Rotor
6 Base unit
Rotary knob
0-Off
H I - Low
II - High
P - Pulse
Suction cup feet
Dough tool
Blades
Slicing/shredding discs x 3
M Feeding lid
N Blender lid
0 Blender jug

Blender base
Specifications
| Power input: | 220-240V~ 50-60Hz |
| Motor power: | 1200W |
| Protection class: | II |
Using the Food Processor
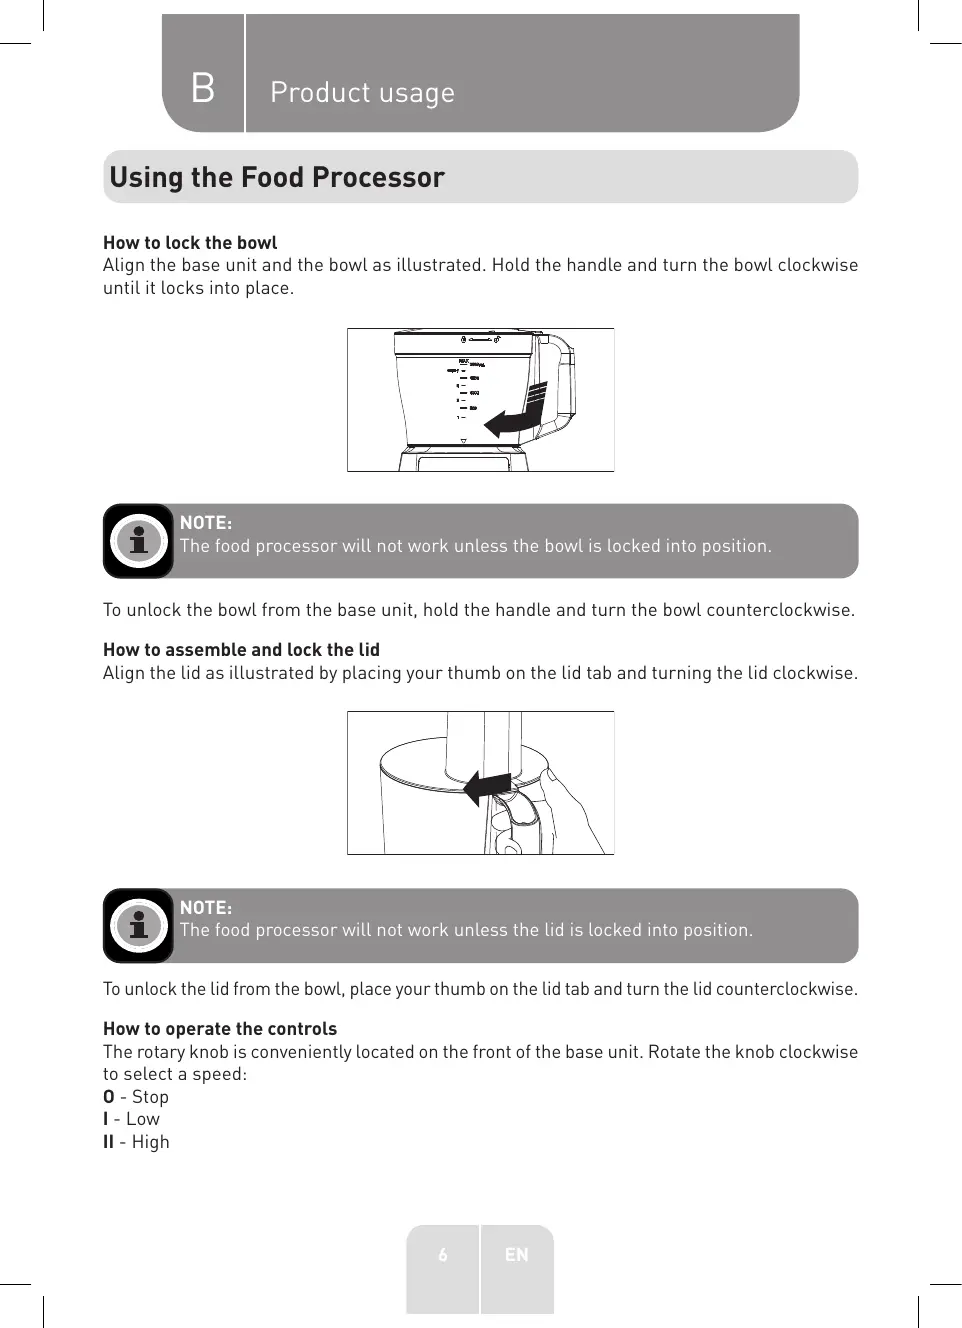
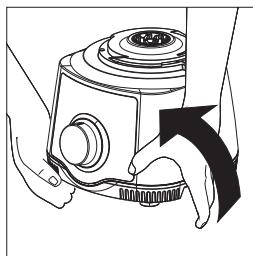
How to lock the bowl
Align the base unit and the bowl as illustrated. Hold the handle and turn the bowl clockwise until it locks into place.

NOTE:
The food processor will not work unless the bowl is locked into position.
To unlock the bowl from the base unit, hold the handle and turn the bowl counterclockwise.
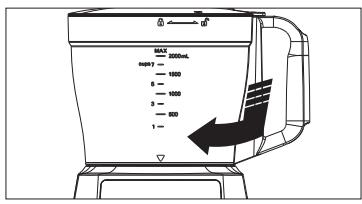
How to assemble and lock the lid
Align the lid as illustrated by placing your thumb on the lid tab and turning the lid clockwise.

NOTE:
The food processor will not work unless the lid is locked into position.
To unlock the lid from the bowl, place your thumb on the lid tab and turn the lid counterclockwise.
How to operate the controls
The rotary knob is conveniently located on the front of the base unit. Rotate the knob clockwise to select a speed:
0 - Stop
I - Low
II - High
B Product usage

The food processor will run continuously for speed I and II. For instant on and off control, turn the knob counterclockwise to P (PULSE) position.
Processing tips and techniques
- This food processor is excellent to chop, mix, slice, or shred most foods. However, to maintain its peak performance, do not use your food processor for the following: grinding grain, coffee beans or spices; slicing frozen meat; or crushing ice.
- To achieve maximum capacity, use the blades and add food no higher than the maximum fill line on the bowl.
- Operating time will depend on quantity of food being processed. Most foods can be sliced, chopped, or shredded in seconds. If the unit is operated for 30 seconds continuously, let it rest for about 3 minutes before continuing.
Processing using the blades
- For a more uniform consistency, start with pieces of food that are similar in size. Carrots, for example, should all be cut in 1-inch (2.5 cm) chunks. Do not process food in different sizes, for example, 4-inch (10cm) pieces with 1/2- inch (1 cm) pieces.
-
The blades can be used to coarsely chop, finely mince, mix, or purée food to a smooth consistency.
-
Make sure the rotary knob is turned to Off position (0) and the unit is unplugged.
- Lock the bowl onto the base unit (see How to lock the bowl section).
- Place the removable drive sleeve and the blades onto the motor shaft in the centre of the bowl. Turn slowly until the blades are locked into place.
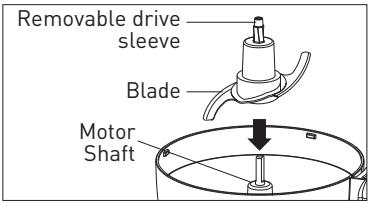

WARNING! Handle carefully; the blades are sharp.
B Product usage
- Lock the lid onto the bowl. Insert the food pusher into food chute.

NOTE:
Do not purée or mash starchy vegetables like potatoes. They will be over-processed in a second and turn gummy.
- Connect the power plug to a mains supply and start processing food. The processing speed and time will determine the finished consistency of the food. The Pulse speed (P) can help you avoid overprocessing.
- When finished processing, turn the rotary knob to Off position (0) or release from PULSE position (P). Wait until the blades have stopped rotating before removing the lid. Unplug the unit.
Processing using the slicer/shredder discs
- To slice or shred cheese, choose a firm cheese like Cheddar, Monterey Jack, or Swiss. Place the cheese in the freezer for 30 minutes before processing.
-
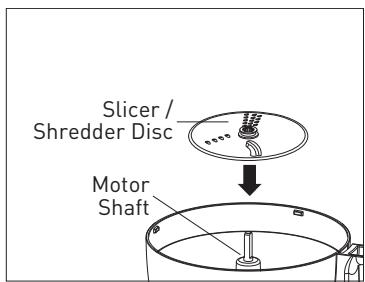
The slicing/shredding discs have a slicing blade on one side and a shredding teeth on the other. Place the disc on the motor shaft with the desired cutting edge facing up.
-
Make sure the rotary knob is turned to Off position (0) and the unit is unplugged.
- Lock the bowl onto base (see How to lock the bowl section).
- Place the removable drive sleeve on the motor shaft. Put the slicing/shredding disc on the removable drive sleeve with the desired cutting side facing up. Lock the lid onto the bowl (see How to assemble and lock the lid section).
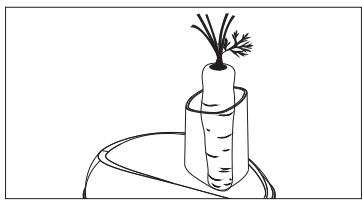
- To slice/shred large foods (such as chunk of cabbage, green pepper, whole tomato), insert the chunk of food into the food chute.
B Product usage

NOTE:
- To julienne vegetables, slice them and then remove from the bowl. Then, restack the vegetables and place them into the food chute vertically. Slice them again to make a match-stick cut vegetable pieces.
-
To slice/shredd long, thin foods (such as potato, pepperoni, carrots, celery), lock the lid. Insert the foods into the food chute.
-
Insert the pusher in the food chute. Always use the pusher to feed food into the food chute.

WARNING!
NEVER PUSH FOOD THROUGH CHUTE WITH HANDS.
- Connect the power plug to a mains supply.
- Select speed. While pressing on the food pusher, turn the rotary knob to 1 (low) or 2 (high) position for optimum slicing and shredding performance.

NOTE:
Turn to P (PULSE) position and hold to process food. The unit will stop when you release the knob.
- When the food chute is empty, turn the rotary knob to Off position [0] to stop; or release from P (PULSE) position. Wait until the blades have stopped rotating before removing the lid.
- Unplug the unit from the mains supply.
Processing using the maxi-blend canopy
The maxi-blend canopy can be used for whipping cream, beating egg whites, emulsifying or preparing dressings.
- Make sure the rotary knob is turned to Off position [0] and the unit is unplugged.
- Lock the bowl onto the base unit (see How to lock the bowl section).
- Place the removable drive sleeve onto the motor shaft in the centre of the bowl, and then place the maxi-blend canopy onto the drive shaft.
- Add your ingredients into the bowl, and then place the lid onto the bowl and turn clockwise to lock it. Place the food pusher into the food chute.
- Connect the power plug to a mains supply and start processing food. The processing speed and time will determine the finished consistency of the food.
- When finished processing, turn the rotary knob to Off position (0) or release from PULSE position (P). Unplug the unit.
B Product usage
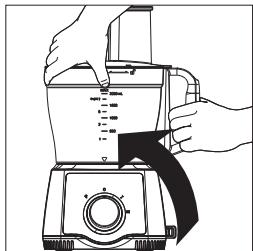
Processing using blender jug
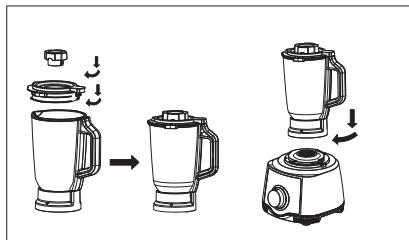
- Install the blender as shown below.
- Cut fruits, vegetables and other foods into pieces about 2cm × 2cm in size.
- Put the food into the blender jug.
- Add appropriate amount of water, juice, milk, honey and other seasonings.
- Close the lid of the jug and the feeding lid.
- Install the blender jug with the food in it onto the base unit by turning the jug clockwise.
- Start blending by turning the knob to select a speed level - I for low and II for high.

NOTE:
Turn to P (PULSE) position and hold to process food. The unit will stop when you release the knob.

TIP:
It is recommended to blend for 30 to 60 seconds when the capacity is half a cup, and you can adjust the actual operation time according to your needs; When the cup is full, it is recommended to blend for 1 to 2 minutes, and the actual operation time can be adjusted according to the needs.

NOTE:
The time of each continuous blending should not be longer than 2 minutes. After each 2-minute continuous blending, let the unit rest for 2 minutes before blending again. After 5 times of continuous operation of blending, stop operating the unit and let it cool for 25 minutes before using it again.
- After blending, turn the rotary knob to the 0 position.
- After the motor stops running, remove the blender jug by turning it counterclockwise from the base unit, and pour out the food in the jug.
B Product usage

NOTE:
Take care not to put too much food and liquid into the blender jug as the content in the jug might overflow during blending.
- Do not blend extremely hot liquid or food (the temperature of the liquid or food should not exceed 60^ C ).
- Never run the machine when the jug is empty (i.e. without any liquid or food in the jug).
- Do not blend hard foods such as bones.
How to release suction cup feet after use
The suction cup feet on the bottom of your Food Processor are designed to keep the unit stationary during use.
- With bowl and lid removed from the Food Processor: lift it from the counter by placing both hands under the unit as shown and lifting to one side
OR
- With the Food Processor fully assembled: lift it from the counter by grabbing the handle as shown and lifting from the same side as the handle.
Cleaning and maintenance
- Wash bowl, lids, blades, discs, removable drive sleeve and food pusher in hot, soapy water. Rinse and dry thoroughly. See How to assemble and lock the lid section for information on how to remove food chute lid for cleaning. To clean food thoroughly from the bowl and bowl lid/food chute, immerse them in hot, soapy water.

WARNING!
The blades are very sharp. Handle with care when using and cleaning.

NOTE:
Do not store unit with lid in locked position; this may put strain on the interlock tab.
- Wipe base unit, rotary knob, and power cord with a damp cloth or sponge. To remove stubborn stain, use a mild non-abrasive cleanser. Do not immerse in water.
- To store the Food Processor, place the bowl on the base unit. Then place the blades on the motor shaft and the slicing/shredding discs on the blades. The removable drive sleeve may be stored in the bowl. Place the lid on the bowl but do not lock it.
Troubleshooting
Before calling the Customer Service number, carefully check the list below for a possible solution to your question.
| Problem | Possible Cause / Solution |
| Unit does not operate on any speed or Pulse. | • Is the unit plugged in? Does the mains supply work? • Are the bowl, bowl lid, and food chute lid all locked in place? See How to assemble and lock the lid section. |
| Food is not chopped, sliced or shredded uniformly. | ·Packing too much food in the food chute, or pushing too hard on the food pusher may cause the processed food to be irregularly sliced or shredded. |
| Unit stops and will not come back on. | ·Are the bowl, bowl lid, and food chute lid all locked in place? They may have moved slightly during processing. See How to assemble and lock the lid section. ·Is the mains outlet still working? Check it by plugging in a working lamp or other appliance. If the mains supply does not work, do not use it until it is checked by a qualified electrian. ·Turn the unit to Off (0) position, and let it rest for 3 to 4 minutes, then try to turn it on to l or ll. If none of these suggestions correct the problem, DO NOT attempt to repair the unit. Call the Customer Service number to get the name of your nearest Authorized Service Centre. |
| Unit has a burning smell. | ·There may be a residue left on the motor from the manufacturing process, causing a slight odor during initial use. This will go away. If a strong odor or any visible smoke appears, unplug the unit IMMEDIATELY and call the Customer Service number. |
Storage
- Always unplug the unit before storing it.
- Store the unit in a fresh, dry and dust-free place, out of the reach of children and pets.
- Please retain the packaging and use it to store your unit when it is not in use for an extended period of time.
Merci!
This product is guaranteed against faults caused by defects in manufacturing or the materials used for a period of two years, starting from the date of purchase.* This warranty does not cover defects or damage caused by failure to install the device correctly, incorrect use of the product, or excessive wear and tear.
*proof of purchase required.