USER MANUAL S12 FLEX AUTO ECO VALBERG
natural_image
Technical line drawing of a vacuum cleaner with attached door panel (no text or symbols)
WARRANTY CONDITIONS
EN
This product is guaranteed against faults caused by defects in manufacturing or the materials used for a period of two years, starting from the date of purchase.* This warranty does not cover defects or damage caused by failure to install the device correctly, incorrect use of the product, or excessive wear and tear.
*proof of purchase required.
CONDITION DE GARANTIE
FR

02/2024-V2
Stick Vacuum
Aspirateur
Stofzuiger
Aspirador
988201 - CYCLONIC - S12
FLEX AUTO ECO
INSTRUCTIONS FOR USE 02
CONSIGNES D'UTILISATION ....16
flowchart
graph TD
    A["Step 9"] --> B["Assembly of a device with hands and gloves"]
    B --> C["Add to a component with a lid"]
    C --> D["Transfer to a container with a lid and handle"]
    D --> E["Final packaging"]
Thank you!
Thank you for choosing this VALBERG product.
VALBERG products are chosen, tested, and recommended by ELECTRO DEPOT, so you can be sure you are getting a top-quality, easy-to-use product that won't let you down.
We're confident your new device will be a pleasure to use every day!
Welcome to ELECTRO DEPOT.
Table of Contents

Product overview
Parts
Product overview
Intended use
Specifications

Product usage
Charging the vacuum cleaner
Using the vacuum cleaner
Operation

Cleaning and maintenance
Cleaning and maintenance
Emptying the dust cup
Detaching the dust cup and filters
Cleaning the bristles/roller brush and wheels
Clearing blockages
Troubleshooting
Error Messages
Storage
Parts
A Motorised floor brush (multi-angle with LED lights)
B Motorised floor brush release button
c Extension tube with flexible joint
D Tube release button
E Vents
F Power/battery display screen
G Power button (AUTO/HIGH/MIDDLE/LOW modes)
H ON/OFF button
I Main unit handle
J Main unit
K Charging socket
L Wall mount hook
M Dust cup with foam filter and permanent filter
N Dust cup lid release lever
0 Dust cup release button
P Crevice tool

2-in-1 brush
- Crevice tool for hard-to-reach places
- Brush for stubborn dirt on furniture, floors and carpets

AC adapter

Bristle brush (for use in motorised floor brush)

Roller brush (for use in motorised floor brush)

Foam filter x2 (part of the filter assembly: 1 filter pre-installed and 1 spare filter provided)

Wall mount

Wall plugs and screws
Product overview
- Unpack and remove all labels from the unit. Please check that all of the unit's parts are included and intact. If the unit is damaged or faulty, do not use it and take it to your retailer or after-sales service centre.
- Keep all packaging out of the reach of children. There is a risk of accidents if children play with packaging materials.
Intended use
This unit has been designed exclusively for household use. It has not been designed for industrial or professional use by cleaning companies. Any other use may damage the unit or cause injury. Only use the unit indoors, in a dry place.
Specifications
| Vacuum cleaner model: | 988201 - CYCLONIC - S12 FLEX AUTO ECO |
| Power: | 25.9 V/DC, 420 W max. |
| Dust cup capacity: | 0.6 L |
| Suction power: | High speed - 140 WMiddle speed - 45 WLow speed - 10 WAuto speed - the suction power varies from low to high speed |
| Noise level: | High speed <=82 dBLow speed <=80 dB |
| Vacuum pressure: | High speed - 30 kPaLow speed - 7 kPa |
| Rechargeable Li-ion battery: | 25.9 V, 2500 mAh |
| Charging time: | 5 hours |
| Operation time: | High speed - 8 minsMiddle speed - 18 minsLow speed - 60 mins |
| Protection class: | Class II |
| AC adapter model: | MC2805B-V |
| Vacuum voltage and adapter input: | 100-240V~, 50-60Hz |
| Adapter output: | 25 V/29 V —— 0.5 A |
| Battery design type: | Non-replaceable |
Charging the vacuum cleaner
Fully charge the vacuum cleaner before the first use, after each use, or whenever the battery level is low.
- When the battery level is low, the low power icon (☐) will be displayed to remind the user to charge the unit. If there is insufficient power, the unit will automatically stop.
- Before charging, always attach the dust cup and filters to the main unit (see Detaching the dust cup and filters in the Cleaning and maintenance section).

NOTE:
• The AC adapter may get warm whilst charging. This is normal.
- To ensure the longevity of the battery and the product's lifespan, recharge the vacuum cleaner whenever the battery has run out even if you do not plan to use it. If the unit is not used for long periods of time, fully charge the battery every 2 months.
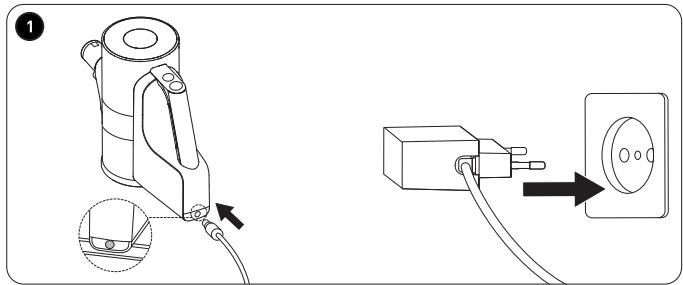
1 Make sure the vacuum cleaner is off. Securely connect the AC adapter cable to the charging socket on the end of the main unit. Then, firmly plug the AC adapter into a suitable mains socket.
- The battery screen displays the current battery charge level, i.e. 50%.
• While charging, the battery level icon will be displayed: 30% in charging.
-
Once the unit is fully charged, the following will be displayed on the screen: √ Charging
• It takes around 5 hours to fully charge the battery.
• Once fully charged, the vacuum cleaner has a usage time of:
-
8 minutes on turbo power
– 18 minutes on medium power
- 60 minutes on eco power
- When the vacuum cleaner is in use, the battery level icon (comprising 6 blue bars that form a circle) will gradually reduce from 6 bars to 1 bar: ☐ to ☐.
- When you have finished charging the unit, unplug the AC adapter from the mains socket first, before removing it from the vacuum cleaner.

WARNING!
- Only use the removable power supply (AC adapter) provided with this unit to recharge the battery: BP25925A.
• The unit will not work when charging. Never attempt to use it when charging.
- Do not leave the unit overnight or unattended when charging.
- Do not charge the battery at temperatures below 5°C or above 40°C.
Using the vacuum cleaner

WARNING:
• Never use the unit without the filters and dust cup.
- Make sure the unit is switched off and unplugged from the mains socket before attaching or changing any tools.
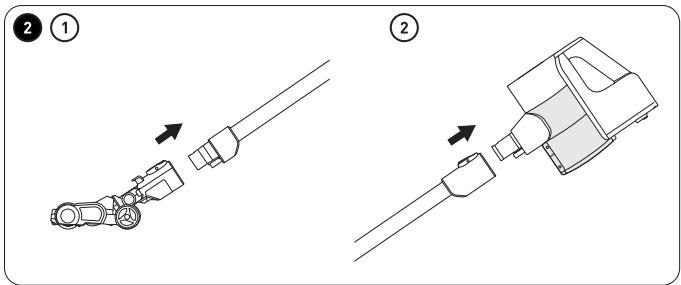
Select the desired vacuum tool and attach it to the main unit with the extension tube (for upright vacuum use) or without the extension tube (for handheld use), according to the task in hand:
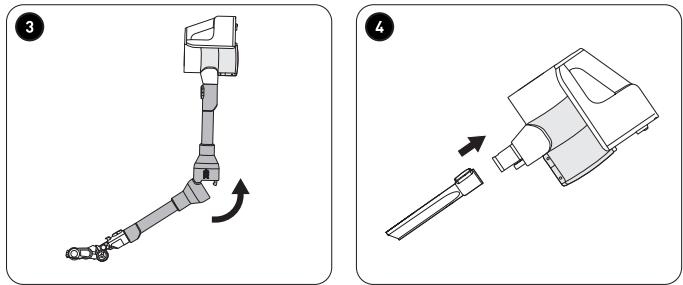
2 ① Insert the motorised floor brush into the bottom of the extension tube. Make sure the black clip is aligned with the slot on the underside of the extension tube. Push both parts together until you hear a click.
② Next, insert the other end of the extension tube into the main unit's air inlet until you hear a click. The tool can also be connected directly to the main unit.
3 The flexible joint on the extension tube changes the angle and height of the extension tube making it easier to vacuum under items such as sofas and tables. Simply pull the top part of the joint upwards in the direction of the arrow and then gently bend the joint. When finished using this feature, straighten the extension tube until the joint clicks into place.
• Motorised floor brush:
- With bristles – Use it on all types of flooring, including hard and smooth surfaces, in addition to carpets that require a deep clean. Attach the floor brush (or roller brush depending on the floor surface) directly to the handheld vacuum to easily vacuum stairs.
- With roller – Use it on surfaces that scratch easily, in addition to hard or smooth surfaces, such as parquet flooring, to optimally remove dust.
- The LED lights on the front of the brush illuminate dark corners or spaces under furniture.
- The motorised floor brush features a multi-angle neck joint which allows the user to vacuum with the extension tube or main unit at a 90-degree angle (e.g. staircases) or at a low angle (e.g. under a bed or sofa). The multi-angle neck joint also allows you to turn the brush left or right for easy control.

NOTE: The motorised floor brush may scratch or damage certain types of flooring or carpet. Make sure to test the surface before using the brush on delicate surfaces. Alternatively, use the 2-in-1 brush tool, if suitable.
4 Securely insert the crevice tool into the extension tube or the main unit's air inlet.
• It is perfect for vacuuming tight corners and small spaces.
- The extension hose gives you an extra reach to vacuum cobwebs or hard-to-reach areas.
B Product usage
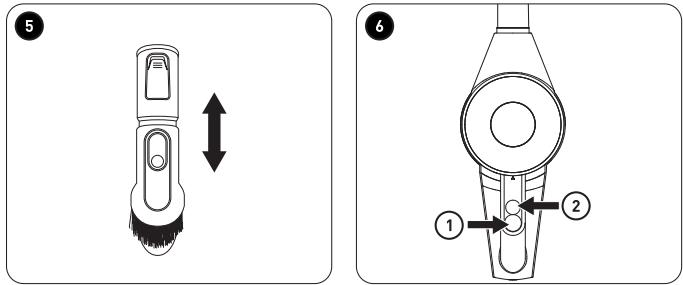
5 Securely insert the 2-in-1 brush tool into the extension tube or the main unit's air inlet.
• This brush is retractable.
- Use the flat side to vacuum beds, sofas, rugs or any other flat surfaces. Use the brush for general dusting tasks, such as dusting furniture and shelves, etc.
• Make sure the unit is switched off.
- Press the release button on the extension tube/motorised floor brush/crevice tool/2-in-1 brush and then pull to detach the tool from the main unit.
Operation
6 ① To turn on the vacuum, press the ON/OFF button. The vacuum cleaner will turn on in AUTO mode and the power display screen will appear. When in AUTO mode, the dust-sensing function is enabled. The display animation will change from blue (no dust) to purple when it detects dust.
② Press the power button repeatedly to select HIGH, MIDDLE, LOW or AUTO power.
• To turn off the vacuum, press the ON/OFF button again.
- Empty the dust cup before its contents exceed the MAX mark (see Emptying the dust cup in the Cleaning and maintenance section).
- Once you have finished using the unit, always turn it off. To clean the unit, follow the instructions in the Cleaning and Maintenance section.
- Charge the vacuum cleaner after each use to ensure the unit is fully charged and ready for the next use.

NOTE:
- When vacuuming heavily soiled surfaces, regularly turn the unit off and check the mouth of the tool is clean to avoid scratching delicate surfaces.
- To avoid blocking the vacuum cleaner, remove large pieces of waste, such as paper or plastic, from the area before vacuuming.
Installing the wall mount

NOTE:
- Securely install the wall mount on a wall that is strong enough to support the weight of the unit.
- Install the wall mount in a dry area, away from extreme heat or cold, and ideally close to a mains socket.
B
Product usage
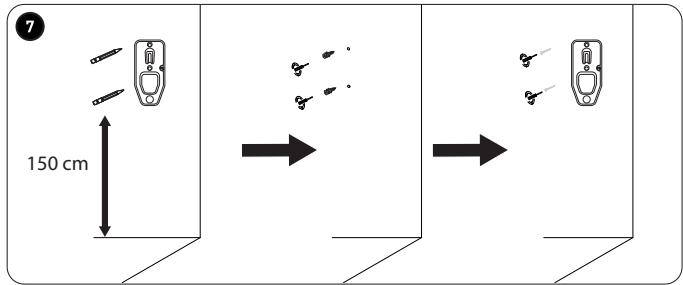
The wall mount (with the supplied wall plugs and screws) can be installed to easily store the vacuum cleaner.
7 Place the wall mount on the wall, leaving a space of at least 150 cm between the floor and the bottom of the wall mount. Mark the drill holes for the screws with a pencil. Then, drill the holes and insert the wall plugs. Place the wall mount over the wall plugs and tighten the screws using a screwdriver.

DANGER! RISK OF ELECTRIC SHOCK
- Do not pierce any electric cables or water pipes located in the wall.
- Do not install the wall mount on a metal wall.
Cleaning and maintenance

WARNING!
- To prevent the risk of electrocution, always turn off and unplug the unit from the mains supply before cleaning.
- Never immerse the main unit, motorised floor brush, AC adapter or cable in water or any other liquid. Never rinse them under the tap.

NOTE: Never use solvents, chemical or abrasive cleaning products, wire brushes, sharp objects or scouring pads to clean the unit.
- Detach all the tools and dust cup from the main unit before cleaning.
- Empty the dust cup after each use.
- Wash the dust cup and filters at least once a month or more often if required.
| Main unit | Wipe with a slightly damp, soft cloth. Dry well. |
| Motorised floor brush | |
| Extension tube | |
| Dust cup | Rinse under a tap or wash in soapy water with a soft sponge. Shake off any excess water and allow to completely air dry. |
| Foam filter |
| Permanent dust filter |
| Crevice tool |
| 2-in-1 brush |
• Once dried, re-assemble all parts.
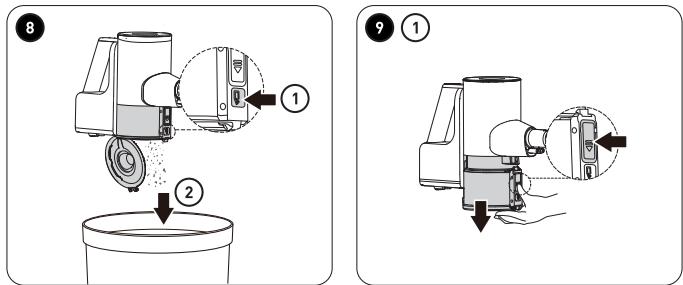
Emptying the dust cup
• To empty the dust cup, turn off the vacuum cleaner.
- Detach the extension tube and/or vacuum tool from the main unit's air inlet.
C
Cleaning and maintenance
8 ① Hold the main unit vertically over a bin. Press the dust cup lid release lever.
② The lid on the bottom of the dust cup will flip open. Close the lid after emptying the contents.
Detaching the dust cup and filters
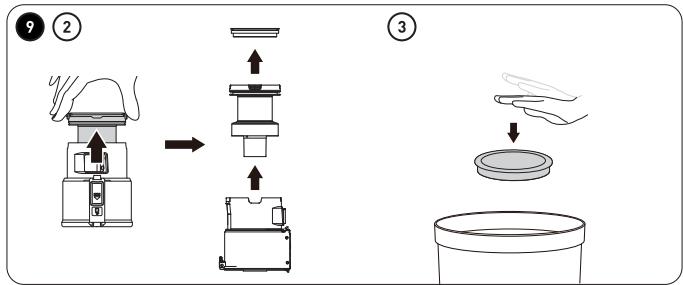
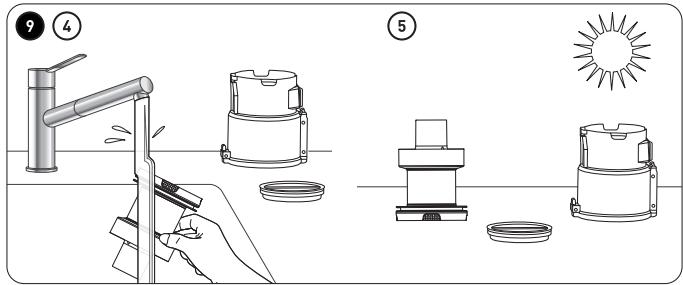
9 ① Hold the bottom of the dust cup with one hand. Press the dust cup release button with the other hand and pull the dust cup away from the main unit.
② Lift the foam filter and then the permanent filter out of the dust cup.
③ Tap the filters over a bin to dislodge the dust. Make sure the foam filter is tapped from above. Do not turn the filter upside down or tap the underside.
④ Rinse the dust cup, the permanent filter and foam filter under a tap.
⑤ Shake off any excess water and dry all parts completely.
• To re-assemble the filters and dust cup, carry out the steps in reverse order.
- Make sure you align the two nodules on the rim of the permanent filter with the grooves on the dust cup when you slot them together.
- Place the foam filter on top, white side up.
- Insert the assembled dust cup onto the main unit, making sure to align the two parts correctly and then push the dust cup until it clicks into place.

WARNING! To prevent damage to the unit, only use dry, intact filters!
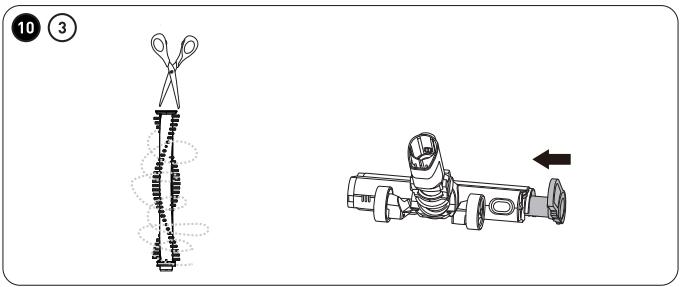
Cleaning the bristles/roller brush and wheels
If the bristles/roller brush or wheels of the motorised brush become blocked or jammed, turn off the unit.
Cleaning the bristles/roller brush
10 ① Press the motorised floor brush release button and separate the motorised floor brush from the extension tube.
C
Cleaning and maintenance
② Turn the brush upside down. Press the brush cover release button and at the same time, push the brush compartment cover towards the unlock symbol ☐. Then, pull the bristle or roller brush out and remove it from the compartment.
③ Use a pair of scissors to carefully remove hair, fur, thread, or any other items that may have become entangled in the brush. Tap the brush to remove any dust. Do not use water to clean the brushes.
- Check and remove any fibre or debris found within the compartment.
- To reassemble, slide the bristle or roller brush back into the compartment. Press the brush cover release button and at the same time push the brush compartment cover towards the lock symbol 🔒. Make sure the brush spins smoothly.
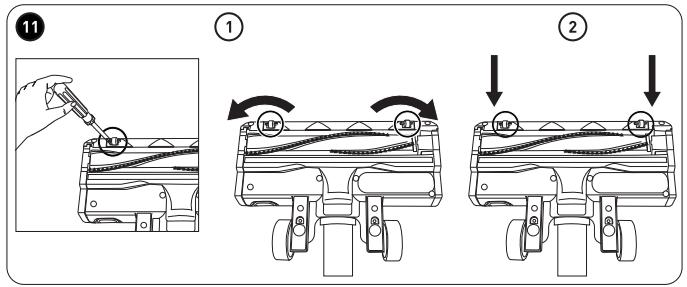
Cleaning the wheels
11 ① If thread or dirt is jamming one of the wheels, carefully insert a screwdriver under the wheel axle and push upwards to prise it out. Remove any thread or object jamming the wheel.
② Reposition the wheel by firmly pressing it back into its compartment. Make sure it spins smoothly.
Clearing blockages
Clearing blockages
Small objects, carpet fibres, etc., can occasionally jam the vacuum cleaner.
• If you notice a blockage or loss of suction during use, turn off the vacuum cleaner.
- Detach the extension tube and/or vacuum tool to find the blockage and clear it.
Troubleshooting
Use this troubleshooting guide to resolve any common problems that you may encounter with the unit. If the problem persists, do not use the unit and contact an authorised repair centre to have it inspected and if necessary, repaired.
| Problem | Possible Cause | Solution |
| The unit does not work. | The unit is not charged.The dust cup is full.The dust cup or filters are not attached properly.The extension tube/vacuum tool is blocked.The unit is off. | Fully charge the battery.Empty the dust cup.Re-attach the dust cup and filters.Turn off the unit and clear the blockage.Press the ON/OFF button to turn on the unit. |
| The unit only works for a short period of time after being charged. | The unit was not fully charged.The built-in rechargeable battery is faulty or has reached the end of its service life. | Fully charge the unit as indicated in the Charging the vacuum cleaner section.The built-in rechargeable battery must be replaced by an authorised technician. Do not attempt to replace it yourself. |
| The motorised floor brush is not spinning. | The bristle/roller brush or a wheel axle is blocked by debris (hair, fur, fibres, etc.). | Clean the brush or wheel as indicated in the Cleaning and maintenance section. Make sure the parts spin smoothly once they are re-assembled. |
| The suction is not strong, there is no suction, or the motor vibrates. | The extension tube, vacuum tool, dust cup or filters are partially blocked or full of dirt. | Remove the blockage.Clean the filters.If necessary, replace the filter with a new one. |
| The battery indicators are flashing quickly, and the vacuum cleaner is hot. | The vacuum cleaner's battery or motor has overheated and/or there is a blockage.The AC adapter is not compatible with the vacuum cleaner. | Turn off the unit and let it cool down completely. Clear the blockage, if applicable.When charging and using the unit, make sure that the ambient temperature is between 5°C and 40°C.Only use the AC adapter supplied with the unit. |
Error Messages
In the event of a malfunction, the vacuum cleaner may display one of the following error messages on the display screen. Refer to the Cleaning and maintenance section for details on how to remove blockages.
Icon
Meaning
The air channel is blocked in the floor brush or the extension tube. Remove any blockages and clean the parts.

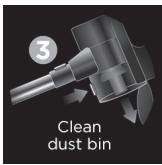
The filters are excessively dirty and/or blocked and require disassembling and cleaning.

The air channel is blocked at the entrance to the main unit or in the attached extension tube or tool. Remove any blockages and clean the parts.
The dust cup is full. Empty out the dust and clean it.
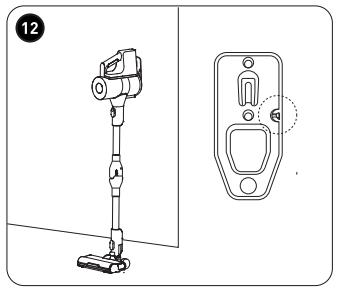
Storage
- 12 When all parts are dry, reassemble and stow the unit on the wall mount as shown. Make sure the unit is securely hooked onto the wall mount.
• Always unplug the unit before storing it.
- Store the unit in a fresh, dry and dust-free place, out of the reach of children and pets.
- Please retain the packaging and use it to store your unit when it is not in use for an extended period of time.
Merci !
AVERTISSEMENT !
Installation du support mural

REMARQUE :
natural_image
Black rectangular icon with a white lowercase 'i' in the center, representing information (no text or symbols beyond the icon itself)
NOTA:
¡ADVERTENCIA!