USER MANUAL WT 813 A S566C VALBERG
Thank you for choosing this VALBERG product. VALBERG products are chosen, tested, and recommended by ELECTRO DEPOT, so you can be sure you are getting a top-quality, easy-to-use product that won't let you down. We're confident your new device will be a pleasure to use every day!
Welcome to ELECTRO DEPOT.
Table of Contents
| A Product overview | Parts
Specifications |
| B Product usage | Installation
Operation |
| C Cleaning and maintenance | Cleaning and maintenance
Trouble Shooting
Transport |
Product Fiche
Parts
A Drain hose
B Control panel
C Power supply cord
Door
Detergent dispenser

Drum

Service filter

Transport hole plug

Supply hose cold water

Acoustic sponge (Optional)

Note:
- The product line chart is for reference only, please refer to real product as standard.
Specifications
| Model: | 987799 - WT 813 A S566C |
| Power Supply: | 220-240V~, 50Hz |
| MAX. Current: | 10A |
| Standard Water Pressure: | 0.1MPa ~ 1MPa |
| Washing Capacity: | 8.0kg |
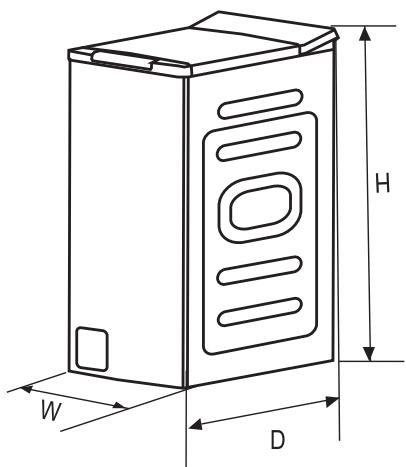
| Dimension |
| W: | 400mm |
| D: | 610mm |
| H: | 880mm |
| Weight: | 56kg |
| Rated Power: | 1900W |
Installation
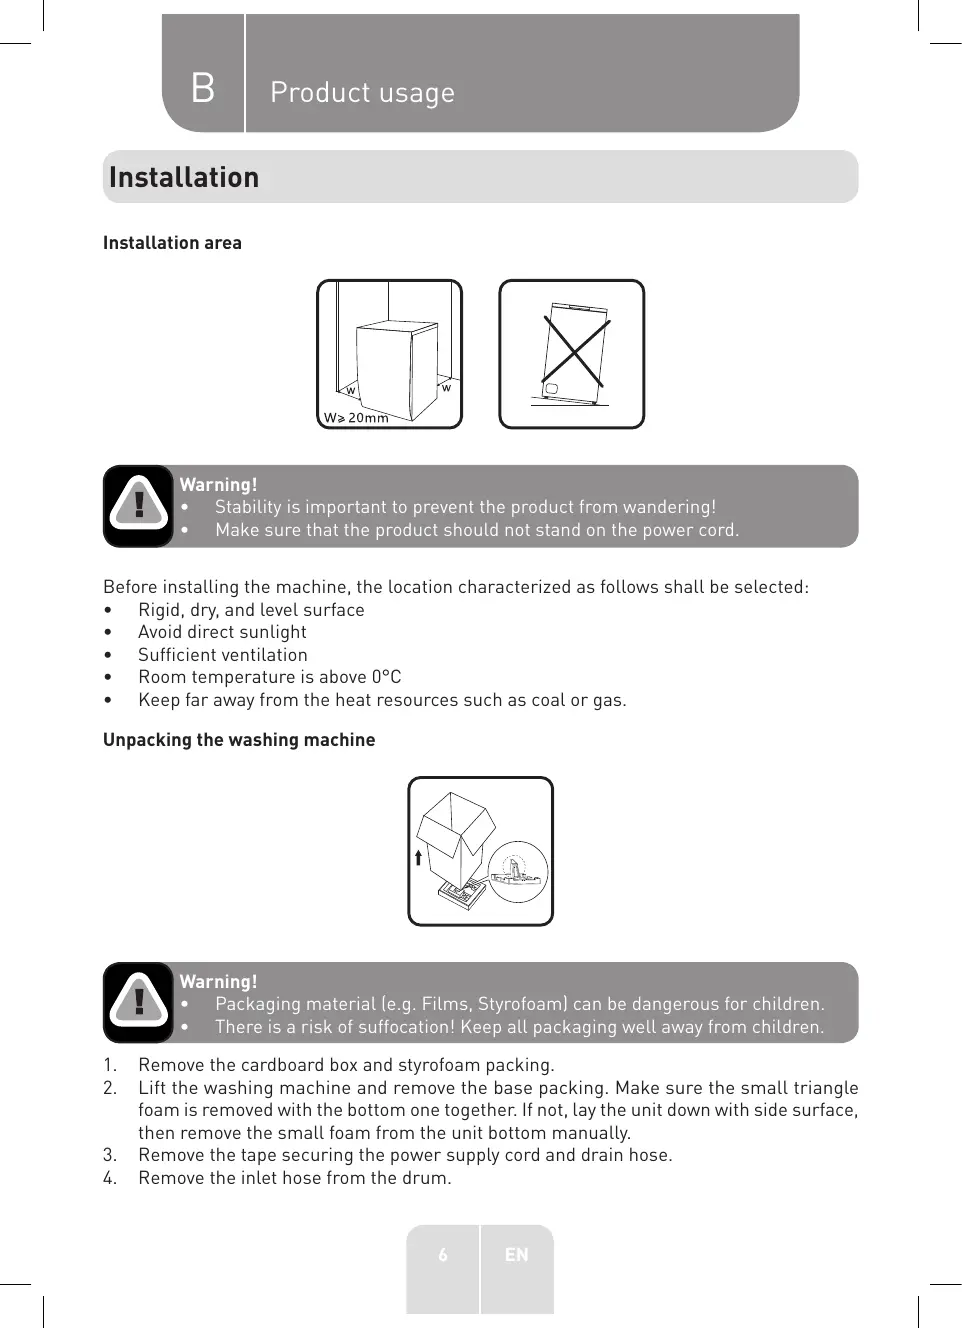
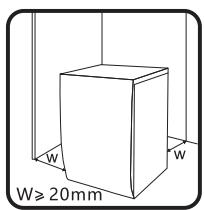
Installation area

Warning!
- Stability is important to prevent the product from wandering!
- Make sure that the product should not stand on the power co
Before installing the machine, the location characterized as follows shall be selected:
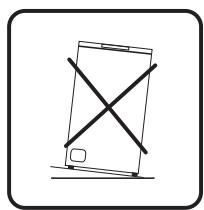
Rigid, dry, and level surface
- Avoid direct sunlight
- Sufficient ventilation
- Room temperature is above 0^ C
- Keep far away from the heat resources such as coal or gas.
Unpacking the washing machine

Warning!
-
Packaging material (e.g. Films, Styrofoam) can be dangerous for children.
There is a risk of suffocation! Keep all packaging well away from children.
-
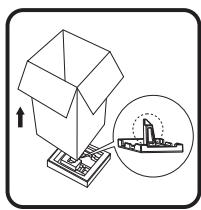
Remove the cardboard box and styrofoam packing.
- Lift the washing machine and remove the base packing. Make sure the small triangle foam is removed with the bottom one together. If not, lay the unit down with side surface, then remove the small foam from the unit bottom manually.
- Remove the tape securing the power supply cord and drain hose.
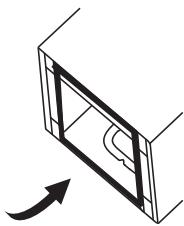
- Remove the inlet hose from the drum.
B Product usage
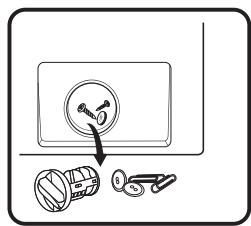
Remove transport bolts

Warning!
- You must remove the transport bolts from the backside before using the product.
- You'll need the transport bolts again if you move the product, so make sure you keep them in a safe place.
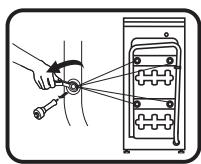
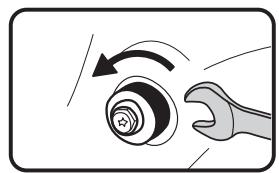
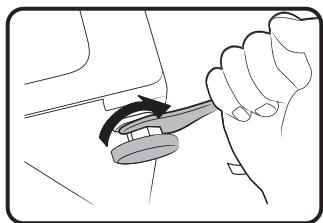
Please take the following steps to remove the bolts:
- Loosen the 4 transport bolts with a spanner.
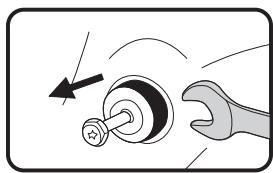
- Remove the bolts including the rubber parts and keep them for future use.
- Close the holes using the cover caps.

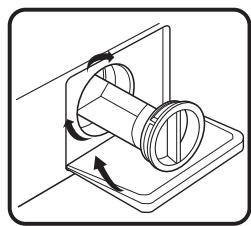
Levelling the washing machine

Warning!
The lock nuts on all four feet must be screwed tightly against the housing.
- Loosen the lock nut.
- Turn the foot until it reaches the floor.
- Adjust the legs and lock the nuts with a spanner. Make sure the machine is level and steady.
B Product usage
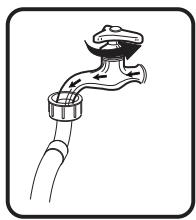
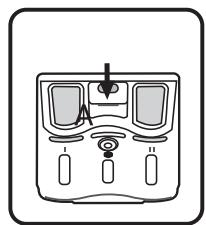
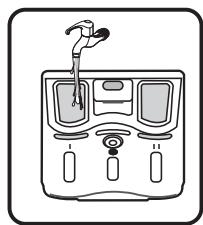
Connect the water supply hose

Warning!
To prevent leakage or water damage, follow the instructions in this chapter.
- Do not kink, crush or modify water inlet hose.
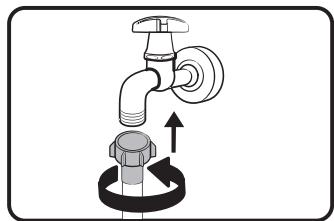
Connect the water supply hose to the water inlet valve and a water tap with cold water as indicated.

Note:
- Connect manually, do not use tools. Check if the connections are tight.
Drain Hose

Warning!
- Do not kink or protract the drain hose.
Position drain hose properly, otherwise damage might result of water leakage.
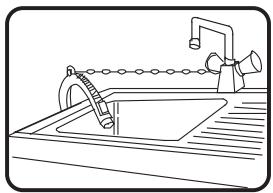
There are two ways to place the end of drain hose:
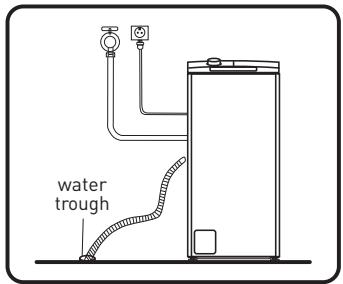
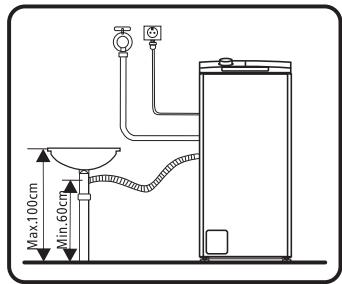
- Put it into the water trough.
- Connect it to the branch drain pipe of the trough.

Note:
If the machine has drain hose support, please install it like the following.
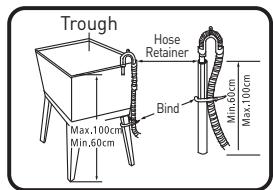

Warning!
- When installing drain hose, fix it properly with a rope.
If drain hose is too long, do not force it into washing machine as it will cause abnormal noises.
Acoustic Sponge

Note:
- Please make sure to assemble the acoustic sponges, which can effectively reduce the noise caused by the machine while working, in order to provide you with a more peaceful and quiet living environment.
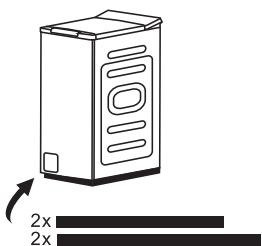
- Get the machine laid on the floor, using some soft material like foam or clothes between the machine and floor for a protection;
- Stick the 2x longer sponges to the longer bottom edges of machine, and the 2x shorter sponges to the shorter bottom edges.
Operation
Quick Start

Caution!
Before washing, please make sure the washing machine is installed properly.
- Your appliance was thoroughly checked before it left the factory. To remove any residual water and to neutralize potential odors, it's recommended to clean your appliance before first use. For this reason, start the Drum Clean without laundry and detergent.
Before Washing

①
②

③
4
(5)
6
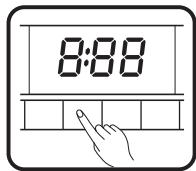
- Plug in
- Open tap
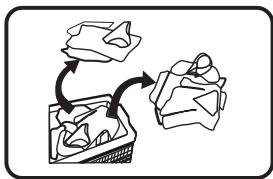
- Load
- Add detergent
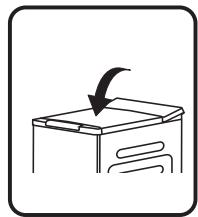
- Close drum door
- Close machine door

Note:
- Detergent need to be added in "case I" after selecting pre-washing for machines with this function.
Make sure that the drum flaps are properly locked.
All metal hooks must be properly hooked inside the rear door flap.

Check the roller before each laundry, it must roll smoothly.
- Washing
①
②
③

4
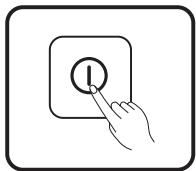
- Power On
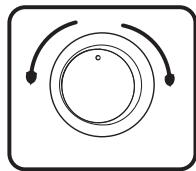
- Select programme
- Select function or remain default settings
- Press Start/Pause to start the program

Note:
After Washing
All lights off.
Before Each Washing
- The ambient temperature of the washing machine should be 5 - 40^ . If used under 0^ , the inlet valve and draining system may be damaged. If the machine is installed under freezing conditions, it should be transferred to normal ambient temperature to ensure the water supply hose and drain hose can unfreeze before use.
- Please check your laundry care labels and the detergent use instructions before wash. Use non-foaming or less-foaming detergent suitable for machine washing properly.
①
②
③
4
5

6
-
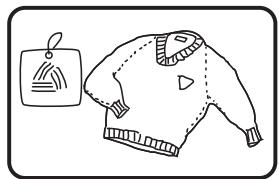
Check the care label
-
Sort laundry according to color and textile type
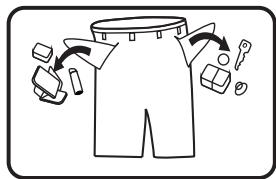
- Take all items out of the pockets
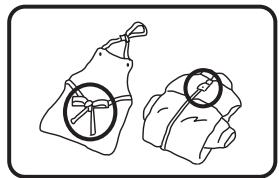
- Tie together long textile strips and belts, close zips and button
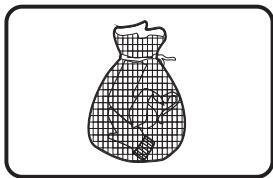
- Put small items into a laundry bag
- Turn easy-pilling and long-pile fabric inside out

Warning!
- Do not wash articles that have been cleaned in, washed in, soaked in, or dabbed with combustible or explosive substances like wax, oil, paint, gasoline, alcohol, kerosene, and other flammable materials.
- Washing single clothes items may easily create big eccentricity and cause alarm due to unbalance. Therefore it is suggested to add one or two more laundry items to the wash so that spin can be done smoothly.
- Do not wash, or spin water-proof seats, mats, or clothing.
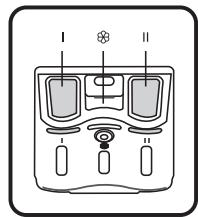
Detergent Dispenser

Pull out the dispenser
Pre Wash detergent
Main Wash detergent

Softener

Caution!
- Detergent only need to be added in "case l" after selecting pre-washing for machines with this function.
- Do not exceed the "MAX" level mark when filling in detergent, additives or softener.
| Programme | I | II | Θ |
| 15Quick 15' | | ● | ○ |
| 45Rapid 45' | | ● | ○ |
| ECO 40-60 | | ● | ○ |
| Steam | ○ | ● | ○ |
| Wool | | ● | ○ |
| Rinse & Spin | | | ○ |
| Spin Only | | | |
| Drum Clean | | | |
| Baby Care | ○ | ● | ○ |
| 20°C | | ● | ○ |
| Sportswear | ○ | ● | ○ |
| Jeans | ○ | ● | ○ |
| Mix | ○ | ● | ○ |
| Synthetic | ○ | ● | ○ |
| Cotton | ○ | ● | ○ |
Means must Means optional
Detergent Recommendation
| Recommended washing detergent | Wash cycles | Washing temp. | Type of laundry and textile |
| Heavy-duty detergent with bleaching agents and optical brighteners | Cotton, Mix | 20/40/60 | White laundry made from boil-proof cotton or linen |
| Colour detergent without bleaching agent and optical brighteners | Cotton, Mix | Cold/20/40 | Coloured laundry made from cotton or linen |
| Color or mild detergent without optical brighteners | Synthetic | Cold/20/40 | Coloured laundry made from easy care fibres or synthetic materials |
| Mild washing detergent | Synthetic | 20/40 | Delicate textiles, silk, viscose |
| Special wool detergent | Wool | 20/40 | Wool |
B Product usage

Note:
- Agglomerating or ropy detergent or additive can be diluted in some water before pouring it into the detergent dispenser, to avoid its inlet to get blocked and thus cause a water overflow.
- Please choose the suitable type of detergent to get a maximum of washing performance and a minimum of water and energy consumption
To achieve the best cleaning result a proper detergent dosing is important.
Use a reduced detergent amount if the drum is not filled completely.
Always adjust the amount of detergent to the water hardness, if your tap water is soft, use less detergent.
- Dose according to how dirty your laundry is, less dirty clothes require less detergent.
Highly concentrated (compact detergent) requires particularly accurate dosing.
Following symptoms are a sign of detergent overdosing:
- heavy foam formation
- poor washing and rinsing result
Following symptoms are a sign of detergent underdosing:
- laundry turns grey
- built-up of limescale deposits on the drum, the heating element and/ or the laundry

Control Panel
1 Power Product is on/off.
2 Start/Pause Press the button to start or pause the washing cycle.
3 Option This allows you to select an additional function.
Programmes Available according to the laundry type.
Display The display shows the settings, estimated time remaining, options, and status messages for your washer. The display will remain on through the cycle.
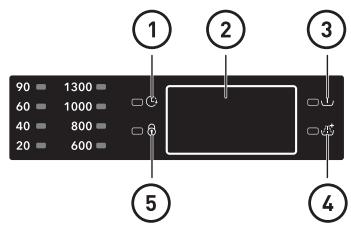
(1) Delay
② Display Wash Time Delay Time
25 2H
End Error
End E30
3 Pre Wash

Extra Rinse

Door Lock
Programmes
Model: WT 813 A S566C
| Programme | Load (kg) | Default Time |
| 8.0 | |
| 15 Quick 15' | 2.0 | 0:15 |
| 45 Rapid 45' | 2.0 | 0:45 |
| ECO 40-60 | 8.0 | 3:38 |
| Steam | 4.0 | 1:47 |
| Wool | 2.0 | 1:07 |
| Rinse & Spin | 8.0 | 0:20 |
| Spin Only | 8.0 | 0:12 |
| Drum Clean | - | 1:18 |
| Baby Care | 8.0 | 2:01 |
| 20°C | 4.0 | 1:01 |
| Sportswear | 4.0 | 0:47 |
| Jeans | 8.0 | 1:40 |
| Mix | 8.0 | 1:20 |
| Synthetic | 4.0 | 2:20 |
| Cotton | 8.0 | 2:40 |

Note:
The parameters in this table are only for user's reference. The actual parameters maybe different with the parameters in above mentioned table.
WT813A5566C
| Cycle | Nominal capacity in kg | Temperature setting | Cycle duration in hours and minutes | Energy consumption in kWh/operating cycle | Water consumption in liter/operating cycle | Highest temperature °C(1) | Residual moisture in %/ spin speed in rpm(2) |
| 15 Quick 15' | 2.0 | cold | 0:15 | 0.026 | 34 | cold | 53%/800 |
| ECO ECO 40-60[3] | 8.0 | -- | 3:38 | 0.739 | 71 | 38 | 53.9%/1250 |
| 4.0 | -- | 2:48 | 0.456 | 47 | 32 | 53.9%/1250 |
| 2.0 | -- | 2:48 | 0.196 | 38 | 23 | 53.9%/1250 |
| 20°C | 4.0 | 20 | 1:01 | 0.183 | 47 | 20 | 70%/800 |
| Mix | 8.0 | 40 | 1:20 | 0.754 | 44 | 40 | 70%/800 |
| Synthetic | 4.0 | 40 | 2:20 | 0.625 | 34 | 40 | 35%/800 |
| Cotton | 8.0 | 60 | 2:45 | 1.394 | 71 | 60 | 53%/1300 |
- The above data is for reference only, and the data may change due to different actual use conditions.
The valves given for programmes other than the ECO 40-60 programme are indicative only.
Compliant to EN 60456: 2016/prA2019 With (EU) 2019/2014, (EU) 2019/2023.
The EU energy efficiency class is: A
Energy test program: ECO 40-60. Other as the default.
Half load for 8.0kg machine: 4.0kg .
Quarter load for 8.0kg machine: 2.0kg.
(1) The highest temperature reached by the laundry in the wash cycle for at least 5 minutes.
[2] Residual moisture after the wash cycle in water content percent and the spin speed at which this was achieved.
(3) The ECO 40-60 programme is able to clean normally soiled cotton laundry declared to be washable at 40^ or 60^ , together in the same cycle. This programme is used to assess the compliance with the regulation (EU) 2019/2023.
The most efficient programmes in terms of energy consumption are generally those that perform at lower temperatures and longer duration.
Loading the household washer up to the capacity indicated for the respective programmes will contribute to energy and water savings.
Noise and remaining moisture content are influenced by the spinning speed: the higher the spinning speed in the spinning phase, the higher the noise and the lower the remaining moisture content.

Caution!
- If there is any break in the power supply while the machine is operating, a special memory stores the selected programme. The machine will continue the programme when the power supply is re-established.
Programmes
Programmes are available according to the laundry type.
| Programmes |
| Quick 15' | Extra short programme approx, suitable for lightly soiled washing as a small amounts of laundry. |
| Rapid 45' | Washing few and not very dirty clothes quickly. |
| ECO 40-60 | Able to clean normally soiled cotton laundry declared to be washable at 40°C or 60°C, together in the same cycle. |
| Steam | The Steam Wash can deeply penetrate the fiber, which effectively eliminate bacterias and germs, preventing odors and protecting health. |
| Wool | Hand or machine-washable wool or richwool textiles. Especially gentle wash programme to prevent shrinkage, longer programme pauses (textiles rest in wash liquor). |
| Rinse & Spin | Rinses and then spins the laundry, and then drains the water. |
| Spin Only | Spins and drains the water. |
| Drum Clean | Specially set in this machine to clean the drum and tube. It applies 90°C high temperature sterilization to make the clothes washing more green. When this programme is performed, the clothes or other washing cannot be added. When proper amount of chlorine bleaching agent is put in, the barrel cleaning effect will be better. The customer can use this programme regularly according to the need. |
| Baby Care | Washing the baby's clothes, it can make the baby's wear cleaner and make the rinse performance better to protect the baby skin. |
| 20°C | Able to clean lightly soiled cotton laundry, at a nominal temperature of 20°C. |
| Sportswear | Washing the activewear. |
| Jeans | Specially for jeans. |
| Mix | Mixed load consisting of textiles made of cotton and synthetics. |
| Synthetic | Wash synthetic articles, for example: shirts, coats, blending. While washing the knitting textiles, detergent quantity shall be reduced due to its loose string construction and easily forming bubbles. |
| Cotton | Hard-wearing textiles, heat-resistant textiles made of cotton or linen. |
Option
Model: WT 813 A S566C
| Cycle | Default Temp. (°C) | Default spin speed in rpm | Additional functions |
| Wash cycles | | 1300 | |
| Quick 15' | Cold | 800 | |
| Rapid 45' | 20 | 800 | |
| ECO 40-60 | -- | -- | |
| Steam | 40 | 800 | |
| Wool | 40 | 600 | |
| Rinse & Spin | -- | 800 | |
| Spin Only | -- | 800 | |
| Drum Clean | 90 | -- | |
| Baby Care | 60 | 800 | |
| 20°C | 20 | 800 | |
| Sportswear | 20 | 800 | |
| Jeans | 40 | 800 | |
| Mix | 40 | 800 | |
| Synthetic | 40 | 800 | |
| Cotton | 40 | 800 | |

Note:
- For the maximum spin speed, program time, and other details of the ECO 40-60 program, please refer to the content on the Product Fiche page.
- The table shows which cycle offers which options for adjustment. It also indicates if a setting is not available for a program.

Pre Wash
The Prewash function can get an extra wash before main wash, it is suitable for washing the dust rises to surface of the clothes; You need to put detergent into the Case (I) when select it.

The laundry will undergo extra rinse once after you select it.

Delay
Set the Delay function:
- Select a programme;
- Press the Delay button to choose the time 0-24H;
- Press [Start/Pause] to commence the delay operation

Choose programme


Setting time


Start
Cancel the Delay function:
Press the [Delay] button until the display be 0H. It should be pressed before starting the programme. If the programme already started, should switch off programme to reset a new one.

Caution!
- If there is any break in the power supply while the machine is operating, a special memory stores the selected programme and when the power is restarted, the program will continue.
| Temp.
Press the button to regulate the temperature[Cold, 20°C, 40°C, 60°C, 90°C] |
| Spin
Press the button to change the speed.
1300: 0-600-800-1000-1300 |

Child Lock
To avoid mis operation by children.

Choose programme


Press [Spin] and [Delay] 3 sec. till buzzer beep.

Caution!
During the "Child Lock" function is activating, the buzzer will beep, When the buttons are pressed.
Press the two button 3sec. also to be released the function.
The "Child Lock" will lock all buttons except Power button.
Cut off the power supply, the kid's protection is to be released.

Mute the buzzer

Choose programme


3sec.
Press the [Spin] button for 3sec., the buzzer is mute.
To act the buzzer function, press the button again for 3 seconds. The setting will be kept until the next reset.

Caution!
After Muting the buzzer function, the sounds will not be activated any more.

My Cycle
To memory the frequently used programme.
After choosing the programme and setting the options, press [Temp.]
3 sec. before start to wash. The default setting course is Cotton.

Note:
Usage counter
- Unplug the equipment for 10s and reconnect again.
- Power on and within 10s, please press "Temp." and "Function" on control panel simultaneously and continuously for around 5s until the device display shows digits -- the value can indicate the times of equipment usage.
- Repeat step 1 again and customer can resume to normal operation.
Cleaning and maintenance

Warning!
- Before your maintenance starts, please unplug the machine and close the tap.
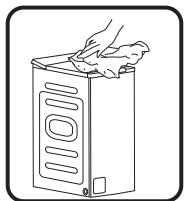
Cleaning the Cabinet
Proper maintenance on the washing machine can extend its working life. The surface can be cleaned with diluted non-abrasive neutral detergents when necessary. If there is any water overflow, use the wet cloth to wipe it off immediately. No sharp items are allowed.

Note:
- Formic acid and its diluted solvents or equivalent are forbidden, such as alcohol, solvents or chemical products, etc.
Cleaning the Drum
The rusts left inside the drum by the metal articles shall be removed immediately with chlorine-free detergents. Never use steel wool.

Note:
- Don't put laundry in the washing machine during the drum cleaning.
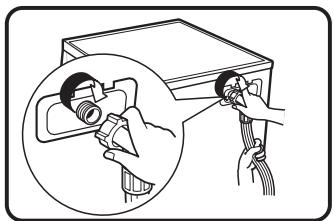
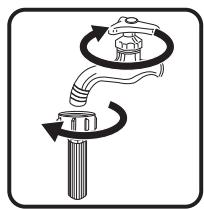
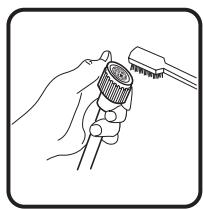
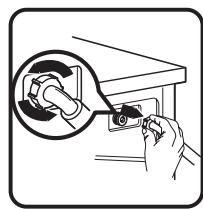
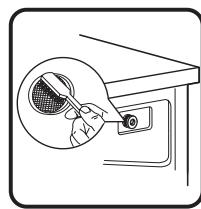
Cleaning the Inlet Filter

Note:
- Diminishing water flow is a sign that the filter need to be cleaned.
①
②
③
4
- Close the tap and remove the water supply hose from it.
- Clean the filter with a brush.
- Unscrew the water supply hose from the backside of the machine. Pull out the filter with long nose pliers.
- Use a brush to clean the filter.
- Reinstall the filter to the water inlet and reconnect the water supply hose.
- Clean the Inlet filter every 3 months to ensure the normal operation of the appliance.
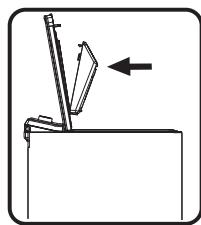
Clean The Detergent Dispenser
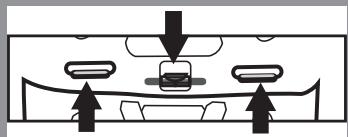
- Press down the arrow location on softener cover inside the dispenser drawer.
- Lift the clip up and take out softener cover and wash all grooves with water.
- Restore the softener cover and push the drawer onto position.
1
2
3
- Pull out the dispenser drawer with press the A.
- Clean the dispenser drawer under water.
- Insert the dispenser drawer.

Note:
- Do not use abrasive or caustic agents to clean plastic parts.
- Clean the detergent dispenser every 3 months to ensure the normal operation of the appliance.
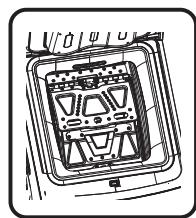
Cleaning the Drain Pump Filter

Warning!
- Make sure that the machine has finished the washing cycle and is empty. Switch it off and unplug it before cleaning the drain pump filter.
- Be careful of hot water. Allow the water to cool down. Risk of scalding!
- Clean the filter periodically every 3 months to ensure the normal operation of the appliance.
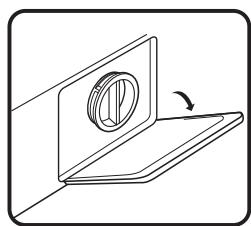
①
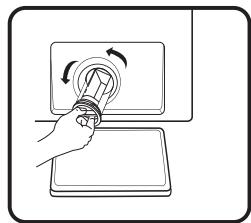
②
③
4
-
Open the lower cover cap.
-
Open the filter by turning to the counter clockwise.
- Remove extraneous matter.
- Close the lower cover cap.
Trouble Shooting
The start of the appliance does not work or it stops during operation.
First try to find a solution to the problem, If not, contact the service centre.
| Description | Possible cause | Solution |
| Washing machine cannot start up | ·Door is not closed properly | ·Restart after the door is closed
Check if the clothes is stuck |
| Door can’t be opened | ·Washer’s safety protection design is working | ·Disconnect the power, restart the product |
| Water leakage | ·The connection between inlet pipe or outlet hose is not tight | ·Check and fasten water pipes
·Clean up outlet hose |
| Detergent residues in the box | ·Detergent is dampened or agglomerated | ·Clean and wipe the detergent box |
| Indicator or display does not light | ·Disconnect the power
·PC board or harness has connection problem | ·Check if the power is shut down and the power plug is connected correctly |
| Abnormal noise | ·Fixing bolts still in place
·Floor is not solid or level | ·Check if the fixing (bolts) have been removed
·Check it’s installed on a solid and level floor |
LED display models:
| E30 | ·Door is not closed properly | ·Restart after the door is closed
·Check if the clothes is stuck |
| E10 | ·Water injecting problem while washing | ·Check if the water pressure is too low
·Straighten the water pipe
·Check if the inlet valve filter is blocked |
| E21 | ·Overtime water draining | ·Check if the drain hose is blocked |
| Description | Possible cause | Solution |
| E12 | • Water overflow | • Restart the washer |
| EXX | • Others | • Please try again first, call up service line if there are still troubles |

Note:
- After the check, activate the appliance. If the problem occurs or the display shows other alarm codes again, contact the service.

Warning!
Risk of electric shock
- Never try repair an appliance which is defective of presumed to be defective. You may put your own and future users' lives in danger. Only authorised specialists are allowed to carry out this repair work.
- Improper repair will void the warranty and subsequent damages can't be recognized!
Transport
IMPORTANT STEPS WHEN MOVING THE APPLIANCE
Unplug the appliance and close the water inlet tap.
- Check, if the door and the detergent dispenser are closed properly.
- Remove the water inlet pipe and the outlet hose from the house installations.
- Let the water drain completely from the appliance (see «Maintenance Cleaning the drain pump filter»).
- Important: Re-install the 4 transport bolts in the back of the appliance.
- This appliance is heavy. Transport with care. Never hold any protruding part of the machine when lifting. The machine door cannot be used as a handle.
Product Fiche
Supplier's name or trade mark[a],[c]:
Supplier's address[a],[c]:
Model identifier[a]: WT 813 A S566C
General product parameters:
| Parameter | Value | Parameter | Value |
| Rated capacity(b)(kg) | 8.0 | Dimensions in cm(a),(c) | Height | 88 |
| Width | 40 |
| Depth | 61 |
| Energy efficiency index(b)(EEIw) | 51.9 | Energy efficiency class(b) | A(d) |
| Washing efficiency index(b) | 1.031 | Rinsing effectiveness (g/kg)(b) | 5.0 |
| Energy consumption in kWh per cycle, based on the eco 40-60 programme. Actual energy consumption will depend on how the appliance is used. | 0.472 | Water consumption in litre per cycle, based on the eco 40-60 programme. Actual water consumption will depend on how the appliance is used and on the hardness of the water. | 48 |
| Maximum temperature inside the treated textile(b)(°C) | Rated capacity | 38 | Weighted remaining moisture content(b)(%) | 53.9 |
| Half | 32 |
| Quarter | 23 |
| Spin speed(b)(rpm) | Rated capacity | 1250 | Spin-drying efficiency class(b) | B(d) |
| Half | 1250 |
| Quarter | 1250 |
| Programme duration(b)(h:min) | Rated capacity | 3:38 | Type | free-standing |
| Half | 2:48 |
| Quarter | 2:48 |
| Airborne acoustical noise emissions in the spinning phase[a] (dB(A) re 1 pW) | 78 | Airborne acoustical noise emission class[b] (spinning phase) | C[d] |
| Off-mode (W) (if applicable) | 0.50 | Standby mode (W) (if applicable) | N/A |
| Delay start (W) (if applicable) | 4.00 | Networked standby (W) (if applicable) | N/A |
Minimum duration of the guarantee offered by the supplier[a],[c]:
| This product has been designed to release silver ions during the washing cycle | NO |
Weblink to the supplier's website, where the information in point 9 of Annex II to Commission Regulation (EU) 2019/2023 (1) is found:
^[a] this item shall not be considered relevant for the purposes of Article 2(6) of Regulation (EU) 2017/1369.
(b) for the eco 40-60 programme.
(c) changes to this item shall not be considered relevant for the purposes of paragraph 4 of Article 4 of Regulation (EU) 2017/1369.
^(d) if the product database automatically generates the definitive content of this cell the supplier shall not enter these data.
- The actual energy consumption will depend on how the appliance is used.
- The actual water consumption will depend on how the appliance is used and on the hardness of the water.
Delivery of the spare parts within 15 working days after having received the order.
Product Data Sheet concerning (EU) 2019/2014.
The product data sheet for your appliance can be found online.
Go to https://eprel.ec.europe.eu and enter the model identifier for your appliance to download the data sheet.
The model identifier for your appliance can be found in the technical specifications section.

Merci!
This product is guaranteed against faults caused by defects in manufacturing or the materials used for a period of two years, starting from the date of purchase.* This warranty does not cover defects or damage caused by failure to install the device correctly, incorrect use of the product, or excessive wear and tear.
*proof of purchase required.
FR
CONDITION DE GARANTIE