USER MANUAL FLOORWASHER FL5 VALBERG
WARRANTY CONDITIONS
EN
This product is guaranteed against faults caused by defects in manufacturing or the materials used for a period of two years, starting from the date of purchase.* This warranty does not cover defects or damage caused by failure to install the device correctly, incorrect use of the product, or excessive wear and tear.
*proof of purchase required.
CONDITION DE GARANTIE
FR
VALBERG
natural_image
Three line drawings of mechanical devices or tools labeled O, P, and Q, with no visible text or symbols.

natural_image
Technical line drawing of a handheld device with two views (① and ②), no text or symbols present
natural_image
Illustration of a hammer and wrench tool with a gear handle, labeled with number 4 (no text or symbols on the diagram itself)
Thank you!
Thank you for choosing this VALBERG product.
VALBERG products are chosen, tested, and recommended by ELECTRO DEPOT, so you can be sure you are getting a top-quality, easy-to-use product that won't let you down.
We're confident your new device will be a pleasure to use every day!
Welcome to ELECTRO DEPOT.
Table of Contents

Product overview
Parts
Product overview
Intended use
Specifications

Product usage
Before using the product
Operations

Cleaning and maintenance
Cleaning and maintenance
Troubleshooting
Storage
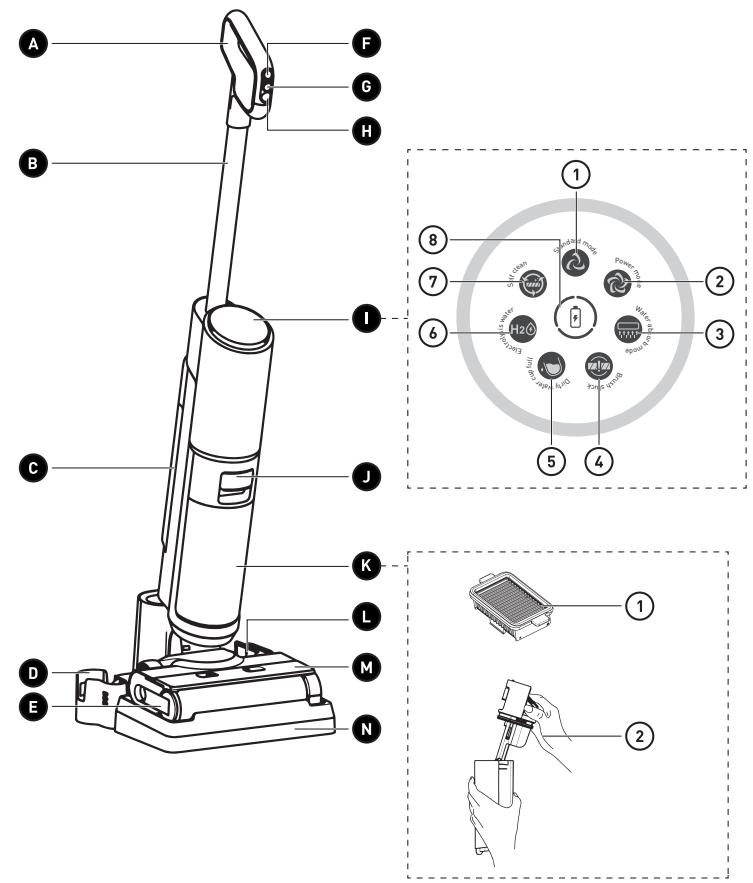
Parts
A Handle
B Aluminum tube
C Clean water cup
D Rolling brush storage base
E Rolling brush release lock handle
F On/Off button
G Mode switching button
H Self-clean button
Status icon display panel
① Standard mode icon - default mode.
② Power mode icon - for cleaning tougher dirtis and stains.
③ Water absorb mode icon - for absorbing excess water on the floor while cleaning.
4 Brush stuck icon - LED turns on when the Rolling brush is stuck.
⑤ Dirty water cup full icon - LED turns on when the dirty water cup is full.
⑥ H2 Electrolysis water icon - LED turns on when water electrolysis for disinfection is in progress.


Self clean icon - LED turns on when self-clean function is in progress.


Battery level icon - the LED around the icon lights up and animates while ging.

Dirty water cup release button

Dirty water cup

2 HEPA filters

Cover with dirt separator and float

HEPA filter storage base

Rolling brush cover

Charging base

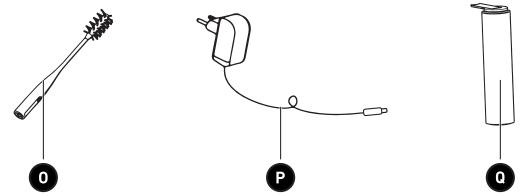
Cleaning brush

Charging cable with power plug

Replacement rolling brush
Product overview
- Unpack and remove all labels from the unit except the nameplate. Please check that all the product's parts are included and intact. If the unit is damaged or faulty, do not use it and take it to your retailer or after-sales service centre.
- Keep all packaging out of the reach of children. There is a risk of accidents if children play with packaging materials.
Intended use
- This product is for domestic use only. It has not been designed for industrial or professional use by cleaning companies. Any other use may damage the product or cause injury. Only use the product indoors, in a dry place.
Specifications
| Model: | 984112 - FL5 |
| Power: | 160 W |
| Voltage: | 22.2 V |
| Clean water cup capacity: | 850ml |
| Dirty water cup capacity: | 750ml |
| Battery: | 3000mAh |
| Battery charging time: | 6 ± 0.5 h |
| Operating time: | 30min |
AC adapter
| Published information | Value and precision | Unit |
| Company name or registered trademark, business registration number and manufacturer's address: | ELECTRO DEPOT/R.C.S. 433 744 5391 route de Vendeville, 59155 Faches Thumesnil, FRANCE | - |
| Model reference: | CZH013260050EUWQ | - |
| Input voltage: | 100-240 | V |
| Input current frequency: | 50/60 | Hz |
| Output voltage: | 26 | V |
| Output current: | 0.5 | A |
| Output power: | 13 | W |
| Average efficiency in active mode: | ≥slant 83.39% | % |
| Low load efficiency (10%): | ≥slant 78% | % |
| No-load power consumption: | ≤slant 0.1 | W |
| Protection class: | Class II | |
Before using the product

WARNING!
- Never use the product without the HEPA filter, clean water cup or dirty water cup.
- Make sure the product is powered off and unplugged from the mains socket before attaching or changing any tools.
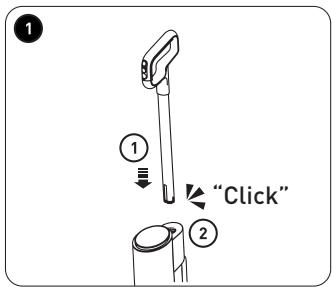
Attach the handle
1 ① Attach the handle with the aluminum tube to the slot of the main body vertically.
② When you hear a click sound, it indicates the handle and the tube are stable and are properly assembled.
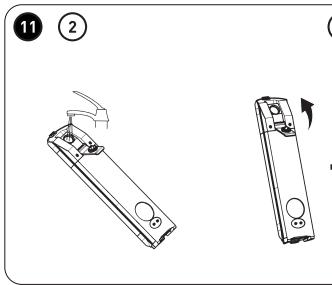
Detach the handle
2 ① Unplug the Floorwasher from the power supply.
② Use a slender tool, for example, a small screwdriver, to insert into the hole at the back of the main body and press it.
③ Hold the tube and then pull out the tube and the handle.
Detach the clean water cup
3 While pressing the clean water cup release button downward, pull out the clean water cup.
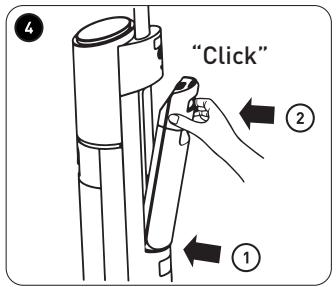
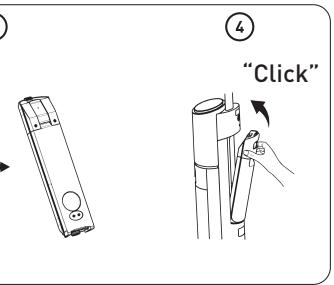
Attach the clean water cup
4 ① Put the clean water cup into the slot of the main body.
② Push the cup in until it clicks into place.
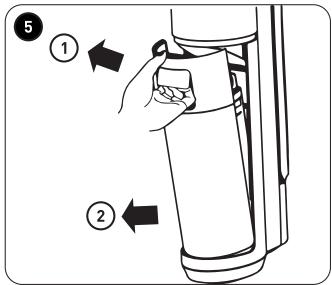
Detach the dirty water cup
5 Press the dirty water cup release button, and then pull out the dirty water cup.
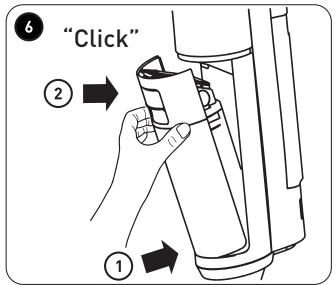
Attach the dirty water cup
6 ① Put the dirty water cup into the slot of the main body.
B Product usage
② Push the cup in until it clicks into place.
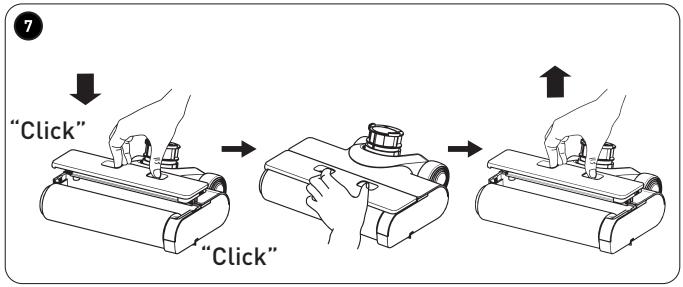
Attach/detach the rolling brush
Attach/detach the rolling brush cover
7 To detach:
- Use your thumb and forefinger together and press the release locks inward, and then pull upward to detach the cover.
To attach:
- Use your thumb and forefinger together and press the release locks inward, and then push down the cover until both sides click into place.
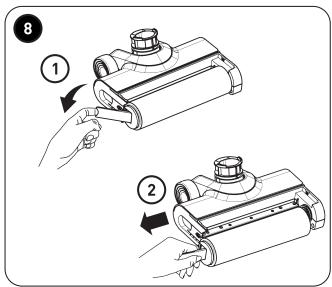
Attach/detach the rolling brush
To detach:
8 ① Pull the rolling brush release lock handle on the left side.
② Hold the rolling brush release lock handle and pull the rolling brush leftward to detach it from the spindle on the right side.
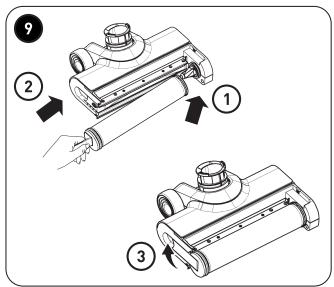
To attach:
9 ① Insert the right side of the rolling brush into the spindle at the right end.
② Put the left side of the rolling brush into the left end and align with the slot.
③ Push the rolling brush release lock handle in until it clicks into place.
Operations

WARNING!
- Never use the product to clean the following substances: explosive or flammable gases, liquids and dust (reactive dust), in addition to magnetic, toxic, flammable or combustible reactive metal dust (e.g. aluminium). Do not use the product to clean sharp, hot or incandescent objects at temperatures above 40°C, such as cigarettes or hot ashes.
- Do not use this product near working fireplaces or heaters. Doing so may result in deformation of the product casing.
- Unplug the charging cable after the Floorwasher is fully charged. Do not overcharge the battery. Doing so may cause overheating or deformation of the battery.

CAUTION!
• Never use the product without the filter or water cups.
- This product is suitable for hard floor of indoor environment, including waxed floor, stone floor, rubber floor, marble floor, granite floor, terrazzo floor, solid wood floor, composite floor, bamboo floor, and all kinds of mirror tiles, porcelain tiles, etc.
- If the product is used on uneven surface, the best cleaning effect may not be achieved.
- When the Floorwasher is not in use, place it upright against a wall corner to prevent from tripping over and causing any injuries.
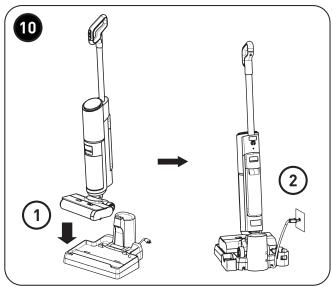
Charge the Floorwasher
10
- Place the Floorwasher on the charging base.
- Connect the charging cable to the charging base and the power socket.

NOTE: When charging, the LED around the battery charging icon Ⓑ lights up and animates on the display panel.
• Make sure the Floorwasher is fully charged before use.
- Place the charging base in a dry place.
- The Floorwasher emits a small sound when the battery is cooling down. This is normal for optimizing battery charging.
Use the Floorwasher
Fill the clean water cup

NOTE: We recommend that when you use the Floorwasher for the first time, connect the Floorwasher to the power supply and keep the main body upright. Then, fill up the clean water cup as described below. This will allow you to easily determine the appropriate amount of water needed.
B
Product usage
Before using the Floorwasher, fill the clean water cup with tap water (do not exceed the MAX line marked on the cup).

NOTE: You can fill the cup with warm water; however, do not use water with temperature over 60 degrees.
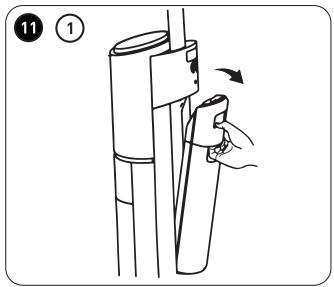
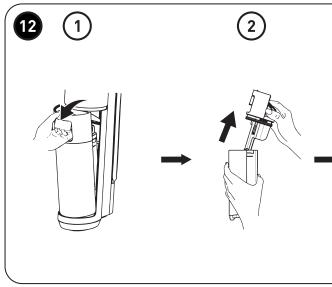
11 ① While pressing the clean water cup release button downward, pull to remove the cup.
② Open the lid and fill the cup with tap water. Do not allow water to exceed the MAX line marked on the cup overflow the cup with water.

NOTE: For deep cleaning, replace 16ml of tap water with neutral floor liquid detergent (to be purchased separately).
③ Close the lid and make sure the cup is closed tight and no leakage.
4 Place the clean water cup back to the main body, and then push the cup in until it clicks into place.
Power on the Floorwasher
- Press the On/Off button Ⓞ on the handle to power on the Floorwasher.
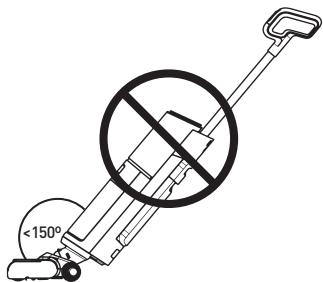
- Tilt the Floorwasher backward to start cleaning.

NOTE:
- When standing upright, the Floorwasher will be powered off even if you press the On/Off button.
- Do not tilt the Floorwasher over 150 degrees. Doing so might result in water leakage from the water cups.
Power off the Floorwasher
- Press the On/Off button Ⓞ on the handle.
Switch modes
-
While the Floorwasher is powering on and cleaning the floor, you can press ⚫ on the handle to switch to Power mode 🔒.
-
Press again to switch to Water absorb mode
- Press again to switch to Eletrolysis water mode H2O.

NOTE:
- Press 📋 on the handle will toggle among Standard mode 🔒, Power mode 🔒, Water absorb 🔒 mode and Eletrolysis water mode H2O.
• Standard mode is the default mode.
• Power mode is ideal for cleaning tougher dirtis and stains.
- Water absorb mode is ideal for absorbing excess water on the floor while cleaning.
- Eletrolysis water mode is for cleaning with electrolyzed water for disinfection.
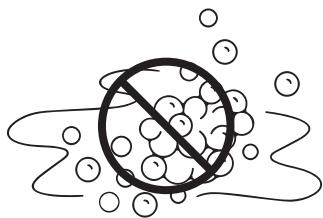
CAUTION: Do not use the Floorwasher to clean surface with foam liquid. It is recommended using Power mode for tougher dirts and stains.
natural_image
Illustration of a prohibition symbol over a surface with scattered circles (no text or symbols)
- The LED of the currently selected mode will light up on the display panel.
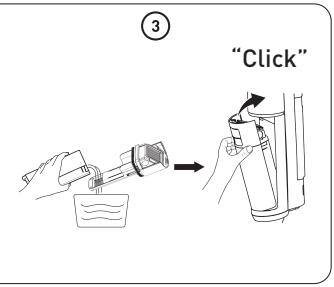
Clean the dirty water cup

NOTE:
- After using the Floorwasher, check the suction nozzle regularly and clean the dirty water cup timely to keep the air tunnel unblocked so as to prevent from any blockages that might cause suction dropping and motor overheating, thus affecting the performance and service life of the product.
- Clean the dirty water cup after each cleaning, or when the dirty water exceeds the water line on the dirty water cup ____
12 ① Press the dirty water cup release button, and then pull out the cup.
② While holding the cup, press the dirty water cup release button and pull the cover with the dirt separator upward to remove it from the cup.
③ Empty the cup, and then place the cup back to the main body. Push the cup in until it clicks into place.

NOTE: When emptying the dirty water cup, make sure you use a drain or sink strainer to avoid blockage to your drain by the dirts.
Self-clean

NOTE:
We recommend that you:
- Clean the dirty water cup before and after performing the Self-clean function.
-
Clean the charging base right away if any dirty residues remain on the charging base after using the Self-clean function.
-
To perform rolling brush self-cleaning, place the Floorwasher back to the charging base after use.
- While the Floorwasher is in the charging base, standing upright, press the Self-clean button on the handle to start 📄.
- After performing the self-cleaning, the Floorwasher enters charging mode and starts the process of auto air-drying the rolling brush.
Cleaning and maintenance

WARNING!
- To prevent the risk of electrocution, always turn off and unplug the product from the mains supply before cleaning.
- Never immerse the main body or power cord in water or any other liquid. Never rinse them under the tap.
- Use a neutral floor liquid detergent (to be purchased separately) according to the instructions. Acid, aqueous alkali or other environmental harmful substance must not be used. (For example: fill the clean water cup with tap water and add 16ml of neutral floor liquid detergent).
- Liquid detergent should be kept out of the reach of children. If the liquid detergent gets into the eyes accidentally, rinse them thoroughly with clean water; seek medical attention immediately in case of accidental ingestion.
- Follow the local environmental protection regulations when disposing of sewage and liquid detergent.

NOTE:
- Never use solvents, chemical or abrasive cleaning products, wire brushes, sharp objects or scouring pads to clean the product.
In order to achieve its best performance, we recommend that you maintain the product regularly.
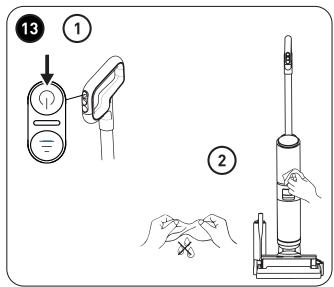
Clean the main body
13 ① Make sure the Floorwasher is powered off before cleaning.
② Clean the main body with a soft cloth. It can be slightly damp with clean water or neutral detergent. Be cautious not to get the internal components wet.
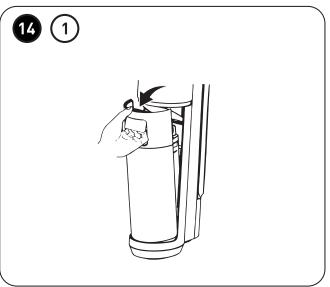
Clean and empty the dirty water cup
14 When the dirty water cup is full, the Floorwasher will turn off automatically. The LED of the Dirty water cup full icon lights up on the display panel.
① Press the dirty water cup release button, and then pull out the cup.
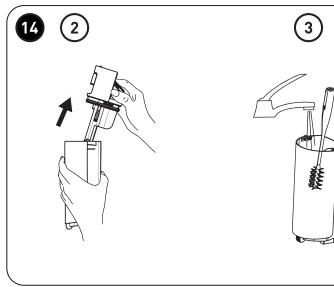
② While holding the cup, press the dirty water cup release button and pull upward to remove the cover with the dirt separator from the cup.
③ Empty the cup and clean the residues on the inner wall of the cup with the cleaning brush provided. Then, rinse the cup clean.
4 If you find blockage in the dirty water cup, rinse the cover, the float and the dirt separator with tap water.
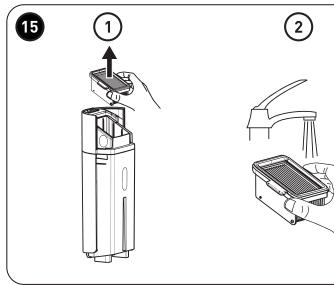
Clean the HEPA filter
15 We recommend that you clean the HEPA filter with tap water after each use.
① Remove the HEPA filter from the dirty water cup.
② Clean the filter under running tap water.
③ After cleaning, allow the filter to air dry before installing back to the dirty water cup.
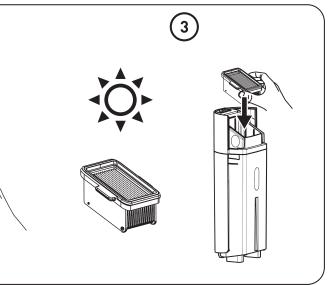
Re-attach the dirty water cup
16 After cleaning, allow the cup, the HEPA filter, the cover with dirt separator to dry.
① Place the HEPA filter back to the cover, and then place the cover back to the dirty water cup.
② Insert the dirty water cup back to the main body. Push the cup in until it clicks into place.
Clean the rolling brush cover and the rolling brush

Tips:
- We recommend that you clean and dry the rolling brush and its cover after each use.
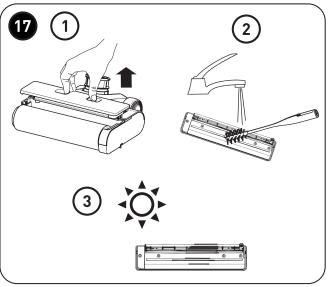
Clean the rolling brush cover
17 ① Use your thumb and forefinger together and press the release locks inward, and then pull upward to detach the cover.
② Clean the rolling brush cover with the cleaning brush provided under running tap water.
③ After cleaning, allow the cover to dry
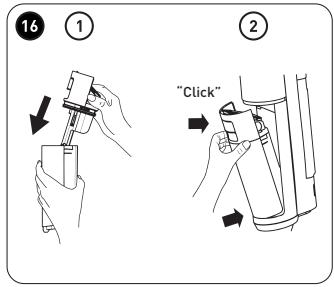
Clean the rolling brush

Tips:
- If there are residual stains on the suction nozzle, please wipe it clean with a damp cloth. Do not rinse with water.
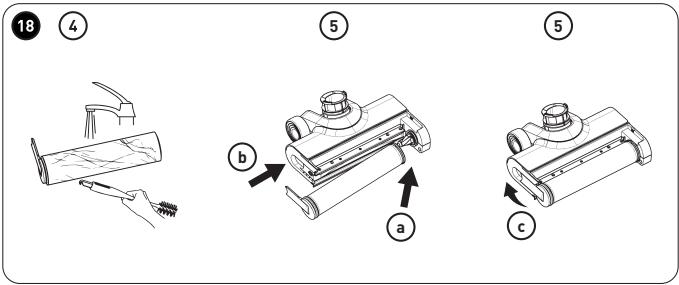
18 ① Pull the rolling brush release lock handle on the left side.
② Hold the rolling brush release lock handle and pull the rolling brush leftward to detach it from the spindle on the right side.
③ Wipe clean the rolling brush compartment with a damp cloth.
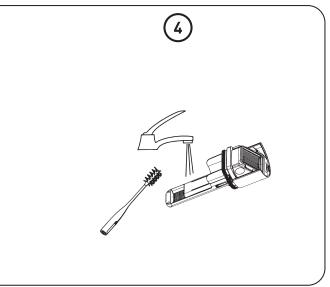
④ Use the hook end of the supplied cleaning brush to remove any tangled hair or debris from the rolling brush. Then, rinse the rolling brush under tap water.
⑤ Attach the rolling brush back to the Floorwasher.
a. Insert the right side of the rolling brush into the spindle at the right end.
b. Put the left side of the rolling brush into the left end and align with the slot.
c. Push the rolling brush release lock handle in until it clicks into place.
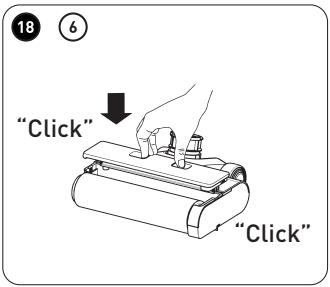
6 Attach the rolling bush cover back to the Floorwasher.
- Use your thumb and forefinger together and press the release locks inward, and then push down the cover until both sides click into place.
Troubleshooting
Use this troubleshooting guide to resolve any common problems that you may encounter with the product. If the problem persists, do not use the product and contact an authorised repair centre to have it inspected and if necessary, repaired.
| Problem | Possible Cause | Solution |
| Battery level icon LED flashing | Motor abnormal | Clean the clog in the tube and restart the appliance. |
| Appliance does not work | Out of power or low batteryThe rolling brush is entangled with objects like hair | Fully recharge the appliance before use.Clean the rolling brush. |
| Weak suction power | Dirty water has reached its designated capacityThe rolling brush or the dirty water cup may have been attached incorrectlyThe rolling brush is entangled with objects like hairThe suction nozzle is blockedThe HEPA filter mesh above the float is dirtyLow battery | Detach the dirty water cup and empty the water.Re-attach the rolling brush or the dirty water cup correctly.Clean the rolling brush.Clean the suction nozzle.Clean the HEPA filterFully recharge the appliance before use. |
| There is abnormal sound in motor operation | The suction nozzle is blockedDirty water has reached its designated capacityThe HEPA filter mesh above the float is dirty | Clean the suction nozzle.Detach the dirty water cup and empty the water.Clean the HEPA filter |
| Cannot be charged | The appliance and the charging slot are not properly contacted | Check and properly attach the appliance to the charging base. |
| No water supplied from the nozzle | Clean water cup is emptyClean water cup is not properly attached | Fill up the clean water cup.Re-attach the clean water cup correctly. |
| There is water leakage from the air outlet | Missing HEPA filterMissing float indicatorHEPA filter is not dry enough after washingDirty water has reached its designated capacity | Re-attach the HEPA filter to the dirty water cup.Re-attach the float indicator.Allow the HEPA filter to completely air-dried before re-attaching it to the dirty water cup.Detach the dirty water cup and empty the water. |
Storage
• Always unplug the product before storing it.
- Store the product in a fresh, dry and dust-free place, out of thereach of children and pets.
- Please retain the packaging and use it to store the product when it is not in use for an extended period of time.
Merci !
natural_image
Black rectangular button with a white circular icon containing an 'i' symbol (no text or numbers)
REMARQUE :
natural_image
Simple line drawing of a prohibition symbol over a droplet and bubbles (no text or labels)
natural_image
Black rectangular icon with a white lowercase 'i' symbol in the center, representing information (no text or numbers present)
REMARQUE :
C Schoonwaterreservoir
natural_image
Illustration of a prohibition symbol over a surface with scattered circles (no text or symbols)
OPMERKING:
natural_image
Simple line drawing of a circle with a diagonal slash and scattered circles around it, no text or symbols present.
natural_image
Black rounded rectangle with a white circular icon containing an 'i' symbol (no text or numbers present)
NOTA: