USER MANUAL CNF 268 E WD B625C VALBERG
This product is guaranteed for a period of 2 years from the date of purchase* against any failure resulting from a manufacturing or material defect. This warranty does not cover defects or damage resulting from incorrect installation, improper use or abnormal wear of the product.
*as shown on the sales receipt.
CONDITION DE GARANTIE
FR
Thank you for choosing this VALBERG product.
Chosen, tested and recommended by ELECTRO DEPOT,
VALBERG branded products are easy to use, reliable,
and of an impeccable standard.
With every use of this appliance, you can be sure of
complete satisfaction.
Welcome to ELECTRO DEPOT.
Visit our website: www.electrodepot.fr

Overview of the appliance
Recommended ambient temperature range
Temperature control adjustment
Appliance description

Using the appliance
Installation
Temperature indicator
Use
Maintenance and cleaning of the appliance

Practical information
Repair instructions
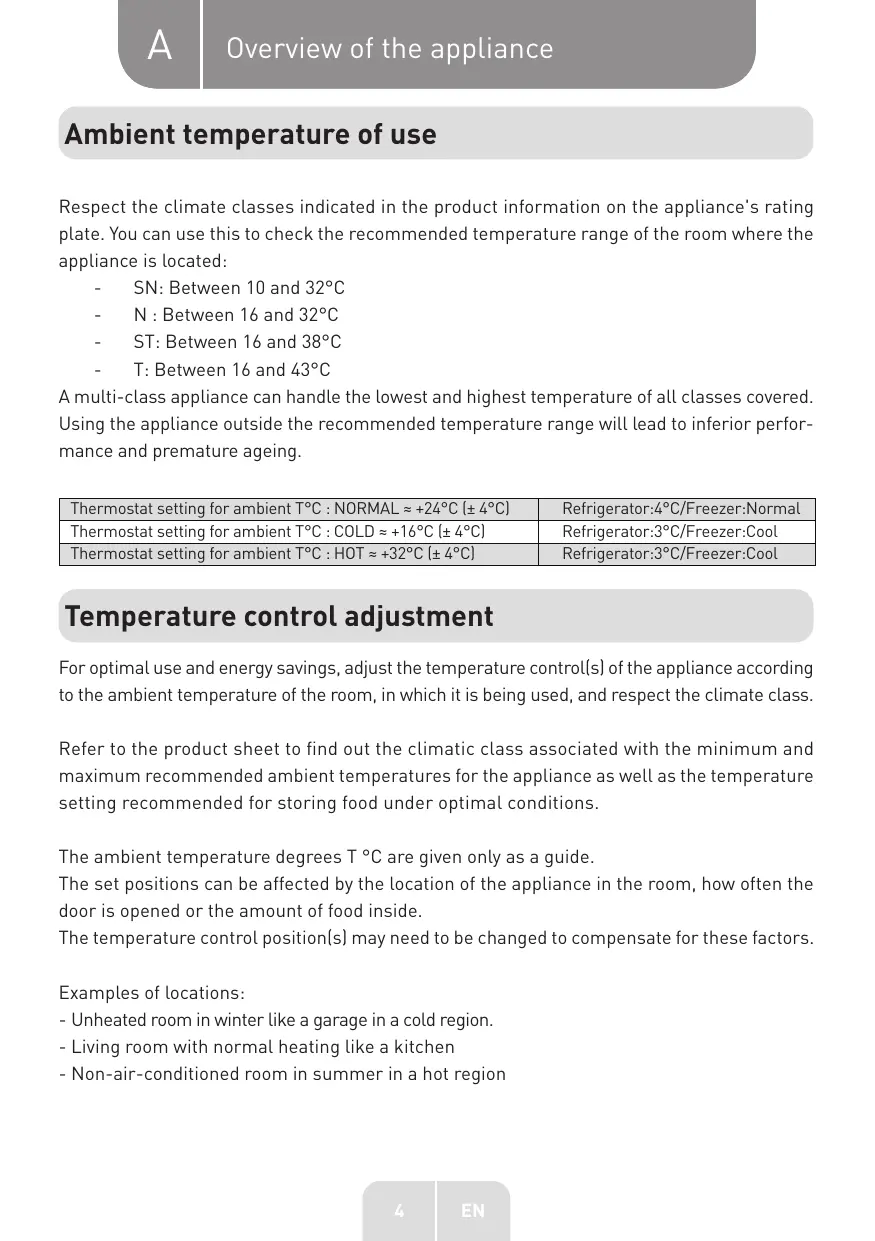
Ambient temperature of use
Respect the climate classes indicated in the product information on the appliance's rating plate. You can use this to check the recommended temperature range of the room where the appliance is located:
SN: Between 10 and 32^ C
- N: Between 16 and 32^ C
ST: Between 16 and 38^
T: Between 16 and 43^ C
A multi-class appliance can handle the lowest and highest temperature of all classes covered. Using the appliance outside the recommended temperature range will lead to inferior performance and premature ageing.
| Thermostat setting for ambient T°C: NORMAL ≈ +24°C (± 4°C) | Refrigerator:4°C/Freezer:Normal |
| Thermostat setting for ambient T°C: COLD ≈ +16°C (± 4°C) | Refrigerator:3°C/Freezer:Cool |
| Thermostat setting for ambient T°C: HOT ≈ +32°C (± 4°C) | Refrigerator:3°C/Freezer:Cool |
Temperature control adjustment
For optimal use and energy savings, adjust the temperature control(s) of the appliance according to the ambient temperature of the room, in which it is being used, and respect the climate class.
Refer to the product sheet to find out the climatic class associated with the minimum and maximum recommended ambient temperatures for the appliance as well as the temperature setting recommended for storing food under optimal conditions.
The ambient temperature degrees T^ are given only as a guide.
The set positions can be affected by the location of the appliance in the room, how often the door is opened or the amount of food inside.
The temperature control position(s) may need to be changed to compensate for these factors.
Examples of locations:
- Unheated room in winter like a garage in a cold region.
- Living room with normal heating like a kitchen
- Non-air-conditioned room in summer in a hot region
Appliance description
Thermostat and lighting adjustment
2Vent
3 Wire shelf
Vegetable drawer
5 Freezer drawers
6Shelves and water tank
7Adjustable legs
Installation
If this appliance, fitted with a magnetic closure, is intended to replace another fitted with a spring-loaded closure, we recommend that you render the latter unusable before disposal. This will prevent children from locking themselves in and thus endangering their lives.
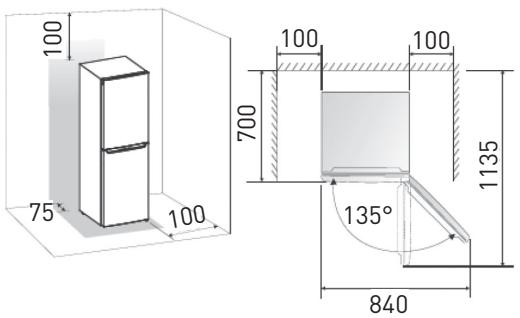
Location
- Place your appliance away from a source of heat (heating, cooking, sunlight). To ensure the correct operation of your appliance, the ambient temperature of the room must be between +16^ and +38^ (class N/ST). Outside of these limits, the appliance will no longer function normally.
- Be sure to ensure good air circulation at the back of the appliance. Do not stick it against a wall to avoid noise due to vibrations. Make sure that air can circulate freely around the appliance. Insufficient ventilation will cause malfunction and increased energy consumption.
- This appliance must be installed so that the plug is always accessible. Make sure, after installing it, that it is not resting on the power cable.
- Level the appliance using the 2 adjustable feet.
Connection to the mains
Your appliance is designed to operate under a single-phase voltage of 230 volts. It must be connected to an earthed outlet and protected by a fuse. The electrical installation must comply with the requirements of standard NF C 15-100.
Door
- You can change the opening direction of the door of your appliance by moving the hinges. When reassembling, make sure that the door is aligned with the body and that the seal adheres correctly.
- We remind you that changing the direction of the door opening must be done when the appliance is unplugged.
- Before laying the refrigerator on its back to gain access to the base, place it on foam or similar material, in order to avoid damaging the cooling circuit located at the back of the refrigerator.
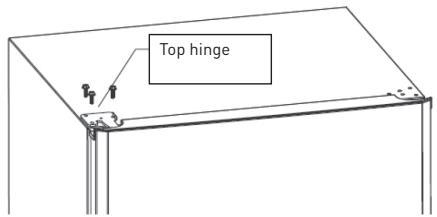
- Remove the hinge cover Loosen the screws used for fixing the upper right hinge of the door.
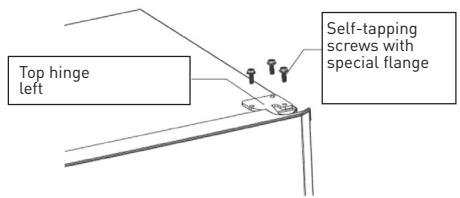
- Remove the rod from the top hinge, position it on the other side and tighten it firmly.

- Lift the lower door and place it on a surface that will not damage it.
- Loosen the screw that fixes the door stopper and install it on the left side.
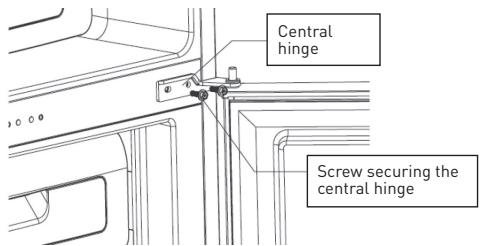
NOTE : When removing the door, make sure you do not lose the washer between the centre hinge and the bottom of the freezer door.
- Loosen the screws that secure the central hinge, then remove the central hinge that holds the lower door in place.
- Lift the lower door and place it on a surface that will not damage it.
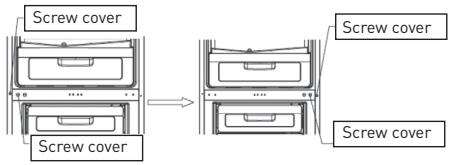
- Remove the screw covers from the left central hinge and place them over the open holes on the right side.
- Lay the refrigerator on foam or similar material, in order to avoid damaging the cooling circuit located at the back of the refrigerator.
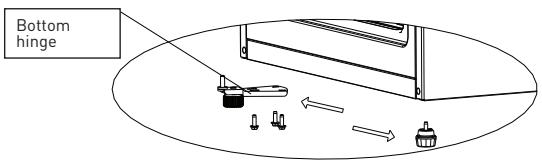
- Remove the two lower adjustable feet, then remove the lower hinge.
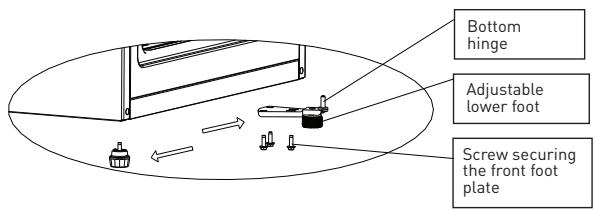
- Place the lower hinge on the left side and screw it in properly.
- Place the fixing plate on the right side and screw it down. Replace the adjustable feet by screwing them on.
- Install the lower door, making sure that it does not fall.
- Position the central hinge opposite its previous position and adjust it.
- Screw the central hinge correctly.
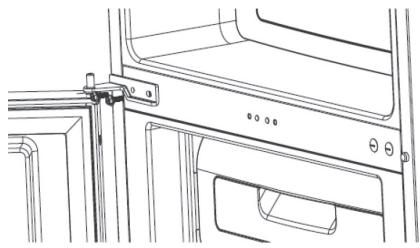
- Install the upper door, making sure that it does not fall.
- Place the top hinge and the top hinge pin in the top door hole, and adjust the position of the top door.
- Secure the upper hinge correctly with the screws.
- Replace the upper hinge cover
Temperature indicator
- To help you adjust your appliance correctly, it is equipped with a temperature indicator located in the coldest area.
- In order to properly preserve the food in the refrigerator, particularly in the coldest part, make sure that the temperature indicator shows the word "OK".
- The symbol opposite indicates the location of the coldest part of the refrigerator. It defines the top of this area.

- If "OK" does not appear, the average temperature of this zone is too high. Set the temperature regulation to a colder setting.

- Whenever the thermostat setting is changed, wait until the temperature inside the appliance has stabilised before carrying out a new adjustment, if necessary. Change the thermostat position gradually only and wait at least 12 hours before checking again.
NOTE : After loading fresh food into the appliance or after opening the door repeatedly or for a long time, it is normal that the word “OK” does not appear on the temperature indicator. Wait at least 12 hours before resetting the temperature control.
Use
Switching on
Once the appliance is correctly installed, we recommend that you clean the inside with lukewarm, slightly soapy water (washing-up liquid). Do not use abrasive products or scouring powder which could damage the finishes.
Use
Household refrigerators are intended only for domestic storage of fresh food and drinks as well as for short-term storage of frozen products.
Food safety
The increasing consumption of ready-made meals and other fragile foods requires better control of the temperature of food transport and storage:
- Store the most fragile foods in the coldest part of the appliance, in accordance with the instructions in this manual (Temperature indicator chapter).
- Limit the number of times the door is opened.
- Position the thermostat setting to lower the temperature. This adjustment must be done gradually so as not to cause the food to freeze.
- Clean the inside of the refrigerator frequently.
When switching it on for the first time, the display screen (including the indicator light of the button) will light up completely for 3 seconds and then the appliance will run on the intermediate program (program D, at a temperature of 4^ ) with the corresponding LED on.
Temperature setting
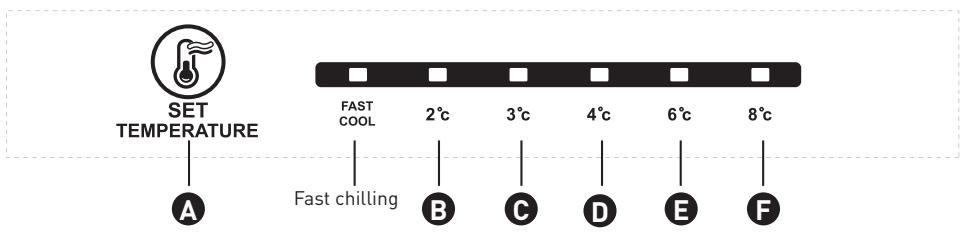
- The interior temperature is regulated via the electronic thermostat controlled by the button located inside the appliance (see "Description of the appliance", point ①).
- To change the mode or the temperature of your appliance, press the SET button. The refrigerator will go into the mode indicated if you do not press any button for 15 seconds.

Fast chilling function
This model makes it possible to obtain, for a determined period [2 hours 30 minutes], the temperature of 2^ inside the refrigerator; in order to chill food more quickly. For example after completely filled the refrigerator.
Stop the mode:
- After the refrigerator has been running for 2 hours 30 minutes on the fast chilling mode, it will return to the previous mode.
- When you select another mode, the fast chilling mode will stop automatically.
Temperature control of the freezer compartment
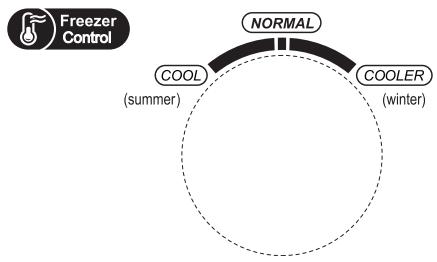
- The NORMAL position is generally used. Freezing temperature is relatively low in the COOLER position, whereas the freezing temperature is relatively high in the COOL position.
-
When the ambient temperature is high in summer, the temperature will be in the NORMAL to COOL range. If the ambient temperature is above 35^ C , then the COOL position will be the most appropriate one.
-
When the ambient temperature is low in winter, the temperature will be in the range between NORMAL and COOLER. If the ambient temperature is less than 10^ , then the COOLER position will be the most appropriate one.
Food storage
- Food preservation can be improved by placing it in the suitable location for the food type concerned.
- The coldest part of the refrigerator compartment is located at the bottom of the appliance, above the vegetable drawer.
Positioning of food:
- On the shelves: cooked foods, desserts and all foodstuffs which must be consumed quickly, cream cheeses, cold meats.
- On the vegetable drawer glass: meat, poultry, fish, Storage time of 1 to 2 days.
- In the vegetable drawer: fruit and vegetables.
- In the interior of the door: in the shelf for low volume products (cream, yoghurt, etc.). Butter and eggs will be placed in the upper shelf.
For better food hygiene:
- Remove commercial packaging before placing food in the refrigerator. (For example, yoghurt outer packaging, etc.)
- Pack foods in appropriate food grade containers to prevent bacteria exchange between foods.
- Wait for the foods to cool down before placing them in the appliance.
Water distributor
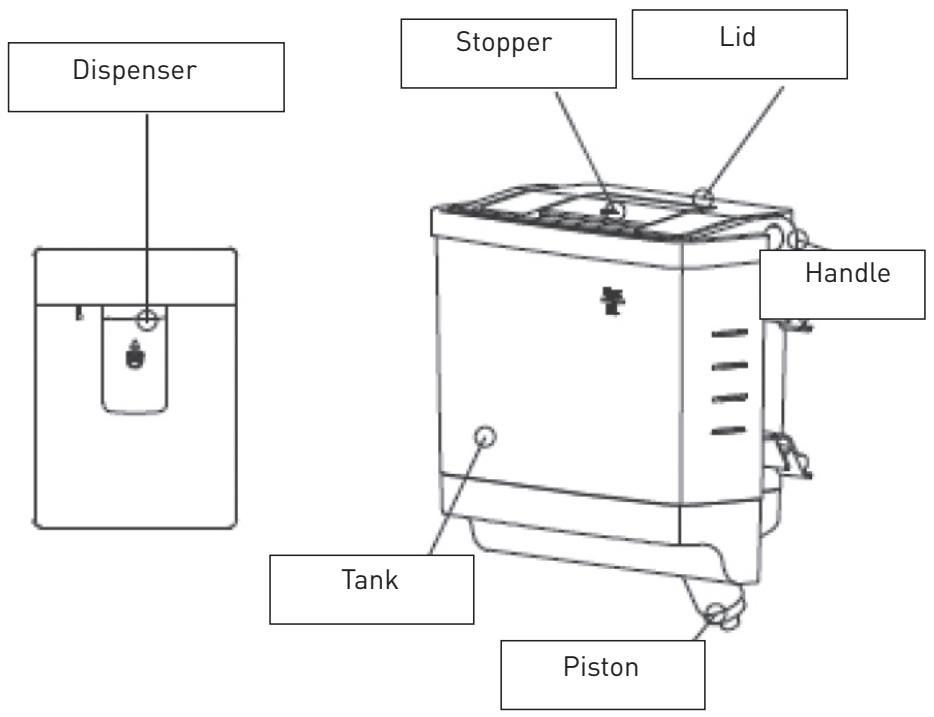
NOTE : Before using the water dispenser for the first time, lift it out carefully holding with both hands. Unscrew the spout and clean it and the tank with soap and water.
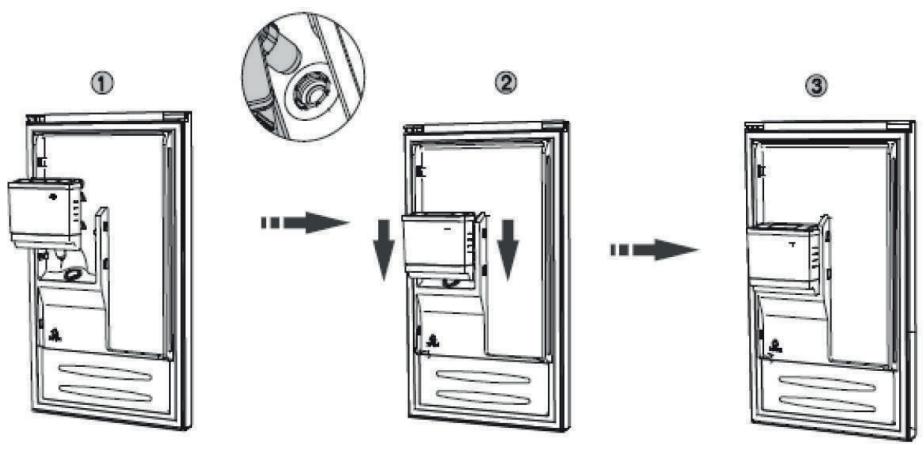
WARNING : Make sure that the spout is inserted correctly in the hole provided (1) when assembling the tank. Installing the tank in the door (2).
Check the vertical and horizontal alignment of the tank in the door (3) and (4).
FILLING
Before filling the tank, make sure that it is correctly positioned and stable. Do not exceed the 2.2 litre limit when filling the tank.
The tank can be filled by taking out the stopper and removing the lid.
WARNING : Take care not to touch any other parts when filling the tank as this could damage the water dispensing system and cause leaks.
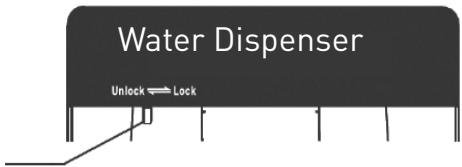
Locking
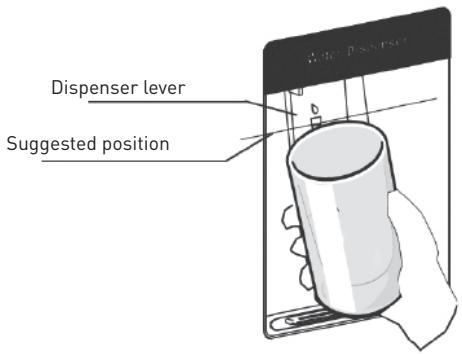
DISTRIBUTION
Make sure that the lid and stopper are correctly positioned before starting to distribute water. Water can only be distributed if the refrigerator door is closed.
Make sure that the lock is in "Unblocked" position before distribution. Water distribution is deactivated when the safety system is in "Blocked" position. This prevents children from spilling water for example.
WARNING: Do not press the lever when the dispenser is blocked as this could damage the dispenser mechanism.
NOTE : The only containers that may be used are the glasses and goblets provided.
FREEZER COMPARTMENT
To freeze fresh produce:
- Adjust the thermostat to obtain the lowest possible temperature without causing it to reach a value below 0^ in the refrigerator.
- Do not open the freezer door during a freezing operation.
- Leave the appliance in freezing mode for 24 hours, then, at the end of this time, return the thermostat button to the medium position.
Storage of frozen products
- Frozen products can be grouped together to leave free spaces for freezing.
- When you buy a frozen product, make sure that the packaging is intact, that it does not show any signs of moisture, that it is not swollen, which would indicate that it has begun to thaw.
- Do not exceed the storage period indicated by the food manufacturer.
- Do not open the door frequently or leave it open longer than absolutely necessary. Increasing the temperature can reduce the storage time of food.
Thawing
- Meats, poultry and fish must be thawed in the refrigerator to prevent the growth of bacteria. Other products can be thawed in ambient air.
- Small portions can be cooked right out of the freezer. Many ready-to-cook meals can also be cooked without defrosting them first. Always follow the advice on the packaging.
- Bread and pastries can be defrosted in a hot oven. Microwaves can be used to thaw most foods. Follow the advice in the instructions for these ovens.
NOTE: In the event of a power cut, if the appliance stops working for less than 15 hours, there is no risk of spoilage of the frozen food. However, do not open the door (the temperature rise time can significantly decrease if the appliance is not full). As soon as you notice food starting to thaw, it should be eaten as quickly as possible. Never refreeze food that has been thawed.
Maintenance and cleaning of the appliance
Defrosting
No-Frost refrigerators and freezers do not produce the formation of frost or ice, so it is not necessary to remove them.
Cleaning
- To clean the appliance, disconnect the appliance. Never use abrasive products or a sponge with a scraper for cleaning the interior or exterior of your appliance.
- Remove all accessories (shelves, door shelves, vegetable bins). Wash them in lukewarm water with a mild, odourless detergent (washing-up liquid for example), rinse with bleach and dry thoroughly.
- Wash the interior walls in the same way; pay particular attention to the cleanliness of the shelf brackets.
- Wash the door seal, remembering to clean under the seal as well.
- Reconnect the appliance.
- Clean the freezer each time you defrost it.
- From time to time, dust off the condenser at the back of the appliance; An accumulation of dust could reduce the performance of the appliance.
- In the event of prolonged absence, empty and clean the appliance; keep the door ajar when not in use.
Replacing the light bulb
This product contains a light source of energy efficiency class F.
Light source in this product can only be replaced by qualified professionals.
Please contact after-sales service if the light source fails.
The light source shall be removed at the end of the product's useful life, with sorting and recycling done separately.

Repair instructions
LED display in normal operation
- Should a malfunction occur, the corresponding LED indicator will indicate a display combined with an error code (looped display).
- During normal operation, the corresponding LED indicator is on, indicating the current operating mode of the refrigerator.
- If you have problems with your appliance or if you think that it does not work properly, there a few simple checks you can do before calling customer service by referring to the following table:
| Problems | Possible causes and solutions |
| The appliance does not work properly | ·Check that the power cable is properly connected.
·Check the fuse or circuit of your power supply and replace it if necessary.
·The ambient temperature is too low. Try to increase the room's temperature. |
| Smells in the drawers | ·The interior may need to be cleaned.
·Some foods, containers or packaging may cause odours. |
| The appliance makes a noise | ·The following noises are quite common:
- Working compressor noise.
- Clicking noise before the compressor starts.
·Other unusual noises due to the following reasons may require your intervention:
- The appliance is not level.
- The back of the appliance touches the wall.
- Bottles or containers roll or fall. |
| The motor runs constantly | ·It is normal to hear the sound of the motor frequently. It should run even more frequently under the following circumstances:
- The temperature settings are cooler than necessary.
-A large amount of hot food has recently been stored in the appliance.
-The temperature outside the appliance is too high.
-The doors are open too long or too often.
-If you have just installed the appliance or if you turn it on again after a long period of non-use. |
| A layer of frost develops in the compartment | ·Make sure that food is placed in the appliance in such a way as to allow sufficient ventilation. Check the door is closed. If you intend to defrost it, please refer to the “Cleaning” section. |
| The interior temperature is too high | ·You may have left the doors open too long or too frequently. It is also possible that the doors remain open because of an obstacle; or there is not enough space around the appliance. |
| The interior temperature is too low | ·Increase the temperature, referring to the “Appliance controls” chapter. |
| The doors are not closing properly. | ·Check that the top of the refrigerator is tilted backwards by 10 to 15 mm, in order to allow the doors to close automatically, or that there is no object inside preventing the doors from closing. |
| Water is running on the ground | ·The water tank (located at the back of the refrigerator) may not be level or the drain trap (located under the top of the compressor) is not pointing properly towards this tank or is blocked. You may need to pull out the refrigerator to check the tank and drain tap. |
| The light is not working | ·The light can be damaged. Refer to the chapter on cleaning and maintenance to replace the lights. |
Merci!