XLB510BK - Micro system SHARP - Free user manual and instructions
Find the device manual for free XLB510BK SHARP in PDF.
| Product type | Micro hi-fi system with CD player, FM radio, Bluetooth, USB, AUX input |
| Brand | SHARP |
| Model | XLB510BK |
| Power supply | AC 220-240 V~ 50 Hz |
| Power consumption | 28 W |
| Standby power consumption | < 0.5 W |
| Output power | 2 x 7 W (RMS) |
| Speaker impedance | 8 Ω |
| Frequency response | 60 Hz - 20 kHz |
| FM radio | Range 87.5 - 108 MHz, 40 presets |
| Bluetooth | Version 2.1 + EDR, range up to 7 m, transmitted power < 20 dBm |
| CD player | Supported formats: CD, CD-R, CD-RW, MP3, WMA |
| USB port | Playback of MP3/WMA files, compatible up to 64 GB, format FAT/FAT16/FAT32 |
| Auxiliary input | AUX IN socket (3.5 mm jack) |
| Remote control | Batteries: 2 x AAA 1.5 V (included) |
| Main unit weight | 1.75 kg |
| Weight of speakers (each) | 0.95 kg |
| Audio functions | Bass/treble adjustment, DSP equalizer (Classic, Rock, Pop, Jazz, Dance, Live), Loudness, Mute |
| Auto standby | After 10 minutes of inactivity |
| Safety | Class 1 laser, automatic shutdown in case of storm (recommendation) |
| Maintenance | Clean with a soft, dry cloth; do not use chemical products |
Frequently Asked Questions - XLB510BK SHARP
User questions about XLB510BK SHARP
0 question about this device. Answer the ones you know or ask your own.
Ask a new question about this device
Download the instructions for your Micro system in PDF format for free! Find your manual XLB510BK - SHARP and take your electronic device back in hand. On this page are published all the documents necessary for the use of your device. XLB510BK by SHARP.
USER MANUAL XLB510BK SHARP
Important safety instructions
Please, read these safety instructions and respect the following warnings before the appliance is operated:

The lightning flash with arrowhead symbol, within an equilateral triangle, is intended to alert the user to the presence of uninsulated "dangerous voltage" within the product's enclosure that may be of sufficient magnitude as to constitute a risk of electric shock to persons.

The exclamation point within an equilateral triangle is intended to alert the user to the presence of important operating and maintenance (servicing) instructions in the literature accompanying the appliance.

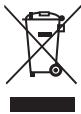
This symbol means that the product should be disposed of in an environmentally friendly manner and not with general household waste.
\~
AC voltage
DC voltage
□
Class II equipment
In order to prevent fire always keep candles and other open flames away from this product.

Warning:
- Always follow basic safety precautions when using this appliance, especially when children are present.
- Children should be supervised to ensure that they do not play with the appliance.
- Do not damage the power cord, neither do not place any heavy objects on it, do not stretch it or bend it. Also do not attach extension cables. Damage to the power cord may occur fire or electric shock.
- If the supply cord is damaged, it must be replaced by the manufacturer, a service agent or similarly qualified persons in order to avoid a hazard.
- Ensure that the unit is plugged into an AC 220-240V 50Hz power outlet. Using higher voltage may cause the unit to malfunction or even fire catching.
- If the power plug does not fit into your outlet, do not force the plug into an electrical socket if it does not fit.
- Turn off the unit before unplugging it from power source to completely switch it off.
- Do not disconnect or connect the power cord with wet hands. It may cause an electric shock.
- Disconnect the power cord if it is not used for a long time.
- Ensure that the mains plug is always easily accessible.
- This product does not contain any parts that are serviceable by the user. In case of a fault, contact the manufacturer or authorised service department. Exposing the internal parts inside the device may endanger
your life. The manufacturers guarantee does not extend to faults caused by repairs carried out by unauthorised third parties.
- Do not use this product immediately after unpacking. Wait until it warms up to room temperature before using it.
- Ensure this product is used in moderate climates only (not in tropical/ subtropical climates).
- Place product on a flat, stable surface that is not subject to vibrations.
- Ensure the product and its parts is not overhanging the edge of the supporting furniture.
- To reduce the risk of fire, electric shock or damage to this product, do not expose it to direct sunlight, dust, rain and moisture. Never expose it to dripping or splashing and do not place objects filled with liquids on or near the product.
- Do not place objects filled with liquids, such as vases, on the apparatus.
- Do not install near any heat sources such as radiators, heat registers, stoves, or other apparatus (including amplifiers) that produce heat.
- Do not place the product where the humidity is high and ventilation is poor.
- Ensure a minimum distance of 5cm around the apparatus for sufficient ventilation. Do not block any ventilation openings of this product. Always ensure that the ventilation openings are not covered with items such as newspapers, table-cloths, curtains, etc.
- NEVER let anyone, especially children, push anything into holes, slots or any other openings in the unit's casing as this could result in a fatal electric shock.
- Storms are dangerous for all electric appliances. If the mains or aerial wiring is struck by lightning, the appliance might get damaged, even if it is turned off. You should disconnect all the cables and connectors of the appliance before a storm.
- Excessive sound pressure from earphones and headphones can cause hearing loss.
- Do not move the unit during disc playback. During playback, the disc rotates at high speed. Do not lift or move the unit during playback, as doing so may damage the disc or the unit.
- Do not turn up the volume while listening to a section with very low level inputs or no audio signals. If you do, the speaker maybe damaged when a peak level section is suddenly played.
Maintenance
- Unplug the power cable from the power source before cleaning the appliance.
- Use a soft and clean rag to clean the outside of the unit. Never clean it with chemicals or detergent.
Batteries
- Observe the correct polarity when inserting the batteries.
- Do not expose batteries to high temperatures and do not place them on locations where the temperature might increase quickly, e.g. near the fire or on the direct sunshine.
- Do not expose batteries to excessive radiant heat, do not throw them into the fire, do not disassemble them and do not try to recharge un-rechargeable batteries. They could leak or explode.
- Never use different batteries together or mix new and old ones.
- When the Remote Control is not to be used for a long time (more than a month), remove the battery from the Remote Control to prevent it from leaking.
- If the batteries leak, wipe away the leakage inside the battery compartment and replace the batteries with new ones.
- Do not use any batteries other than those specied.
Do not ingest battery, chemical burn hazard
- If the battery is swallowed, it can cause severe internal burns in just 2 hours and lead to death. Keep new and used batteries away from children. If the battery compartment does not close securely, stop
Cd
using the product and keep it away from children. If you think batteries might have been swallowed or placed inside any part of the body, seek immediate medical attention.
Disposal of this equipment and Batteries
- Do not dispose of this product or its batteries as assorted municipal waste. Return it to a designated collection point for the recycling of WEEE in accordance with local law. By doing so, you will help to conserve resources and protect the environment.
- Most of the EU countries regulate the disposal of batteries by law. Contact your retailer or local authorities for more information.
- The shown above appears on electrical and electronic equipment and batteries (or the packaging) to remind users of this. If "Hg" or 'Pb' appears below the symbol, this mean that the battery contains traces of mercury (Hg) respectively.
- Users are requested to use existing return facilities for used equipment and batteries.

CAUTION:
- Appliances with built in CD player are marked with this caution label
THIS UNIT IS A CLASS 1 LASER
PRODUCT. THIS UNIT USES A VISIBLE LASER BEAM WHICH COULD CAUSE HAZARDOUS RADIATION EXPOSURE IF DIRECTED. BE SURE TO OPERATE THE
PLAYER CORRECTLY AS INSTRUCTED. WHEN THIS UNIT IS PLUGGED INTO THE WALL OUTLET, DO NOT PLACE YOUR EYES CLOSE TO THE OPENINGS TO LOOK INTO THE INSIDE OF THIS UNIT.
- USE OF CONTROLS OR ADJUSTMENTS OR PERFORMANCE OF PROCEDURES OTHER THAN THOSE SPECIFIED HEREIN MAY RESULT IN HAZARDOUS RADIATION EXPOSURE.
- DO NOT OPEN COVERS AND DO NOT REPAIR YOURSELF. REFER SERVICING TO QUALIFIED PERSONNEL.
CE Statement:
- Hereby, UMC Poland Sp. z o.o. declares that this audio device is in compliance with the essential requirements and other relevant provisions of RED Directive 2014/53/EU. The full text of the EU declaration of conformity is available by following the link http://www-strong.eu/av/documents-of-conformity
Trademarks:

Bluetooth
The Bluetooth word mark and logos are registered trademarks owned by Bluetooth SIG., Inc.
What is included in the box
1 x Main unit
2 x Speaker
1 x Remote control
2x AAA battery
1 x User guide
1 x Quick start guide
1 x EU power cord
Panels & Controls
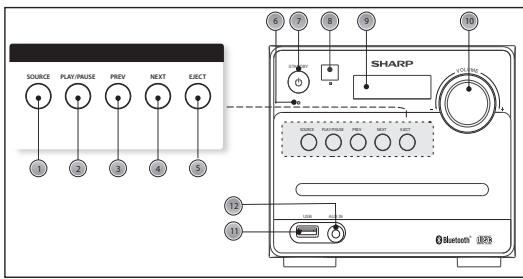
Front panel
- SOURCE button: Press to select the modes.
- PLAY/PAUSE button: Press to pause or play the music.
- PREVIOUS button: Press to skip to the previous song/station.
- NEXT button: Press to skip to the next song/station.
- EJECT button: Press to pop out the disc drawer.
- Power Indicator: Indicate the status.
- STANDBY button: Press to set to standby mode or turn on.
-
Remote Sensor: Point the remote control to the sensor within 7 meters.
-
Display Screen: Display the station information.
- VOLUME+/- knob: Turn to adjust the volume level.
- USB Port: Used to connect with the USB flash disk.
- Audio Input Socket: Used to connect external audio sources.
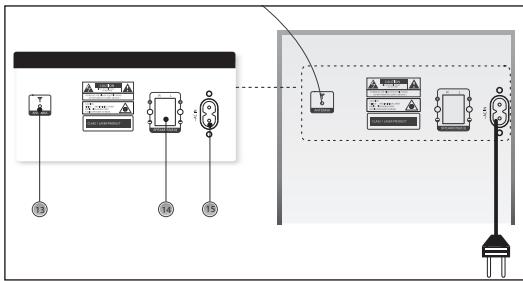
Rear panel
- FM Antenna: To receive the FM signal.
- Speaker Terminals: Connect the speakers to the main unit.
- Power socket Connect the power cord to the power supply.
Remote control
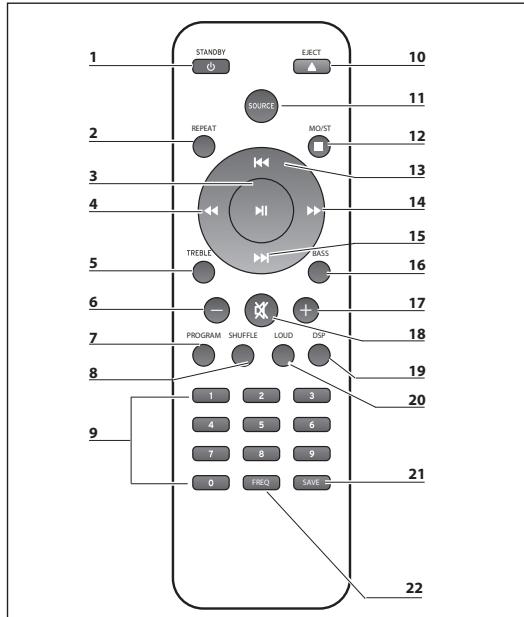
- STANDBY: Press this to turn on the unit or enter Standby mode.
- REPEAT: Press this to repeat the song.
- PLAY/PAUSE: Start/ Pause playback.
- FAST REWIND: Press this to fast-rewind the track that is currently playing.
- TREBLE: Press this button to adjust the treble, use the + or - buttons to increase/decrease the treble.
- VOLUME- : Press this to decrease volume.
- PROGRAM: Use this to program the playback order.
- SHUFFLE: Press this to play music in the random order.
- NUMBER (0-9): Go to storage location, enter frequency, select track
- EJECT: Press this to pop out the disc drawer
- SOURCE: Select mode of operation: CD, FM, USB, Bluetooth® (BT), AUX
- STOP/MO/ST: Stop playback, switch between mono and stereo while in FM mode.
- PREVIOUS: Press this to skip to the previous track.
- FAST FORWARD: Press this to fast forward the track that is currently playing.
- NEXT: Jump to next track/ station.
- BASS: Press this button to adjust the bass, use the + or - buttons to increase/decrease the bass.
- VOLUME+: Press this to increase volume.
- MUTE: Press once to mute the sound, press again to unmute. You can also unmute by pressing the volume control buttons.
- DSP: Press this to select the sound equalizer.
- LOUD: Press LOUD to increase the level of bass at low volume levels.
- SAVE: Press to save your favourite stations.
- FREQ: Frequency, in FM mode, press to enter your favourite frequency.
Fitting or replacing the remote control batteries
- Push the catch on the battery cover in the direction of the embossed arrow on the rear of the remote.
-
While pushing the catch, open the battery cover.
-
Fit two batteries observing polarity +, - as shown.When replacing the batteries, use only the same type of battery supplied.
- Re-fit the battery cover and clip it in place.
Preparation for use
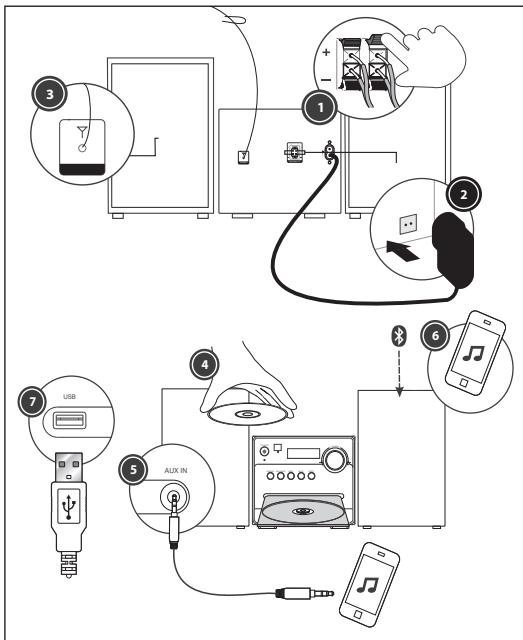
- Place a speaker on either side of the main unit, preferably at the same height and with at least 150mm space between each speaker to the main unit.
Connect the speaker plugs to the rear of the unit. Take care to match the speaker placed to the LEFT to the LEFT output on the rear of the unit. Repeat for the RIGHT speaker.
The LEFT RED cable connects to the LEFT RED terminal, the RIGHT RED cable to the RIGHT RED terminal. Both BLACK cables connect to the corresponding BLACK terminals. - Please ensure that the voltage marked on the rating label, located on the rear panel, is the same as the voltage in your area. Choose a suitable Power Cord, insert the end of the cord into the Power Socket on the rear panel of the unit. Then plug the other end of the cable in to the wall socket.
- Press the STANDBY button on the main unit to turn ON the unit. Extend the ANTENNA to get the best reception. Press the SOURCE button to enter the FM mode. To use the radio in FM mode, follow the instructions in the FM RADIO OPERATION chapter of the User manual.
- Press the SOURCE button to enter the CD mode. Press the EJECT button to open the disc drawer and insert a disc. Press the EJECT button again to close. The CD will begin playing from the first track.
- Press the SOURCE button to enter the Aux In (Audio) mode. Connect your audio device to the AUX IN socket via a 3.5mm aux in cable. Control playback via your connected audio device.
-
Press the SOURCE button to enter the Bluetooth mode. Activate the Bluetooth enabled device and select the "SHARP XL-B510". Select the song you want and press to play.
-
Press the SOURCE button to enter the USB mode. Plug the USB device to USB port on the front panel of the unit, and it will read the USB and play automatically.
BASIC FUNCTIONS
Switching modes
To switch between the modes: CD, FM, Bluetooth, USB and AUX IN. Press SOURCE button on the unit or the remote control to switch modes.
Volume control
- Rotate the VOLUME control clockwise or press the ^+ button to increase the volume level.
- Rotate the VOLUME control anti-clockwise or press the " - " button to decrease the volume level.
DSP effects
Press the DSP button repeatedly to cyclethrough a set of equalizer presets to alter the sound. Choose from CLASSIC, ROCK, POP, JAZZ, DANCE, LIVE and Off.
Loudness function
This function will increase the level of bass at low volume levels. Press the LOUD button on remote to enable the effect. Press again to disable the effect.
Mute function
Press the button at any time to mute the sound output. Press again to unmute.
Tone controls
Adjust the bass and treble tone controls if required.
Press the BASS or TREBLE button on remote control directly to select bass or treble, then use the" ^+ "or"-" buttons to adjust.
Standby mode
Press the STANDBY button on the unit or the remote to put the system into standby mode. To resume normal operation, press this button again.
NOTE: This unit is designed to enter STANDBY mode automatically, after about 10 minutes (approximately) of inactivity. Press STANDBY button to wake the unit.
NOTE: When you power on the unit from standby, the last used mode will resume.
FM radio operation
- Press the SOURCE button on the panel or the remote control to enter the FM mode. (FM frequency: 87.50-108.00MHz)
- Press the buttons on remote control to decrease or increase the frequency in 0.05MHz increments.
- Press and hold the PREV/NEXT buttons on the panel or the / buttons on remote control to scan through the frequency range quickly. The scan will stop once it has found a station.
- Press and hold the button to scan through the frequency range quickly; it will store any stations found automatically.
5. SAVE a station:
You can store up to 40 FM stations in memory.
- Press the FREQ button and then, using the number buttons enter the frequency that you want to store.
- Press the SAVE button, it will show "P01" on the display.
Press the button to select through the station number you want to save. -
Press the SAVE button again to confirm.
-
Recall the preset stations:
-
Press the!按钮 to recall your stored stations.
CD operations
- Press the SOURCE button on the panel or the remote control to enter the CD mode. Press the EJECT button to pop out the disc drawer, put a CD on, then press the EJECT button again.
- Press the button to pause or play the song.
- Press the STOP/MO/ST button on remote control to stop playing, press the button to re-start.
- Press the PREV/NEXT button or I▶按钮 on remote control to skip to the previous or next song.
- Press the button on remote control to fast forward or fast rewind the playback, press repeatedly to resume normal speed.
-
To directly select a specific song press the number buttons 0-9 on remote control. Example:
-
If the track number consists of two digits, for example25, press button "2", and then button "5" to select the 25th track.
- If the track number is a one digit number, for example 9, press "0" first, then "9" to skip to the 9th track.
7. REPEAT button:
While in playing mode, press the REPEAT button to set repeat mode.
- For CD and CD-R discs, press the REPEAT
button to repeat playing songs. - Press once to repeat current song. Press again to repeat all tracks.
-
Press a third time to cancel.
-
Press the SHUFFLE button on remote control to play the disc in random order. Press again to resume.
-
You can set the disc played in a programmed order:
-
Press the STOP/MO/ST button on remote control to stop playing.
- Press the PROGRAM button on remote control. The screen displays: P01.
- Press the number buttons on remote control to select the tracks to program.
- Press the buttons on remote control to skip between the program tracks.
- Press the PROGRAM button on the remote control to confirm.
- To begin the programmed order, press the button.
- To cancel the program sequence, press the STOP/MO/ST button twice.
Notes:
- MP3 and WAV formats are supported.
-Unsupported file formats are skipped. For example, Word documents (.doc) or MP3 files with extension.dlf are ignored and not played.
Bluetooth Operation
The Micro system has Bluetooth capability and is able to receive a signal within 7 meters. To pair the Micro system with a Bluetooth device:
- Press the SOURCE button repeatedly to enter the Bluetooth mode, the "bt" message appear and flash on the display.
-
Activate your Bluetooth device and select the search mode.
-
Select "SHARP XL-B510" from the search list and connect.
- Enter "0000" for password if prompted.
- When the devices are connected to each other, a confirmation sound will be made. "bt" will stop flashing in the display.
- Now you can enjoy the music from your device.
- To turn off the Bluetooth function, switch to another function on the Micro system, or disable the function on your Bluetooth device.
Connect other audio devices
Audio allows your unit quickly and easily to connect to an MP3 player or other external sources.
- Use a 3.5mm audio cable to connect your external audio device to the AUX IN socket on the front panel.
- Connect the Micro System mains plug to the power supply.
- Press the SOURCE button to switch to the AUX IN mode.
- You may need to operate the external audio device directly for playback features.
- For optimum volume levels, adjust the volume on the external audio device.
USB Operation
It is possible to listen to the music using the USB device interface of the unit.
Connecting a USB device:
- Switch the unit on and select USB mode by pressing the SOURCE button.
- Connect the USB device to the USB connection socket on the front panel of the unit.
- The radio will now play songs which are saved on the USB device.
Notes:
- MP3 and WAV formats are supported.
-Unsupported file formats are skipped. For example, Word documents (.doc) or MP3 files with extension.dlf are ignored and not played - Even when the files are in a supported format (MP3), some may not play or display depending on the compatibility.
- In some case, reading may be as long as 60 seconds, this is not a malfunction.
Depending on the amount of data and media speed, it may take longer for the unit to read the USB device. - The maximum USB memory size is 64GB.
- USB memory device must be formatted in FAT, FAT16 or FAT32
Troubleshooting
No Power
Reason
- Power cable not connected to wall socket
- Power socket is not switched on
Solution
Make sure the plug is connected
- Switch the power on
No Sound CD/AUX/RADIO
No Sound from AUX input
Reason
Volume is too low
AUX source volume is too low
Solution
- Increase the volume
- Increase the output volume of the AUX source
Sound is distorted
Sound is distorted from AUX Input
Reason
Volume is too high
AUX source volume is too high
Solution
- Reduce the volume
- Reduce the output volume of the AUX source
Unable to play CD
Reason
- No disc in the tray
- Disc not loaded properly
Disc is dirty
Solution
- Insert a compatible disc
- Check the disc loaded
Clean the disc
Static Sound
Reason
Solution
Poor reception
- Re-locate the antenna (FM)
Desired station not found
Reason
- Weak signal
- Station not available in your area
Unit switches off after 10 minutes of inactivity
Reason
- Auto standby mode in operation
Solution
- This unit is designed to enter STANDBY mode automatically after 10 minutes of inactivity. Press the STANDBY button to wake up the unit.
Technical specification
| Model | XL-B510 |
| Radio Signal | 87.5-108MHz |
| Power Supply | AC 220-240V~ 50Hz |
| Power Consumption | 28 W |
| Standby Power Consumption | <0,5 W |
| Output Power | 2 x 7 W (RMS) |
| Impedance | 2 x 8 Ω |
| Frequency Response | 60Hz - 20KHz |
| Bluetooth | |
| Version | V 2.1 + EDR |
| Maximum power transmitted | <20 dbm |
| Frequency bands | 2402 MHz ~ 2480 MHz |
| CD player | |
| Disc format | CD, CD-R, CD-RW, MP3, WMA |
| Remote Control | |
| Battery Type | 2x AAA / 1.5V |
1,75kg
0,95kg
CLASS 1 LASER PRODUCT


LASERPRODUKT DER KLASSE 1
CLASS 1 LASER PRODUCT
CLASS 1 LASER PRODUCT
PRODUIT LASER CLASSE 1
CLASS 1 LASER PRODUCT
Contenu de la boîte
UMC Poland Sp. z o.o.
Ostaszewo 57B, 87-148 Lysomice,
Poland
Made in China
SAU/MAN/0025