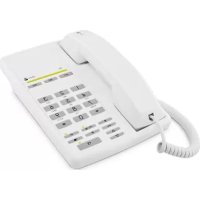
1015CS - Phone DORO - Free user manual and instructions
Find the device manual for free 1015CS DORO in PDF.
| Product Type | Wired phone with SMS function |
| Dimensions (approx.) | 220 x 180 x 60 mm |
| Weight (approx.) | 600 g |
| Power supply | AC adapter included |
| Phonebook | 100 entries (name, number, email, melody) |
| Direct memory | 10 keys for speed dial |
| Call log | 100 entries (incoming and outgoing calls) |
| SMS messaging | Compose, send, receive (160 characters max) |
| Display | LCD screen, adjustable contrast |
| Volume adjustment | Adjustable ringer and handset volume |
| Secret function | Mute microphone during call |
| Hearing aid compatible | Yes (T position) |
| Customization | Modular design, wall mountable |
| Display languages | French, English, German, etc. (13 languages) |
| Care and cleaning | Clean only with a soft, dry cloth |
| Safety | Compliant with EN 60950, EN 55022, EN 55024 standards |
| Warranty | 1 year from date of purchase |
| After-sales service | Contact your retailer or DORO |
Frequently Asked Questions - 1015CS DORO
User questions about 1015CS DORO
0 question about this device. Answer the ones you know or ask your own.
Ask a new question about this device
Download the instructions for your Phone in PDF format for free! Find your manual 1015CS - DORO and take your electronic device back in hand. On this page are published all the documents necessary for the use of your device. 1015CS by DORO.
USER MANUAL 1015CS DORO
English (see pages 4-25)
1 Recall (R)/Left scroll button
2 Menu Button
3 Up/Down scroll buttons
4 Call list
5 Mute/Right scroll button
Adapt your telephone the way you want it!
This modular product offers several interesting installation possibilities.
It can be easily converted into a wall telephone, you can move or reposition the cradle, the cable can be fitted in either direction, and the front fascia of the handset can be changed.
Various accessory modules are also available, please contact DORO or your retailer for more information.
Please refer to the illustrations on page 19 on how to fit and remove the modules.
Always disconnect the telephone line before the contact plug.
The illustrations show 1015CS.
Always disconnect the telephone line before the contact plug.
Positioning cradle and cable
Select the cradle position (right or left-hand side) and cable routing (back or front) to suit your installation.
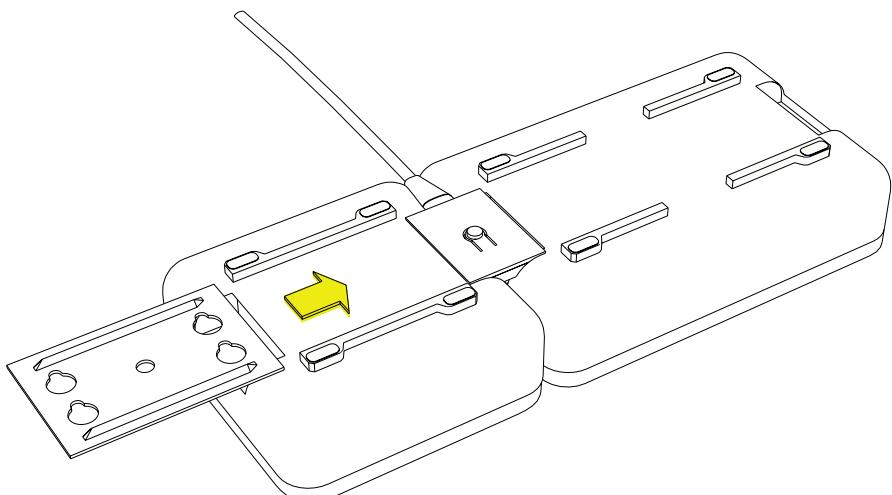
- Locate the metal retaining plate holding the modules in place, press down on the tab in the middle of the plate and push sideways to remove.
- Unplug the cradle from the module.
- Decide on the position of the cradle and cable routing for your installation.
- If necessary remove any protective socket cover from the cradle or telephone module
- Connect the cradle and telephone modules using the cable contact plug.
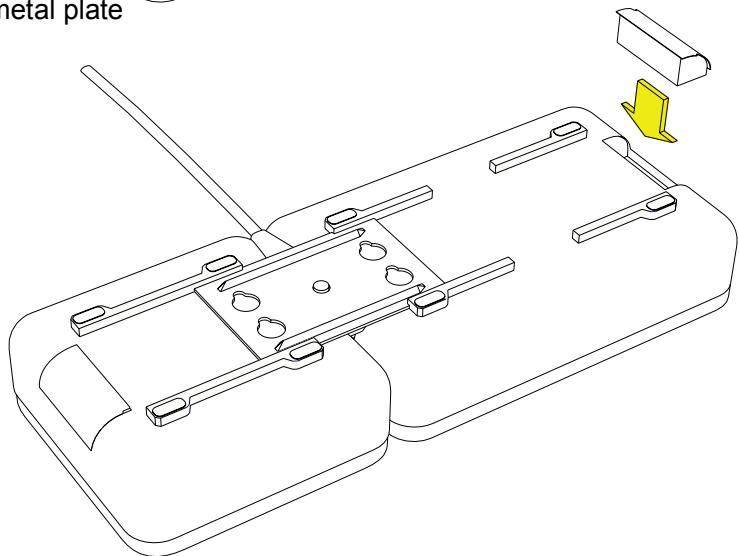
- Slide the metal retaining plate into the locating grooves by pushing sideways.
- Fit any remaining protective covers to exposed contact sockets.
Connection
- Ensure the cable contact plug has been correctly fitted to the cradle and dialler module, and the metal retaining plate covers both units equally.
- Connect the handset curly cord to the socket on the cradle module.
- Connect the mains adaptor to an electrical wall socket, and the line cord to a telephone network socket
- Lift the handset and listen for the dial tone.
Installation
Wall mounting
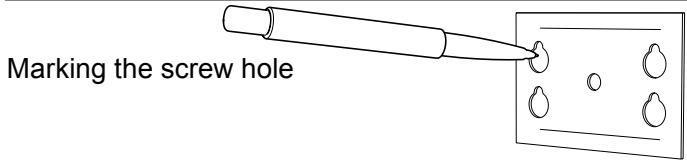
Prior to assembly the metal retaining plate can be used to mark the screw positions on any flat vertical surface. See page 22.
- Ensure the wall cradle has been fitted to the dialler module, see above.
- Check there are no hidden cables or pipes prior to drilling and fixing the 2 mounting screws. Leave the screw heads protruding slightly.
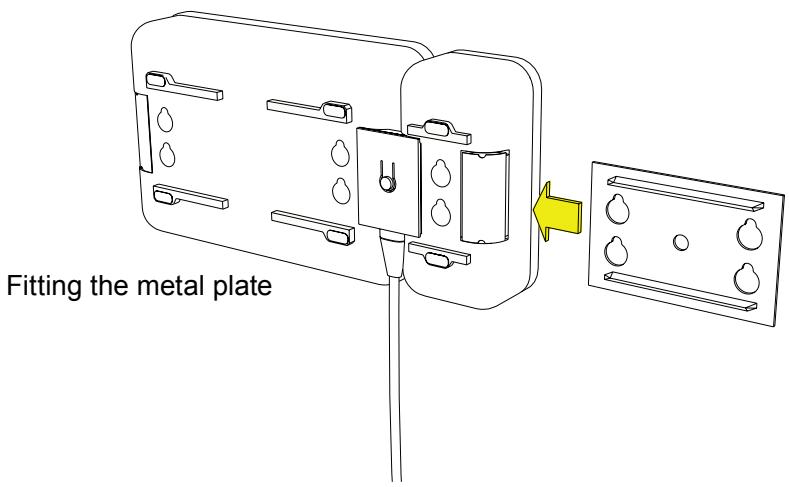
- Position the metal retaining plate/telephone over the screws and slide the unit downward into place.
Important!
Please note when programming all references to press = to press once and then immediately release the button.
Language selection
The display messages can be shown in several different languages (English, French, German, Finnish, Polish, Norwegian Swedish, Danish, Turkish and Italian).
- Do NOT lift the handset. Press Menu.
2.Scroll to Settings using / .Press Select. - Scroll to Language using / . Press Select.
- Scroll using / to the required language. Press Select to save your settings.
Country selection
Your country of operation can be selected from one of the following - UK, Finland, Poland, Norway, Sweden, Denmark, Australia, New Zealand, France, Turkey and Switzerland.
- Do NOT lift the handset. Press Menu.
- Scroll to Settings using / . Press Select.
- Scroll to Country using / . Press Select.
- Scroll to the required country using / . Press Select to save your settings.
Installation
Setting the Time and Date
- Do NOT lift the handset. Press Menu.
2.Scroll to Settings using / .Press Select. - Scroll to Date & Time using / Press Select.
- Scroll to required setting using / . Press Select and follow any on screen prompts..
Set time: Enter the current time using the number keys.
Time format: Select 12 or 24 hour display
Set date: Enter the current date using the number keys.
Date format: Select the date display as day/month or month/day.
- Press OK to save your settings.
Operation
Mute button
The handset microphone can be muted during a call by pressing , will be displayed while this function is active. Press again to reactivate the microphone.
Volume control
The handsets earpiece volume can be adjusted during a call.
- Press Volume.
- Select the desired earpiece volume using /
- Press OK to store your selected setting.
Timer
Upon connection of a call a call timer will be shown on the display. The timer is a simple way to help you keep track of how long the call lasts.
Making a call
Lift the handset and wait for dial tone, then dial the required telephone number. Alternatively to pre-dial.
- Enter the required telephone number. Mistakes can be erased using Clear.
- Lift the handset or press OK and then lift the handset.
Temporary ringer mute/off
The ringer can be temporarily muted on incoming calls. While the unit is ringing Ignore will be displayed, press the button next to this and the telephone will return to standby mode.
The ringer will remain muted until the next time the handset is lifted.
Hearing aid compatible
This telephone is hearing aid compatible. Select the T mode on your hearing aid to enable this feature.
Network
Network
The most common additional network services are pre-programmed in the unit, the functions available depend on the country selected. Refer to Country selection on page 5.
In standby mode
- Do NOT lift the handset. Press Menu.
- Scroll to Supplier Services using / . Press Select.
- Scroll to the required service using / . Press Select.
- Follow any on screen prompts.
In call mode
- Press Supplier Services.
- Scroll using / to the required service. Press OK.
Please note!
The services programmed are those of the main network operator for each country. Ensure the correct country selection has been made (see page 5).
Some additional network services may require subscription or be turned off; for further information on network services contact your local network operator.
Memory
Using the Phonebook
The phone book can store 100 sets of names and telephone numbers. If you subscribe to a Caller ID service, the name (for those numbers stored in the Phonebook) and number of the caller will be shown when you receive an incoming call.
Entries in the Phonebook are arranged alphabetically and can be up to 20 digits or 20 characters in length.
If you subscribe to a caller ID service you can select different ringer melodies for the numbers saved in the Phonebook.
Please note!
If SMS protocol 2 is used, fax number and e-mail addresses can be stored in the phone book, but can in that case only be sent with the SMS functionality with operators using protocol 2.
Letters
Each number button has been allocated specific letters/characters.
Press the corresponding number button one or more times for the required letter/character, press and hold button key for three seconds to switch between upper and lower case.
The cursor can be manually moved using either / .
Button Letters/symbols 1. .?!, " ' ) < = 2. A B C 2 Å Å à A E @ β C 3. D E F 3 É è 4. G H I 4ì 5. J K L 5 6. M N O 6 ñ ò ò 7. P Q R S 7 β 8. T U V 8 Ü ÷ 9. W X Y Z 9 0. [Space]0 + - @ _ & / % £ £ € ∈ ¥ < = * * #
Memory
Storing a new telephone number
- Do NOT lift the handset. Press Menu.
- Scroll to Phonebook using / . Press Select.
- Scroll to Add new using / . Press Select.
- Enter name. Press the corresponding number button one or more times for the first letter (refer to the table on the previous page). Press .
- Enter the telephone number, including area code. Press .
- Select the required ringer melody using / . Press Save
Please note!
If the next letter is not on the same button, you can immediately press the button containing that letter without waiting.
Access/modifying a phonebook entry
- Do NOT lift the handset. Press Menu.
- Scroll to Phonebook using / . Press Select.
- Scroll to Search name using / . Press Select.
- Scroll to required telephone number using / . Press Option.
It is also possible to quick-search by pressing the corresponding number button one or more times for the first letter, see the table on the previous page.
- Scroll to the required option using / . Press Select and follow any on screen prompts..
Call: The selected name/number will be dialled.
View: Displays information on the selected name/number.
Edit: Change information in the same way as storing a new entry:
Erase: Deletes a selected name/number.
Quick dialling from the phonebook
- Do NOT lift the handset. Press .
- Scroll to required name/telephone number using / .
- Lift the handset.
Memory
Speed dial
In addition to the phonebook there are ten speed dial (one touch) memories. Using speed dial a call can be made by simply pressing only one button. Stored speed dial numbers will also be visible in the phonebook, and can be erased and changed in the same way as in the phonebook.
Storing speed dial numbers
- Do NOT lift the handset. Press Menu.
- Scroll to Speed dials using / . Press Select.
- Select the required location using / . Press Option.
- Scroll to Add new using / . Press Select.
- Enter name. Press the corresponding number button one or more times for the first letter (refer to the table on page 9.) Press .
- Enter the telephone number including the area code. Press .
- Select either Save or Exit using / . Press Select.
- Scroll to the required ringer melody using / . Press Save
Transfer from the phonebook
- Do NOT lift the handset. Press Menu.
- Scroll to Speed dials using / . Press Select.
- Scroll to required name/number using / . Press Option.
- Scroll to Copy from phonebook using / . Press Select.
- Select the required location using / . Press Select to save.
Please note!
The speed dial function must be activated to operate. See page 14.
Dialling speed dial memories
- Press and hold (approximately 3 seconds) the button where the telephone number is stored.
- Lift the handset when the displayed telephone number is dialled.
Call list
Call list, Phone book and Caller ID
The call list is divided into calls received and calls dialled, the call list will store 100 sets of names and phone numbers.
If you subscribe to a Caller ID service the name of the caller will be displayed when you receive an incoming call (names will only display when associated with a numbers stored in the Phonebook). When the log is full, the oldest numbers will be erased automatically as the new call is logged.
New calls are indicated in standby mode by
Symbols in the call list
New calls
Answered/read calls
Dialled calls
Received call list
- Press Call list.
- Scroll through the displayed names/numbers using /
- Follow any on screen prompts.
Dialled call list
- Press Call list.
- Scroll through the displayed names/numbers using / . Press Option.
- Scroll to the required function using / . Press Select.
- Follow any on screen prompts.
Quick-dialling from the call list
- Press Call list.
- Scroll through the displayed names/numbers using / .
- Lift the handset, the displayed number will now be dialled.
Displaying details
- Press Call list.
- Scroll to the required function using / . Press Option.
3.Scroll to View using / .Press Select. - Follow any on screen prompts.
Call list
Dialling
- Press Call list.
- Scroll to the required name/number using / . Press Option.
- Scroll to Calls using / . Press Select.
- Lift the handset.
Saving to the phonebook
- Press Call list.
- Scroll to the required name/number using / . Press Option.
- Scroll to Save number using / . Press Select.
- Follow any on screen prompts.
Delete a single entry
- Press Call list.
- Scroll to the required name/number using / . Press Option.
- Scroll to Erase using / . Press Select.
- Press OK to confirm.
- Follow any on screen prompts.
Delete all entries
- Press Call list.
- Scroll to the required name/number using / . Press Option.
- Scroll to Erase all using / . Press Select.
- Press OK to confirm.
- Follow any on screen prompts.
Settings
Ringer
The ringer volume and melody can be personalised.
- Do NOT lift the handset. Press Menu.
2.Scroll to Settings using / .Press Select. - Scroll to Ring signal using / . Press Select.
- Scroll to required melody using / .Press Select.
- Scroll to Ring level using / . Press Select.
- Scroll to the desired volume using / . Press Save.
- Follow any on screen prompts.
This product will usually not ring on the first signal in order to make a correct match against the phone book.
Speed dial
The speed dial function can be set on or off. In the off mode, it is not possible to use the speed dial function.
- Do NOT lift the handset. Press Menu.
2.Scroll to Settings using / .Press Select. - Scroll to Speed dialling using / . Press Select.
- Select either on or off using / . Press Select.
- Follow any on screen prompts.
Display contrast
- Do NOT lift the handset. Press Menu.
2.Scroll to Settings using / .Press Select. - Scroll to Contrast using / . Press Select.
- Adjust the display contrast using / . Press Save.
- Follow any on screen prompts.
Reset
Most functions and settings can be restored back to the factory supplied defaults. Please note when resetting the Country selection will change to UK and the language to English.
- Do NOT lift the handset. Press Menu.
- Scroll to Settings using / . Press Select.
3.Scroll to Reset using / .Press Select. - Press OK to confirm.
Messages
SMS messages
This feature requires a current Caller Id subscription to be in place and only applies to text message users (SMS). The memory will store up to 100 messages, the maximum number of characters per message is 160. In standby mode new messages will be indicated by .
Please remember individual SMS features are country dependent and will vary or be unavailable. The following points are based on the UK service and may be of assistance, if difficulty is experienced please contact your network provider for assistance.
- To register for the SMS text messaging service you can either send a text message to another telephone number, or text REGISTER to 00000.
- Should you wish to reset your SMS settings text RESET to 00000.
- You can also request a delivery report by entering * 0 # prior to any SMS message.
- An SMS message can also be sent to a telephone number that does not support this feature, and will be received as a voice message.
Not all networks (ie mobile, cable) are compatible.
Further details regarding the SMS text message service are available from your local network provider.
Please note!
Check that the right number for your network has been programmed (see next page).
In order for message receiving to work, you must normally subscribe to the caller ID service supplied by your operator.
Information on which functions you can use varies according to network. Not all networks can necessarily send/receive SMS messages on all types of equipment.
On certain networks it may sometimes be possible to send an SMS message to someone without SMS equipment. In such cases the message will be read out by an automatic voice.
Messages
Read and manage messages in the Inbox
- Do NOT lift the handset. Press Menu.
2.Scroll to Messages using / Press Select. - Inbox is displayed. Press Select.
- Scroll to the required message using / . Press Read.
- Read your message using / .
- Press Select.
- Scroll to the required option using / to the required option. Press Select.
Reply: Reply to a message. Follow item 4, Writing a new SMS on the next page.
Forward: Follow item 7, Writing a new SMS below.
Call: Dials the number currently displayed.
Save number. Saves to the phonebook. Follow item 4, Storing speed dial numbers on page 11.
Erase: Deletes individual messages. Confirm with OK.
Erase all: Deletes all messages. Confirm with OK.
Writing a new SMS
- Do NOT lift the handset. Press Menu.
- Scroll to Messages using / . Press Select.
- Scroll to Write Message using / . Press Select.
- Write your message. Press the corresponding number button one or more times for the first letter (refer to the table on page 9).
/ move the cursor within the text
0-9 hold pressed for 3 seconds to switch between upper/ lower case letters.
0 insert a space
- Press Select.
- Scroll using / to send or store the text message. Press Select.
- Enter the telephone number including area code, alternatively press to retrieve a number from the Phonebook. Press Select.
- Scroll using / to send or store the message. Press Select.
- The display will show if the SMS has been sent or failed. If you do not receive an error message, the message has been sent correctly.
Stored SMS messages are saved in Unsent.
Messages
Changing, forwarding or erasing messages in "Unsent".
- Do NOT lift the handset. Press Menu.
2.Scroll to Messages using / .Press Select. - Scroll to Unsent using / . Press Select.
- Scroll to the required message using / . Press Read.
- Press Select.
- Scroll to the required option using / . Press Select.
Edit: Edits the text. Follow item 4, Writing a new SMS on the top of this page.
Forward: Follow item 7, Writing a new SMS on the top of this page.
Erase: Deletes individual messages. Confirm with OK.
Erase all: Deletes all messages. Confirm with OK.
SMS message settings
Check that the right protocol and SMS centre number for your network has been programmed. If you require further details please contact your network provider.
Protocol
Select protocol 1 or 2. Protocol 1 is standard in most countries.
- Do NOT lift the handset. Press Menu.
- Scroll to Settings using / . Press Select.
3.Scroll to SMS using / .Press Select. - Scroll to Protocol using / . Press Select.
- Select the required protocol using / . Press Select.
Entering telephone numbers for SMS Service Centre/network
Check that the correct SMS centre number/s for your network have been programmed.
- Do NOT lift the handset. Press Menu.
2.Scroll to Settings using / .Press Select.
3.Scroll to SMS using / .Press Select. - Scroll using / to the required centre (Servicecenter 1: Number, OUT-centre - for outgoing messages, servicecenter 2: Number, IN-centre - for incoming messages). Press Select.
- Enter number, mistakes can be erased by pressing Clear. Press OK.
Messages
Message alert
You can activate a tone that is heard when new messages have been received.
- Press Menu.
- Scroll to Settings using / . Press Select.
3.Scroll to SMS using / .Press Select. - Scroll to SMS message tone using / . Press Select.
- Select the required setting using / . Press Select.
Enter terminal number
Terminal number will only work if your network provider supports this feature. SMS messages that do not match the stored terminal number are not received. This function is sometimes referred to as Sub-addressing, the default setting is for non-subaddressed conditions (usually 9 or 0).
The terminal number is used if there are several different SMS telephones are connected to the same telephone line, allowing personal SMS messages to a received only on a specific telephone. To send and SMS to specific terminal, enter the destination telephone number plus the additional digit representing the terminal number required.
- Press Menu.
- Scroll to Settings using / . Press Select.
3.Scroll to SMS using / .Press Select. - Scroll to Terminal number using / . Press Select.
- Enter a terminal number. Press OK.
Please note!
In certain countries, the number for the service centre is saved using 1-2 extra figures following the number itself. The first figure added is the terminal number and the second (i.e. the last) is the message type (0-9). Contact your network operator to find out if the message type and terminal number must be used or if these can be set to 00 or left out entirely.
Removing
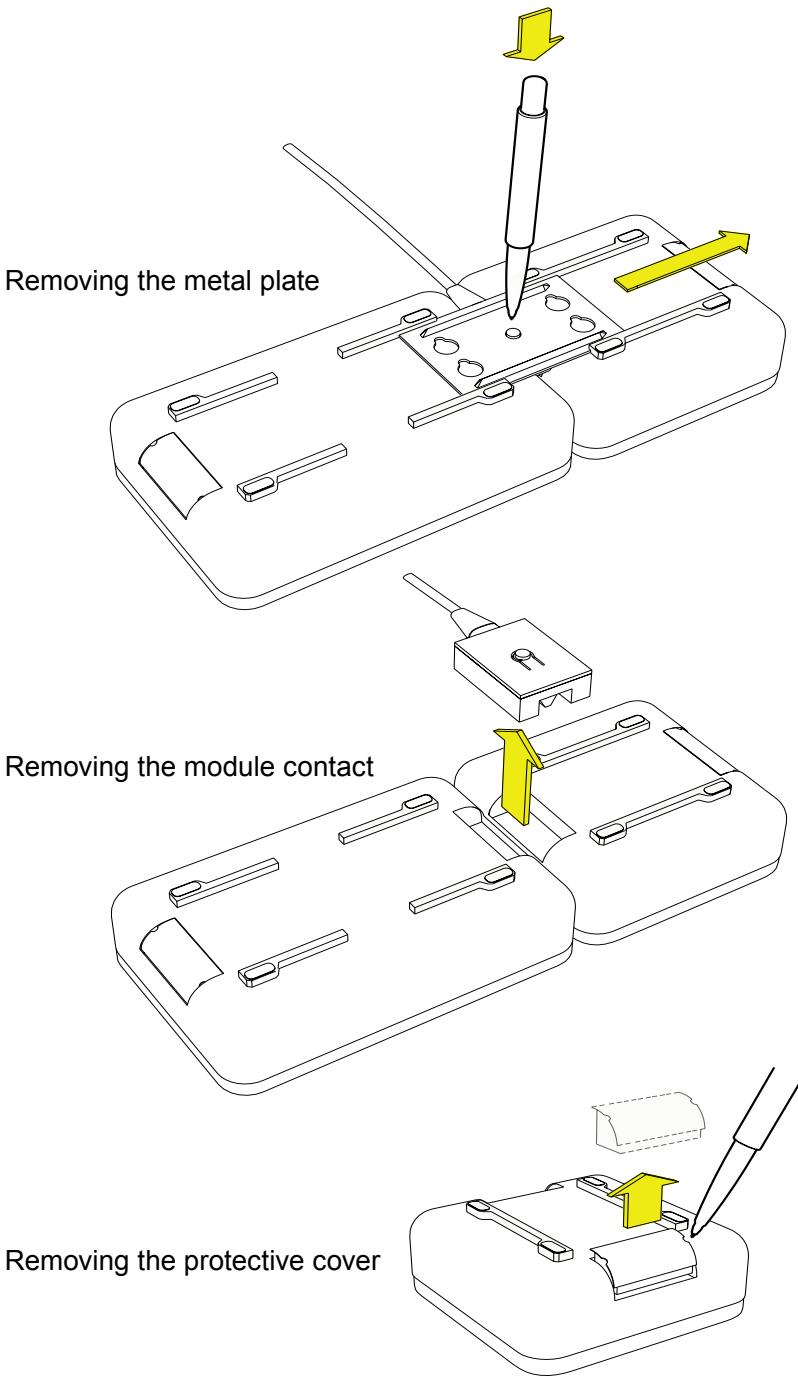
Entry
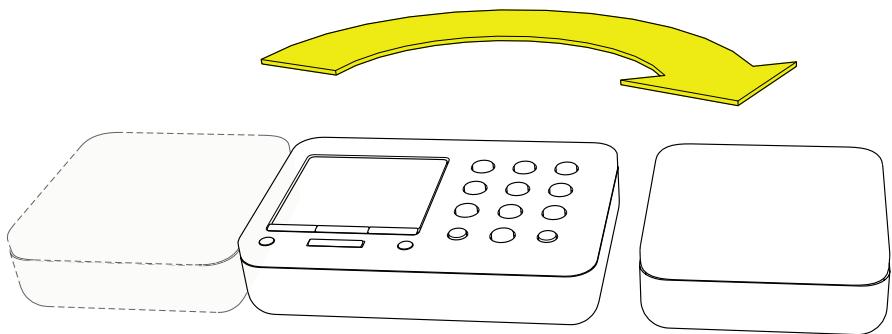
Selecting the position of the modules

Selecting the direction of the cable
Fitting
Fitting the metal plate
Fitting the protective cover
Wall mounting

2x

Other
Troubleshooting
Check that the telephone cord is undamaged and properly plugged in.
Disconnect any additional equipment, extension cords and other telephones. If the problem is resolved, the fault is with other equipment.
Test the equipment on another working line. If the product works, then the fault is probably with your line. Please inform your local telephone company.
No number shown in display when ringing
- In order for this feature to function, you must subscribe to the Caller ID service from your network provider.
- If a text message is shown on the display, the call may be an international call (no data received), or from a private or withheld number.
- It may not be possible to receive Caller ID information if the phone operates in a PBX system.
If the telephone still does not work, contact the place of purchase. Don't forget the receipt or copy of the invoice.
UK
If you cannot resolve the fault using the faultfinder section, technical support is available on the Premium Rate Number: 0906 302 0114.
Calls cost 50 pence per minute (prices correct at the time of going to press), and is operational between 9AM - 5PM Monday-Friday excluding Bank Holidays. Alternatively,
E-mail on: tech@doro-uk.com
You can contact us in writing: Consumer Support Group, Doro UK Ltd., 22 Walkers Road, North Moons Moat, Redditch, Worcestershire, B98 9HE, (regarding any Spares or Technical query), or
Telephoning (Spares only): 01527 584377
Web site: www.doro-uk.com
Guarantee
This product is guaranteed for a period of 12 months from the date of purchase. Proof of purchase is required for any service or support required during the guarantee period. This guarantee shall not apply to a fault caused by an accident or a similar incident or damage, liquid ingress, negligence, abnormal usage, not reasonably maintained or any other circumstances on the purchaser's part.
Furthermore, this guarantee shall not apply to a fault caused by a thunderstorm or any other voltage fluctuations. This guarantee does not in any way affect your statutory rights. (As a matter of precaution, we recommend disconnecting the telephone during a thunderstorm.)
Australia and New Zealand
Products permitted for connection to the telephone network are marked with in Australia and TELEPERMIT in New Zealand. These marks indicate the products comply with the regulations and can be used without concern in the country of purchase.
If you believe this product is malfunctioning, please refer to the relevant section and/or consult the troubleshooting guide in this manual to ensure that you have followed the instructions carefully. As an alternative you can visit our web site for FAQ's or send an e-mail for a prompt reply.
Guarantee
This product is guaranteed for a period of 12 months from the date of purchase. Should you experience difficulties with the product, please contact us for assistance. If the product is then found to be faulty you will be asked to return it directly to us with a copy of the purchase receipt. This guarantee shall not apply to a fault caused by an accident or a similar incident or damage, liquid ingress negligence, abnormal usage, not reasonably maintained or any other circumstances on the purchaser's part. Furthermore, this guarantee shall not apply to a fault caused by a thunderstorm or lightning, excessive or any other voltage fluctuations or faults on the telephone line. (As a matter of precaution, we recommend disconnecting the telephone during a thunderstorm).
This guarantee does not affect your statutory rights.
AUSTRALIA
DORO Australia Pty Ltd
PO Box 6760
Baulkham Hills BC NSW 2153
Australia
Consumer Support
Ph: Ph: 1300 885 023
Fax: (02) 8853-8489
Email: support@doro.com.au
Web site: www.doro.com.au
NEW ZEALAND
Atlas Gentech (NZ) Limited
Private Bag 14927
Panmure
Auckland
New Zealand
Consumer Support
Ph: 0900-500-25 (Toll Call)
Fax: (09) 574-2722
Email: support@atlasgentech.co.nz
Technical information
REN (RN for New Zealand)
The REN (Ringer Equivalence Number) or (RN) is of significance only if you wish to connect more than 1 telephone to your telephone line. A standard telephone line has a maximum REN capacity of 3 (RN of 5). It is possible to connect 3 devices with a REN of 1 (RN of 1) with no degradation to the product's performance. Exceeding this limit may cause the volume of the ringer in any phone to decrease or not ring at all.
Notes for operation in New Zealand
ALLPRODUCTS
The grant of a Telepermit for any item of terminal equipment indicates only that Telecom has accepted that the item complies with the minimum conditions for connection to its network. It indicates no endorsement of the product by Telecom, nor does it provide any sort of warranty. Above all, it provides no assurance that any item will work correctly in all respects with another item of Tele permitted equipment of a different make or model, nor does it imply that any product is compatible with all of Telecom's network services.
This equipment shall not be set to make automatic calls to the Telecom "111" Emergency Service.
This equipment may not provide for the effective hand-over of a call to another device connected to the same line.
This equipment should not be used under any circumstances that may constitute a nuisance to other Telecom Customers.
CNDPRODUCTS
If a charge for local calls is unacceptable, the "DIAL" button should NOT be used for local calls. Only the 7 digits of the local number should be dialled from your telephone. DO NOT dial the area code digit or the "0" prefix.
Installation
Raccordement
DECLARATION OF CONFORMITY
WE DORO AB
Of Skiffervagen 80
SE-224 78 Lund
Sweden
As the EU/EES/EC/EEA Authorised representative declare under our sole responsibility that the product
Model: Doro 1015C
Description: Corded telephone
IS IN CONFORMITY WITH R&TTE DIRECTIVE: 1999/5/EC
Authorised by:

Name (printed): Per Carlenhag
Position in company: Quality Manager
Date of issue: 28 December 2004
Copies of this document will be held on file for a period of 10 years after the last production.
Supplier: DORO AB
Skiffervagen 80
SE-224 78 Lund
Sweden

Product: Doro 1015C
This product is in conformity with the essential requirements of the following specifications:
Safety - EN 60950
EMC-EN55022/55024
Electrical Performance - CTR 37/38
This product is intended for connection to analogue PSTN lines within the following countries: United Kingdom, Sweden, Norway, France, Denmark, Finland, Turkey and Switzerland. However, due to differences between the individual PSTN's provided in the different countries, the approval does not, of itself, give an unconditional assurance of successful operation on every PSTN network termination point.
DECLARATION DE CONFORMITE
Nous DORO AB
Skiffervagen 80
SE-224 78 Lund
SUEDE
Description: Telephone
EST CONFORME A LA DIRECTIVE: 1999/5/CE
Autorisé par :
Signature

Nom: Per Carlenhag