USER MANUAL XS-F720B JVC
Hotline Darcy France
- The ventilation should not be impeded by covering the ventilation openings with items, such as newspapers, table-cloths, curtains, etc.
- No naked flame sources, such as lighted candles, should be placed on the apparatus.
- This apparatus is not suitable for use in a tropical climate.
- The apparatus shall not be exposed to dripping or splashing and that no objects filled with liquids, such as vases, shall be placed on the apparatus.
- Where an appliance coupler is used as the disconnect device, the disconnect device shall remain readily operable.
- Attention should be drawn to the environmental aspects of battery disposal. Don't throw used batteries in dustbin. Please contact your retailer in order to protect the environment.
- To protect the environment, use local recycling facilities for battery disposal.
- Batteries (battery pack or batteries installed) shall not be exposed to excessive heat such as sunshine, fire or the like.
- CAUTION: Risk of fire or explosion if the battery is replaced by an incorrect type.
- Disposal of a battery into fire or a hot oven, or mechanically crushing or cutting of a battery or expose to excessive heat such as sunshine, fire or the like that can result in an explosion.
- Leaving a battery in an extremely high temperature surrounding environment that can result in an explosion or the leakage of flammable liquid or gas.
- A battery subjected in extremely low air pressure that may result in an explosion or the leakage of flammable liquid or gas.
- Exhausted batteries are to be removed from the apparatus.
- The supply terminals are not to be short-circuited.
Children should be supervised to ensure that they do not play with theproduct.
- Ensure that the unit is plugged into an AC 100-240V 50/60Hz power outlet. Using highervoltage may cause the unit to malfunction or even firecatching.
- Turn off the unit before unplugging it from power source to completely switch it off.
- Do not disconnect or connect the power cord with wet hands. It may cause an electric shock.
- If the power plug does not fit into your outlet, do not force the plug intoan electrical socket if it does not fit.
- Place the unit on a flat, stable surface that is not subject to vibrations. Do not expose to temperatures above 35^ .
- Do not mount the unit on a wall or ceiling.
- Do not place the unit near TVs, speakers and other objects that generate strong magnetic fields.
- Do not leave the unit unattended when it is in use.
- Allow at least 30~cm clearance from the rear and the top of the unitand 5cm from each side.
- NEVER let anyone, especially children, push anything into holes, slots or any other openings in the unit's casing as this could result in a fatalelectric shock.
- Press the buttons of the unit gently. Pressing them too hard can damage the unit.
- Always ensure that the unit is unplugged from the electrical outlet before moving or cleaning. Clean it with dry cloth only.
- Unplug the unit during lightning, storms or when it will not be used for long periods of time.
- This product does not contain any parts that are serviceable by theuser. Do not attempt to repair this product yourself. Only qualified service personnel should perform servicing. In case of a fault, contact the authorised service personnel for inspection and repair.
Trademark

Bluetooth
The Bluetooth® word mark and logos are registered trademarks owned by Bluetooth of such marks by King Profit Trading Ltd.is under license.
Symbols

This mark is applied to show the equipment conforms to European radio equipment directive.
The letters 'CE' signify that products sold in the EEA have been assessed to meet high safety, health, and environmental protection requirements.

Class II equipment To identify equipment meeting the safety requirements specified for Class II equipment according to IEC 61140.
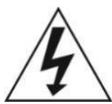
The lightning flash with arrow-head symbol, within an equilateral triangle, is intended to alert the user to the presence of uninsulated dangerous voltage within the product's enclosure that may be of sufficient magnitude to constitute a risk of electric shock to persons.

Warning: to reduce the risk of electric shock, do not remove cover (or back). No user serviceable parts inside, refer servicing to qualified service personnel.

The exclamation point within an equilateral triangle is intended to alert the user to the presence of important operating and maintenance (servicing) instructions in the literature accompanying the apparatus.
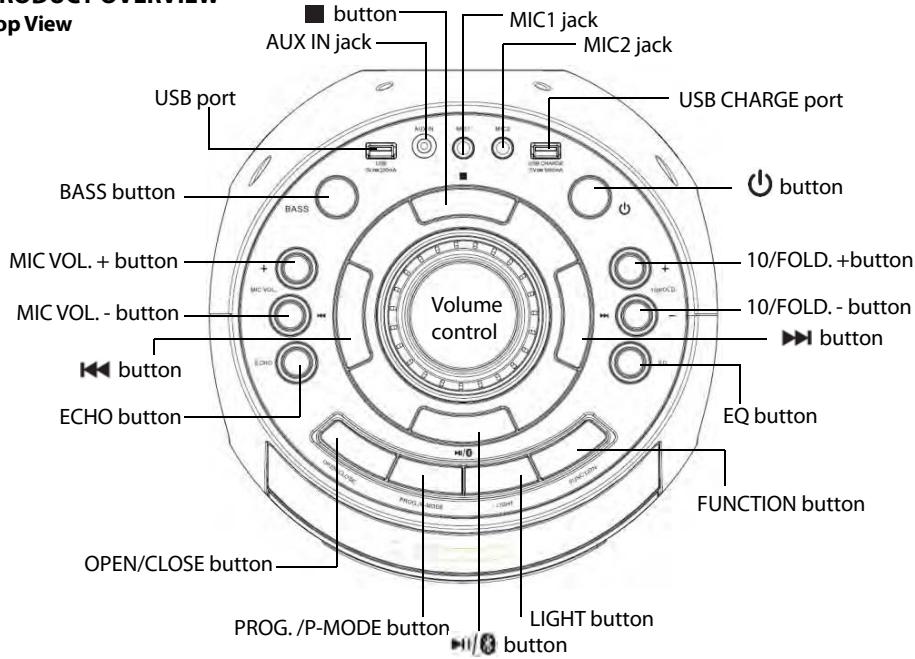
PRODUCT OVERVIEW
Top View

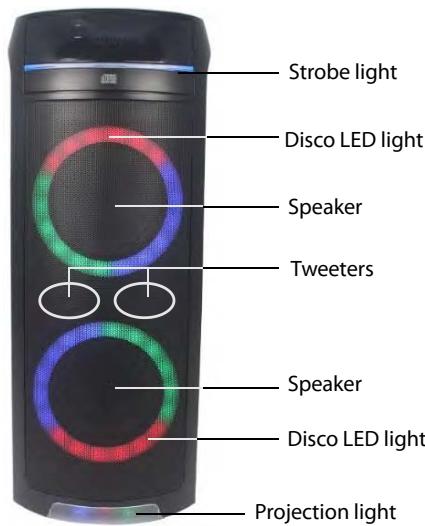
Front View
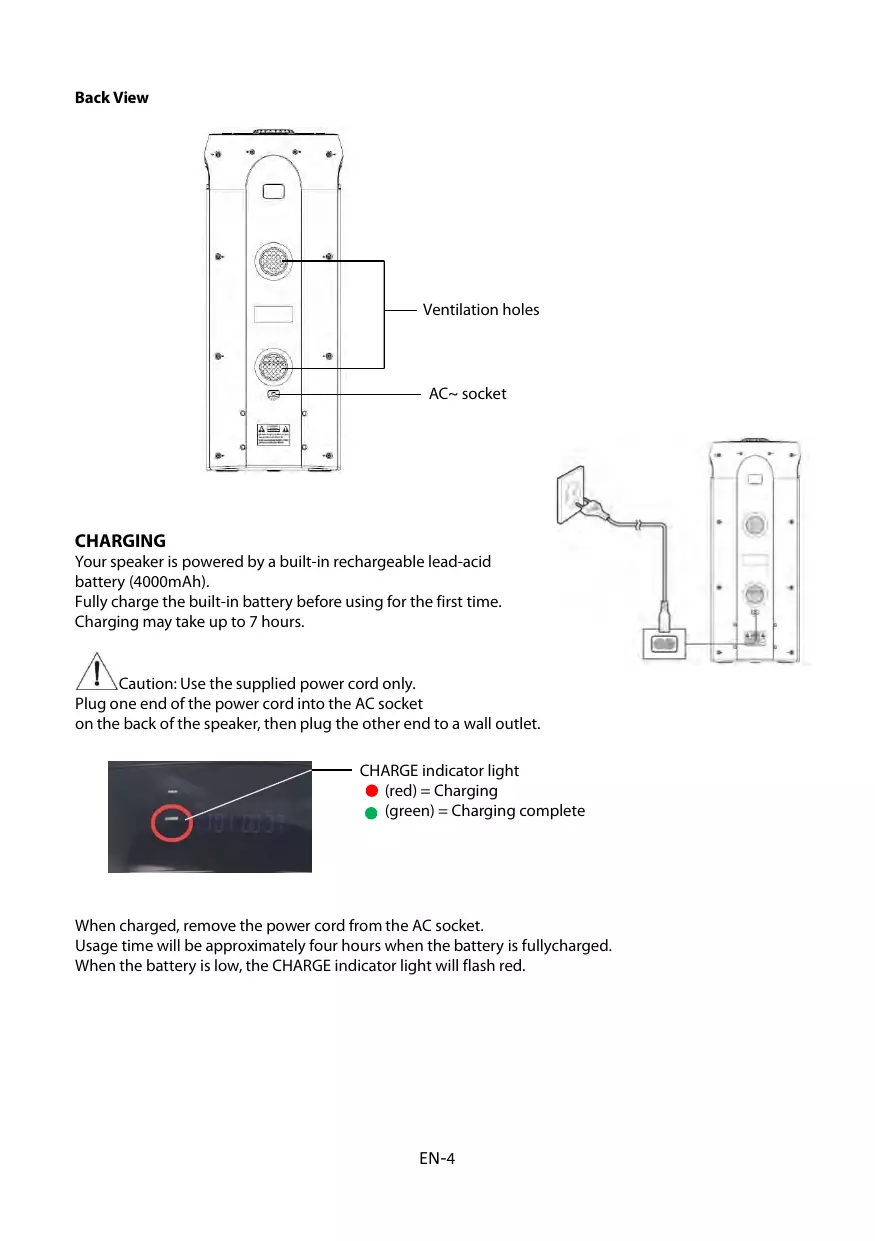
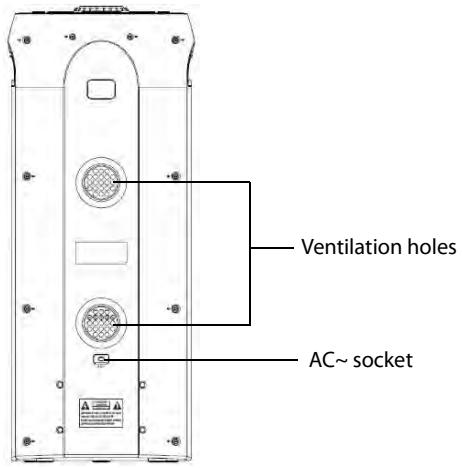
Back View
CHARGING
Your speaker is powered by a built-in rechargeable lead-acid battery (4000mAh).
Fully charge the built-in battery before using for the first time.
Charging may take up to 7 hours.

Caution: Use the supplied power cord only.
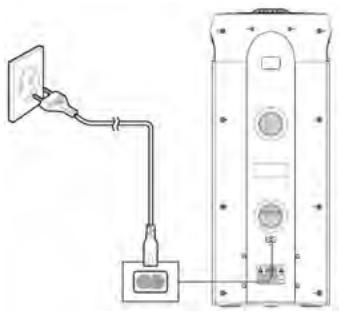
Plug one end of the power cord into the AC socket on the back of the speaker, then plug the other end to a wall outlet.

CHARGE indicator light
(red) = Charging
(green) = Charging complete
When charged, remove the power cord from the AC socket.
Usage time will be approximately four hours when the battery is fullycharged.
When the battery is low, the CHARGE indicator light will flash red.
Caution:
- Dispose of batteries responsibly at local authority household waste recycling facility.
- Do not dispose of batteries in a fire as the batteries may explode.
- Do not attempt to open the product to replace the battery. It is built-in and not changeable.
- The battery should be removed only by authorized service personnel.
- If you get acid on your skin, wash immediately with soapy water or acid neutralizer. If acid is ingested, seek immediate professional medical attention. Do not induce vomiting and drink a lot of water.
Press and hold the buttonsto switch the unit on/off.
Standby mode:
In CD/USB/Bluetooth/AUX mode, if there is no operation for 15 minutes, the unit will enter standby mode.
Pressand hold the button to turn on the unit again.
NOTE:
Low volume setting in the audio source may be recognized as "no audio signal".
This will affect the capability of signal detection from the unit and can also originate an automatic switch into standby mode.
If this happens, please increase the volume setting on the unit and audio source player in order to resume playback.
Electrostatic discharge hints
The unit may reset or may not reset to normal operation mode due to electrostatic discharge, just switch it off and reconnect again.
BLUETOOTH OPERATION
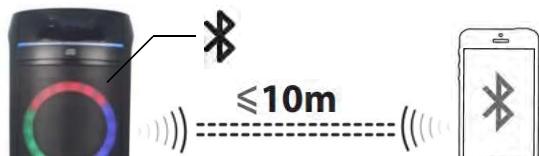
You can listen to the Bluetooth enabled audio device from this unit wirelessly.
NOTE:
The Bluetooth works best within 10 meters in open air.
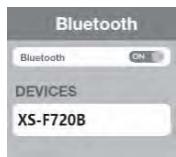
1 Enter the Bluetooth pairing mode.
- Press the FUNCTIONbutton until the displayshows "BLUETOOTH" and the pair indicatorlight will flash.
2 Turn on the Bluetooth function on the device. Choose "XS-F720B" to connect.
- If a PIN code is requested while connecting a Bluetooth device, enter "0000".
3 Once successfully connected, start playback on your Bluetooth device.
- The pairindicatorlight will stop flashing.
4 Rotate the volume control knob on the unit or adjust the volume on the external device to increase or decrease the volume to your desired level.
5 To disconnect a Bluetooth device, press and hold the button on the unit until the pair indicator light flashes.
CD/MP3 OPERATION
Press the FUNCTION button until the display shows "CD".
About Compact Discs
This player is compatible with all digital audio CDs, digital audio CD-Recordable discs (CD-R) and CD- Rewritable discs (CD-RW) that have been finalized, and CD-DA format digital audio CDs.
This player is also compatible with MP3-CDs. These are compact discs that contain MP3 audio files on them.

Always use compact discs bearing the mark as shown.
Handling and maintenance of discs
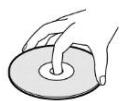
Never touch the recorded surface of the disc (reflective surface). Pick the disk up by the edges and the central hole. Do not stick paper or tape on the disc.
Put the disc back in its protective case after using it.
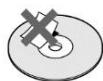
Do not expose the disc to direct sunlight, heat sources, high humidity and dusty places.
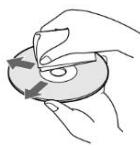
Clean the disc with a cleaning cloth ifit is dirty. Wipe the disc from the center hole outward in a straight across motion.
If there are scratches, dirt or fingerprints on the disc, a tracking error may occur.
Never use benzene, thinners, record cleaner fluid or anti-static spray.
Loading a Disc
1 Press the OPEN/CLOSE button to open the CD door. The display will show "OPEN".
2 Place an audio CD/MP3 disc into the tray with the label side facing up.
3 Close the CD door, making sure it clicks into place.
- The display will show "READING", then playback will start from the first track.
- For Audio CD, the display will show the total number of tracks and total playing time.
- For MP3 CD with several folders, the display will show the total number of folders and total number of files.
4 To remove a disc, press the button to stop playback and then press the OPEN/CLOSE button to open the CD door.
- The display will show "OPEN".
5 Grasp the disc by its edgesand take it out carefully.
NOTE:
To ensure good performance, wait until the system has completely read the disc before proceeding with other functions.
If no disc is loaded or if the disc is unreadable, the display will show "NO DISC".
Other operations
| To | Do this |
| Pause playback | Press the ➔ button.
The playing time and the current track number will flash on the display. |
| Resume playback | Press the ➔ button again. |
| Stop playback | Press the ■ button.
For audio discs, the total number of tracks will be displayed.
For MP3 discs containing several folders, the total number of folders and tracks will be displayed. |
| Select a folder (for MP3 discs only) | Press and hold the 10/FOLD.+ or 10/FOLD. - button. |
| Select a track/file | Press the << or >> button. You can skip tracks/files one by one. |
| Select a track/file number above 10 (for MP3 discs only) | Press the 10/FOLD. +or10/FOLD. - button to skip forward or backward 10 tracks. |
| Find a point in a track/file | Press and hold the << or >> button during playback, and release the button at the desired point. |
USB OPERATION
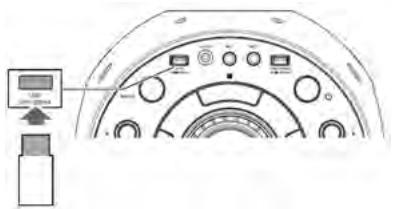
1 Press the FUNCTION button until the display shows "USB".
2 Plug the USB memory stick to the USB port on top of the unit.
- Playback will start automatically from the first track.
Other operations
| To | Do this |
| Pause playback | Press the 📅/ 📅 button.
The playing time and the current track number will flash on the display. |
| Resume playback | Press the 📅/ 📅 button again. |
| Stop playback | Press the 📅 button. |
IMPORTANT:
The USB port is intended for data transfer only and other devices cannot be used with this USB connection. The use of USB extension cords is not recommended. Don't unplug the USB device from the unit when playing or reading the USB device.
| The total number of folders and tracks will be displayed. |
| Select a folder | Press and hold the 10/FOLD.+ or 10/FOLD.- button. |
| Select a track/file | Press theor button. You can skip tracks/files one by one. |
| Select a track/file number above 10 | Press the 10/FOLD. +or10/FOLD. - button to skip forward or backward 10 tracks/files. |
| Find a point in a track/file | Press and hold theor button during playback, and release the button at the desired point. |
REPEAT PLAY MODES
When playing a disc/USB device, you can control the order in which tracks/files are played by changing the repeat play mode.
Press the PROG./P-MODEbutton repeatedly during playback. The repeat indicators shown below will appear on the display.
| → | Repeat.
Repeat the current track only. |
| →ALL | Repeat all.
Repeat all tracks/files. |
| →DIR | Repeat directory.
Repeat all files in the current folder. (This mode is only available when playing USB device that has more than one folder.) |
| RAN | Random.
Play tracks/files in random order. |
| INTRO | Intro.
Play the first 10 seconds of each track/file. |
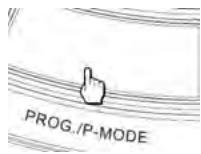
To cancel repeat play mode and return to normal playback, press the PROG./P-MODE button until all of the Repeat indicators disappear from the display.
PROGRAM PLAY
Programming tracks/files of a disc/USB device is possible when playback is stopped.
Up to 20 tracks for CD disc and 99 tracks/files for MP3 disc or USB device can be programmed to play in any order.
1 While playback is stopped, press the PROG./P-MODE button to enter program mode.
- The text "PROG" will flash and "P01" will be shown on the display.
2 Press the or button to select a track/file.
- When you want to specify a folder in a USB device, press and hold the 10/FOLD.+ or 10/FOLD.- buttonfirst to select a folder, and then press the or button to select a file.
3 Press the PROG./P-MODE button to save the track.
- The text "PROG" will flash and "P02" will be shown on the display.
4 Repeat steps 2 & 3 to store other desired tracks until all desired tracks/files have been programmed.
5 Press the (\text{串串串串串串串串串串串串串串串串串串串串串串串串串串串串串串串串串串串串串串串串串串串串串串串串串串串串串串串串串串串串串串串串串串串串串串串串串串串串串串串串串串串串串串串串串串串串串串串串串串串串
6 Press the button to stop program playback.
To clear the program play
Press the button twice during playback. The text "PROG" will disappear from the display.
AUX-IN OPERATION
1 Press the FUNCTION button until the display shows "AUX".
2 Connect your audio device to the AUX IN jack on the top panel of the unit with an AUX IN cable.(audio cable is not included)
3 Rotate the VOLUME knob on the unit or adjust the volume on theexternal device to increase or decrease the music volume to yourdesired level.
4 Control the playback with your audio device.
MIC JACK OPERATION
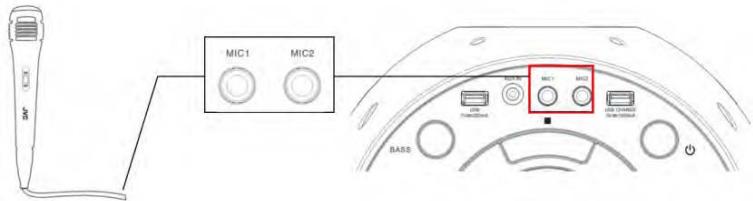
Microphone input is available in all modes.
1 Connect your microphone to the MIC1 or MIC2jack on the toppanel of the unit.
2 On the microphone, there is an ON/OFF switch. Ensure that you set the switch to the ON position during operation.
3 Press the MIC VOL + or - button on the unit to increase or decrease the microphone volume.
4 Press the ECHO button on the unit to turn on or off the echo effect of the microphone.
FLASHING LIGHT
There are 5 modes for the DISCO LED lighting. Press the LIGHT button repeatedly to choose the desired light mode.
To turn off the lighting, press the LIGHT button until the display shows "OFF".
The projection and strobe lights will flash to the music beat in all light modes.
Press and hold the LIGHT button to turn the lights on or off.
ADJUSTING SOUND EFFECT
This function enables you to enjoy special sound effects.
During play, press the EQ button repeatedly to select the desired setting:
Press the BASS button to switch the bass enhancement on or off.
CHARGING THE EXTERNAL USB DEVICES
You can use this unit as a battery charger for your rechargeable USB devices.
Connect your USB device to the USB CHARGEport on the rear of thisunit.

CARE AND MAINTENANCE
- Clean the outside of the unit with a soft, slightly damp cloth.
- Never clean it with chemicals or detergent with chemicals or detergent.
- Keep the unit dust-free.
SPECIFICATIONS
| ACpower input | 100-240V~ ( ~ alternating current symbol) 50/60Hz |
| Power consumption | 39W |
| USB output | 5V---200mA(--- direct current symbol) |
| USB CHARGE output | 5V---1000mA |
| Power output | 25Wx2 |
| AUX-IN jack | 3.5mm |
| Microphone jack | 6.3mm |
| Working temperature | 5°C – 35°C |
| Bluetooth version | 5.0 |
| Bluetooth range | Approximately 10 meter (line-of-sight distance) |
| Bluetooth profile | A2DP |
| Bluetooth transmitter frequency range | 2402 - 2480 MHz |
| Bluetooth maximum transmitter power | 0.167 dBm |
DISPOSAL
As a responsible retailer we care about the environment. As such we urge you to follow the correct disposal procedure for the product, packaging materials and if applicable, accessories and batteries. This will help conserve natural resources and ensure that the materials are recycled in a manner that protects health and the environment.
You must follow laws and regulations about disposal. Waste electrical products and batteries must be disposed of separately from household waste when the product reaches the end of its life.
Contact the store where you bought the product and your local authority to learn about disposal and recycling.
The batteries must be disposed of at your local recycling point.
We apologise for any inconvenience caused by minor inconsistencies in these instructions, which may occur as a result of product improvement and development.
EU Declaration of Conformity
Bluetooth speaker with CD player
The object of the declaration described above is in conformity with the relevant Union harmonisation legislation:
EN IEC 62368-1:2020+A11:2020
CE
This declaration of conformity is drawn up under the sole responsibility of the manufacturer.
The person responsible for this declaration is:
Place, Date / Lieu :