
REVEILRA-F223B - Alarm clock radio JVCRADIO - Free user manual and instructions
Find the device manual for free REVEILRA-F223B JVCRADIO in PDF.
User questions about REVEILRA-F223B JVCRADIO
0 question about this device. Answer the ones you know or ask your own.
Ask a new question about this device
Download the instructions for your Alarm clock radio in PDF format for free! Find your manual REVEILRA-F223B - JVCRADIO and take your electronic device back in hand. On this page are published all the documents necessary for the use of your device. REVEILRA-F223B by JVCRADIO.
USER MANUAL REVEILRA-F223B JVCRADIO
Hotline Darty France
Naar DAB+ stations scanners
EXTERNE APPARATEN OPLADEN
HET APPARAAT RESETTEN
This product is manufactured, distributed, serviced and warranted exclusively by Etablissements DARTY et Fils.
"JVC" is the trademark of JVCKENWOOD Corporation, used by Etablissements DARTY et Fils under license.
WARNING
- Ventilation
- Heed all warnings - All warnings on the appliance and in the operating instructions should be adhered to.
- Follow all instructions - All operating and use instructions should be followed.
- Do not use this apparatus near water - The appliance should not be used near water or moisture - for example, in a wet basement or near a swimming pool, and the like.
- Do not install near any heat sources such as radiators, heat registers, stoves, or other apparatus (including amplifiers) that produce heat.
- Only use attachments/accessories specified by the manufacturer.
Allow at least a 5 cm gap all around the product.
- The ventilation should not be impeded by covering the ventilation openings with items, such as newspapers, table-cloths, curtains, etc.
- No naked flame sources, such as lighted candles, should be placed on the apparatus.
- This apparatus is not suitable for use in a tropical climate
- The apparatus shall not be exposed to dripping or splashing and that no objects filled with liquids, such as vases, shall be placed on the apparatus.
- Where the MAINS plug or an appliance coupler is used as the disconnect device, the disconnect device shall remain readily operable.
- The marking plate is located on the bottom of the apparatus.
Symbols

This mark is applied to show the equipment conforms to European radio equipment directive.

For power adapter: This symbol indicates that the unit has double insulation and an earth connection is not required.

For indoor use only

Use only power supplies in the user manual.
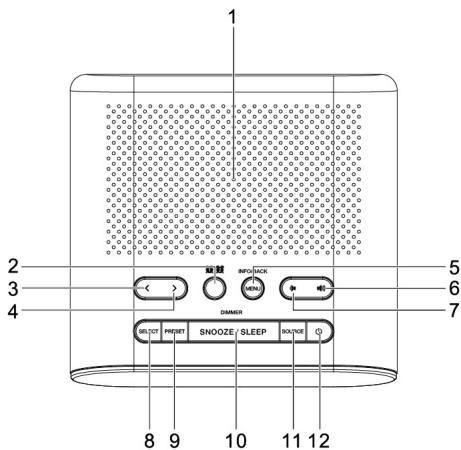
- Speaker
- ALARM button (1/2)
- < button
-
button
- MENU / INFO / BACK button
- VOLUME UP button
- VOLUME DOWN button
-
SELECT button
-
PRESET button
- SNOOZE / SLEEP / DIMMER button
- SOURCE button
- POWER / ALARM OFF button
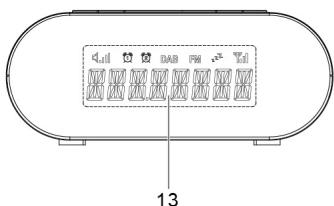
- Display
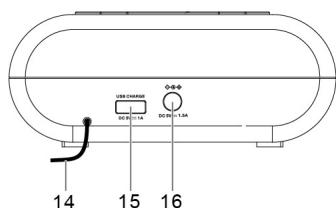
- Antenna
- USB charging port
- DC IN jack
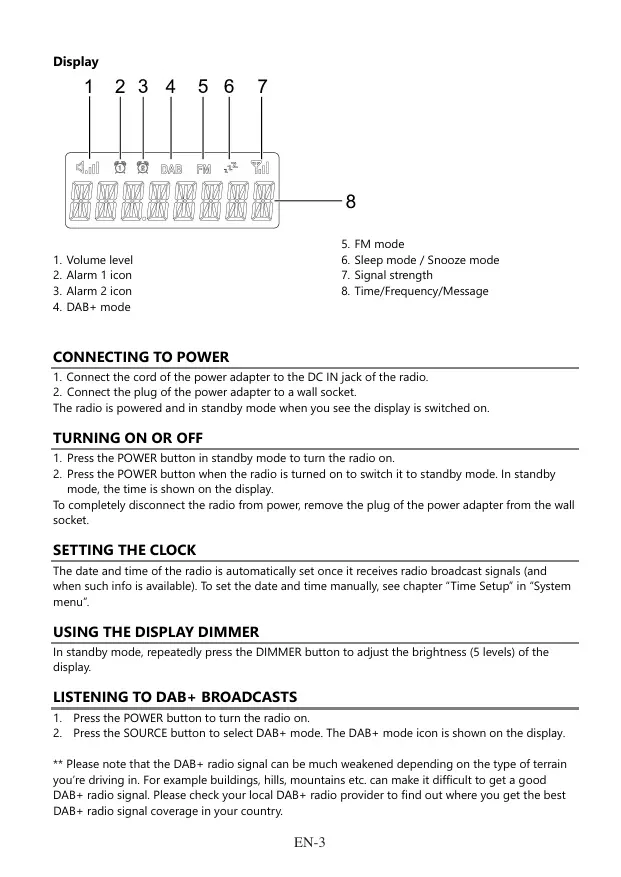
Display
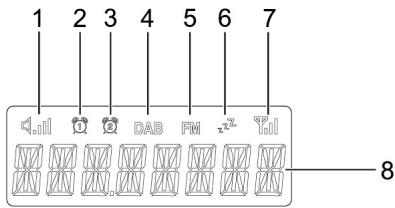
- Volume level
- Alarm 1 icon
- Alarm 2 icon
-
DAB+mode
-
FM mode
- Sleep mode / Snooze mode
- Signal strength
- Time/Frequency/Message
CONNECTING TO POWER
- Connect the cord of the power adapter to the DC IN jack of the radio.
- Connect the plug of the power adapter to a wall socket.
The radio is powered and in standby mode when you see the display is switched on.
TURNING ON OR OFF
- Press the POWER button in standby mode to turn the radio on.
- Press the POWER button when the radio is turned on to switch it to standby mode. In standby mode, the time is shown on the display.
To completely disconnect the radio from power, remove the plug of the power adapter from the wall socket.
SETTING THE CLOCK
The date and time of the radio is automatically set once it receives radio broadcast signals (and when such info is available). To set the date and time manually, see chapter "Time Setup" in "System menu".
USING THE DISPLAY DIMMER
In standby mode, repeatedly press the DIMMER button to adjust the brightness (5 levels) of the display.
LISTENING TO DAB+ BROADCASTS
- Press the POWER button to turn the radio on.
- Press the SOURCE button to select DAB+ mode. The DAB+ mode icon is shown on the display.
** Please note that the DAB+ radio signal can be much weakened depending on the type of terrain you're driving in. For example buildings, hills, mountains etc. can make it difficult to get a good DAB+ radio signal. Please check your local DAB+ radio provider to find out where you get the best DAB+ radio signal coverage in your country.
Scanning for DAB+ stations
The first time you use the radio, or if the station list is empty, the radio automatically performs a station search.
To perform a station search manually:
- In DAB+ mode, press and hold the MENU button until you see "STATION SCAN" on the display.
- Press the SELECT button.
- Press the < or > button to select "FULL SCAN" or "MANUAL TUNE".
FULL SCAN: To perform a wide range search for DAB+ stations and store them automatically.
MANUAL TUNE: Repeatedly press the < or > button to tune the frequency manually.
- Press the SELECT button to confirm the selection.
Tuning to a DAB+ station
- In DAB+ mode, repeatedly press the < or > button to cycle through the DAB+ stations in the station list.
- Press the SELECT button to tune to the selected DAB+ station.
Storing preset stations
You can store up to 20 DAB+ stations as preset stations.
- Tune to a DAB+ station.
- Press and hold the PRESET button until the display shows "XX-(station name)" or "XX-EMPTY" with "XX" blinking. "XX" is the preset number (1-20).
- Repeatedly press the < or > button to select a preset number.
- Press the SELECT button to confirm. The DAB+ station is stored with the selected preset number. Repeat steps 1-4 to store more preset stations.
- To tune to a preset station, press the PRESET button once, then repeatedly press the < or button to cycle through the list of preset stations and then press the SELECT button to confirm the selection.
To change the DAB+ station assigned to a preset number, repeat steps 1 to 4 above to overwrite the existing DAB+ station.
Displaying DAB+ information
Repeatedly press the INFO button to cycle through the DAB+ information (such as program type, frequency, time, date, if available).
Using the DAB+ menus
- In DAB+ mode, press and hold the MENU button to access the DAB+ menus.
-
Repeatedly press the < or > button to cycle through the below options and then press the SELECT button to confirm the selection.
-
Station scan (see chapter "Scanning for DAB+ stations")
System (see chapter "System menu") -
Press the POWER button to turn the radio on.
- Press the SOURCE button to select FM mode. The FM mode icon is shown on the display.
Scanning for FM stations
In FM mode, press the SELECT button to activate the automatic search for the next available FM station. After an FM radio station is detected, the search stops. The FM radio station is broadcast.
Tuning the FM frequency
In FM mode, repeatedly press the < or > button to tune down or up the frequency.
Once you have tuned up or down the frequency, press the SELECT button to activate the automatic search for the next available FM station in the selected tune up or down direction.
Storing preset stations
You can store up to 20 FM stations as preset stations.
- Tune to an FM station.
- Press and hold the PRESET button until the display shows "XX-(frequency)" or "XX-EMPTY" with "XX" blinking. "XX" is the preset number (1-20).
- Repeatedly press the < or > button to select a preset number.
- Press the SELECT button to confirm.
The FM station is stored with the selected preset number.
Repeat steps 1-4 to store more preset stations.
- To tune to a preset station, press the PRESET button once, then repeatedly press the < or > button to cycle through the list of preset stations and then press the SELECT button to confirm the selection.
To change the FM station assigned to a preset number, repeat steps 1 to 4 above to overwrite the existing FM station.
Displaying RDS information
Repeatedly press the INFO button to cycle through the RDS (Radio Data System) information (such as radio text, program type, time and date, if available).
Using the FM menu
- In FM mode, press and hold the MENU button to access the FM menus.
-
Repeatedly press the < or > button to cycle through the below options and then press the SELECT button to confirm the selection.
-
Scan (To define how the radio scans for the next available station. Select "DX" to search for strong stations only, or "LOCAL" to search for all stations regardless of the signal strength)
System (see chapter "System menu")
The radio lets you have 2 alarm settings.
To set the alarm:
- Press the ALARM button to select between Alarm 1 and Alarm 2 and then press the SELECT button to confirm the selection.
- Press the < or > button to select alarm "ON" and then press the SELECT button to confirm the selection.
- Repeatedly press the < or > button to set the hour time of the alarm and then press the SELECT button.
- Repeatedly press the < or > button to set the minute time of the alarm and then press the SELECT button.
- Repeatedly press the < or > button to cycle through the alarm frequency options and then press the SELECT button to confirm the selection.
The alarm frequency defines how often the alarm is active.
Frequency options: Daily, Once, Weekends and Weekdays. If "Once" is selected, you will also be prompted to set a specific date.
- Repeatedly press the < or > button to cycle through the source options and then press the SELECT button to confirm the selection.
The source defines the sound source of the alarm.
Source options: DAB+, FM and Buzzer. If DAB+ or FM is selected, the last played station will be used as the alarm.
- Repeatedly press the < or > button to adjust the volume level and then press the SELECT button.
This setting defines the volume of the alarm. The alarm setting is now saved.
When the alarm setting is active (ON), the corresponding alarm icon (1 or 2) shows on the display. At the set time, the alarm will sound. The volume will increase gradually until it reaches the set volume level. The corresponding alarm icon will flash on the display.
Turning off the alarm settings
- Press the ALARM button to select between Alarm 1 and Alarm 2 and then press the SELECT button to confirm the selection.
- Press the < or > button to select alarm "OFF" and then press the SELECT button to confirm the selection.
When the alarm setting is deactivated (OFF), the corresponding alarm icon (1 or 2) turns off on the display.
Deactivating a sounding alarm
Press the POWER button to deactivate a sounding alarm.
Snoopze
- To temporarily silence a sounding alarm, press the SNOOZE button. The snooze period is 9 minutes.
- The radio will return to standby mode during the snooze period. The alarm will sound again when the snooze period is over.
- To cancel the snooze period and the alarm, press the POWER button.
SLEEP
This sleep function defines the duration of time before the radio switches itself off automatically. When the radio is turned on, press the SLEEP button repeatedly to select a sleep period (Options: Off, 5, 15, 30, 60 and 90 minutes).
Once a sleep period is set, the sleep icon will be shown on the display. The radio will automatically switch off when the sleep period is over.
CHARGING EXTERNAL DEVICES
Connect an external device (e.g. smartphone, mp3 player) via a USB cable (not provided) to the USB charging port on the back of the radio for charging. The radio cannot access the contents in the connected external device.
SYSTEM MENU
Accessing the system menu
- Press and hold the MENU button in DAB+ or FM mode.
- Repeatedly press the < or > button to cycle through the options until you see "System".
- Press the SELECT button to confirm the selection "System".
- Repeatedly press the < or > button to cycle through the below options.
Time Setup
- Alarms
- DRC (DAB+ mode only)
- Prune (DAB+ mode only)
Factory Reset
- SW Ver (Software version)
See below for details of each option.
Using the system menu
To cycle through the options in a menu, press the < or > button.
To confirm a selection, press the SELECT button.
- To adjust a value (e.g. hour time), press the < or > button to select a value and then press the SELECT button.
- To go back to the previous menu/screen, press the BACK button.
Time Setup
The Time Setup menu contains the below options:
- Set Clock (Set the clock time: HH:MM)
- Set Date (Set the date: DD-MM-YY)
- Auto Update (To define how the radio updates the time and date information. Select "From Radio" to update from radio signals, or "No Update" to stop automatic update.)
- Set 12/24 (Set the time format: 12 or 24 hours)
Note: You can also access the Time Setup menu in standby mode. To do so, press and hold the MENU button when the radio is turned off.
Alarms
See chapter "Setting alarms".
DRC (Dynamic Range Control) (DAB+ mode only).
Use this option to add or remove a degree of compensation for the differences in the dynamic range between radio stations. Select one of the options below.
- DRC off: No compensation applied
- DRC low: Medium compensation applied
- DRC high: Maximum compensation applied
Prune (DAB+ mode only)
Use this option to remove any stations that are in the list but have no service in your area. Select "Yes" to confirm the removal.
Factory Reset
This setting clears all user-defined settings and replaces them with the original default settings. Select "Yes" to confirm factory reset.
Software Version
This option displays the current software version.
RESTTING THE UNIT
If the system does not respond or exhibit erratic or intermittent operation, you may have experienced an electrostatic discharge (ESD) or a power surge that triggered the internal microcontroller to shut down automatically. If this occurs, disconnect the AC power adaptor from the wall socket. Wait at least 3 minutes, and re-attach the AC cord to the wall outlet. The unit is now reset, and you will need to set up the unit time and alarm again.
CARE AND MAINTENANCE
- Clean the radio with a soft damp cloth and let all parts dry completely after cleaning.
- Do not use any aggressive cleaners, brushes with nylon bristles, sharp or metallic cleaning utensils, knives, scrapers and the like. They could damage the surfaces of the radio.
- Do not immerse the radio in water and do not let water getting into the housing of the radio.
SPECIFICATIONS
| Radio frequency range | FM: 87.5 – 108 MHz DAB: 174.928 – 239.200 MHz |
| USB charging output | DC 5.0V——1A |
External power supply
| Information published | Value and precision | Unit |
| Manufacturer's name or trade mark, commercial registration number and address | DongGuan Obelieve Electronic Co.,Ltd WuKeng Intersection,TangLi,FengGang,DongGuan, GuangDong Province,P.R.C | |
| Model identifier | 0BL-0501500E | |
| Input voltage | 100-240 | V |
| Input AC frequency | 50-60 | Hz |
| Output voltage | DC 5.0 | V |
| Output current | 1,5 | A |
| Output power | 7,5 | W |
| Average active efficiency | 76,7 | % |
| Efficiency at low load (10 %) | - | % |
| No-load power consumption | 0,10 | W |

Alternating current

Direct current
DISPOSAL

As a responsible retailer we care about the environment. As such we urge you to follow the correct disposal procedure for the product, packaging materials and if applicable, accessories. This will conserve natural resources and ensure that the material is recycled in a manner that protects health and the environment.
You must follow laws and regulations about disposal. Waste electrical products must be disposed of separately from household waste when the product reaches the end of its life. Contact the store where you bought the product and your local authority to learn about disposal and recycling.
We apologise for any inconvenience caused by minor inconsistencies in these instructions, which may occur as a result of product improvement and development.
EU Declaration of Conformity
The object of the declaration described above is in conformity with the relevant Union harmonisation legislation:
This declaration of conformity is drawn up under the sole responsibility of the manufacturer.
The person responsible for this declaration is:
Place, Date / Lieu :