USER MANUAL RA-F324B JVC
ENTRETIEN ET NETTOYAGE
https://www.darty.com/achat/services/reparation-hors-garantie/index.html


Hotline Darty France
Achteraanzicht

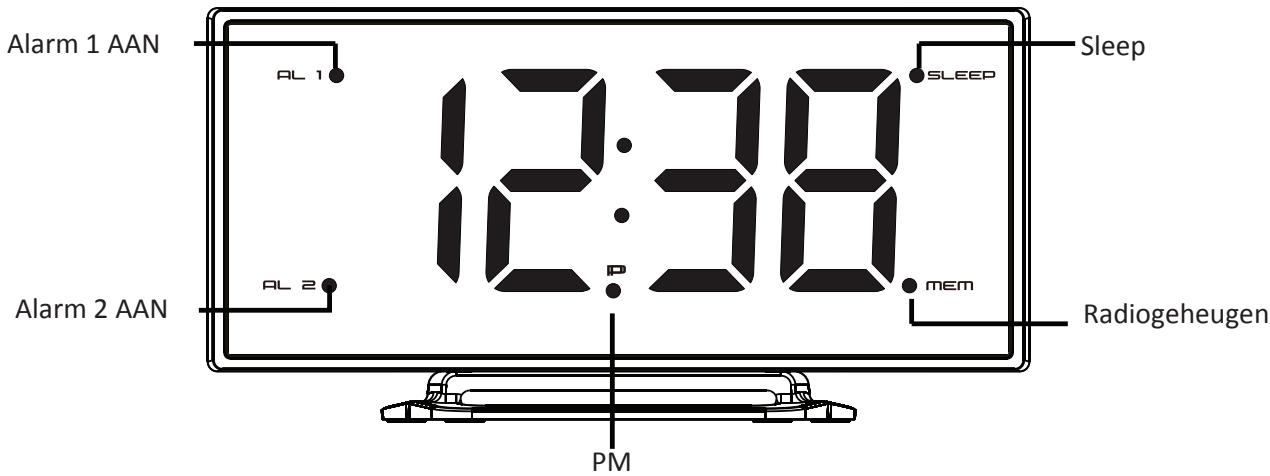
Controlelampjes
OP DE VOEDING AANSLUITEN
EXTERNE APPARATEN OPLADEN
REINIGING EN ONDERHOUD
This product is manufactured, distributed, serviced and warranted exclusively by
"JVC" is the trademark of JVCKENWOOD Corporation, used by Etablissements DARTY et Fils under license.
WARNINGS
- Heed all warnings – All warnings on the appliance and in the operating instructions should be adhered to.
- Follow all instructions – All operating and use instructions should be followed.
- Do not use this apparatus near water. – The appliance should not be used near water or moisture – for example, in a wet basement or near a swimming pool, and the like.
- Do not install near any heat sources such as radiators, heat registers, stoves, or other apparatus (including amplifiers) that produce heat.
- Only use attachments/accessories specified by the manufacturer.
- Ventilation
Allow at least a 5 cm gap all around the product.
- The ventilation should not be impeded by covering the ventilation openings with items, such as newspapers, table-cloths, curtains, etc.
- No naked flame sources, such as lighted candles, should be placed on the apparatus.
- This apparatus is not suitable for use in a tropical climate.
- The apparatus shall not be exposed to dripping or splashing and that no objects filled with liquids, such as vases, shall be placed on the apparatus.
- Where the MAINS plug or an appliance coupler is used as the disconnect device, the disconnect device shall remain readily operable.
- Batteries (battery pack or batteries installed) shall not be exposed to excessive heat such as sunshine, fire or the like.
- To protect the environment, use local recycling facilities for battery disposal.
- Do not ingest battery, Chemical Burn Hazard.
- Keep new and used batteries away from children.
- Replacement of a battery with an incorrect type that can defeat a safeguard (for example, in the case of some lithium battery types).
- Disposal of a battery into fire or a hot oven, or mechanically crushing or cutting of a battery or expose to excessive heat such as sunshine, fire or the like that can result in an explosion.
- Leaving a battery in an extremely high temperature surrounding environment that can result in an explosion or the leakage of flammable liquid or gas.
- A battery subjected in extremely low air pressure that may result in an explosion or the leakage of flammable liquid or gas.
- Batteries are to be inserted with the correct polarity.
- Exhausted batteries are to be removed from the appliance.
- The supply terminal are not to be short-circuited.
- The marking plate is located on the back of the apparatus.
Symbols

This mark is applied to show the equipment conforms to European radio equipment directive.

For power adapter:
This symbol indicates that the unit has double insulation and an earth connection is not required.

For indoor use only

Use only power supplies in the user manual.
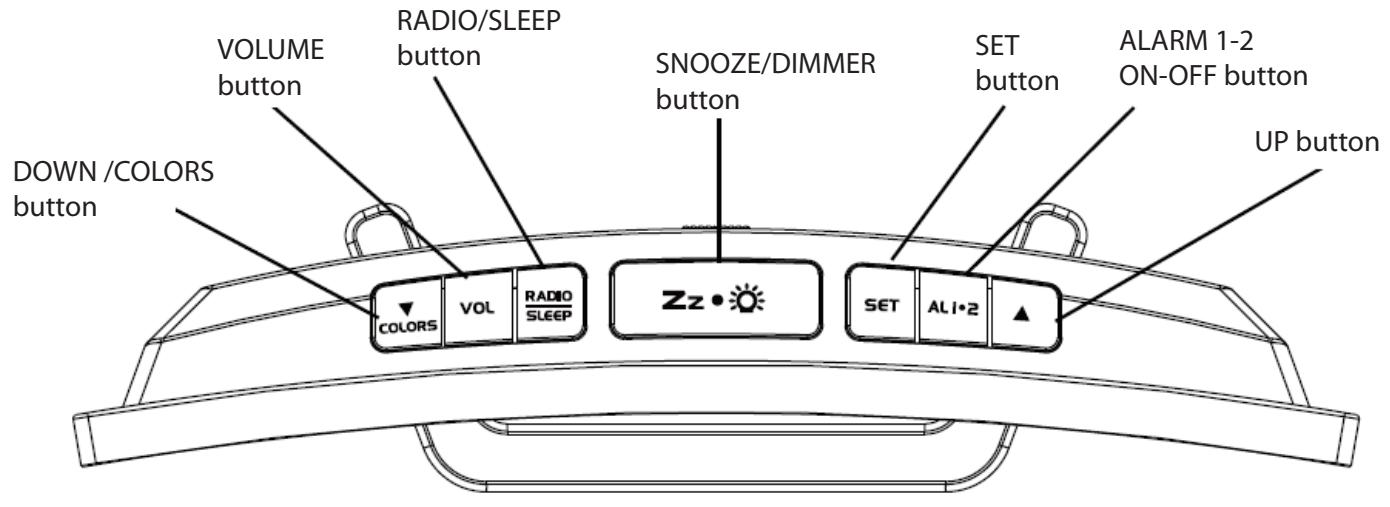
Top View
Rear View

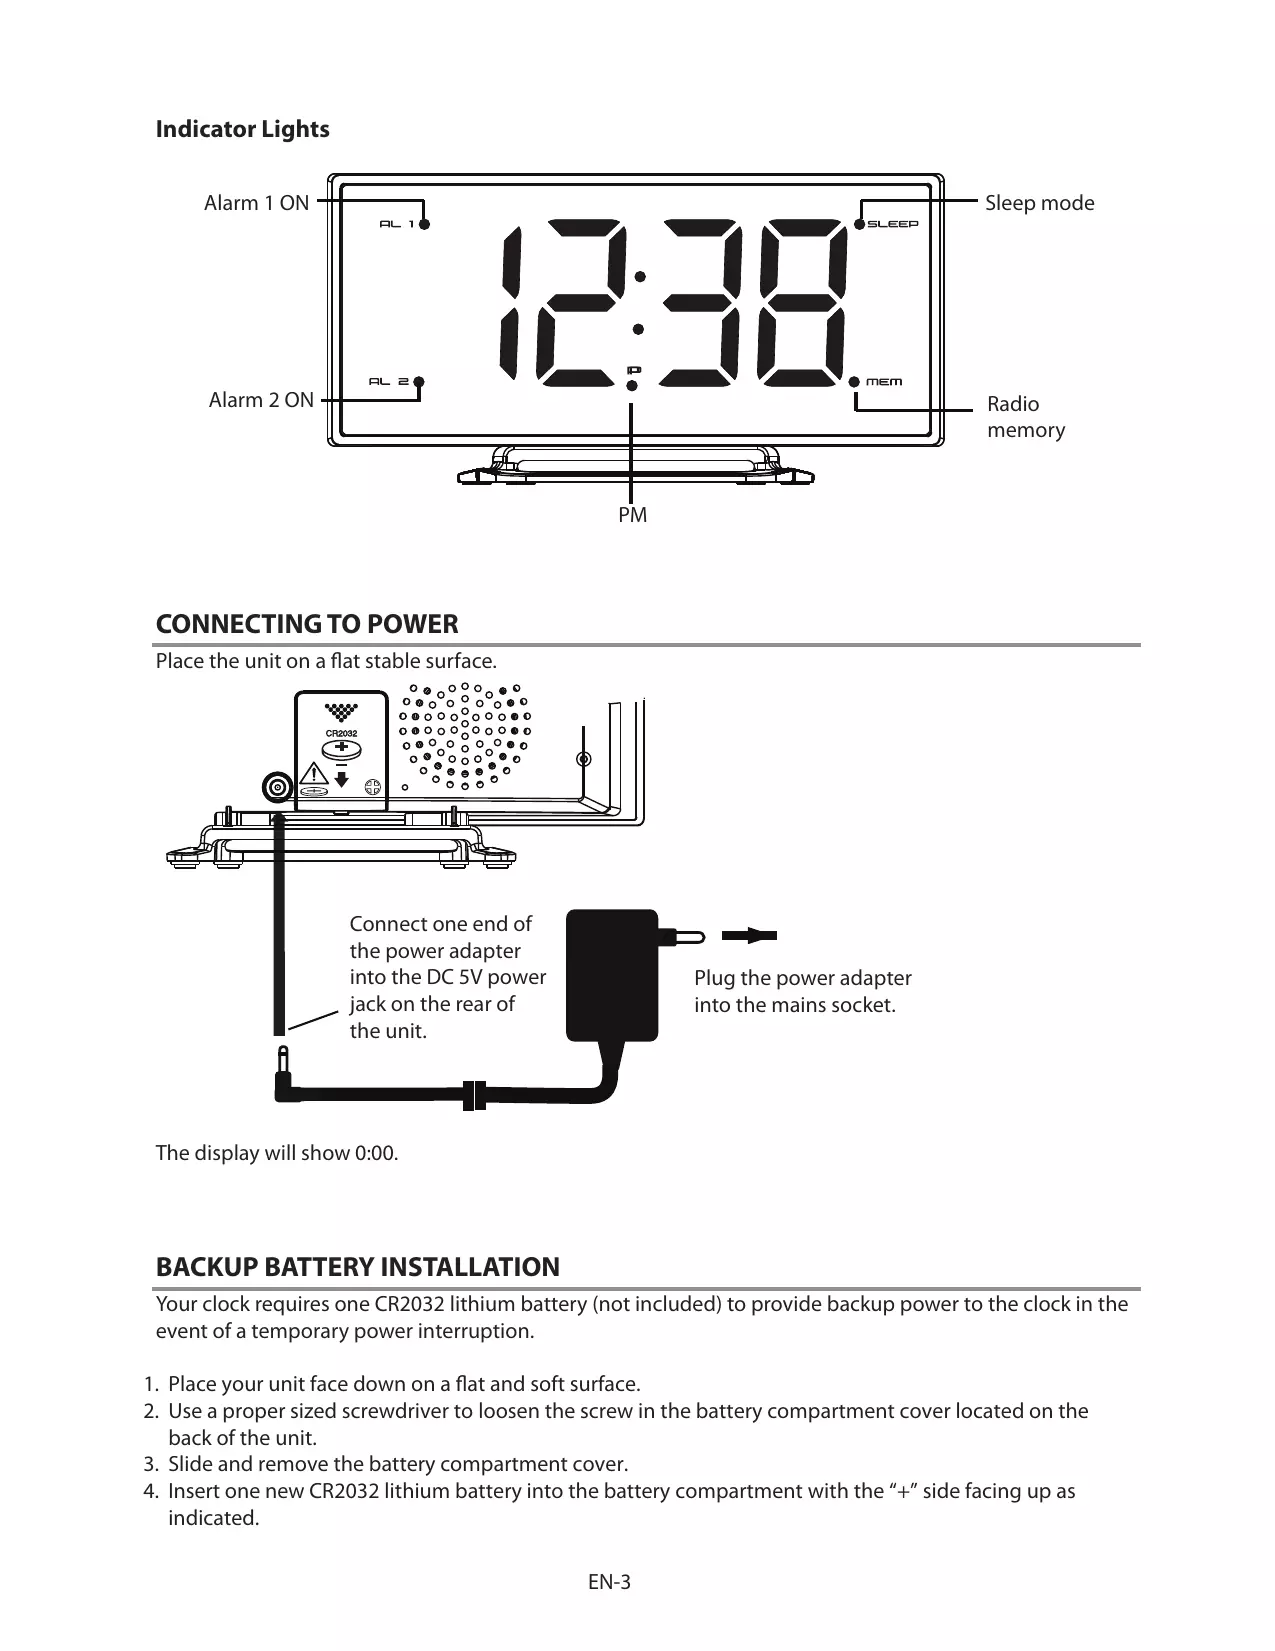
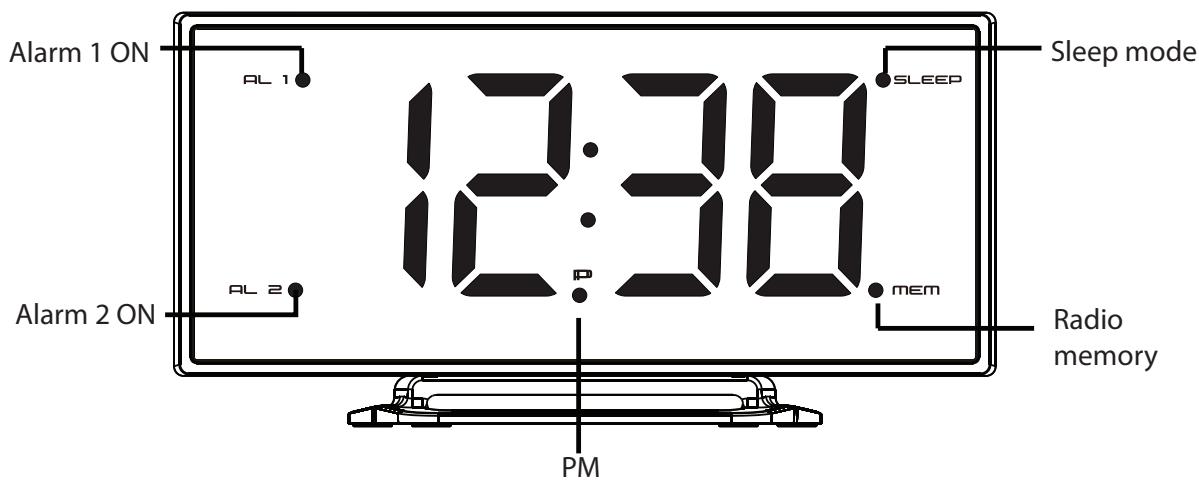
Indicator Lights
CONNECTING TO POWER
Place the unit on a flat stable surface.
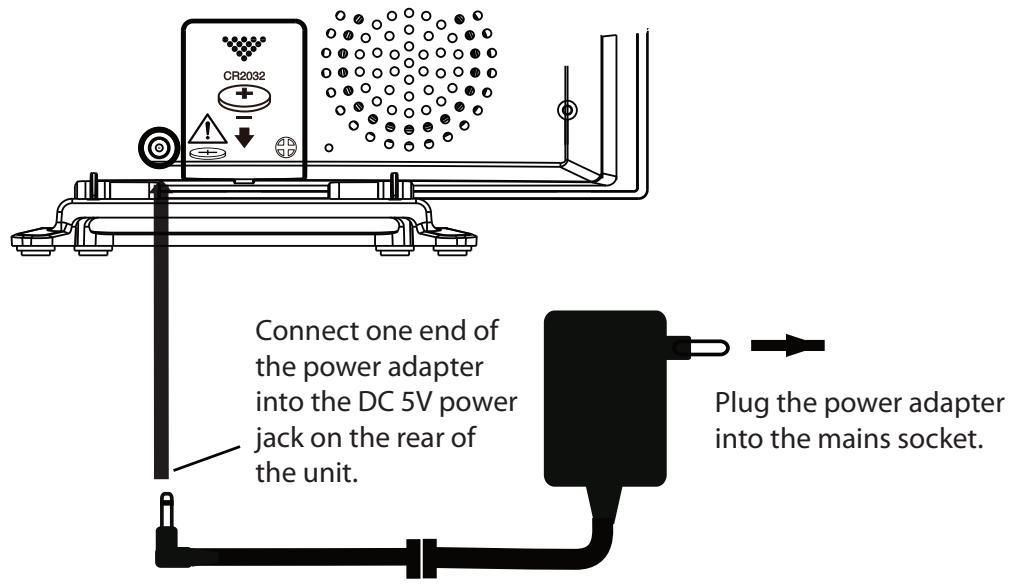
The display will show 0:00.
BACKUP BATTERY INSTALLATION
Your clock requires one CR2032 lithium battery (not included) to provide backup power to the clock in the event of a temporary power interruption.
- Place your unit face down on a flat and soft surface.
- Use a proper sized screwdriver to loosen the screw in the battery compartment cover located on the back of the unit.
- Slide and remove the battery compartment cover.
-
Insert one new CR2032 lithium battery into the battery compartment with the "+" side facing up as indicated.
-
Replace the battery compartment cover and tighten the screw.
If AC power is interrupted, the LED display will go off and the alarm will not function. The backup battery will keep the time and all settings of your unit. Make sure a fresh CR2032 lithium battery is used. A fresh CR2032 battery could backup your clock continuously for around 3 days.
SETTING THE CLOCK AND SNOOZE DURATION
-
Press and hold SET until the hour digit flashes on the display.
-
While the hour digit is flashing, repeatedly press ▲/▼ until the desired hour appears.
- Press and hold ▲/▼ for fast setting.
- Press SET to confirm.
- The minute digits will flash on the display.
- While the minute digits are flashing, repeatedly press ▲/▼ until the desired minutes appear.
- Press and hold ▲/▼ for fast setting.
- Press SET to confirm.
- The hour format will flash on the display.
- While the hour format is flashing, repeatedly press ▲/▼ to select 12-hour or 24-hour format. Press SET to confirm.
- The snooze time will flash on the display.
- While the snooze time is flashing, repeatedly press ▲/▼ until the desired snooze time appears. Press SET to confirm.
- Press and hold ▲/▼ for fast setting.
- The snooze time can be selected from 5 to 60 minutes.
- If the button is not pressed in around 10 seconds, the unit will exit from the setting.
NOTE: In 12-hour format, the P indicator light will illuminate on the display for PM time.
ALARM 1 & 2 OPERATION
Before setting the alarm time, make sure the Clock has been set.
Setting Alarm 1 / Alarm 2
- In clock time state, press and hold ALI•2 for about 2 seconds.
- The Alarm 1 indicator light and hour digits will flash on the display.
- While the hour digits are flashing, set hours for alarm 1 by repeatedly pressing ▲/▼.
- Press and hold ▲/▼ for fast setting.
- Press AL1·2 to confirm.
• The minute digits will flash.
- While the minute digits are flashing, set minutes for alarm 1 by repeatedly pressing ▲/▼.
- Press and hold ▲/▼ for fast setting.
- Press AL1·2 to confirm.
- "bu" will flash on the display.
- While "bu" is flashing, set the alarm to wake to the desired mode by repeatedly pressing ▲/▼.
- bu= wake-by-buzzer
- rd = wake-by-radio
-
Press AL1·2 to confirm.
-
If you set the alarm to wake-by-radio, you can adjust the alarm volume by pressing ▲/▼. "HI" (high volume) or "LO" (low volume) will flash on the display. Press ALI•2 to confirm.
-
The Alarm 2 indicator light and hour digits will flash on the display.
-
Follow steps 2 to 7 to set the alarm 2.
- If the button is not pressed in around 10 seconds, the unit will exit from the setting.
Activating / Deactivating alarm 1 & 2
- Press ALI•2 once to activate Alarm 1, Alarm 1 indicator light appears.
- Press AL1•2 again to activate Alarm 2, Alarm 2 indicator light appears.
- Press AL1•2 three times to activate both alarms. Both Alarm 1 and 2 indicator lights appear.
- Press AL1·2 four times to deactivate both alarms. Both Alarm 1 and 2 indicator lights disappear.
Stop and reset the alarm to come on the next day
When the alarm 1 or 2 is sounding, the Alarm 1 or Alarm 2 indicator light will flash.
To stop the alarm, press AL1•2 once. The alarm will come on again at the set time on the following days. Alarm 1 or Alarm 2 indicator light will stay on the display.
Snooze function (default snooze duration is 5 minutes)
When alarm is sounding, press Zz• once, the alarm will be silenced and come on again after the set snooze duration. The Alarm 1 or Alarm 2 indicator light will flash.
NOTE: If your second alarm activates while the first alarm is sounding or it is in the snooze mode, the second alarm overrides the first alarm (the first alarm will be reset to come on the next day).
LISTENING TO THE FM RADIO
Extend the FM wire antenna fully and vary the direction for the best FM reception. Do not strip, alter or attach to other antennas.
Setting the FM radio automatically
- To turn on the radio, press once.
- The display will show "ON" and then the radio frequency is in MHz.
- Press and hold Zz•☀️ for about 2 seconds and then release the button to activate auto scanning and storage of preset memory.
- The scanning and storage will automatically stop and return to preset memory 1 upon completion (up to 20 memory presets).
- Press once to turn off the radio.
Setting the FM radio manually
- To turn on the radio, press once.
- The display will show "ON" and then the radio frequency is in MHz.
- Repeatedly press ▲/▼ to tune into the desired station.
- Press and hold ▲/▼ for about 2 seconds and then release the button, the unit will scan the frequencies until a broadcasting station strong enough for good reception is found.
-
To adjust the volume, press VOL once. The display will show "L05". While "L05" is shown, repeatedly press to set the desired volume from L01 (minimum) to L16 (maximum).
-
Press once to turn off the radio.
NOTE: Keep your radio away from fluorescent lamps or other electronic devices, which may cause interference to the radio.
PRESETTING YOUR FAVOURITE RADIO STATION
Up to 20 FM radio stations can be preset. This allows you to preset your favorite stations and access them quickly.
- Turn on the radio and select a radio station you like to memorize.
- Press and hold SET until the radio memory indicator light and "P01" flashes on the display.
- Press SET once to store selected radio station into Memory 1.
- Repeatedly press ▲/▼ to select another station you like to memorize. Then press and hold SET until memory indicator light and "P01" flash on the display. Press ▲ once and "P02" will flash on the display. Press SET once to store preset radio station into Memory 2.
- Repeat Step 2 to 4 to preset memories 3 through 20.
To listen to a preset station
While the radio is turned on, repeatedly press SET to select the desired radio station.
To change a preset station
- Tune into the new station that you want to store.
- Press and hold SET until the radio memory and preset number indicator lights begin flashing.
- Repeatedly press ▲/▼ until the preset number that you want to change is flashing on the display.
- Press SET once. The new station is entered into the preset memory number that you selected and the previous station is deleted.
USING THE SLEEP TIMER
- In FM radio mode, press and hold for about 2 seconds to enter the sleep mode.
- The sleep indicator light and "05" (5 minutes) will appear on the display.
- While the sleep time is displayed, repeatedly press to select the desired sleep time from 5,10,15,30,45,60,75 or 90 minutes.
- To deactivate the sleep timer, repeatedly press until the display shows "OFF."
- The radio will be turned off after the set sleep time has elapsed.
To check remaining sleep time
When the display shows the clock time, press and hold for about 2 seconds to show the remaining sleep time.
To turn off the radio before the sleep time has elapsed, press once.
DIMMER (Display brightness) CONTROL
Under CLOCK mode, repeatedly press Zz ●☀️ to adjust the brightness of the LED display among HI-LO color, a dim blue (as a sleep display) and off settings.
Or under RADIO mode, repeatedly press Zz ●☀️ to adjust the brightness of the LED display among HI-LO color, a dim blue (as a sleep display) and off settings.
You could select different color display in your clock. Repeatedly press COLORS to select your favorite color in the following order:
• Multiple Color Display (default)
- Gradient Color Changing Display (C1)
• Constant Color Display (C2)
- Gradient Multiple Color Digits Changing Display (C3)
• Constant Multiple Color Digits display (C4)
NOTE: When the dim blue sleep display is selected, the above selection of different color displays does not work.
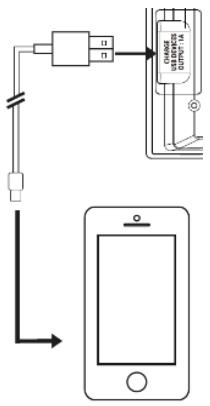
CHARGING EXTERNAL DEVICES
Connect an external device (e.g. smartphone) via a USB cable (not provided) to the USB charging port on the back of the radio for charging. The radio cannot access the contents in the connected external device.
CARE AND MAINTENANCE
- Clean the radio with a soft damp cloth and let all parts dry completely after cleaning.
- Do not use any aggressive cleaners, brushes with nylon bristles, sharp or metallic cleaning utensils, knives, scrapers and the like. They could damage the surfaces of the radio.
- Do not immerse the radio in water and do not let water getting into the housing of the radio.
- If the unit is not to be used for a prolonged period, such as a month or longer, remove the battery to prevent possible corrosion. Should the battery compartment become corroded or dirty, clean the compartment thoroughly and replace the battery.
- Do not open the inner back case or tamper with any components of this radio.
SPECIFICATIONS
| Radio frequency range | FM: 87.5 – 108.0 MHz |
| USB charging output | DC 5.0V— — 1A |
| Battery backup | 1 x CR2032 (not included) |
External power supply
| Information published | Value and precision | Unit |
| Manufacturer's name or trade mark, commercial registration number and address | SHENZHEN KEYU POWER SUPPLY TECHNOLOGY CO., LTD.91440300591889293HLane3,Yuquan East Road, the 2nd Industrial park, Yulv , Guangming District, Shenzhen ,Guangdong Province, P.R.China |
| Model identifier | KA0601A-0501200EUS |
| Input voltage | AC 100-240 | V |
| Input AC frequency | 50/60 | Hz |
| Output voltage | DC 5,0 | V |
| Output current | 1,2 | A |
| Output power | 6,0 | W |
| Average active efficiency | ≥77,1 | % |
| Efficiency at low load (10 %) | - | % |
| No-load power consumption | ≤0,06 | W |

Alternating current

Direct current
DISPOSAL


As a responsible retailer we care about the environment. As such we urge you to follow the correct disposal procedure for the product, packaging materials and if applicable, accessories.
This will conserve natural resources and ensure that the material is recycled in a manner that protects health and the environment.
You must follow laws and regulations about disposal. Waste electrical products must be disposed of separately from household waste when the product reaches the end of its life.
Contact the store where you bought the product and your local authority to learn about disposal and recycling.
We apologise for any inconvenience caused by minor inconsistencies in these instructions, which may occur as a result of product improvement and development.
EU Declaration of Conformity
Clock Radio with Colour LED Screen
The object of the declaration described above is in conformity with the relevant Union harmonisation legislation:
EN IEC 62368-1:2020 +A11:2020

This declaration of conformity is drawn up under the sole responsibility of the manufacturer.
The person responsible for this declaration is:
Place, Date / Lieu :
Ivry-sur-Seine, mai 24, 2024


JVC