PROLINECadre photonumériquePL-DPF720 - Digital photo frame DARRY - Free user manual and instructions
Find the device manual for free PROLINECadre photonumériquePL-DPF720 DARRY in PDF.
| Product type | Digital photo frame |
| Brand | DARRY |
| Model | PL-DPF720 |
| Screen resolution | 800 x 480 pixels |
| Screen format | 16:9 |
| Screen type | LCD |
| Supported media | SD/MMC/SDHC card, USB key |
| Photo format | JPEG |
| Input power | AC 100-240V, 50/60Hz, 0.2A max |
| Output power | DC 5V, 1A |
| Power consumption | 5 W |
| Operating temperature | 5°C to 35°C |
| Connections | 1x USB port, 1x SD slot, 1x PC port (USB) |
| Package contents | Photo frame, power adapter, instruction manual, strap |
| Main functions | Slideshow, calendar, clock, date/time setting, auto on/off |
| Slideshow settings | Interval (5s to 30min), transition, scale, repeat |
| Rotation and zoom | Rotation 0/90/180/270°, zoom x1 to x4 |
| Double insulation | Yes |
| Usage | Household use only, indoor |
| Safety | Do not block vents, avoid heat sources, do not expose to water |
| Maintenance | Clean with a soft dry cloth |
| Auto power on | Yes, programmable |
| Auto power off | Yes, programmable |
Frequently Asked Questions - PROLINECadre photonumériquePL-DPF720 DARRY
User questions about PROLINECadre photonumériquePL-DPF720 DARRY
0 question about this device. Answer the ones you know or ask your own.
Ask a new question about this device
Download the instructions for your Digital photo frame in PDF format for free! Find your manual PROLINECadre photonumériquePL-DPF720 - DARRY and take your electronic device back in hand. On this page are published all the documents necessary for the use of your device. PROLINECadre photonumériquePL-DPF720 by DARRY.
USER MANUAL PROLINECadre photonumériquePL-DPF720 DARRY
Hotline Darty France
- This appliance is intended for domestic household use only and should not be used for any other purpose or in any other application, such as for non domestic use or in a commercial environment.
- Ventilation
Allow at least a 10 ~cm gap all around the product.
-
The ventilation should not be impeded by covering the ventilation openings with items, such as newspapers, table-cloths, curtains, etc.
-
No naked flame sources, such as lighted candles, should be placed on the apparatus.
-
Attention should be drawn to the environmental aspects of battery disposal. Don't throw used batteries in dustbin. Please contact your retailer in order to protect the environment.
This apparatus is not suitable for use in a tropical climate.
-
The apparatus shall not be exposed to dripping or splashing and that no objects filled with liquids, such as vases, shall be placed on the apparatus.
-
To protect the environment, use local recycling facilities for battery disposal.
-
Batteries (battery pack or batteries installed) shall not be exposed to excessive heat such as sunshine, fire or the like.
-
Where the MAINS plug or an appliance couple is used as the disconnect device, the disconnect device shall remain readily operable.
. CAUTION
Danger of explosion if battery is incorrectly replaced. Replace only with the same or equivalent type.

This equipment is double insulated and an earth connection
is not required.

This mark is applied to show the equipment conforms to
the European low voltage and electromagnetic compatibility directives.

PACKAGE CONTENT
Digital photo frame (1)
Power adapter (1)
Instruction manual (1)
- Bracket (1)

IDENTIFYING THE PARTS
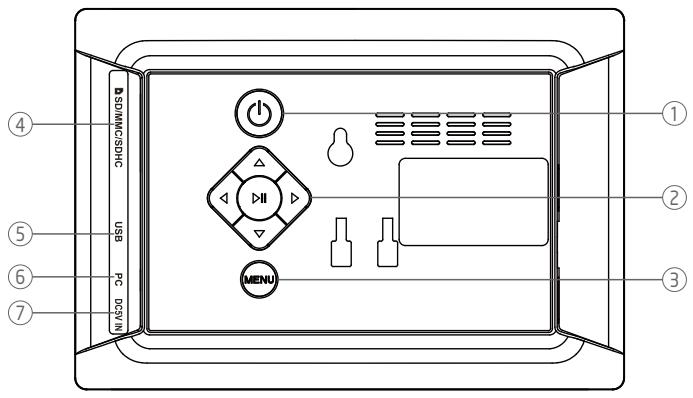
- Power button
- / / / Buttons
- MENU Menu button
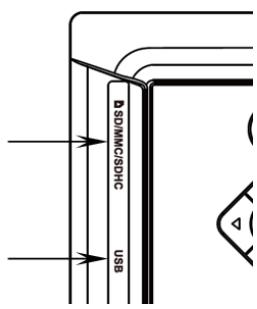
- SD/MMC/SDHC Card slot
- USB Port
- PC Port
- DC5V IN Socket

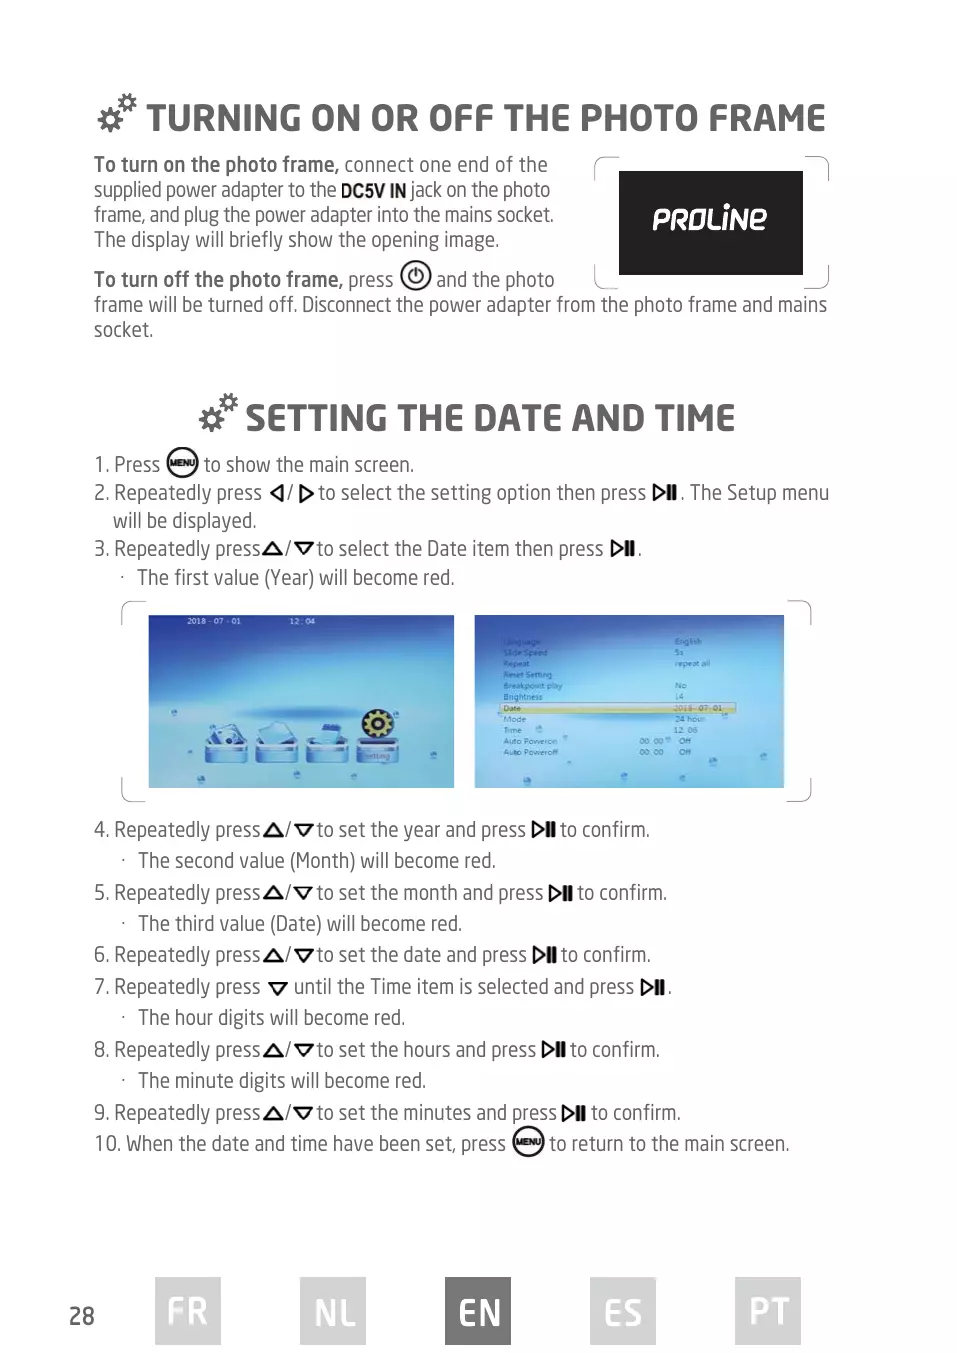
TURNING ON OR OFF THE PHOTO FRAME
To turn on the photo frame, connect one end of the supplied power adapter to the DC5V IN jack on the photo frame, and plug the power adapter into the mains socket. The display will briefly show the opening image.
PROLINE
To turn off the photo frame, press () and the photo
frame will be turned off. Disconnect the power adapter from the photo frame and mains socket.

SETTING THE DATE AND TIME
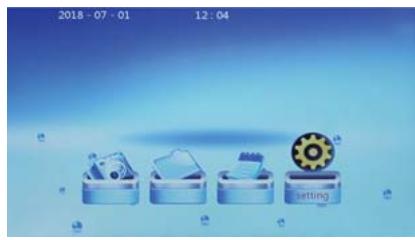
- Press menu to show the main screen.
- Repeatedly press / to select the setting option then press . The Setup menu will be displayed.
- Repeatedly press / to select the Date item then press
The first value (Year) will become red.
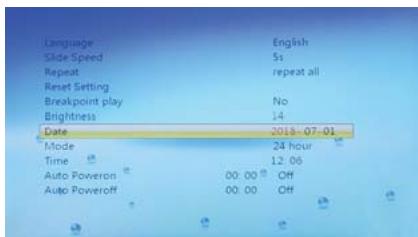
- Repeatedly press / to set the year and press to confirm.
The second value (Month) will become red.
- Repeatedly press / to set the month and press to confirm.
The third value (Date) will become red. - Repeatedly press / to set the date and press to confirm.
- Repeatedly press until the Time item is selected and press
The hour digits will become red.
- Repeatedly press / to set the hours and press to confirm.
The minute digits will become red. - Repeatedly press / to set the minutes and press to confirm.
- When the date and time have been set, press (MEN) to return to the main screen.

CONNECTING TO PC AND USING COPY FUNCTION
The photo frame has built-in memory.
- Connect the photo frame to PC using a USB cable.
- When connected correctly, the screen will show 'USB device is connecting'.
- You can copy and pasta photos between PC and photo frame.

DISPLAYING PHOTOS
-
Insert a memory card or USB memory firmly into the corresponding slot or port of the photo frame.
-
Playback will automatically begin and images on the memory card or USB memory will be displayed one after another as a slideshow.
-
To pause, press . The photo information will be displayed.
- To resume the slideshow, press again.
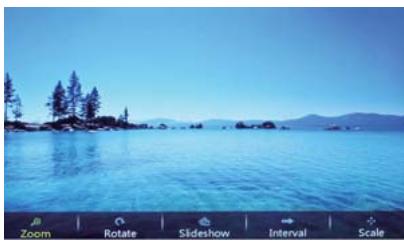
- When playing photos, press and then press and hold (MENU) for about 3 seconds to see a menu list for you to adjust the photo.
- Use / to select Zoom and then press to set the magnification of the picture: x1, x2, x3, x4.
Use / to select Rotate and then press to the angle of rotation: 0, 90, 180, 270. - Use / to select Slideshow and then press to show a list. Use / to select the switching mode of slideshow and then press to confirm.
- Use / to select Interval and then press
to show a list. Use / to select a switching speed and then press to confirm.
- Use / to select Scale and then press to show a list. Use / to select a Scale type and then press to confirm.
To exit from the current setting, press (MENU).
- Press to show a thumbnail of images.
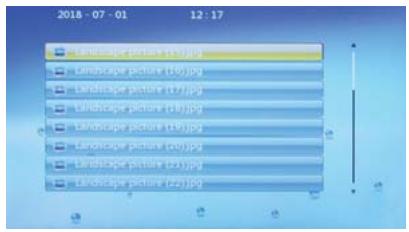
- To exit, press (MEN) to return to the main screen.

DISPLAYINGCALENDAR
- Repeatedly press / to select the calendar option then press
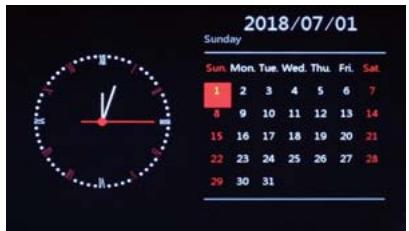
- Repeatedly press / to view the monthly calendar.
- To exit, press (MENU) to return to the main screen.

CHANGING THE MENU SETTINGS
- Repeatedly press / to select the setting option then press . The Setup menu will be displayed.
- Repeatedly press / to select an item then press
- Repeatedly press / to select a setting and then press to confirm.
- To exit, press (MEN) to return to the main screen.
| Language | Set the language |
| Slide Speed | 5s /10s /15s /1min /15min /30min |
| Repeat | Repeat all / off / one / play random |
| Reset Setting | Cue: Restore factory setting? Yes or No |
| Breakpoint Play | Yes or NO |
| Brightness | 1 to 15 |
| Date | YYYY-MM-DD |
| Mode | 24 hour or 12 hour |
| Time | Hour / Minute |
| Auto Power On | You can set the time for the photo frame to turn on or off automatically. 1. When selecting this item, press ➔ and the hour digits become red. 2. Repeatedly press ▲/ ▼to set the hours and press ➔ to confirm. · The minute digits will become red. 3. Repeatedly press ▲/ ▼to set the minutes and press ➔ to confirm. 4. Repeatedly press ▲/ ▼to set the status - Once, Every time or Off. Press ➔ to confirm. |
| Auto Power Off | |
| Model | PL-DPF720 |
| Power adapter | Input: AC100-240V~, 50/60Hz, 0.2A Max. Output: 5.0V == 1.0A |
| Panel resolution | 800 x 480 pixels |
| Screen format | 16:9 |
| Media | SD / MMC / SDHC + USB |
| Photo format | JPEG |
| Operating temperature | 5°C ~ 35°C |
Direct current Alternating Current

EXTERNAL POWER SUPPLY
| Information published | Value and precision | Unit |
| Manufacturer's name or trade mark, commercial registration number and address | Shenzhen Keyu Power Supply Technology Co., Ltd. 2~3F, No. 13, Lane 3, Yuquan East Road, the 2nd Industrial Guangming District, 518000 Shenzhen, P.R.China | |
| Model identifier | KA0601A-0501000EUS | |
| Input voltage | 100-240 | V |
| Input AC frequency | 50/60 | Hz |
| Output voltage | DC 5,0 | V |
| Output current | 1,0 | A |
| Output power | 5,0 | W |
| Average active efficiency | 74,0 | % |
| Efficiency at low load (10%) | - | % |
| No-load power consumption | 0,09 | W |

For indoor use only
Positive polarity

TROUBLESHOOTING
| Problem | Possible Cause / Solution |
| No power | The power adapter is not properly connected to the unit and the mains socket. |
| Screen freezes and does not respond to control. | The unit may have malfunctioned. Switch it off and wait for a few minutes before turning it on again. |
| Unable to insert memory card or USB device | Memory card or USB device is not inserted incorrectly. |
| The unit fails to read memory card or USB device. | Check whether the memory card or USB device is inserted properly. Do not force the memory card in. |
DISPOSAL

As a responsible retailer we care about the environment. As such we urge you to follow the correct disposal procedure for the appliance and packaging materials. This will help conserve natural resources and ensure that it is recycled in a manner that protects health and the environment.
You must dispose of this appliance and its packaging according to local laws and regulations. Because this appliance contains electronic components, the appliance and its accessories must be disposed of separately from household waste when the appliance reaches its end of life.
Contact your local authority to learn about disposal and recycling.
The appliance should be taken to your local collection point for recycling. Some collection points accept appliance free of charge.
We apologise for any inconvenience caused by minor inconsistencies in these instructions, which may occur as a result of product improvement and development.
Etablissements Darty & fils ©, 129 Avenue Gallieni, 93140 Bondy, France 23/06/2021
INDICE
ADVERTENCIAS. p.36
CONTENIDO. p.38
IDENTIFICACION DE PARTES. p.38
CÓMOCENCENDER O APAGAR EL MARCO DE FOTOS. .p.39
AJUSTE DE LA FECHA Y LA HORA. .p.39
CÓMOCONECTARSEAUNPCYUSARLA FUNCIONDECOPIAR. .p.40
VISUALIZACION DE FOTOS. p.40
CÓMOMOSTRARELCALENDARIO. p.41
CÓMOCAMBIAR LOS AJUSTES DEL MENU. .p.42
ESPECIFICACIONES. p.43
fuENTE DE ALIMENTACION EXTERNA .p.43
SOLUTION DE PROBLEMAS. p.44
DISPOSICION. p.45
ADVERTENCIAS
EU Declaration of Conformity
Product Description:
We declare that the above product has been evaluated and deemed to comply with the requirements of the listed European Directives and standards:
Low Voltage Directive (LVD)
Eco design requirements for energy-related products (ErP)
RoHS
EMC:
EN 55032:2015
EN 55035:2017
EN 61000-3-2:2014
EN 61000-3-3:2013
LVD:
EN 62368-1:2014+A11:2017
ErP:
(EU) 2019/1782
EN 50563:2011+A1:2013
This declaration of conformity is drawn up under the sole responsibility of the manufacturer.
The person responsible for this declaration is:
Fonction - Position: General Manager Direct Sourcing
Place, Date / Lieu :
Bondy,juin 25,2021


PROLINE
Etablissements Darty & fils ©, 129 Avenue Gallieni, 93140 Bondy, France