
EMI47103PWHT - Consumer Electronics MEMOREX - Free user manual and instructions
Find the device manual for free EMI47103PWHT MEMOREX in PDF.
| Product Type | Consumer electronic device |
| Brand | MEMOREX |
| Model | EMI47103PWHT |
| Dimensions (L x W x H) | 20.0 x 15.0 x 5.0 cm |
| Weight | 0.5 kg |
| Power Supply | AC adapter 5V DC / 2A |
| Power Consumption | 10 W max |
| Main Functions | Playback of audio and video files, USB connectivity |
| Connectivity | USB 2.0 port, 3.5 mm audio jack output |
| Supported Formats | MP3, WAV, JPEG, MPEG-4 |
| Display | 2.4 inch LCD screen |
| Speakers | Built-in |
| Battery | Rechargeable lithium-ion, 1000 mAh |
| Battery Life | Approximately 4 hours |
| Care and Cleaning | Clean with a soft, dry cloth; avoid liquids |
| Safety | Keep out of reach of children, do not expose to moisture |
| Spare Parts and Repairability | Contact MEMOREX customer service for spare parts |
| General Information | Compliant with Canadian ICES-003 standard |
Frequently Asked Questions - EMI47103PWHT MEMOREX
User questions about EMI47103PWHT MEMOREX
0 question about this device. Answer the ones you know or ask your own.
Ask a new question about this device
Download the instructions for your Consumer Electronics in PDF format for free! Find your manual EMI47103PWHT - MEMOREX and take your electronic device back in hand. On this page are published all the documents necessary for the use of your device. EMI47103PWHT by MEMOREX.
USER MANUAL EMI47103PWHT MEMOREX
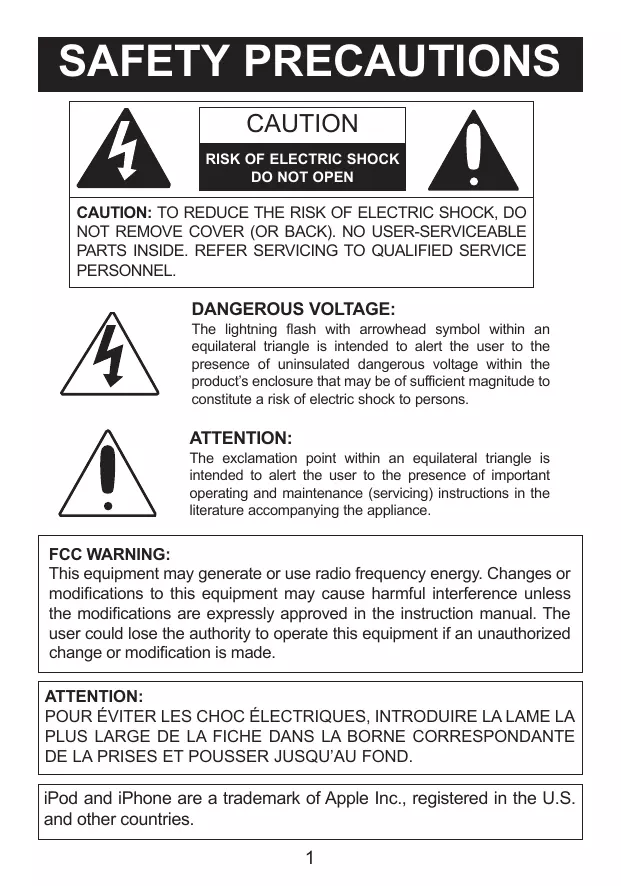
The lightning flash with arrowhead symbol within an equilateral triangle is intended to alert the user to the presence of uninsulated dangerous voltage within the product's enclosure that may be of sufficient magnitude to constitute a risk of electric shock to persons.

ATTENTION:
The exclamation point within an equilateral triangle is intended to alert the user to the presence of important operating and maintenance (servicing) instructions in the literature accompanying the appliance.
FCC WARNING:
This equipment may generate or use radio frequency energy. Changes or modifications to this equipment may cause harmful interference unless the modifications are expressly approved in the instruction manual. The user could lose the authority to operate this equipment if an unauthorized change or modification is made.
ATTENTION:
POUR ÉVITER LES CHOC ÉLECTRIQUES, INTRODUIRE LA LAME LA PLUS LARGE DE LA FICHE DANS LA BORNE CORRESPONDANTE DE LA PRISES ET POUSSER JUSQU'AU FOND.
iPod and iPhone are a trademark of Apple Inc., registered in the U.S. and other countries.
SAFETY PRECAUTIONS
NOTE: This equipment has been tested and found to comply with the limits for a Class B digital device, pursuant to part 15 of the FCC Rules. These limits are designed to provide reasonable protection against harmful interference in a residential installation.
This equipment generates, uses and can radiate radio frequency energy and, if not installed and used in accordance with the instructions, may cause harmful interference to radio communications. However, there is no guarantee that interference will not occur in a particular installation. If this equipment does cause harmful interference to radio or television reception, which can be determined by turning the equipment off and on, the user is encouraged to try to correct the interference by one or more of the following measures:
- Reorient or relocate the receiving antenna.
- Increase the separation between the equipment and receiver.
- Connect the equipment into an outlet on a circuit different from that to which the receiver is connected.
- Consult the dealer or an experienced radio/TV technician for help.
- The rating information is located at the bottom of the apparatus.
WARNING: TO PREVENT FIRE OR SHOCK HAZARD, DO NOT EXPOSE THIS UNIT TO RAIN OR MOISTURE.
SURGE PROTECTORS: It is recommended to use a surge protector for AC connection. Lightning and power surges ARE NOT covered under warranty for this product.
Only use attachments/accessories specified by the manufacturer.
To be completely disconnected from the power input, the main plug of the AC/DC adapter shall be disconnected from the electrical outlet. The main plug of the AC/DC adapter should not be obstructed OR should be easily accessed during intended use.
Do not expose the product to dripping or splashing. Do not place liquid filled objects such as vases on the product.
IMPORTANT SAFETY INSTRUCTIONS
- Read these Instructions.
- Keep these Instructions.
- Heed allWarnings.
- Follow all instructions.
- Do not use this apparatus near water.
- Clean only with a dry cloth.
- Do not block any of the ventilation openings. Install in accordance with the manufacturer's instructions.
- Do not install near any heat sources such as radiators, heat registers, stoves, or other apparatus (including amplifiers) that produce heat.
- Do not defeat the safety purpose of the polarized or grounding-type plug. A polarized plug has two blades with one wider than the other. A grounding-type plug has two blades and a third grounding prong. The wide blade or the third prong are provided for your safety. When the provided plug does not fit into your outlet, consult an electrician for replacement of the obsolete outlet.
- Protect the power cord from being walked on or pinched particularly at plugs, convenience receptacles, and the point where they exit from the apparatus.
- Only use attachments/accessories specified by the manufacturer.
- Use only with a cart, stand, tripod, bracket, or table specified by the manufacturer, or sold with the apparatus. When a cart is used, use caution when moving the cart/apparatus combination to avoid injury from tip-over.
- Unplug this apparatus during lightning storms or when unused for long periods of time.
- Refer all servicing to qualified service personnel. Servicing is required when the apparatus has been damaged in any way, such as power-supply cord or plug is damaged, liquid has been spilled or objects have fallen into the apparatus, the apparatus has been exposed to rain or moisture, does not operate normally, or has been dropped.
- Do not expose this product to dripping or splashing. Do not place objects filled with liquids, such as vases, on this product.
- Main plug is used as disconnect device and it should remain readily operable during intended use. In order to disconnect the apparatus from the mains completely, the mains plug should be disconnected from the mains socket outlet completely.
- CAUTION: To reduce the risk of fire or explosion, do not expose batteries to excessive heat such as sunshine, fire or other heat sources.

PORTABLE CART WARNING symbol provided by RETAC)
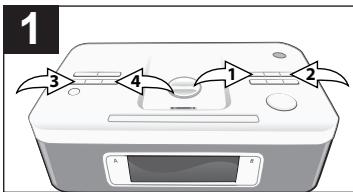
LOCATION OF CONTROLS
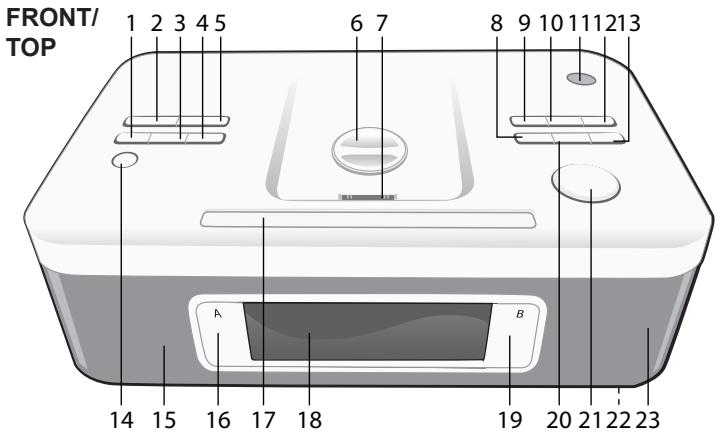
- Set Alarm A Button
- Nap Button
3 Set Time (Sync) Button - Set Alarm B Button
- Sleep Button
- iPod Support Knob
- iPod/iPhone Compartment with Connector
- Tune Down/Skip/Search K Button
- Preset 1 Button
- Preset 2 Button
- Power Button
- Preset 3 Button
- Tune Up/Skip/Search Button
-
Source Button
-
Left Speaker
- Alarm A On/Off Button
- Snooze Button
- LCD Display
- Alarm B On/Off Button
- Play/Pause▶II Button
- Volume/Time Control
- Battery Compartment (on bottom of unit)
(BATTERY COVER PART NO. BLK: 21.4.017.0023, WHT: 21.4.017.0023) - Right Speaker
*Consumer Replaceable Part (See page 19 to order.)
LOCATION OF CONTROLS (CONTINUED)
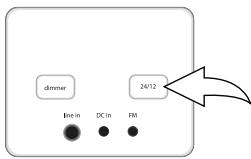
REAR PANEL
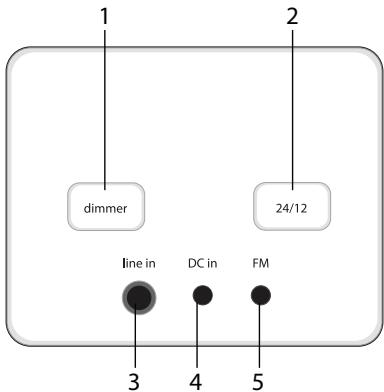
- Dimmer Button
- 24/12 Hour Button
- Line In Jack
- DC In Jack
(AC ADAPTER PART NO. BLK: 11.2.007.0039, WHT: 11.2.007.0028)
- FM In Jack
(FM WIRE PART NO. BLK: 11.1.290.0005, WHT: 11.1.290.0004)
*Consumer Replaceable Part (See page 19 to order.)
POWER SOURCE
AC CONNECTION
Insert the small end of the AC adapter into the DC In jack (located on the rear of the unit). Connect the other end to a wall outlet having 120V AC, 60 Hz.
AC Adapter, DC 9V +
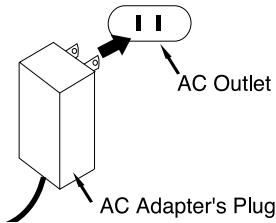
NOTES:
- Remove both the DC plug and the AC-IN plug to disconnect the AC adapter when not in use.
Only use the supplied AC adapter which has the following specs: DC 9V
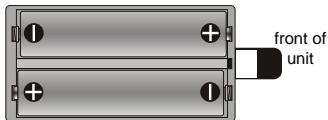
BATTERY INSTALLATION
Two (2) "AAA" size batteries can also be used to provide a back-up for the clock and alarm times and radio presets for this unit as follows:
- Open the battery door by pushing in on the tab, then removing the door.
- Insert two (2) "AAA" batteries as shown. Alkaline batteries are recommended for the longest playing time.
- Place the battery door back on the compartment.
NOTES:
- The batteries are used to back-up the clock and alarm times and radio presets when the AC adapter is disconnected or there is a power failure.
- The battery indicator will blink in the display when there are no batteries, or the batteries are low and need replacing.
IMPORTANT! See BATTERY PRECAUTIONS on the next page.
POWER SOURCE (CONTINUED)
BATTERY PRECAUTIONS
Follow these precautions when using batteries in this device:
- Warning - Danger of explosion if battery is incorrectly replaced. Replace only with the same or equivalent type.
- Use only the size and type of batteries specified.
- Be sure to follow the correct polarity when installing the batteries as indicated in the Battery Compartment. A reversed battery may cause damage to the device.
- Do not mix different types of batteries together (e.g. Alkaline, Rechargeable and Carbon-zinc) or old batteries with fresh ones.
- If the device is not to be used for a long period of time, remove the batteries to prevent damage or injury from possible battery leakage.
- Do not try to recharge a battery not intended to be recharged; it can overheat and rupture. (Follow battery manufacturer's directions.)
- Remove batteries promptly if consumed.
- Clean the battery contacts and also those of the device prior to battery installation.
CONNECTIONS
LINE IN JACK (REAR OF UNIT)
Insert one end of the audio cable (not included) into the LINE OUT jack on your external audio unit and the other end into the LINE IN jack on the rear of this unit. To listen to the external audio unit, turn this unit on using the Power button, and turn on the external unit as well. Repeatedly press the SOURCE button to select LINE IN mode; "line in" will appear in the display. The external audio unit's output sound will be heard through this unit's speakers. If you wish to listen to the iPod in the iPod compartment, repeatedly press the SOURCE button to select iPod mode; "I Pod" will appear in the display.
FM IN JACK (REAR OF UNIT)
For best reception, plug the included FM Antenna Wire into the FM Antenna Jack on the rear of the unit. Unravel and extend for best reception.
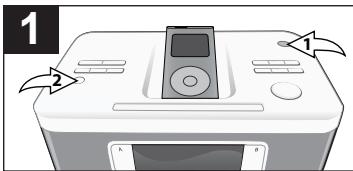
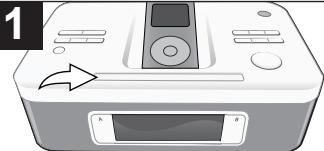
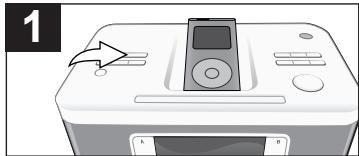
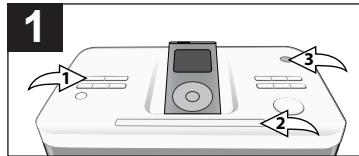
INSERTING AN iPod
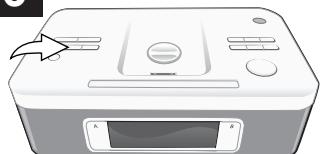
1
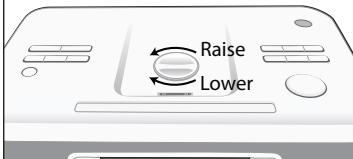
Rotate the adjustable iPod support knob counter-clockwise to raise or clockwise to lower the support position as desired.
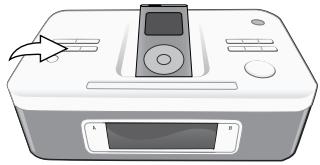
2
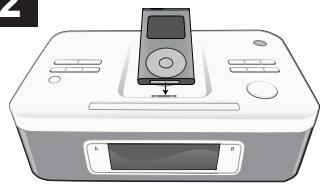
Gently slide in the iPod/iPhone so the connector on the iPod/ iPhone slides onto the connector on this unit.
3
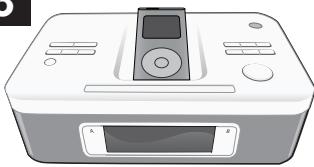
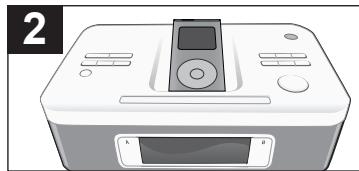
The iPod/iPhone will charge as long as this unit is connected with the AC adapter.
Please see the next page for instructions on using an iPod/ iPhone with this unit.
NOTES:
- When the iPod/iPhone is connected to this unit, and in iPod mode, it will be in the Pause mode and the Pause icon will flash in the display.
- To remove the iPod/iPhone, gently slide it off the connector.
- CHARGING: When the iPod/ iPhone is inserted into the dock, whether this unit is on or off, the iPod/iPhone's battery will charge until it is full.
OPERATION
USING AN iPod WITH THIS UNIT
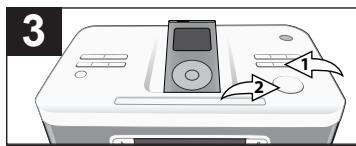
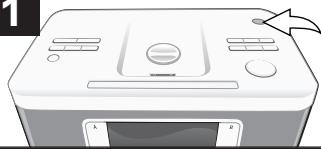
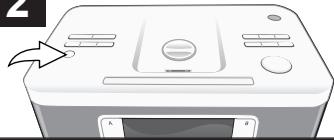
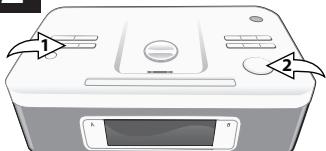
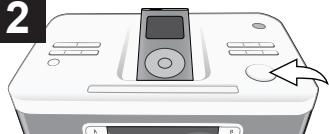
With an iPod/iPhone connected (see previous page), if not already on, turn this unit on by pressing the Power button 1. Repeatedly press the SOURCE button 2 to select iPod/ iPhone mode; "iPod" will appear in the display.
You can operate the iPod/iPhone using its own controls, as per its owner's manual, or you can use the controls on this unit to operate the iPod/iPhone.
To play/pause the iPod/Phone:
Press the Play/Pause button to start playback on your iPod/iPhone. Press again to pause playback and press yet again to resume playback.
To adjust the main volume:
Rotate the Volume/Time control clockwise to increase the volume or counter-clockwise to decrease the volume.
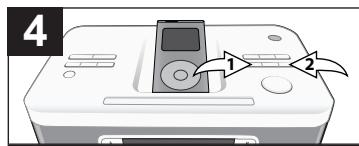
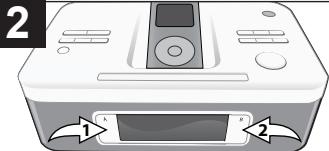
To skip forward or backward on the iPod/iPhone: Press the Skip/Search 1 or 2 button to skip to the beginning of the current track/previous or next track.
To search forward or backward on the iPod/iPhone: Press and hold the Skip/Search or 2 button to search within the currently-playing track.
NOTES:
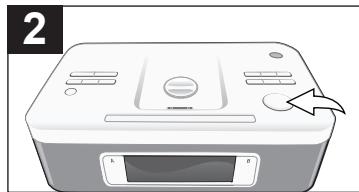
To turn this unit off, press the Power button.
- While there is an incoming call for the iPhone, the music will pause. After finishing the call, the music will resume playing.
- After you have adjusted the volume setting, if you turn the unit off and then on again, the volume level will be set to the level prior to turning the unit off.
OPERATION (CONTINUED)
SETTING THE FM RADIO REGION
This unit allows you to set the desired radio region. For region details, see the section on the bottom of this page.
With the unit on and in Radio mode, press and hold the Preset 1 (1), Preset 3 (2), Set Alarm A (3) and Set Alarm B (4) buttons simultaneously until the region number appears in the display.
Within four seconds, rotate the Volume/Time control clockwise one full revolution to increase or one full revolution counterclockwise to decrease the region number.
When done setting, press any button or wait for five seconds. The region will be set and the region number will disappear from the display.
RADIO REGIONS
Region 1 (USA). 87.5MHz to 108MHz
Region 2 (Europe) .87.5MHz to 108MHz
Region 3 (Japan-wide). 76MHz to 108MHz
Region 4 (Japan) .76MHz to 90MHz
OPERATION (CONTINUED)
USING THE FM RADIO
1
Turn this unit on by pressing the Power button.
2
Repeatedly press the Source button to select the FM Radio mode; "Radio FM" will appear in the display.
3
Repeatedly press the Tune/Skip/ Search Down 1 or Up 2 button to manually advance the frequency in the display up or down until the desired frequency appears.
For auto tuning, press and hold the Tune/Skip/Search Down or Up button until the frequency in the display starts to scan and then release; the tuner will search and then stop on the next strong station it finds. Repeat this step until the desired frequency appears in the display.
NOTES:
- To turn this unit off, press the Power button.
After you have adjusted the volume setting, if you turn the unit off and then on again, the volume level will be set to the level prior to turning the unit off.
Antenna:
For best reception, plug the included FM Antenna Wire into the FM Antenna Jack on the rear of the unit. Unravel and extend for best reception.
OPERATION (CONTINUED)
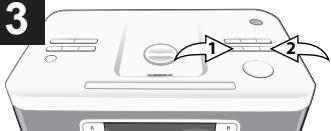
SETTING THE THREE RADIO PRESETS
1
Follow Steps 1-3 on the previous page to tune a station. Press and hold one of the 3 Preset buttons. The display will blink twice and the preset will be set.
RETRIEVING THE THREE RADIO PRESETS
1
Follow Steps 1-2 on the previous page to turn the unit on and select the Radio mode. Press one of the Preset buttons (1-3) to tune in the preset station.
NOTE: The preset memories will be erased if the unit is without power (no batteries/AC adapter is not connected/power failure) for a long period of time, or the FM Radio Region is changed.
OPERATION (CONTINUED)
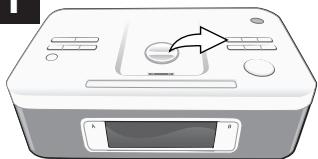
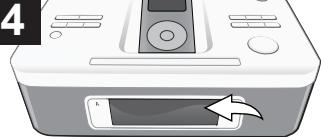
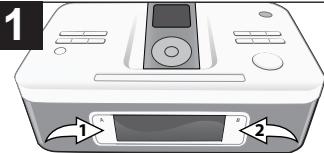
TO SET OR RESET THE ACTUAL TIME
Follow the instructions below to manually set the time. To automatically set the time with the iPod, see the following page.
1
To set the clock to 24 hour (Military) time, press the 24/12 button until "24" appears in the display.
To set to standard 12 hour time, press the 24/12 button until "12" appears in the display.
2
Press the Set Time (Sync) button ①; the display will blink and the Volume/Time control will light up. Within five seconds, rotate the Volume/Time control ② clockwise to increase or counter-clockwise to decrease the time.
NOTE: If the 24/12 hour button (see step 1) is set to 12, be sure to observe the AM or PM indicators to make sure you have set the hour correctly.
3
Press the Set Time (Sync) button (or wait approx. four seconds) and the time will be set.
OPERATION (CONTINUED)
TO SYNC THE TIME
1
With the power on, connect an iPod as shown on page 8. Press and hold the Set Time (Sync) button until the current time appears and the display blinks twice. The time will then be synced.
NOTES:
The Time (Sync) button will not set the alarm.
- The iPod mini, iPod photo and iPod 4th generation do not support the SYNC function.
- If you have been traveling, please make sure to reset your iPhone or iPod device so that the system clock on your device is updated to your current time zone. We recommend that you turn your iPhone or iPod device "OFF" and "ON". Also make sure to turn the unit "OFF" and "ON", and then dock your iPhone or iPod device to SYNC.
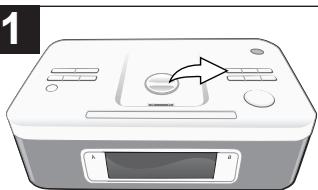
TO SET OR RESET THE ALARM TIME
1

Press the Set Alarm A ① or Set Alarm B ② button and the respective alarm will blink in the display. The Source button and Volume/Time control will light when setting the alarm.
2
Within five seconds, rotate the Volume/Time control clockwise to increase or counter-clockwise to decrease the alarm time.
NOTE: If the 24/12 hour button is set to 12, be sure to observe the AM or PM indicators to make sure you have set the hour correctly.
OPERATION (CONTINUED)
3
Within five seconds, press the Source button to select the desired source (iPod, Radio or Buzzer) as desired.
NOTE: You cannot select Line In.
If set to iPod/iPhone, select a track before activating the alarm. If set to Radio, set the station (see pages 11-12) before activating the alarm.
4
When the alarm is set, the alarm mode will be On; the respective alarm's time will appear in the display to indicate it is activated.
NOTES:
- When the alarm time is reached, if set to Radio or iPod, the alarm volume level will begin at 20% of maximum volume and will increase by 10% continuously until it reaches 70% of maximum volume during a five minute cycle (four minutes ramping up/one minute off). This cycle will repeat up to six times for a total of 30 minutes.
- If set to Buzzer, the alarm first emits a single tone, next a double tone, then a triple tone during a five minute cycle (four minutes buzzer tone/one minute off). This cycle will repeat up to six times for a total of 30 minutes. The volume remains constant throughout each cycle.
- If set to Radio, the alarm will activate the pre-selected station. If set to iPod, the unit will start playback on the track that you selected and will continue with the tracks following it in the playlist.
- While the alarm is sounding, if the other alarm reaches the alarm time, the first alarm will stop sounding and the second alarm will start sounding.
- TO SHUT OFF THE ALARM, see the "TO SHUT THE ALARM OFF" section on the next page.
OPERATION (CONTINUED)
TO SHUT THE ALARM OFF
To turn the alarm off, simply press the Alarm A ① or Alarm B ② On/Off button corresponding to the alarm that is sounding. The alarm will turn off, but will remain set for the next day.
To turn the alarm off so it will not sound the next day, press the desired Alarm A 1 or Alarm B 2 On/Off button.
SNOOZE
While the alarm is sounding, press the Snooze button. The alarm will turn back on automatically ten minutes later. If desired, press the Snooze button again for another ten minutes after the original Snooze time has been reached. You may repeat this process up to six times.
To cancel the Snooze function (the alarm will not turn back on), press the Alarm A ① or Alarm B ② On/Off button corresponding to the alarm that was set; the alarm time will stop blinking in the display.
OPERATION (CONTINUED)
SLEEP
With the unit on, press the Sleep button; "SLEEP" and "10" will blink in the display for five seconds which indicates the unit will turn off after 10 minutes. Repeatedly press the Sleep button to select the Sleep time, up to 90 minutes (i.e., "20" turns off automatically after 20 minutes, "30" turns off automatically after 30 minutes, etc.). After five seconds, the Sleep time will disappear from the display.
NOTE: To cancel the Sleep function, press the Sleep button and "SLEEP" will disappear from the display.
NAP
With the unit off, press the Nap button ①; "NAP" and "10" will blink in the display for five seconds which indicates the buzzer will sound after 10 minutes. Repeatedly press the Nap button ① to select the Nap time, up to 60 minutes (i.e., "20" activates the buzzer automatically after 20 minutes, "30" activates the buzzer automatically after 30 minutes, etc.). After five seconds, the Nap time will disappear from the display. When the buzzer sounds, the Snooze button ② can be pressed to get 10 extra minutes.
NOTE: To cancel the Nap function, press the Nap button 1 or Power button 6 and "NAP" will disappear from the display.
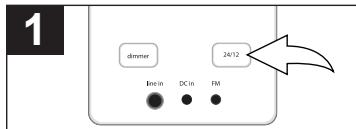
24/12 HOUR BUTTON
To set the clock to 24 hour (Military) time, press the 24/12 until "24" appears in the display.
To set to standard 12 hour time, press the 24/12 button until "12" appears in the display.
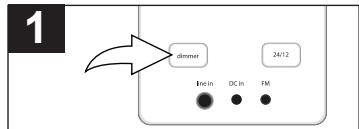
DIMMER BUTTON
Repeatedly press the Dimmer button to decrease the display brightness. There are seven levels of brightness.
TROUBLESHOOTING GUIDE
If you experience a problem with this unit, check the chart below before calling for service.
| SYMPTOM | CAUSE | SOLUTION |
| No sound. | Volume is set to minimum. | Increase volume. |
| Radio, no sound. | Power is not on. | Press the Power button to turn the power on. |
| Volume is set to minimum. | Increase volume. | |
| FM Radio, poor sound. | Station is not tuned properly. | Retune the FM broadcast station. |
| FM: Wire antenna is not extended. | Extend FM wire antenna. | |
| iPod mode, no sound. | Incorrectly connected. | Check the connection. |
| Not in iPod mode. | Press the Source button. | |
| Time reset to "6:00 PM". | Batteries connected improperly, not connected or dead. | Check the batteries. |
| Clock is not set. | Set the clock. | |
| Alarm does not turn on. | Alarm is not activated or set properly. | Set and activate alarm as described on pages 14-15. |
| Clock is not set. | Set the clock. |
SPECIFICATIONS
GENERAL:
Power Source .DC 9V Adapter (Center Positive)
Battery Backup. 2 x 1.5V "AAA" size batteries
Speaker 2x8ohms
Output Power 2x4.5 W
Weight 2 lbs
Dimensions. 9.25 (L) x 5.9 (W) x 3.25 (H) inches
RADIO REGIONS
Region 1 (USA) .87.5MHz to 108MHz
Region 2 (Europe) .87.5MHz to 108MHz
Region 3 (Japan-wide) .76MHz to 108MHz
Region 4 (Japan) .76MHz to 90MHz
Specifications are subject to change without notice.
FOR ADDITIONAL SET-UP OR OPERATING ASSISTANCE, PLEASE VISIT OUR WEBSITE AT:
WWW.MEMOREX.COM
FOR CONSUMER REPLACEABLE PART(S), VERIFY PART NUMBER(S) ON PAGES 4 AND 5, THEN CONTACT OUR PARTS AND ACCESSORIES FULFILLMENT CENTER AT: 1-800-379-8439.
Imation Electronic Products
1 Imation Way, Oakdale, MN 55128-3414 USA · memorex.com
Imation Corp.
Memorex and the Memorex logo are trademarks
of Imation Corp. and its affiliates.