
PartyCube - Docking Station MEMOREX - Free user manual and instructions
Find the device manual for free PartyCube MEMOREX in PDF.


| Product Type | Docking Station |
| Brand | Memorex |
| Model | PartyCube |
| Color Options | Black |
| Dimensions (H x W x D) | 9.5 x 9.5 x 9.5 inches |
| Weight | 4.5 lbs |
| Power Supply | AC adapter (included) |
| Power Input | 100-240V, 50/60Hz |
| Battery Type | Rechargeable lithium-ion |
| Battery Life | Up to 10 hours |
| Charging Time | Approximately 4 hours |
| Bluetooth Version | 5.0 |
| Bluetooth Range | Up to 33 feet (10 meters) |
| Audio Inputs | AUX (3.5mm), USB |
| USB Charging Output | 5V/1A |
| Speaker Power (RMS) | 30W total |
| Frequency Response | 40Hz - 20kHz |
| Impedance | 4 ohms |
| LED Lighting | Multi-color party lights |
| FM Radio | Yes, with digital tuner |
| Remote Control | Included |
| Microphone Input | Yes (2 x 1/4 inch) |
| Microphone | Not included |
| Compatible Devices | Smartphones, tablets, MP3 players |
| Cleaning Instructions | Wipe with a dry cloth; avoid liquids |
Frequently Asked Questions - PartyCube MEMOREX
User questions about PartyCube MEMOREX
0 question about this device. Answer the ones you know or ask your own.
Ask a new question about this device
Download the instructions for your Docking Station in PDF format for free! Find your manual PartyCube - MEMOREX and take your electronic device back in hand. On this page are published all the documents necessary for the use of your device. PartyCube by MEMOREX.
USER MANUAL PartyCube MEMOREX
natural_image
Black triangular warning symbol with white lightning bolt symbol (no text)CAUTION
RISK OF ELECTRIC SHOCK DO NOT OPEN

natural_image
Black triangular warning symbol with exclamation mark (no text or numbers)CAUTION: TO REDUCE THE RISK OF ELECTRIC SHOCK, DO NOT REMOVE COVER (OR BACK). NO USER-SERVICEABLE PARTS INSIDE. REFER SERVICING TO QUALIFIED SERVICE PERSONNEL.
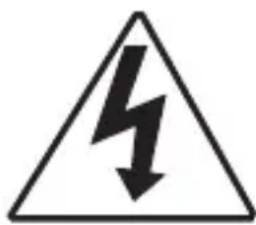
DANGEROUS VOLTAGE:
The lightning flash with arrowhead symbol within an equilateral triangle is intended to alert the user to the presence of uninsulated dangerous voltage within the product's enclosure that may be of sufficient magnitude to constitute a risk of electric shock to persons.

ATTENTION:
The exclamation point within an equilateral triangle is intended to alert the user to the presence of important operating and maintenance (servicing) instructions in the literature accompanying the appliance.
FCC WARNING:
This equipment may generate or use radio frequency energy. Changes or modifications to this equipment may cause harmful interference unless the modifications are expressly approved in the instruction manual. The user could lose the authority to operate this equipment if an unauthorized change or modification is made.
ATTENTION:
POUR ÉVITER LES CHOC ÉLECTRIQUES, INTRODUIRE LA LAME LA PLUS LARGE DE LA FICHE DANS LA BORNE CORRESPONDANTE DE LA PRISES ET POUSSER JUSQU'AU FOND.
iPod and iPhone are a trademark of Apple Inc., registered in the U.S. and other countries.
SAFETY PRECAUTIONS
NOTE: This equipment has been tested and found to comply with the limits for a Class B digital device, pursuant to part 15 of the FCC Rules. These limits are designed to provide reasonable protection against harmful interference in a residential installation.
This equipment generates, uses and can radiate radio frequency energy and, if not installed and used in accordance with the instructions, may cause harmful interference to radio communications. However, there is no guarantee that interference will not occur in a particular installation. If this equipment does cause harmful interference to radio or television reception, which can be determined by turning the equipment off and on, the user is encouraged to try to correct the interference by one or more of the following measures:
- Reorient or relocate the receiving antenna.
- Increase the separation between the equipment and receiver.
- Connect the equipment into an outlet on a circuit different from that to which the receiver is connected.
- Consult the dealer or an experienced radio/TV technician for help.
- The rating information is located at the bottom of the apparatus.
WARNING: TO PREVENT FIRE OR SHOCK HAZARD, DO NOT EXPOSE THIS UNIT TO RAIN OR MOISTURE.
SURGE PROTECTORS: It is recommended to use a surge protector for AC connection. Lightning and power surges ARE NOT covered under warranty for this product.
Only use attachments/accessories specified by the manufacturer.
To be completely disconnected from the power input, the main plug of the AC/DC adapter shall be disconnected from the electrical outlet. The main plug of the AC/DC adapter should not be obstructed OR should be easily accessed during intended use.
Do not expose the product to dripping or splashing. Do not place liquid filled objects such as vases on the product.
IMPORTANT SAFETY INSTRUCTIONS
- Read these Instructions.
- Keep these Instructions.
- Heed all Warnings.
-
Follow all instructions.
-
Do not use this apparatus near water.
-
Clean only with a dry cloth.
-
Do not block any of the ventilation openings. Install in accordance with the manufacturer's instructions.
-
Do not install near any heat sources such as radiators, heat registers, stoves, or other apparatus (including amplifiers) that produce heat.
-
Do not defeat the safety purpose of the polarized or grounding-type plug. A polarized plug has two blades with one wider than the other. A grounding-type plug has two blades and a third grounding prong. The wide blade or the third prong are provided for your safety. When the provided plug does not fit into your outlet, consult an electrician for replacement of the obsolete outlet.
-
Protect the power cord from being walked on or pinched particularly at plugs, convenience receptacles, and the point where they exit from the apparatus.
-
Only use attachments/accessories specified by the manufacturer.
-
Use only with a cart, stand, tripod, bracket, or table specified by the manufacturer, or sold with the apparatus. When a cart is used, use caution when moving the cart/apparatus combination to avoid injury from tip-over.
-
Unplug this apparatus during lightning storms or when unused for long periods of time.
PORTABLE CART WARNING (symbol provided by RETAG)

natural_image
Symbolic icon of a person climbing a ladder inside a circle with no text or symbols-
Refer all servicing to qualified service personnel. Servicing is required when the apparatus has been damaged in any way, such as power-supply cord or plug is damaged, liquid has been spilled or objects have fallen into the apparatus, the apparatus has been exposed to rain or moisture, does not operate normally, or has been dropped.
-
Do not expose this product to dripping or splashing. Do not place objects filled with liquids, such as vases, on this product.
-
Main plug is used as disconnect device and it should remain readily operable during intended use. In order to disconnect the apparatus from the mains completely, the mains plug should be disconnected from the mains socket outlet completely.
-
CAUTION: To reduce the risk of fire or explosion, do not expose batteries to excessive heat such as sunshine, fire or other heat sources.
LOCATION OF CONTROLS
FRONT/TOP
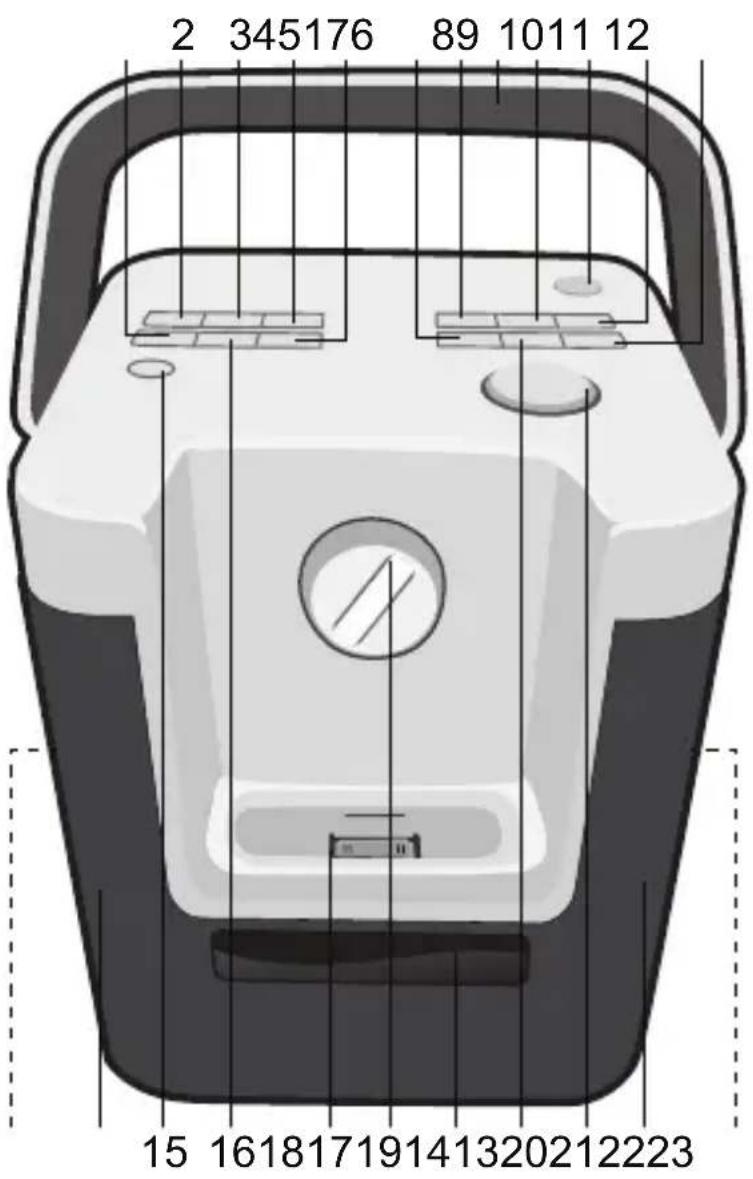
-
Preset 4 Button
-
Preset 1 Button
-
Preset 2 Button
-
Preset 3 Button
-
Preset 6 Button
-
Tune Down/Skip/Search ◀ Button
-
AM/FM Button
-
Carrying Handle
-
Repeat 🏠 Button
-
Power Button
-
Shuffle ✦ Button
-
Tune Up/Skip/Search ▶▶ Button
-
Left Side Speaker
-
Left Front Speaker
-
Source Button
-
Preset 5 Button
-
iPod Compartment with Connector (for use with Universal Docks)
-
iPod Support Knob
-
LCD Display
-
Play/Pause ▶II Button
-
Volume Control
-
Right Front Speaker
-
Right Side Speaker
LOCATION OF CONTROLS (CONTINUED)
REAR

- Line In Jack
- DC In 9V Jack
(AC Adapter Part No. White: 412300810109*,
Black: 412300810209*)
- FM Antenna Jack
(FM Antenna Wire Part No. White: 461111020029*,
Black: 461111020039*)
- AM Antenna Jack
(AM Antenna Wire Part No. White: 423010010019*,
Insert the small end of the AC adapter into the DC In jack (located on the rear of the unit). Connect the other end to a wall outlet having 120V AC, 60 Hz. The AC indicator will appear in the display.
AC Adapter, DC 9V ⊙⊕⊕

NOTES:
- Remove both the DC plug and the AC-IN plug to disconnect the AC adapter when not in use.
- Only use the supplied AC adapter which has the following specs: DC 9V ⊙⊕⊕
CHARGING THE BUILT-IN LITHIUM BATTERIES
This unit has built-in Lithium batteries that will operate the unit when not connected to the AC power source. When connected to AC (see above), the built-in batteries will charge and the battery indicator will show the bars cycling. When fully charged, all five bars in the battery indicator will be lit. This battery cannot be replaced by the user.
NOTES:
- You must charge this unit for 12 hours before using for the first time.
- It takes about 7 hours to charge the batteries from empty to full.
- The backlight is 100% brightness in AC mode, but 50% brightness while in DC mode only.
- Do not dispose of unit in fire; batteries may explode or leak.
POWER SOURCES (CONTINUED)
BATTERY PRECAUTIONS
Follow these precautions when using batteries in this device:
- WARNING: Risk of fire, explosion, and burns. Do not disassemble, crush, heat above 100^ (212°F), or incinerate.
- Dispose of used batteries promptly according to local recycling or waste regulations. Never put batteries in mouth. If swallowed, contact your physician or local poison control center. Do not disassemble and do not dispose of in fire.
- CAUTION: Replace battery with exact same battery only. Use of another battery may present a risk of fire or explosion.
- CAUTION: The battery used in this device may present a risk of fire or chemical burn if mistreated.
- Do not use a damaged battery. If a battery pack has leaking fluids, do not touch any fluids.
- In case of eye contact with fluid, do not rub eyes. Immediately flush eyes thoroughly with water for at least 15 minutes, lifting upper and lower lids, until no evidence of the fluid remains. Seek medical attention.
- Do not short the external contacts on a battery.
OPTIONAL CONNECTIONS
LINE IN JACK (REAR OF UNIT)
Insert one end of the audio cable (not included) into the LINE OUT jack on your external audio unit and the other end into the LINE IN jack on the rear of this unit. To listen to the external audio unit, turn this unit on using the Power button, and turn on the external unit as well. Repeatedly press the Source button to select LINE IN mode; “line in” will appear in the display. The external audio unit’s output sound will be heard through this unit’s speakers. If you wish to listen to the iPod in the iPod compartment, repeatedly press the Source button to select iPod mode; “iPod” will appear in the display.
FM IN JACK (REAR OF UNIT)
For best FM reception, plug the included FM Antenna Wire into the FM Antenna jack on the rear of the unit. Unravel and extend for best reception.
AM IN JACK (REAR OF UNIT)
For best AM reception, plug the included AM Antenna Wire into the AM Antenna jack on the rear of the unit. Unravel and extend and insert onto the stand (if desired) for best reception.

natural_image
Simple line drawing of a computer monitor with a blank screen and a circular base (no text or symbols)OPERATION
INSERTING AN iPod/iPhone
1

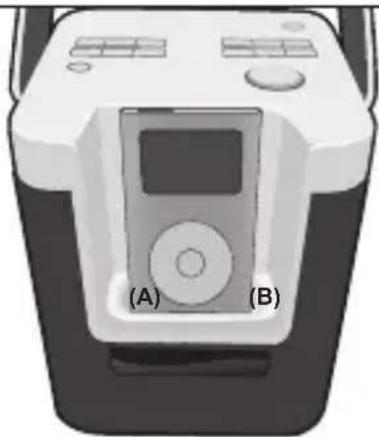
Insert the Universal Dock included with your iPod (A) into the iPod compartment (B) (as shown), making sure the tabs are facing front, and slip the tabs into place. Press the rear side of the Universal Dock until it is positioned inside the iPod/iPhone compartment.
NOTE: If using the iPhone, locate the correct Universal dock to use as shown on page 15.
3

natural_image
Illustration of a vintage electronic device with a digital display and control panel (no text or symbols visible)The iPod will charge as long as this unit is connected with the AC adapter.
Please see the next page for instructions on using an iPod with this unit.
2
natural_image
Front view of a portable electronic device with labeled buttons (A) and (B), no visible text or symbols beyond labels.Rotate the adjustable iPod support knob counter-clockwise to raise or clockwise to lower the support position as desired.
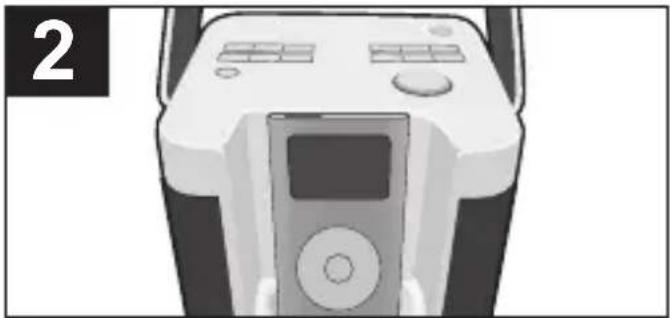
Slide the iPod (A) into the Universal Dock (B) (as shown). Gently push down so the connector on the iPod slides onto the connector on this unit.
NOTES:
- When the iPod is connected to this unit, it will be in the Pause mode. When the iPod is removed, the unit will remain in iPod mode.
• To remove the Dock, insert your finger (or other object) into the gap in the Dock, then gently pull the Dock out to remove it. - CHARGING: When the iPod is inserted into the dock and the AC adapter is connected, whether this unit is on or off, the iPod's battery will charge until it is full.
- While there is an incoming call for the iPhone, the music will pause. After finishing the call, the music will resume playing.
- If this unit is in iPod mode and is not connected with the iPod/iPhone, the unit will power off automatically after five minutes. Press the Power button twice to turn on the unit again.
OPERATION (CONTINUED)
USING AN iPod/iPhone WITH THIS UNIT

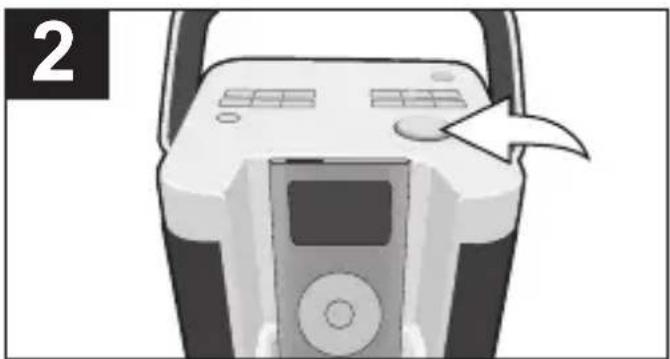
With an iPod/iPhone connected (see previous page), if not already on, turn this unit on by pressing the Power button ①. Repeatedly press the Source button ② to select iPod/iPhone mode; “iPod” will appear in the display.
natural_image
Front view of a portable electronic device with control panel and display (no visible text or symbols)You can operate the iPod/iPhone using its own controls, as per its owner's manual, or you can use the controls on this unit to operate the iPod/iPhone.

To play/pause the iPod/iPhone:
Press the Play/Pause ▶ II button ① to start playback of your iPod/ iPhone. Press again to pause playback and press yet again to resume playback.
To adjust the main volume:
Rotate the Volume control ② clockwise to increase the volume or counter-clockwise to decrease the volume.

To skip forward or backward on the iPod/iPhone: Press the Skip/Search ◀◀ ① or ▶▶ ② button to skip to the beginning of the current track/previous or next track.
To search forward or backward on the iPod/iPhone: Press and hold the Skip/Search ◀◀ ① or ▶▶ ② button to search within the currently-playing track.
NOTES:
• To turn this unit off, press the Power button.
• After you have adjusted the volume setting, if you turn the unit off and then on again, the volume level will be set to the level prior to turning the unit off.
OPERATION (CONTINUED)
REPEAT PLAYBACK

natural_image
Illustration of a portable electronic device with a control panel and an arrow pointing to it (no text or symbols)With an iPod inserted, press the Repeat button to cycle through the following iPod Repeat modes: Repeat One (will playback the current track continuously), Repeat All (will playback all tracks on the iPod continuously) or Repeat Off.

natural_image
Illustration of a portable electronic device with control panel and buttons, no visible text or symbolsWhen the Repeat mode is selected, press the Play/Pause ▶■button.
NOTE: To cancel Repeat playback, press the Repeat button until the Repeat indicator disappears from the iPod display.
RANDOM PLAYBACK

To randomly play the tracks or albums on the iPod, with an iPod inserted, press the Shuffle button ①; the Shuffle indicator will appear in the iPod's display. Press the Play/Pause button ② and random playback will begin.

natural_image
Illustration of a portable electronic device with a control panel and a scroll, showing no text or symbols.To cancel Random playback, press the Shuffle ✦ button until the Shuffle indicator disappears from the iPod's display.
OPERATION (CONTINUED)
SETTING THE RADIO REGION
This unit allows you to set the desired radio region. For region details, see the section on the bottom of this page.

With the unit on and in Radio mode, press and hold the Preset 1 ①, Preset 3 ②, AM/FM ③ and Shuffle ④ buttons simultaneously until the region number appears in the display.
natural_image
Illustration of a portable electronic device with a control panel and a scroll wheel (no text or symbols)Within four seconds, rotate the Volume control clockwise one full revolution to increase or one full revolution counter-clockwise to decrease the region number. When done setting, press any button or wait for five seconds. The region will be set and the region number will disappear from the display.
RADIO REGIONS - FM
Region 1 (USA)....87.5MHz to 108MHz
Region 2 (Europe) 87.5MHz to 108MHz
Region 3 (Japan) 76MHz to 90MHz
RADIO REGIONS - AM
Region 1 (USA) ....520kHz to 1720kHz
Region 2 (Europe)....522kHz to 1629kHz
Region 3 (Japan)....522kHz to 1629kHz
OPERATION (CONTINUED)
USING THE RADIO
1

natural_image
Illustration of a vintage electronic device with a screen and control panel (no text or symbols visible)Turn this unit on by pressing the Power button.
2

Repeatedly press the Source button ① to select the Radio mode; “Radio” will appear in the display. Press the AM/FM button ② to select AM or FM.
3
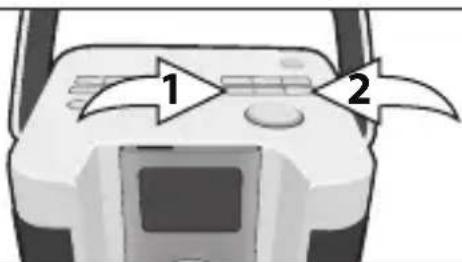
Repeatedly press the Tune/Skip/Search Down ◀◀① or Up ▶▶② button to manually advance the frequency in the display up or down until the desired frequency appears.
For auto tuning, press and hold the Tune/Skip/Search Down ◀◀ ① or Up ▶▶ ② button until the frequency in the display starts to scan and then release; the tuner will search and then stop on the next strong station it finds. Repeat this step until the desired frequency appears in the display.
NOTES:
- To turn this unit off, press the Power button.
• After you have adjusted the volume setting, if you turn the unit off and then on again, the volume level will be set to the level prior to turning the unit off.
Antennas:
FM: For best FM reception, plug the included FM Antenna Wire into the FM Antenna jack on the rear of the unit. Unravel and extend for best reception.
AM: For best AM reception, plug the included AM Antenna Wire into the AM Antenna jack on the rear of the unit. Unravel and extend for best reception. Move the AM Loop Antenna away from the system, AC adapter and other equipment.
OPERATION (CONTINUED)
SETTING THE SIX RADIO PRESETS

natural_image
Illustration of a portable electronic device with a hand pointing to a grid panel, no text or symbols presentFollow Steps 1-3 on the previous page to tune a station. Press and hold one of the six Preset buttons. The display will blink twice and the preset will be set.
RETRIEVING THE SIX RADIO PRESETS

natural_image
Illustration of a portable electronic device with a scroll and control panel, no text or symbols presentFollow Steps 1-2 on the previous page to turn the unit on and select the Radio mode. Press one of the six Preset buttons to tune in the preset station.
NOTE: The preset memories will be erased if the built-in battery is empty or the Radio Region is changed.
OPERATION (CONTINUED)
iPhone UNIVERSAL DOCKS
Locate your iPhone in the chart below and select the respective Universal Dock (the Universal Dock No. is engraved at the front of the Universal Dock as shown below) to match with your iPhone. Insert the corresponding Universal Dock and your iPod into the unit as described on page 9.
| iPhone Type Memory Universal Dock No. | |||
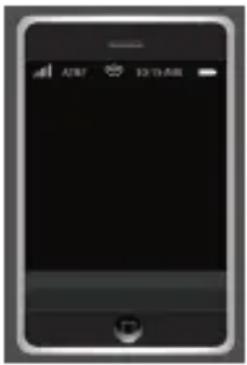 | iPhone 3G S/iPhone 3GiPhone | 8 to 32 GB4 to 16 GB | No. 15 (Part No.White: 24129080801049*, Black: 24129080802049*)No. 12 (Part No.White: 24129011105049*, Black: 24129082901049*) |
*Consumer Replaceable Part (See page 17 to order.)
IMPORTANT! The Universal Dock No. is engraved on the front of the dock. Please refer to the illustration below for the location of the Universal Dock No.


The two holders provided with this unit are Universal Docks.
TROUBLESHOOTING GUIDE
If you experience a problem with this unit, check the chart below before calling for service.
| SYMPTOM | CAUSE | SOLUTION |
| No sound. | Volume is set to minimum. | Increase volume. |
| Radio: no sound. | Power is not on. | Press the Power Button to turn the unit on. |
| Volume is set to minimum. | Increase volume. | |
| Radio: poor sound. | Station is not tuned properly. | Retune the FM or AM broadcast station. |
| FM or AM antenna is not extended. | Extend FM and/or AM antenna. | |
| iPod mode: no sound. | Incorrectly connected. | Check the connection. |
| Not in iPod mode. | Press the Source button to select iPod mode. |
SPECIFICATIONS
GENERAL:
Power Source (Main Unit) ......DC 9V (Center positive)
Speaker 2.5", 8W (rated power), 8 ohms x 2
1.25", 2W (rated power), 8ohms x 2
Output Power 2 x 5 W
Weight....3.2 lbs
Dimensions ......6.3 (W) x 5.9 (D) x 8.1 (H) inches
RADIO REGIONS - FM
Region 1 (USA) 87.5MHz to 108MHz
Region 2 (Europe) 87.5MHz to 108MHz
Region 3 (Japan) 76MHz to 90MHz
RADIO REGIONS - AM
Region 1 (USA)....520kHz to 1720kHz
Region 2 (Europe)....522kHz to 1629kHz
Region 3 (Japan) ....522kHz to 1629kHz
Specifications are subject to change without notice.
FOR ADDITIONAL SET-UP OR OPERATING ASSISTANCE, PLEASE VISIT OUR WEBSITE AT:
WWW.MEMOREX.COM
FOR CONSUMER REPLACEABLE PART(S), VERIFY PART NUMBER(S) ON PAGES 5 AND 15, THEN CONTACT OUR PARTS AND ACCESSORIES FULFILLMENT CENTER AT: 1-800-379-8439.
Imation Electronic Products
1 Imation Way, Oakdale, MN 55128-3414 USA • memorex.com
© Imation Corp.
Memorex and the Memorex logo are trademarks
of Imation Corp. and its affiliates.

- DANGEROUS VOLTAGE:
- ATTENTION:
- FCC WARNING:
- SAFETY PRECAUTIONS
- WARNING: TO PREVENT FIRE OR SHOCK HAZARD, DO NOT EXPOSE THIS UNIT TO RAIN OR MOISTURE.
- IMPORTANT SAFETY INSTRUCTIONS
- LOCATION OF CONTROLS
- LOCATION OF CONTROLS (CONTINUED)
- NOTES:
- CHARGING THE BUILT-IN LITHIUM BATTERIES
- POWER SOURCES (CONTINUED)
- BATTERY PRECAUTIONS
- OPTIONAL CONNECTIONS
- LINE IN JACK (REAR OF UNIT)
- FM IN JACK (REAR OF UNIT)
- AM IN JACK (REAR OF UNIT)
- OPERATION
- INSERTING AN iPod/iPhone
- OPERATION (CONTINUED)
- USING AN iPod/iPhone WITH THIS UNIT
- To play/pause the iPod/iPhone:
- To adjust the main volume:
- REPEAT PLAYBACK
- RANDOM PLAYBACK
- SETTING THE RADIO REGION
- RADIO REGIONS - FM
- RADIO REGIONS - AM
- USING THE RADIO
- Antennas:
- SETTING THE SIX RADIO PRESETS
- RETRIEVING THE SIX RADIO PRESETS
- iPhone UNIVERSAL DOCKS
- TROUBLESHOOTING GUIDE
- SPECIFICATIONS
- GENERAL:
- Imation Electronic Products
Brand : MEMOREX
Model : PartyCube
Category : Docking Station