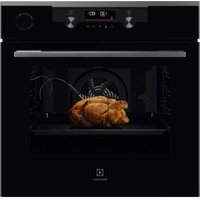
MINI FOURES046DIGIT - Electric oven ELECTROLUX - Free user manual and instructions
Find the device manual for free MINI FOURES046DIGIT ELECTROLUX in PDF.

| Product type | Electric oven |
| Brand | Electrolux |
| Model | MINI FOURES046DIGIT |
| External dimensions (H x W x D) | 379 x 540 x 459 mm |
| Internal dimensions (H x W x D) | 305 x 373 x 400 mm |
| Weight | 12.0 kg |
| Power supply | 220-240 V ~ 50/60 Hz, 1800 W |
| Wire grid capacity | 3.5 kg |
| Baking tray capacity | 3.5 kg |
| Rotisserie capacity | 2.0 kg |
| Cooking modes | Grill, Keep warm, Rotisserie, Defrost, Pizza, Meat, Bake, Fish, Hot air |
| Temperature range | 50 °C to 230 °C depending on mode |
| Timer | Up to 120 minutes |
| Temperature control | Separate for upper and lower elements (tolerance 30°C) |
| Interior light | Yes, manual control |
| Included accessories | Wire grid, Baking tray, Crumb tray, Rotisserie spit, Rotisserie handle |
| Safety | Tempered glass door, hot surface, automatic shut-off, caution |
| Cleaning | Damp cloth, no abrasive products or metal scouring pads |
| Recommended use | Flat surface, at least 10 cm clearance around |
| First use | Operate at 230°C for 15 minutes to burn off protective coating |
Frequently Asked Questions - MINI FOURES046DIGIT ELECTROLUX
User questions about MINI FOURES046DIGIT ELECTROLUX
0 question about this device. Answer the ones you know or ask your own.
Ask a new question about this device
Download the instructions for your Electric oven in PDF format for free! Find your manual MINI FOURES046DIGIT - ELECTROLUX and take your electronic device back in hand. On this page are published all the documents necessary for the use of your device. MINI FOURES046DIGIT by ELECTROLUX.
USER MANUAL MINI FOURES046DIGIT ELECTROLUX
Language of introduction
English 1-11
French 12-24
Dutch 25-37
Spanish 38-50
Portuguese 51-63
EN
IMPORTANT SAFETY INSTRUCTIONS
PLEASE READ THE FOLLOWING SAFETYWARNINGS AND THE INSTRUCTIONS CAREFULLY BEFORE USING THE APPLIANCE AND KEEP FOR FUTURE REFERENCE.
Warnings
- This appliance is intended to be used in household and similar applications such as:
staff kitchen areas in shops, offices and other working environments;
- farm houses;
by clients in hotels, motels and other residential type environments;
bed and breakfast type environments.
- If the supply cord is damaged, it must be replaced by the manufacturer, its service agent or similarly qualified persons in order to avoid a hazard.

Caution: Hot Surface.
- The surfaces are liable to get hot during use.
- The temperature of accessible surfaces may be high when the appliance is operating.
- This appliance can be used by children aged from 8 years and above and persons with reduced physical, sensory or mental capabilities or lack of experience and knowledge if they have been given supervision or instruction concerning use of the appliance in a safe way and understand the hazards involved. Children shall not play with the appliance. Cleaning and user maintenance shall not be made by children unless they are older than 8 and supervised.
- Keep the appliance and its cord out of reach of children less than 8 years.
- The appliance is not intended to be operated by means of an external timer or separate remote-control system.
- Regarding the instructions for cleaning surfaces in contact with food, refer to the section "Cleaning and Maintenance" on page 10 of the manual.
- The door or the outer surface may get hot when the appliance is operating.
- WARNING: If the surface is cracked, switch off the appliance to avoid the possibility of electric shock.
- Do not touch hot surface. Use the handle while moving the product.
-
Do not place the appliance in or near hot gas or electric burner, or permit to touch a heated oven or mini oven.
-
The rear surface of appliance shall be placed against a wall.
Safety Precautions
- To protect against electric shock, do not immerse cord, plug or any parts of the oven in water or any other liquid.
- Do not let cord hang over edge of table or counter, or touch hot surfaces.
- The use of accessory attachments not recommended by the appliance manufacturer may cause hazard or injury.
- When operating the oven, keep at least 10cm of free space on both and front sides of the oven to allow for adequate air circulation.
- Turn off and unplug the oven from the mains socket when not in use and before cleaning. Allow to cool before putting on or taking off parts, and before cleaning.
- Do not cover crumb tray or any part of the oven with metal foil. This may cause the oven to overheat.
- Over-sized foods or metal utensils must not be inserted in the oven as they may create a fire or risk of electric shock.
- A fire may occur if the oven is covered or touching flammable material, including the curtain, draperies, walls, and the like, when in operation. Do not store any item on top of the appliance when in operation.
- Extreme cautions should be exercised when using cooking or baking containers constructed of anything other than metal or ovenproof glass.
- Be sure that nothing touches the top or bottom elements of the oven.
- Do not place any of the following materials in the oven: cardboard, plastic, paper, or anything similar.
- Do not store any materials other than manufacturer's recommended accessories in this oven when not in use.
- Always wear protective, insulated oven gloves when inserting or removing items from the hot oven.
- This appliance has a tempered, safety glass door. The glass in stronger than ordinary glass and more resistant to breakage. Tempered glass can still break around edges. Avoid scratching door surface or nicking edges.
- Children should be supervised to ensure that they do not play with the appliance.
- Do not use outdoors.
EN
- Do not use the appliance for other than intended use.
- Extreme caution must be used when moving the appliance containing hot oil or other hot liquids.
- Do not clean the inside of the oven with metal scouring pads as pieces can break off the pad and touch electrical parts, creating a risk of electric shock.
PRODUCT OVERVIEW
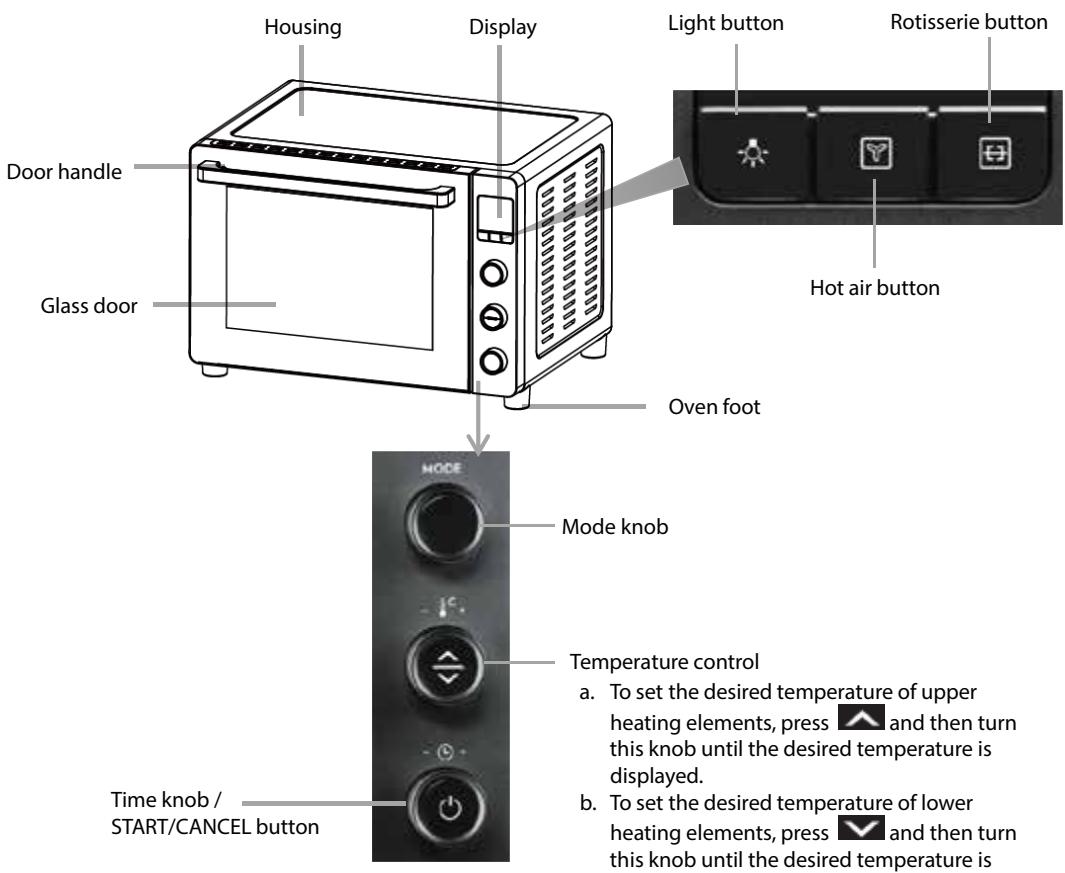
NOTE : The temperature difference between the upper and lower heating elements should not be more than 30^
Oven accessories
| Wire rack For toasting, baking and general cooking in casserole dishes and standard pans. Wire rack cannot be used individually. Always put with bake tray. Place the bake tray in the shelf position under wire rack. |
| Bake tray For use when broiling or roasting meat, poultry, fish or various other foods. It can also used as a drip tray to collect grease, oil, and liquid which come from the food being rotisserie cooked. |
| Crumb tray Always keep the crumb tray at the very bottom of the oven while cooking to collect crumbs and drips during cooking. |
| Rotisserie fork For roasting whole chicken or other kinds of meat. |
| Rotisserie handle Use this handle to remove the rotisserie fork out of the oven. |
Weight capacity of accessories
| Accessory | Weight limit |
| Wire rack | 3,5 kg |
| Bake tray | 3,5 kg |
| Rotisserie fork | 2,0 kg |
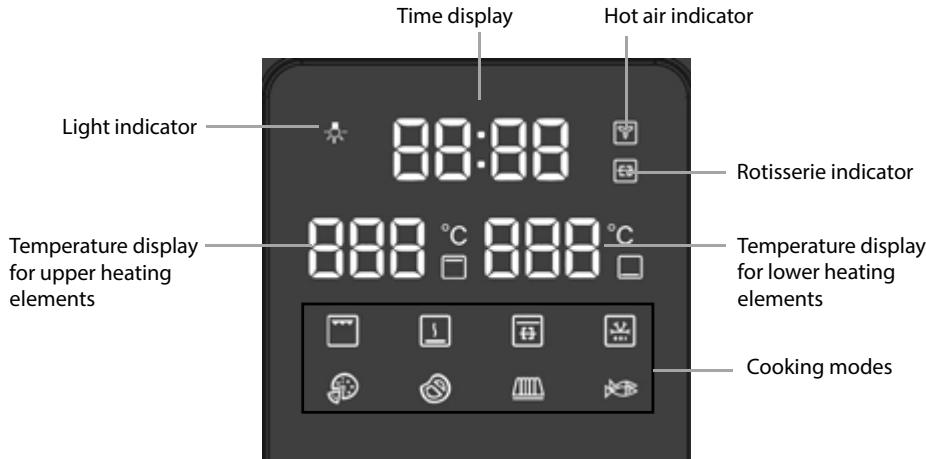
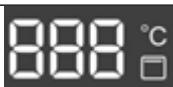
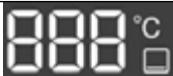
Display
| Indicator light | Mode | Default Temperature | Temperature Range | Default Time |
| Grill | 180°C | 150°C ~ 180°C | 10 minutes | |
| Warm | 80°C | 50°C ~ 80°C | 15 minutes | |
| Rotisserie | 180°C | 150°C ~ 180°C | 60 minutes | |
| Defrost | 65°C, fixed | / | 60 minutes | |
| Pizza | 200°C | 70°C ~ 230°C | 15 minutes | |
| Meat | 210°C | 150°C ~ 230°C | 50 minutes | |
| Bake | 180°C | 70°C ~ 230°C | 30 minutes | |
| Fish | 200°C | 150°C ~ 230°C | 25 minutes |
NOTE : Please adjust the cooking time based on the type of food to be cooked as well as the food weight or size.
BEFORE FIRST USE
Before using your toaster oven for the first time, be sure to:
- Read all instructions in the manual.
- Make sure the oven is unplugged.
- Wash all accessories in warm soapy water. Thoroughly dry all accessories.
- Plug the oven in the mains socket and then you are ready to use the oven.
- Before cooking food, it recommends that you run the oven at the highest temperature (230^) for 15 minutes to allow the manufacturer's protective coating of oil to burn off.
- Wipe the inside of the oven with a damp cloth or sponge after this burning-off cycle. Dry with paper towels and make sure the oven is dry before using.
Please Note: When using the oven for the first time, the oven may produce an odor and emit smoke.
The oven is burning off the excess oils in the heating elements and this is normal.
OPERATION
1 Place the oven on a clean, flat and heat resistant surface.
- Ensure that the oven is used in an area with good air circulation.
NOTE: Always place the crumb tray at the bottom of the oven when cooking for easy cleanup.
2 Plug in the oven.
3 Select the oven accessory for your recipe. Place the food to be cooked on the accessory.
4 Place the accessory with food into the appropriate shelf position in the oven and close the door.
5 Select a preset cooking mode.
Turn the MODE knob to select the desired cooking mode.
The corresponding indicator light will flash.

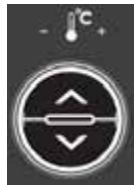
6 Set the temperature.
Your oven has a separate temperature control for upper and lower heating elements. The temperature tolerance between upper and lower heating elements is 30^ .
Press to set the temperature for upper heating elements. Turn the knob until the desired temperature is displayed.
Press to set the temperature for lower heating elements. Turn the knob until the desired temperature is displayed.
7 Set the time.
Turn the knob to increase or decrease the cooking time. The maximum cooking time is 120 minutes (2:00).

8 Start cooking.
Press to start cooking cycle. To cancel cooking, press again.
Your oven will preheat for 5 minutes and the time starts to count down, indicating that the oven starts to run.
9 When the cooking process is complete and the cooking time has elapsed, your oven will beep and "00:00" will flash on the time display.
You can also press and hold for a while to turn off the oven.
EN
Using the grill function
- Place the food to be cooked on the wire rack or bake tray.
-
Insert the rack or tray into the upper position of the oven. Close the door.
-
Turn the MODE knob until the indicator light is displayed.
-
The default temperature and time will be displayed.
-
You can set the desired temperature and cooking time using the temperature control and time knob.

- Press to start cooking.
- When the cooking is finished, the oven will beep and the display will show "00:00".
- Open the door. Always remove food with oven mitts as the food and oven are very hot.
Using the warm function
Use this function for keeping food warm.
- Place the food on the wire rack or bake tray.
-
Insert the rack or tray into the middle position of the oven. Close the door.
-
Turn the MODE knob until the indicator light is displayed.
-
The default temperature and time will be displayed.
-
You can set the desired temperature and cooking time using the temperature control and time knob.

- Press to start the warming process.
- When the warming process is finished, the oven will beep and the display will show "00:00".
- Open the door. Always remove food with oven mitts as the food and oven are hot.
Using the rotisserie function
-
Place the bake tray in the lowest position of the oven.
-
This will catch food drippings from the rotisserie fork during cooking.
-
Secure the whole chicken with its weight centered on the forks and tighten the screws.
-
Insert the first thumbscrew onto the rotisserie shaft by pointing inward. Secure the first rotisserie fork with thumbscrew provided.
-
Place the rotisserie shaft across the center of the food that you are going to cook. Make sure the food is at the center before inserting the second fork onto the rotisserie shaft. Secure the second fork with the thumbscrew.
-
Place the rotisserie fork with the whole chicken in the oven. Close the door.
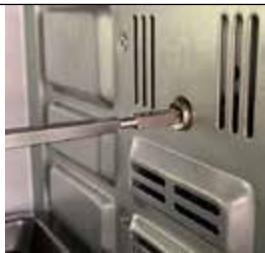
Insert the pointed end of the rotisserie fork into the rotisserie socket on the inner right side of the oven.
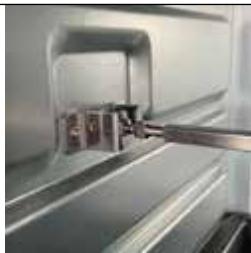
Place the rotisserie fork onto the support of the inner left side of the oven to allow the square end of the rotisserie fork fit into the notch of the support.
-
Turn the MODE knob until the indicator light is displayed.
-
The default temperature and time will be displayed.
-
You can set the desired temperature and cooking time using the temperature control and time knob.

to start cooking.
- When the cooking is finished, the oven will beep and the display will show "00:00".
- Open the door and check the internal temperature of the food to ensure that it has cooked properly.
-
Remove the rotisserie fork with the rotisserie handle.
-
Hold the rotisserie handle in one hand and support it with the other.
- Place the hooks on the handle underneath the rotisserie fork.
- First, lift the left side of the rotisserie fork out of the support, pulling slightly towards yourself.
- Then, gently remove the right pointed side of the rotisserie fork from the rotisserie socket and remove the food on the fork out of the oven.
Using the defrost function
- Place the food to be defrosted on the bake tray.
-
Insert the bake tray into the middle position of the oven. Close the door.
-
Turn the MODE knob until the indicator light is displayed.
-
The default defrosting temperature is 65^ and cannot be adjusted.
- The default defrosting time is 60 minutes and cannot be adjusted.

-
Press to start defrosting.
-
When the defrosting is finished, the oven will beep and the display will show "00:00".
- Open the door. Always remove food with oven mitts as the food and oven are hot.
Using the pizza function
- Place the pizza to be cooked on the wire rack.
-
Insert the wire rack into the middle position of the oven. Close the door.
-
Turn the MODE knob until the indicator light is displayed.
-
The default temperature and time will be displayed.
-
You can set the desired temperature and cooking time using the temperature control and time knob.

- Press to start cooking.
- When the cooking is finished, the oven will beep and the display will show "00:00".
- Open the door. Always remove food with oven mitts as the food and oven are very hot.
Using the meat function
- Place the food to be cooked on the wire rack or bake tray.
-
Insert the rack or tray into the middle position of the oven. Close the door.
-
Turn the MODE knob until the indicator light is displayed.
-
The default temperature and time will be displayed.
-
You can set the desired temperature and cooking time using the temperature control and time knob.
EN

to start cooking.
- When the cooking is finished, the oven will beep and the display will show "00:00".
- Open the door. Always remove food with oven mitts as the food and oven are very hot.
Using the bake function
- Place the food to be cooked on the wire rack or bake tray.
-
Insert the rack or tray into the middle position of the oven. Close the door.
-
Turn the MODE knob until the indicator light is displayed.
-
The default temperature and time will be displayed.
-
You can set the desired temperature and cooking time using the temperature control and time knob.

to start cooking.
- When the cooking is finished, the oven will beep and the display will show "00:00".
- Open the door. Always remove food with oven mitts as the food and oven are very hot.
Using the fish function
- Place the food to be cooked on the wire rack or bake tray.
-
Insert the rack or pan into the middle position of the oven. Close the door.
-
Turn the MODE knob until the indicator light is displayed.
-
The default temperature and time will be displayed.
-
You can set the desired temperature and cooking time using the temperature control and time knob.

to start cooking.
- When the cooking is finished, the oven will beep and the display will show "00:00".
- Open the door. Always remove food with oven mitts as the food and oven are very hot.
Using the hot air function
You can use this function for cooking a variety of toast, steaks, and bread.
- Place the food to be cooked on the wire rack or bake tray.
- Insert the rack or tray into the middle position of the oven. Close the door.
- Select a preset mode and set desired temperature and time.

to activate this function and the hot air indicator will be displayed.

to start cooking.
5. Press to start cooking.
6. When the cooking is finished, the oven will beep and the display will show "00:00".
7. Open the door. Always remove food with oven mitts as the food and oven are very hot.
To deactivate this function, press again. The hot air indicator will disappear from the display.
Rotisserie button
You can press to use the rotation function. When the function is activated, the indicator will be displayed.
Set the desired temperature and time and then press to start cooking.
NOTE: When selecting the preset mode, this function is activated by default.
To deactivate this function, press again. The rotisserie indicator will disappear from the display.
Interior light
Your oven has an interior light and it will automatically turn on when plugging in the oven.
This facilitates easy viewing of the inside of your oven.
You can press to turn on or off the interior light.
CLEANING AND MAINTENANCE
Turn off and unplug the appliance and allow it to cool before cleaning.
Do not immerse the appliance in water.
After each use, use a damp cloth to clean the interior and exterior of the oven and door, then dry them thoroughly.
Wash all the accessories in warm soapy water with a sponge or cloth. Rinse and dry thoroughly.
Never use abrasive or chemical cleaning agents.
Surfaces in contact with food should be cleaned regularly to avoid cross contamination from different types of food, the use of a damp cloth is advisable when dealing with surfaces that come into contact with food.
Correct food hygiene practices should always be followed at all times to avoid possibility of food poisoning /cross contamination.
Dry all parts and surfaces thoroughly before use.
Make sure that all parts and surfaces are completely dry before plugging in the appliance.
SPECIFICATIONS
Ratings: 220-240V~ 50-60Hz
1800W
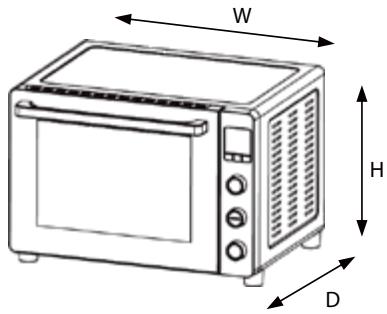
| Dimensions (outer dimensions) | (H) 379 x (W) 540 x (D) 459 mm |
| Dimensions (cavity / inner dimensions) | (H) 305 x (W) 373 x (D) 400 mm |
| Weight (approx.) | 12.0kg |
DISPOSAL

As a responsible company we care about the environment. As such we urge you to follow the
correct disposal procedure for the appliance and packaging materials. This will help conserve natural resources and ensure that it is recycled in a manner that protects health and the environment.
You must dispose of this appliance and its packaging according to local laws and regulations.
Because this appliance contains electronic components, the appliance and its accessories must be disposed of separately from household waste when the appliance reaches its end of life.
Contact your local authority to learn about disposal and recycling.
The appliance should be taken to your local collection point for recycling. Some collection points accept appliance free of charge.
We apologise for any inconvenience caused by minor inconsistencies in these instructions, which may occur as a result of product improvement and development.
ELECTROLUX 27/07/2022
MISES EN GARDE IMPORTANTES
MERCI DE BIEN VOULOIR LIRE LES CONSIGNES DE SECURITE ATTENTIVEMENT AVANT D'UTILISER L'APPAREIL ET DE LES CONSERVER POUR RÉFERENCE ULTÉRIEURE.
Attention
Hotline Darcy France
EU Declaration of Conformity
Product Description:
The object of the declaration described above is in conformity with the relevant Union harmonisation legislation:
Low Voltage Directive (LVD)
Eco design requirements for energy-related products (ErP)
RoHS
EMC:
EN IEC 55014-1:2021
EN IEC 55014-2:2021
EN IEC 61000-3-2:2019+A1:2021
EN 61000-3-3:2013+A1:2019
LVD:
EN 60335-2-9:2003+A1:2004 + A2:2006+A12:2007+A13:2010
EN 60335-1:2012+A11:2014+A13:2017 +A1:2019+A14:2019+A2:2019+A15:2021
EN 62233:2008
ErP :
(EC) No. 1275/2008
(EU) No. 801/2013
EN 50564:2011
IEC 62301:2011
This declaration of conformity is drawn up under the sole responsibility of the manufacturer.
The person responsible for this declaration is:
Place, Date / Lieu :
Share more of our thinking at www.electrolux.com
electrolux.com/shop

Electrolux Appliances AB
S:tGoransgatan 143
S-105 45 Stockholm
Sweden